Quantcast
Channel: Baeldung
Viewing all 4699 articles
Browse latest View live

Hibernate Named Query

$
0
0

1. Overview

A major disadvantage of having HQL and SQL scattered across data access objects is that it makes the code unreadable. Hence, it might make sense to group all HQL and SQL in one place and use only their reference in the actual data access code. Fortunately, Hibernate allows us to do this with named queries.

A named query is a statically defined query with a predefined unchangeable query string. They’re validated when the session factory is created, thus making the application to fail fast in case of an error.

In this article, we’ll see how to define and use Hibernate Named Queries using the @NamedQuery and @NamedNativeQuery annotations.

2. The Entity

Let’s first look at the entity we’ll be using in this article:

@Entity
public class DeptEmployee {
    @Id
    @GeneratedValue(strategy = GenerationType.SEQUENCE)
    private long id;

    private String employeeNumber;

    private String designation;

    private String name;

    @ManyToOne
    private Department department;

    // getters and setters
}

In our example, we’ll retrieve an employee based on their employee number.

3. Named Query

To define this as a named query, we’ll use the org.hibernate.annotations.NamedQuery annotation. It extends the javax.persistence.NamedQuery with Hibernate features.

We’ll define it as an annotation of the DeptEmployee class:

@org.hibernate.annotations.NamedQuery(name = "DeptEmployee_findByEmployeeNumber", 
  query = "from DeptEmployee where employeeNumber = :employeeNo")

It’s important to note that every @NamedQuery annotation is attached to exactly one entity class or mapped superclass. But, since the scope of named queries is the entire persistence unit, we should select the query name carefully to avoid a collision. And we have achieved this by using the entity name as a prefix.

If we have more than one named query for an entity, we’ll use the @NamedQueries annotation to group these:

@org.hibernate.annotations.NamedQueries({
    @org.hibernate.annotations.NamedQuery(name = "DeptEmployee_FindByEmployeeNumber", 
      query = "from DeptEmployee where employeeNumber = :employeeNo"),
    @org.hibernate.annotations.NamedQuery(name = "DeptEmployee_FindAllByDesgination", 
      query = "from DeptEmployee where designation = :designation"),
    @org.hibernate.annotations.NamedQuery(name = "DeptEmployee_UpdateEmployeeDepartment", 
      query = "Update DeptEmployee set department = :newDepartment where employeeNumber = :employeeNo"),
...
})

Note that the HQL query can be a DML-style operation. So, it doesn’t need to be a select statement only. For example, we can have an update query as in DeptEmployee_UpdateEmployeeDesignation above.

3.1. Configuring Query Features

We can set various query features with the @NamedQuery annotation. Let’s look at an example:

@org.hibernate.annotations.NamedQuery(
  name = "DeptEmployee_FindAllByDepartment", 
  query = "from DeptEmployee where department = :department",
  timeout = 1,
  fetchSize = 10
)

Here, we’ve configured the timeout interval and the fetch size. Apart from these two, we can also set features such as:

  • cacheable – whether the query (results) is cacheable or not
  • cacheMode – the cache mode used for this query; this can be one of GET, IGNORE, NORMAL, PUT, or REFRESH
  • cacheRegion – if the query results are cacheable, name the query cache region to use
  • comment – a comment added to the generated SQL query; targetted for DBAs
  • flushMode – the flush mode for this query, one of ALWAYS, AUTO, COMMIT, MANUAL, or PERSISTENCE_CONTEXT

3.2. Using the Named Query

Now that we’ve defined the named query, let’s use it to retrieve an employee:

Query<DeptEmployee> query = session.createNamedQuery("DeptEmployee_FindByEmployeeNumber", 
  DeptEmployee.class);
query.setParameter("employeeNo", "001");
DeptEmployee result = query.getSingleResult();

Here, we’ve used the createNamedQuery method. It takes the name of the query and returns an org.hibernate.query.Query object.

4. Named Native Query

As well as HQL queries, we can also define native SQL as a named query. To do this, we can use the @NamedNativeQuery annotation. Though it is similar to the @NamedQuery, it requires a bit more configuration.

Let’s explore this annotation using an example:

@org.hibernate.annotations.NamedNativeQueries(
    @org.hibernate.annotations.NamedNativeQuery(name = "DeptEmployee_GetEmployeeByName", 
      query = "select * from deptemployee emp where name=:name",
      resultClass = DeptEmployee.class)
)

Since this is a native query, we’ll have to tell Hibernate what entity class to map the results to. Consequently, we’ve used the resultClass property for doing this.

Another way to map the results is to use the resultSetMapping property. Here, we can specify the name of a pre-defined SQLResultSetMapping.

Note that we can use only one of resultClass and resultSetMapping.

4.1. Using the Named Native Query

To use the named native query, we can use the Session.createNamedQuery():

Query<DeptEmployee> query = session.createNamedQuery("DeptEmployee_FindByEmployeeName", DeptEmployee.class);
query.setParameter("name", "John Wayne");
DeptEmployee result = query.getSingleResult();

Or the Session.getNamedNativeQuery():

NativeQuery query = session.getNamedNativeQuery("DeptEmployee_FindByEmployeeName");
query.setParameter("name", "John Wayne");
DeptEmployee result = (DeptEmployee) query.getSingleResult();

The only difference between these two approaches is the return type. The second approach returns a NativeQuery, which is a subclass of Query.

5. Stored Procedures and Functions

We can use the @NamedNativeQuery annotation to define calls to stored procedures and functions as well:

@org.hibernate.annotations.NamedNativeQuery(
  name = "DeptEmployee_UpdateEmployeeDesignation", 
  query = "call UPDATE_EMPLOYEE_DESIGNATION(:employeeNumber, :newDesignation)", 
  resultClass = DeptEmployee.class)

Notice that although this is an update query, we’ve used the resultClass property. This is because Hibernate doesn’t support pure native scalar queries. And the way to work around the problem is to either set a resultClass or a resultSetMapping.

6. Conclusion

In this article, we saw how to define and use named HQL and native queries.

The source code is available over on GitHub.


Debugging Reactive Streams in Spring 5

$
0
0

1. Overview

Debugging reactive streams is probably one of the main challenges we’ll have to face once we start using these data structures.

And having in mind that Reactive Streams have been gaining popularity over the last years, it’s a good idea to know how we can carry out this task efficiently.

Let’s start by setting up a project using a reactive stack to see why this is often troublesome.

2. Scenario with Bugs

We want to simulate a real-case scenario, where several asynchronous processes are running, and where we’ve introduced some defects in the code that will eventually trigger exceptions.

To understand the big picture, we’ll mention that our application will be consuming and processing streams of simple Foo objects which contain only an id, a formattedName, and a quantity field. For more details please look on the project here.

2.1. Analyzing the Log Output

Now, let’s examine a snippet and the output it generates when an unhandled error shows up:

public void processFoo(Flux<Foo> flux) {
    flux = FooNameHelper.concatFooName(flux);
    flux = FooNameHelper.substringFooName(flux);
    flux = FooReporter.reportResult(flux);
    flux.subscribe();
}

public void processFooInAnotherScenario(Flux<Foo> flux) {
    flux = FooNameHelper.substringFooName(flux);
    flux = FooQuantityHelper.divideFooQuantity(flux);
    flux.subscribe();
}

After running our application for a few seconds, we’ll realize that it’s logging exceptions from time to time.

Having a close look at one of the errors, we’ll find something similar to this:

Caused by: java.lang.StringIndexOutOfBoundsException: String index out of range: 15
    at j.l.String.substring(String.java:1963)
    at com.baeldung.debugging.consumer.service.FooNameHelper
      .lambda$1(FooNameHelper.java:38)
    at r.c.p.FluxMap$MapSubscriber.onNext(FluxMap.java:100)
    at r.c.p.FluxMap$MapSubscriber.onNext(FluxMap.java:114)
    at r.c.p.FluxConcatMap$ConcatMapImmediate.innerNext(FluxConcatMap.java:275)
    at r.c.p.FluxConcatMap$ConcatMapInner.onNext(FluxConcatMap.java:849)
    at r.c.p.Operators$MonoSubscriber.complete(Operators.java:1476)
    at r.c.p.MonoDelayUntil$DelayUntilCoordinator.signal(MonoDelayUntil.java:211)
    at r.c.p.MonoDelayUntil$DelayUntilTrigger.onComplete(MonoDelayUntil.java:290)
    at r.c.p.MonoDelay$MonoDelayRunnable.run(MonoDelay.java:118)
    at r.c.s.SchedulerTask.call(SchedulerTask.java:50)
    at r.c.s.SchedulerTask.call(SchedulerTask.java:27)
    at j.u.c.FutureTask.run(FutureTask.java:266)
    at j.u.c.ScheduledThreadPoolExecutor$ScheduledFutureTask
      .access$201(ScheduledThreadPoolExecutor.java:180)
    at j.u.c.ScheduledThreadPoolExecutor$ScheduledFutureTask
      .run(ScheduledThreadPoolExecutor.java:293)
    at j.u.c.ThreadPoolExecutor.runWorker(ThreadPoolExecutor.java:1149)
    at j.u.c.ThreadPoolExecutor$Worker.run(ThreadPoolExecutor.java:624)
    at j.l.Thread.run(Thread.java:748)

Based on the root cause, and noticing the FooNameHelper class mentioned in the stack trace, we can imagine that on some occasions, our Foo objects are being processed with a formattedName value that is shorter than expected.

Of course, this is just a simplified case, and the solution seems rather obvious.

But let’s imagine this was a real-case scenario where the exception itself doesn’t help us solve the issue without some context information.

Was the exception triggered as a part of the processFoo, or of the processFooInAnotherScenario method?

Did other previous steps affect the formattedName field before arriving at this stage?

The log entry wouldn’t help us figure out these questions.

To make things worse, sometimes the exception isn’t even thrown from within our functionality.

For example, imagine we rely on a reactive repository to persist our Foo objects. If an error rises at that point, we might not even have a clue on where to get started to debug our code.

We need tools to debug reactive streams efficiently.

3. Using a Debug Session

One option to figure out what’s going on with our application is starting a debugging session using our favorite IDE.

We’ll have to set up up a couple of conditional breakpoints and analyze the flow of data when each step in the stream gets executed.

Indeed, this might be a cumbersome task, especially when we’ve got a lot of reactive processes running and sharing resources.

Additionally, there are many circumstances where we can’t start a debugging session for security reasons.

4. Logging Information with the doOnError Method or Using the Subscribe Parameter

Sometimes, we can add useful context information, by providing a Consumer as a second parameter of the subscribe method:

public void processFoo(Flux<Foo> flux) {

    // ...

    flux.subscribe(foo -> {
        logger.debug("Finished processing Foo with Id {}", foo.getId());
    }, error -> {
        logger.error(
          "The following error happened on processFoo method!",
           error);
    });
}

Note: It’s worth mentioning that if we don’t need to carry out further processing on the subscribe method, we can chain the doOnError function on our publisher:

flux.doOnError(error -> {
    logger.error("The following error happened on processFoo method!", error);
}).subscribe();

Now we’ll have some guidance on where the error might be coming from, even though we still don’t have much information about the actual element that generated the exception.

5. Activating Reactor’s Global Debug Configuration

The Reactor library provides a Hooks class that lets us configure the behavior of Flux and Mono operators.

By just adding the following statement, our application will instrument the calls to the to the publishers’ methods, wrap the construction of the operator, and capture a stack trace:

Hooks.onOperatorDebug();

After the debug mode gets activated, our exception logs will include some helpful information:

16:06:35.334 [parallel-1] ERROR c.b.d.consumer.service.FooService
  - The following error happened on processFoo method!
java.lang.StringIndexOutOfBoundsException: String index out of range: 15
    at j.l.String.substring(String.java:1963)
    at c.d.b.c.s.FooNameHelper.lambda$1(FooNameHelper.java:38)
    ...
    at j.l.Thread.run(Thread.java:748)
    Suppressed: r.c.p.FluxOnAssembly$OnAssemblyException: 
Assembly trace from producer [reactor.core.publisher.FluxMapFuseable] :
    reactor.core.publisher.Flux.map(Flux.java:5653)
    c.d.b.c.s.FooNameHelper.substringFooName(FooNameHelper.java:32)
    c.d.b.c.s.FooService.processFoo(FooService.java:24)
    c.d.b.c.c.ChronJobs.consumeInfiniteFlux(ChronJobs.java:46)
    o.s.s.s.ScheduledMethodRunnable.run(ScheduledMethodRunnable.java:84)
    o.s.s.s.DelegatingErrorHandlingRunnable
      .run(DelegatingErrorHandlingRunnable.java:54)
    o.u.c.Executors$RunnableAdapter.call(Executors.java:511)
    o.u.c.FutureTask.runAndReset(FutureTask.java:308)
Error has been observed by the following operator(s):
    |_    Flux.map ⇢ c.d.b.c.s.FooNameHelper
            .substringFooName(FooNameHelper.java:32)
    |_    Flux.map ⇢ c.d.b.c.s.FooReporter.reportResult(FooReporter.java:15)

As we can see, the first section remains relatively the same, but the following sections provide information about:

  1. The assembly trace of the publisher — here we can confirm that the error was first generated in the processFoo method.
  2. The operators that observed the error after it was first triggered, with the user class where they were chained.

Note: In this example, mainly to see this clearly, we’re adding the operations on different classes.

We can toggle the debug mode on or off at any time, but it won’t affect Flux and Mono objects that have already been instantiated.

5.1. Executing Operators on Different Threads

One other aspect to keep in mind is that the assembly trace is generated properly even if there are different threads operating on the stream.

Let’s have a look at the following example:

public void processFoo(Flux<Foo> flux) {
    flux = flux.publishOn(Schedulers.newSingle("foo-thread"));
    // ...

    flux = flux.publishOn(Schedulers.newSingle("bar-thread"));
    flux = FooReporter.reportResult(flux);
    flux.subscribeOn(Schedulers.newSingle("starter-thread"))
      .subscribe();
}

Now if we check the logs we’ll appreciate that in this case the first section might change a little bit, but the last two remain fairly the same.

The first part is the thread stack trace, therefore it’ll show only the operations carried out by a particular thread.

As we’ve seen, that’s not the most important section when we’re debugging the application, so this change is acceptable.

6. Activating the Debug Output on a Single Process

Instrumenting and generating a stack trace in every single reactive process is costly.

Thus, we should implement the former approach only in critical cases.

Anyhow, Reactor provides a way to enable the debug mode on single crucial processes, which is less memory-consuming.

We’re referring to the checkpoint operator:

public void processFoo(Flux<Foo> flux) {
    
    // ...

    flux = flux.checkpoint("Observed error on processFoo", true);
    flux.subscribe();
}

Note that in this manner, the assembly trace will be logged at the checkpoint stage:

Caused by: java.lang.StringIndexOutOfBoundsException: String index out of range: 15
	...
Assembly trace from producer [reactor.core.publisher.FluxMap],
  described as [Observed error on processFoo] :
    r.c.p.Flux.checkpoint(Flux.java:3096)
    c.b.d.c.s.FooService.processFoo(FooService.java:26)
    c.b.d.c.c.ChronJobs.consumeInfiniteFlux(ChronJobs.java:46)
    o.s.s.s.ScheduledMethodRunnable.run(ScheduledMethodRunnable.java:84)
    o.s.s.s.DelegatingErrorHandlingRunnable.run(DelegatingErrorHandlingRunnable.java:54)
    j.u.c.Executors$RunnableAdapter.call(Executors.java:511)
    j.u.c.FutureTask.runAndReset(FutureTask.java:308)
Error has been observed by the following operator(s):
    |_    Flux.checkpoint ⇢ c.b.d.c.s.FooService.processFoo(FooService.java:26)

We should implement the checkpoint method towards the end of the reactive chain.

Otherwise, the operator won’t be able to observe errors occurring downstream.

Also, let’s note that the library offers an overloaded method. We can avoid:

  • specifying a description for the observed error if we use the no-args option
  • generating a filled stack trace (which is the most costly operation), by providing just the custom description

7. Logging a Sequence of Elements

Finally, Reactor publishers offer one more method that could potentially come in handy in some cases.

By calling the log method in our reactive chain, the application will log each element in the flow with the state that it has at that stage.

Let’s try it out in our example:

public void processFoo(Flux<Foo> flux) {
    flux = FooNameHelper.concatFooName(flux);
    flux = FooNameHelper.substringFooName(flux);
    flux = flux.log();
    flux = FooReporter.reportResult(flux);
    flux = flux.doOnError(error -> {
        logger.error("The following error happened on processFoo method!", error);
    });
    flux.subscribe();
}

And check the logs:

INFO  reactor.Flux.Map.1 - onSubscribe(FluxMap.MapSubscriber)
INFO  reactor.Flux.Map.1 - request(unbounded)
INFO  reactor.Flux.Map.1 - onNext(Foo(id=0, formattedName=theFo, quantity=8))
INFO  reactor.Flux.Map.1 - onNext(Foo(id=1, formattedName=theFo, quantity=3))
INFO  reactor.Flux.Map.1 - onNext(Foo(id=2, formattedName=theFo, quantity=5))
INFO  reactor.Flux.Map.1 - onNext(Foo(id=3, formattedName=theFo, quantity=6))
INFO  reactor.Flux.Map.1 - onNext(Foo(id=4, formattedName=theFo, quantity=6))
INFO  reactor.Flux.Map.1 - cancel()
ERROR c.b.d.consumer.service.FooService 
  - The following error happened on processFoo method!
...

We can easily see the state of each Foo object at this stage, and how the framework cancels the flow when an exception happens.

Of course, this approach is also costly, and we’ll have to use it with moderation.

8. Conclusion

We can consume a lot of our time and effort troubleshooting problems if we don’t know the tools and mechanisms to debug our application properly.

This is especially true if we’re not used to handling reactive and asynchronous data structures, and we need extra help to figure out how things work.

As always, the full example is available over on the Github repo.

How to Check if Java is Installed

$
0
0

1. Overview

In this short tutorial, we’re going to take a look at a few ways to determine if Java is installed on a machine.

2. Command Line

First, let’s open a command window or terminal and enter:

> java -version

If Java is installed and the PATH is configured correctly, our output will be similar to:

java version "1.8.0_31"
Java(TM) SE Runtime Environment (build 1.8.0_31-b13)
Java HotSpot(TM) Client VM (build 25.31-b07, mixed mode, sharing)

Otherwise, we’ll see an error message like the one below and we need to check elsewhere:

'java' is not recognized as an internal or external command,
operable program or batch file.

The exact messages we see will vary depending on the operating system used and the Java version installed.

3. When PATH is Not Set

Going to a command line and typing java -version can tell us for sure if Java is installed. However, if we see an error message, Java might still be installed – we’ll just need to investigate further.

Many discussions about using java -version mention the JAVA_HOME environment variable. This is misleading because JAVA_HOME won’t affect our java -version results.

Additionally, JAVA_HOME should point to a JDK and other applications that use JDK features, such as Maven, use it.

For more information, please check our articles JAVA_HOME should point to a JDK and how to set JAVA_HOME.

So, let’s look at alternative ways to find Java, in case the command-line failed us.

3.1. Windows 10

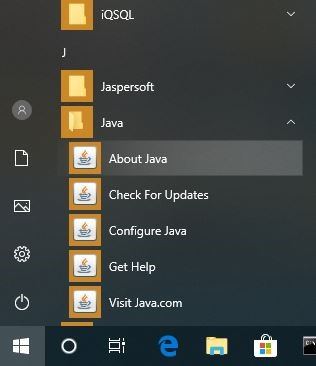
On Windows, we can find it in the Application list:

  1. Press the Start Button
  2. Scroll down the application list to J
  3. Open the Java folder
  4. Click About Java

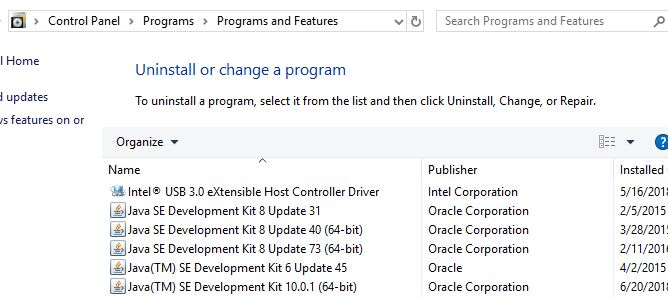
We can also look at installed Programs and Features:

  1. In the Search bar, type Control Panel
  2. Click Programs
  3. If the Java icon present, then Java is installed
  4. If not, click Programs and Features, and look for installed versions of Java in the J’s

3.2. Mac OS X

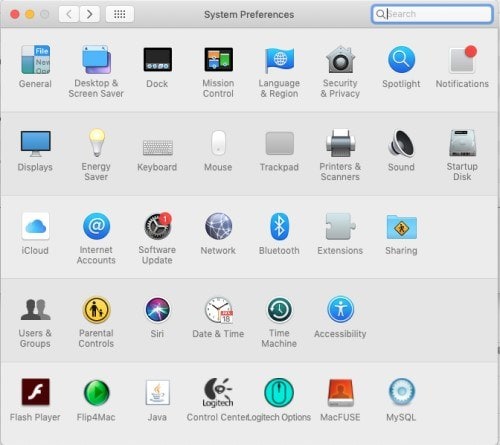
To see if Java 7 or greater is installed on a Mac we can:

  1. Go to System Preferences
  2. Look for the Java icon

For earlier versions of Java, we’ll need to:

  1. Open Finder
  2. Go to the Applications folder
  3. Go to the Utilities folder
  4. Look for the Java Preferences app

3.3. *Nix

There are few different package managers in the *nix world.

In a Debian-based distribution, we can use the aptitude search command:

$ sudo aptitude search jdk jre

If there is an i before the result, then that means the package is installed:

...
i   oracle-java8-jdk                - Java™ Platform, Standard Edition 8 Develop
...
4. Other Command Line Tools

In addition to java -version, there are some other command line tools we can use to learn about our Java installation.

4.1. Windows where Command

In Windows, we can use the where command to find where our java.exe is located:

> where java

And our output will look something like:

C:\Apps\Java\jdk1.8.0_31\bin\java.exe

However, as with java -version, this command is only useful if our PATH environment variable points to the bin directory.

4.2. Mac OS X and *nix which and whereis

In a *nix system or on a Mac in the Terminal app, we can use the which command:

$ which java

The output tells us where the Java command is:

/usr/bin/java

Now let’s use the whereis command:

$ whereis java -b

The whereis command also gives us the path to our Java installation:

/usr/bin/java

As with java -version, these commands will only find Java if it’s on the path. We can use these when we have Java installed but want to know exactly what’s going to run when we use the java command.

5. Conclusion

In this short article, we discussed how to find out if Java is installed on a Windows 10, Mac OS X or Linux/Unix machine even if it’s not on the PATH.

We also looked at a couple useful commands for locating our Java installation.

How to Start a Thread in Java

$
0
0

1. Introduction

In this tutorial, we’re going to explore different ways to start a thread and execute parallel tasks.

This is very useful, in particular when dealing with long or recurring operations that can’t run on the main thread, or where the UI interaction can’t be put on hold while waiting for the operation’s results.

To learn more about the details of threads, definitely read our tutorial about the Life Cycle of a Thread in Java.

2. The Basics of Running a Thread

We can easily write some logic that runs in a parallel thread by using the Thread framework.

Let’s try a basic example, by extending the Thread class:

public class NewThread extends Thread {
    public void run() {
        long startTime = System.currentTimeMillis();
        int i = 0;
        while (true) {
            System.out.println(this.getName() + ": New Thread is running..." + i++);
            try {
                //Wait for one sec so it doesn't print too fast
                Thread.sleep(1000);
            } catch (InterruptedException e) {
                e.printStackTrace();
            }
            ...
        }
    }
}

And now we write a second class to initialize and start our thread:

public class SingleThreadExample {
    public static void main(String[] args) {
        NewThread t = new NewThread();
        t.start();
    }
}

Now let’s assume we need to start multiple threads:

public class MultipleThreadsExample {
    public static void main(String[] args) {
        NewThread t1 = new NewThread();
        t1.setName("MyThread-1");
        NewThread t2 = new NewThread();
        t2.setName("MyThread-2");
        t1.start();
        t2.start();
    }
}

Our code still looks quite simple and very similar to the examples we can find online.

Of course, this is far from production-ready code, where it’s of critical importance to manage resources in the correct way, to avoid too much context switching or too much memory usage.

So, to get production-ready we now need to write additional boilerplate to deal with:

  • the consistent creation of new threads
  • the number of concurrent live threads
  • the threads deallocation: very important for daemon threads in order to avoid leaks

If we want to, we can write our own code for all these case scenarios and even some more, but why should we reinvent the wheel?

3. The ExecutorService Framework

The ExecutorService implements the Thread Pool design pattern (also called a replicated worker or worker-crew model) and takes care of the thread management we mentioned above, plus it adds some very useful features like thread reusability and task queues.

Thread reusability, in particular, is very important: in a large-scale application, allocating and deallocating many thread objects creates a significant memory management overhead.

With worker threads, we minimize the overhead caused by thread creation.

To ease the pool configuration, ExecutorService comes with an easy constructor and some customization options, such as the type of queue, the minimum and the maximum number of threads and their naming convention.

For more details about the ExecutorService, please read our Guide to the Java ExecutorService.

4. Starting a Task with Executors

Thanks to this powerful framework, we can switch our mindset from starting threads to submitting tasks.

Let’s look at how we can submit an asynchronous task to our executor:

ExecutorService executor = Executors.newFixedThreadPool(10);
...
executor.submit(() -> {
    new Task();
});

There are two methods we can use: execute, which returns nothing, and submit, which returns a Future encapsulating the computation’s result.

For more information about Futures, please read our Guide to java.util.concurrent.Future.

5. Starting a Task with CompletableFutures

To retrieve the final result from a Future object we can use the get method available in the object, but this would block the parent thread until the end of the computation.

Alternatively, we could avoid the block by adding more logic to our task, but we have to increase the complexity of our code.

Java 1.8 introduced a new framework on top of the Future construct to better work with the computation’s result: the CompletableFuture.

CompletableFuture implements CompletableStage, which adds a vast selection of methods to attach callbacks and avoid all the plumbing needed to run operations on the result after it’s ready.

The implementation to submit a task is a lot simpler:

CompletableFuture.supplyAsync(() -> "Hello");

supplyAsync takes a Supplier containing the code we want to execute asynchronously — in our case the lambda parameter.

The task is now implicitly submitted to the ForkJoinPool.commonPool(), or we can specify the Executor we prefer as a second parameter.

To know more about CompletableFuture, please read our Guide To CompletableFuture.

6. Running Delayed or Periodic Tasks

When working with complex web applications, we may need to run tasks at specific times, maybe regularly.

Java has few tools that can help us to run delayed or recurring operations:

  • java.util.Timer
  • java.util.concurrent.ScheduledThreadPoolExecutor

6.1. Timer

Timer is a facility to schedule tasks for future execution in a background thread.

Tasks may be scheduled for one-time execution, or for repeated execution at regular intervals.

Let’s see what the code looks if we want to run a task after one second of delay:

TimerTask task = new TimerTask() {
    public void run() {
        System.out.println("Task performed on: " + new Date() + "n" 
          + "Thread's name: " + Thread.currentThread().getName());
    }
};
Timer timer = new Timer("Timer");
long delay = 1000L;
timer.schedule(task, delay);

Now let’s add a recurring schedule:

timer.scheduleAtFixedRate(repeatedTask, delay, period);

This time, the task will run after the delay specified and it’ll be recurrent after the period of time passed.

For more information, please read our guide to Java Timer.

6.2. ScheduledThreadPoolExecutor

ScheduledThreadPoolExecutor has methods similar to the Timer class:

ScheduledExecutorService executorService = Executors.newScheduledThreadPool(2);
ScheduledFuture<Object> resultFuture
  = executorService.schedule(callableTask, 1, TimeUnit.SECONDS);

To end our example, we use scheduleAtFixedRate() for recurring tasks:

ScheduledFuture<Object> resultFuture
 = executorService.scheduleAtFixedRate(runnableTask, 100, 450, TimeUnit.MILLISECONDS);

The code above will execute a task after an initial delay of 100 milliseconds, and after that, it’ll execute the same task every 450 milliseconds.

If the processor can’t finish processing the task in time before the next occurrence, the ScheduledExecutorService will wait until the current task is completed, before starting the next.

To avoid this waiting time, we can use scheduleWithFixedDelay(), which, as described by its name, guarantees a fixed length delay between iterations of the task.

For more details about ScheduledExecutorService, please read our Guide to the Java ExecutorService.

6.3. Which Tool is Better?

If we run the examples above, the computation’s result looks the same.

So, how do we choose the right tool?

When a framework offers multiple choices, it’s important to understand the underlying technology to make an informed decision.

Let’s try to dive a bit deeper under the hood.

Timer:

  • does not offer real-time guarantees: it schedules tasks using the Object.wait(long) method
  • there’s a single background thread, so tasks run sequentially and a long-running task can delay others
  • runtime exceptions thrown in a TimerTask would kill the only thread available, thus killing Timer

ScheduledThreadPoolExecutor:

  • can be configured with any number of threads
  • can take advantage of all available CPU cores
  • catches runtime exceptions and lets us handle them if we want to (by overriding afterExecute method from ThreadPoolExecutor)
  • cancels the task that threw the exception, while letting others continue to run
  • relies on the OS scheduling system to keep track of time zones, delays, solar time, etc.
  • provides collaborative API if we need coordination between multiple tasks, like waiting for the completion of all tasks submitted
  • provides better API for management of the thread life cycle

The choice now is obvious, right?

7. Difference Between Future and ScheduledFuture

In our code examples, we can observe that ScheduledThreadPoolExecutor returns a specific type of Future: ScheduledFuture.

ScheduledFuture extends both Future and Delayed interfaces, thus inheriting the additional method getDelay that returns the remaining delay associated with the current task. It’s extended by RunnableScheduledFuture that adds a method to check if the task is periodic.

ScheduledThreadPoolExecutor implements all these constructs through the inner class ScheduledFutureTask and uses them to control the task life cycle.

8. Conclusions

In this tutorial, we experimented with the different frameworks available to start threads and run tasks in parallel.

Then, we went deeper into the differences between Timer and ScheduledThreadPoolExecutor.

The source code for the article is available over on GitHub.

Connecting Through Proxy Servers in Core Java

$
0
0

1. Introduction

Proxy servers act as intermediaries between client applications and other servers. In an enterprise setting, we often use them to help provide control over the content that users consume, usually across network boundaries.

In this tutorial, we’ll look at how to connect through proxy servers in Java.

First, we’ll explore the older, more global approach that is JVM-wide and configured with system properties. Afterward, we’ll introduce the Proxy class, which gives us more control by allowing configuration on a per-connection basis.

2. Setup

To run the samples in this article, we’ll need access to a proxy server. Squid is a popular implementation that is available for most operating systems. The default configuration of Squid will be good enough for most of our examples.

3. Using a Global Setting

Java exposes a set of system properties that can be used to configure JVM-wide behavior. This “one size fits all approach” is often the simplest to implement if it’s appropriate for the use case.

We can set the required properties from the command line when invoking the JVM. As an alternative, we can also set them by calling System.setProperty() at runtime.

3.1. Available System Properties

Java provides proxy handlers for HTTP, HTTPS, FTP, and SOCKS protocols. A proxy can be defined for each handler as a hostname and port number:

  • http.proxyHost – The hostname of the HTTP proxy server
  • http.proxyPort – The port number of the HTTP proxy server – property is optional and defaults to 80 if not provided
  • http.nonProxyHosts – A pipe-delimited (“|”) list of host patterns for which the proxy should be bypassed – applies for both the HTTP and HTTPS handlers if set
  • socksProxyHost – The hostname of the SOCKS proxy server
  • socksProxyPort – The port number of the SOCKS proxy server

If specifying nonProxyHosts, host patterns may start or end with a wildcard character (“*”). It may be necessary to escape the “|” delimiter on Windows platforms. An exhaustive list of all available proxy-related system properties can be found in Oracle’s official Java documentation on networking properties.

3.2. Set via Command Line Arguments

We can define proxies on the command line by passing in the settings as system properties:

java -Dhttp.proxyHost=127.0.0.1 -Dhttp.proxyPort=3128 com.baeldung.networking.proxies.CommandLineProxyDemo

When starting a process in this way, we’re able to simply use openConnection() on the URL without any additional work:

URL url = new URL(RESOURCE_URL);
URLConnection con = url.openConnection();

3.3. Set Using System.setProperty(String, String)

If we’re unable to set proxy properties on the command line, we can set them with calls to System.setProperty() within our program:

System.setProperty("http.proxyHost", "127.0.0.1");
System.setProperty("http.proxyPort", "3128");

URL url = new URL(RESOURCE_URL);
URLConnection con = url.openConnection();
// ...

If we later unset the relevant system properties manually, then the proxy will no longer be used:

System.setProperty("http.proxyHost", null);

3.4. Limitations of Global Configuration

Although using a global configuration with system properties is easy to implement, this approach limits what we can do because the settings apply across the entire JVM. For this reason, settings defined for a particular protocol are active for the life of the JVM or until they are un-set.

To get around this limitation, it might be tempting to flip the settings on and off as needed. To do this safely in a multi-threaded program, it would be necessary to introduce measures to protect against concurrency issues.

As an alternative, the Proxy API provides more granular control over proxy configuration.

4. Using the Proxy API

The Proxy class gives us a flexible way to configure proxies on a per-connection basis. If there are any existing JVM-wide proxy settings, connection-based proxy settings using the Proxy class will override them.

There are three types of proxies that we can define by Proxy.Type:

  • HTTP – a proxy using the HTTP protocol
  • SOCKS – a proxy using the SOCKS protocol
  • DIRECT – an explicitly configured direct connection without a proxy

4.1. Using an HTTP Proxy

To use an HTTP proxy, we first wrap a SocketAddress instance with a Proxy and type of Proxy.Type.HTTP. Next, we simply pass the Proxy instance to URLConnection.openConnection():

URL weburl = new URL(URL_STRING);
Proxy webProxy 
  = new Proxy(Proxy.Type.HTTP, new InetSocketAddress("127.0.0.1", 3128));
HttpURLConnection webProxyConnection 
  = (HttpURLConnection) weburl.openConnection(webProxy);

Simply put, this means that we’ll connect to URL_STRING, but then route that connection through a proxy server hosted at 127.0.0.1:3128.

4.2. Using a DIRECT Proxy

We may have a requirement to connect directly to a host. In this case, we can explicitly bypass a proxy that may be configured globally by using the static Proxy.NO_PROXY instance. Under the covers, the API constructs a new instance of Proxy for us, using Proxy.Type.DIRECT as the type:

HttpURLConnection directConnection 
  = (HttpURLConnection) weburl.openConnection(Proxy.NO_PROXY);

Basically, if there is no globally configured proxy, then this is the same as calling openConnection() with no arguments.

4.3. Using a SOCKS Proxy

Using a SOCKS proxy is similar to the HTTP variant when working with URLConnection. We start by wrapping a SocketAddress instance with a Proxy using a type of Proxy.Type.SOCKS. Afterward, we pass the Proxy instance to URLConnection.openConnection:

Proxy socksProxy 
  = new Proxy(Proxy.Type.SOCKS, new InetSocketAddress("127.0.0.1", 1080));
HttpURLConnection socksConnection 
  = (HttpURLConnection) weburl.openConnection(socksProxy);

It’s also possible to use a SOCKS proxy when connecting to a TCP socket. First, we use the Proxy instance to construct a Socket. Afterward, we pass the destination SocketAddress instance to Socket.connect():

Socket proxySocket = new Socket(socksProxy);
InetSocketAddress socketHost 
  = new InetSocketAddress(SOCKET_SERVER_HOST, SOCKET_SERVER_PORT);
proxySocket.connect(socketHost);

5. Conclusion

In this article, we looked at how to work with proxy servers in core Java.

First, we looked at the older, more global style of connecting through proxy servers using system properties. Then, we saw how to use the Proxy class, which provides fine-grained control when connecting through proxy servers.

As always, all source code used in this article can be found over on GitHub.

Converting Synchronous and Asynchronous APIs to Observables using RxJava2

$
0
0

1. Overview

In this tutorial, we’re going to learn how to transform traditional synchronous and asynchronous APIs into Observables using RxJava2 operators.

We’ll create a few simple functions that will help us discuss these operators in detail.

2. Maven Dependencies

First, we have to add RxJava2 and RxJava2Extensions as Maven dependencies:

<dependency>
    <groupId>io.reactivex.rxjava2</groupId>
    <artifactId>rxjava</artifactId>
    <version>2.2.2</version>
</dependency>
<dependency>
    <groupId>com.github.akarnokd</groupId>
    <artifactId>rxjava2-extensions</artifactId>
    <version>0.20.4</version>
</dependency>

3. The Operators

RxJava2 defines a whole lot of operators for various use cases of reactive programming.

But we’ll be discussing only a few operators that are commonly used for converting synchronous or asynchronous methods into Observables based on their nature. These operators take functions as arguments and emit the value returned from that function.

Along with the normal operators, RxJava2 defines a few more operators for extended functionalities.

Let’s explore how we can make use of these operators to convert synchronous and asynchronous methods.

4. Synchronous Method Conversion

4.1. Using  fromCallable()

This operator returns an Observable that, when a subscriber subscribes to it, invokes the function passed as the argument and then emits the value returned from that function. Let’s create a function that returns an integer and transform it:

AtomicInteger counter = new AtomicInteger();
Callable<Integer> callable = () -> counter.incrementAndGet();

Now, let’s transform it into an Observable and test it by subscribing to it:

Observable<Integer> source = Observable.fromCallable(callable);

for (int i = 1; i < 5; i++) {
    source.test()
      .awaitDone(5, TimeUnit.SECONDS)
      .assertResult(i);
    assertEquals(i, counter.get());
}

The fromCallable() operator executes the specified function lazily each time when the wrapped Observable gets subscribed. To test this behavior, we’ve created multiple subscribers using a loop.

Since reactive streams are asynchronous by default, the subscriber will return immediately. In most of the practical scenarios, the callable function will have some kind of delay to complete its execution. So, we’ve added a maximum wait time of five seconds before testing the result of our callable function.

Note also that we’ve used Observable‘s test() method. This method is handy when testing Observables. It creates a TestObserver and subscribes to our Observable.

4.2. Using start()

The start() operator is part of the RxJava2Extension module. It will invoke the specified function asynchronously and returns an Observable that emits the result:

Observable<Integer> source = AsyncObservable.start(callable);

for (int i = 1; i < 5; i++) {
    source.test()
      .awaitDone(5, TimeUnit.SECONDS)
      .assertResult(1);
    assertEquals(1, counter.get());
}

The function is called immediately, not whenever a subscriber subscribes to the resulting Observable. Multiple subscriptions to this observable observe the same return value.

5. Asynchronous Method Conversion

5.1. Using  fromFuture()

As we know, the most common way of creating an asynchronous method in Java is using the Future implementation. The fromFuture method takes a Future as its argument and emits the value obtained from the Future.get() method.

First, let’s make the function which we’ve created earlier asynchronous:

ExecutorService executor = Executors.newSingleThreadExecutor();
Future<Integer> future = executor.submit(callable);

Next, let’s do the testing by transforming it:

Observable<Integer> source = Observable.fromFuture(future);

for (int i = 1; i < 5; i++) {
    source.test()
      .awaitDone(5, TimeUnit.SECONDS)
      .assertResult(1);
    assertEquals(1, counter.get());
}
executor.shutdown();

And notice once again that each subscription observes the same return value.

Now, the dispose() method of Observable is really helpful when it comes to memory leak prevention. But in this case, it will not cancel the future because of the blocking nature of Future.get().

So, we can make sure to cancel the future by combining the doOnDispose() function of the source observable and the cancel method on future:

source.doOnDispose(() -> future.cancel(true));

5.2. Using startFuture()

As the name depicts, this operator will start the specified Future immediately and emits the return value when a subscriber subscribes it. Unlike the fromFuture operator which caches the result for next use, this operator will execute the asynchronous method each time when it gets subscribed:

ExecutorService executor = Executors.newSingleThreadExecutor();
Observable<Integer> source = AsyncObservable.startFuture(() -> executor.submit(callable));

for (int i = 1; i < 5; i++) {
    source.test()
      .awaitDone(5, TimeUnit.SECONDS)
      .assertResult(i);
    assertEquals(i, counter.get());
}
executor.shutdown();

5.3. Using deferFuture()

This operator aggregates multiple Observables returned from a Future method and returns a stream of return values obtained from each Observable. This will start the passed asynchronous factory function whenever a new subscriber subscribes.

So let’s first create the asynchronous factory function:

List<Integer> list = Arrays.asList(new Integer[] { counter.incrementAndGet(), counter.incrementAndGet(), counter.incrementAndGet() });
ExecutorService exec = Executors.newSingleThreadExecutor();
Callable<Observable<Integer>> callable = () -> Observable.fromIterable(list);

And then we can do a quick test:

Observable<Integer> source = AsyncObservable.deferFuture(() -> exec.submit(callable));
for (int i = 1; i < 4; i++) {
    source.test()
      .awaitDone(5, TimeUnit.SECONDS)
      .assertResult(1,2,3);
}
exec.shutdown();

6. Conclusion

In this tutorial, we’ve learned how to transform synchronous and the asynchronous methods to RxJava2 observables.

Of course, the examples we’ve shown here are the basic implementations. But we can use RxJava2 for more complex applications like video streaming and applications where we need to send large amounts of data in portions.

As usual, all the short examples we’he discussed here can be found over on the Github project.

Escape JSON String in Java

$
0
0

1. Overview

In this short tutorial, we’ll show some ways to escape a JSON string in Java.

We’ll take a quick tour of the most popular JSON-processing libraries and how they make escaping a simple task.

2. What Could Go Wrong?

Let’s consider a simple yet common use case of sending a user-specified message to a web service. Naively, we might try:

String payload = "{\"message\":\"" + message + "\"}";
sendMessage(payload);

But, really, this can introduce many problems.

The simplest is if the message contains a quote:

{ "message" : "My "message" breaks json" }

Worse is the user can knowingly break the semantics of the request. If he sends:

Hello", "role" : "admin

Then the message becomes:

{ "message" : "Hello", "role" : "admin" }

The simplest approach is to replace quotes with the appropriate escape sequence:

String payload = "{\"message\":\"" + message.replaceAll("\"", "\\\"") + "\"}";

However, this approach is quite brittle:

  • It needs to be done for every concatenated value, and we need to always keep in mind which strings we’ve already escaped
  • Moreover, as the message structure changes over time, this can become a maintenance headache
  • And it’s hard to read, making it even more error-prone

Simply put, we need to employ a more general approach. Unfortunately, native JSON processing features are still in the JEP phase, so we’ll have to turn our sights to a variety of open source JSON libraries.

Fortunately, there are several JSON processing libraries. Let’s take a quick look at the three most popular ones.

3. JSON-java Library

The simplest and smallest library in our review is JSON-java also known as org.json.

To construct a JSON object, we simply create an instance of JSONObject and basically treat it like a Map:

JSONObject jsonObject = new JSONObject();
jsonObject.put("message", "Hello \"World\"");
String payload = jsonObject.toString();

This will take the quotes around “World” and escape them:

{
   "message" : "Hello \"World\""
}

4. Jackson Library

One of the most popular and versatile Java libraries for JSON processing is Jackson.

At first glance, Jackson behaves similarly to org.json:

Map<String, Object> params = new HashMap<>();
params.put("message", "Hello \"World\"");
String payload = new ObjectMapper().writeValueAsString(params);

However, Jackson can also support serializing Java objects.

So let’s enhance our example a bit by wrapping our message in a custom class:

class Payload {
    Payload(String message) {
        this.message = message;
    }

    String message;
    
    // getters and setters
}

Then, we need an instance of ObjectMapper to which we can pass an instance of our object:

String payload = new ObjectMapper().writeValueAsString(new Payload("Hello \"World\""));

In both cases, we get the same result as before:

{
   "message" : "Hello \"World\""
}

In cases where we have an already-escaped property and need to serialize it without any further escaping, we may want to use Jackson’s @JsonRawValue annotation on that field.

5. Guava Library

Gson is a library from Google that often goes head to head with Jackson.

We can, of course, do as we did with org.json again:

JsonObject json = new JsonObject();
json.addProperty("message", "Hello \"World\"");
String payload = new Gson().toJson(gsonObject);

Or we can use custom objects, like with Jackson:

String payload = new Gson().toJson(new Payload("Hello \"World\""));

And we’ll again get the same result.

6. Conclusion

In this short article, we’ve seen how to escape JSON strings in Java using different open source libraries.

All the code related to this article can be found over on Github.

Comparing Two HashMaps in Java

$
0
0

1. Overview

In this tutorial, we’re going to explore different ways to compare two HashMaps in Java.

We’ll discuss multiple ways to check if two HashMaps are similar. We’ll also use Java 8 Stream API and Guava to get the detailed differences between different HashMaps.

2. Using Map.equals()

First, we’ll use Map.equals() to check if two HashMaps have the same entries:

@Test
public void whenCompareTwoHashMapsUsingEquals_thenSuccess() {
    Map<String, String> asiaCapital1 = new HashMap<String, String>();
    asiaCapital1.put("Japan", "Tokyo");
    asiaCapital1.put("South Korea", "Seoul");

    Map<String, String> asiaCapital2 = new HashMap<String, String>();
    asiaCapital2.put("South Korea", "Seoul");
    asiaCapital2.put("Japan", "Tokyo");

    Map<String, String> asiaCapital3 = new HashMap<String, String>();
    asiaCapital3.put("Japan", "Tokyo");
    asiaCapital3.put("China", "Beijing");

    assertTrue(asiaCapital1.equals(asiaCapital2));
    assertFalse(asiaCapital1.equals(asiaCapital3));
}

Here, we’re creating three HashMap objects and adding entries. Then we’re using Map.equals() to check if two HashMaps have the same entries.

The way that Map.equals() works is by comparing keys and values using the Object.equals() method. This means it only works when both key and value objects implement equals() properly.

For example, Map.equals() doesn’t work when the value type is array, as an array’s equals() method compares identity and not the contents of the array:

@Test
public void whenCompareTwoHashMapsWithArrayValuesUsingEquals_thenFail() {
    Map<String, String[]> asiaCity1 = new HashMap<String, String[]>();
    asiaCity1.put("Japan", new String[] { "Tokyo", "Osaka" });
    asiaCity1.put("South Korea", new String[] { "Seoul", "Busan" });

    Map<String, String[]> asiaCity2 = new HashMap<String, String[]>();
    asiaCity2.put("South Korea", new String[] { "Seoul", "Busan" });
    asiaCity2.put("Japan", new String[] { "Tokyo", "Osaka" });

    assertFalse(asiaCity1.equals(asiaCity2));
}

3. Using the Java Stream API

We can also implement our own method to compare HashMaps using the Java 8 Stream API:

private boolean areEqual(Map<String, String> first, Map<String, String> second) {
    if (first.size() != second.size()) {
        return false;
    }

    return first.entrySet().stream()
      .allMatch(e -> e.getValue().equals(second.get(e.getKey())));
}

For simplicity, we implemented the areEqual() method that we can now use to compare HashMap<String, String> objects:

@Test
public void whenCompareTwoHashMapsUsingStreamAPI_thenSuccess() {
    assertTrue(areEqual(asiaCapital1, asiaCapital2));
    assertFalse(areEqual(asiaCapital1, asiaCapital3));
}

But we can also customize our own method areEqualWithArrayValue() to handle array values by using Arrays.equals() to compare two arrays:

private boolean areEqualWithArrayValue(Map<String, String[]> first, Map<String, String[]> second) {
    if (first.size() != second.size()) {
        return false;
    }

    return first.entrySet().stream()
      .allMatch(e -> Arrays.equals(e.getValue(), second.get(e.getKey())));
}

Unlike Map.equals(), our own method will successfully compare HashMaps with array values:

@Test
public void whenCompareTwoHashMapsWithArrayValuesUsingStreamAPI_thenSuccess() {
    assertTrue(areEqualWithArrayValue(asiaCity1, asiaCity2)); 
    assertFalse(areEqualWithArrayValue(asiaCity1, asiaCity3));
}

4. Comparing HashMap Keys and Values

Next, let’s see how to compare two HashMap keys and their corresponding values.

4.1. Comparing HashMap Keys

First, we can check if two HashMaps have same keys by just comparing their KeySet():

@Test
public void whenCompareTwoHashMapKeys_thenSuccess() {
    assertTrue(asiaCapital1.keySet().equals(asiaCapital2.keySet())); 
    assertFalse(asiaCapital1.keySet().equals(asiaCapital3.keySet()));
}

4.2. Comparing HashMap Values

Next, we’ll see how to compare HashMap values one by one.

We’ll implement a simple method to check which keys have the same value in both HashMaps using Stream API:

private Map<String, Boolean> areEqualKeyValues(Map<String, String> first, Map<String, String> second) {
    return first.entrySet().stream()
      .collect(Collectors.toMap(e -> e.getKey(), 
        e -> e.getValue().equals(second.get(e.getKey()))));
}

We can now use areEqualKeyValues() to compare two different HashMaps to see in detail which keys have the same value and which have different values:

@Test
public void whenCompareTwoHashMapKeyValuesUsingStreamAPI_thenSuccess() {
    Map<String, String> asiaCapital3 = new HashMap<String, String>();
    asiaCapital3.put("Japan", "Tokyo");
    asiaCapital3.put("South Korea", "Seoul");
    asiaCapital3.put("China", "Beijing");

    Map<String, String> asiaCapital4 = new HashMap<String, String>();
    asiaCapital4.put("South Korea", "Seoul");
    asiaCapital4.put("Japan", "Osaka");
    asiaCapital4.put("China", "Beijing");

    Map<String, Boolean> result = areEqualKeyValues(asiaCapital3, asiaCapital4);

    assertEquals(3, result.size());
    assertThat(result, hasEntry("Japan", false));
    assertThat(result, hasEntry("South Korea", true));
    assertThat(result, hasEntry("China", true));
}

5. Map Difference Using Guava

Finally, we’ll see how to get a detailed difference between two HashMaps using Guava Maps.difference().

This method returns a MapDifference object that has a number of useful methods to analyze the difference between the Maps. Let’s have a look at some of these.

5.1. MapDifference.entriesDiffering()

First, we’ll obtain common keys that have different values in each HashMap using MapDifference.entriesDiffering():

@Test
public void givenDifferentMaps_whenGetDiffUsingGuava_thenSuccess() {
    Map<String, String> asia1 = new HashMap<String, String>();
    asia1.put("Japan", "Tokyo");
    asia1.put("South Korea", "Seoul");
    asia1.put("India", "New Delhi");

    Map<String, String> asia2 = new HashMap<String, String>();
    asia2.put("Japan", "Tokyo");
    asia2.put("China", "Beijing");
    asia2.put("India", "Delhi");

    MapDifference<String, String> diff = Maps.difference(asia1, asia2);
    Map<String, ValueDifference<String>> entriesDiffering = diff.entriesDiffering();

    assertFalse(diff.areEqual());
    assertEquals(1, entriesDiffering.size());
    assertThat(entriesDiffering, hasKey("India"));
    assertEquals("New Delhi", entriesDiffering.get("India").leftValue());
    assertEquals("Delhi", entriesDiffering.get("India").rightValue());
}

The entriesDiffering() method returns a new Map that contains the set of common keys and ValueDifference objects as the set of values.

Each ValueDifference object has a leftValue() and rightValue() methods that return the values in the two Maps respectively.

5.2. MapDifference.entriesOnlyOnRight() and MapDifference.entriesOnlyOnLeft()

Then, we can get entries that exist in only one HashMap using MapDifference.entriesOnlyOnRight() and MapDifference.entriesOnlyOnLeft():

@Test
public void givenDifferentMaps_whenGetEntriesOnOneSideUsingGuava_thenSuccess() {
    MapDifference<String, String> diff = Maps.difference(asia1, asia2);
    Map<String, String> entriesOnlyOnRight = diff.entriesOnlyOnRight();
    Map<String, String> entriesOnlyOnLeft = diff.entriesOnlyOnLeft();
    
    assertEquals(1, entriesOnlyOnRight.size());
    assertEquals(1, entriesOnlyOnLeft.size());
    assertThat(entriesOnlyOnRight, hasEntry("China", "Beijing"));
    assertThat(entriesOnlyOnLeft, hasEntry("South Korea", "Seoul"));
}

5.3. MapDifference.entriesInCommon()

Next, we’ll get common entries using MapDifference.entriesInCommon():

@Test
public void givenDifferentMaps_whenGetCommonEntriesUsingGuava_thenSuccess() {
    MapDifference<String, String> diff = Maps.difference(asia1, asia2);
    Map<String, String> entriesInCommon = diff.entriesInCommon();

    assertEquals(1, entriesInCommon.size());
    assertThat(entriesInCommon, hasEntry("Japan", "Tokyo"));
}

5.4. Customizing Maps.difference() Behavior

Since Maps.difference() use equals() and hashCode() by default to compare entries, it won’t work for Objects that don’t implement them properly:

@Test
public void givenSimilarMapsWithArrayValue_whenCompareUsingGuava_thenFail() {
    MapDifference<String, String[]> diff = Maps.difference(asiaCity1, asiaCity2);
    assertFalse(diff.areEqual());
}

But, we can customize the method used in comparison using Equivalence.

For example, we’ll define Equivalence for type String[] to compare String[] values in our HashMaps as we like:

@Test
public void givenSimilarMapsWithArrayValue_whenCompareUsingGuavaEquivalence_thenSuccess() {
    Equivalence<String[]> eq = new Equivalence<String[]>() {
        @Override
        protected boolean doEquivalent(String[] a, String[] b) {
            return Arrays.equals(a, b);
        }

        @Override
        protected int doHash(String[] value) {
            return value.hashCode();
        }
    };

    MapDifference<String, String[]> diff = Maps.difference(asiaCity1, asiaCity2, eq);
    assertTrue(diff.areEqual());

    diff = Maps.difference(asiaCity1, asiaCity3, eq); 
    assertFalse(diff.areEqual());
}

6. Conclusion

In this article, we discussed different ways to compare HashMaps in Java. We learned multiple ways to check if two HashMaps are equal and how to get the detailed difference as well.

The full source code is available over on GitHub.


Spring MVC Interview Questions

$
0
0

1. Introduction

Spring MVC is the original web framework from Spring built on the Servlet API. It provides Model-View-Controller architecture that can be used to develop flexible web applications.

In this tutorial, we’ll focus on the questions related to it, as it is often a topic on a Spring developer job interview.

For more questions on the Spring Framework, you can check out another Spring related article of our interview questions series.

2. Basic Spring MVC Questions

Q1. Why Should We Use Spring MVC?

Spring MVC implements a clear separation of concerns that allows us to develop and unit test our applications easily.

The concepts like:

  • Dispatcher Servlet
  • Controllers
  • View Resolvers
  • Views, Models
  • ModelAndView
  • Model and Session Attributes

are completely independent of each other, and they are responsible for one thing only.

Therefore, MVC gives us quite big flexibility. It’s based on interfaces (with provided implementation classes), and we can configure every part of the framework by using custom interfaces.

Another important thing is that we aren’t tied to a specific view technology (for example, JSP), but we have the option to choose from the ones we like the most.

Also, we don’t use Spring MVC only in web applications development but in the creation of RESTful web services as well.

Q2. What is the Role of the @Autowired Annotation?

The @Autowired annotation can be used with fields or methods for injecting a bean by type. This annotation allows Spring to resolve and inject collaborating beans into your bean.

For more details, please refer to the tutorial about @Autowired in Spring.

Q3. Explain a Model Attribute

The @ModelAttribute annotation is one of the most important annotations in Spring MVC. It binds a method parameter or a method return value to a named model attribute and then exposes it to a web view.

If we use it at the method level, it indicates the purpose of that method is to add one or more model attributes.

On the other hand, when used as a method argument, it indicates the argument should be retrieved from the model. When not present, we should first instantiate it and then add it to the model. Once present in the model, we should populate the arguments fields from all request parameters that have matching names.

More about this annotation can be found in our article related to the @ModelAttribute annotation.

Q4. Explain the Difference Between @Controller and @RestController?

The main difference between the @Controller and @RestController annotations is that the @ResponseBody annotation is automatically included in the @RestController. This means that we don’t need to annotate our handler methods with the @ResponseBody. We need to do this in a @Controller class if we want to write response type directly to the HTTP response body.

Q5. Describe a PathVariable

We can use the @PathVariable annotation as a handler method parameter in order to extract the value of a URI template variable.

For example, if we want to fetch a user by id from the www.mysite.com/user/123, we should map our method in the controller as /user/{id}:

@RequestMapping("/user/{id}")
public String handleRequest(@PathVariable("id") String userId, Model map) {}

The @PathVariable has only one element named value. It’s optional and we use it to define the URI template variable name. If we omit the value element, then the URI template variable name must match the method parameter name.

It’s also allowed to have multiple @PathVariable annotations, either by declaring them one after another:

@RequestMapping("/user/{userId}/name/{userName}")
public String handleRequest(@PathVariable String userId,
  @PathVariable String userName, Model map) {}

or putting them all in a  Map<String, String> or MultiValueMap<String, String>:

@RequestMapping("/user/{userId}/name/{userName}")
public String handleRequest(@PathVariable Map<String, String> varsMap, Model map) {}

Q6. Validation Using Spring MVC

Spring MVC supports JSR-303 specifications by default. We need to add JSR-303 and its implementation dependencies to our Spring MVC application. Hibernate Validator, for example, is one of the JSR-303 implementations at our disposal.

JSR-303 is a specification of the Java API for bean validation, part of JavaEE and JavaSE, which ensures that properties of a bean meet specific criteria, using annotations such as @NotNull, @Min, and @Max. More about validation is available in the Java Bean Validation Basics article.

Spring offers the @Validator annotation and the BindingResult class. The Validator implementation will raise errors in the controller request handler method when we have invalid data. Then we may use the BindingResult class to get those errors.

Besides using the existing implementations, we can make our own. To do so, we create an annotation that conforms to the JSR-303 specifications first. Then, we implement the Validator class. Another way would be to implement Spring’s Validator interface and set it as the validator via @InitBinder annotation in Controller class.

To check out how to implement and use your own validations, please see the tutorial regarding Custom Validation in Spring MVC.

Q7. What are the @RequestBody and the @ResponseBody?

The @RequestBody annotation, used as a handler method parameter, binds the HTTP Request body to a transfer or a domain object. Spring automatically deserializes incoming HTTP Request to the Java object using Http Message Converters.

When we use the @ResponseBody annotation on a handler method in the Spring MVC controller, it indicates that we’ll write the return type of the method directly to the HTTP response body. We’ll not put it in a Model, and Spring won’t interpret as a view name.

Please check out the article on @RequestBody and @ResponseBody to see more details about these annotations.

Q8. Explain Model, ModelMap and ModelAndView?

The Model interface defines a holder for model attributes. The ModelMap has a similar purpose, with the ability to pass a collection of values. It then treats those values as if they were within a Map. We should note that in Model (ModelMap) we can only store data. We put data in and return a view name.

On the other hand, with the ModelAndView, we return the object itself. We set all the required information, like the data and the view name, in the object we’re returning.

You can find more details in the article on Model, ModelMap, and ModelView.

Q9. Explain SessionAttributes and SessionAttribute

The @SessionAttributes annotation is used for storing the model attribute in the user’s session. We use it at the controller class level, as shown in our article about the Session Attributes in Spring MVC:

@Controller
@RequestMapping("/sessionattributes")
@SessionAttributes("todos")
public class TodoControllerWithSessionAttributes {

    @GetMapping("/form")
    public String showForm(Model model,
      @ModelAttribute("todos") TodoList todos) {
        // method body
        return "sessionattributesform";
    }

    // other methods
}

In the previous example, the model attribute ‘todos‘ will be added to the session if the @ModelAttribute and the @SessionAttributes have the same name attribute.

If we want to retrieve the existing attribute from a session that is managed globally, we’ll use @SessionAttribute annotation as a method parameter:

@GetMapping
public String getTodos(@SessionAttribute("todos") TodoList todos) {
    // method body
    return "todoView";
}

Q10. What is the Purpose of @EnableWebMVC?

The @EnableWebMvc annotation’s purpose is to enable Spring MVC via Java configuration. It’s equivalent to <mvc: annotation-driven> in an XML configuration. This annotation imports Spring MVC Configuration from WebMvcConfigurationSupport. It enables support for @Controller-annotated classes that use @RequestMapping to map incoming requests to a handler method.

You can learn more about this and similar annotations in our Guide to the Spring @Enable Annotations.

Q11. What is ViewResolver in Spring?

The ViewResolver enables an application to render models in the browser – without tying the implementation to a specific view technology – by mapping view names to actual views.

For more details about the ViewResolver, have a look at our Guide to the ViewResolver in Spring MVC.

Q12. What is the BindingResult?

BindingResult is an interface from org.springframework.validation package that represents binding results. We can use it to detect and report errors in the submitted form. It’s easy to invoke — we just need to ensure that we put it as a parameter right after the form object we’re validating. The optional Model parameter should come after the BindingResult, as it can be seen in the custom validator tutorial:

@PostMapping("/user")
public String submitForm(@Valid NewUserForm newUserForm, 
  BindingResult result, Model model) {
    if (result.hasErrors()) {
        return "userHome";
    }
    model.addAttribute("message", "Valid form");
    return "userHome";
}

When Spring sees the @Valid annotation, it’ll first try to find the validator for the object being validated. Then it’ll pick up the validation annotations and invoke the validator. Finally, it’ll put found errors in the BindingResult and add the latter to the view model.

Q13. What is a Form Backing Object?

The form backing object or a Command Object is just a POJO that collects data from the form we’re submitting.

We should keep in mind that it doesn’t contain any logic, only data.

To learn how to use form backing object with the forms in Spring MVC, please take a look at our article about Forms in Spring MVC.

Q14. What is the Role of the @Qualifier Annotation?

It is used simultaneously with the @Autowired annotation to avoid confusion when multiple instances of a bean type are present.

Let’s see an example. We declared two similar beans in XML config:

<bean id="person1" class="com.baeldung.Person" >
    <property name="name" value="Joe" />
</bean>
<bean id="person2" class="com.baeldung.Person" >
    <property name="name" value="Doe" />
</bean>

When we try to wire the bean, we’ll get an org.springframework.beans.factory.NoSuchBeanDefinitionException. To fix it, we need to use @Qualifier to tell Spring about which bean should be wired:

@Autowired
@Qualifier("person1")
private Person person;

Q15. What is the Role of the @Required Annotation?

The @Required annotation is used on setter methods, and it indicates that the bean property that has this annotation must be populated at configuration time. Otherwise, the Spring container will throw a BeanInitializationException exception.

Also, @Required differs from @Autowired – as it is limited to a setter, whereas @Autowired is not. @Autowired can be used to wire with a constructor and a field as well, while @Required only checks if the property is set.

Let’s see an example:

public class Person {
    private String name;
 
    @Required
    public void setName(String name) {
        this.name = name;
    }
}

Now, the name of the Person bean needs to be set in XML config like this:

<bean id="person" class="com.baeldung.Person">
    <property name="name" value="Joe" />
</bean>

Please note that @Required doesn’t work with Java based @Configuration classes by default. If you need to make sure that all your properties are set, you can do so when you create the bean in the @Bean annotated methods.

Q16. Describe the Front Controller Pattern

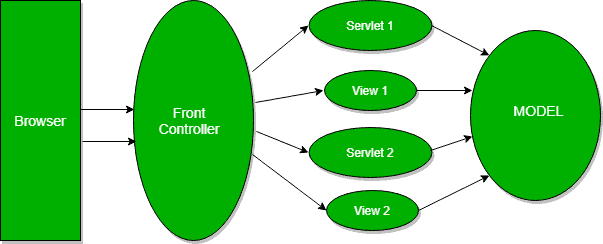
In the Front Controller pattern, all requests will first go to the front controller instead of the servlet. It’ll make sure that the responses are ready and will send them back to the browser. This way we have one place where we control everything that comes from the outside world.

The front controller will identify the servlet that should handle the request first. Then, when it gets the data back from the servlet, it’ll decide which view to render and, finally, it’ll send the rendered view back as a response:

To see the implementation details, please check out our Guide to the Front Controller Pattern in Java.

Q17. What are Model 1 and Model 2 Architectures?

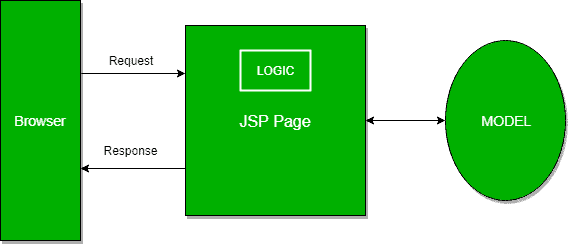
Model 1 and Model 2 represent two frequently used design models when it comes to designing Java Web Applications.

In Model 1, a request comes to a servlet or JSP where it gets handled. The servlet or the JSP processes the request, handles business logic, retrieves and validates data, and generates the response:

Since this architecture is easy to implement, we usually use it in small and simple applications.

On the other hand, it isn’t convenient for large-scale web applications. The functionalities are often duplicated in JSPs where business and presentation logic are coupled.

The Model 2 is based on the Model View Controller design pattern and it separates the view from the logic that manipulates the content.

Furthermore, we can distinguish three modules in the MVC pattern: the model, the view, and the controller. The model is representing the dynamic data structure of an application. It’s responsible for the data and business logic manipulation. The view is in charge of displaying the data, while the controller serves as an interface between the previous two.

In Model 2, a request is passed to the controller, which handles the required logic in order to get the right content that should be displayed. The controller then puts the content back into the request, typically as a JavaBean or a POJO. It also decides which view should render the content and finally passes the request to it. Then, the view renders the data:

3. Advanced Spring MVC Questions

Q18. What’s the Difference Between @Controller, @Component, @Repository, and @Service Annotations in Spring?

According to the official Spring documentation, @Component is a generic stereotype for any Spring-managed component. @Repository, @Service, and @Controller are specializations of @Component for more specific use cases, for example, in the persistence, service, and presentation layers, respectively.

Let’s take a look at specific use cases of last three:

  • @Controller – indicates that the class serves the role of a controller, and detects @RequestMapping annotations within the class
  • @Service – indicates that the class holds business logic and calls methods in the repository layer
  • @Repository – indicates that the class defines a data repository; its job is to catch platform-specific exceptions and re-throw them as one of Spring’s unified unchecked exceptions

Q19. What are DispatcherServlet and ContextLoaderListener?

Simply put, in the Front Controller design pattern, a single controller is responsible for directing incoming HttpRequests to all of an application’s other controllers and handlers.

Spring’s DispatcherServlet implements this pattern and is, therefore, responsible for correctly coordinating the HttpRequests to the right handlers.

On the other hand, ContextLoaderListener starts up and shuts down Spring’s root WebApplicationContext. It ties the lifecycle of ApplicationContext to the lifecycle of the ServletContext. We can use it to define shared beans working across different Spring contexts.

For more details on DispatcherServlet, please refer to this tutorial.

Q20. What is a MultipartResolver and When Should We Use It?

The MultipartResolver interface is used for uploading files. The Spring framework provides one MultipartResolver implementation for use with Commons FileUpload and another for use with Servlet 3.0 multipart request parsing.

Using these, we can support file uploads in our web applications.

Q21. What is Spring MVC Interceptor and How to Use It?

Spring MVC Interceptors allow us to intercept a client request and process it at three places – before handling, after handling, or after completion (when the view is rendered) of a request.

The interceptor can be used for cross-cutting concerns and to avoid repetitive handler code like logging, changing globally used parameters in Spring model, etc.

For details and various implementations, take a look at Introduction to Spring MVC HandlerInterceptor article.

Q22. What is an Init Binder?

A method annotated with @InitBinder is used to customize a request parameter, URI template, and backing/command objects. We define it in a controller and it helps in controlling the request. In this method, we register and configure our custom PropertyEditors, a formatter, and validators.

The annotation has the ‘value‘ element. If we don’t set it, the @InitBinder annotated methods will get called on each HTTP request. If we set the value, the methods will be applied only for particular command/form attributes and/or request parameters whose names correspond to the ‘value‘ element.

It’s important to remember that one of the arguments must be WebDataBinder. Other arguments can be of any type that handler methods support except for command/form objects and corresponding validation result objects.

Q23. Explain a Controller Advice

The @ControllerAdvice annotation allows us to write global code applicable to a wide range of controllers. We can tie the range of controllers to a chosen package or a specific annotation.

By default, @ControllerAdvice applies to the classes annotated with @Controller (or @RestController). We also have a few properties that we use if we want to be more specific.

If we want to restrict applicable classes to a package, we should add the name of the package to the annotation:

@ControllerAdvice("my.package")
@ControllerAdvice(value = "my.package")
@ControllerAdvice(basePackages = "my.package")

It’s also possible to use multiple packages, but this time we need to use an array instead of the String.

Besides restricting to the package by its name, we can do it by using one of the classes or interfaces from that package:

@ControllerAdvice(basePackageClasses = MyClass.class)

The ‘assignableTypes‘ element applies the @ControllerAdvice to the specific classes, while ‘annotations‘ does it for particular annotations.

It’s noteworthy to remember that we should use it along with @ExceptionHandler. This combination will enable us to configure a global and more specific error handling mechanism without the need to implement it every time for every controller class.

Q24. What Does the @ExceptionHandler Annotation Do?

The @ExceptionHandler annotation allows us to define a method that will handle the exceptions. We may use the annotation independently, but it’s a far better option to use it together with the @ControllerAdvice. Thus, we can set up a global error handling mechanism. In this way, we don’t need to write the code for the exception handling within every controller.

Let’s take a look at the example from our article about Error Handling for REST with Spring:

@ControllerAdvice
public class RestResponseEntityExceptionHandler
  extends ResponseEntityExceptionHandler {

    @ExceptionHandler(value = { IllegalArgumentException.class,
      IllegalStateException.class })
    protected ResponseEntity<Object> handleConflict(RuntimeException ex,
      WebRequest request) {
        String bodyOfResponse = "This should be application specific";
        return handleExceptionInternal(ex, bodyOfResponse, new HttpHeaders(),
          HttpStatus.CONFLICT, request);
    }
}

We should also note that this will provide @ExceptionHandler methods to all controllers that throw IllegalArgumentException or IllegalStateException. The exceptions declared with @ExceptionHandler should match the exception used as the argument of the method. Otherwise, the exception resolving mechanism will fail at runtime.

One thing to keep in mind here is that it’s possible to define more than one @ExceptionHandler for the same exception. We can’t do it in the same class though since Spring would complain by throwing an exception and failing on startup.

On the other hand, if we define those in two separate classes, the application will start, but it’ll use the first handler it finds, possibly the wrong one.

Q25. Exception Handling in Web Applications

We have three options for exceptions handling in Spring MVC:

  • per exception
  • per controller
  • globally

If an unhandled exception is thrown during web request processing, the server will return an HTTP 500 response. To prevent this, we should annotate any of our custom exceptions with the @ResponseStatus annotation. This kind of exceptions is resolved by HandlerExceptionResolver.

This will cause the server to return an appropriate HTTP response with the specified status code when a controller method throws our exception. We should keep in mind that we shouldn’t handle our exception somewhere else for this approach to work.

Another way to handle the exceptions is by using the @ExceptionHandler annotation. We add @ExceptionHandler methods to any controller and use them to handle the exceptions thrown from inside that controller. These methods can handle exceptions without the @ResponseStatus annotation, redirect the user to a dedicated error view, or build a totally custom error response.

We can also pass in the servlet-related objects (HttpServletRequest, HttpServletResponse, HttpSession, and Principal) as the parameters of the handler methods. But, we should remember that we can’t put the Model object as the parameter directly.

The third option for handling errors is by @ControllerAdvice classes. It’ll allow us to apply the same techniques, only this time at the application level and not only to the particular controller. To enable this, we need to use the @ControllerAdvice and the @ExceptionHandler together. This way exception handlers will handle exceptions thrown by any controller.

For more detailed information on this topic, go through the Error Handling for REST with Spring article.

4. Conclusion

In this article, we’ve explored some of the Spring MVC related questions that could come up at the technical interview for Spring developers. You should take these questions into account as a starting point for further research since this is by no means an exhaustive list.

We wish you good luck in any upcoming interviews!

Java Stream Filter with Lambda Expression

$
0
0

1. Introduction

In this quick tutorial, we’ll explore the use of the Stream.filter() method when we work with Streams in Java.

We’ll show how to use it and how to handle special cases with checked exceptions.

2. Using Stream.filter()

The filter() method is an intermediate operation of the Stream interface that allows us to filter elements of a stream that match a given Predicate:

Stream<T> filter(Predicate<? super T> predicate)

To see how this works, let’s create a Customer class:

public class Customer {
    private String name;
    private int points;
    //Constructor and standard getters
}

In addition, let’s create a collection of customers:

Customer john = new Customer("John P.", 15);
Customer sarah = new Customer("Sarah M.", 200);
Customer charles = new Customer("Charles B.", 150);
Customer mary = new Customer("Mary T.", 1);

List<Customer> customers = Arrays.asList(john, sarah, charles, mary);

2.1. Filtering Collections

A common use case of the filter() method is processing collections.

Let’s make a list of customers with more than 100 points. To do that, we can use a lambda expression:

List<Customer> customersWithMoreThan100Points = customers
  .stream()
  .filter(c -> c.getPoints() > 100)
  .collect(Collectors.toList());

We can also use a method reference, which is shorthand for a lambda expression:

List<Customer> customersWithMoreThan100Points = customers
  .stream()
  .filter(Customer::hasOverThousandPoints)
  .collect(Collectors.toList());

But, for this case we added the hasOverThousandPoints method to our Customer class:

public boolean hasOverThousandPoints() {
    return this.points > 100;
}

In both cases, we get the same result:

assertThat(customersWithMoreThan100Points).hasSize(2);
assertThat(customersWithMoreThan100Points).contains(sarah, charles);

2.2. Filtering Collections with Multiple Criteria

Also, we can use multiple conditions with filter(). For example, filter by points and name:

List<Customer> charlesWithMoreThan100Points = customers
  .stream()
  .filter(c -> c.getPoints() > 100 && c.getName().startsWith("Charles"))
  .collect(Collectors.toList());

assertThat(charlesWithMoreThan100Points).hasSize(1);
assertThat(charlesWithMoreThan100Points).contains(charles);

3. Handling Exceptions

Until now, we’ve been using the filter with predicates that don’t throw an exception. Indeed the functional interfaces in Java don’t declare any checked or unchecked exception.

Next, we’re going to show some different ways to handle exceptions in lambda expressions.

3.1. Using a Custom Wrapper

First, we’ll start adding to our Customer a profilePhotoUrl:

private String profilePhotoUrl;

In addition, let’s add a simple hasValidProfilePhoto() method to check the availability of the profile:

public boolean hasValidProfilePhoto() throws IOException {
    URL url = new URL(this.profilePhotoUrl);
    HttpsURLConnection connection = (HttpsURLConnection) url.openConnection();
    return connection.getResponseCode() == HttpURLConnection.HTTP_OK;
}

We can see that the hasValidProfilePhoto() method throws an IOException. Now, if we try to filter the customers with this method:

List<Customer> customersWithValidProfilePhoto = customers
  .stream()
  .filter(Customer::hasValidProfilePhoto)
  .collect(Collectors.toList());

We’ll see the following error:

Incompatible thrown types java.io.IOException in functional expression

To handle it, one of the alternatives we can use is to wrap it with a try-catch block:

List<Customer> customersWithValidProfilePhoto = customers
  .stream()
  .filter(c -> {
      try {
          return c.hasValidProfilePhoto();
      } catch (IOException e) {
          //handle exception
      }
      return false;
  })
  .collect(Collectors.toList());

If we need to throw an exception from our predicate, we can wrap it in an unchecked exception like RuntimeException.

3.2. Using ThrowingFunction

Alternatively, we can use the ThrowingFunction library.

ThrowingFunction is an open source library that allows us to handle checked exceptions in Java functional interfaces.

Let’s start by adding the throwing-function dependency to our pom:

<dependency>
    <groupId>pl.touk</groupId>
    <artifactId>throwing-function</artifactId>
    <version>1.3</version>
</dependency>

To handle exceptions in predicates, this library offers us the ThrowingPredicate class, which has the unchecked() method to wrap checked exceptions.

Let’s see it in action:

List customersWithValidProfilePhoto = customers
  .stream()
  .filter(ThrowingPredicate.unchecked(Customer::hasValidProfilePhoto))
  .collect(Collectors.toList());

4. Conclusion

In this article, we saw an example of how to use the filter() method to process streams. Also, we explored some alternatives to handle exceptions.

As always, the complete code is available over on GitHub.

Java Weekly, Issue 259

$
0
0

Here we go…

1. Spring and Java

>> Reactive Programming and Relational Databases [spring.io]

A brief look at why R2DBC may be winning the race to integrate the Reactive Programming model with RDBMS stacks. Very exciting.

>> What is Java object equals contract? [dolszewski.com]

A quick write-up describing what can happen when our implementation fails to honor this basic yet often misunderstood Java contract.

>> Micronaut Tutorial: Part 2: Easy Distributed Tracing, JWT Security and AWS Lambda Deployment [infoq.com]

The second installment in this series takes a deeper dive into advanced solutions using the JVM-based Micronaut framework.

>> How to intercept entity changes with Hibernate event listeners [vladmihalcea.com]

And a solid piece detailing how to replicate entity changes to other database tables using the event listener mechanism. Very cool.

Also worth reading:

Webinars and presentations:

Time to upgrade:

2. Technical and Musings

>> Limits of programming by interface [blog.frankel.ch]

A reminder that strict adherence to this basic programming principle isn’t always the best option.

>> Is It Possible to Have a Company with No Office Politics? [daedtech.com]

While office politics are unavoidable, there are pockets of healthy office politics that are worth seeking out.

Also worth reading:

3. Comics

And my favorite Dilberts of the week:

>> Write Your Own Performance Review [dilbert.com]

>> Horse Blinders for the Open Office Plan [dilbert.com]

>> Jargon [dilbert.com]

4. Pick of the Week

>> Subtract [sivers.org]

Guide to the Hibernate EntityManager

$
0
0

1. Introduction

EntityManager is a part of the Java Persistence API. Chiefly, it implements the programming interfaces and lifecycle rules defined by the JPA 2.0 specification.

Moreover, we can access the Persistence Context, by using the APIs in EntityManager.

In this tutorial, we’ll take a look at the configuration, types, and various APIs of the EntityManager.

2. Maven Dependencies

First, we need to include the dependencies of Hibernate:

<dependency>
    <groupId>org.hibernate</groupId>
    <artifactId>hibernate-core</artifactId>
    <version>5.4.0.Final</version>
</dependency>

We will also have to include the driver dependencies, depending upon the database that we’re using:

<dependency>
    <groupId>mysql</groupId>
    <artifactId>mysql-connector-java</artifactId>
    <version>8.0.13</version>
</dependency>

The hibernate-core and mysql-connector-java dependencies are available on Maven Central.

3. Configuration

Now, let’s demonstrate the EntityManager, by using a Movie entity which corresponds to a MOVIE table in the database.

Over the course of this article, we’ll make use of the EntityManager API to work with the Movie objects in the database.

3.1. Defining the Entity

Let’s start by creating the entity corresponding to the MOVIE table, using the @Entity annotation:

@Entity
@Table(name = "MOVIE")
public class Movie {
    
    @Id
    private Long id;

    private String movieName;

    private Integer releaseYear;

    private String language;

    // standard constructor, getters, setters
}

3.2. The persistence.xml File

When the EntityManagerFactory is created, the persistence implementation searches for the META-INF/persistence.xml file in the classpath.

This file contains the configuration for the EntityManager:

<persistence-unit name="com.baeldung.movie_catalog">
    <description>Hibernate EntityManager Demo</description>
    <class>com.baeldung.hibernate.pojo.Movie</class> 
    <exclude-unlisted-classes>true</exclude-unlisted-classes>
    <properties>
        <property name="hibernate.dialect" value="org.hibernate.dialect.MySQL5Dialect"/>
        <property name="hibernate.hbm2ddl.auto" value="update"/>
        <property name="javax.persistence.jdbc.driver" value="com.mysql.jdbc.Driver"/>
        <property name="javax.persistence.jdbc.url" value="jdbc:mysql://127.0.0.1:3306/moviecatalog"/>
        <property name="javax.persistence.jdbc.user" value="root"/>
        <property name="javax.persistence.jdbc.password" value="root"/>
    </properties>
</persistence-unit>

To explain, we define the persistence-unit that specifies the underlying datastore managed by the EntityManager.

Furthermore, we define the dialect and the other JDBC properties of the underlying datastore. Hibernate is database-agnostic. Based on these properties, Hibernate connects with the underlying database.

4. Container and Application Managed EntityManager

Basically, there are two types of EntityManager – Container Managed and Application Managed.

Let’s have a closer look at each type.

4.1. Container Managed EntityManager

Here, the container injects the EntityManager in our enterprise components.

In other words, the container creates the EntityManager from the EntityManagerFactory for us:

@PersistenceContext
EntityManager entityManager;

This also means the container is in charge of beginning, committing, or rolling back the transaction.

4.2. Application Managed EntityManager

Conversely, the lifecycle of the EntityManager is managed by the application in here.

In fact, we’ll manually create the EntityManager. Furthermore, we’ll also manage the lifecycle of the EntityManager we’ve created.

First, let’s create the EntityManagerFactory:

EntityManagerFactory emf = Persistence.createEntityManagerFactory("com.baeldung.movie_catalog");

In order to create an EntityManager, we must explicitly call createEntityManager() in the EntityManagerFactory:

public static EntityManager getEntityManager() {
    return emf.createEntityManager();
}

5. Hibernate Entity Operations

The EntityManager API provides a collection of methods. We can interact with the database, by making use of these methods.

5.1. Persisting Entities

In order to have an object associated with the EntityManager, we can make use of the persist() method :

public void saveMovie() {
    EntityManager em = getEntityManager();
    
    em.getTransaction().begin();
    
    Movie movie = new Movie();
    movie.setId(1L);
    movie.setMovieName("The Godfather");
    movie.setReleaseYear(1972);
    movie.setLanguage("English");

    em.persist(movie);
    em.getTransaction().commit();
}

Once the object is saved in the database, it is in the persistent state.

5.2. Loading Entities

For the purpose of retrieving an object from the database, we can use the find() method.

Here, the method searches by primary key. In fact, the method expects the entity class type and the primary key:

public Movie getMovie(Long movieId) {
    EntityManager em = getEntityManager();
    Movie movie = em.find(Movie.class, new Long(movieId));
    em.detach(movie);
    return movie;
}

However, if we just need the reference to the entity, we can use the getReference() method instead. In effect, it returns a proxy to the entity:

Movie movieRef = em.getReference(Movie.class, new Long(movieId));

5.3. Detaching Entities

In the event that we need to detach an entity from the persistence context, we can use the detach() method. We pass the object to be detached as the parameter to the method:

em.detach(movie);

Once the entity is detached from the persistence context, it will be in the detached state.

5.4. Merging Entities

In practice, many applications require entity modification across multiple transactions. For example, we may want to retrieve an entity in one transaction for rendering to the UI. Then, another transaction will bring in the changes made in the UI.

We can make use of the merge() method, for such situations. The merge method helps to bring in the modifications made to the detached entity, in the managed entity, if any:

public void mergeMovie() {
    EntityManager em = getEntityManager();
    Movie movie = getMovie(1L);
    em.detach(movie);
    movie.setLanguage("Italian");
    em.getTransaction().begin();
    em.merge(movie);
    em.getTransaction().commit();
}

5.5. Querying for Entities

Furthermore, we can make use of JPQL to query for entities. We’ll invoke getResultList() to execute them.

Of course, we can use the getSingleResult(), if the query returns just a single object:

public List<?> queryForMovies() {
    EntityManager em = getEntityManager();
    List<?> movies = em.createQuery("SELECT movie from Movie movie where movie.language = ?1")
      .setParameter(1, "English")
      .getResultList();
    return movies;
}

5.6. Removing Entities

Additionally, we can remove an entity from the database using the remove() method. It’s important to note that, the object is not detached, but removed.

Here, the state of the entity changes from persistent to new:

public void removeMovie() {
    EntityManager em = HibernateOperations.getEntityManager();
    em.getTransaction().begin();
    Movie movie = em.find(Movie.class, new Long(1L));
    em.remove(movie);
    em.getTransaction().commit();
}

6. Conclusion

In this article, we have explored the EntityManager in Hibernate. We’ve looked at the types and configuration, and we learned about the various methods available in the API for working with the persistence context.

As always, the code used in the article is available over at Github.

Java 11 Single File Source Code

$
0
0

1. Introduction

JDK 11, which is the implementation of Java SE 11, released in September 2018.

In this tutorial, we’ll cover the new Java 11 feature of launching single-file source-code programs.

2. Before Java 11

A single-file program is one where the program fits in a single source file.

Before Java 11, even for a single-file program, we had to follow a two-step process to run the program.

For example, if a file called HelloWorld.java contains a class called HelloWorld with a main() method, we would have to first compile it:

$ javac HelloWorld.java

This would generate a class file that we would have to run using the command:

$ java HelloWorld
Hello Java 11!

Such programs are standard in the early stages of learning Java or when writing small utility programs. In this context, it’s a bit ceremonial to have to compile the program before running it.

But, wouldn’t it be great to just have a one-step process instead? Java 11 tries to address this, by allowing us to run such programs directly from the source.

3. Launching Single-File Source-Code Programs

Starting in Java 11, we can use the following command to execute a single-file program:

$ java HelloWorld.java
Hello Java 11!

Notice how we passed the Java source code file name and not the Java class to the java command.

The JVM compiles the source file into memory and then runs the first public main() method it finds.

We’ll get compilation errors if the source file contains errors, but otherwise, it will run just as if we’d already compiled it.

4. Command-Line Options

The Java launcher introduced a new source-file mode to support this feature. The source-file mode is enabled if one of the following two conditions are true:

  1. The first item on the command line followed by the JVM options is a file name with the .java extension
  2. The command line contains the –source version option

If the file does not follow the standard naming conventions for Java source files, we need to use the –source option. We’ll talk more about such files in the next section.

Any arguments placed after the name of the source file in the original command line are passed to the compiled class when it is executed.

For example, we have a file called Addition.java that contains an Addition class. This class contains a main() method that calculates the sum of its arguments:

$ java Addition.java 1 2 3

Also, we can pass options likes  –class-path before the file name:

$ java --class-path=/some-path Addition.java 1 2 3

Now, we’ll get an error if there is a class on the application classpath with the same name as the class we are executing.

For example, let’s say at some point during development, we compiled the file present in our current working directory using javac:

$ javac HelloWorld.java

We now have both HelloWorld.java and HelloWorld.class present in the current working directory:

$ ls
HelloWorld.class  HelloWorld.java

But, if we try to use the source-file mode, we’ll get an error:

$ java HelloWorld.java                                            
error: class found on application class path: HelloWorld

5. Shebang Files

It’s common in Unix-derived systems, like macOS and Linux to use the “#!” directive to run an executable script file.

For example, a shell script typically starts with:

#!/bin/sh

We can then execute the script:

$ ./some_script

Such files are called “shebang files”.

We can now execute Java single-file programs using this same mechanism.

If we add the following to the beginning of a file:

#!/path/to/java --source version

For example, let’s add the following code in a file named add:

#!/usr/local/bin/java --source 11

import java.util.Arrays;

public class Addition
{
    public static void main(String[] args) {
        Integer sum = Arrays.stream(args)
          .mapToInt(Integer::parseInt)
          .sum();
        
        System.out.println(sum);
    }
}

And mark the file as executable:

$ chmod +x add

Then, we can execute the file just like a script:

$ ./add 1 2 3
6

We can also explicitly use the launcher to invoke the shebang file:

$ java --source 11 add 1 2 3
6

The –source option is required even if it’s already present in the file. The shebang in the file is ignored and is treated as a normal java file without the .java extension.

However, we can’t treat a .java file as a shebang file, even if it contains a valid shebang. Thus the following will result in an error:

$ ./Addition.java
./Addition.java:1: error: illegal character: '#'
#!/usr/local/bin/java --source 11
^

One last thing to note about shebang files is that the directive makes the file platform-dependent. The file will not be usable on platforms like Windows, which does not natively support it.

6. Conclusion

In this article, we saw the new single file source code feature introduced in Java 11.

As usual, code snippets can be found over on GitHub.

Using c3p0 with Hibernate

$
0
0

1. Overview

It’s quite expensive to establish database connections. Database connection pooling is a well-established way to lower this expenditure.

In this tutorial, we’ll discuss how to use c3p0 with Hibernate to pool connections.

2. What is c3p0?

c3p0 is a Java library that provides a convenient way for managing database connections.

In short, it achieves this by creating a pool of connections. It also effectively handles the cleanup of Statements and ResultSets after use. This cleanup is necessary to ensure that resource usage is optimized and avoidable deadlocks do not occur.

This library integrates seamlessly with various traditional JDBC drivers. Additionally, it provides a layer for adapting DriverManager-based JDBC drivers to the newer javax.sql.DataSource scheme.

And, because Hibernate supports connecting to databases over JDBC, it’s simple to use Hibernate and c3p0 together.

3. Configuring c3p0 with Hibernate

Let’s now look at how to configure an existing Hibernate application to use c3p0 as its database connection manager.

3.1. Maven Dependencies

Firstly, we’ll first need to add the hibernate-c3p0 maven dependency:

<dependency>
    <groupId>org.hibernate</groupId>
    <artifactId>hibernate-c3p0</artifactId>
    <version>5.3.6.Final</version>
</dependency>

With Hibernate 5, just adding the above dependency is enough to enable c3p0. This is true as long as no other JDBC connection pool manager is specified.

Therefore, after we add the dependency, we can run our application and check the logs:

Initializing c3p0-0.9.5.2 [built 08-December-2015 22:06:04 -0800; debug? true; trace: 10]
Initializing c3p0 pool... com.mchange.v2.c3p0.PoolBackedDataSource@34d0bdb9 [ ... default settings ... ]

If another JDBC connection pool manager is being used, we can force our application to use c3p0. We just need to set the provider_class to C3P0ConnectionProvider in our properties file:

hibernate.connection.provider_class=org.hibernate.connection.C3P0ConnectionProvider

3.2. Connection Pool Properties

Eventually, we will need to override the default configuration. We can add custom properties to the hibernate.cfg.xml file:

<property name="hibernate.c3p0.min_size">5</property>
<property name="hibernate.c3p0.max_size">20</property>
<property name="hibernate.c3p0.acquire_increment">5</property>
<property name="hibernate.c3p0.timeout">1800</property>

Likewise, the hibernate.properties file can contain the same settings:

hibernate.c3p0.min_size=5
hibernate.c3p0.max_size=20
hibernate.c3p0.acquire_increment=5
hibernate.c3p0.timeout=1800

The min_size property specifies the minimum number of connections it should maintain at any given time. By default, it will maintain at least three connections. This setting also defines the initial size of the pool.

The max_size property specifies the maximum number of connections it can maintain at any given time. By default, it will keep a maximum of 15 connections.

The acquire_increment property specifies how many connections it should try to acquire if the pool runs out of available connections. By default, it will attempt to acquire three new connections.

The timeout property specifies the number of seconds an unused connection will be kept before being discarded. By default, connections will never expire from the pool.

We can verify the new pool settings by checking the logs again:

Initializing c3p0-0.9.5.2 [built 08-December-2015 22:06:04 -0800; debug? true; trace: 10]
Initializing c3p0 pool... com.mchange.v2.c3p0.PoolBackedDataSource@b0ad7778 [ ... new settings ... ]

These are the basic connection pool properties. In addition, other configuration properties can be found in the official guide.

5. Conclusion

In this article, we’ve discussed how to use c3p0 with Hibernate. We’ve looked at some common configuration properties and added c3p0 to a test application.

For most environments, we recommend using a connection pool manager such as c3p0 or HikariCP instead of traditional JDBC drivers.

As usual, the complete source code for this tutorial is available on GitHub.

Introduction to Functional Java

$
0
0

1. Overview

In this tutorial, we’ll provide a quick overview of the Functional Java library along with a few examples.

2. The Functional Java Library

The Functional Java library is an open source library meant to facilitate functional programming in Java. The library provides lots of basic and advanced programming abstractions commonly used in Functional Programming.

Much of the library’s functionality revolves around the F interface. This F interface models a function that takes an input of type A and returns an output of type B. All of this is built on top of Java’s own type system.

3. Maven Dependencies

First, we need to add the required dependencies to our pom.xml file:

<dependency>
    <groupId>org.functionaljava</groupId>
    <artifactId>functionaljava</artifactId>
    <version>4.8.1</version>
</dependency>
<dependency>
    <groupId>org.functionaljava</groupId>
    <artifactId>functionaljava-java8</artifactId>
    <version>4.8.1</version>
</dependency>
<dependency>
    <groupId>org.functionaljava</groupId>
    <artifactId>functionaljava-quickcheck</artifactId>
    <version>4.8.1</version>
</dependency>
<dependency>
    <groupId>org.functionaljava</groupId>
    <artifactId>functionaljava-java-core</artifactId>
    <version>4.8.1</version>
</dependency>

4. Defining a Function

Let’s start by creating a function that we can use in our examples later on.

Without Functional Java, a basic multiplication method would look something like:

public static final Integer timesTwoRegular(Integer i) {
    return i * 2;
}

Using the Functional Java library, we can define this functionality a little more elegantly:

public static final F<Integer, Integer> timesTwo = i -> i * 2;

Above, we see an example of the F interface that takes an Integer as input and returns that Integer times two as its output.

Here is another example of a basic function that takes an Integer as input, but in this case, returns a Boolean to indicate if the input was even or odd:

public static final F<Integer, Boolean> isEven = i -> i % 2 == 0;

5. Applying a Function

Now that we have our functions in place, let’s apply them to a dataset.

The Functional Java library provides the usual set of types for managing data like lists, sets, arrays, and maps. The key thing to realize is that these data types are immutable.

Additionally, the library provides convenience functions to convert to and from standard Java Collections classes if needed.

In the example below, we’ll define a list of integers and apply our timesTwo function to it. We’ll also call map using an inline definition of the same function. Of course, we expect the results to be the same:

public void multiplyNumbers_givenIntList_returnTrue() {
    List<Integer> fList = List.list(1, 2, 3, 4);
    List<Integer> fList1 = fList.map(timesTwo);
    List<Integer> fList2 = fList.map(i -> i * 2);

    assertTrue(fList1.equals(fList2));
}

As we can see map returns a list of the same size where each element’s value is the value of the input list with the function applied. The input list itself does not change.

Here’s a similar example using our isEven function:

public void calculateEvenNumbers_givenIntList_returnTrue() {
    List<Integer> fList = List.list(3, 4, 5, 6);
    List<Boolean> evenList = fList.map(isEven);
    List<Boolean> evenListTrueResult = List.list(false, true, false, true);

    assertTrue(evenList.equals(evenListTrueResult));
}

Since the map method returns a list, we can apply another function to its output. The order in which we invoke our map functions alters our resulting output:

public void applyMultipleFunctions_givenIntList_returnFalse() {
    List<Integer> fList = List.list(1, 2, 3, 4);
    List<Integer> fList1 = fList.map(timesTwo).map(plusOne);
    List<Integer> fList2 = fList.map(plusOne).map(timesTwo);

    assertFalse(fList1.equals(fList2));
}

The output of the above lists will be:

List(3,5,7,9)
List(4,6,8,10)

6. Filtering Using a Function

Another frequently used operation in Functional Programming is to take an input and filter out data based on some criteria. And as you’ve probably already guessed, these filtering criteria are provided in the form of a function. This function will need to return a boolean to indicate whether or not the data needs to be included in the output.

Now, let’s use our isEven function to filter out the odd numbers from an input array using the filter method:

public void filterList_givenIntList_returnResult() {
    Array<Integer> array = Array.array(3, 4, 5, 6);
    Array<Integer> filteredArray = array.filter(isEven);
    Array<Integer> result = Array.array(4, 6);

    assertTrue(filteredArray.equals(result));
}

One interesting observation is that in this example, we used an Array instead of a List as we used in previous examples, and our function worked fine. Because of the way functions are abstracted and executed, they do not need to be aware of what method was used to collect the input and output.

In this example, we also used our own isEven function, but Functional Java’s own Integer class also has standard functions for basic numerical comparisons.

7. Applying Boolean Logic Using a Function

In Functional Programming, we frequently use logic like “only do this if all elements satisfy some condition”, or “only do this if at least one element satisfies some condition”.

The Functional Java library provides us with shortcuts for this logic through the exists and the forall methods:

public void checkForLowerCase_givenStringArray_returnResult() {
    Array<String> array = Array.array("Welcome", "To", "baeldung");
    assertTrue(array.exists(s -> List.fromString(s).forall(Characters.isLowerCase)));

    Array<String> array2 = Array.array("Welcome", "To", "Baeldung");
    assertFalse(array2.exists(s -> List.fromString(s).forall(Characters.isLowerCase)));

    assertFalse(array.forall(s -> List.fromString(s).forall(Characters.isLowerCase)));
}

In the example above, we used an array of strings as our input. Calling the fromString function will convert each of the strings from the array into a list of characters. To each of those lists, we applied forall(Characters.isLowerCase).

As you probably guessed, Characters.isLowerCase is a function that returns true if a character is lowercase. So applying forall(Characters.isLowerCase) to a list of characters will only return true if the entire list consists of lowercase characters, which in turn then indicates that the original string was all lowercase.

In the first two tests, we used exists because we only wanted to know whether at least one string was lowercase. The third test used forall to verify whether all strings were lowercase.

8. Handling Optional Values with a Function

Handling optional values in code typically requires == null or isNotBlank checks. Java 8 now provides the Optional class to handle these checks more elegantly, and the Functional Java library offers a similar construct to deal with missing data gracefully through its Option class:

public void checkOptions_givenOptions_returnResult() {
    Option<Integer> n1 = Option.some(1);
    Option<Integer> n2 = Option.some(2);
    Option<Integer> n3 = Option.none();

    F<Integer, Option<Integer>> function = i -> i % 2 == 0 ? Option.some(i + 100) : Option.none();

    Option<Integer> result1 = n1.bind(function);
    Option<Integer> result2 = n2.bind(function);
    Option<Integer> result3 = n3.bind(function);

    assertEquals(Option.none(), result1);
    assertEquals(Option.some(102), result2);
    assertEquals(Option.none(), result3);
}

9. Reducing a Set Using a Function

Finally, we will look at functionality to reduce a set. “Reducing a set” is a fancy way of saying “rolling it up into one value”.

The Functional Java library refers to this functionality as folding.

A function needs to be specified to indicate what it means to fold the element. An example of this is the Integers.add function to show the integers in an array or list need to be added.

Based on what the function does when folding, the result can be different depending on whether you start folding from the right or the left. That’s why the Functional Java library provides both versions:

public void foldLeft_givenArray_returnResult() {
    Array<Integer> intArray = Array.array(17, 44, 67, 2, 22, 80, 1, 27);

    int sumAll = intArray.foldLeft(Integers.add, 0);
    assertEquals(260, sumAll);

    int sumEven = intArray.filter(isEven).foldLeft(Integers.add, 0);
    assertEquals(148, sumEven);
}

The first foldLeft simply adds all the integers. Whereas the second will first apply a filter and then add the remaining integers.

10. Conclusion

This article is just a short introduction to the Functional Java library.

As always, the full source code of the article is available over on GitHub.


Java 11 Local Variable Syntax for Lambda Parameters

$
0
0

1. Introduction

The local variable syntax for lambda parameters is the only language feature introduced in Java 11. In this tutorial, we’ll explore and use this new feature.

2. Local Variable Syntax for Lambda Parameters

One of the key features introduced in Java 10 was local variable type inference. It allowed the use of var as the type of the local variable instead of the actual type. The compiler inferred the type based on the value assigned to the variable.

However, we could not use this feature with lambda parameters. For example, consider the following lambda. Here we explicitly specify the types of the parameters:

(String s1, String s2) -> s1 + s2

We could skip the parameter types and rewrite the lambda as:

(s1, s2) -> s1 + s2

Even Java 8 supported this. The logical extension to this in Java 10 would be:

(var s1, var s2) -> s1 + s2

However, Java 10 did not support this.

Java 11 addresses this by supporting the above syntax. This makes the usage of var uniform in both local variables and lambda parameters.

3. Benefit

Why would we want to use var for lambda parameters when we could simply skip the types?

One benefit of uniformity is that modifiers can be applied to local variables and lambda formals without losing brevity. For example, a common modifier is a type annotation:

(@Nonnull var s1, @Nullable var s2) -> s1 + s2

We cannot use such annotations without specifying the types.

4. Limitations

There are a few limitations of using var in lambda.

For example, we cannot use var for some parameters and skip for others:

(var s1, s2) -> s1 + s2

Similarly, we cannot mix var with explicit types:

(var s1, String s2) -> s1 + s2

Finally, even though we can skip the parentheses in single parameter lambda:

s1 -> s1.toUpperCase()

we cannot skip them while using var:

var s1 -> s1.toUpperCase()

All of the above three usages will result in compilation error.

5. Conclusion

In this quick article, we explored this cool new feature in Java 11 and saw how we can use local variable syntax for lambda parameters.

Programmatically Restarting a Spring Boot Application

$
0
0

1. Overview

In this tutorial, we’ll show how to programmatically restart a Spring Boot application.

Restarting our application can be very handy in some cases:

  • Reloading config files upon changing some parameter
  • Changing the currently active profile at runtime
  • Re-initializing the application context for any reason

While this article covers the functionality of restarting a Spring Boot application, note that we also have a great tutorial about shutting down Spring Boot applications.

Now, let’s explore different ways we can implement the restart of a Spring Boot application.

2. Restart by Creating a New Context

We can restart our application by closing the application context and creating a new context from scratch. Although this approach is quite simple, there are some delicate details we have to be careful with to make it work.

Let’s see how to implement this in the main method of our Spring Boot app:

@SpringBootApplication
public class Application {

    private static ConfigurableApplicationContext context;

    public static void main(String[] args) {
        context = SpringApplication.run(Application.class, args);
    }

    public static void restart() {
        ApplicationArguments args = context.getBean(ApplicationArguments.class);

        Thread thread = new Thread(() -> {
            context.close();
            context = SpringApplication.run(Application.class, args.getSourceArgs());
        });

        thread.setDaemon(false);
        thread.start();
    }
}

As we can see in the above example, it’s important to recreate the context in a separate non-daemon thread — this way we prevent the JVM shutdown, triggered by the close method, from closing our application. Otherwise, our application would stop since the JVM doesn’t wait for daemon threads to finish before terminating them.

Additionally, let’s add a REST endpoint through which we can trigger the restart:

@RestController
public class RestartController {
    
    @PostMapping("/restart")
    public void restart() {
        Application.restart();
    } 
}

Here, we’ve added a controller with a mapping method that invokes our restart method.

We can then call our new endpoint to restart the application:

curl -X POST localhost:port/restart

Of course, if we add an endpoint like this in a real-life application, we’ll have to secure it as well.

3. Actuator’s Restart Endpoint

Another way to restart our application is to use the built-in RestartEndpoint from Spring Boot Actuator.

First, let’s add the required Maven dependencies:

<dependency>
    <groupId>org.springframework.boot</groupId>
    <artifactId>spring-boot-starter-actuator</artifactId>
</dependency>
<dependency>
    <groupId>org.springframework.boot</groupId>
    <artifactId>spring-cloud-starter</artifactId>
</dependency>

Next, we have to enable the built-in restart endpoint in our application.properties file:

management.endpoint.restart.enabled=true

Now that we have set up everything, we can inject the RestartEndpoint into our service:

@Service
public class RestartService {
    
    @Autowired
    private RestartEndpoint restartEndpoint;
    
    public void restartApp() {
        restartEndpoint.restart();
    }
}

In the above code, we are using the RestartEndpoint bean to restart our application. This is a nice way of restarting because we only have to call one method that does all the work.

As we can see, using the RestartEndpoint is a simple way to restart our application. On the other side, there is a drawback with this approach because it requires us to add the mentioned libraries. If we aren’t using them already, this might be too much overhead for only this functionality. In that case, we can stick to the manual approach from the previous section since it requires only a few more lines of code.

4. Refreshing the Application Context

In some cases, we can reload the application context by calling its refresh method.

Although this method might sound promising, only some application context types support refreshing an already initialized context. For example, FileSystemXmlApplicationContextGroovyWebApplicationContext, and a few others support it.

Unfortunately, if we try this in a Spring Boot web application, we will get the following error:

java.lang.IllegalStateException: GenericApplicationContext does not support multiple refresh attempts:
just call 'refresh' once

Finally, although there are some context types that support multiple refreshes, we should avoid doing this. The reason is that the refresh method is designed as an internal method used by the framework to initialize the application context.

5. Conclusion

In this article, we explored a number of different ways how to restart a Spring Boot application programmatically.

As always, we can find the source code for the examples over on GitHub.

Introduction to RSocket

$
0
0

1. Introduction

In this tutorial, we’ll take a first look at RSocket and how it enables client-server communication.

2. What is RSocket?

RSocket is a binary, point-to-point communication protocol intended for use in distributed applications. In that sense, it provides an alternative to other protocols like HTTP.

A full comparison between RSocket and other protocols is beyond the scope of this article. Instead, we’ll focus on a key feature of RSocket: its interaction models.

RSocket provides four interaction models. With that in mind, we’ll explore each one with an example.

3. Maven Dependencies

RSocket needs only two direct dependencies for our examples:

<dependency>
    <groupId>io.rsocket</groupId>
    <artifactId>rsocket-core</artifactId>
    <version>0.11.13</version>
</dependency>
<dependency>
    <groupId>io.rsocket</groupId>
    <artifactId>rsocket-transport-netty</artifactId>
    <version>0.11.13</version>
</dependency>

The rsocket-core and rsocket-transport-netty dependencies are available on Maven Central.

An important note is that the RSocket library makes frequent use of reactive streams. The Flux and Mono classes are used throughout this article so a basic understanding of them will be helpful.

4. Server Setup

First, let’s create the Server class:

public class Server {
    private final Disposable server;

    public Server() {
        this.server = RSocketFactory.receive()
          .acceptor((setupPayload, reactiveSocket) -> Mono.just(new RSocketImpl()))
          .transport(TcpServerTransport.create("localhost", TCP_PORT))
          .start()
          .subscribe();
    }

    public void dispose() {
        this.server.dispose();
    }

    private class RSocketImpl extends AbstractRSocket {}
}

Here we use the RSocketFactory to set up and listen to a TCP socket. We pass in our custom RSocketImpl to handle requests from clients. We’ll add methods to the RSocketImpl as we go.

Next, to start the server we just need to instantiate it:

Server server = new Server();

A single server instance can handle multiple connections. As a result, just one server instance will support all of our examples.

When we’re finished, the dispose method will stop the server and release the TCP port.

4. Interaction Models

4.1. Request/Response

RSocket provides a request/response model – each request receives a single response.

For this model, we’ll create a simple service that returns a message back to the client.

Let’s start by adding a method to our extension of AbstractRSocket, RSocketImpl:

@Override
public Mono<Payload> requestResponse(Payload payload) {
    try {
        return Mono.just(payload); // reflect the payload back to the sender
    } catch (Exception x) {
        return Mono.error(x);
    }
}

The requestResponse method returns a single result for each request, as we can see by the Mono<Payload> response type.

Payload is the class that contains message content and metadata. It’s used by all of the interaction models. The content of the payload is binary, but there are convenience methods that support String-based content.

Next, we can create our client class:

public class ReqResClient {

    private final RSocket socket;

    public ReqResClient() {
        this.socket = RSocketFactory.connect()
          .transport(TcpClientTransport.create("localhost", TCP_PORT))
          .start()
          .block();
    }

    public String callBlocking(String string) {
        return socket
          .requestResponse(DefaultPayload.create(string))
          .map(Payload::getDataUtf8)
          .block();
    }

    public void dispose() {
        this.socket.dispose();
    }
}

The client uses the RSocketFactory.connect() method to initiate a socket connection with the server. We use the requestResponse method on the socket to send a payload to the server.

Our payload contains the String passed into the client. When the Mono<Payload> response arrives we can use the getDataUtf8() method to access the String content of the response.

Finally, we can run the integration test to see request/response in action. We’ll send a String to the server and verify that the same String is returned:

@Test
public void whenSendingAString_thenRevceiveTheSameString() {
    ReqResClient client = new ReqResClient();
    String string = "Hello RSocket";

    assertEquals(string, client.callBlocking(string));

    client.dispose();
}

4.2. Fire-and-Forget

With the fire-and-forget model, the client will receive no response from the server.

In this example, the client will send simulated measurements to the server in 50ms intervals. The server will publish the measurements.

Let’s add a fire-and-forget handler to our server in the RSocketImpl class:

@Override
public Mono<Void> fireAndForget(Payload payload) {
    try {
        dataPublisher.publish(payload); // forward the payload
        return Mono.empty();
    } catch (Exception x) {
        return Mono.error(x);
    }
}

This handler looks very similar to the request/response handler. However, fireAndForget returns Mono<Void> instead of Mono<Payload>.

The dataPublisher is an instance of org.reactivestreams.Publisher. Thus, it makes the payload available to subscribers. We’ll make use of that in the request/stream example.

Next, we’ll create the fire-and-forget client:

public class FireNForgetClient {
    private final RSocket socket;
    private final List<Float> data;

    public FireNForgetClient() {
        this.socket = RSocketFactory.connect()
          .transport(TcpClientTransport.create("localhost", TCP_PORT))
          .start()
          .block();
    }

    /** Send binary velocity (float) every 50ms */
    public void sendData() {
        data = Collections.unmodifiableList(generateData());
        Flux.interval(Duration.ofMillis(50))
          .take(data.size())
          .map(this::createFloatPayload)
          .flatMap(socket::fireAndForget)
          .blockLast();
    }

    // ... 
}

The socket setup is exactly the same as before.

The sendData() method uses a Flux stream to send multiple messages. For each message, we invoke socket::fireAndForget.

We need to subscribe to the Mono<Void> response for each message. If we forget to subscribe then socket::fireAndForget will not execute.

The flatMap operator makes sure the Void responses are passed to the subscriber, while the blockLast operator acts as the subscriber.

We’re going to wait until the next section to run the fire-and-forget test. At that point, we’ll create a request/stream client to receive the data that was pushed by the fire-and-forget client.

4.3. Request/Stream

In the request/stream model, a single request may receive multiple responses. To see this in action we can build upon the fire-and-forget example. To do that, let’s request a stream to retrieve the measurements we sent in the previous section.

As before, let’s start by adding a new listener to the RSocketImpl on the server:

@Override
public Flux<Payload> requestStream(Payload payload) {
    return Flux.from(dataPublisher);
}

The requestStream handler returns a Flux<Payload> stream. As we recall from the previous section, the fireAndForget handler published incoming data to the dataPublisher. Now, we’ll create a Flux stream using that same dataPublisher as the event source. By doing this the measurement data will flow asynchronously from our fire-and-forget client to our request/stream client.

Let’s create the request/stream client next:

public class ReqStreamClient {

    private final RSocket socket;

    public ReqStreamClient() {
        this.socket = RSocketFactory.connect()
          .transport(TcpClientTransport.create("localhost", TCP_PORT))
          .start()
          .block();
    }

    public Flux<Float> getDataStream() {
        return socket
          .requestStream(DefaultPayload.create(DATA_STREAM_NAME))
          .map(Payload::getData)
          .map(buf -> buf.getFloat())
          .onErrorReturn(null);
    }

    public void dispose() {
        this.socket.dispose();
    }
}

We connect to the server in the same way as our previous clients.

In getDataStream() we use socket.requestStream() to receive a Flux<Payload> stream from the server. From that stream, we extract the Float values from the binary data. Finally, the stream is returned to the caller, allowing the caller to subscribe to it and process the results.

Now let’s test. We’ll verify the round trip from fire-and-forget to request/stream.

We can assert that each value is received in the same order as it was sent. Then, we can assert that we receive the same number of values that were sent:

@Test
public void whenSendingStream_thenReceiveTheSameStream() {
    FireNForgetClient fnfClient = new FireNForgetClient(); 
    ReqStreamClient streamClient = new ReqStreamClient();

    List<Float> data = fnfClient.getData();
    List<Float> dataReceived = new ArrayList<>();

    Disposable subscription = streamClient.getDataStream()
      .index()
      .subscribe(
        tuple -> {
            assertEquals("Wrong value", data.get(tuple.getT1().intValue()), tuple.getT2());
            dataReceived.add(tuple.getT2());
        },
        err -> LOG.error(err.getMessage())
      );

    fnfClient.sendData();

    // ... dispose client & subscription

    assertEquals("Wrong data count received", data.size(), dataReceived.size());
}

4.4. Channel

The channel model provides bidirectional communication. In this model, message streams flow asynchronously in both directions.

Let’s create a simple game simulation to test this. In this game, each side of the channel will become a player.  As the game runs, these players will send messages to the other side at random time intervals. The opposite side will react to the messages.

Firstly, we’ll create the handler on the server. Like before, we add to the RSocketImpl:

@Override
public Flux<Payload> requestChannel(Publisher<Payload> payloads) {
    Flux.from(payloads)
      .subscribe(gameController::processPayload);
    return Flux.from(gameController);
}

The requestChannel handler has Payload streams for both input and output. The Publisher<Payload> input parameter is a stream of payloads received from the client. As they arrive, these payloads are passed to the gameController::processPayload function.

In response, we return a different Flux stream back to the client. This stream is created from our gameController, which is also a Publisher.

Here is a summary of the GameController class:

public class GameController implements Publisher<Payload> {
    
    @Override
    public void subscribe(Subscriber<? super Payload> subscriber) {
        // send Payload messages to the subscriber at random intervals
    }

    public void processPayload(Payload payload) {
        // react to messages from the other player
    }
}

When the GameController receives a subscriber it begins sending messages to that subscriber.

Next, let’s create the client:

public class ChannelClient {

    private final RSocket socket;
    private final GameController gameController;

    public ChannelClient() {
        this.socket = RSocketFactory.connect()
          .transport(TcpClientTransport.create("localhost", TCP_PORT))
          .start()
          .block();

        this.gameController = new GameController("Client Player");
    }

    public void playGame() {
        socket.requestChannel(Flux.from(gameController))
          .doOnNext(gameController::processPayload)
          .blockLast();
    }

    public void dispose() {
        this.socket.dispose();
    }
}

As we have seen in our previous examples, the client connects to the server in the same way as the other clients.

The client creates its own instance of the GameController.

We use socket.requestChannel() to send our Payload stream to the server.  The server responds with a Payload stream of its own.

As payloads received from the server we pass them to our gameController::processPayload handler.

In our game simulation, the client and server are mirror images of each other. That is, each side is sending a stream of Payload and receiving a stream of Payload from the other end.

The streams run independently, without synchronization.

Finally, let’s run the simulation in a test:

@Test
public void whenRunningChannelGame_thenLogTheResults() {
    ChannelClient client = new ChannelClient();
    client.playGame();
    client.dispose();
}

5. Conclusion

In this introductory article, we’ve explored the interaction models provided by RSocket. The full source code of the examples can be found in our Github repository.

Be sure to check out the RSocket website for a deeper discussion. In particular, the FAQ and Motivations documents provide a good background.

Testing with Spring and Spock

$
0
0

1. Introduction

In this short tutorial, we’ll show the benefits of combining the supporting power of Spring Boot‘s testing framework and the expressiveness of the Spock framework whether that be for unit or integration tests.

2. Project Setup

Let’s start with a simple web application. It can greet, change the greeting and reset it back to the default by simple REST calls.  Aside from the main class, we use a simple RestController to provide the functionality:

@RestController
@RequestMapping("/hello")
public class WebController {

    @GetMapping
    public String salutation() {
        return "Hello world!";
    }
}

So the controller greets with ‘Hello world!’. The @RestController annotation and the shortcut annotations ensure the REST endpoint registration.

3. Maven Dependencies for Spock and Spring Boot Test

We start by adding the Maven dependencies and if needed Maven plugin configuration.

3.1. Adding the Spock Framework Dependencies with Spring Support

For Spock itself and for the Spring support we need two dependencies:

<dependency>
    <groupId>org.spockframework</groupId>
    <artifactId>spock-core</artifactId>
    <version>1.2-groovy-2.4</version>
    <scope>test</scope>
</dependency>

<dependency>
    <groupId>org.spockframework</groupId>
    <artifactId>spock-spring</artifactId>
    <version>1.2-groovy-2.4</version>
    <scope>test</scope>
</dependency>

Notice, that the versions are specified with are a reference to the used groovy version.

3.2. Adding Spring Boot Test

In order to use the testing utilities of Spring Boot Test, we need the following dependency:

<dependency>
    <groupId>org.springframework.boot</groupId>
    <artifactId>spring-boot-starter-test</artifactId>
    <version>2.1.1.RELEASE</version>
    <scope>test</scope>
</dependency>

3.3. Setting up Groovy

And since Spock is based on Groovy, we have to add and configure the gmavenplus-plugin as well to be able to use this language in our tests:

<plugin>
    <groupId>org.codehaus.gmavenplus</groupId>
    <artifactId>gmavenplus-plugin</artifactId>
    <version>1.6</version>
    <executions>
        <execution>
            <goals>
                <goal>compileTests</goal>
            </goals>
        </execution>
    </executions>
</plugin>

Note, that since we only need Groovy for test purposes and therefore we restrict the plugin goal to compileTest.

4. Loading the ApplicationContext in a Spock Test

One simple test is to check if all Beans in the Spring application context are created:

@SpringBootTest
class LoadContextTest extends Specification {

    @Autowired (required = false)
    private WebController webController

    def "when context is loaded then all expected beans are created"() {
        expect: "the WebController is created"
        webController
    }
}

For this integration test, we need to start up the ApplicationContext, which is what @SpringBootTest does for us. Spock provides the section separation in our test with the keywords like “when”, “then” or “expect”.

In addition, we can exploit Groovy Truth to check if a bean is null, as the last line of our test here.

5. Using WebMvcTest in a Spock Test

Likewise, we can test the behavior of the WebController:

@AutoConfigureMockMvc
@WebMvcTest
class WebControllerTest extends Specification {

    @Autowired
    private MockMvc mvc

    def "when get is performed then the response has status 200 and content is 'Hello world!'"() {
        expect: "Status is 200 and the response is 'Hello world!'"
        mvc.perform(get("/hello"))
          .andExpect(status().isOk())
          .andReturn()
          .response
          .contentAsString == "Hello world!"
    }
}

It’s important to note that in our Spock tests (or rather Specifications) we can use all familiar annotations from the Spring Boot test framework that we are used to.

6. Conclusion

In this article, we’ve explained how to set up a Maven project to use Spock and the Spring Boot test framework combined. Furthermore, we have seen how both frameworks supplement each other perfectly.

For a deeper dive, have a look to our tutorials about testing with Spring Boot, about the Spock framework and about the Groovy language.

Finally, the source code with additional examples can be found in our GitHub repository.

Guide to ShedLock with Spring

$
0
0

1. Overview

Spring provides an easy to implement API for scheduling jobs. It works great until we deploy multiple instances of our application. Spring by default cannot handle scheduler synchronization over multiple instances and executes the jobs simultaneously on every node instead.

In this short tutorial, we’ll look at ShedLock – a Java library that makes sure our scheduled tasks run only once at the same time and is an alternative to Quartz.

2. Maven Dependencies

To use ShedLock with Spring we need to add the shedlock-spring dependency:

<dependency>
    <groupId>net.javacrumbs.shedlock</groupId>
    <artifactId>shedlock-spring</artifactId>
    <version>2.2.0</version>
</dependency>

3. Configuration

Note that ShedLock works only in environments with a shared database. It creates a table or document in the database where it stores the information about the current locks.

Currently, ShedLock supports Mongo, Redis, Hazelcast, ZooKeeper, and anything with a JDBC driver.

For this example, we’ll use a PostgreSQL database. To make it work we need to provide ShedLock’s JDBC dependency:

<dependency>
    <groupId>net.javacrumbs.shedlock</groupId>
    <artifactId>shedlock-provider-jdbc-template</artifactId>
    <version>2.1.0</version>
</dependency>

Next, we need to create a database table for ShedLock to keep information about scheduler locks:

CREATE TABLE shedlock(
  name VARCHAR(64),
  lock_until TIMESTAMP(3) NULL,
  locked_at TIMESTAMP(3) NULL,
  locked_by  VARCHAR(255),
  PRIMARY KEY (name)
)

Another configuration requirement we have to provide are the @EnableScheduling and @EnableSchedulerLock annotations on our Spring configuration class:

@SpringBootApplication
@EnableScheduling
@EnableSchedulerLock(defaultLockAtMostFor = "PT30S")
public class SpringApplication {

    public static void main(String[] args) {
        SpringApplication.run(SpringApplication.class, args);
    }
}

The defaultLockAtMostFor parameter specifies the default amount of time the lock should be kept in case the executing node dies. It uses the ISO8601 Duration format.

In the next section, we’ll see how to override this default.

4. Creating Tasks

To create a scheduled task handled by ShedLock, we simply put the @Scheduled and @SchedulerLock annotations on a method:

@Component
class TaskScheduler {

    @Scheduled(cron = "*/15 * * * * *")
    @SchedulerLock(name = "TaskScheduler_scheduledTask", 
      lockAtLeastForString = "PT5M", lockAtMostForString = "PT14M")
    public void scheduledTask() {
        // ...
    }
}

First, let’s look at @Scheduled. It supports the cron format, with this expression meaning “every 15 minutes”.

Next, taking a look at @SchedulerLock, the name parameter has to be unique and ClassName_methodName is typically enough to achieve that. We don’t want more than one run of this method happening at the same time, and ShedLock uses the unique name to achieve that.

We’ve also added a couple of optional parameters.

First, we’ve added lockAtLeastForString so that we can put some distance between method invocations. Using “PT5M” means that this method will hold the lock for 5 minutes, at a minimum. In other words, that means that this method can be run by ShedLock no more often than every five minutes.

Next, we added lockAtMostForString to specify how long the lock should be kept in case the executing node dies. Using “PT14M” means that it will be locked for no longer than 14 minutes.

In normal situations, ShedLock releases the lock directly after the task finishes. Now, really, we didn’t have to do that because there is a default provided in @EnableSchedulerLock, but we’ve chosen to override that here.

5. Conclusion

In this article, we’ve learned how to create and synchronize scheduled tasks using ShedLock.

As always all source code is available over on GitHub.

Viewing all 4699 articles
Browse latest View live


<script src="https://jsc.adskeeper.com/r/s/rssing.com.1596347.js" async> </script>