Quantcast
Channel: Baeldung
Viewing all 4699 articles
Browse latest View live

Pagination and Sorting using Spring Data JPA

$
0
0

1. Overview

Pagination is often helpful when we have a large dataset and we want to present it to the user in smaller chunks.

Also, we often need to sort that data by some criteria while paging.

In this tutorial, we’ll learn how to easily paginate and sort using Spring Data JPA.

2. Initial Setup

First, let’s say we have a Product entity:

@Entity 
public class Product {
    
    @Id
    private long id;
    private String name;
    private double price; 

    // constructors, getters and setters 

}

as our domain class. Each of our Product instances has a unique identifier – id, its name and its price associated with it.

3. Creating a Repository

To access our Products, we’ll need a ProductRepository:

public interface ProductRepository extends PagingAndSortingRepository<Product, Integer> {

    List<Product> findAllByPrice(double price, Pageable pageable);
}

By having it extend PagingAndSortingRepository, we get findAll(Pageable pageable) and findAll(Sort sort) methods for paging and sorting.

Or, we could have chosen to extend JpaRepository instead, as it extends PagingAndSortingRepository, too.

Once we extend PagingAndSortingRepository, we can add our own methods that take Pageable and Sort as parameters, as we did here with findAllByPrice.

Let’s take a look at how to paginate our Products using our new method.

4. Pagination

Once we have our repository extending from PagingAndSortingRepository, we just need to:

  1. Create or obtain a PageRequest object, which is an implementation of the Pageable interface
  2. Pass the PageRequest object as an argument to the repository method we intend to use

We can create a PageRequest object by passing in the requested page number and the page size.

Here, the page counts starts at zero:

Pageable firstPageWithTwoElements = PageRequest.of(0, 2);

Pageable secondPageWithFiveElements = PageRequest.of(1, 5);

In Spring MVC, we can also choose to obtain the Pageable instance in our controller using Spring Data Web Support.

Once we have our PageRequest object\, we can pass it in while invoking our repository’s method:

Page<Product> allProducts = productRepository.findAll(firstPageWithTwoElements);

List<Product> allTenDollarProducts = 
  productRepository.findAllByPrice(10, secondPageWithFiveElements);

The findAll(Pageable pageable) method by default returns a Page<T> object.

However, we can choose to return either a Page<T>, a Slice<T> or a List<T> from any of our custom methods returning a paginated data.

A Page<T> instance, in addition to having the list of Products, also knows about the total number of available pages. It triggers an additional count query to achieve it. To avoid such an overhead cost, we can instead return a Slice<T> or a List<T>.

A Slice only knows about whether the next slice is available or not.

5. Pagination and Sorting

Similarly, to just have our query results sorted, we can simply pass an instance of Sort to the method:

Page<Product> allProductsSortedByName = productRepository.findAll(Sort.by("name"));

However, what if we want to both sort and page our data?

We can do that by passing the sorting details into our PageRequest object itself:

Pageable sortedByName = 
  PageRequest.of(0, 3, Sort.by("name"));

Pageable sortedByPriceDesc = 
  PageRequest.of(0, 3, Sort.by("price").descending());

Pageable sortedByPriceDescNameAsc = 
  PageRequest.of(0, 5, Sort.by("price").descending().and(Sort.by("name")));

Based on our sorting requirements, we can specify the sort fields and the sort direction while creating our PageRequest instance.

As usual, we can then pass this Pageable type instance to the repository’s method.

6. Conclusion

In this article, we learned how to paginate and sort our query results in Spring Data JPA.

As always, the complete code examples used in this tutorial are available over on Github.


Find Substrings That Are Palindromes in Java

$
0
0

1. Overview

In this quick tutorial, we’ll go through different approaches to finding all substrings within a given string that are palindromes. We’ll also note the time complexity of each approach.

2. Brute Force Approach

In this approach, we’ll simply iterate over the input string to find all the substrings. At the same time, we’ll check whether the substring is a palindrome or not:

public Set<String> findAllPalindromesUsingBruteForceApproach(String input) {
    Set<String> palindromes = new HashSet<>();
    for (int i = 0; i < input.length(); i++) {
        for (int j = i + 1; j <= input.length(); j++) {
            if (isPalindrome(input.substring(i, j))) {
                palindromes.add(input.substring(i, j));
            }
        }
    }
    return palindromes;
}

In the example above, we just compare the substring to its reverse to see if it’s a palindrome:

private boolean isPalindrome(String input) {
    StringBuilder plain = new StringBuilder(input);
    StringBuilder reverse = plain.reverse();
    return (reverse.toString()).equals(input);
}

Of course, we can easily choose from several other approaches.

The time complexity of this approach is O(n^3). While this may be acceptable for small input strings, we’ll need a more efficient approach if we’re checking for palindromes in large volumes of text.

3. Centralization Approach

The idea in the centralization approach is to consider each character as the pivot and expand in both directions to find palindromes.

We’ll only expand if the characters on the left and right side match, qualifying the string to be a palindrome. Otherwise, we continue to the next character.

Let’s see a quick demonstration wherein we’ll consider each character as the center of a palindrome:

public Set<String> findAllPalindromesUsingCenter(String input) {
    Set<String> palindromes = new HashSet<>();
    for (int i = 0; i < input.length(); i++) {
        palindromes.addAll(findPalindromes(input, i, i + 1));
        palindromes.addAll(findPalindromes(input, i, i));
    }
    return palindromes;
}

Within the loop above, we expand in both directions to get the set of all palindromes centered at each position. We’ll find both even and odd length palindromes by calling the method findPalindromes twice in the loop:

private Set<String> findPalindromes(String input, int low, int high) {
    Set<String> result = new HashSet<>();
    while (low >= 0 && high < input.length() && input.charAt(low) == input.charAt(high)) {
        result.add(input.substring(low, high + 1));
        low--;
        high++;
    }
    return result;
}

The time complexity of this approach is O(n^2). This is an improvement over our brute-force approach, but we can do even better, as we’ll see in the next section.

4. Manacher’s Algorithm

Manacher’s algorithm finds the longest palindromic substring in linear time. We’ll use this algorithm to find all substrings that are palindromes.

Before we dive into the algorithm, we’ll initialize a few variables.

First, we’ll guard the input string with a boundary character at the beginning and end before converting the resulting string to a character array:

String formattedInput = "@" + input + "#";
char inputCharArr[] = formattedInput.toCharArray();

Then, we’ll use a two-dimensional array radius with two rows — one to store the lengths of odd-length palindromes, and the other to store lengths of even-length palindromes:

int radius[][] = new int[2][input.length() + 1];

Next, we’ll iterate over the input array to find the length of the palindrome centered at position and store this length in radius[][]:

Set<String> palindromes = new HashSet<>();
int max;
for (int j = 0; j <= 1; j++) {
    radius[j][0] = max = 0;
    int i = 1;
    while (i <= input.length()) {
        palindromes.add(Character.toString(inputCharArr[i]));
        while (inputCharArr[i - max - 1] == inputCharArr[i + j + max])
            max++;
        radius[j][i] = max;
        int k = 1;
        while ((radius[j][i - k] != max - k) && (k < max)) {
            radius[j][i + k] = Math.min(radius[j][i - k], max - k);
            k++;
        }
        max = Math.max(max - k, 0);
        i += k;
    }
}

Finally, we’ll traverse through the array radius[][] to calculate the palindromic substrings centered at each position:

for (int i = 1; i <= input.length(); i++) {
    for (int j = 0; j <= 1; j++) {
        for (max = radius[j][i]; max > 0; max--) {
            palindromes.add(input.substring(i - max - 1, max + j + i - 1));
        }
    }
}

The time complexity of this approach is O(n).

5. Conclusion

In this quick article, we discussed the time complexities of different approaches to finding substrings that are palindromes.

As always, the full source code of the examples is available over on GitHub.

Calculate Factorial in Java

$
0
0

1. Overview

Given a non-negative integer n, factorial is the product of all positive integers less than or equal to n.

In this quick tutorial, we’ll explore different ways to calculate factorial for a given number in Java.

2. Factorial for Numbers up to 20

2.1. Using a for Loop

Let’s see a basic factorial algorithm using a for loop:

public long factorialUsingForLoop(int n) {
    long fact = 1;
    for (int i = 2; i <= n; i++) {
        fact = fact * i;
    }
    return fact;
}

The above solution will work fine for numbers up to 20. But, if we try something bigger than 20, then it will fail because results would be too large to be fit into a long, causing an overflow.

Let’s see a few more, noting that each of these will only work for small numbers.

2.2. Using Java 8 Streams

We can also use the Java 8 Stream API to calculate factorials quite easily:

public long factorialUsingStreams(int n) {
    return LongStream.rangeClosed(1, n)
        .reduce(1, (long x, long y) -> x * y);
}

In this program, we first use LongStream to iterate through the numbers between 1 and n. We then used reduce(), which uses an identity value and accumulator function for the reduction step.

2.3. Using Recursion

And let’s see another example of a factorial program, this time using recursion:

public long factorialUsingRecursion(int n) {
    if (n <= 2) {
        return n;
    }
    return n * factorialUsingRecursion(n - 1);
}

2.4. Using Apache Commons Math

Apache Commons Math has a CombinatoricsUtils class with a static factorial method that we can use to calculate the factorial.

To include Apache Commons Math, we’ll add the commons-math3 dependency into our pom:

<dependency>
    <groupId>org.apache.commons</groupId>
    <artifactId>commons-math3</artifactId>
    <version>3.6.1</version>
</dependency>

Let’s see an example using the CombinatoricsUtils class:

public long factorialUsingApacheCommons(int n) {
    return CombinatoricsUtils.factorial(n);
}

Notice that its return type is long, just like our home-grown solutions.

That means here that if the computed value exceeds Long.MAX_VALUE, a MathArithmeticException is thrown.

To get any bigger, we are going to need a different return type.

3. Factorial for Numbers Greater Than 20

3.1. Using BigInteger

As discussed before, the long datatype can be used for factorials only for n <= 20.

For larger values of n, we can use the BigInteger class from the java.math package, which can hold values up to 2^Integer.MAX_VALUE:

public BigInteger factorialHavingLargeResult(int n) {
    BigInteger result = BigInteger.ONE;
    for (int i = 2; i <= n; i++)
        result = result.multiply(BigInteger.valueOf(i));
    return result;
}

3.2. Using Guava

Google’s Guava library also provides a utility method for calculating factorials for larger numbers.

To include the library, we can add its the guava dependency to our pom:

<dependency>
    <groupId>com.google.guava</groupId>
    <artifactId>guava</artifactId>
    <version>25.1-jre</version>
</dependency>

Now, we can use the static factorial method from the BigIntegerMath class to calculate the factorial of a given number:

public BigInteger factorialUsingGuava(int n) {
    return BigIntegerMath.factorial(n);
}

4. Conclusion

In this article, we saw a few ways of calculating factorials using core Java as well as a couple of external libraries.

We first saw solutions using the long data type for calculating factorials of numbers up to 20. Then, we saw a couple of ways to use BigInteger for numbers greater than 20.

The code presented in this article is available over on Github.

Intro to Spinnaker

$
0
0

1. Overview

In this tutorial, we’re going to look at Spinnaker, an open-source continuous delivery platform built by Netflix. We can use it to deploy our applications across multiple cloud providers.

The system is built on top of Spring Boot and supports many cloud providers.

We’ll see how it works and for which cases we can use it.

2. Background

Let’s have a look at the history of software development. First, we had the Waterfall with infrequent releases.

After that, we started working Agile and delivered features every sprint. However, we still didn’t deploy to production every sprint. Unfortunately, the users still couldn’t use the new features, which were lying on a shelf.

There were some reasons for not deploying regularly. One of them was the fact that deployment steps were often manually executed and prone to human errors.

In addition, some people thought that deploying more often meant more risk for potential problems. Nowadays, we mostly agree that deploying small changes means less risk for big mistakes. Even so, if there is a mistake, we can quickly locate it in the small change and release a new version that resolves the issue.

3. Spinnaker

With Spinnaker, we can use continuous delivery or continuous deployment to release our application on production automatically. Continuous delivery means that everything is prepared for a production release.

However, the release is approved manually before the application is deployed on production. Continuous deployment means there is no manual intervention. All steps are executed, including the deployment to production. We just push our application code to a version control system and that’s it.

From pushing our code to version control until the deployment to production, we can execute lots of steps. We can build our code, unit test the code, deploy it on a test environment, and execute functional tests. We use a so-called pipeline to configure all those steps.

With Spinnaker, we can create such a pipeline and deploy our application on most cloud providers.

4. Components

Spinnaker basically consists of two parts: an abstraction layer on top of various cloud providers and a tool for continuous delivery.

4.1. Traditional Cloud Deployments

When we look at cloud providers, they all offer more or less the same services. Those services include things as instances, serverless, and container support.

However, the configuration of those services greatly varies between the providers. That makes it harder to switch between providers. It takes some time to move to another cloud provider and learn all the details, which means we basically have vendor lock-in with our cloud provider.

Netflix wanted to have the possibility to easily switch between cloud providers, rather than be dependent on just one. That’s why they built an abstraction layer on top of the cloud providers.

4.2. Abstraction Layer

When we use Spinnaker, it’s the same on all cloud providers. We can use it on Amazon Web Services, Microsoft Azure, Google Cloud Platform, OpenStack, Google App Engine, or Kubernetes. This allows us to move to another cloud provider if the prices are more competitive.

Even more, we can choose to deploy to multiple providers at the same time. That way we can run our application on two or more providers for extra redundancy.

Another benefit of the abstraction layer is that it focuses on the applications instead of the resources. Normally, cloud providers show us the resources that we currently use. However, we have to figure out ourselves what application is using which resources.

But resources aren’t interesting for us. We want to run our application without spending time keeping track of resources. Spinnaker has an application-centric view. So, when we look at it, we first see the application, and then we see the resources used by the application.

4.3. Continuous Delivery

On top of the abstraction layer, Netflix built a continuous delivery platform. This platform allows us to deploy our application on one or more cloud providers. It looks a bit like Jenkins, but it offers nicer integration with the cloud providers and requires less configuration.

We can trigger the continuous delivery pipeline from Jenkins, an uploaded Docker image, or a git push, for example. After that, we can simply create an image or a container with our application and start it on production.

However, there are many more options available such as automated tests and manual approvals before deploying on production.

We can even decide what strategy we want to follow when deploying a new version of an existing application. As such, it’s possible to simply replace the old version with the new version. However, a better strategy would be to run them side by side first. That way we can automatically or manually check if the new version works and, if so, remove the old version.

5. The Netflix Cloud Model

Every application consists of one or more server groups. The same version of the application runs on all instances in the server group. The following naming convention is used: <application-name>-<(optional) stack>-<(optional detail)>-<version-number>. The (optional) stack field is used to specify if the server group is for test, production or other purposes. The optional detail field is used for extra information.

Finally, we have the concept of a cluster that contains one or more server groups with the same name, stack, and detail. However, most of the time each server group in the cluster runs a different version of the application. Failing instances will be replaced by a new instance.

It’s also possible to automatically add instances to a server group to accommodate the increased load.

6. Deployment Strategy

When we deploy a new version of an application, the ‘red/black’ strategy is normally chosen. First, a new server group containing the new version of the application is deployed to the cluster. After the application deployment, a check is performed to verify if the new server group is healthy.

Now, the server group is enabled and available to our customers. Finally, the old server group is disabled.

In this scenario, it’s easy to roll back if something goes wrong with the new application server. We can simply enable the server group with the old version again and make it available to our customers.

7. Why Spinnaker

With Spinnaker, we can focus on our application instead of the cloud resources that we use. This makes it easier to deploy and maintain our applications.

Additionally, Spinnaker makes it possible to run on multiple cloud providers at the same time. Moreover, we can easily switch to other cloud providers depending on their pricing strategy and available features.

8. Conclusion

Spinnaker builds on the experience of Netflix. We can use their knowledge and work in the same way with minimal effort. Based on these tools, we can easily implement a deployment pipeline to deploy our applications to production.

To learn more about Spinnaker, download the free Continuous Delivery with Spinnaker ebook.

Spring MVC Interview Questions

$
0
0

1. Introduction

Spring MVC is the original web framework from Spring built on the Servlet API. It provides Model-View-Controller architecture that can be used to develop flexible web applications.

In this tutorial, we’ll focus on the questions related to it, as it is often a topic on a Spring developer job interview.

For more questions on the Spring Framework, you can check out another Spring related article of our interview questions series.

2. Basic Spring MVC Questions

Q1. Why Should We Use Spring MVC?

Spring MVC implements a clear separation of concerns that allows us to develop and unit test our applications easily.

The concepts like:

  • Dispatcher Servlet
  • Controllers
  • View Resolvers
  • Views, Models
  • ModelAndView
  • Model and Session Attributes

are completely independent of each other, and they are responsible for one thing only.

Therefore, MVC gives us quite big flexibility. It’s based on interfaces (with provided implementation classes), and we can configure every part of the framework by using custom interfaces.

Another important thing is that we aren’t tied to a specific view technology (for example, JSP), but we have the option to choose from the ones we like the most.

Also, we don’t use Spring MVC only in web applications development but in the creation of RESTful web services as well.

Q2. What is the Role of the @Autowired Annotation?

The @Autowired annotation can be used with fields or methods for injecting a bean by type. This annotation allows Spring to resolve and inject collaborating beans into your bean.

For more details, please refer to the tutorial about @Autowired in Spring.

Q3. Explain a Model Attribute

The @ModelAttribute annotation is one of the most important annotations in Spring MVC. It binds a method parameter or a method return value to a named model attribute and then exposes it to a web view.

If we use it at the method level, it indicates the purpose of that method is to add one or more model attributes.

On the other hand, when used as a method argument, it indicates the argument should be retrieved from the model. When not present, we should first instantiate it and then add it to the model. Once present in the model, we should populate the arguments fields from all request parameters that have matching names.

More about this annotation can be found in our article related to the @ModelAttribute annotation.

Q4. Explain the Difference Between @Controller and @RestController?

The main difference between the @Controller and @RestController annotations is that the @ResponseBody annotation is automatically included in the @RestController. This means that we don’t need to annotate our handler methods with the @ResponseBody. We need to do this in a @Controller class if we want to write response type directly to the HTTP response body.

Q5. Describe a PathVariable

We can use the @PathVariable annotation as a handler method parameter in order to extract the value of a URI template variable.

For example, if we want to fetch a user by id from the www.mysite.com/user/123, we should map our method in the controller as /user/{id}:

@RequestMapping("/user/{id}")
public String handleRequest(@PathVariable("id") String userId, Model map) {}

The @PathVariable has only one element named value. It’s optional and we use it to define the URI template variable name. If we omit the value element, then the URI template variable name must match the method parameter name.

It’s also allowed to have multiple @PathVariable annotations, either by declaring them one after another:

@RequestMapping("/user/{userId}/name/{userName}")
public String handleRequest(@PathVariable String userId,
  @PathVariable String userName, Model map) {}

or putting them all in a  Map<String, String> or MultiValueMap<String, String>:

@RequestMapping("/user/{userId}/name/{userName}")
public String handleRequest(@PathVariable Map<String, String> varsMap, Model map) {}

Q6. Validation Using Spring MVC

Spring MVC supports JSR-303 specifications by default. We need to add JSR-303 and its implementation dependencies to our Spring MVC application. Hibernate Validator, for example, is one of the JSR-303 implementations at our disposal.

JSR-303 is a specification of the Java API for bean validation, part of JavaEE and JavaSE, which ensures that properties of a bean meet specific criteria, using annotations such as @NotNull, @Min, and @Max. More about validation is available in the Java Bean Validation Basics article.

Spring offers the @Validator annotation and the BindingResult class. The Validator implementation will raise errors in the controller request handler method when we have invalid data. Then we may use the BindingResult class to get those errors.

Besides using the existing implementations, we can make our own. To do so, we create an annotation that conforms to the JSR-303 specifications first. Then, we implement the Validator class. Another way would be to implement Spring’s Validator interface and set it as the validator via @InitBinder annotation in Controller class.

To check out how to implement and use your own validations, please see the tutorial regarding Custom Validation in Spring MVC.

Q7. What are the @RequestBody and the @ResponseBody?

The @RequestBody annotation, used as a handler method parameter, binds the HTTP Request body to a transfer or a domain object. Spring automatically deserializes incoming HTTP Request to the Java object using Http Message Converters.

When we use the @ResponseBody annotation on a handler method in the Spring MVC controller, it indicates that we’ll write the return type of the method directly to the HTTP response body. We’ll not put it in a Model, and Spring won’t interpret as a view name.

Please check out the article on @RequestBody and @ResponseBody to see more details about these annotations.

Q8. Explain Model, ModelMap and ModelAndView?

The Model interface defines a holder for model attributes. The ModelMap has a similar purpose, with the ability to pass a collection of values. It then treats those values as if they were within a Map. We should note that in Model (ModelMap) we can only store data. We put data in and return a view name.

On the other hand, with the ModelAndView, we return the object itself. We set all the required information, like the data and the view name, in the object we’re returning.

You can find more details in the article on Model, ModelMap, and ModelView.

Q9. Explain SessionAttributes and SessionAttribute

The @SessionAttributes annotation is used for storing the model attribute in the user’s session. We use it at the controller class level, as shown in our article about the Session Attributes in Spring MVC:

@Controller
@RequestMapping("/sessionattributes")
@SessionAttributes("todos")
public class TodoControllerWithSessionAttributes {

    @GetMapping("/form")
    public String showForm(Model model,
      @ModelAttribute("todos") TodoList todos) {
        // method body
        return "sessionattributesform";
    }

    // other methods
}

In the previous example, the model attribute ‘todos‘ will be added to the session if the @ModelAttribute and the @SessionAttributes have the same name attribute.

If we want to retrieve the existing attribute from a session that is managed globally, we’ll use @SessionAttribute annotation as a method parameter:

@GetMapping
public String getTodos(@SessionAttribute("todos") TodoList todos) {
    // method body
    return "todoView";
}

Q10. What is the Purpose of @EnableWebMVC?

The @EnableWebMvc annotation’s purpose is to enable Spring MVC via Java configuration. It’s equivalent to <mvc: annotation-driven> in an XML configuration. This annotation imports Spring MVC Configuration from WebMvcConfigurationSupport. It enables support for @Controller-annotated classes that use @RequestMapping to map incoming requests to a handler method.

You can learn more about this and similar annotations in our Guide to the Spring @Enable Annotations.

Q11. What is ViewResolver in Spring?

The ViewResolver enables an application to render models in the browser – without tying the implementation to a specific view technology – by mapping view names to actual views.

For more details about the ViewResolver, have a look at our Guide to the ViewResolver in Spring MVC.

Q12. What is the BindingResult?

BindingResult is an interface from org.springframework.validation package that represents binding results. We can use it to detect and report errors in the submitted form. It’s easy to invoke — we just need to ensure that we put it as a parameter right after the form object we’re validating. The optional Model parameter should come after the BindingResult, as it can be seen in the custom validator tutorial:

@PostMapping("/user")
public String submitForm(@Valid NewUserForm newUserForm, 
  BindingResult result, Model model) {
    if (result.hasErrors()) {
        return "userHome";
    }
    model.addAttribute("message", "Valid form");
    return "userHome";
}

When Spring sees the @Valid annotation, it’ll first try to find the validator for the object being validated. Then it’ll pick up the validation annotations and invoke the validator. Finally, it’ll put found errors in the BindingResult and add the latter to the view model.

Q13. What is a Form Backing Object?

The form backing object or a Command Object is just a POJO that collects data from the form we’re submitting.

We should keep in mind that it doesn’t contain any logic, only data.

To learn how to use form backing object with the forms in Spring MVC, please take a look at our article about Forms in Spring MVC.

Q14. What is the Role of the @Qualifier Annotation?

It is used simultaneously with the @Autowired annotation to avoid confusion when multiple instances of a bean type are present.

Let’s see an example. We declared two similar beans in XML config:

<bean id="person1" class="com.baeldung.Person" >
    <property name="name" value="Joe" />
</bean>
<bean id="person2" class="com.baeldung.Person" >
    <property name="name" value="Doe" />
</bean>

When we try to wire the bean, we’ll get an org.springframework.beans.factory.NoSuchBeanDefinitionException. To fix it, we need to use @Qualifier to tell Spring about which bean should be wired:

@Autowired
@Qualifier("person1")
private Person person;

Q15. What is the Role of the @Required Annotation?

The @Required annotation is used on setter methods, and it indicates that the bean property that has this annotation must be populated at configuration time. Otherwise, the Spring container will throw a BeanInitializationException exception.

Also, @Required differs from @Autowired – as it is limited to a setter, whereas @Autowired is not. @Autowired can be used to wire with a constructor and a field as well, while @Required only checks if the property is set.

Let’s see an example:

public class Person {
    private String name;
 
    @Required
    public void setName(String name) {
        this.name = name;
    }
}

Now, the name of the Person bean needs to be set in XML config like this:

<bean id="person" class="com.baeldung.Person">
    <property name="name" value="Joe" />
</bean>

Please note that @Required doesn’t work with Java based @Configuration classes by default. If you need to make sure that all your properties are set, you can do so when you create the bean in the @Bean annotated methods.

Q16. Describe the Front Controller Pattern

In the Front Controller pattern, all requests will first go to the front controller instead of the servlet. It’ll make sure that the responses are ready and will send them back to the browser. This way we have one place where we control everything that comes from the outside world.

The front controller will identify the servlet that should handle the request first. Then, when it gets the data back from the servlet, it’ll decide which view to render and, finally, it’ll send the rendered view back as a response:

To see the implementation details, please check out our Guide to the Front Controller Pattern in Java.

Q17. What are Model 1 and Model 2 Architectures?

Model 1 and Model 2 represent two frequently used design models when it comes to designing Java Web Applications.

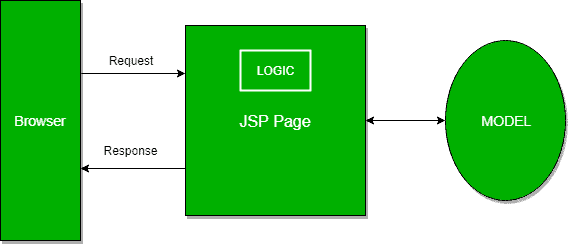
In Model 1, a request comes to a servlet or JSP where it gets handled. The servlet or the JSP processes the request, handles business logic, retrieves and validates data, and generates the response:

Since this architecture is easy to implement, we usually use it in small and simple applications.

On the other hand, it isn’t convenient for large-scale web applications. The functionalities are often duplicated in JSPs where business and presentation logic are coupled.

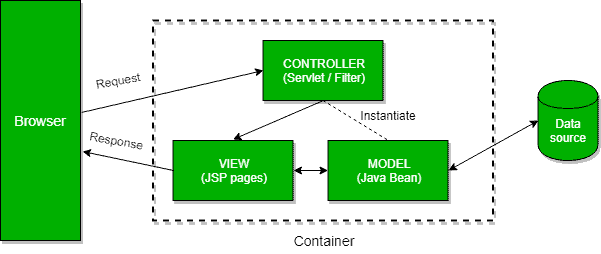
The Model 2 is based on the Model View Controller design pattern and it separates the view from the logic that manipulates the content.

Furthermore, we can distinguish three modules in the MVC pattern: the model, the view, and the controller. The model is representing the dynamic data structure of an application. It’s responsible for the data and business logic manipulation. The view is in charge of displaying the data, while the controller serves as an interface between the previous two.

In Model 2, a request is passed to the controller, which handles the required logic in order to get the right content that should be displayed. The controller then puts the content back into the request, typically as a JavaBean or a POJO. It also decides which view should render the content and finally passes the request to it. Then, the view renders the data:

3. Advanced Spring MVC Questions

Q18. What’s the Difference Between @Controller, @Component, @Repository, and @Service Annotations in Spring?

According to the official Spring documentation, @Component is a generic stereotype for any Spring-managed component. @Repository, @Service, and @Controller are specializations of @Component for more specific use cases, for example, in the persistence, service, and presentation layers, respectively.

Let’s take a look at specific use cases of last three:

  • @Controller – indicates that the class serves the role of a controller, and detects @RequestMapping annotations within the class
  • @Service – indicates that the class holds business logic and calls methods in the repository layer
  • @Repository – indicates that the class defines a data repository; its job is to catch platform-specific exceptions and re-throw them as one of Spring’s unified unchecked exceptions

Q19. What are DispatcherServlet and ContextLoaderListener?

Simply put, in the Front Controller design pattern, a single controller is responsible for directing incoming HttpRequests to all of an application’s other controllers and handlers.

Spring’s DispatcherServlet implements this pattern and is, therefore, responsible for correctly coordinating the HttpRequests to the right handlers.

On the other hand, ContextLoaderListener starts up and shuts down Spring’s root WebApplicationContext. It ties the lifecycle of ApplicationContext to the lifecycle of the ServletContext. We can use it to define shared beans working across different Spring contexts.

For more details on DispatcherServlet, please refer to this tutorial.

Q20. What is a MultipartResolver and When Should We Use It?

The MultipartResolver interface is used for uploading files. The Spring framework provides one MultipartResolver implementation for use with Commons FileUpload and another for use with Servlet 3.0 multipart request parsing.

Using these, we can support file uploads in our web applications.

Q21. What is Spring MVC Interceptor and How to Use It?

Spring MVC Interceptors allow us to intercept a client request and process it at three places – before handling, after handling, or after completion (when the view is rendered) of a request.

The interceptor can be used for cross-cutting concerns and to avoid repetitive handler code like logging, changing globally used parameters in Spring model, etc.

For details and various implementations, take a look at Introduction to Spring MVC HandlerInterceptor article.

Q22. What is an Init Binder?

A method annotated with @InitBinder is used to customize a request parameter, URI template, and backing/command objects. We define it in a controller and it helps in controlling the request. In this method, we register and configure our custom PropertyEditors, a formatter, and validators.

The annotation has the ‘value‘ element. If we don’t set it, the @InitBinder annotated methods will get called on each HTTP request. If we set the value, the methods will be applied only for particular command/form attributes and/or request parameters whose names correspond to the ‘value‘ element.

It’s important to remember that one of the arguments must be WebDataBinder. Other arguments can be of any type that handler methods support except for command/form objects and corresponding validation result objects.

Q23. Explain a Controller Advice

The @ControllerAdvice annotation allows us to write global code applicable to a wide range of controllers. We can tie the range of controllers to a chosen package or a specific annotation.

By default, @ControllerAdvice applies to the classes annotated with @Controller (or @RestController). We also have a few properties that we use if we want to be more specific.

If we want to restrict applicable classes to a package, we should add the name of the package to the annotation:

@ControllerAdvice("my.package")
@ControllerAdvice(value = "my.package")
@ControllerAdvice(basePackages = "my.package")

It’s also possible to use multiple packages, but this time we need to use an array instead of the String.

Besides restricting to the package by its name, we can do it by using one of the classes or interfaces from that package:

@ControllerAdvice(basePackageClasses = MyClass.class)

The ‘assignableTypes‘ element applies the @ControllerAdvice to the specific classes, while ‘annotations‘ does it for particular annotations.

It’s noteworthy to remember that we should use it along with @ExceptionHandler. This combination will enable us to configure a global and more specific error handling mechanism without the need to implement it every time for every controller class.

Q24. What Does the @ExceptionHandler Annotation Do?

The @ExceptionHandler annotation allows us to define a method that will handle the exceptions. We may use the annotation independently, but it’s a far better option to use it together with the @ControllerAdvice. Thus, we can set up a global error handling mechanism. In this way, we don’t need to write the code for the exception handling within every controller.

Let’s take a look at the example from our article about Error Handling for REST with Spring:

@ControllerAdvice
public class RestResponseEntityExceptionHandler
  extends ResponseEntityExceptionHandler {

    @ExceptionHandler(value = { IllegalArgumentException.class,
      IllegalStateException.class })
    protected ResponseEntity<Object> handleConflict(RuntimeException ex,
      WebRequest request) {
        String bodyOfResponse = "This should be application specific";
        return handleExceptionInternal(ex, bodyOfResponse, new HttpHeaders(),
          HttpStatus.CONFLICT, request);
    }
}

We should also note that this will provide @ExceptionHandler methods to all controllers that throw IllegalArgumentException or IllegalStateException. The exceptions declared with @ExceptionHandler should match the exception used as the argument of the method. Otherwise, the exception resolving mechanism will fail at runtime.

One thing to keep in mind here is that it’s possible to define more than one @ExceptionHandler for the same exception. We can’t do it in the same class though since Spring would complain by throwing an exception and failing on startup.

On the other hand, if we define those in two separate classes, the application will start, but it’ll use the first handler it finds, possibly the wrong one.

Q25. Exception Handling in Web Applications

We have three options for exceptions handling in Spring MVC:

  • per exception
  • per controller
  • globally

If an unhandled exception is thrown during web request processing, the server will return an HTTP 500 response. To prevent this, we should annotate any of our custom exceptions with the @ResponseStatus annotation. This kind of exceptions is resolved by HandlerExceptionResolver.

This will cause the server to return an appropriate HTTP response with the specified status code when a controller method throws our exception. We should keep in mind that we shouldn’t handle our exception somewhere else for this approach to work.

Another way to handle the exceptions is by using the @ExceptionHandler annotation. We add @ExceptionHandler methods to any controller and use them to handle the exceptions thrown from inside that controller. These methods can handle exceptions without the @ResponseStatus annotation, redirect the user to a dedicated error view, or build a totally custom error response.

We can also pass in the servlet-related objects (HttpServletRequest, HttpServletResponse, HttpSession, and Principal) as the parameters of the handler methods. But, we should remember that we can’t put the Model object as the parameter directly.

The third option for handling errors is by @ControllerAdvice classes. It’ll allow us to apply the same techniques, only this time at the application level and not only to the particular controller. To enable this, we need to use the @ControllerAdvice and the @ExceptionHandler together. This way exception handlers will handle exceptions thrown by any controller.

For more detailed information on this topic, go through the Error Handling for REST with Spring article.

4. Conclusion

In this article, we’ve explored some of the Spring MVC related questions that could come up at the technical interview for Spring developers. You should take these questions into account as a starting point for further research since this is by no means an exhaustive list.

We wish you good luck in any upcoming interviews!

Java Stream Filter with Lambda Expression

$
0
0

1. Introduction

In this quick tutorial, we’ll explore the use of the Stream.filter() method when we work with Streams in Java.

We’ll show how to use it and how to handle special cases with checked exceptions.

2. Using Stream.filter()

The filter() method is an intermediate operation of the Stream interface that allows us to filter elements of a stream that match a given Predicate:

Stream<T> filter(Predicate<? super T> predicate)

To see how this works, let’s create a Customer class:

public class Customer {
    private String name;
    private int points;
    //Constructor and standard getters
}

In addition, let’s create a collection of customers:

Customer john = new Customer("John P.", 15);
Customer sarah = new Customer("Sarah M.", 200);
Customer charles = new Customer("Charles B.", 150);
Customer mary = new Customer("Mary T.", 1);

List<Customer> customers = Arrays.asList(john, sarah, charles, mary);

2.1. Filtering Collections

A common use case of the filter() method is processing collections.

Let’s make a list of customers with more than 100 points. To do that, we can use a lambda expression:

List<Customer> customersWithMoreThan100Points = customers
  .stream()
  .filter(c -> c.getPoints() > 100)
  .collect(Collectors.toList());

We can also use a method reference, which is shorthand for a lambda expression:

List<Customer> customersWithMoreThan100Points = customers
  .stream()
  .filter(Customer::hasOverThousandPoints)
  .collect(Collectors.toList());

But, for this case we added the hasOverThousandPoints method to our Customer class:

public boolean hasOverThousandPoints() {
    return this.points > 100;
}

In both cases, we get the same result:

assertThat(customersWithMoreThan100Points).hasSize(2);
assertThat(customersWithMoreThan100Points).contains(sarah, charles);

2.2. Filtering Collections with Multiple Criteria

Also, we can use multiple conditions with filter(). For example, filter by points and name:

List<Customer> charlesWithMoreThan100Points = customers
  .stream()
  .filter(c -> c.getPoints() > 100 && c.getName().startsWith("Charles"))
  .collect(Collectors.toList());

assertThat(charlesWithMoreThan100Points).hasSize(1);
assertThat(charlesWithMoreThan100Points).contains(charles);

3. Handling Exceptions

Until now, we’ve been using the filter with predicates that don’t throw an exception. Indeed the functional interfaces in Java don’t declare any checked or unchecked exception.

Next, we’re going to show some different ways to handle exceptions in lambda expressions.

3.1. Using a Custom Wrapper

First, we’ll start adding to our Customer a profilePhotoUrl:

private String profilePhotoUrl;

In addition, let’s add a simple hasValidProfilePhoto() method to check the availability of the profile:

public boolean hasValidProfilePhoto() throws IOException {
    URL url = new URL(this.profilePhotoUrl);
    HttpsURLConnection connection = (HttpsURLConnection) url.openConnection();
    return connection.getResponseCode() == HttpURLConnection.HTTP_OK;
}

We can see that the hasValidProfilePhoto() method throws an IOException. Now, if we try to filter the customers with this method:

List<Customer> customersWithValidProfilePhoto = customers
  .stream()
  .filter(Customer::hasValidProfilePhoto)
  .collect(Collectors.toList());

We’ll see the following error:

Incompatible thrown types java.io.IOException in functional expression

To handle it, one of the alternatives we can use is to wrap it with a try-catch block:

List<Customer> customersWithValidProfilePhoto = customers
  .stream()
  .filter(c -> {
      try {
          return c.hasValidProfilePhoto();
      } catch (IOException e) {
          //handle exception
      }
      return false;
  })
  .collect(Collectors.toList());

If we need to throw an exception from our predicate, we can wrap it in an unchecked exception like RuntimeException.

3.2. Using ThrowingFunction

Alternatively, we can use the ThrowingFunction library.

ThrowingFunction is an open source library that allows us to handle checked exceptions in Java functional interfaces.

Let’s start by adding the throwing-function dependency to our pom:

<dependency>
    <groupId>pl.touk</groupId>
    <artifactId>throwing-function</artifactId>
    <version>1.3</version>
</dependency>

To handle exceptions in predicates, this library offers us the ThrowingPredicate class, which has the unchecked() method to wrap checked exceptions.

Let’s see it in action:

List customersWithValidProfilePhoto = customers
  .stream()
  .filter(ThrowingPredicate.unchecked(Customer::hasValidProfilePhoto))
  .collect(Collectors.toList());

4. Conclusion

In this article, we saw an example of how to use the filter() method to process streams. Also, we explored some alternatives to handle exceptions.

As always, the complete code is available over on GitHub.

Guide to the Hibernate EntityManager

$
0
0

1. Introduction

EntityManager is a part of the Java Persistence API. Chiefly, it implements the programming interfaces and lifecycle rules defined by the JPA 2.0 specification.

Moreover, we can access the Persistence Context, by using the APIs in EntityManager.

In this tutorial, we’ll take a look at the configuration, types, and various APIs of the EntityManager.

2. Maven Dependencies

First, we need to include the dependencies of Hibernate:

<dependency>
    <groupId>org.hibernate</groupId>
    <artifactId>hibernate-core</artifactId>
    <version>5.4.0.Final</version>
</dependency>

We will also have to include the driver dependencies, depending upon the database that we’re using:

<dependency>
    <groupId>mysql</groupId>
    <artifactId>mysql-connector-java</artifactId>
    <version>8.0.13</version>
</dependency>

The hibernate-core and mysql-connector-java dependencies are available on Maven Central.

3. Configuration

Now, let’s demonstrate the EntityManager, by using a Movie entity which corresponds to a MOVIE table in the database.

Over the course of this article, we’ll make use of the EntityManager API to work with the Movie objects in the database.

3.1. Defining the Entity

Let’s start by creating the entity corresponding to the MOVIE table, using the @Entity annotation:

@Entity
@Table(name = "MOVIE")
public class Movie {
    
    @Id
    private Long id;

    private String movieName;

    private Integer releaseYear;

    private String language;

    // standard constructor, getters, setters
}

3.2. The persistence.xml File

When the EntityManagerFactory is created, the persistence implementation searches for the META-INF/persistence.xml file in the classpath.

This file contains the configuration for the EntityManager:

<persistence-unit name="com.baeldung.movie_catalog">
    <description>Hibernate EntityManager Demo</description>
    <class>com.baeldung.hibernate.pojo.Movie</class> 
    <exclude-unlisted-classes>true</exclude-unlisted-classes>
    <properties>
        <property name="hibernate.dialect" value="org.hibernate.dialect.MySQL5Dialect"/>
        <property name="hibernate.hbm2ddl.auto" value="update"/>
        <property name="javax.persistence.jdbc.driver" value="com.mysql.jdbc.Driver"/>
        <property name="javax.persistence.jdbc.url" value="jdbc:mysql://127.0.0.1:3306/moviecatalog"/>
        <property name="javax.persistence.jdbc.user" value="root"/>
        <property name="javax.persistence.jdbc.password" value="root"/>
    </properties>
</persistence-unit>

To explain, we define the persistence-unit that specifies the underlying datastore managed by the EntityManager.

Furthermore, we define the dialect and the other JDBC properties of the underlying datastore. Hibernate is database-agnostic. Based on these properties, Hibernate connects with the underlying database.

4. Container and Application Managed EntityManager

Basically, there are two types of EntityManager – Container Managed and Application Managed.

Let’s have a closer look at each type.

4.1. Container Managed EntityManager

Here, the container injects the EntityManager in our enterprise components.

In other words, the container creates the EntityManager from the EntityManagerFactory for us:

@PersistenceContext
EntityManager entityManager;

This also means the container is in charge of beginning, committing, or rolling back the transaction.

4.2. Application Managed EntityManager

Conversely, the lifecycle of the EntityManager is managed by the application in here.

In fact, we’ll manually create the EntityManager. Furthermore, we’ll also manage the lifecycle of the EntityManager we’ve created.

First, let’s create the EntityManagerFactory:

EntityManagerFactory emf = Persistence.createEntityManagerFactory("com.baeldung.movie_catalog");

In order to create an EntityManager, we must explicitly call createEntityManager() in the EntityManagerFactory:

public static EntityManager getEntityManager() {
    return emf.createEntityManager();
}

5. Hibernate Entity Operations

The EntityManager API provides a collection of methods. We can interact with the database, by making use of these methods.

5.1. Persisting Entities

In order to have an object associated with the EntityManager, we can make use of the persist() method :

public void saveMovie() {
    EntityManager em = getEntityManager();
    
    em.getTransaction().begin();
    
    Movie movie = new Movie();
    movie.setId(1L);
    movie.setMovieName("The Godfather");
    movie.setReleaseYear(1972);
    movie.setLanguage("English");

    em.persist(movie);
    em.getTransaction().commit();
}

Once the object is saved in the database, it is in the persistent state.

5.2. Loading Entities

For the purpose of retrieving an object from the database, we can use the find() method.

Here, the method searches by primary key. In fact, the method expects the entity class type and the primary key:

public Movie getMovie(Long movieId) {
    EntityManager em = getEntityManager();
    Movie movie = em.find(Movie.class, new Long(movieId));
    em.detach(movie);
    return movie;
}

However, if we just need the reference to the entity, we can use the getReference() method instead. In effect, it returns a proxy to the entity:

Movie movieRef = em.getReference(Movie.class, new Long(movieId));

5.3. Detaching Entities

In the event that we need to detach an entity from the persistence context, we can use the detach() method. We pass the object to be detached as the parameter to the method:

em.detach(movie);

Once the entity is detached from the persistence context, it will be in the detached state.

5.4. Merging Entities

In practice, many applications require entity modification across multiple transactions. For example, we may want to retrieve an entity in one transaction for rendering to the UI. Then, another transaction will bring in the changes made in the UI.

We can make use of the merge() method, for such situations. The merge method helps to bring in the modifications made to the detached entity, in the managed entity, if any:

public void mergeMovie() {
    EntityManager em = getEntityManager();
    Movie movie = getMovie(1L);
    em.detach(movie);
    movie.setLanguage("Italian");
    em.getTransaction().begin();
    em.merge(movie);
    em.getTransaction().commit();
}

5.5. Querying for Entities

Furthermore, we can make use of JPQL to query for entities. We’ll invoke getResultList() to execute them.

Of course, we can use the getSingleResult(), if the query returns just a single object:

public List<?> queryForMovies() {
    EntityManager em = getEntityManager();
    List<?> movies = em.createQuery("SELECT movie from Movie movie where movie.language = ?1")
      .setParameter(1, "English")
      .getResultList();
    return movies;
}

5.6. Removing Entities

Additionally, we can remove an entity from the database using the remove() method. It’s important to note that, the object is not detached, but removed.

Here, the state of the entity changes from persistent to new:

public void removeMovie() {
    EntityManager em = HibernateOperations.getEntityManager();
    em.getTransaction().begin();
    Movie movie = em.find(Movie.class, new Long(1L));
    em.remove(movie);
    em.getTransaction().commit();
}

6. Conclusion

In this article, we have explored the EntityManager in Hibernate. We’ve looked at the types and configuration, and we learned about the various methods available in the API for working with the persistence context.

As always, the code used in the article is available over at Github.

Guide to Java Packages

$
0
0

1. Introduction

In this quick tutorial, we’ll cover the basics of packages in Java. We’ll see how to create packages and access the types we place inside them.

We’ll also discuss naming conventions and how that relates to the underlying directory structure.

Finally, we’ll compile and run our packaged Java classes.

2. Overview of Java Packages

In Java, we use packages to group related classes, interfaces and sub-packages.

The main benefits of doing this are:

  • Making related types easier to find – packages usually contain types that are logically related
  • Avoiding naming conflicts – a package will help us to uniquely identify a class; for example, we could have a com.baeldung.Application, as well as com.example.Application classes
  • Controlling access – we can control visibility and access to types by combining packages and access modifiers

Next, let’s see how we can create and use Java packages.

3. Creating a Package

To create a package, we have to use the package statement by adding it as the very first line of code in a file.

Let’s place a type in a package named com.baeldung.packages:

package com.baeldung.packages;

It’s highly recommended to add each new type in a package. If we define types and don’t place them in a package, they will go in the default or unnamed package. In this, we lose the benefits of using the package structure, and will not be to access these types from other packages.

3.1. Naming Conventions

In order to avoid packages with the same name, we follow some naming conventions:

  • we define our package names in all lower case
  • package names are period-delimited
  • names are also determined by the company or organization that creates them

To determine the package name based on an organization, we’ll typically start by reversing the company URL. After that, the naming convention is defined by the company and may include division names and project names.

For example, to make a package out of www.baeldung.com, let’s reverse it:

com.baeldung

We can then further define sub-packages of this, like com.baeldung.packages or com.baeldung.packages.domain.

3.2. Directory Structure

Packages in Java correspond with a directory structure.

Each package and subpackage has its own directory. So, for the package com.baeldung.packages, we should have a directory structure of com -> baeldung -> packages.

Most IDE’s will help with creating this directory structure based on our package names, so we don’t have to create these by hand.

4. Using Package Members

Let’s start by defining a class TodoItem in a subpackage named domain:

package com.baeldung.packages.domain;

public class TodoItem {
    private Long id;
    private String description;

    // standard getters and setters

}

4.1. Imports

In order to use our TodoItem class from a class in another package, we need to import it. Once it’s imported, we can access it by name.

We can import a single type from a package or use an asterisk to import all of the types in a package.

Let’s import the entire domain subpackage:

import com.baeldung.packages.domain.*;

Now, let’s import only the TodoItem class:

import com.baeldung.packages.domain.TodoItem;

The JDK and other Java libraries also come with their own packages. We can import pre-existing classes that we want to use in our project in the same manner.

For example, let’s import the Java core List interface and ArrayList class:

import java.util.ArrayList;
import java.util.List;

We can then use these types in our application by simply using their name:

public class TodoList {

    private List<TodoItem> todoItems;

    public void addTodoItem(TodoItem todoItem) {
        if (todoItems == null) {
            todoItems = new ArrayList<TodoItem>();
        }
        todoItems.add(todoItem);
    }
}

Here, we’ve used our new classes along with Java core classes, to create a List of ToDoItems.

4.2. Fully Qualified Name

Sometimes, we may be using two classes with the same name from different packages. For example, we might be using both java.sql.Date and java.util.Date. When we run into naming conflicts, we need to use a fully qualified class name for at least one of the classes.

Let’s use TodoItem with a fully qualified name:

public class TodoList {
    private List<com.baeldung.packages.domain.TodoItem> todoItems;

    public void addTodoItem(com.baeldung.packages.domain.TodoItem todoItem) {
        if (todoItems == null) {
            todoItems = new ArrayList<com.baeldung.packages.domain.TodoItem>();
        }

        todoItems.add(todoItem);
    }

    // standard getters and setters

}

5. Compiling with javac

When it’s time to compile our packaged classes, we need to remember our directory structure. Starting in the source folder, we need to tell javac where to find our files.

We need to compile our TodoItem class first because our TodoList class depends on it.

Let’s start by opening a command line or terminal and navigating to our source directory.

Now, let’s compile our com.baeldung.packages.domain.TodoItem class:

> javac com/baeldung/packages/domain/TodoItem.java

If our class compiles cleanly, we’ll see no error messages and a file TodoItem.class should appear in our com/baeldung/packages/domain directory.

For types that reference types in other packages, we should use the -classpath flag to tell the javac command where to find the other compiled classes.

Now that our TodoItem class is compiled, we can compile our TodoList and TodoApp classes:

>javac -classpath . com/baeldung/packages/*.java

Again, we should see no error messages and we should find two class files in our com/baeldung/packages directory.

Let’s run our application using the fully qualified name of our TodoApp class:

>java com.baeldung.packages.TodoApp

Our output should look like this:

6. Conclusion

In this short article, we learned what a package is and why we should use them.

We discussed naming conventions and how packages relate to the directory structure. We also saw how to create and use packages.

Finally, we went over how to compile and run an application with packages using the javac and java commands.

The full example code is available over on GitHub.


IntelliJ Debugging Tricks

$
0
0

1. Overview

In this tutorial, we’ll look into some advanced IntelliJ debugging facilities.

It’s assumed that debugging basics are already known (how to start debugging, Step Into, Step Over actions etc). If not, please refer to this article for more details on that.

2. Smart Step Into

There are situations when multiple methods are called on a single line of source code, such as doJob(getArg1(), getArg2()). If we call Step Into action (F7), the debugger goes into the methods in the order used by the JVM for evaluation: getArg1getArg2doJob.

However, we might want to skip all intermediate invocations and proceed to the target method directly. Smart Step Into action allows doing that.

It’s bound to the Shift + F7 by default and looks like this when invoked:

Now we can choose the target method to proceed. Also, note that IntelliJ always puts the outermost method to the top of the list. That means that we can quickly go to it by pressing Shift + F7 | Enter.

3. Drop Frame

We may realize that some processing we’re interested in has already happened (e.g. current method argument’s calculation). In this case, it’s possible to drop the current JVM stack frame(s) in order to re-process them.

Consider the following situation:

Suppose we’re interested in debugging getArg1 processing, so we drop the current frame (doJob method):

Now we’re in the previous method:

However, the call arguments are already calculated at this point, so, we need to drop the current frame as well:

Now we can re-run the processing by calling Step Into.

4. Field Breakpoints

Sometimes non-private fields are modified by other classes, not through setters but directly (that is the case with third-party libraries where we don’t control the source code).

In such situations, it might be hard to understand when the modification is done. IntelliJ allows creating field-level breakpoints to track that.

They are set as usual – left-click on the left editor gutter on the field line. After that, it’s possible to open breakpoint properties (right-click on the breakpoint mark) and configure if we’re interested in the field’s reads, writes, or both:

5. Logging Breakpoints

Sometimes we know that there is a race condition in the application but don’t know where exactly it is. It may be a challenge to nail it down, especially while working with new code.

We can add debugging statements to our program’s sources. However, there’s no such ability for third-party libraries.

The IDE can help here – it allows setting breakpoints that don’t block execution once hit, but produce logging statements instead.

Consider the following example:

public static void main(String[] args) {
    ThreadLocalRandom random = ThreadLocalRandom.current();
    int count = 0;
    for (int i = 0; i < 5; i++) {
        if (isInterested(random.nextInt(10))) {
            count++;
        }
    }
    System.out.printf("Found %d interested values%n", count);
}

private static boolean isInterested(int i) {
    return i % 2 == 0;
}

Suppose we’re interested in logging actual isInterested call’s parameters.

Let’s create a non-blocking breakpoint in the target method (Shift + left-click on the left editor gutter). After that let’s open its properties (right-click on the breakpoint) and define the target expression to log:

When running the application (note that it’s still necessary to use Debug mode), we’ll see the output:

isInterested(1)
isInterested(4)
isInterested(3)
isInterested(1)
isInterested(6)
Found 2 interested values

6. Conditional Breakpoints

We may have a situation where a particular method is called from multiple threads simultaneously and we need to debug the processing just for a particular argument.

IntelliJ allows creating breakpoints that pause the execution only if a user-defined condition is satisfied.

Here’s an example that uses the source code above:

Now the debugger will stop on the breakpoint only if the given argument is greater than 3.

7. Object Marks

This is the most powerful and the least known IntelliJ feature. It’s quite simple in the essence – we can attach custom labels to JVM objects.

Let’s have a look at an application that we’ll use for demonstrating them:

public class Test {

    public static void main(String[] args) {
        Collection<Task> tasks = Arrays.asList(new Task(), new Task());
        tasks.forEach(task -> new Thread(task).start());
    }

    private static void mayBeAdd(Collection<Integer> holder) {
        int i = ThreadLocalRandom.current().nextInt(10);
        if (i % 3 == 0) {
            holder.add(i);
        }
    }

    private static class Task implements Runnable {

        private final Collection<Integer> holder = new ArrayList<>();

        @Override
        public void run() {
            for (int i = 0; i < 20; i++) {
                mayBeAdd(holder);
            }
        }
    }
}

7.1. Creating Marks

An object can be marked when an application is stopped on a breakpoint and the target is reachable from stack frames.

Select it, press F11 (Mark Object action) and define target name:

7.2. View Marks

Now we can see our custom object labels even in other parts of the application:

The cool thing is that even if a marked object is not reachable from stack frames at the moment, we can still see its state – open an Evaluate Expression dialog or add a new watch and start typing the mark’s name.

IntelliJ offers to complete it with the _DebugLabel suffix:

When we evaluate it, the target object’s state is shown:

7.3. Marks as Conditions

It’s also possible to use marks in breakpoint conditions:

8. Conclusion

We checked a number of techniques that increase productivity a lot while debugging a multi-threaded application.

This is usually a challenging task, and we cannot understate the importance of tooling’s help here.

Implementing a Custom Lombok Annotation

$
0
0

1. Overview

In this tutorial, we’ll implement a custom annotation using Lombok to remove the boiler-plate around implementing Singletons in an application.

Lombok is a powerful Java library that aims to reduce the boiler-plate code in Java. If you’re not familiar with it, here you can find the introduction to all the features of Lombok.

2. Lombok as an Annotation Processor

Java allows application developers to process annotations during the compilation phase; most importantly, to generate new files based on an annotation. As a result, libraries like Hibernate allow developers to reduce the boiler-plate code and use annotations instead.

Annotation processing is covered in depth in this tutorial.

In the same way, Project Lombok also works as an Annotation Processor. It processes the annotation by delegating it to a specific handler.

When delegating, it sends the compiler’s Abstract Syntax Tree (AST) of the annotated code to the handler. Therefore, it allows the handlers to modify the code by extending the AST.

3. Implementing a Custom Annotation

3.1. Extending Lombok

Surprisingly, Lombok is not easy to extend and add a custom annotation.

In fact, the newer versions of Lombok use Shadow ClassLoader (SCL) to hide the .class files in Lombok as .scl files. Thus, it forces the developers to fork the Lombok source code and implement annotations there.

On the positive side, it simplifies the process of extending custom handlers and AST modification using utility functions.

3.2. Singleton Annotation

Generally, a lot of code is required for implementing a Singleton class. For applications that don’t use a dependency injection framework, this is just boilerplate stuff.

For instance, here’s one way of implementing a Singleton class:

public class SingletonRegistry {
    private SingletonRegistry() {}
    
    private static class SingletonRegistryHolder {
        private static SingletonRegistry registry = new SingletonRegistry();
    }
    
    public static SingletonRegistry getInstance() {
        return SingletonRegistryHolder.registry;
    }
	
    // other methods
}

In contrast, this is how it would look like if we implement an annotation version of it:

@Singleton
public class SingletonRegistry {}

And, the Singleton annotation :

@Target(ElementType.TYPE)
public @interface Singleton {}

It is important to emphasize here that a Lombok Singleton handler would generate the implementation code we saw above by modifying the AST.

Since the AST is different for every compiler, a custom Lombok handler is needed for each. Lombok allows custom handlers for javac (used by Maven/Gradle and Netbeans) and the Eclipse compiler.

In the following sections, we’ll implement our Annotation handler for each compiler.

4. Implementing a Handler for javac

4.1. Maven Dependency

Let’s pull the required dependencies for Lombok first:

<dependency>
    <groupId>org.projectlombok</groupId>
    <artifactId>lombok</artifactId>
    <version>1.18.4</version>
</dependency>

Additionally, we would also need the tools.jar shipped with Java for accessing and modifying the javac AST. However, there is no Maven repository for it. The easiest way to include this in a Maven project is by adding it to Profile:

<profiles>
    <profile>
        <id>default-tools.jar</id>
            <activation>
                <property>
                    <name>java.vendor</name>
                    <value>Oracle Corporation</value>
                </property>
            </activation>
            <dependencies>
                <dependency>
                    <groupId>com.sun</groupId>
                    <artifactId>tools</artifactId>
                    <version>${java.version}</version>
                    <scope>system</scope>
                    <systemPath>${java.home}/../lib/tools.jar</systemPath>
                </dependency>
            </dependencies>
    </profile>
</profiles>

4.2. Extending JavacAnnotationHandler

In order to implement a custom javac handler, we need to extend Lombok’s JavacAnnotationHandler:

public class SingletonJavacHandler extends JavacAnnotationHandler<Singleton> {
    public void handle(
      AnnotationValues<Singleton> annotation,
      JCTree.JCAnnotation ast,
      JavacNode annotationNode) {}
}

Next, we’ll implement the handle() method. Here, the annotation AST is made available as a parameter by Lombok.

4.3. Modifying the AST

This is where things get tricky. Generally, changing an existing AST is not as straightforward.

Luckily, Lombok provides many utility functions in JavacHandlerUtil and JavacTreeMaker for generating code and injecting it in the AST. With this in mind, let’s use these functions and create the code for our SingletonRegistry:

public void handle(
  AnnotationValues<Singleton> annotation,
  JCTree.JCAnnotation ast,
  JavacNode annotationNode) {
    Context context = annotationNode.getContext();
    Javac8BasedLombokOptions options = Javac8BasedLombokOptions
      .replaceWithDelombokOptions(context);
    options.deleteLombokAnnotations();
    JavacHandlerUtil
      .deleteAnnotationIfNeccessary(annotationNode, Singleton.class);
    JavacHandlerUtil
      .deleteImportFromCompilationUnit(annotationNode, "lombok.AccessLevel");
    JavacNode singletonClass = annotationNode.up();
    JavacTreeMaker singletonClassTreeMaker = singletonClass.getTreeMaker();
    addPrivateConstructor(singletonClass, singletonClassTreeMaker);

    JavacNode holderInnerClass = addInnerClass(singletonClass, singletonClassTreeMaker);
    addInstanceVar(singletonClass, singletonClassTreeMaker, holderInnerClass);
    addFactoryMethod(singletonClass, singletonClassTreeMaker, holderInnerClass);
}

It’s important to point out that the deleteAnnotationIfNeccessary() and the deleteImportFromCompilationUnit() methods provided by Lombok are used for removing annotations and any imports for them.

Now, let’s see how other private methods are implemented for generating the code. First, we’ll generate the private constructor:

private void addPrivateConstructor(
  JavacNode singletonClass,
  JavacTreeMaker singletonTM) {
    JCTree.JCModifiers modifiers = singletonTM.Modifiers(Flags.PRIVATE);
    JCTree.JCBlock block = singletonTM.Block(0L, nil());
    JCTree.JCMethodDecl constructor = singletonTM
      .MethodDef(
        modifiers,
        singletonClass.toName("<init>"),
        null, nil(), nil(), nil(), block, null);

    JavacHandlerUtil.injectMethod(singletonClass, constructor);
}

Next, the inner SingletonHolder class:

private JavacNode addInnerClass(
  JavacNode singletonClass,
  JavacTreeMaker singletonTM) {
    JCTree.JCModifiers modifiers = singletonTM
      .Modifiers(Flags.PRIVATE | Flags.STATIC);
    String innerClassName = singletonClass.getName() + "Holder";
    JCTree.JCClassDecl innerClassDecl = singletonTM
      .ClassDef(modifiers, singletonClass.toName(innerClassName),
      nil(), null, nil(), nil());
    return JavacHandlerUtil.injectType(singletonClass, innerClassDecl);
}

Now, we’ll add an instance variable in the holder class:

private void addInstanceVar(
  JavacNode singletonClass,
  JavacTreeMaker singletonClassTM,
  JavacNode holderClass) {
    JCTree.JCModifiers fieldMod = singletonClassTM
      .Modifiers(Flags.PRIVATE | Flags.STATIC | Flags.FINAL);

    JCTree.JCClassDecl singletonClassDecl
      = (JCTree.JCClassDecl) singletonClass.get();
    JCTree.JCIdent singletonClassType
      = singletonClassTM.Ident(singletonClassDecl.name);

    JCTree.JCNewClass newKeyword = singletonClassTM
      .NewClass(null, nil(), singletonClassType, nil(), null);

    JCTree.JCVariableDecl instanceVar = singletonClassTM
      .VarDef(
        fieldMod,
        singletonClass.toName("INSTANCE"),
        singletonClassType,
        newKeyword);
    JavacHandlerUtil.injectField(holderClass, instanceVar);
}

Finally, let’s add a factory method for accessing the singleton object:

private void addFactoryMethod(
  JavacNode singletonClass,
  JavacTreeMaker singletonClassTreeMaker,
  JavacNode holderInnerClass) {
    JCTree.JCModifiers modifiers = singletonClassTreeMaker
      .Modifiers(Flags.PUBLIC | Flags.STATIC);

    JCTree.JCClassDecl singletonClassDecl
      = (JCTree.JCClassDecl) singletonClass.get();
    JCTree.JCIdent singletonClassType
      = singletonClassTreeMaker.Ident(singletonClassDecl.name);

    JCTree.JCBlock block
      = addReturnBlock(singletonClassTreeMaker, holderInnerClass);

    JCTree.JCMethodDecl factoryMethod = singletonClassTreeMaker
      .MethodDef(
        modifiers,
        singletonClass.toName("getInstance"),
        singletonClassType, nil(), nil(), nil(), block, null);
    JavacHandlerUtil.injectMethod(singletonClass, factoryMethod);
}

Clearly, the factory method returns the instance variable from the holder class. Let’s implement that as well:

private JCTree.JCBlock addReturnBlock(
  JavacTreeMaker singletonClassTreeMaker,
  JavacNode holderInnerClass) {

    JCTree.JCClassDecl holderInnerClassDecl
      = (JCTree.JCClassDecl) holderInnerClass.get();
    JavacTreeMaker holderInnerClassTreeMaker
      = holderInnerClass.getTreeMaker();
    JCTree.JCIdent holderInnerClassType
      = holderInnerClassTreeMaker.Ident(holderInnerClassDecl.name);

    JCTree.JCFieldAccess instanceVarAccess = holderInnerClassTreeMaker
      .Select(holderInnerClassType, holderInnerClass.toName("INSTANCE"));
    JCTree.JCReturn returnValue = singletonClassTreeMaker
      .Return(instanceVarAccess);

    ListBuffer<JCTree.JCStatement> statements = new ListBuffer<>();
    statements.append(returnValue);

    return singletonClassTreeMaker.Block(0L, statements.toList());
}

As a result, we have the modified AST for our Singleton class.

4.4. Registering Handler with SPI

Until now, we only implemented a Lombok handler for generating an AST for our SingletonRegistry. Here, it’s important to repeat that Lombok works as an annotation processor.

Usually, Annotation Processors are discovered via META-INF/services. Lombok also maintains a list of handlers in the same way. Additionally, it uses a framework named SPI for automatically updating the handler list.

For our purpose, we’ll use the metainf-services:

<dependency>
    <groupId>org.kohsuke.metainf-services</groupId>
    <artifactId>metainf-services</artifactId>
    <version>1.8</version>
</dependency>

Now, we can register our handler with Lombok:

@MetaInfServices(JavacAnnotationHandler.class)
public class SingletonJavacHandler extends JavacAnnotationHandler<Singleton> {}

This will generate a lombok.javac.JavacAnnotationHandler file at compile time. This behavior is common for all SPI frameworks.

5. Implementing a Handler for Eclipse IDE

5.1. Maven Dependency

Similar to tools.jar we added for accessing the AST for javac, we’ll add eclipse jdt for Eclipse IDE:

<dependency>
    <groupId>org.eclipse.jdt</groupId>
    <artifactId>core</artifactId>
    <version>3.3.0-v_771</version>
</dependency>

5.2. Extending EclipseAnnotationHandler

We’ll now extend EclipseAnnotationHandler for our Eclipse handler:

@MetaInfServices(EclipseAnnotationHandler.class)
public class SingletonEclipseHandler
  extends EclipseAnnotationHandler<Singleton> {
    public void handle(
      AnnotationValues<Singleton> annotation,
      Annotation ast,
      EclipseNode annotationNode) {}
}

Together with the SPI annotation, MetaInfServices, this handler acts as a processor for our Singleton annotation. Hence, whenever a class is compiled in Eclipse IDE, the handler converts the annotated class into a singleton implementation.

5.3. Modifying AST

With our handler registered with SPI, we can now start editing the AST for Eclipse compiler:

public void handle(
  AnnotationValues<Singleton> annotation,
  Annotation ast,
  EclipseNode annotationNode) {
    EclipseHandlerUtil
      .unboxAndRemoveAnnotationParameter(
        ast,
        "onType",
        "@Singleton(onType=", annotationNode);
    EclipseNode singletonClass = annotationNode.up();
    TypeDeclaration singletonClassType
      = (TypeDeclaration) singletonClass.get();
    
    ConstructorDeclaration constructor
      = addConstructor(singletonClass, singletonClassType);
    
    TypeReference singletonTypeRef 
      = EclipseHandlerUtil.cloneSelfType(singletonClass, singletonClassType);
    
    StringBuilder sb = new StringBuilder();
    sb.append(singletonClass.getName());
    sb.append("Holder");
    String innerClassName = sb.toString();
    TypeDeclaration innerClass
      = new TypeDeclaration(singletonClassType.compilationResult);
    innerClass.modifiers = AccPrivate | AccStatic;
    innerClass.name = innerClassName.toCharArray();
    
    FieldDeclaration instanceVar = addInstanceVar(
      constructor,
      singletonTypeRef,
      innerClass);
    
    FieldDeclaration[] declarations = new FieldDeclaration[]{instanceVar};
    innerClass.fields = declarations;
    
    EclipseHandlerUtil.injectType(singletonClass, innerClass);
    
    addFactoryMethod(
      singletonClass,
      singletonClassType,
      singletonTypeRef,
      innerClass,
      instanceVar);
}

Next, the private constructor:

private ConstructorDeclaration addConstructor(
  EclipseNode singletonClass,
  TypeDeclaration astNode) {
    ConstructorDeclaration constructor
      = new ConstructorDeclaration(astNode.compilationResult);
    constructor.modifiers = AccPrivate;
    constructor.selector = astNode.name;
    
    EclipseHandlerUtil.injectMethod(singletonClass, constructor);
    return constructor;
}

And for the instance variable:

private FieldDeclaration addInstanceVar(
  ConstructorDeclaration constructor,
  TypeReference typeReference,
  TypeDeclaration innerClass) {
    FieldDeclaration field = new FieldDeclaration();
    field.modifiers = AccPrivate | AccStatic | AccFinal;
    field.name = "INSTANCE".toCharArray();
    field.type = typeReference;
    
    AllocationExpression exp = new AllocationExpression();
    exp.type = typeReference;
    exp.binding = constructor.binding;
    
    field.initialization = exp;
    return field;
}

Lastly, the factory method:

private void addFactoryMethod(
  EclipseNode singletonClass,
  TypeDeclaration astNode,
  TypeReference typeReference,
  TypeDeclaration innerClass,
  FieldDeclaration field) {
    
    MethodDeclaration factoryMethod
      = new MethodDeclaration(astNode.compilationResult);
    factoryMethod.modifiers 
      = AccStatic | ClassFileConstants.AccPublic;
    factoryMethod.returnType = typeReference;
    factoryMethod.sourceStart = astNode.sourceStart;
    factoryMethod.sourceEnd = astNode.sourceEnd;
    factoryMethod.selector = "getInstance".toCharArray();
    factoryMethod.bits = ECLIPSE_DO_NOT_TOUCH_FLAG;
    
    long pS = factoryMethod.sourceStart;
    long pE = factoryMethod.sourceEnd;
    long p = (long) pS << 32 | pE;
    
    FieldReference ref = new FieldReference(field.name, p);
    ref.receiver = new SingleNameReference(innerClass.name, p);
    
    ReturnStatement statement
      = new ReturnStatement(ref, astNode.sourceStart, astNode.sourceEnd);
    
    factoryMethod.statements = new Statement[]{statement};
    
    EclipseHandlerUtil.injectMethod(singletonClass, factoryMethod);
}

Additionally, we must plug this handler into the Eclipse boot classpath. Generally, it is done by adding the following parameter to the eclipse.ini:

-Xbootclasspath/a:singleton-1.0-SNAPSHOT.jar

6. Custom Annotation in IntelliJ

Generally speaking, a new Lombok handler is needed for every compiler, like the javac and Eclipse handlers that we implemented before.

Conversely, IntelliJ doesn’t support Lombok handler. It provides Lombok support through a plugin instead.

Due to this, any new annotation must be supported by the plugin explicitly. This also applies to any annotation added to Lombok.

7. Conclusion

In this article, we implemented a custom annotation using Lombok handlers. We also briefly looked at AST modification for our Singleton annotation in different compilers, available in various IDEs.

The full source code is available over on Github.

Java 8 Predicate Chain

$
0
0

1. Overview

In this quick tutorial, we’ll discuss different ways to chain Predicates in Java 8.

2. Basic Example

First, let’s see how to use a simple Predicate to filter a List of names:

@Test
public void whenFilterList_thenSuccess(){
   List<String> names = Arrays.asList("Adam", "Alexander", "John", "Tom");
   List<String> result = names.stream()
     .filter(name -> name.startsWith("A"))
     .collect(Collectors.toList());
   
   assertEquals(2, result.size());
   assertThat(result, contains("Adam","Alexander"));
}

In this example, we filtered our List of names to only leave names that start with “A” using the Predicate:

name -> name.startsWith("A")

But what if we wanted to apply multiple Predicates?

3. Multiple Filters

If we wanted to apply multiple Predicates, one option is to simply chain multiple filters:

@Test
public void whenFilterListWithMultipleFilters_thenSuccess(){
    List<String> result = names.stream()
      .filter(name -> name.startsWith("A"))
      .filter(name -> name.length() < 5)
      .collect(Collectors.toList());

    assertEquals(1, result.size());
    assertThat(result, contains("Adam"));
}

We’ve now updated our example to filter our list by extracting names that start with “A” and have a length that is less than 5.

We used two filters — one for each Predicate.

4. Complex Predicate

Now, instead of using multiple filters, we can use one filter with a complex Predicate:

@Test
public void whenFilterListWithComplexPredicate_thenSuccess(){
    List<String> result = names.stream()
      .filter(name -> name.startsWith("A") && name.length() < 5)
      .collect(Collectors.toList());

    assertEquals(1, result.size());
    assertThat(result, contains("Adam"));
}

This option is more flexible than the first one, as we can use bitwise operations to build the Predicate as complex as we want.

5. Combining Predicates

Next, if we don’t want to build a complex Predicate using bitwise operations, Java 8 Predicate has useful methods that we can use to combine Predicates.

We’ll combine Predicates using the methods Predicate.and(), Predicate.or(), and Predicate.negate().

5.1. Predicate.and()

In this example, we’ll define our Predicates explicitly, and then we’ll combine them using Predicate.and():

@Test
public void whenFilterListWithCombinedPredicatesUsingAnd_thenSuccess(){
    Predicate<String> predicate1 =  str -> str.startsWith("A");
    Predicate<String> predicate2 =  str -> str.length() < 5;
  
    List<String> result = names.stream()
      .filter(predicate1.and(predicate2))
      .collect(Collectors.toList());
        
    assertEquals(1, result.size());
    assertThat(result, contains("Adam"));
}

As we can see, the syntax is fairly intuitive, and the method names suggest the type of operation. Using and(), we’ve filtered our List by extracting only names that fulfill both conditions.

5.2. Predicate.or()

We can also use Predicate.or() to combine Predicates.

Let’s extract names start with “J”, as well as names with a length that’s less than 4:

@Test
public void whenFilterListWithCombinedPredicatesUsingOr_thenSuccess(){
    Predicate<String> predicate1 =  str -> str.startsWith("J");
    Predicate<String> predicate2 =  str -> str.length() < 4;
    
    List<String> result = names.stream()
      .filter(predicate1.or(predicate2))
      .collect(Collectors.toList());
    
    assertEquals(2, result.size());
    assertThat(result, contains("John","Tom"));
}

5.3. Predicate.negate()

We can use Predicate.negate() when combining our Predicates as well:

@Test
public void whenFilterListWithCombinedPredicatesUsingOrAndNegate_thenSuccess(){
    Predicate<String> predicate1 =  str -> str.startsWith("J");
    Predicate<String> predicate2 =  str -> str.length() < 4;
    
    List<String> result = names.stream()
      .filter(predicate1.or(predicate2.negate()))
      .collect(Collectors.toList());
    
    assertEquals(3, result.size());
    assertThat(result, contains("Adam","Alexander","John"));
}

Here, we’ve used a combination of or() and negate() to filter the List by names that start with “J” or have a length that isn’t less than 4.

5.4. Combine Predicates Inline

We don’t need to explicitly define our Predicates to use and(),  or(), and negate().

We can also use them inline by casting the Predicate:

@Test
public void whenFilterListWithCombinedPredicatesInline_thenSuccess(){
    List<String> result = names.stream()
      .filter(((Predicate<String>)name -> name.startsWith("A"))
      .and(name -> name.length()<5))
      .collect(Collectors.toList());

    assertEquals(1, result.size());
    assertThat(result, contains("Adam"));
}

6. Combining a Collection of Predicates

Finally, let’s see how to chain a collection of Predicates by reducing them.

In the following example, we have a List of Predicates that we combined using Predicate.and():

@Test
public void whenFilterListWithCollectionOfPredicatesUsingAnd_thenSuccess(){
    List<Predicate<String>> allPredicates = new ArrayList<Predicate<String>>();
    allPredicates.add(str -> str.startsWith("A"));
    allPredicates.add(str -> str.contains("d"));        
    allPredicates.add(str -> str.length() > 4);
    
    List<String> result = names.stream()
      .filter(allPredicates.stream().reduce(x->true, Predicate::and))
      .collect(Collectors.toList());
    
    assertEquals(1, result.size());
    assertThat(result, contains("Alexander"));
}

Note that we use our base identity as:

x->true

But that will be different if we want to combine them using Predicate.or():

@Test
public void whenFilterListWithCollectionOfPredicatesUsingOr_thenSuccess(){
    List<String> result = names.stream()
      .filter(allPredicates.stream().reduce(x->false, Predicate::or))
      .collect(Collectors.toList());
    
    assertEquals(2, result.size());
    assertThat(result, contains("Adam","Alexander"));
}

7. Conclusion

In this article, we explored different ways to chain Predicates in Java 8, by using filter(), building complex Predicates, and combining Predicates.

The full source code is available over on GitHub.

Sorting Arrays in Java

$
0
0

1. Overview

In this tutorial, we’ll discuss common methods to sort arrays in ascending and descending order.

We’ll look at using Java’s Arrays class sorting method as well as implementing our own Comparator to order our arrays’ values.

2. Object Definitions

Before we begin, let’s quickly define a few arrays that we’ll sort throughout this tutorial. First, we’ll create an array of ints and an array of strings:

int[] numbers = new int[] { -8, 7, 5, 9, 10, -2, 3 };
String[] strings = new String[] { "learning", "java", "with", "baeldung" };

And let’s also create an array of Employee objects where each employee has an id and a name attribute:

Employee john = new Employee(6, "John");
Employee mary = new Employee(3, "Mary");
Employee david = new Employee(4, "David");
Employee[] employees = new Employee[] { john, mary, david };

3. Sorting in Ascending Order

Java’s util.Arrays.sort method provides us with a quick and simple way to sort an array of primitives or objects that implement the Comparable interface in ascending order.

When sorting primitives, the Arrays.sort method uses a Dual-Pivot implementation of Quicksort. However, when sorting objects an iterative implementation of MergeSort is used.

3.1. Primitives

To sort a primitive array in ascending order, we pass our array to the sort method:

Arrays.sort(numbers);
assertArrayEquals(new int[] { -8, -2, 3, 5, 7, 9, 10 }, numbers);

3.2. Objects That Implement Comparable

For objects that implement the Comparable interface, as with our primitive array, we can also simply pass our array to the sort method:

Arrays.sort(strings);
assertArrayEquals(new String[] { "baeldung", "java", "learning", "with" }, strings);

3.3. Objects That Don’t Implement Comparable

Sorting objects that don’t implement the Comparable Interface, like our array of Employees, requires us to specify our own comparator.

We can do this very easily in Java 8 by specifying the property that we would like to compare our Employee objects on within our Comparator:

Arrays.sort(employees, Comparator.comparing(Employee::getName));
assertArrayEquals(new Employee[] { david, john, mary }, employees);

In this case, we’ve specified that we would like to order our employees by their name attributes.

We can also sort our objects on more that one attribute by chaining our comparisons using Comparator’s thenComparing method:

Arrays.sort(employees, Comparator.comparing(Employee::getName).thenComparing(Employee::getId));

4. Sorting in Descending Order

4.1. Primitives

Sorting a primitive array in descending order is not quite as simple as sorting it in ascending order because Java doesn’t support the use of Comparators on primitive types. To overcome this shortfall we have a few options.

First, we could sort our array in ascending order and then do an in-place reversal of the array.

Second, could convert our array to a list, use Guava’s Lists.reverse() method and then convert our list back into an array.

Finally, we could transform our array to a Stream and then map it back to an int array. It has a nice advantage of being a one-liner and just using core Java:

numbers = IntStream.of(numbers).boxed().sorted(Comparator.reverseOrder()).mapToInt(i -> i).toArray();
assertArrayEquals(new int[] { 10, 9, 7, 5, 3, -2, -8 }, numbers);

The reason this works is that boxed turns each int into an Integer, which does implement Comparator.

4.2. Objects That Implement Comparable

Sorting an object array that implements the Comparable interface in descending order is quite simple. All we need to do is pass a Comparator as the second parameter of our sort method.

In Java 8 we can use Comparator.reverseOrder() to indicate that we would like our array to be sorted in descending order:

Arrays.sort(strings, Comparator.reverseOrder());
assertArrayEquals(new String[] { "with", "learning", "java", "baeldung" }, strings);

4.3. Objects That Don’t Implement Comparable

Similarly to sorting objects that implement comparable, we can reverse the order of our custom Comparator by adding reversed() at the end of our comparison definition:

Arrays.sort(employees, Comparator.comparing(Employee::getName).reversed());
assertArrayEquals(new Employee[] { mary, john, david }, employees);

5. Conclusion

In this article, we discussed how to sort arrays of primitives and objects in ascending and descending order using the Arrays.sort method.

As usual, the source code from this article can be found over on Github.

Working with Primitive Values in Gson

$
0
0

1. Overview

In this tutorial, we’re going to learn how to serialize and deserialize primitive values with Gson. Google developed the Gson library to serialize and deserialize JSON. Additionally, we’re going to learn about some specific quirks that the Gson library has when it comes to dealing with primitives.

On the other hand, if we need to work with arrays, collections, nested objects, or other customization, we have additional tutorials on serializing with Gson and deserializing with Gson.

2. Maven Dependency

To work with Gson, we must add the Gson dependency to the pom:

<dependency> 
    <groupId>com.google.code.gson</groupId> 
    <artifactId>gson</artifactId> 
    <version>2.8.5</version> 
</dependency>

3. Serializing Primitive Types

Serializing with Gson is pretty straightforward. We’ll use the following model as an example:

public class PrimitiveBundle {
    public byte byteValue;
    public short shortValue;
    public int intValue;
    public long longValue;
    public float floatValue;
    public double doubleValue;
    public boolean booleanValue;
    public char charValue;
}

First, let’s initialize an instance with some test values:

PrimitiveBundle primitiveBundle = new PrimitiveBundle();
primitiveBundle.byteValue = (byte) 0x00001111;
primitiveBundle.shortValue = (short) 3;
primitiveBundle.intValue = 3;
primitiveBundle.longValue = 3;
primitiveBundle.floatValue = 3.5f;
primitiveBundle.doubleValue = 3.5;
primitiveBundle.booleanValue = true;
primitiveBundle.charValue = 'a';

Next, we can serialize it:

Gson gson = new Gson();
String json = gson.toJson(primitiveBundle);

Finally, we can see the serialized result:

{  
   "byteValue":17,
   "shortValue":3,
   "intValue":3,
   "longValue":3,
   "floatValue":3.5,
   "doubleValue":3.5,
   "booleanValue":true,
   "charValue":"a"
}

We should note a few details from our example. For starters, the byte value is not serialized as a string of bits like it was in the model. In addition to that, there is no distinction between short, int and long. Also, there is no distinction between float and double.

Another thing to notice is that a string represents the character value.

Actually, these last three things don’t have anything to do with Gson, but it is the way JSON is defined.

3.1. Serializing Special Floating-Point Values

Java has constants Float.POSITIVE_INFINITY and NEGATIVE_INFINITY to represent infinity. Gson can’t serialize these special values:

public class InfinityValuesExample {
    public float negativeInfinity;
    public float positiveInfinity;
}
InfinityValuesExample model = new InfinityValuesExample();
model.negativeInfinity = Float.NEGATIVE_INFINITY;
model.positiveInfinity = Float.POSITIVE_INFINITY;

Gson gson = new Gson();
gson.toJson(model);

Trying to do so raises an IllegalArgumentException.

Trying to serialize NaN also raises an IllegalArgumentException because this value is not allowed by the JSON specification.

For the same reason, trying to serialize Double.POSITIVE_INFINITY, NEGATIVE_INFINITY, or NaN also throws an IllegalArgumentException.

4. Deserializing Primitive Types

Let’s take a look now at how we would deserialize the JSON string obtained in the previous example.

The deserialization is as easy as the serialization:

Gson gson = new Gson();
PrimitiveBundle model = gson.fromJson(json, PrimitiveBundle.class);

Finally, we can verify the model contains the desired values:

assertEquals(17, model.byteValue);
assertEquals(3, model.shortValue);
assertEquals(3, model.intValue);
assertEquals(3, model.longValue);
assertEquals(3.5, model.floatValue, 0.0001);
assertEquals(3.5, model.doubleValue, 0.0001);
assertTrue(model.booleanValue);
assertEquals('a', model.charValue);

4.1. Deserializing String Values

When a valid value is put within a String, Gson parses it and handles it expectedly:

String json = "{\"byteValue\": \"15\", \"shortValue\": \"15\", "
  + "\"intValue\": \"15\", \"longValue\": \"15\", \"floatValue\": \"15.0\""
  + ", \"doubleValue\": \"15.0\"}";

Gson gson = new Gson();
PrimitiveBundleInitialized model = gson.fromJson(json, PrimitiveBundleInitialized.class);
assertEquals(15, model.byteValue);
assertEquals(15, model.shortValue);
assertEquals(15, model.intValue);
assertEquals(15, model.longValue);
assertEquals(15, model.floatValue, 0.0001);
assertEquals(15, model.doubleValue, 0.0001);

It is worth noting that string values can’t be deserialized into boolean types.

4.2. Deserializing Empty String Values

On the other hand, let’s try to deserialize the following JSON with empty strings:

String json = "{\"byteValue\": \"\", \"shortValue\": \"\", "
  + "\"intValue\": \"\", \"longValue\": \"\", \"floatValue\": \"\""
  + ", \"doubleValue\": \"\"}";

Gson gson = new Gson();
gson.fromJson(json, PrimitiveBundleInitialized.class);

This raises a JsonSyntaxException because empty strings are not expected when deserializing primitives.

4.3. Deserializing Null Values

Trying to deserialize a field with the value null will result in Gson ignoring that field. For example, with the following class:

public class PrimitiveBundleInitialized {
    public byte byteValue = (byte) 1;
    public short shortValue = (short) 1;
    public int intValue = 1;
    public long longValue = 1L;
    public float floatValue = 1.0f;
    public double doubleValue = 1;
}

Gson ignores the null fields:

String json = "{\"byteValue\": null, \"shortValue\": null, "
  + "\"intValue\": null, \"longValue\": null, \"floatValue\": null"
  + ", \"doubleValue\": null}";

Gson gson = new Gson();
PrimitiveBundleInitialized model = gson.fromJson(json, PrimitiveBundleInitialized.class);

assertEquals(1, model.byteValue);
assertEquals(1, model.shortValue);
assertEquals(1, model.intValue);
assertEquals(1, model.longValue);
assertEquals(1, model.floatValue, 0.0001);
assertEquals(1, model.doubleValue, 0.0001);

4.4. Deserializing Values That Overflow

This is a very interesting case that Gson handles unexpectedly. Trying to deserialize:

{"value": 300}

With the model:

class ByteExample {
    public byte value;
}

As a result, the object has a value of 44. It is handled poorly because in these cases an exception could be raised instead. This would prevent undetectable mistakes propagating through the application.

4.5. Deserializing Floating-Point Numbers

Next, let’s try to deserialize the following JSON into a ByteExample object:

{"value": 2.3}

Gson here does the right thing and raises a JsonSyntaxException whose subtype is a NumberFormatException. It doesn’t matter which discrete type we use (byte, shortint or long), we get the same result.

If the value ends in “.0”, Gson will deserialize the number as expected.

4.6. Deserializing Numeric Boolean Values

Sometimes, a boolean is codified as 0 or 1 instead of “true” or “false”. Gson doesn’t allow this by default. For example, if we try to deserialize:

{"value": 1}

into the model:

class BooleanExample {
    public boolean value;
}

Gson raises a JsonSyntaxException with an exception subtype of IllegalStateException. This is in contrast with the NumberFormatException raised when numbers didn’t match. If we wanted to change that we could use a custom deserializer.

4.7. Deserializing Unicode Characters

It is worth noting that deserialization of Unicode characters requires no extra configuration.

For example, the JSON:

{"value": "\u00AE"}

Will result in the ® character.

5. Conclusion

As we have seen, Gson provides a straightforward way to work with JSON and Java primitive types. There are some unexpected behaviors to be aware of, even when dealing with simple primitive types.

The full implementation of this article can be found in the GitHub project – this is an Eclipse based project, so it should be easy to import and run as it is.

A Guide to Hibernate OGM

$
0
0

1. Overview

In this tutorial, we’ll go through the basics of Hibernate Object/Grid Mapper (OGM).

Hibernate OGM provides Java Persistence API (JPA) support for NoSQL datastores. NoSQL is an umbrella term covering a wide variety of data storage. For example, this includes key-value, document, column-oriented and graph-oriented datastores.

2. The Architecture of Hibernate OGM

Hibernate traditionally offers an Object Relational Mapping (ORM) engine for relational databases. Hibernate OGM engine extends its functionality to support NoSQL datastores. The primary benefit of using it is the consistency of the JPA interface across relational and NoSQL datastores.

Hibernate OGM is able to provide abstraction over a number of NoSQL datastores because of two key interfaces, DatastoreProvider and GridDialect. Therefore, each new NoSQL datastore that it supports comes with an implementation of these interfaces.

As of today, it does not support all NoSQL datastores, but it is capable of working with many of them like Infinispan and Ehcache (key-value), MongoDB and CouchDB (document), and Neo4j (graph).

It also fully supports transactions and can work with standard JTA providers. Firstly, this can be provided through the Java EE container without any explicit configuration. Moreover, we can use a standalone JTA transaction manager like Narayana in the Java SE environment.

3. Setup

For this tutorial, we’ll use Maven to pull the required dependencies to work with Hibernate OGM. We’ll also use MongoDB.

To clarify, let’s see how to set them up for the tutorial.

3.1. Maven Dependencies

Let’s see the dependencies required to work with Hibernate OGM and MongoDB:

<dependency>
    <groupId>org.hibernate.ogm</groupId>
    <artifactId>hibernate-ogm-mongodb</artifactId>
    <version>5.4.0.Final</version>
</dependency>
<dependency>
    <groupId>org.jboss.narayana.jta</groupId>
    <artifactId>narayana-jta</artifactId>
    <version>5.9.2.Final</version>
</dependency>

Here we’re pulling required dependencies through Maven:

3.2. Persistence Unit

We’ll also have to define datastore details in the Hibernate persistance.xml:

<persistence-unit name="ogm-mongodb" transaction-type="JTA">
    <provider>org.hibernate.ogm.jpa.HibernateOgmPersistence</provider>
    <properties>
        <property name="hibernate.ogm.datastore.provider" value="MONGODB" />
        <property name="hibernate.ogm.datastore.database" value="TestDB" />
        <property name="hibernate.ogm.datastore.create_database" value="true" />
    </properties>
</persistence-unit>

Note the definitions we’ve provided here:

  • the value of attribute transaction-type as “JTA” (this implies that we want a JTA entity manager from the EntityManagerFactory)
  • the provider, which is HibernateOgmPersistence for Hibernate OGM
  • a few additional details related to the DB (these typically vary between different data sources)

The configuration assumes MongoDB is running and accessible on defaults. If this is not the case, we can always provide details as necessary. One of our previous articles also covers setting up MongoDB in detail.

4. Entity Definition

Now that we’ve gone through the basics, let’s define some entities. If we worked with Hibernate ORM or JPA before, this has nothing more to add. This is the fundamental premise of Hibernate OGM. It promises to let us work with different NoSQL datastores with just the knowledge of JPA.

For this tutorial, we’ll define a simple object model:

It defines Article, Author and Editor classes along with their relationships.

Let’s also define them in Java:

@Entity
public class Article {
    @Id
    @GeneratedValue(generator = "uuid")
    @GenericGenerator(name = "uuid", strategy = "uuid2")
    private String articleId;
    
    private String articleTitle;
    
    @ManyToOne
    private Author author;

    // constructors, getters and setters...
}
@Entity
public class Author {
    @Id
    @GeneratedValue(generator = "uuid")
    @GenericGenerator(name = "uuid", strategy = "uuid2")
    private String authorId;
    
    private String authorName;
    
    @ManyToOne
    private Editor editor;
    
    @OneToMany(mappedBy = "author", cascade = CascadeType.PERSIST)
    private Set<Article> authoredArticles = new HashSet<>();

    // constructors, getters and setters...
}
@Entity
public class Editor {
    @Id
    @GeneratedValue(generator = "uuid")
    @GenericGenerator(name = "uuid", strategy = "uuid2")
    private String editorId;
    
    private String editorName;
    @OneToMany(mappedBy = "editor", cascade = CascadeType.PERSIST)
    private Set<Author> assignedAuthors = new HashSet<>();

    // constructors, getters and setters...
}

We’ve now defined entity classes and annotated them with JPA standard annotations:

  • @Entity to establish them as JPA entities
  • @Id to generate primary keys for the entities with UUIDs
  • @OneToMany and @ManyToOne to establish bidirectional relationships between the entities

5. Operations

Now that we’ve created our entities, let’s see if we can perform some operations on them. As a first step, we’ll have to generate some test data. Here, we’ll create an Editor, a few Author, and some Article. We’ll also establish their relationships.

Thereafter, before we can perform any operation, we’ll need an instance of EntityManagerFactory. We can use this to create EntityManager. Along with this, we need to create TransactionManager to handle transaction boundaries.

Let’s see how we can use these to persist and retrieve the entities we created earlier:

private void persistTestData(EntityManagerFactory entityManagerFactory, Editor editor) 
  throws Exception {
    TransactionManager transactionManager = 
      com.arjuna.ats.jta.TransactionManager.transactionManager();
    transactionManager.begin();
    EntityManager entityManager = entityManagerFactory.createEntityManager();
    
    entityManager.persist(editor);
    entityManager.close();
    transactionManager.commit();
}

Here, we are using EntityManager to persist the root entity, which cascades to all its relations. We are also performing this operation within a defined transaction boundary.

Now we’re ready to load the entity that we just persisted and verify its contents. We can run a test to verify this:

@Test
public void givenMongoDB_WhenEntitiesCreated_thenCanBeRetrieved() throws Exception {
    EntityManagerFactory entityManagerFactory = 
      Persistence.createEntityManagerFactory("ogm-mongodb");
    Editor editor = generateTestData();
    persistTestData(entityManagerFactory, editor);
    
    TransactionManager transactionManager = 
      com.arjuna.ats.jta.TransactionManager.transactionManager();  
    transactionManager.begin();
    EntityManager entityManager = entityManagerFactory.createEntityManager();
    Editor loadedEditor = entityManager.find(Editor.class, editor.getEditorId());
    
    assertThat(loadedEditor).isNotNull();
    // Other assertions to verify the entities and relations
}

Here, we’re using the EntityManager again to find the data and perform standard assertions on it. When we run this test, it instantiates the datastore, persists the entities, retrieves them back, and verifies.

Again, we’ve just used JPA to persist the entities along with their relationship. Similarly, we use JPA to load the entities back and it all works fine, even when our database choice is MongoDB instead of a traditional relational database.

6. Switching Backend

We can also switch our backend. Let’s find out now how difficult it’ll be to do this.

We’ll change our backend to Neo4j, which happens to be a popular graph-oriented datastore.

Firstly, let’s add the Maven dependency for Neo4j:

<dependency>
    <groupId>org.hibernate.ogm</groupId>
    <artifactId>hibernate-ogm-neo4j</artifactId>
    <version>5.4.0.Final</version>
</dependency>

Next, we’ll have to add the relevant persistence unit in our persistence.xml:

<persistence-unit name="ogm-neo4j" transaction-type="JTA">
    <provider>org.hibernate.ogm.jpa.HibernateOgmPersistence</provider>
    <properties>
        <property name="hibernate.ogm.datastore.provider" value="NEO4J_EMBEDDED" />
        <property name="hibernate.ogm.datastore.database" value="TestDB" />
        <property name="hibernate.ogm.neo4j.database_path" value="target/test_data_dir" />
    </properties>
</persistence-unit>

In short, these are the very basic configurations required for Neo4j. This can be detailed further as required.

Well, that’s pretty much what needs to be done. When we run the same test with Neo4j as the backend datastore, it works pretty seamlessly.

Note that we’ve switched our backend from MongoDB, which happens to be a document-oriented datastore, to Neo4j, which is a graph-oriented datastore. And we did all this with minimal changes and without needing any changes in any of our operations.

7. Conclusion

In this article, we’ve gone through the basics of Hibernate OGM, including its architecture. Subsequently, we implemented a basic domain model and performed various operations using various DBs.

As always, the code for the examples is available over on GitHub.

Java Weekly, Issue 260

$
0
0

Here we go…

1. Spring and Java

>> How Fast is Spring? [spring.io]

An overview recent optimizations around startup time and heap usage in Spring Boot 2.1 and Spring 5.1, plus a handful of tips to make your apps start and run faster.

>> Netflix OSS and Spring Boot — Coming Full Circle [medium.com]

After years of building its infrastructure in-house, Netflix is fully embracing Spring Boot.

>> Hibernate Tips: How To Apply DISTINCT to Your JPQL But Not Your SQL Query [thoughts-on-java.org]

A quick look at using Hibernate’s QueryHints to make DISTINCT queries more efficient.

>> How to bind custom Hibernate parameter types to JPA queries [vladmihalcea.com]

A good write-up on using custom types in Hibernate entities and queries, with a complete example in PostgreSQL. Very cool.

>> Even and odd with coroutines [blog.frankel.ch]

And a nice piece comparing two approaches to a concurrent algorithm — one using Kotlin coroutines and another using Java threads.

Also worth reading:

Webinars and presentations:

Time to upgrade:

2. Technical and Musings

>> FP vs. OO List Processing [blog.cleancoder.com]

An interesting Clojure example of a functional algorithm with recursive loops and tail-call optimization.

>> How to Make Cross-Functional Operations a Team Effort [infoq.com]

A study of cross-functional teams reveals that lack of collaboration can cost companies thousands of dollars per day. Here’s a look at how to remedy the situation.

>> Keeping the Lines Open [builttoadapt.io]

A great write-up on why communication and camaraderie are necessary for a distributed team.

Also worth reading:

3. Comics

And my favorite Dilberts of the week:

>> Soaring with the Eagles [dilbert.com]

>> The Candy Honor System [dilbert.com]

>> Following Up [dilbert.com]

4. Pick of the Week

>> The Bullshit Web [pxlnv.com]


Java EE 7 Batch Processing

$
0
0

1. Introduction

Imagine we had to manually complete tasks like processing payslips, calculating interest, and generating bills. It would become quite boring, error-prone and a never-ending list of manual tasks!

In this tutorial, we’ll take a look at Java Batch Processing (JSR 352), a part of the Jakarta EE platform, and a great specification for automating tasks like these. It offers application developers a model for developing robust batch processing systems so that they can focus on the business logic.

2. Maven Dependencies

Since JSR 352, is just a spec, we’ll need to include its API and implementation, like jberet:

<dependency>
    <groupId>javax.batch</groupId>
    <artifactId>javax.batch-api</artifactId>
    <version>1.0.1</version>
</dependency>
<dependency>
    <groupId>org.jberet</groupId>
    <artifactId>jberet-core</artifactId>
    <version>1.0.2.Final</version>
</dependency>
<dependency>
    <groupId>org.jberet</groupId>
    <artifactId>jberet-support</artifactId>
    <version>1.0.2.Final</version>
</dependency>
<dependency>
    <groupId>org.jberet</groupId>
    <artifactId>jberet-se</artifactId>
    <version>1.0.2.Final</version>
</dependency>

We’ll also add an in-memory database so we can look at some more realistic scenarios.

3. Key Concepts

JSR 352 introduces a few concepts, which we can look at this way:

Let’s first define each piece:

  • Starting on the left, we have the JobOperator. It manages all aspects of job processing such as starting, stopping, and restarting
  • Next, we have the Job. A job is a logical collection of steps; it encapsulates an entire batch process
  • A job will contain between 1 and n Steps. Each step is an independent, sequential unit of work. A step is composed of reading input, processing that input, and writing output
  • And last, but not least, we have the JobRepository which stores the running information of the jobs. It helps to keep track of jobs, their state, and their completion results

Steps have a bit more detail than this, so let’s take a look at that next. First, we’ll look at Chunk steps and then at Batchlets.

4. Creating a Chunk

As stated earlier, a chunk is a kind of step. We’ll often use a chunk to express an operation that is performed over and over, say over a set of items. It’s kind of like intermediate operations from Java Streams.

When describing a chunk, we need to express where to take items from, how to process them, and where to send them afterward.

4.1. Reading Items

To read items, we’ll need to implement ItemReader.

In this case, we’ll create a reader that will simply emit the numbers 1 through 10:

@Named
public class SimpleChunkItemReader extends AbstractItemReader {
    private Integer[] tokens;
    private Integer count;
    
    @Inject
    JobContext jobContext;

    @Override
    public Integer readItem() throws Exception {
        if (count >= tokens.length) { 
            return null;
        }

        jobContext.setTransientUserData(count);
        return tokens[count++];
    }

    @Override
    public void open(Serializable checkpoint) throws Exception {
        tokens = new Integer[] { 1,2,3,4,5,6,7,8,9,10 };
        count = 0;
    }
}

Now, we’re just reading from the class’s internal state here. But, of course, readItem could pull from a database, from the file system, or some other external source.

Note that we are saving some of this internal state using JobContext#setTransientUserData() which will come in handy later on.

Also, note the checkpoint parameter. We’ll pick that up again, too.

4.2. Processing Items

Of course, the reason we are chunking is that we want to perform some kind of operation on our items!

Any time we return null from an item processor, we drop that item from the batch.

So, let’s say here that we want to keep only the even numbers. We can use an ItemProcessor that rejects the odd ones by returning null:

@Named
public class SimpleChunkItemProcessor implements ItemProcessor {
    @Override
    public Integer processItem(Object t) {
        Integer item = (Integer) t;
        return item % 2 == 0 ? item : null;
    }
}

processItem will get called once for each item that our ItemReader emits.

4.3. Writing Items

Finally, the job will invoke the ItemWriter so we can write our transformed items:

@Named
public class SimpleChunkWriter extends AbstractItemWriter {
    List<Integer> processed = new ArrayList<>();
    @Override
    public void writeItems(List<Object> items) throws Exception {
        items.stream().map(Integer.class::cast).forEach(processed::add);
    }
}

How long is items? In a moment, we’ll define a chunk’s size, which will determine the size of the list that is sent to writeItems.

4.4. Defining a Chunk in a Job

Now we put all this together in an XML file using JSL or Job Specification Language. Note that we’ll list our reader, processor, chunker, and also a chunk size:

<job id="simpleChunk">
    <step id="firstChunkStep" >
        <chunk item-count="3">
            <reader ref="simpleChunkItemReader"/>
            <processor ref="simpleChunkItemProcessor"/>
            <writer ref="simpleChunkWriter"/>
        </chunk>    
    </step>
</job>

The chunk size is how often progress in the chunk is committed to the job repository, which is important to guarantee completion, should part of the system fail.

We’ll need to place this file in META-INF/batch-jobs for .jar files and in WEB-INF/classes/META-INF/batch-jobs for .war files.

We gave our job the id “simpleChunk”, so let’s try that in a unit test.

Now, jobs are executed asynchronously, which makes them tricky to test. In the sample, make sure to check out our BatchTestHelper which polls and waits until the job is complete:

@Test
public void givenChunk_thenBatch_completesWithSuccess() throws Exception {
    JobOperator jobOperator = BatchRuntime.getJobOperator();
    Long executionId = jobOperator.start("simpleChunk", new Properties());
    JobExecution jobExecution = jobOperator.getJobExecution(executionId);
    jobExecution = BatchTestHelper.keepTestAlive(jobExecution);
    assertEquals(jobExecution.getBatchStatus(), BatchStatus.COMPLETED);
}

So that’s what chunks are. Now, let’s take a look at batchlets.

5. Creating a Batchlet

Not everything fits neatly into an iterative model. For example, we may have a task that we simply need to invoke once, run to completion, and return an exit status.

The contract for a batchlet is quite simple:

@Named
public class SimpleBatchLet extends AbstractBatchlet {
 
    @Override
    public String process() throws Exception {
        return BatchStatus.COMPLETED.toString();
    }
}

As is the JSL:

<job id="simpleBatchLet">
    <step id="firstStep" >
        <batchlet ref="simpleBatchLet"/>
    </step>
</job>

And we can test it using the same approach as before:

@Test
public void givenBatchlet_thenBatch_completeWithSuccess() throws Exception {
    JobOperator jobOperator = BatchRuntime.getJobOperator();
    Long executionId = jobOperator.start("simpleBatchLet", new Properties());
    JobExecution jobExecution = jobOperator.getJobExecution(executionId);
    jobExecution = BatchTestHelper.keepTestAlive(jobExecution);
    assertEquals(jobExecution.getBatchStatus(), BatchStatus.COMPLETED);
}

So, we’ve looked at a couple of different ways to implement steps.

Now let’s look at mechanisms for marking and guaranteeing progress.

6. Custom Checkpoint

Failures are bound to happen in the middle of a job. Should we just start over the whole thing, or can we somehow start where we left off?

As the name suggests, checkpoints help us to periodically set a bookmark in case of failure.

By default, the end of chunk processing is a natural checkpoint.

However, we can customize it with our own CheckpointAlgorithm:

@Named
public class CustomCheckPoint extends AbstractCheckpointAlgorithm {
    
    @Inject
    JobContext jobContext;
    
    @Override
    public boolean isReadyToCheckpoint() throws Exception {
        int counterRead = (Integer) jobContext.getTransientUserData();
        return counterRead % 5 == 0;
    }
}

Remember the count that we placed in transient data earlier? Here, we can pull it out with JobContext#getTransientUserData to state that we want to commit on every 5th number processed.

Without this, a commit would happen at the end of each chunk, or in our case, every 3rd number.

And then, we match that up with the checkout-algorithm directive in our XML underneath our chunk:

<job id="customCheckPoint">
    <step id="firstChunkStep" >
        <chunk item-count="3" checkpoint-policy="custom">
            <reader ref="simpleChunkItemReader"/>
            <processor ref="simpleChunkItemProcessor"/>
            <writer ref="simpleChunkWriter"/>
            <checkpoint-algorithm ref="customCheckPoint"/>
        </chunk>    
    </step>
</job>

Let’s test the code, again noting that some of the boilerplate steps are hidden away in BatchTestHelper:

@Test
public void givenChunk_whenCustomCheckPoint_thenCommitCountIsThree() throws Exception {
    // ... start job and wait for completion

    jobOperator.getStepExecutions(executionId)
      .stream()
      .map(BatchTestHelper::getCommitCount)
      .forEach(count -> assertEquals(3L, count.longValue()));
    assertEquals(jobExecution.getBatchStatus(), BatchStatus.COMPLETED);
}

So, we might be expecting a commit count of 2 since we have ten items and configured the commits to be every 5th item. But, the framework does one more final read commit at the end to ensure everything has been processed, which is what brings us up to 3.

Next, let’s look at how to handle errors.

7. Exception Handling

By default, the job operator will mark our job as FAILED in case of an exception.

Let’s change our item reader to make sure that it fails:

@Override
public Integer readItem() throws Exception {
    if (tokens.hasMoreTokens()) {
        String tempTokenize = tokens.nextToken();
        throw new RuntimeException();
    }
    return null;
}

And then test:

@Test
public void whenChunkError_thenBatch_CompletesWithFailed() throws Exception {
    // ... start job and wait for completion
    assertEquals(jobExecution.getBatchStatus(), BatchStatus.FAILED);
}

But, we can override this default behavior in a number of ways:

  • skip-limit specifies the number of exceptions this step will ignore before failing
  • retry-limit specifies the number of times the job operator should retry the step before failing
  • skippable-exception-class specifies a set of exceptions that chunk processing will ignore

So, we can edit our job so that it ignores RuntimeException, as well as a few others, just for illustration:

<job id="simpleErrorSkipChunk" >
    <step id="errorStep" >
        <chunk checkpoint-policy="item" item-count="3" skip-limit="3" retry-limit="3">
            <reader ref="myItemReader"/>
            <processor ref="myItemProcessor"/>
            <writer ref="myItemWriter"/>
            <skippable-exception-classes>
                <include class="java.lang.RuntimeException"/>
                <include class="java.lang.UnsupportedOperationException"/>
            </skippable-exception-classes>
            <retryable-exception-classes>
                <include class="java.lang.IllegalArgumentException"/>
                <include class="java.lang.UnsupportedOperationException"/>
            </retryable-exception-classes>
        </chunk>
    </step>
</job>

And now our code will pass:

@Test
public void givenChunkError_thenErrorSkipped_CompletesWithSuccess() throws Exception {
   // ... start job and wait for completion
   jobOperator.getStepExecutions(executionId).stream()
     .map(BatchTestHelper::getProcessSkipCount)
     .forEach(skipCount -> assertEquals(1L, skipCount.longValue()));
   assertEquals(jobExecution.getBatchStatus(), BatchStatus.COMPLETED);
}

8. Executing Multiple Steps

We mentioned earlier that a job can have any number of steps, so let’s see that now.

8.1. Firing the Next Step

By default, each step is the last step in the job.

In order to execute the next step within a batch job, we’ll have to explicitly specify by using the next attribute within the step definition:

<job id="simpleJobSequence">
    <step id="firstChunkStepStep1" next="firstBatchStepStep2">
        <chunk item-count="3">
            <reader ref="simpleChunkItemReader"/>
            <processor ref="simpleChunkItemProcessor"/>
            <writer ref="simpleChunkWriter"/>
        </chunk>    
    </step>
    <step id="firstBatchStepStep2" >
        <batchlet ref="simpleBatchLet"/>
    </step>
</job>

If we forget this attribute, then the next step in sequence will not get executed.

And we can see what this looks like in the API:

@Test
public void givenTwoSteps_thenBatch_CompleteWithSuccess() throws Exception {
    // ... start job and wait for completion
    assertEquals(2 , jobOperator.getStepExecutions(executionId).size());
    assertEquals(jobExecution.getBatchStatus(), BatchStatus.COMPLETED);
}

8.2. Flows

A sequence of steps can also be encapsulated into a flowWhen the flow is finished, it is the entire flow that transitions to the execution element. Also, elements inside the flow can’t transition to elements outside the flow.

We can, say, execute two steps inside a flow, and then have that flow transition to an isolated step:

<job id="flowJobSequence">
    <flow id="flow1" next="firstBatchStepStep3">
        <step id="firstChunkStepStep1" next="firstBatchStepStep2">
            <chunk item-count="3">
	        <reader ref="simpleChunkItemReader" />
		<processor ref="simpleChunkItemProcessor" />
		<writer ref="simpleChunkWriter" />
	    </chunk>
	</step>
	<step id="firstBatchStepStep2">
	    <batchlet ref="simpleBatchLet" />
	</step>
    </flow>
    <step id="firstBatchStepStep3">
	 <batchlet ref="simpleBatchLet" />
    </step>
</job>

And we can still see each step execution independently:

@Test
public void givenFlow_thenBatch_CompleteWithSuccess() throws Exception {
    // ... start job and wait for completion
 
    assertEquals(3, jobOperator.getStepExecutions(executionId).size());
    assertEquals(jobExecution.getBatchStatus(), BatchStatus.COMPLETED);
}

8.3. Decisions

We also have if/else support in the form of decisions. Decisions provide a customized way of determining a sequence among steps, flows, and splits.

Like steps, it works on transition elements such as next which can direct or terminate job execution.

Let’s see how the job can be configured:

<job id="decideJobSequence">
     <step id="firstBatchStepStep1" next="firstDecider">
	 <batchlet ref="simpleBatchLet" />
     </step>	
     <decision id="firstDecider" ref="deciderJobSequence">
        <next on="two" to="firstBatchStepStep2"/>
        <next on="three" to="firstBatchStepStep3"/>
     </decision>
     <step id="firstBatchStepStep2">
	<batchlet ref="simpleBatchLet" />
     </step>	
     <step id="firstBatchStepStep3">
	<batchlet ref="simpleBatchLet" />
     </step>		
</job>

Any decision element needs to be configured with a class that implements Decider. Its job is to return a decision as a String.

Each next inside decision is like a case in a switch statement.

8.4. Splits

Splits are handy since they allow us to execute flows concurrently:

<job id="splitJobSequence">
   <split id="split1" next="splitJobSequenceStep3">
      <flow id="flow1">
	  <step id="splitJobSequenceStep1">
              <batchlet ref="simpleBatchLet" />
           </step>
      </flow>
      <flow id="flow2">
          <step id="splitJobSequenceStep2">
              <batchlet ref="simpleBatchLet" />
	  </step>
      </flow>
   </split>
   <step id="splitJobSequenceStep3">
      <batchlet ref="simpleBatchLet" />
   </step>
</job>

Of course, this means that the order isn’t guaranteed.

Let’s confirm that they still all get run. The flow steps will be performed in an arbitrary order, but the isolated step will always be last:

@Test
public void givenSplit_thenBatch_CompletesWithSuccess() throws Exception {
    // ... start job and wait for completion
    List<StepExecution> stepExecutions = jobOperator.getStepExecutions(executionId);

    assertEquals(3, stepExecutions.size());
    assertEquals("splitJobSequenceStep3", stepExecutions.get(2).getStepName());
    assertEquals(jobExecution.getBatchStatus(), BatchStatus.COMPLETED);
}

9. Partitioning a Job

We can also consume the batch properties within our Java code which have been defined in our job.

They can be scoped at three levels – the job, the step, and the batch-artifact.

Let’s see some examples of how they consumed.

When we want to consume the properties at job level:

@Inject
JobContext jobContext;
...
jobProperties = jobContext.getProperties();
...

This can be consumed at a step level as well:

@Inject
StepContext stepContext;
...
stepProperties = stepContext.getProperties();
...

When we want to consume the properties at batch-artifact level:

@Inject
@BatchProperty(name = "name")
private String nameString;

This comes in handy with partitions.

See, with splits, we can run flows concurrently. But we can also partition a step into sets of items or set separate inputs, allowing us another way to split up the work across multiple threads.

To comprehend the segment of work each partition should do, we can combine properties with partitions:

<job id="injectSimpleBatchLet">
    <properties>
        <property name="jobProp1" value="job-value1"/>
    </properties>
    <step id="firstStep">
        <properties>
            <property name="stepProp1" value="value1" />
        </properties>
	<batchlet ref="injectSimpleBatchLet">
	    <properties>
		<property name="name" value="#{partitionPlan['name']}" />
	    </properties>
	</batchlet>
	<partition>
	    <plan partitions="2">
		<properties partition="0">
		    <property name="name" value="firstPartition" />
		</properties>
		<properties partition="1">
		    <property name="name" value="secondPartition" />
		</properties>
	    </plan>
	</partition>
    </step>
</job>

10. Stop and Restart

Now, that’s it for defining jobs. Now let’s talk for a minute about managing them.

We’ve already seen in our unit tests that we can get an instance of JobOperator from BatchRuntime:

JobOperator jobOperator = BatchRuntime.getJobOperator();

And then, we can start the job:

Long executionId = jobOperator.start("simpleBatchlet", new Properties());

However, we can also stop the job:

jobOperator.stop(executionId);

And lastly, we can restart the job:

executionId = jobOperator.restart(executionId, new Properties());

Let’s see how we can stop a running job:

@Test
public void givenBatchLetStarted_whenStopped_thenBatchStopped() throws Exception {
    JobOperator jobOperator = BatchRuntime.getJobOperator();
    Long executionId = jobOperator.start("simpleBatchLet", new Properties());
    JobExecution jobExecution = jobOperator.getJobExecution(executionId);
    jobOperator.stop(executionId);
    jobExecution = BatchTestHelper.keepTestStopped(jobExecution);
    assertEquals(jobExecution.getBatchStatus(), BatchStatus.STOPPED);
}

And if a batch is STOPPED, then we can restart it:

@Test
public void givenBatchLetStopped_whenRestarted_thenBatchCompletesSuccess() {
    // ... start and stop the job
 
    assertEquals(jobExecution.getBatchStatus(), BatchStatus.STOPPED);
    executionId = jobOperator.restart(jobExecution.getExecutionId(), new Properties());
    jobExecution = BatchTestHelper.keepTestAlive(jobOperator.getJobExecution(executionId));
 
    assertEquals(jobExecution.getBatchStatus(), BatchStatus.COMPLETED);
}

11. Fetching Jobs

When a batch job is submitted then the batch runtime creates an instance of JobExecution to track it.

To obtain the JobExecution for an execution id, we can use the JobOperator#getJobExecution(executionId) method.

And, StepExecution provides helpful information for tracking a step’s execution.

To obtain the StepExecution for an execution id, we can use the JobOperator#getStepExecutions(executionId) method.

And from that, we can get several metrics about the step via StepExecution#getMetrics:

@Test
public void givenChunk_whenJobStarts_thenStepsHaveMetrics() throws Exception {
    // ... start job and wait for completion
    assertTrue(jobOperator.getJobNames().contains("simpleChunk"));
    assertTrue(jobOperator.getParameters(executionId).isEmpty());
    StepExecution stepExecution = jobOperator.getStepExecutions(executionId).get(0);
    Map<Metric.MetricType, Long> metricTest = BatchTestHelper.getMetricsMap(stepExecution.getMetrics());
    assertEquals(10L, metricTest.get(Metric.MetricType.READ_COUNT).longValue());
    assertEquals(5L, metricTest.get(Metric.MetricType.FILTER_COUNT).longValue());
    assertEquals(4L, metricTest.get(Metric.MetricType.COMMIT_COUNT).longValue());
    assertEquals(5L, metricTest.get(Metric.MetricType.WRITE_COUNT).longValue());
    // ... and many more!
}

12. Disadvantages

JSR 352 is powerful, though it is lacking in a number of areas:

  • There seems to be lack of readers and writers which can process other formats such as JSON
  • There is no support of generics
  • Partitioning only supports a single step
  • The API does not offer anything to support scheduling (though J2EE has a separate scheduling module)
  • Due to its asynchronous nature, testing can be a challenge
  • The API is quite verbose

13. Conclusion

In this article, we looked at JSR 352 and learned about chunks, batchlets, splits, flows and much more. Yet, we’ve barely scratched the surface.

As always the demo code can be found over on GitHub.

BufferedReader vs Console vs Scanner in Java

$
0
0

1. Overview

In this article, we’re going to walk through the differences between BufferedReader, Console, and Scanner classes in Java.

To have a deep dive on each topic, we suggest having a look at our individual articles on Java Scanner, Console I/O in Java, and BufferedReader.

2. User Input

Given the underlying stream passed to the constructors, both BufferedReader and Scanner classes are able to handle a wider range of user input, such as a string, file, system console (which is typically connected to the keyboard), and socket.

On the other hand, the Console class is designed to only access the character-based system console, if any, associated with the current Java virtual machine.

Let’s have a look at the BufferedReader constructors, which accept different inputs:

BufferedReader br = new BufferedReader(
  new StringReader("Bufferedreader vs Console vs Scanner in Java"));
BufferedReader br = new BufferedReader(
  new FileReader("file.txt"));
BufferedReader br = new BufferedReader(
  new InputStreamReader(System.in))

Socket socket = new Socket(hostName, portNumber);
BufferedReader br =  new BufferedReader(
  new InputStreamReader(socket.getInputStream()));

The Scanner class could similarly accept different inputs in its constructors as well:

Scanner sc = new Scanner("Bufferedreader vs Console vs Scanner in Java")
Scanner sc = new Scanner(new File("file.txt"));
Scanner sc = new Scanner(System.in);

Socket socket = new Socket(hostName, portNumber);
Scanner sc =  new Scanner(socket.getInputStream());

The Console class is available only via the method call:

Console console = System.console();

Please bear in mind that when we use the Console class, the JVM associated system console isn’t available if we run the code within an IDE such as Eclipse or IntelliJ IDEA.

3. User Output

In contrast to BufferedReader and Scanner classes, which don’t write anything to the output stream, the Console class offers some convenient methods like readPassword (String fmt, Object… args), readLine (String fmt, Object… args), and printf (String format,Object… args)to write the prompt to the system console’s output stream:

String firstName = console.readLine("Enter your first name please: ");
console.printf("Welcome " + firstName );

So when we write a program to interact with the system console, Console class will simplify the code by removing unnecessary System.out.println.

4. Parsing Input

The Scanner class can parse primitive types and strings using regular expressions.

It breaks its input into tokens using a custom delimiter pattern, which by default matches whitespace:

String input = "Bufferedreader vs Console vs Scanner";
Scanner sc = new Scanner(input).useDelimiter("\\s*vs\\s*");
System.out.println(sc.next());
sc.close();

BufferredReader and Console classes simply read the input stream as it is.

5. Reading Secure Data

The Console class has methods readPassword() and readPassword (String fmt, Object… args) to read the secure data with echoing disabled so users will not see what they are typing:

String password = String.valueOf(console.readPassword("Password :"));

BufferedReader and Scanner have no capability to do so.

6. Thread Safe

The read methods in BufferedReader and the read and write methods in Console are all synchronized, whereas those in the Scanner class are not. If we read the user input in a multi-threaded program, either BufferedReader or Console will be a better option.

7. Buffer Size

The buffer size is 8 KB in BufferedReader as compared to 1 KB in Scanner class.

In addition, we can specify the buffer size in the constructor of the BufferedReader class if needed. This will help when reading the long strings from user input. Console class has no buffer when reading from the system console, but it has a buffered output stream to write to the system console.

8. Miscellaneous

There are some differences that are not the major factors we consider when choosing the appropriate class to use in various situations.

8.1. Closing the Input Stream

Once we create the instance of BufferedReader or Scanner,  we need to remember to close it in order to avoid a memory leak. But this doesn’t happen with the Console class — we don’t need to close the system console after use.

8.2. Exception Handling

While Scanner and Console go with the unchecked exception approach, methods in BufferedReader throw checked exceptions, which forces us to write boilerplate try-catch syntax to handle the exceptions.

9. Conclusion

Now that we’ve stated the differences among these classes, let’s come up with some rules of thumb regarding which one(s) are best suited to tackle different situations:

  • Use BufferedReader if we need to read long strings from a file, as it has better performance than Scanner
  • Consider Console if we’re reading secure data from the system console and want to hide what is being typed
  • Use Scanner if we need to parse the input stream with a custom regular expression
  • Scanner would be preferred when we interact with the system console, as it offers fine-grained methods to read and parse the input stream. In addition, the performance drawback is not a big problem, as in most cases, the nextXXX methods are blocking and wait for manual input
  • In a thread-safe context, consider BufferedReader unless we have to use features specific to the Console class

Creating Java static final Equivalents in Kotlin

$
0
0

1. Overview

In this quick tutorial, we’ll discuss static final variables in Java and their equivalent in Kotlin.

In Java, declaring static final variables helps us create constants. And in Kotlin, we have several ways to achieve the same goal.

2. Inside an object

Firstly, let’s take a look at declaring constants in a Kotlin object:

object TestKotlinConstantObject {
    const val COMPILE_TIME_CONST = 10

    val RUN_TIME_CONST: Int
    init {
        RUN_TIME_CONST = TestKotlinConstantObject.COMPILE_TIME_CONST + 20;
    }
}

In the above example, we use const val to declare a compile-time constant, and val to declare a run-time constant.

We call them in our Kotlin code in the same way as Java static final variables:

@Test
fun givenConstant_whenCompareWithActualValue_thenReturnTrue() {
    assertEquals(10, TestKotlinConstantObject.COMPILE_TIME_CONST)
    assertEquals(30, TestKotlinConstantObject.RUN_TIME_CONST)
}

Note, though, that we cannot use TestKotlinConstantObject.RUN_TIME_CONST in Java code. The val keyword by itself, without const keyword, doesn’t expose Kotlin fields as public for Java classes to call.

That’s the reason why we have @JvmField to expose val variables to create Java-friendly static final variables:

@JvmField val JAVA_STATIC_FINAL_FIELD = 20

We can call this one just like a const val variable in both Kotlin and Java classes:

assertEquals(20, TestKotlinConstantObject.JAVA_STATIC_FINAL_FIELD)

In addition, we also have @JvmStatic, which we can use in a similar manner to @JvmField. But we’re not using it here since @JvmStatic makes the property accessor static in Java but not the variable itself.

3. Inside a Kotlin class

The declaration of these constants are similar in a Kotlin class, but inside its companion object:

class TestKotlinConstantClass { 
    companion object { 
        const val COMPANION_OBJECT_NUMBER = 40 
    } 
}

And we can do the same as before:

assertEquals(40, TestKotlinConstantClass.COMPANION_OBJECT_NUMBER)

5. Conclusion

In this article, we’ve gone through the usage of const, val, and @JvmField in Kotlin to create static final variables.

As always, the code can be found over on GitHub.

Self-Healing Applications with Kubernetes and Spring Boot

$
0
0

1. Introduction

In this tutorial, we’re going to talk about Kubernetes‘s probes and demonstrate how we can leverage Actuator‘s HealthIndicator to have an accurate view of our application’s state.

For the purpose of this tutorial, we’re going to assume some pre-existing experience with Spring Boot ActuatorKubernetes, and Docker.

2. Kubernetes Probes

Kubernetes defines two different probes that we can use to periodically check if everything is working as expected: liveness and readiness.

2.1. Liveness and Readiness

With Liveness and Readiness probes, Kubelet can act as soon as it detects that something’s off and minimize the downtime of our application.

Both are configured the same way, but they have different semantics and Kubelet performs different actions depending on which one is triggered:

  • Readiness – Readiness verifies if our Pod is ready to start receiving traffic. Our Pod is ready when all of its containers are ready
  • Liveness – Contrary to readinessliveness checks if our Pod should be restarted. It can pick up use cases where our application is running but is in a state where it’s unable to make progress; for example, it’s in deadlock

We configure both probe types at the container level:

apiVersion: v1
kind: Pod
metadata:
  name: goproxy
  labels:
    app: goproxy
spec:
  containers:
  - name: goproxy
    image: k8s.gcr.io/goproxy:0.1
    ports:
    - containerPort: 8080
    readinessProbe:
      tcpSocket:
        port: 8080
      initialDelaySeconds: 5
      periodSeconds: 10
      timeoutSeconds: 2
      failureThreshold: 1
      successThreshold: 1
    livenessProbe:
      tcpSocket:
        port: 8080
      initialDelaySeconds: 15
      periodSeconds: 20
      timeoutSeconds: 2
      failureThreshold: 1
      successThreshold: 1

There are a number of fields that we can configure to more precisely control the behavior of our probes:

  • initialDelaySeconds – After creating the container, wait seconds before initiating the probe
  • periodSecondsHow often this probe should be run, defaulting to 10 seconds; the minimum is 1 second
  • timeoutSecondsHow long we wait before timing out the probe, defaulting to 1 second; the minimum is again 1 second
  • failureThreshold – Try n times before giving up. In the case of readiness, our pod will be marked as not ready, whereas giving up in case of liveness means restarting the Pod. The default here is 3 failures, with the minimum being 1
  • successThreshold – This is the minimum number of consecutive successes for the probe to be considered successful after having failed. It defaults to 1 success and its minimum is 1 as well

In this case, we opted for a tcp probe, however, there are other types of probes we can use, too.

2.2. Probe Types

Depending on our use case, one probe type may prove more useful than the other. For example, if our container is a web server, using an http probe could be more reliable than a tcp probe.

Luckily, Kubernetes has three different types of probes that we can use:

  • execExecutes bash instructions in our container. For example, check that a specific file exists. If the instruction returns a failure code, the probe fails
  • tcpSocket – Tries to establish a tcp connection to the container, using the specified port. If it fails to establish a connection, the probe fails
  • httpGetSends an HTTP GET request to the server that is running in the container and listening on the specified port. Any code greater than or equal to 200 and less than 400 indicates success

It’s important to note that HTTP probes have additional fields, besides the ones we mentioned earlier:

  • host – Hostname to connect to, defaults to our pod’s IP
  • scheme – Scheme that should be used to connect, HTTP or HTTPS, with the default being HTTP
  • path – The path to access on the web server
  • httpHeaders – Custom headers to set in the request
  • port – Name or number of the port to access in the container

3. Spring Actuator and Kubernetes Self-Healing Capabilities

Now that we have a general idea on how Kubernetes is able to detect if our application is in a broken state, let’s see how we can take advantage of Spring’s Actuator to keep a closer eye not only on our application but also on its dependencies!

For the purpose of these examples, we’re going to rely on Minikube.

3.1. Actuator and its HealthIndicators

Considering that Spring has a number of HealthIndicators ready to use, reflecting the state of some of our application’s dependencies over Kubernetes‘s probes is as simple as adding the Actuator dependency to our pom.xml:

<dependency>
    <groupId>org.springframework.boot</groupId>
    <artifactId>spring-boot-starter-actuator</artifactId>
</dependency>

3.2. Liveness Example

Let’s begin with an application that will boot up normally and, after 30 seconds will transition to a broken state.

We’re going to emulate a broken state by creating a HealthIndicator that verifies if a boolean variable is true. We’ll initialize the variable to true, and then we’ll schedule a task to change it to false after 30 seconds:

@Component
public class CustomHealthIndicator implements HealthIndicator {

    private boolean isHealthy = true;

    public CustomHealthIndicator() {
        ScheduledExecutorService scheduled =
          Executors.newSingleThreadScheduledExecutor();
        scheduled.schedule(() -> {
            isHealthy = false;
        }, 30, TimeUnit.SECONDS);
    }

    @Override
    public Health health() {
        return isHealthy ? Health.up().build() : Health.down().build();
    }
}

With our HealthIndicator in place, we need to dockerize our application:

FROM openjdk:8-jdk-alpine
RUN mkdir -p /usr/opt/service
COPY target/*.jar /usr/opt/service/service.jar
EXPOSE 8080
ENTRYPOINT exec java -jar /usr/opt/service/service.jar

Next, we create our Kubernetes template:

apiVersion: apps/v1
kind: Deployment
metadata:
  name: liveness-example
spec:
  ...
    spec:
      containers:
      - name: liveness-example
        image: dbdock/liveness-example:1.0.0
        ...
        readinessProbe:
          httpGet:
            path: /health
            port: 8080
          initialDelaySeconds: 10
          timeoutSeconds: 2
          periodSeconds: 3
          failureThreshold: 1
        livenessProbe:
          httpGet:
            path: /health
            port: 8080
          initialDelaySeconds: 20
          timeoutSeconds: 2
          periodSeconds: 8
          failureThreshold: 1

We’re using an httpGet probe pointing to Actuator’s health endpoint. Any change to our application state (and its dependencies) will be reflected on the healthiness of our deployment.

After deploying our application to Kubernetes, we’ll be able to see both probes in action: after approximately 30 seconds, our Pod will be marked as unready and removed from rotation; a few seconds later, the Pod is restarted.

We can see the events of our Pod executing kubectl describe pod liveness-example:

Warning  Unhealthy 3s (x2 over 7s)   kubelet, minikube  Readiness probe failed: HTTP probe failed ...
Warning  Unhealthy 1s                kubelet, minikube  Liveness probe failed: HTTP probe failed ...
Normal   Killing   0s                kubelet, minikube  Killing container with id ...

3.3. Readiness Example

In the previous example, we saw how we could use a HealthIndicator to reflect our application’s state on the healthiness of a Kubernetes deployment.

Let’s use it on a different use case: suppose that our application needs a bit of time before it’s able to receive traffic. For example, it needs to load a file into memory and validate its content.

This is a good example of when we can take advantage of a readiness probe.

Let’s modify the HealthIndicator and Kubernetes template from the previous example and adapt them to this use case:

@Component
public class CustomHealthIndicator implements HealthIndicator {

    private boolean isHealthy = false;

    public CustomHealthIndicator() {
        ScheduledExecutorService scheduled =
          Executors.newSingleThreadScheduledExecutor();
        scheduled.schedule(() -> {
            isHealthy = true;
        }, 40, TimeUnit.SECONDS);
    }

    @Override
    public Health health() {
        return isHealthy ? Health.up().build() : Health.down().build();
    }
}

We initialize the variable to false, and after 40 seconds, a task will execute and set it to true.

Next, we dockerize and deploy our application using the following template:

apiVersion: apps/v1
kind: Deployment
metadata:
  name: readiness-example
spec:
  ...
    spec:
      containers:
      - name: readiness-example
        image: dbdock/readiness-example:1.0.0
        ...
        readinessProbe:
          httpGet:
            path: /health
            port: 8080
          initialDelaySeconds: 40
          timeoutSeconds: 2
          periodSeconds: 3
          failureThreshold: 2
        livenessProbe:
          httpGet:
            path: /health
            port: 8080
          initialDelaySeconds: 100
          timeoutSeconds: 2
          periodSeconds: 8
          failureThreshold: 1

While similar, there are a few changes in the probes configuration that we need to point out:

  • Since we know that our application needs around 40 seconds to become ready to receive traffic, we increased the initialDelaySeconds of our readiness probe to 40 seconds
  • Similarly, we increased the initialDelaySeconds of our liveness probe to 100 seconds to avoid being prematurely killed by Kubernetes

If it still hasn’t finished after 40 seconds, it still has around 60 seconds to finish. After that, our liveness probe will kick in and restart the Pod.

4. Conclusion

In this article, we talked about Kubernetes probes and how we can use Spring’s Actuator to improve our application’s health monitoring.

The full implementation of these examples can be found over on Github.

Testing Reactive Streams Using StepVerifier and TestPublisher

$
0
0

1. Overview

In this tutorial, we’ll take a close look at testing reactive streams with StepVerifier and TestPublisher.

We’ll base our investigation on a Spring Reactor application containing a chain of reactor operations.

2. Maven Dependencies

Spring Reactor comes with several classes for testing reactive streams.

We can get these by adding the reactor-test dependency:

<dependency>
    <groupId>io.projectreactor</groupId>
    <artifactId>reactor-test</artifactId>
    <scope>test</scope>
    <version>3.2.3.RELEASE</version>
</dependency>

3. StepVerifier

In general, reactor-test has two main uses:

  • creating a step-by-step test with StepVerifier
  • producing predefined data with TestPublisher to test downstream operators

The most common case in testing reactive streams is when we have a publisher (a Flux or Mono) defined in our code. We want to know how it behaves when someone subscribes. 

With the StepVerifier API, we can define our expectations of published elements in terms of what elements we expect and what happens when our stream completes.

First of all, let’s create a publisher with some operators.

We’ll use a Flux.just(T elements). This method will create a Flux that emits given elements and then completes.

Since advanced operators are beyond the scope of this article, we’ll just create a simple publisher that outputs only four-letter names mapped to uppercase:

Flux<String> source = Flux.just("John", "Monica", "Mark", "Cloe", "Frank", "Casper", "Olivia", "Emily", "Cate")
  .filter(name -> name.length() == 4)
  .map(String::toUpperCase);

3.1. Step-By-Step Scenario

Now, let’s test our source with StepVerifier in order to test what will happen when someone subscribes:

StepVerifier
  .create(source)
  .expectNext("JOHN")
  .expectNextMatches(name -> name.startsWith("MA"))
  .expectNext("CLOE", "CATE")
  .expectComplete()
  .verify();

First, we create a StepVerifier builder with the create method.

Next, we wrap our Flux source, which is under test. The first signal is verified with expectNext(T element), but really, we can pass any number of elements to expectNext.

We can also use expectNextMatches and provide a Predicate<T> for a more custom match.

For our last expectation, we expect that our stream completes.

And finally, we use verify() to trigger our test.

3.2. Exceptions in StepVerifier

Now, let’s concatenate our Flux publisher with Mono.

We’ll have this Mono terminate immediately with an error when subscribed to:

Flux<String> error = source.concatWith(
  Mono.error(new IllegalArgumentException("Our message"))
);

Now, after four all elements, we expect our stream to terminate with an exception:

StepVerifier
  .create(error)
  .expectNextCount(4)
  .expectErrorMatches(throwable -> throwable instanceof IllegalArgumentException &&
    throwable.getMessage().equals("Our message")
  ).verify();

We can use only one method to verify exceptions. The OnError signal notifies the subscriber that the publisher is closed with an error state. Therefore, we can’t add more expectations afterward.

If it’s not necessary to check the type and message of the exception at once, then we can use one of the dedicated methods:

  • expectError() – expect any kind of error
  • expectError(Class<? extends Throwable> clazz) – expect an error of a specific type
  • expectErrorMessage(String errorMessage) – expect an error having a specific message
  • expectErrorMatches(Predicate<Throwable> predicate) – expect an error that matches a given predicate
  • expectErrorSatisfies(Consumer<Throwable> assertionConsumer) – consume a Throwable in order to do a custom assertion

3.3. Testing Time-Based Publishers

Sometimes our publishers are time-based.

For example, suppose that in our real-life application, we have a one-day delay between events. Now, obviously, we don’t want our tests to run for an entire day to verify expected behavior with such a delay.

StepVerifier.withVirtualTime builder is designed to avoid long-running tests.

We create a builder by calling withVirtualTime. Note that this method doesn’t take Flux as input. Instead, it takes a Supplier, which lazily creates an instance of the tested Flux after having the scheduler set up.

To demonstrate how we can test for an expected delay between events, let’s create a Flux with an interval of one second that runs for two seconds. If the timer runs correctly, we should only get two elements:

StepVerifier
  .withVirtualTime(() -> Flux.interval(Duration.ofSeconds(1)).take(2))
  .expectSubscription()
  .expectNoEvent(Duration.ofSeconds(1))
  .expectNext(0L)
  .thenAwait(Duration.ofSeconds(1))
  .expectNext(1L)
  .verifyComplete();

Note that we should avoid instantiating the Flux earlier in the code and then having the Supplier returning this variable. Instead, we should always instantiate Flux inside the lambda.

There are two major expectation methods that deal with time:

  • thenAwait(Duration duration) – pauses the evaluation of the steps; new events may occur during this time
  • expectNoEvent(Duration duration) – fails when any event appears during the duration; the sequence will pass with a given duration

Please notice that the first signal is the subscription event, so every expectNoEvent(Duration duration) should be preceded with expectSubscription().

3.4. Post-Execution Assertions with StepVerifier

So, as we’ve seen, it’s straightforward to describe our expectations step-by-step.

However, sometimes we need to verify additional state after our whole scenario played out successfully.

Let’s create a custom publisher. It will emit a few elements, then complete, pause, and emit one more element, which we’ll drop:

Flux<Integer> source = Flux.<Integer>create(emitter -> {
    emitter.next(1);
    emitter.next(2);
    emitter.next(3);
    emitter.complete();
    try {
        Thread.sleep(1000);
    } catch (InterruptedException e) {
        e.printStackTrace();
    }
    emitter.next(4);
}).filter(number -> number % 2 == 0);

We expect that it will emit a 2, but drop a 4, since we called emitter.complete first.

So, let’s verify this behavior by using verifyThenAssertThat. This method returns StepVerifier.Assertions on which we can add our assertions:

@Test
public void droppedElements() {
    StepVerifier.create(source)
      .expectNext(2)
      .expectComplete()
      .verifyThenAssertThat()
      .hasDropped(4)
      .tookLessThan(Duration.ofMillis(1050));
}

4. Producing Data with TestPublisher

Sometimes, we might need some special data in order to trigger the chosen signals.

For instance, we may have a very particular situation that we want to test.

Alternatively, we may choose to implement our own operator and want to test how it behaves.

For both cases, we can use TestPublisher<T>, which allows us to programmatically trigger miscellaneous signals:

  • next(T value) or next(T value, T rest) – send one or more signals to subscribers
  • emit(T value) – same as next(T) but invokes complete() afterwards
  • complete() – terminates a source with the complete signal
  • error(Throwable tr) – terminates a source with an error
  • flux() – convenient method to wrap a TestPublisher into Flux
  • mono() – same us flux() but wraps to a Mono

4.1. Creating a TestPublisher

Let’s create a simple TestPublisher that emits a few signals and then terminates with an exception:

TestPublisher
  .<String>create()
  .next("First", "Second", "Third")
  .error(new RuntimeException("Message"));

4.2. TestPublisher in Action

As we mentioned earlier, we may sometimes want to trigger a finely chosen signal that closely matches to a particular situation.

Now, it’s especially important in this case that we have complete mastery over the source of the data. To achieve this, we can again rely on TestPublisher.

First, let’s create a class that uses Flux<String> as the constructor parameter to perform the operation getUpperCase():

class UppercaseConverter {
    private final Flux<String> source;

    UppercaseConverter(Flux<String> source) {
        this.source = source;
    }

    Flux<String> getUpperCase() {
        return source
          .map(String::toUpperCase);
    }   
}

Suppose that UppercaseConverter is our class with complex logic and operators, and we need to supply very particular data from the source publisher.

We can easily achieve this with TestPublisher:

final TestPublisher<String> testPublisher = TestPublisher.create();

UppercaseConverter uppercaseConverter = new UppercaseConverter(testPublisher.flux());

StepVerifier.create(uppercaseConverter.getUpperCase())
  .then(() -> testPublisher.emit("aA", "bb", "ccc"))
  .expectNext("AA", "BB", "CCC")
  .verifyComplete();

In this example, we create a test Flux publisher in the UppercaseConverter constructor parameter. Then, our TestPublisher emits three elements and completes.

4.3. Misbehaving TestPublisher

On the other hand, we can create a misbehaving TestPublisher with the createNonCompliant factory method. We need to pass in the constructor one enum value from TestPublisher.Violation. These values specify which parts of specifications our publisher may overlook.

Let’s take a look at a TestPublisher that won’t throw a NullPointerException for the null element:

TestPublisher
  .createNoncompliant(TestPublisher.Violation.ALLOW_NULL)
  .emit("1", "2", null, "3");

In addition to ALLOW_NULL, we can also use TestPublisher.Violation to:

  • REQUEST_OVERFLOW – allows calling next() without throwing an IllegalStateException when there’s an insufficient number of requests
  • CLEANUP_ON_TERMINATE – allows sending any termination signal several times in a row
  • DEFER_CANCELLATION – allows us to ignore cancellation signals and continue with emitting elements

5. Conclusion

In this article, we discussed various ways of testing reactive streams from the Spring Reactor project.

First, we saw how to use StepVerifier to test publishers. Then, we saw how to use TestPublisher. Similarly, we saw how to operate with a misbehaving TestPublisher.

As usual, the implementation of all our examples can be found in the Github project.

Viewing all 4699 articles
Browse latest View live


<script src="https://jsc.adskeeper.com/r/s/rssing.com.1596347.js" async> </script>