Quantcast
Channel: Baeldung
Viewing all 4700 articles
Browse latest View live

Building a Basic UAA-Secured JHipster Microservice

$
0
0

1. Overview

In previous articles, we’ve covered the basics of JHipster and how to use it to generate a microservices-based application.

In this tutorial, we’ll explore JHipster’s User Account and Authorization service — UAA for short — and how to use it to secure a fully fledged JHispter-based microservice application. Even better, all this can be achieved without writing a single line of code!

2. UAA Core Features

An important feature of the applications we’ve built in our previous articles is that user accounts were an integral part of them. Now, this is fine when we have a single application, but what if we want to share user accounts between multiple JHipster-generated applications? This is where JHipster’s UAA comes in.

JHipster’s UAA is a microservice that is built, deployed, and run independently of other services in our application. It serves as:

  • An OAuth2 Authorization Server, based on Spring Boot’s implementation
  • An Identity Management Server, exposing a user account CRUD API

JHipster UAA also supports typical login features like self-registration and “remember me”. And of course, it fully integrates with other JHipster services.

3. Development Environment Setup

Before starting any development, we must first be sure our environment has all its prerequisites set up. Besides all of the tools described in our Intro To JHipster article, we’ll need a running JHipster Registry. Just as a quick recap, the registry service allows the different services that we’ll create to find and talk to each other.

The full procedure for generating and running the registry is described in section 4.1 of our JHipster with a Microservice Architecture article so we won’t repeat it here. A Docker image is also available and can be used as an alternative.

4. Generating a New JHipster UAA Service

Let’s generate our UAA service using the JHipster command line utility:

$ mkdir uaa
$ cd uaa
$ jhipster

The first question we have to answer is which type of application we want to generate. Using the arrow keys, we’ll select the “JHipster UAA (for microservice OAuth2 authentication)” option:

Next, we’ll be prompted for a few of questions regarding specific details regarding the generated service, such as application name, server port and service discovery:

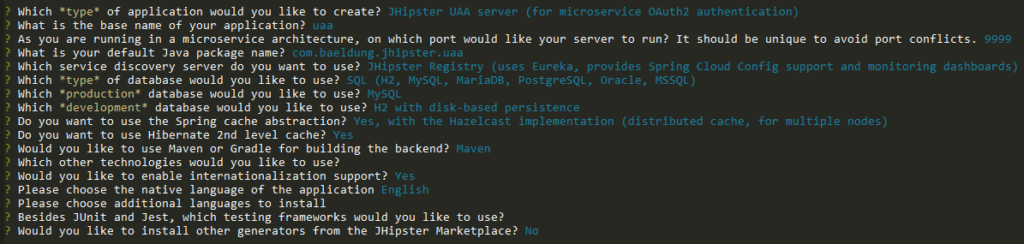
For the most part, the default answers are fine. As for the application’s base name, which affects many of the generated artifacts, we’ve chosen “uaa” (lowercase) — a sensible name. We can play around with the other values if we want, but it won’t change the main features of the generated project.

After answering these questions, JHipster will create all project files and install npm package dependencies (which are not really used in this case).

We can now use the local Maven script to build and run our UAA service:

$ ./mvnw
... build messages omitted
2018-10-14 14:07:17.995  INFO 18052 --- [  restartedMain] com.baeldung.jhipster.uaa.UaaApp         :
----------------------------------------------------------
        Application 'uaa' is running! Access URLs:
        Local:          http://localhost:9999/
        External:       http://192.168.99.1:9999/
        Profile(s):     [dev, swagger]
----------------------------------------------------------
2018-10-14 14:07:18.000  INFO 18052 --- [  restartedMain] com.baeldung.jhipster.uaa.UaaApp         :
----------------------------------------------------------
        Config Server:  Connected to the JHipster Registry config server!
----------------------------------------------------------

The key message to pay attention to here is the one stating that UAA is connected to the JHipster Registry. This message indicates that UAA was able to register itself and will be available for discovery by other microservices and gateways.

5. Testing the UAA Service

Since the generated UAA service has no UI by itself, we must use direct API calls to test if it is working as expected.

There are two functionalities that we must make sure are working before using it with other parts or our system: OAuth2 token generation and account retrieval.

First, let’s get a new token from our UAA’s OAuth endpoint, using a simple curl command:

$ curl -X POST --data \
 "username=user&password=user&grant_type=password&scope=openid" \
 http://web_app:changeit@localhost:9999/oauth/token

Here, we’ve used the password grant flow, using two pairs of credentials. In this kind of flow, we send client credentials using basic HTTP authentication, which we encode directly in the URL.

The end user credentials are sent as part of the body, using the standard username and password parameters. We’re also using the user account named “user”, which is available by default in the test profile.

Assuming we’ve provided all details correctly, we’ll get an answer containing an access token and a refresh token:

{
  "access_token" : "eyJh...(token omitted)",
  "token_type" : "bearer",
  "refresh_token" : "eyJ...(token omitted)",
  "expires_in" : 299,
  "scope" : "openid",
  "iat" : 1539650162,
  "jti" : "8066ab12-6e5e-4330-82d5-f51df16cd70f"
}

We can now use the returned access_token to get information for the associated account using the account resource, which is available in the UAA service:

$ curl -H "Authorization: Bearer eyJh...(access token omitted)" \ 
 http://localhost:9999/api/account
{
  "id" : 4,
  "login" : "user",
  "firstName" : "User",
  "lastName" : "User",
  "email" : "user@localhost",
  "imageUrl" : "",
  "activated" : true,
  "langKey" : "en",
  "createdBy" : "system",
  "createdDate" : "2018-10-14T17:07:01.336Z",
  "lastModifiedBy" : "system",
  "lastModifiedDate" : null,
  "authorities" : [ "ROLE_USER" ]
}

Please notice that we must issue this command before the access token expires. By default, the UAA service issues tokens valid for five minutes, which is a sensible value for production.

We can easily change the lifespan of valid tokens by editing the application-<profile>.yml file corresponding to the profile we’re running the app under and setting the uaa.web-client-configuration.access-token-validity-in-seconds key. The settings files reside in the src/main/resources/config directory of our UAA project.

6. Generating the UAA-Enabled Gateway

Now that we’re confident our UAA service and service registry are working, let’s create an ecosystem for these to interact with. By the end, we’ll have added:

  • An Angular-based front-end
  • A microservice back-end
  • An API Gateway that fronts both of these

Let’s actually begin with the gateway, as it will be the service that will negotiate with UAA for authentication. It’s going to host our front-end application and route API requests to other microservices.

Once again, we’ll use the JHipster command-line tool inside a newly created directory:

$ mkdir gateway
$ cd gateway
$ jhipster

As before, we have to answer a few questions in order to generate the project. The important ones are the following:

  • Application typemust be “Microservices gateway”
  • Application name: We’ll use “gateway” this time
  • Service discovery: Select “JHipster registry”
  • Authentication type: We must select the “Authentication with JHipster UAA server” option here
  • UI Framework: Let’s pick “Angular 6”

Once JHipster generates all its artifacts, we can build and run the gateway with the provided Maven wrapper script:

$ ./mwnw
... many messages omitted
----------------------------------------------------------
        Application 'gateway' is running! Access URLs:
        Local:          http://localhost:8080/
        External:       http://192.168.99.1:8080/
        Profile(s):     [dev, swagger]
----------------------------------------------------------
2018-10-15 23:46:43.011  INFO 21668 --- [  restartedMain] c.baeldung.jhipster.gateway.GatewayApp   :
----------------------------------------------------------
        Config Server:  Connected to the JHipster Registry config server!
----------------------------------------------------------

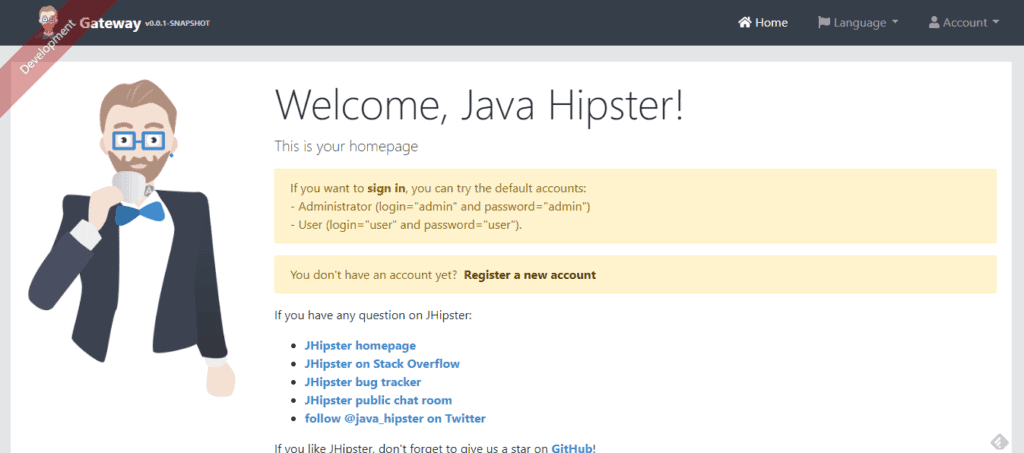
With the above message, we can access our application by pointing our browser to http://localhost:8080, which should display the default generated homepage:

Let’s go ahead and log into our application, by navigating to the Account > Login menu item. We’ll use admin/admin as credentials, which JHipster creates automatically by default. All going well, the welcome page will display a message confirming a successful logon:

Let’s recap what happened to get us here: First, the gateway sent our credentials to UAA’s OAuth2 token endpoint, which validated them and generated a response containing an access and a refresh JWT token. The gateway then took those tokens and sent them back to the browser as cookies.

Next, the Angular front-end called the /uaa/api/account API, which once again the gateway forwarded to UAA. In this process, the gateway takes the cookie containing the access token and use its value to add an authorization header to the request.

If needed, we can see all this flow in great detail by checking both UAA and Gateway’s logs. We can also get full wire-level data by setting the org.apache.http.wire logger level to DEBUG.

7. Generating a UAA-Enabled Microservice

Now that our application environment is up and running, it’s time to add a simple microservice to it. We’ll create a “quotes” microservice, which will expose a full REST API that allows us to create, query, modify, and delete a set of stock quotes. Each quote will have only three properties:

  • The quote’s trade symbol
  • Its price, and
  • The last trade’s timestamp

Let’s go back to our terminal and use JHipster’s command-line tool to generate our project:

$ mkdir quotes
$ cd quotes
$ jhipster

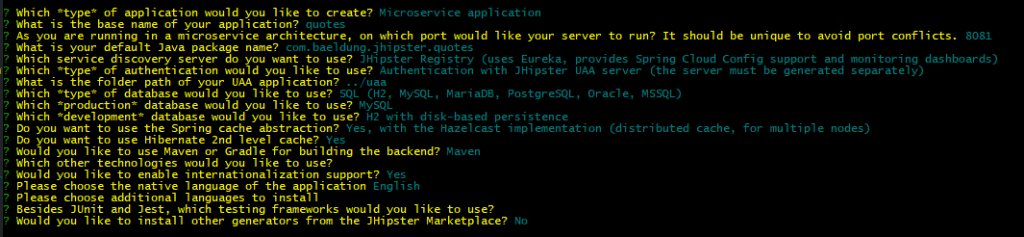
This time, we’ll ask JHipster to generate a Microservice application, which we’ll call “quotes”. The questions are similar to the ones we’ve answered before. We can keep the defaults for most of them, except for these three:

  • Service Discovery: Select “JHipster Registry” since we’re already using it in our architecture
  • Path to the UAA application: Since we’re keeping all projects directories under the same folder, this will be ../uaa (unless we’ve changed it, of course)
  • Authentication Type: Select “JHipster UAA server”

Here’s what a typical sequence of answers will look like in our case:

Once JHipster finishes generating the project, we can go ahead and build it:

$ mvnw
... many, many messages omitted
----------------------------------------------------------
        Application 'quotes' is running! Access URLs:
        Local:          http://localhost:8081/
        External:       http://192.168.99.1:8081/
        Profile(s):     [dev, swagger]
----------------------------------------------------------
2018-10-19 00:16:05.581  INFO 16092 --- [  restartedMain] com.baeldung.jhipster.quotes.QuotesApp   :
----------------------------------------------------------
        Config Server:  Connected to the JHipster Registry config server!
----------------------------------------------------------
... more messages omitted

The message “Connected to the JHipster Registry config server!” is what we’re looking for here. Its presence tells us that the microservice registered itself with the registry and, because of this, the gateway will be able to route requests to our “quotes” resource and display it on a nice UI, once we’ve created it. Since we’re using a microservice architecture, we split this task into two parts:

  • Create the “quotes” resource back-end service
  • Create the “quotes” UI in the front-end (part of the gateway project)

7.1. Adding the Quotes Resource

First, we need to make sure the that the quotes microservice application is stopped — we can hit CTRL-C on the same console window that we previously used to run it.

Now, let’s add an entity to the project using JHipster’s tool. This time we’ll use the import-jdl command, which will save us from the tedious and error-prone process of supplying all details individually. For additional information about the JDL format, please refer to the full JDL reference.

Next, we create a text file called quotes.jh containing our Quote entity definition, along with some code generation directives:

entity Quote {
  symbol String required unique,
  price BigDecimal required,
  lastTrade ZonedDateTime required
}
dto Quote with mapstruct
paginate Quote with pagination
service Quote with serviceImpl
microservice Quote with quotes
filter Quote
clientRootFolder Quote with quotes

We can now import this entity definition to our project:

$ jhipster import-jdl quotes.jh

Note: during the import, JHipster will complain about a conflict while applying changes to the master.xml file. We can safely choose the overwrite option in this case.

We can now build and run our microservice again using mvnw. Once it’s up, we can verify that the gateway picks up the new route accessing the Gateway view, available from the Administration menu. This time, we can see that there’s an entry for the “/quotes/**” route, which shows that the backend is ready to be used by the UI.

7.2. Adding the Quotes UI

Finally, let’s generate the CRUD UI in the gateway project that we’ll use to access our quotes. We’ll use the same JDL file from the “quotes” microservice project to generate the UI components, and we’ll import it using JHipster’s import-jdl command:

$ jhipster import-jdl ../jhipster-quotes/quotes.jh
...messages omitted
? Overwrite webpack\webpack.dev.js? <b>y</b>
... messages omitted
Congratulations, JHipster execution is complete!

During the import, JHipster will prompt a few times for the action it should take regarding conflicting files. In our case, we can simply overwrite existing resources, since we haven’t done any customization.

Now we can restart the gateway and see what we’ve accomplished. Let’s point our browser to the gateway at http://localhost:8080, making sure we refresh its contents. The Entities menu should now have a new entry for the Quotes resource:

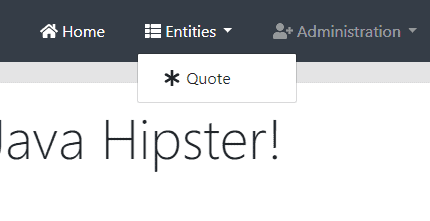
Clicking on this menu option brings up the Quotes listing screen:

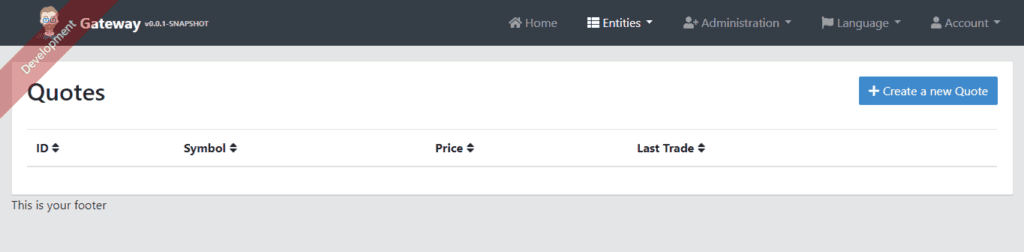
As expected, the listing is empty — we haven’t added any quotes yet! Let’s try to add one by clicking the “Create New Quote Button” on the top right of this screen, which brings us to the create/edit form:

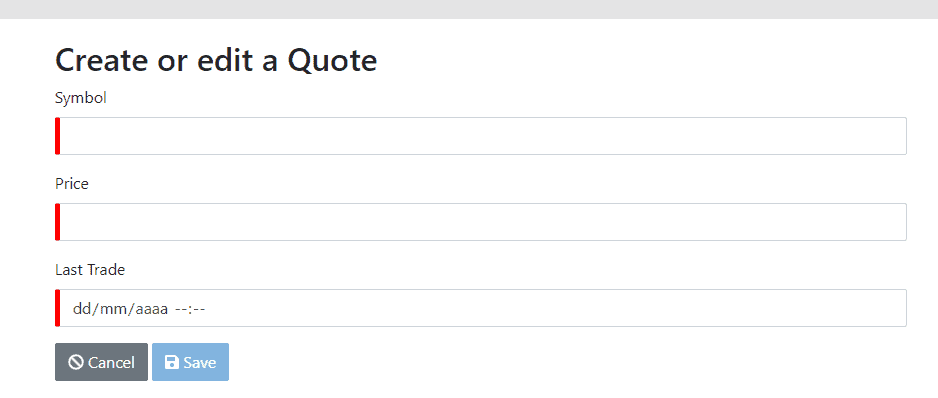
We can see that the generated form has all expected features:

  • Required fields are marked with a red indicator, which turns green once filled
  • Date/Time and numeric fields use native components to help with data entry
  • We can cancel this activity, which will leave data unchanged, or save our new or modified entity

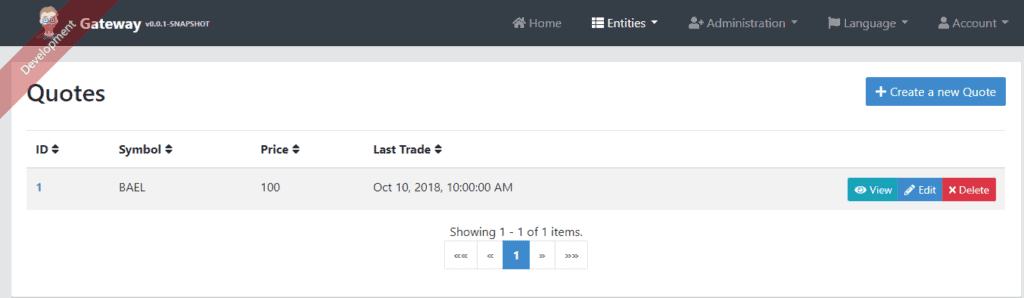
After filling this form and hitting Save, we’ll see the results on the listing screen. We can now see the new Quotes instance in the data grid:

As an admin, we also have access to the API menu item, which takes us to the standard Swagger API Developer Portal. In this screen, we can select one of the available APIs to exercise:

  • default: Gateway’s own API that displays available routes
  • uaa: Account and User APIs
  • quotes: Quotes API

8. Next Steps

The application we’ve built so far works as expected and provides a solid base for further development. We’ll most definitely also need to write some (or a lot of) custom code, depending on the complexity of our requirements. Some areas that are likely to need some work are:

  • UI look and feel customization: This is usually quite easy due to the way the front-end application is structured — we can go a long way simply by fiddling with CSS and adding some images
  • User repository changes: Some organizations already have some sort of internal user repository (e.g. an LDAP directory) — this will require changes on the UAA, but the nice part is that we only need to change it once
  • Finer grained authorization on entities: The standard security model used by the generated entity back-end does not have any kind of instance-level and/or field-level security — it’s up to the developer to add those restrictions at the appropriate level (API or service, depending on the case)

Even with those remarks, using a tool like JHispter can help a lot when developing a new application. It will bring with it a solid foundation and can keep a good level of consistency in our code base as the system — and developers — evolve.

9. Conclusion

In this article, we’ve shown how to use JHispter to create a working application based on a microservices architecture and JHipster’s UAA server. We achieved that without writing a single line of Java code, which is quite impressive.

As usual, the full code for the projects presented in this article is available in our GitHub repository.


Debugging Spring Applications

$
0
0

1. Introduction

Debugging is one of the most important tools for writing software.

In this tutorial, we’ll review some of the ways in which we can debug Spring applications.

We’ll also see how Spring Boot, traditional application servers, and IDEs simplify this.

2. Java Debug Args

First, let’s look at what Java gives us out of the box.

By default, the JVM does not enable debugging. This is because debugging creates additional overhead inside the JVM. It can also be a security concern for applications that are publicly accessible.

Therefore, debugging should only be performed during development and never on production systems.

Before we can attach a debugger, we must first configure the JVM to allow debugging. We do this by setting a command line argument for the JVM:

-agentlib:jdwp=transport=dt_socket,server=y,suspend=n,address=8000

Let’s break down what each of these values means:

-agentlib:jdwp

Enable the Java Debug Wire Protocol (JDWP) agent inside the JVM. This is the main command line argument that enables debugging.

transport=dt_socket

Use a network socket for debug connections. Other options include Unix sockets and shared memory.

server=y

Listen for incoming debugger connections. When set to n, the process will try to connect to a debugger instead of waiting for incoming connections. Additional arguments are required when this is set to n.

suspend=n

Do not wait for a debug connection at startup. The application will start and run normally until a debugger is attached. When set to y, the process will not start until a debugger is attached.

address=8000

The network port that the JVM will listen for debug connections.

The values above are standard and will work for most use cases and operating systems. The JPDA connection guide covers all possible values in more detail.

3. Spring Boot Applications

Spring Boot applications can be started several ways. The simplest way is from the command line using the java command with -jar option.

To enable debugging, we would simply add the debug argument using the -D option:

java -jar myapp.jar -Dagentlib:jdwp=transport=dt_socket,server=y,suspend=n,address=8000

With Maven, we can use the provided run goal to start our application with debugging enabled:

mvn spring-boot:run -Dagentlib:jdwp=transport=dt_socket,server=y,suspend=n,address=8000

Likewise, with Gradle, we can use the bootRun task. First, we must update the build.gradle file to ensure Gradle passes command line arguments to the JVM:

bootRun {
   systemProperties = System.properties
}

Now we can execute the bootRun task:

gradle bootRun -Dagentlib:jdwp=transport=dt_socket,server=y,suspend=n,address=8000

4. Application Servers

While Spring Boot has become very popular in recent years, traditional application servers are still quite prevalent in modern software architectures. In this section, we’ll look at how to enable debug for some of the more popular applications servers.

Most application servers provide a script for starting and stopping applications. Enabling debug is typically just a matter of adding additional arguments to this script and/or setting additional environment variables.

4.1. Tomcat

The startup script for Tomcat is named catalina.sh (catalina.bat on Windows). To start a Tomcat server with debug enabled we can prepend jpda to the arguments:

catalina.sh jpda start

The default debug arguments will use a network socket listening on port 8000 with suspend=n. These can be changed by setting one or more of the following environment variables: JPDA_TRANSPORT, JPDA_ADDRESS, and JPDA_SUSPEND.

We can also get full control of the debug arguments by setting JPDA_OPTS. When this variable is set, it takes precedence over the other JPDA variables. Thus it must be a complete debug argument for the JVM.

4.2. Wildfly

The startup script for Wildfly is stand-alone.sh. To start a Wildfly server with debug enabled we can add –debug.

The default debug mode uses a network listener on port 8787 with suspend=n. We can override the port by specifying it after the –debug argument.

For more control over the debug argument, we can just add the complete debug arguments to the JAVA_OPTS environment variable.

4.3. Weblogic

The startup script for Weblogic is startWeblogic.sh. To start a Weblogic server with debug enabled we can set the environment variable debugFlag to true.

The default debug mode uses a network listener on port 8453 with suspend=n. We can override the port by setting the DEBUG_PORT environment variable.

For more control over the debug argument, we can just add the complete debug arguments to the JAVA_OPTIONS environment variable.

The latest versions of Weblogic also provide a Maven plugin to start and stop servers. This plugin will honor the same environment variables as the startup script.

4.4. Glassfish

The startup script for Glassfish is asadmin. To start a Glassfish server with debug enabled we have to use –debug:

asadmin start-domain --debug

The default debug mode uses a network listener on port 9009 with suspend=n.

4.5. Jetty

The Jetty application server does not come with a startup script. Instead, Jetty servers are started using the java command.

Thus, enabling debugging is as simple as adding the standard JVM command line arguments.

5. Debugging From an IDE

Now that we have seen how to enable debugging in various application types, let’s look at connecting a debugger.

Every modern IDE offers debugging support. This includes both the ability to start a new process with debugging enabled, as well as the ability to debug an already running process.

5.1. IntelliJ

IntelliJ offers first-class support for Spring and Spring Boot applications. Debugging is as simple as navigating to the class with the main method, right-clicking the triangle icon, and choosing Debug.

If a project contains multiple Spring Boot applications, IntelliJ will provide a Run Dashboard tool window. This window lets us debug multiple Spring Boot applications from a single place:

For applications using Tomcat or other web servers, we can create a custom configuration for debugging. Under Run > Edit Configurations, there are a number of templates for most popular application servers:

Finally, IntelliJ makes it very easy to connect to any running process and debug it. As long as the application was started with the proper debug arguments, IntelliJ can connect to it, even if it’s on another host.

On the Run/Debug Configurations screen, the Remote template will let us configure how to attach to the already running application:

Note that IntelliJ only needs to know the hostname and debug port. As a convenience, it tells us the proper JVM command line arguments which should be used on the application that we want to debug.

5.2. Eclipse

The quickest way to debug a Spring Boot application in Eclipse is to right-click the main method from either the Package Explorer or Outline windows:

The default installation of Eclipse does not support Spring or Spring Boot out of the box. However, there is a Spring Tools add-on available in the Eclipse Marketplace that provides Spring support comparable to IntelliJ.

Most notably the add-on provides a Boot Dashboard that lets us manage multiple Spring Boot applications from a single place:

The add-on also provides a Spring Boot Run/Debug Configuration that allows customizing debug of a single Spring Boot application. This customized view is available from all the same places as the standard Java Application configuration.

To debug an already running process, either locally or on a remote host, we can use the Remote Java Application configuration:

6. Debugging with Docker

Debugging a Spring application inside a Docker container may require additional configuration. If the container is running locally and is not using host network mode, then the debug port will not be accessible outside the container.

There are several ways to expose the debug port in Docker.

We can use –expose with the docker run command:

docker run --expose 8000 mydockerimage

We can also add the EXPOSE directive to the Dockerfile:

EXPOSE 8000

Or if we’re using Docker Compose, we can add it into the YAML:

expose:
 - "8000"

7. Conclusion

In this article, we’ve seen how to enable debugging for any Java application.

By simply adding a single command line argument, we can easily debug any Java application.

We also saw that both Maven and Gradle, as well as most popular IDEs, all have specialized add-ons to make debugging Spring and Spring Boot applications even easier.

Persist a JSON Object Using Hibernate

$
0
0

1. Overview

Some projects may require JSON objects to be persisted in a relational database.

In this tutorial, we’ll see how to take a JSON object and persist it in a relational database.

There are several frameworks available that provide this functionality, but we will look at a few simple, generic options using only Hibernate and Jackson.

2. Dependencies

We’ll use the basic Hibernate Core dependency for this tutorial:

<dependency>
    <groupId>org.hibernate</groupId>
    <artifactId>hibernate-core</artifactId>
    <version>5.4.0.Final</version>
</dependency>

We’ll also be using Jackson as our JSON library:

<dependency>
    <groupId>com.fasterxml.jackson.core</groupId>
    <artifactId>jackson-databind</artifactId>
    <version>2.9.8</version>
</dependency>

Note that these techniques are not limited to these two libraries. We can substitute our favorite JPA provider and JSON library.

3. Serialize and Deserialize Methods

The most basic way to persist a JSON object in a relational database is to convert the object into a String before persisting it. Then, we convert it back into an object when we retrieve it from the database.

We can do this in a few different ways.

The first one we’ll look at is using custom serialize and deserialize methods.

We’ll start with a simple Customer entity that stores the customer’s first and last name, as well as some attributes about that customer.

A standard JSON object would represent those attributes as a HashMap, so that’s what we’ll use here:

@Entity
@Table(name = "Customers")
public class Customer {

    @Id
    private int id;

    private String firstName;

    private String lastName;

    private String customerAttributeJSON;

    @Convert(converter = HashMapConverter.class)
    private Map<String, Object> customerAttributes;
}

Rather than saving the attributes in a separate table, we are going to store them as JSON in a column in the Customers table. This can help reduce schema complexity and improve the performance of queries.

First, we’ll create a serialize method that will take our customerAttributes and convert it to a JSON string:

public void serializeCustomerAttributes() throws JsonProcessingException {
    this.customerAttributeJSON = objectMapper.writeValueAsString(customerAttributes);
}

We can call this method manually before persisting, or we can call it from the setCustomerAttributes method so that each time the attributes are updated, the JSON string is also updated. 

Next, we’ll create a method to deserialize the JSON string back into a HashMap object when we retrieve the Customer from the database:

public void deserializeCustomerAttributes() throws IOException {
    this.customerAttributes = objectMapper.readValue(customerAttributeJSON, HashMap.class);
}

Once again, there are a few different places that we can call this method from, but, in this example, we’ll call it manually. 

So, persisting and retrieving our Customer object would look something like this:

@Test
public void whenStoringAJsonColumn_thenDeserializedVersionMatches() {
    Customer customer = new Customer();
    customer.setFirstName("first name");
    customer.setLastName("last name");

    Map<String, Object> attributes = new HashMap<>();
    attributes.put("address", "123 Main Street");
    attributes.put("zipcode", 12345);

    customer.setCustomerAttributes(attributes);
    customer.serializeCustomerAttributes();

    String serialized = customer.getCustomerAttributeJSON();

    customer.setCustomerAttributeJSON(serialized);
    customer.deserializeCustomerAttributes();

    assertEquals(attributes, customer.getCustomerAttributes());
}

4. Attribute Converter

If we are using JPA 2.1 or higher, we can make use of AttributeConverters to streamline this process.

First, we’ll create an implementation of AttributeConverter. We’ll reuse our code from earlier:

public class HashMapConverter implements AttributeConverter<Map<String, Object>, String> {

    @Override
    public String convertToDatabaseColumn(Map<String, Object> customerInfo) {

        String customerInfoJson = null;
        try {
            customerInfoJson = objectMapper.writeValueAsString(customerInfo);
        } catch (final JsonProcessingException e) {
            logger.error("JSON writing error", e);
        }

        return customerInfoJson;
    }

    @Override
    public Map<String, Object> convertToEntityAttribute(String customerInfoJSON) {

        Map<String, Object> customerInfo = null;
        try {
            customerInfo = objectMapper.readValue(customerInfoJSON, Map.class);
        } catch (final IOException e) {
            logger.error("JSON reading error", e);
        }

        return customerInfo;
    }

}

Next, we tell Hibernate to use our new AttributeConverter for the customerAttributes field, and we’re done:

@Convert(converter = HashMapConverter.class)
private Map<String, Object> customerAttributes;

With this approach, we no longer have to manually call the serialize and deserialize methods since Hibernate will take care of that for us. We can simply save and retrieve the Customer object normally.

5. Conclusion

In this article, we’ve seen several examples of how to persist JSON objects using Hibernate and Jackson.

Our first example looked at a simple, compatible method using custom serialize and deserialize methods. And second, we introduced AttributeConverters as a powerful way to simplify our code.

As always, make sure to check out the source code for this tutorial over on Github.

Introduction to JVM Code Cache

$
0
0

1. Introduction

In this tutorial, we’re going to have a quick look at and learn about the JVM’s code cache memory.

2. What is the Code Cache?

Simply put, JVM Code Cache is an area where JVM stores its bytecode compiled into native code. We call each block of the executable native code an nmethod. The nmethod might be a complete or inlined Java method.

The just-in-time (JIT) compiler is the biggest consumer of the code cache area. That’s why some developers call this memory a JIT code cache.

3. Code Cache Tuning 

The code cache has a fixed size. Once it is full, the JVM won’t compile any additional code as the JIT compiler is now off. Furthermore, we will receive the “CodeCache is full… The compiler has been disabled” warning message. As a result, we’ll end up with degraded performance in our application. To avoid this, we can tune the code cache with the following size options:

  • InitialCodeCacheSize – the initial code cache size, 160K default
  • ReservedCodeCacheSize – the default maximum size is 48MB
  • CodeCacheExpansionSize – the expansion size of the code cache, 32KB or 64KB

Increasing the ReservedCodeCacheSize can be a solution, but this is typically only a temporary workaround.

Fortunately, the JVM offers a UseCodeCacheFlushing option to control the flushing of the code cache area. Its default value is false. When we enable it, it frees the occupied area when the following conditions are met:

  • the code cache is full; this area is flushed if its size exceeds a certain threshold
  • the certain interval is passed since the last cleanup
  • the precompiled code isn’t hot enough. For each compiled method the JVM keeps track with a special hotness counter. If the value of this counter is less than a computed threshold, the JVM frees this piece of precompiled code

4. Code Cache Usage

In order to monitor the code cache usage, we need to track the size of the memory currently in use.

To get information on code cache usage, we can specify the –XX:+PrintCodeCache JVM option. After running our application, we’ll see a similar output:

CodeCache: size=32768Kb used=542Kb max_used=542Kb free=32226Kb

Let’s see what each of these values mean:

  • size in the output shows the maximum size of the memory, which is identical to ReservedCodeCacheSize
  • used is the actual size of the memory that currently is in use
  • max_used is the maximum size that has been in use
  • free is the remaining memory which is not occupied yet

The PrintCodeCache option is very useful, as we can:

  • see when the flushing happens
  • determine if we reached a critical memory usage point

5. Conclusion

This quick article presents a brief introduction to the JVM Code Cache.

Additionally, we presented some usage and tune-up options to monitor and diagnose this memory area.

Java Weekly, Issue 261

$
0
0

Here we go…

1. Spring and Java

>> Raw String Literals Removed From Java 12 as Feature Set Frozen [infoq.com]

A rundown of the features that made the cut for Java 12, and one highly anticipated feature that did not.

>> Building Native Images of Kotlin Programs Using GraalVM [vorba.ch]

And a clever way to build native binary command-line applications in Kotlin.

>> Hibernate Tips: How To Map an Entity to a Query [thoughts-on-java.org]

A brief look at when to consider the @Subselect annotation over other options.

Also worth reading:

Webinars and presentations:

Time to upgrade:

2. Technical and Musings

>> Building a VPC with CloudFormation – Part 1 [infoq.com]

A new series kicks off, all about creating and managing Virtual Private Clouds with CloudFormation.

>> How to manage custom CloudFormation resources with Lambda [advancedweb.hu]

And a good write-up on how to create custom resources using a Lambda function.

>> Understanding Blockchain Basics and Use Cases [infoq.com]

A solid intro to blockchain, if you need one.

Also worth reading:

3. Comics

And my favorite Dilberts of the week:

>> Boss Has a Vision for the Company [dilbert.com]

>> Ask Ted [dilbert.com]

>> Contacting the Alien Probe [dilbert.com]

4. Pick of the Week

>> This is why you sanitize user input: Chat hacked live by XSS/HTML code injection, hilarity ensues [youtube.com]

Happy New Year,

Eugen.

Intersection of Two Lists in Java

$
0
0

1. Overview

In this tutorial, we’ll learn how to retrieve the intersection of two Lists.

Like many other things, this has become much easier thanks to the introduction of streams in Java 8.

2. Intersection of Two Lists of Strings

Let’s create two Lists of Strings with some intersection — both having some duplicated elements:

List<String> list = Arrays.asList("red", "blue", "blue", "green", "red");
List<String> otherList = Arrays.asList("red", "green", "green", "yellow");

And now we’ll determine the intersection of the lists with the help of stream methods:

Set<String> result = list.stream()
  .distinct()
  .filter(otherList::contains)
  .collect(Collectors.toSet());

Set<String> commonElements = new HashSet(Arrays.asList("red", "green"));

Assert.assertEquals(commonElements, result);

First, we remove the duplicated elements with distinct. Then, we use the filter to select the elements that are also contained in the otherList.

Finally, we convert our output with a Collector. The intersection should contain each common element only once. The order shouldn’t matter, thus toSet is the most straightforward choice, but we can also use toList or another collector method.

For more details, review our guide to Java 8’s Collectors.

3. Intersection of Lists of Custom Classes

What if our Lists don’t contain Strings but rather instances of a custom class we’ve created? Well, as long as we follow Java’s conventions, the solution with stream methods will work fine for our custom class.

How does the contains method decide whether a specific object appears in a list? Based on the equals method. Thus, we have to override the equals method and make sure that it compares two objects based on the values of the relevant properties.

For instance, two rectangles are equal if their widths and heights are equal.

If we don’t override the equals method, our class uses the equals implementation of the parent class. At the end of the day, or rather, the inheritance chain, the Object class’ equals method gets executed. Then two instances are equal only if they refer to exactly the same object on the heap.

For more information about the equals method, see our article on Java equals() and hashCode() Contracts.

4. Conclusion

In this quick article, we’ve seen how to use streams to calculate the intersection of two lists. There are many other operations that used to be quite tedious but are pretty straightforward if we know our way around the Java Stream API. Take a look at our further tutorials with Java streams here.

Code examples are available over on GitHub.

Mapping a Dynamic JSON Object with Jackson

$
0
0

1. Introduction

Working with predefined JSON data structures with Jackson is straightforward. However, sometimes we need to handle dynamic JSON objects, which have unknown properties.

In this short tutorial, we’ll see multiple ways of mapping dynamic JSON objects into Java classes.

Note that in all of the tests, we assume we have a field objectMapper of type com.fasterxml.jackson.databind.ObjectMapper.

2. Using JsonNode

Let’s say we want to process product specifications in a webshop. All products have some common properties, but there’re others, which depend on the type of the product.

For example, we want to know the aspect ratio of the display of a cell phone, but this property doesn’t make much sense for a shoe.

The data structure looks like this:

{
    "name": "Pear yPhone 72",
    "category": "cellphone",
    "details": {
        "displayAspectRatio": "97:3",
        "audioConnector": "none"
    }
}

We store the dynamic properties in the details object.

We can map the common properties with the following Java class:

class Product {

    String name;
    String category;

    // standard getters and setters
}

On top of that, we need an appropriate representation for the details object. For example, com.fasterxml.jackson.databind.JsonNode can handle dynamic keys.

To use it, we have to add it as a field to our Product class:

class Product {

    // common fields

    JsonNode details;

    // standard getters and setters
}

Finally, we verify that it works:

String json = "<json object>";

Product product = objectMapper.readValue(json, Product.class);

assertThat(product.getName()).isEqualTo("Pear yPhone 72");
assertThat(product.getDetails().get("audioConnector").asText()).isEqualTo("none");

However, we have a problem with this solution. Our class depends on the Jackson library since we have a JsonNode field.

3. Using Map

We can solve this issue by using java.util.Map for the details field. More precisely, we have to use Map<String, Object>.

Everything else can stay the same:

class Product {

    // common fields

    Map<String, Object> details;

    // standard getters and setters
}

And then we can verify it with a test:

String json = "<json object>";

Product product = objectMapper.readValue(json, Product.class);

assertThat(product.getName()).isEqualTo("Pear yPhone 72");
assertThat(product.getDetails().get("audioConnector")).isEqualTo("none");

4. Using @JsonAnySetter

The previous solutions are good when an object contains only dynamic properties. However, sometimes we have fixed and dynamic properties mixed in a single JSON object.

For example, we may need to flatten our product representation:

{
    "name": "Pear yPhone 72",
    "category": "cellphone",
    "displayAspectRatio": "97:3",
    "audioConnector": "none"
}

We can treat a structure like this as a dynamic object. Unfortunately, that means we can’t define common properties — we have to treat them dynamically, too.

Alternatively, we could use @JsonAnySetter to mark a method for handling additional, unknown properties. Such a method should accept two arguments: the name and value of the property:

class Product {

    // common fields

    Map<String, Object> details = new LinkedHashMap<>();

    @JsonAnySetter
    void setDetail(String key, Object value) {
        details.put(key, value);
    }

    // standard getters and setters
}

Note, that we have to instantiate the details object to avoid NullPointerExceptions.

Since we store the dynamic properties in a Map, we can use it the same way we did before:

String json = "<json object>";

Product product = objectMapper.readValue(json, Product.class);

assertThat(product.getName()).isEqualTo("Pear yPhone 72");
assertThat(product.getDetails().get("audioConnector")).isEqualTo("none");

5. Creating a Custom Deserializer

For most cases, these solutions work just fine. However, sometimes we need much more control. For example, we could store deserialization information about our JSON objects in a database.

We can target those situations with a custom deserializer. Since it’s a complex topic, we cover it in a different article, getting Started with Custom Deserialization in Jackson.

6. Conclusion

In this article, we saw multiple ways of handling dynamic JSON objects with Jackson.

As usual, the examples are available over on GitHub.

Replace a Character at a Specific Index in a String in Java

$
0
0

1. Introduction

In this quick tutorial, we’ll demonstrate how to replace a character at a specific index in a String in Java.

We’ll present four implementations of simple methods that take the original String, a character, and the index where we need to replace it.

2. Using a Character Array

Let’s begin with a simple approach, using an array of char.

Here, the idea is to convert the String to char[] and then assign the new char at the given index. Finally, we construct the desired String from that array.

public String replaceCharUsingCharArray(String str, char ch, int index) {
    char[] chars = str.toCharArray();
    chars[index] = ch;
    return String.valueOf(chars);
}

This is a low-level design approach and gives us a lot of flexibility.

3. Using the substring Method

A higher-level approach is to use the substring() method of the String class.

It will create a new String by concatenating the substring of the original String before the index with the new character and substring of the original String after the index:

public String replaceChar(String str, char ch, int index) {
    return str.substring(0, index) + ch + str.substring(index+1);
}

4. Using StringBuilder

We can get the same effect by using StringBuilder. We can replace the character at a specific index using the method setCharAt():

public String replaceChar(String str, char ch, int index) {
    StringBuilder myString = new StringBuilder(str);
    myString.setCharAt(index, ch);
    return myString.toString();
}

However, StringBuilder is not thread-safe. In a multi-threaded environment, multiple threads can access the StringBuilder object simultaneously, and the output it produces can’t be predicted.

In the next section, we’ll implement the thread-safe version.

5. Using StringBuffer

Using StringBuffer, we can overcome the problem of thread safety as the StringBuffer class is thread-safe. It is a synchronized class, where only one thread can access the String at a time, so the output it produces is predictable:

public String replaceChar(String str, char ch, int index) {
    StringBuffer myString = new StringBuffer(str);
    myString.setCharAt(index, ch);
    return myString.toString();
}

6. Conclusion

In this article, we focused on several ways of replacing a character at a specific index in a String using Java.

String instances are immutable, so we need to create a new string or use StringBuffer and StringBuilder to give us some mutability.

As usual, the complete source code for the above tutorial is available over on GitHub.


Verbose Garbage Collection in Java

$
0
0

1. Overview

In this tutorial, we’ll take a look at how to turn on verbose garbage collection in a Java application. We’ll begin by introducing what verbose garbage collection is and why it can be useful.

Next, we’ll look at several different examples and we’ll learn about the different configuration options available. Additionally, we’ll also focus on how to interpret the output of our verbose logs.

To learn more about Garbage Collection (GC) and the different implementations available, check out our article on Java Garbage Collectors.

2. Brief Introduction to Verbose Garbage Collection

Switching on verbose garbage collection logging is often required when tuning and debugging many issues, particularly memory problems. In fact, some would argue that in order to strictly monitor our application health, we should always monitor the JVM’s Garbage Collection performance.

As we’ll see, the GC log is a very important tool for revealing potential improvements to the heap and GC configuration of our application. For each GC happening, the GC log provides exact data about its results and duration.

Over time, analysis of this information can help us better understand the behavior or our application and help us tune our application’s performance. Moreover, it can help optimize GC frequency and collection times by specifying the best heap sizes, other JVM options, and alternate GC algorithms.

2.1. A Simple Java Program

We’ll use a straightforward Java program to demonstrate how to enable and interpret our GC logs:

public class Application {

    private static Map<String, String> stringContainer = new HashMap<>();

    public static void main(String[] args) {
        System.out.println("Start of program!");
        String stringWithPrefix = "stringWithPrefix";

        // Load Java Heap with 3 M java.lang.String instances
        for (int i = 0; i < 3000000; i++) {
            String newString = stringWithPrefix + i;
            stringContainer.put(newString, newString);
        }
        System.out.println("MAP size: " + stringContainer.size());

        // Explicit GC!
        System.gc();

        // Remove 2 M out of 3 M
        for (int i = 0; i < 2000000; i++) {
            String newString = stringWithPrefix + i;
            stringContainer.remove(newString);
        }

        System.out.println("MAP size: " + stringContainer.size());
        System.out.println("End of program!");
    }
}

As we can see in the above example, this simple program loads 3 million String instances into a Map object. We then make an explicit call to the garbage collector using System.gc().

Finally, we remove 2 million of the String instances from the Map. We also explicitly use System.out.println to make interpreting the output easier.

In the next section, we’ll see how to activate GC logging.

3. Activating “simple” GC Logging

Let’s begin by running our program and enabling verbose GC via our JVM start-up arguments:

-XX:+UseSerialGC -Xms1024m -Xmx1024m -verbose:gc

The important argument here is the -verbose:gc, which activates the logging of garbage collection information in its simplest form. By default, the GC log is written to stdout and should output a line for every young generation GC and every full GC.

For the purposes of our example, we’ve specified the serial garbage collector, the simplest GC implementation, via the argument -XX:+UseSerialGC.

We’ve also set a minimal and maximal heap size of 1024mb, but there are, of course, more JVM parameters we can tune.

3.1. Basic Understanding of the Verbose Output

Now let’s take a look at the output of our simple program:

Start of program!
[GC (Allocation Failure)  279616K->146232K(1013632K), 0.3318607 secs]
[GC (Allocation Failure)  425848K->295442K(1013632K), 0.4266943 secs]
MAP size: 3000000
[Full GC (System.gc())  434341K->368279K(1013632K), 0.5420611 secs]
[GC (Allocation Failure)  647895K->368280K(1013632K), 0.0075449 secs]
MAP size: 1000000
End of program!

In the above output, we can already see a lot of useful information about what is going on inside the JVM.

At first, this output can look pretty daunting, but let’s now go through it step by step.

First of all, we can see that four collections took place, one Full GC and three cleaning Young generation.

3.2. The Verbose Output in More Detail

Let’s decompose the output lines in more detail to understand exactly what is going on:

  1. GC or Full GCThe type of Garbage Collection, either GC or Full GC to distinguish a minor or full garbage collection
  2. (Allocation Failure) or (System.gc()) – The cause of the collection – Allocation Failure indicates that no more space was left in Eden to allocate our objects
  3. 279616K->146232K – The occupied heap memory before and after the GC, respectively (separated by an arrow)
  4. (1013632K) – The current capacity of the heap
  5. 0.3318607 secs – The duration of the GC event in seconds

Thus, if we take the first line, 279616K->146232K(1013632K) means that the GC reduced the occupied heap memory from 279616K to 146232K. The heap capacity at the time of GC was 1013632K, and the GC took 0.3318607 seconds.

However, although the simple GC logging format can be useful, it provides limited details. For example, we cannot tell if the GC moved any objects from the young to the old generation or what was the total size of the young generation before and after each collection.

For that reason, detailed GC logging is more useful than the simple one.

4. Activating “detailed” GC Logging

To activate the detailed GC logging, we use the argument -XX:+PrintGCDetails. This will give us more details about each GC, such as:

  • Size of the young and old generation before and after each GC
  • The time it takes for a GC to happen in young and old generation
  • The Size of objects promoted at every GC
  • A summary of the size of the total heap

In the next example, we’ll see how to capture even more detailed information in our logs combining -verbose:gc with this extra argument.

5. Interpreting the “detailed” Verbose Output

Let’s run our sample program again:

-XX:+UseSerialGC -Xms1024m -Xmx1024m -verbose:gc -XX:+PrintGCDetails

This time the output is rather more verbose:

Start of program!
[GC (Allocation Failure) [DefNew: 279616K-&gt;34944K(314560K), 0.3626923 secs] 279616K-&gt;146232K(1013632K), 0.3627492 secs] [Times: user=0.33 sys=0.03, real=0.36 secs] 
[GC (Allocation Failure) [DefNew: 314560K-&gt;34943K(314560K), 0.4589079 secs] 425848K-&gt;295442K(1013632K), 0.4589526 secs] [Times: user=0.41 sys=0.05, real=0.46 secs] 
MAP size: 3000000
[Full GC (System.gc()) [Tenured: 260498K-&gt;368281K(699072K), 0.5580183 secs] 434341K-&gt;368281K(1013632K), [Metaspace: 2624K-&gt;2624K(1056768K)], 0.5580738 secs] [Times: user=0.50 sys=0.06, real=0.56 secs] 
[GC (Allocation Failure) [DefNew: 279616K-&gt;0K(314560K), 0.0076722 secs] 647897K-&gt;368281K(1013632K), 0.0077169 secs] [Times: user=0.01 sys=0.00, real=0.01 secs] 
MAP size: 1000000
End of program!
Heap
 def new generation   total 314560K, used 100261K [0x00000000c0000000, 0x00000000d5550000, 0x00000000d5550000)
  eden space 279616K,  35% used [0x00000000c0000000, 0x00000000c61e9370, 0x00000000d1110000)
  from space 34944K,   0% used [0x00000000d3330000, 0x00000000d3330188, 0x00000000d5550000)
  to   space 34944K,   0% used [0x00000000d1110000, 0x00000000d1110000, 0x00000000d3330000)
 tenured generation   total 699072K, used 368281K [0x00000000d5550000, 0x0000000100000000, 0x0000000100000000)
   the space 699072K,  52% used [0x00000000d5550000, 0x00000000ebcf65e0, 0x00000000ebcf6600, 0x0000000100000000)
 Metaspace       used 2637K, capacity 4486K, committed 4864K, reserved 1056768K
  class space    used 283K, capacity 386K, committed 512K, reserved 1048576K

We should be able to recognize all of the elements from the simple GC log. But there are several new items.

Let’s now consider the new items in the output which are highlighted in blue in the next section:

5.1. Interpreting a Minor GC in Young Generation

We’ll begin by analyzing the new parts in a minor GC:

  • [GC (Allocation Failure) [DefNew: 279616K->34944K(314560K), 0.3626923 secs] 279616K->146232K(1013632K), 0.3627492 secs] [Times: user=0.33 sys=0.03, real=0.36 secs]

As before we’ll break the lines down into parts:

  1. DefNew – Name of the garbage collector used. This not so obvious name stands for the single-threaded mark-copy stop-the-world garbage collector and is what is used to clean the Young generation
  2. 279616K->34944K – Usage of the Young generation before and after collection
  3. (314560K) – The total size of the Young generation
  4. 0.3626923 secs – The duration in seconds
  5. [Times: user=0.33 sys=0.03, real=0.36 secs] – Duration of the GC event, measured in different categories

Now let’s explain the different categories:

  • user – The total CPU time that was consumed by Garbage Collector
  • sys – The time spent in OS calls or waiting for system events
  • real – This is all elapsed time including time slices used by other processes

Since we’re running our example using the Serial Garbage Collector, which always uses just a single thread, real-time is equal to the sum of user and system times.

5.2. Interpreting a Full GC

In this penultimate example, we see that for a major collection (Full GC), which was triggered by our system call, the collector used was Tenured.

The final piece of additional information we see is a breakdown following the same pattern for the Metaspace:

[Metaspace: 2624K->2624K(1056768K)], 0.5580738 secs]

Metaspace is a new memory space introduced in Java 8 and is an area of native memory. 

5.3. Java Heap Breakdown Analysis

The final part of the output includes a breakdown of the heap including a memory footprint summary for each part of memory.

We can see that Eden space had a 35% footprint and Tenured had a 52% footprint. A summary for Metadata space and class space is also included.

From the above examples, we can now understand exactly what was happening with memory consumption inside the JVM during the GC events.

6. Adding Date and Time Information

No good log is complete without date and time information.

This extra information can be highly useful when we need to correlate GC log data with data from other sources, or it can simply help facilitate searching.

We can add the following two arguments when we run our application to get date and time information to appear in our logs:

-XX:+PrintGCTimeStamps -XX:+PrintGCDateStamps

Each line now starts with the absolute date and time when it was written followed by a timestamp reflecting the real-time passed in seconds since the JVM started:

2018-12-11T02:55:23.518+0100: 2.601: [GC (Allocation ...

7. Logging to a File

As we’ve already seen, by default the GC log is written to stdout. A more practical solution is to specify an output file.

We can do this by using the argument -Xloggc:<file> where file is the absolute path to our output file:

-Xloggc:/path/to/file/gc.log

8. A Word on Java 9 and Beyond

We’ll likely come across another argument in the world of GC logging, -XX:+PrintGC. In Java 8, -verbose:gc is an exact alias for XX:+PrintGC. However, -verbose:gc is a standard option, while -XX:+PrintGC is not.

We should also point out at that -XX:+PrintGC is deprecated as of Java 9 in favor of the unified logging option -Xlog:gc. However, verbose:gc still works in JDK 9 and 10.

To learn more about Unified JVM Logging, see the JEP 158 standard.

9. A Tool to Analyze GC Logs

It can be time-consuming and quite tedious to analyze GC logs using a text editor. Depending on the JVM version and the GC algorithm that is used, the GC log format could differ.

There is a very good free graphical analysis tool that analyzes the Garbage collection logs, provides many metrics about potential Garbage Collection problems, and even provides potential solutions to these problems.

Definitely check out the Universal GC Log Analyzer!

10. Conclusion

To summarize, in this tutorial, we’ve explored in detail verbose garbage collection in Java.

First, we started by introducing what verbose garbage collection is and why we might want to use it. We then looked at several examples using a simple Java application. We began with enabling GC logging in its simplest form before exploring several more detailed examples and how to interpret the output.

Finally, we explored several extra options for logging time and date information and how to write information to a log file.

The code examples can be found over on GitHub.


Introduction to Akka HTTP

$
0
0

1. Overview

In this tutorial, with the help of Akka’s Actor & Stream models, we’ll learn how to set up Akka to create an HTTP API that provides basic CRUD operations.

2. Maven Dependencies

To start, let’s take a look at the dependencies required to start working with Akka HTTP:

<dependency>
    <groupId>com.typesafe.akka</groupId>
    <artifactId>akka-http_2.12</artifactId>
    <version>10.0.11</version>
</dependency>
<dependency>
    <groupId>com.typesafe.akka</groupId>
    <artifactId>akka-stream_2.12</artifactId>
    <version>2.5.11</version>
</dependency>
<dependency>
    <groupId>com.typesafe.akka</groupId>
    <artifactId>akka-http-jackson_2.12</artifactId>
    <version>10.0.11</version>
</dependency>
<dependency>
    <groupId>com.typesafe.akka</groupId>
    <artifactId>akka-http-testkit_2.12</artifactId>
    <version>10.0.11</version>
    <scope>test</scope>
</dependency>

We can, of course, find the latest version of these Akka libraries on Maven Central.

3. Creating an Actor

As an example, we’ll build an HTTP API that allows us to manage user resources. The API will support two operations:

  • creating a new user
  • loading an existing user

Before we can provide an HTTP API, we’ll need to implement an actor that provides the operations we need:

class UserActor extends AbstractActor {

  private UserService userService = new UserService();

  static Props props() {
    return Props.create(UserActor.class);
  }

  @Override
  public Receive createReceive() {
    return receiveBuilder()
      .match(CreateUserMessage.class, handleCreateUser())
      .match(GetUserMessage.class, handleGetUser())
      .build();
  }

  private FI.UnitApply<CreateUserMessage> handleCreateUser() {
    return createUserMessage -> {
      userService.createUser(createUserMessage.getUser());
      sender()
        .tell(new ActionPerformed(
           String.format("User %s created.", createUserMessage.getUser().getName())), getSelf());
    };
  }

  private FI.UnitApply<GetUserMessage> handleGetUser() {
    return getUserMessage -> {
      sender().tell(userService.getUser(getUserMessage.getUserId()), getSelf());
    };
  }
}

Basically, we’re extending the AbstractActor class and implementing its createReceive() method.

Within createReceive(), we’re mapping incoming message types to methods that handle messages of the respective type.

The message types are simple serializable container classes with some fields that describe a certain operation. GetUserMessage and has a single field userId to identify the user to load. CreateUserMessage contains a User object with the user data we need to create a new user.

Later, we’ll see how to translate incoming HTTP requests into these messages.

Ultimately, we delegate all messages to a UserService instance, which provides the business logic necessary for managing persistent user objects.

Also, note the props() method. While the props() method isn’t necessary for extending AbstractActor, it will come in handy later when creating the ActorSystem.

For a more in-depth discussion about actors, have a look at our introduction to Akka Actors.

4. Defining HTTP Routes

Having an actor that does the actual work for us, all we have left to do is to provide an HTTP API that delegates incoming HTTP requests to our actor.

Akka uses the concept of routes to describe an HTTP API. For each operation, we need a route.

To create an HTTP server, we extend the framework class HttpApp and implement the routes method:

class UserServer extends HttpApp {

  private final ActorRef userActor;

  Timeout timeout = new Timeout(Duration.create(5, TimeUnit.SECONDS));

  UserServer(ActorRef userActor) {
    this.userActor = userActor;
  }

  @Override
  public Route routes() {
    return path("users", this::postUser)
      .orElse(path(segment("users").slash(longSegment()), id -> route(getUser(id))));
  }

  private Route getUser(Long id) {
    return get(() -> {
      CompletionStage<Optional<User>> user = 
        PatternsCS.ask(userActor, new GetUserMessage(id), timeout)
          .thenApply(obj -> (Optional<User>) obj);

      return onSuccess(() -> user, performed -> {
        if (performed.isPresent())
          return complete(StatusCodes.OK, performed.get(), Jackson.marshaller());
        else
          return complete(StatusCodes.NOT_FOUND);
      });
    });
  }

  private Route postUser() {
    return route(post(() -> entity(Jackson.unmarshaller(User.class), user -> {
      CompletionStage<ActionPerformed> userCreated = 
        PatternsCS.ask(userActor, new CreateUserMessage(user), timeout)
          .thenApply(obj -> (ActionPerformed) obj);

      return onSuccess(() -> userCreated, performed -> {
        return complete(StatusCodes.CREATED, performed, Jackson.marshaller());
      });
    })));
  }
}

Now, there is a fair amount of boilerplate here, but note that we follow the same pattern as before of mapping operations, this time as routes. Let’s break it down a bit.

Within getUser(), we simply wrap the incoming user id in a message of type GetUserMessage and forward that message to our userActor.

Once the actor has processed the message, the onSuccess handler is called, in which we complete the HTTP request by sending a response with a certain HTTP status and a certain JSON body. We use the Jackson marshaller to serialize the answer given by the actor into a JSON string.

Within postUser(), we do things a little differently, since we’re expecting a JSON body in the HTTP request. We use the entity() method to map the incoming JSON body into a User object before wrapping it into a CreateUserMessage and passing it on to our actor. Again, we use Jackson to map between Java and JSON and vice versa.

Since HttpApp expects us to provide a single Route object, we combine both routes to a single one within the routes method. Here, we use the path directive to finally provide the URL path at which our API should be available.

We bind the route provided by postUser() to the path /users. If the incoming request is not a POST request, Akka will automatically go into the orElse branch and expect the path to be /users/<id>. Depending on the incoming HTTP method, the request will either be forwarded to the getUser() route or if that still doesn’t match, return HTTP status 404.

For more information about how to define HTTP routes with Akka, have a look at the Akka docs.

5. Starting the Server

Once we have created an HttpApp implementation like above, we can start up our HTTP server with a couple lines of code:

public static void main(String[] args) throws Exception {
  ActorSystem system = ActorSystem.create("userServer");
  ActorRef userActor = system.actorOf(UserActor.props(), "userActor");
  UserServer server = new UserServer(userActor);
  server.startServer("localhost", 8080, system);
}

We simply create an ActorSystem with a single actor of type UserActor and start the server on localhost.

6. Conclusion

In this article, we’ve learned about the basics of Akka HTTP with an example showing how to set up an HTTP server and expose endpoints to create and load resources, similar to a REST API.

As usual, the source code presented here can be found over on GitHub.

Differences Between HashMap and Hashtable

$
0
0

1. Overview

In this short tutorial, we are going to focus on the core differences between the Hashtable and the HashMap.

2. Hashtable and HashMap in Java

Hashtable and HashMap are quite similar – both are collections that implement the Map interface.

Also, the put(), get(), remove(), and containsKey() methods provide constant-time performance O(1). Internally, these methods work based on a general concept of hashing using buckets for storing data.

Neither class maintains the insertion order of the elements. In other words, the first item added may not be the first item when we iterate over the values.

But they also have some differences that make one better than another in some situations. Let’s look closer at these differences.

3. Differences Between Hashtable and HashMap

3.1. Synchronization

Firstly, Hashtable is thread-safe and can be shared between multiple threads in the application.

On the other hand, HashMap is not synchronized and can’t be accessed by multiple threads without additional synchronization code. We can use Collections.synchronizedMap() to make a thread-safe version of a HashMap. We can also just create custom lock code or make the code thread-safe by using the synchronized keyword.

HashMap is not synchronized, therefore it’s faster and uses less memory than Hashtable. Generally, unsynchronized objects are faster than synchronized ones in a single threaded application.

3.2. Null Values

Another difference is null handling. HashMap allows adding one Entry with null as key as well as many entries with null as value. In contrast, Hashtable doesn’t allow null at all. Let’s see an example of null and HashMap:

HashMap<String, String> map = new HashMap<String, String>();
map.put(null, "value");
map.put("key1", null);
map.put("key2", null);

This will result in:

assertEquals(3, map.size());

Next, let’s see how Hashtable is different:

Hashtable<String, String> table = new Hashtable<String, String>();
table.put("key", null);

This results in a NullPointerException. Adding an object with null as a key also results in a NullPointerException:

table.put(null, "value");

3.3. Iteration Over Elements

HashMap uses Iterator to iterate over values, whereas Hashtable has Enumerator for the same. The Iterator is a successor of Enumerator that eliminates its few drawbacks. For example, Iterator has a remove() method to remove elements from underlying collections.

The Iterator is a fail-fast iterator. In other words, it throws a ConcurrentModificationException when the underlying collection is modified while iterating. Let’s see the example of fail-fast:

HashMap<String, String> map = new HashMap<String, String>();
map.put("key1", "value1");
map.put("key2", "value2");

Iterator<String> iterator = map.keySet().iterator();
while(iterator.hasNext()){ 
    iterator.next();
    map.put("key4", "value4");
}

This throws a ConcurrentModificationException exception because we are calling put() while iterating over the collection.

4. When to Choose HashMap Over Hashtable

We should use HashMap for an unsynchronized or single threaded application.

It is worth mentioning that since JDK 1.8, Hashtable has been deprecated. However, ConcurrentHashMap is a great Hashtable replacement. We should consider ConcurrentHashMap to use in applications with multiple threads.

5. Conclusion

In this article, we illustrated differences between HashMap and Hashtable and what to keep in mind when we need to choose one.

As usual, the implementation of all these examples and code snippets are over on Github.

Hibernate 5 Bootstrapping API

$
0
0

1. Overview

In this tutorial, we’ll explore the new mechanism by which we can initialize and start a Hibernate SessionFactory. We’ll especially focus on the new native bootstrapping process as it was redesigned in version 5.0.

Prior to version 5.0, applications had to use the Configuration class to bootstrap the SessionFactory. This approach is now deprecated, as the Hibernate documentation recommends using the new API based on the ServiceRegistry.

Simply put, building a SessionFactory is all about having a ServiceRegistry implementation that holds the Services needed by Hibernate during both startup and runtime.

2. Maven Dependencies

Before we start exploring the new bootstrapping process, we need to add the hibernate-core jar file to the project classpath. In a Maven based project, we just need to declare this dependency in the pom.xml file:

<dependency>
    <groupId>org.hibernate</groupId>
    <artifactId>hibernate-core</artifactId>
    <version>5.4.0.Final</version>
</dependency>

As Hibernate is a JPA provider, this will also include the JPA API dependency transitively.

We also need the JDBC driver of the database that we’re working with. In this example, we’ll use an embedded H2 database:

<dependency>
    <groupId>com.h2database</groupId>
    <artifactId>h2</artifactId>
    <version>1.4.197</version>
</dependency>

Feel free to check the latest versions of hibernate-core and H2 driver on Maven Central.

3. Bootstrapping API

Bootstrapping refers to the process of building and initializing a SessionFactory.

To achieve this purpose, we need to have a ServiceRegistry that holds the Services needed by Hibernate. From this registry, we can build a Metadata object that represents the application’s domain model and its mapping to the database.

Let’s explore these major objects in greater detail.

3.1. Service

Before we dig into the ServiceRegistry concept, we first need to understand what a Service is. In Hibernate 5.0, a Service is a type of functionality represented by the interface with the same name:

org.hibernate.service.Service

By default, Hibernate provides implementations for the most common Services, and they are sufficient in most cases. Otherwise, we can build our own Services to either modify original Hibernate functionalities or add new ones.

In the next subsection, we’ll show how Hibernate makes these Services available through a lightweight container called ServiceRegistry.

3.2. ServiceRegistry

The first step in building a SessionFactory is to create a ServiceRegistry. This allows holding various Services that provide functionalities needed by Hibernate and is based on the Java SPI functionality.

Technically speaking, we can see the ServiceRegistry as a lightweight Dependency Injection tool where beans are only of type Service.

There are two types of ServiceRegistry and they are hierarchical. The first is the BootstrapServiceRegistry, which has no parent and holds these three required services:

  • ClassLoaderService: allows Hibernate to interact with the ClassLoader of the various runtime environments
  • IntegratorService: controls the discovery and management of the Integrator service allowing third-party applications to integrate with Hibernate
  • StrategySelector: resolves implementations of various strategy contracts

To build a BootstrapServiceRegistry implementation, we use the BootstrapServiceRegistryBuilder factory class, which allows customizing these three services in a type-safe manner:

BootstrapServiceRegistry bootstrapServiceRegistry = new BootstrapServiceRegistryBuilder()
  .applyClassLoader()
  .applyIntegrator()
  .applyStrategySelector()
  .build();

The second ServiceRegistry is the StandardServiceRegistry, which builds on the previous BootstrapServiceRegistry and holds the three Services mentioned above. Additionally, it contains various other Services needed by Hibernate, listed in the StandardServiceInitiators class.

Like the previous registry, we use the StandardServiceRegistryBuilder to create an instance of the StandardServiceRegistry:

StandardServiceRegistryBuilder standardServiceRegistry =
  new StandardServiceRegistryBuilder();

Under the hood, the StandardServiceRegistryBuilder creates and uses an instance of BootstrapServiceRegistry. We can also use an overloaded constructor to pass an already created instance:

BootstrapServiceRegistry bootstrapServiceRegistry = 
  new BootstrapServiceRegistryBuilder().build();
StandardServiceRegistryBuilder standardServiceRegistryBuilder = 
  new StandardServiceRegistryBuilder(bootstrapServiceRegistry);

We use this builder to load a configuration from a resource file, such as the default hibernate.cfg.xml, and finally, we invoke the build() method to get an instance of the StandardServiceRegistry.

StandardServiceRegistry standardServiceRegistry = standardServiceRegistryBuilder
  .configure()
  .build();

3.3. Metadata

Having configured all the Services needed by instantiating a ServiceRegistry either of type BootstrapServiceRegistry or StandardServiceRegistry, we now need to provide the representation of the application’s domain model and its database mapping.

The MetadataSources class is responsible for this:

MetadataSources metadataSources = new MetadataSources(standardServiceRegistry);
metadataSources.addAnnotatedClass();
metadataSources.addResource()

Next, we get an instance of Metadata, which we’ll use in the last step:

Metadata metadata = metadataSources.buildMetadata();

3.4. SessionFactory

The last step is to create the SessionFactory from the previously created Metadata:

SessionFactory sessionFactory = metadata.buildSessionFactory();

We can now open a Session and start persisting and reading entities:

Session session = sessionFactory.openSession();
Movie movie = new Movie(100L);
session.persist(movie);
session.createQuery("FROM Movie").list();

4. Conclusion

In this article, we explored the steps needed to build a SessionFactory. Although the process seems complex, we can summarize it in three major steps: we first created an instance of StandardServiceRegistry, then we built a Metadata object, and finally, we built the SessionFactory.

The full code for these examples can be found over on Github.

Passing Parameters to Java Threads

$
0
0

 1. Overview

In this tutorial, we’ll run through different options available for passing parameters to a Java thread.

2. Thread Fundamentals

As a quick reminder, we can create a thread in Java by implementing Runnable or Callable.

To run a thread, we can invoke Thread#start (by passing an instance of Runnable) or use a thread pool by submitting it to an ExecutorService.

Neither of these approaches accepts any extra parameters, though.

Let’s see what can we do to pass parameters to a thread.

3. Sending Parameters in the Constructor

The first way we can send a parameter to a thread is simply providing it to our Runnable or Callable in their constructor.

Let’s create an AverageCalculator that accepts an array of numbers and returns their average:

public class AverageCalculator implements Callable<Double> {

    int[] numbers;

    public AverageCalculator(int... numbers) {
        this.numbers = numbers == null ? new int[0] : numbers;
    }

    @Override
    public Double call() throws Exception {
        return IntStream.of(numbers).average().orElse(0d);
    }
}

Next, we’ll provide some numbers to our average calculator thread and validate the output:

@Test
public void whenSendingParameterToCallable_thenSuccessful() throws Exception {
    ExecutorService executorService = Executors.newSingleThreadExecutor();
    Future<Double> result = executorService.submit(new AverageCalculator(1, 2, 3));
    try {
        assertEquals(2.0, result.get().doubleValue());
    } finally {
        executorService.shutdown();
    }
}

Note that the reason this works is that we’ve handed our class its state before launching the thread.

4. Sending Parameters Through a Closure

Another way of passing parameters to a thread is by creating a closure.

A closure is a scope that can inherit some of its parent’s scope – we see it with lambdas and anonymous inner classes.

Let’s extend our previous example and create two threads.

The first one will calculate the average:

executorService.submit(() -> IntStream.of(numbers).average().orElse(0d));

And, the second will do the sum:

executorService.submit(() -> IntStream.of(numbers).sum());

Let’s see how we can pass the same parameter to both threads and get the result:

@Test
public void whenParametersToThreadWithLamda_thenParametersPassedCorrectly()
  throws Exception {
    ExecutorService executorService = Executors.newFixedThreadPool(2);
    int[] numbers = new int[] { 4, 5, 6 };

    try {
        Future<Integer> sumResult = 
          executorService.submit(() -> IntStream.of(numbers).sum()); 
        Future<Double> averageResult = 
          executorService.submit(() -> IntStream.of(numbers).average().orElse(0d));
        assertEquals(Integer.valueOf(15), sumResult.get());
        assertEquals(Double.valueOf(5.0), averageResult.get());
    } finally {
        executorService.shutdown();
    }
}

One important thing to remember is to keep the parameters effectively final or we won’t be able to hand them to the closure.

Also, the same concurrency rules apply here as everywhere. If we change a value in the numbers array while the threads are running, there is no guarantee that they will see it without introducing some synchronization.

And to wrap up here, an anonymous inner class would have worked, too, say if we are using an older version of Java:

final int[] numbers = { 1, 2, 3 };
Thread parameterizedThread = new Thread(new Callable<Double>() {
    @Override
    public Double call() {
        return calculateTheAverage(numbers);
    }
});
parameterizedThread.start();

5. Conclusion

In this article, we discovered the different options available for passing parameters to a Java thread.

As always, the code samples are available over on Github.

JEE vs J2EE vs Jakarta

$
0
0

1. Introduction

Ever heard of Java EE? How about Java 2EE, J2EE, or now Jakarta EE? Actually, these are all different names for the same thing: a set of enterprise specifications that extend Java SE.

In this short article, we’ll describe the evolution of Java EE.

2. History

In the first version of Java, Java enterprise extensions were simply a part of the core JDK.

Then, as part of Java 2 in 1999, these extensions were broken out of the standard binaries, and J2EE, or Java 2 Platform Enterprise Edition, was born. It would keep that name until 2006.

For Java 5 in 2006, J2EE was renamed to Java EE or Java Platform Enterprise Edition. That name would stick all the way to September 2017, when something major happened.

See, in September 2017, Oracle decided to give away the rights for Java EE to the Eclipse Foundation (the language is still owned by Oracle).

3. In Transition

Actually, the Eclipse Foundation legally had to rename Java EE. That’s because Oracle has the rights over the “Java” brand.

So to choose the new name, the community voted and picked: Jakarta EE. In a certain way, it’s still JEE.


*New name announced

This is still an evolving story, though, and the dust hasn’t completely settled.

For example, while Oracle open-sourced the source code, they did not open-source all the documentation. There’s still a lot of discussion over this matter because of legal issues that make it tricky to open-source documentation related to, for example, JMS and EJB.

It’s not clear yet if new Eclipse Foundation documentation will be able to refer to the originals.

Also, curiously, the Eclipse Foundation can’t create any new Java packages using the javax namespace, but it can create new classes and subclasses under the existing ones.

The transition also means a new process for adding specifications to Jakarta EE. To understand it better, let’s take a look at what that process was like under Oracle and how it changes under the Eclipse Foundation.

4. The Future

Historically, in order for a feature to make it into “EE”, we needed three things: a specification, a reference implementation, and tests. These three things could be provided by anyone in the community, and an Executive Committee would decide when these were ready to add to the language.

To better understand the past process, let’s take a closer look at what JSRs, Glassfish, and the TCK are and how they embodied new EE features.

We’ll also get a glimpse of what to expect in the future.

4.1. The JCP and Now, the EFSP

In the past, the process by which a new EE feature was born was called the Java Community Process (JCP).

Java SE still uses the JCP today. But, since EE has changed its ownership, from Oracle to the Eclipse Foundation, we have a new and separate process for that. It’s the Eclipse Foundation Specification Process (EFSP) and it’s an extension of the Eclipse Development Process.

There are some important differences, though, mostly around “Transparency, Openness, Shared Burden and Vendor Neutrality”. The EFSP organizers, for example, envision collaborative working groups that are vendor-neutral, a certification process that is self-service, and an organization that operates and governs as a meritocracy.

4.2. JSRs

In the JCP, the first step to adding a feature to EE was to create a JSR or Java Specification Request. The JSR was a bit like the interface for an EE feature. The JCP Executive Committee reviewed and approved a completed JSR, and then JSR contributors would code it up and make it available to the community.

A good example of this was JSR-339  – or JAX-RS – which was originally proposed in 2011, approved by JCP in 2012 and finally released in 2013.

And while the community could always weigh in while a specification was under discussion, time showed that an implementation-first approach – like in the case of JSR 310, java.timeand Joda Time – tended to create more widely-accepted features and APIs.

So, the EFSP reflects this code-first view in its stated goal: “EFSP will be based on hands-on experimenting and coding first, as a way to prove something is worthy of documenting in a specification.”

4.3. Glassfish

Then, as part of the JCP, a JSR needed a reference implementation. This is a bit like the class that implements the interface. A reference implementation helps developers of compatible libraries or other organizations that want to create their own implementation of the spec.

For Java EE features, the JCP used Glassfish for its reference implementations.

And while this centralization on Glassfish simplified the discovery process for implementers, that centralization also required more governance and had a tendency to favor one vendor over another.

Hence, the EFSP doesn’t require a reference implementation, but instead only a compatible implementation. Simply put, this subtle change makes so that implementations inside of a central architecture, like Glassfish, won’t be inadvertently preferred by the foundation.

4.4. TCK

Finally, the JCP required that EE features be tested through the Technology Compatibility Kit, or TCK.

The TCK was a suite of tests to validate a specific EE JSR. Simply put, in order to comply with Java EE, an application server needs to implement all of its JSRs and pass all the tests on the designated TCK.

Not much changes here. Oracle open-sourced the TCK as well as the EE JSRs. Of course, all future documents and the TCK will be open-source.

5. Conclusion

Java EE has certainly evolved a lot during those years. It’s nice to see it continuing to change and improve.

There are many challenges ahead, so let’s hope for a smooth transition.

Concatenating Strings In Java

$
0
0

1. Introduction

Java provides a substantial number of methods and classes dedicated to concatenating Strings.

In this tutorial, we’ll dive into several of them as well as outline some common pitfalls and bad practices.

2. StringBuilder

First up is the humble StringBuilder. This class provides an array of String-building utilities that makes easy work of String manipulation.

Let’s build a quick example of String concatenation using the StringBuilder class:

StringBuilder stringBuilder = new StringBuilder(100);

stringBuilder.append("Baeldung");
stringBuilder.append(" is");
stringBuilder.append(" awesome");

assertEquals("Baeldung is awesome", stringBuilder.toString());

Internally, StringBuilder maintains a mutable array of characters. In our code sample, we’ve declared this to have an initial size of 100 through the StringBuilder constructor. Because of this size declaration, the StringBuilder can be a very efficient way to concatenate Strings.

It’s also worth noting that the StringBuffer class is the synchronized version of StringBuilder

Although synchronization is often synonymous with thread safety, it’s not recommended for use in multithreaded applications due to StringBuffer’s builder pattern. While individual calls to a synchronized method are thread safe, multiple calls are not.

3. Addition Operator

Next up is the addition operator (+). This is the same operator that results in the addition of numbers and is overloaded to concatenate when applied to Strings.

Let’s take a quick look at how this works:

String myString = "The " + "quick " + "brown " + "fox...";

assertEquals("The quick brown fox...", myString);

At first glance, this may seem much more concise than the StringBuilder option. However, when the source code compiles, the + symbol translates to chains of StringBuilder.append() calls. Due to this, mixing the StringBuilder and + method of concatenation is considered bad practice.

Additionally, String concatenation using the + operator within a loop should be avoided. Since the String object is immutable, each call for concatenation will result in a new String object being created.

4. String methods

The String class itself provides a whole host of methods for concatenating Strings.

4.1. String.concat

Unsurprisingly, the String.concat method is our first port of call when attempting to concatenate String objects. This method returns a String object, so chaining together the method is a useful feature.

String myString = "Both".concat(" fickle")
  .concat(" dwarves")
  .concat(" jinx")
  .concat(" my")
  .concat(" pig")
  .concat(" quiz");

assertEquals("Both fickle dwarves jinx my pig quiz", myString);

In this example, our chain is started with a String literal, the concat method then allows us to chain the calls to append further Strings.

4.2. String.format

Next up is the String.format method, which allows us to inject a variety of Java Objects into a String template.

The String.format method signature takes a single String denoting our template. This template contains ‘%’ characters to represent where the various Objects should be placed within it.

Once our template is declared, it then takes a varargs Object array which is injected into the template.

Let’s see how this works with a quick example:

String myString = String.format("%s %s %.2f %s %s, %s...", "I",
  "ate",
  2.5056302,
  "blueberry",
  "pies",
  "oops");

assertEquals("I ate 2.51 blueberry pies, oops...", myString);

As we can see above, the method has injected our Strings into the correct format.

4.3. String. join (Java 8+)

If our application is running on Java 8 or above, we can take advantage of the String.join method. With this, we can join an array of Strings with a common delimiter, ensuring no spaces are missed.

String[] strings = {"I'm", "running", "out", "of", "pangrams!"};

String myString = String.join(" ", strings);

assertEquals("I'm running out of pangrams!", myString);

A huge advantage of this method is not having to worry about the delimiter between our strings.

5. StringJoiner (Java 8+)

StringJoiner abstracts all of the String.join functionality into a simple to use class. The constructor takes a delimiter, with an optional prefix and suffix. We can append Strings using the well-named add method.

StringJoiner fruitJoiner = new StringJoiner(", ");

fruitJoiner.add("Apples");
fruitJoiner.add("Oranges");
fruitJoiner.add("Bananas");

assertEquals("Apples, Oranges, Bananas", fruitJoiner.toString());

By using this class, instead of the String.join method, we can append Strings as the program runs; There’s no need to create the array first!

Head over to our article on StringJoiner for more information and examples.

6. Arrays.toString

On the topic of arrays, the Array class also contains a handy toString method which nicely formats an array of objects. The Arrays.toString method also calls the toString method of any enclosed object – so we need to ensure we have one defined.

String[] myFavouriteLanguages = {"Java", "JavaScript", "Python"};

String toString = Arrays.toString(myFavouriteLanguages);

assertEquals("[Java, JavaScript, Python]", toString);

Unfortunately, the Arrays.toString method is not customizable and only outputs a String encased in square brackets.

7. Collectors.joining (Java 8+)

Finally, let’s take a look at the Collectors.joining method which allows us to funnel the output of a Stream into a single String.

List<String> awesomeAnimals = Arrays.asList("Shark", "Panda", "Armadillo");

String animalString = awesomeAnimals.stream().collect(Collectors.joining(", "));

assertEquals("Shark, Panda, Armadillo", animalString);

Using streams unlocks all of the functionality associated with the Java 8 Stream API, such as filtering, mapping, iterating and more.

8. Wrap up

In this article, we’ve taken a deep dive into the multitude of classes and methods used to concatenate Strings in the Java language.

As always, the source code is available over on GitHub.


Convert a Comma Separated String to a List in Java

$
0
0

1. Overview

In this tutorial, we’ll look at converting a comma-separated String into a List of strings. Additionally, we’ll transform a comma-separated String of integers to a List of Integers.

2. Dependencies

A few of the methods that we’ll use for our conversions require the Apache Commons Lang 3 and Guava libraries. So, let’s add them to our pom.xml file:

<dependency>
    <groupId>org.apache.commons</groupId>
    <artifactId>commons-lang3</artifactId>
    <version>3.8.1</version>
</dependency>
<dependency>
    <groupId>com.google.guava</groupId>
    <artifactId>guava</artifactId>
    <version>27.0.1-jre</version>
</dependency>

3. Defining Our Example

Before we start, let’s define two inputs strings that we’ll use in our examples. The first string, countries, contains several strings separated by a comma, and the second string, ranks, includes numbers separated by a comma:

String countries = "Russia,Germany,England,France,Italy";
String ranks = "1,2,3,4,5,6,7";

And, throughout this tutorial, we’ll convert the above strings into lists of strings and integers which we will store in:

List<String> convertedCountriesList;
List<Integer> convertedRankList;

Finally, after we perform our conversions, the expected outputs will be:

List<String> expectedCountriesList = Arrays.asList("Russia", "Germany", "England", "France", "Italy");
List<Integer> expectedRanksList = Arrays.asList(1, 2, 3, 4, 5, 6, 7);

4. Core Java

In our first solution, we’ll convert a string to a list of strings and integers using core Java.

First, we’ll split our string into an array of strings using split, a String class utility method. Then, we’ll use Arrays.asList on our new array of strings to convert it into a list of strings:

List<String> convertedCountriesList = Arrays.asList(countries.split(",", -1));

Let’s now turn our string of numbers to a list of integers.

We’ll use the split method to convert our numbers string into an array of strings. Then, we’ll convert each string in our new array to an integer and add it to our list:

String[] convertedRankArray = ranks.split(",");
List<Integer> convertedRankList = new ArrayList<Integer>();
for (String number : convertedRankArray) {
    convertedRankList.add(Integer.parseInt(number.trim()));
}

In both these cases, we use the split utility method from the String class to split the comma-separated string into a string array.

Note that the overloaded split method used to convert our countries string contains the second parameter limit, for which we provided the value as -1. This specifies that the separator pattern should be applied as many times as possible.

The split method we used to split our string of integers (ranks) uses zero as the limit, and so it ignores the empty strings, whereas the split used on the countries string retains empty strings in the returned array.

5. Java Streams

Now, we’ll implement the same conversions using the Java Stream API.

First, we’ll convert our countries string into an array of strings using the split method in the String class. Then, we’ll use the Stream class to convert our array into a list of strings:

List<String> convertedCountriesList = Stream.of(countries.split(",", -1))
  .collect(Collectors.toList());

Let’s see how to convert our string of numbers into a list of integers using a Stream.

Again, we’ll first convert the string of numbers into an array of strings using the split method and convert the resulting array to a Stream of String using the of() method in the Stream class.

Then, we’ll trim the leading and trailing spaces from each String on the Stream using map(String::trim).

Next, we’ll apply map(Integer::parseInt) on our stream to convert every string in our Stream to an Integer.

And finally, we’ll call collect(Collectors.toList()) on the Stream to convert it to an integer list:

List<Integer> convertedRankList = Stream.of(ranks.split(","))
  .map(String::trim)
  .map(Integer::parseInt)
  .collect(Collectors.toList());

6. Apache Commons Lang

In this solution, we’ll use the Apache Commons Lang3 library to perform our conversions. Apache Commons Lang3 provides several helper functions to manipulate core Java classes.

First, we’ll split our string into an array of strings using StringUtils.splitPreserveAllTokens. Then, we’ll convert our new string array into a list using Arrays.asList method:

List<String> convertedCountriesList = Arrays.asList(StringUtils.splitPreserveAllTokens(countries, ","));

Let’s now transform our string of numbers to a list of integers.

We’ll again use the StringUtils.split method to create an array of strings from our string. Then, we’ll convert each string in our new array into an integer using Integer.parseInt and add the converted integer to our list:

String[] convertedRankArray = StringUtils.split(ranks, ",");
List<Integer> convertedRankList = new ArrayList<Integer>();
for (String number : convertedRankArray) {
    convertedRankList.add(Integer.parseInt(number.trim()));
}

In this example, we used the splitPreserveAllTokens method to split our countries string, whereas we used the split method to split our ranks string.

Even though both these functions split the string into an array, the splitPreserveAllTokens preserves all tokens including the empty strings created by adjoining separators, while the split method ignores the empty strings.

So, if we have empty strings that we want to be included in our list, then we should use the splitPreserveAllTokens instead of split.

7. Guava

Finally, we’ll use the Guava library to convert our strings to their appropriate lists.

To convert our countries string, we’ll first call Splitter.on with a comma as the parameter to specify what character our string should be split on.

Then, we’ll use the trimResults method on our Splitter instance. This will ignore all leading and trailing white spaces from the created substrings.

Finally, we’ll use the splitToList method to split our input string and convert it to a list:

List<String> convertedCountriesList = Splitter.on(",")
  .trimResults()
  .splitToList(countries);

Now, let’s convert the string of numbers to a list of integers.

We’ll again convert the string of numbers into a list of strings using the same process we followed above.

Then, we’ll use the Lists.transform method, which accepts our list of strings as the first parameter an implementation of the Function interface as the second parameter.

The Function interface implementation converts each string in our list to an integer:

List<Integer> convertedRankList = Lists.transform(Splitter.on(",")
  .trimResults()
  .splitToList(ranks), new Function<String, Integer>() {
      @Override
      public Integer apply(String input) {
          return Integer.parseInt(input.trim());
      }
  });

8. Conclusion

In this article, we converted comma-separated Strings into a list of strings and a list of integers. However, we can follow similar processes to convert a String into a list of any primitive data types.

As always, the code from this article is available over on Github.

Criteria Queries Using JPA Metamodel

$
0
0

1. Overview

In this tutorial, we’ll discuss how to use the JPA static metamodel classes while writing criteria queries in Hibernate.

We’ll need a basic understanding of criteria query APIs in Hibernate, so please check out our tutorial on Criteria Queries for more information on this topic, if needed.

2. Why the JPA Metamodel?

Often, when we write a criteria query, we need to reference entity classes and their attributes.

Now, one of the ways of doing this is to provide the attributes’ names as strings. But, this has several downsides.

For one, we have to look up the names of entity attributes. And, in case a column name is changed later in the project lifecycle, we have to refactor each query where the name is being used.

The JPA Metamodel was introduced by the community to avoid these drawbacks and provide static access to the metadata of the managed entity classes.

3. Entity Class

Let’s consider a scenario where we are building a Student Portal Management system for one of our clients, and a requirement comes up to provide search functionality on Students based on their graduation year.

First, let’s look at our Student class:

@Entity
@Table(name = "students")
public class Student {
    
    @Id
    @GeneratedValue(strategy = GenerationType.AUTO)
    private int id;

    @Column(name = "first_name")
    private String firstName;

    @Column(name = "last_name")
    private String lastName;

    @Column(name = "grad_year")
    private int gradYear;

    // standard getters and setters
}

4. Generating JPA Metamodel Classes

Next, we need to generate the metamodel classes, and for this purpose, we’ll use the metamodel generator tool provided by JBoss. JBoss is just one of the many tools available to generate the metamodel. Other suitable tools include EclipseLinkOpenJPA, and DataNucleus.

To use the JBoss tool, we need to add the latest dependency in our pom.xml file, and the tool will generate the metamodel classes once we trigger the maven build command:

<dependency>
    <groupId>org.hibernate</groupId>
    <artifactId>hibernate-jpamodelgen</artifactId>
    <version>5.3.7.Final</version>
</dependency>

Note, we need to add the target/generated-classes folder to the classpath of our IDE, as by default, the classes will be generated in this folder only.

5. Static JPA Metamodel Classes

Based on the JPA specification, a generated class will reside in the same package as the corresponding entity class and will have the same name with an added “_” (underscore) at the end. So, the metamodel class generated for the Student class will be Student_ and will look something like:

@Generated(value = "org.hibernate.jpamodelgen.JPAMetaModelEntityProcessor")
@StaticMetamodel(Student.class)
public abstract class Student_ {

    public static volatile SingularAttribute<Student, String> firstName;
    public static volatile SingularAttribute<Student, String> lastName;
    public static volatile SingularAttribute<Student, Integer> id;
    public static volatile SingularAttribute<Student, Integer> gradYear;

    public static final String FIRST_NAME = "firstName";
    public static final String LAST_NAME = "lastName";
    public static final String ID = "id";
    public static final String GRAD_YEAR = "gradYear";
}

6. Using JPA Metamodel Classes

We can use the static metamodel classes in the same way we would use the String references to attributes. The criteria query API provides overloaded methods that accept String references as well as Attribute interface implementations.

Let’s look at the criteria query that will fetch all Students who graduated in 2015:

//session set-up code
CriteriaBuilder cb = session.getCriteriaBuilder();
CriteriaQuery<Student> criteriaQuery = cb.createQuery(Student.class);

Root<Student> root = criteriaQuery.from(Student.class);
criteriaQuery.select(root).where(cb.equal(root.get(Student_.gradYear), 2015));

Query<Student> query = session.createQuery(criteriaQuery);
List<Student> results = query.getResultList();

Notice how we’ve used the Student_.gradYear reference instead of using the conventional grad_year column name.

7. Conclusion

In this quick article, we learned how to use static metamodel classes and why they may be preferred over the traditional way of using String references as described earlier.

The source code of this tutorial can be found over on Github.

Integrating Spring Boot with HSQLDB

$
0
0

1. Overview

Spring Boot makes it really easy to work with different database systems, without the hassle of manual dependency management.

More specifically, Spring Data JPA starter provides all the functionality required for seamless integration with several DataSource implementations.

In this tutorial, we’ll learn how to integrate Spring Boot with HSQLDB.

2. The Maven Dependencies

To demonstrate how easy is to integrate Spring Boot with HSQLDB, we’ll create a simple JPA repository layer that performs CRUD operations on customers entities using an in-memory HSQLDB  database.

Here’s the Spring Boot starter that we’ll use for getting our sample repository layer up and running:

<dependency>
    <groupId>org.springframework.boot</groupId>
    <artifactId>spring-boot-starter-data-jpa</artifactId>
    <version>2.1.1.RELEASE</version>
</dependency>
<dependency>
    <groupId>org.hsqldb</groupId>
    <artifactId>hsqldb</artifactId>
    <version>2.4.0</version>
    <scope>runtime</scope>
</dependency>

Note that we’ve included the HSQLDB dependency as well. Without it, Spring Boot will try to automatically configure a DataSource bean and a JDBC connection pool for us through HikariCP.

As a consequence, if we don’t specify a valid DataSource dependency in our pom.xml file, we’ll get a build failure.

In addition, let’s make sure to check the latest version of spring-boot-starter-data-jpa on Maven Central.

3. Connecting to an HSQLDB Database

For exercising our demo repository layer, we’ll be using an in-memory database. It’s possible, however, to work with file-based databases as well. We’ll explore each of these methods in the sections below.

3.1. Running an External HSQLDB Server

Let’s take a look at how to get an external HSQLDB server running and create a file-based database. Installing HSQLDB and running the server is straightforward, overall.

Here are the steps that we should follow:

  • First, we’ll download HSQLDB and unzip it to a folder
  • Since HSQLDB doesn’t provide a default database out of the box, we’ll create one called “testdb” for example purposes
  • We’ll launch a command prompt and navigate to the HSQLDB data folder
  • Within the data folder, we’ll run the following command:
    java -cp ../lib/hsqldb.jar org.hsqldb.server.Server --database.0 file.testdb --dbname0.testdb
  • The above command will start the HSQLDB server and create our database whose source files will be stored in the data folder
  • We can make sure the database has been actually created by going to the data folder, which should contain a set of files called “testdb.lck”, “testdb.log”, “testdb.properties”, and “testdb.script” (the number of files varies depending on the type of database we’re creating)

Once the database has been set up, we need to create a connection to it.

To do this on Windows, let’s go to the database bin folder and run the runManagerSwing.bat file. This will open HSQLDB Database Manager’s initial screen, where we can enter the connection credentials:

  • Type: HSQL Database Engine
  • URL: jdbc:hsqldb:hsql://localhost/testdb
  • User: “SA” (System Administrator)
  • Password: leave the field empty

On Linux/Unix/Mac, we can use NetBeans, Eclipse, or IntelliJ IDEA to create the database connection through the IDE’s visual tools, using the same credentials.

In any of these tools, it’s straightforward to create a database table either by executing an SQL script in the Database Manager or within the IDE.

Once connected, we can create a customers table:

CREATE TABLE customers (
   id INT  NOT NULL,
   name VARCHAR (45),
   email VARCHAR (45),      
   PRIMARY KEY (ID)
); 

In just a few easy steps, we’ve created a file-based HSQLDB database containing a customers table.

3.2. The application.properties File

If we wish to connect to the previous file-based database from Spring Boot, here are the settings that we should include in the application.properties file:

spring.datasource.driver-class-name=org.hsqldb.jdbc.JDBCDriver 
spring.datasource.url=jdbc:hsqldb:hsql://localhost/testdb 
spring.datasource.username=sa 
spring.datasource.password= 
spring.jpa.hibernate.ddl-auto=update

Alternatively, if we use an in-memory database, we should use these:

spring.datasource.driver-class-name=org.hsqldb.jdbc.JDBCDriver
spring.datasource.url=jdbc:hsqldb:mem:testdb;DB_CLOSE_DELAY=-1
spring.datasource.username=sa
spring.datasource.password=
spring.jpa.hibernate.ddl-auto=create

Please note the DB_CLOSE_DELAY=-1 parameter appended to the end of the database URL. When working with an in-memory database, we need to specify this, so the JPA implementation, which is Hibernate, won’t close the database while the application is running.

4. The Customer Entity

With the database connection settings already set up,  next we need to define our Customer entity:

@Entity
@Table(name = "customers")
public class Customer {
    
    @Id
    @GeneratedValue(strategy = GenerationType.AUTO)
    private long id;
    
    private String name;
    
    private String email;

    // standard constructors / setters / getters / toString
}

5. The Customer Repository

In addition, we need to implement a thin persistence layer, which allows us to have basic CRUD functionality on our Customer JPA entities.

We can easily implement this layer by just extending the CrudRepository interface:

@Repository
public interface CustomerRepository extends CrudRepository<Customer, Long> {}

6. Testing the Customer Repository

Finally, we should make sure that Spring Boot can actually connect to HSQLDB. We can easily accomplish this by just testing the repository layer.

Let’s start testing the repository’s findById() and findAll() methods:

@RunWith(SpringRunner.class)
@SpringBootTest
public class CustomerRepositoryTest {
    
    @Autowired
    private CustomerRepository customerRepository;
    
    @Test
    public void whenFindingCustomerById_thenCorrect() {
        customerRepository.save(new Customer("John", "john@domain.com"));
        assertThat(customerRepository.findById(1L)).isInstanceOf(Optional.class);
    }
    
    @Test
    public void whenFindingAllCustomers_thenCorrect() {
        customerRepository.save(new Customer("John", "john@domain.com"));
        customerRepository.save(new Customer("Julie", "julie@domain.com"));
        assertThat(customerRepository.findAll()).isInstanceOf(List.class);
    }
}

Finally, let’s test the save() method:

@Test
public void whenSavingCustomer_thenCorrect() {
    customerRepository.save(new Customer("Bob", "bob@domain.com"));
    Customer customer = customerRepository.findById(1L).orElseGet(() 
      -> new Customer("john", "john@domain.com"));
    assertThat(customer.getName()).isEqualTo("Bob");
}

7. Conclusion

In this article, we learned how to integrate Spring Boot with HSQLDB, and how to use either a file-based or in-memory database in the development of a basic JPA repository layer.

As usual, all the code samples shown in this article are available over on GitHub.

INSERT Statement in JPA

$
0
0

1. Overview

In this quick tutorial, we’ll learn how to perform an INSERT statement on JPA objects.

For more information about Hibernate in general, check out our comprehensive guide to JPA with Spring and introduction to Spring Data with JPA for deep dives into this topic.

2. Persisting Objects in JPA

In JPA, every entity going from a transient to managed state is automatically handled by the EntityManager.

The EntityManager checks whether a given entity already exists and then decides if it should be inserted or updated. Because of this automatic management, the only statements allowed by JPA are SELECT, UPDATE and DELETE.

In the examples below, we’ll look at different ways of managing and bypassing this limitation.

3. Defining a Common Model

Now, let’s start by defining a simple entity that we’ll use throughout this tutorial:

@Entity
public class Person {

    @Id
    private Long id;
    private String firstName;
    private String lastName;

    // standard getters and setters, default and all-args constructors
}

Also, let’s define a repository class that we’ll use for our implementations:

@Repository
public class PersonInsertRepository {

    @PersistenceContext
    private EntityManager entityManager;

}

Additionally, we’ll apply the @Transactional annotation to handle transactions automatically by Spring. This way, we won’t have to worry about creating transactions with our EntityManager, committing our changes, or performing rollback manually in the case of an exception.

4. createNativeQuery

For manually created queries, we can use the EntityManager#createNativeQuery method. It allows us to create any type of SQL query, not only ones supported by JPA. Let’s add a new method to our repository class:

@Transactional
public void insertWithQuery(Person person) {
    entityManager.createNativeQuery("INSERT INTO person (id, first_name, last_name) VALUES (?,?,?)")
      .setParameter(1, person.getId())
      .setParameter(2, person.getFirstName())
      .setParameter(3, person.getLastName())
      .executeUpdate();
}

With this approach, we need to define a literal query including names of the columns and set their corresponding values.

We can now test our repository:

@Test
public void givenPersonEntity_whenInsertedTwiceWithNativeQuery_thenPersistenceExceptionExceptionIsThrown() {
    Person person = new Person(1L, "firstname", "lastname");

    assertThatExceptionOfType(PersistenceException.class).isThrownBy(() -> {
        personInsertRepository.insertWithQuery(PERSON);
        personInsertRepository.insertWithQuery(PERSON);
    });
}

In our test, every operation attempts to insert a new entry into our database. Since we tried to insert two entities with the same id, the second insert operation fails by throwing a PersistenceException.

The principle here is the same if we are using Spring Data’s @Query.

5. persist

In our previous example, we created insert queries, but we had to create literal queries for each entity. This approach is not very efficient and results in a lot of boilerplate code.

Instead, we can make use of the persist method from EntityManager.

As in our previous example, let’s extend our repository class with a custom method:

@Transactional
public void insertWithEntityManager(Person person) {
    this.entityManager.persist(person);
}

Now, we can test our approach again:

@Test
public void givenPersonEntity_whenInsertedTwiceWithEntityManager_thenEntityExistsExceptionIsThrown() {
    assertThatExceptionOfType(EntityExistsException.class).isThrownBy(() -> {
        personInsertRepository.insertWithEntityManager(new Person(1L, "firstname", "lastname"));
        personInsertRepository.insertWithEntityManager(new Person(1L, "firstname", "lastname"));
    });
}

In contrast to using native queries, we don’t have to specify column names and corresponding values. Instead, EntityManager handles that for us.

In the above test, we also expect EntityExistsException to be thrown instead of its superclass PersistenceException which is more specialized and thrown by persist.

On the other hand, in this example, we have to make sure that we call our insert method each time with a new instance of Person. Otherwise, it will be already managed by EntityManager, resulting in an update operation.

6. Conclusion

In this article, we illustrated ways to perform insert operations on JPA objects. We looked at examples of using a native query, as well as using EntityManager#persist to create custom INSERT statements.

As always, the complete code used in this article is available over on GitHub.

Java 11 Nest Based Access Control

$
0
0

1. Introduction

In this tutorial, we will explore nests, the new access control context introduced in Java 11.

2. Before Java 11

2.1. Nested Types

Java allows classes and interfaces to be nested within each other. These nested types have unrestricted access to each other, including to private fields, methods, and constructors.

Consider the following nested class example:

public class Outer {

    public void outerPublic() {
    }

    private void outerPrivate() {
    }

    class Inner {

        public void innerPublic() {
            outerPrivate();
        }
    }
}

Here, although the method outerPrivate() is private, it is accessible from the method innerPublic().

We can describe a top-level type, plus all types nested within it, as forming a nest. Two members of a nest are described as nestmates.

Thus, in the above example, Outer and Inner together form a nest and are nestmates of each other.

2.2. Bridge Method

JVM access rules do not permit private access between nestmates. Ideally, we should get a compilation error for the above example. However, the Java source code compiler permits the access by introducing a level of indirection.

For example, an invocation of a private member is compiled into an invocation of a compiler-generated, package-private, bridging method in the target class, which in turn invokes the intended private method.

This happens behind the scenes. This bridging method slightly increases the size of a deployed application and can confuse users and tools.

2.3. Using Reflection

A further consequence of this is that core reflection also denies access. This is surprising given that reflective invocations should behave the same as source level invocations.

For example, if we try to call the outerPrivate() reflectively from the Inner class:

public void innerPublicReflection(Outer ob) throws Exception {
    Method method = ob.getClass().getDeclaredMethod("outerPrivate");
    method.invoke(ob);
}

We would get an exception:

java.lang.IllegalAccessException: 
Class com.baeldung.Outer$Inner can not access a member of class com.baeldung.Outer with modifiers "private"

Java 11 tries to address these concerns.

3. Nest Based Access Control

Java 11 brings the notion of nestmates and the associated access rules within the JVM. This simplifies the job of Java source code compilers.

To achieve this, the class file format now contains two new attributes:

  1. One nest member (typically the top-level class) is designated as the nest host. It contains an attribute (NestMembers) to identify the other statically known nest members.
  2. Each of the other nest members has an attribute (NestHost) to identify its nest host.

Thus, for types C and D to be nestmates they must have the same nest host. A type C claims to be a member of the nest hosted by D, if it lists D in its NestHost attribute. The membership is validated if D also lists C in its NestMembers attribute. Also, type D is implicitly a member of the nest that it hosts.

Now there is no need for the compiler to generate the bridge methods.

Finally, the nest based access control removes the surprising behavior from the core reflection. Therefore, method innerPublicReflection() shown in the previous section will execute without any exceptions.

4. Nestmate Reflection API

Java 11 provides means to query the new class file attributes using core reflection. The class java.lang.Class contains the following three new methods.

4.1. getNestHost()

This returns the nest host of the nest to which this Class object belongs:

@Test
public void whenGetNestHostFromOuter_thenGetNestHost() {
    is(Outer.class.getNestHost().getName()).equals("com.baeldung.Outer");
}

@Test
public void whenGetNestHostFromInner_thenGetNestHost() {
    is(Outer.Inner.class.getNestHost().getName()).equals("com.baeldung.Outer");
}

Both Outer and Inner classes belong to the nest host com.baeldung.Outer.

4.2. isNestmateOf()

This determines if the given Class is a nestmate of this Class object:

@Test
public void whenCheckNestmatesForNestedClasses_thenGetTrue() {
    is(Outer.Inner.class.isNestmateOf(Outer.class)).equals(true);
}

4.3. getNestMembers()

This returns an array containing Class objects representing all the members of the nest to which this Class object belongs:

@Test
public void whenGetNestMembersForNestedClasses_thenGetAllNestedClasses() {
    Set<String> nestMembers = Arrays.stream(Outer.Inner.class.getNestMembers())
      .map(Class::getName)
      .collect(Collectors.toSet());

    is(nestMembers.size()).equals(2);

    assertTrue(nestMembers.contains("com.baeldung.Outer"));
    assertTrue(nestMembers.contains("com.baeldung.Outer$Inner"));
}

5. Compilation Details

5.1. Bridge Method Before Java 11

Let’s dig into the details of the compiler generated bridging method. We can see this by disassembling the resulting class file:

$ javap -c Outer
Compiled from "Outer.java"
public class com.baeldung.Outer {
  public com.baeldung.Outer();
    Code:
       0: aload_0
       1: invokespecial #2                  // Method java/lang/Object."<init>":()V
       4: return

  public void outerPublic();
    Code:
       0: return

  static void access$000(com.baeldung.Outer);
    Code:
       0: aload_0
       1: invokespecial #1                  // Method outerPrivate:()V
       4: return
}

Here, apart from the default constructor and the public method outerPublic(), notice the method access$000(). The compiler generates this as a bridging method.

The innerPublic() goes through this method to call the outerPrivate():

$ javap -c Outer\$Inner
Compiled from "Outer.java"
class com.baeldung.Outer$Inner {
  final com.baeldung.Outer this$0;

  com.baeldung.Outer$Inner(com.baeldung.Outer);
    Code:
       0: aload_0
       1: aload_1
       2: putfield      #1                  // Field this$0:Lcom/baeldung/Outer;
       5: aload_0
       6: invokespecial #2                  // Method java/lang/Object."<init>":()V
       9: return

  public void innerPublic();
    Code:
       0: aload_0
       1: getfield      #1                  // Field this$0:Lcom/baeldung/Outer;
       4: invokestatic  #3                  // Method com/baeldung/Outer.access$000:(Lcom/baeldung/Outer;)V
       7: return
}

Notice the comment at line #19. Here, innerPublic() calls the bridge method access$000().

5.2. Nestmates with Java 11

The Java 11 compiler would generate the following disassembled Outer class file:

$ javap -c Outer
Compiled from "Outer.java"
public class com.baeldung.Outer {
  public com.baeldung.Outer();
    Code:
       0: aload_0
       1: invokespecial #1                  // Method java/lang/Object."<init>":()V
       4: return

  public void outerPublic();
    Code:
       0: return
}

Notice that there isn’t a compiler generated bridging method. Also, the Inner class can now make a direct call to the outerPrivate() method:

$ javap -c Outer\$Inner.class 
Compiled from "Outer.java"
class com.baeldung.Outer$Inner {
  final com.baeldung.Outer this$0;

  com.baeldung.Outer$Inner(com.baeldung.Outer);
    Code:
       0: aload_0
       1: aload_1
       2: putfield      #1                  // Field this$0:Lcom/baeldung/Outer;
       5: aload_0
       6: invokespecial #2                  // Method java/lang/Object."<init>":()V
       9: return

  public void innerPublic();
    Code:
       0: aload_0
       1: getfield      #1                  // Field this$0:Lcom/baeldung/Outer;
       4: invokevirtual #3                  // Method com/baeldung/Outer.outerPrivate:()V
       7: return
}

6. Conclusion

In this article, we explored the nest based access control introduced in Java 11.

As usual, code snippets can be found over on GitHub.

Viewing all 4700 articles
Browse latest View live