Quantcast
Channel: Baeldung
Viewing all 4699 articles
Browse latest View live

Guide to the Java Queue Interface

$
0
0

1. Introduction

In this tutorial, we’ll be discussing Java’s Queue interface.

First, we’ll take a peek at what a Queue does, and some of its core methods. Next, we’ll dive into a number of implementations that Java provides as standard.

Finally, we’ll talk about thread safety before wrapping it all up.

2. Visualizing the Queue

Let’s start with a quick analogy.

Imagine we’ve just opened our first business – a hot dog stand. We want to serve our new potential clients in the most efficient way possible for our small business; one at a time. First, we ask them to form an orderly line in front of our stand, with new customers joining at the rear. Thanks to our organization skills, we can now distribute our tasty hot dogs in a fair way.

Queues in Java work in a similar way. After we declare our Queue, we can add new elements to the back, and remove them from the front.

In fact, most Queues we’ll encounter in Java work in this first in, first out manner – often abbreviated to FIFO.

However, there’s one exception that we’ll touch upon later.

3. Core Methods

The Queue declares a number of methods that need to be coded by all implementing classes. Let’s outline a few of the more important ones now:

  1. offer() – Inserts a new element onto the Queue
  2. poll() – Removes an element from the front of the Queue
  3. peek() Inspects the element at the front of the Queue, without removing it

4. AbstractQueue

AbstractQueue is the simplest possible Queue implementation that Java provides. It includes a skeletal implementation of some of the Queue interface’s methods, excluding offer.

When we create a custom queue extending the AbstractQueue class, we must provide an implementation of the offer method which does not allow the insertion of null elements.

Additionally, we must provide the methods peek, poll, size, and java.util‘s iterator.

Let’s put together a simple Queue implementation using AbstractQueue.

First, let’s define our class with a LinkedList to store our Queue’s elements:

public class CustomBaeldungQueue<T> extends AbstractQueue<T> {

    private LinkedList<T> elements;

    public CustomBaeldungQueue() {
      this.elements = new LinkedList<T>();
    }

}

Next, let’s override the required methods and provide the code:

@Override
public Iterator<T> iterator() {
    return elements.iterator();
}

@Override
public int size() {
    return elements.size();
}

@Override
public boolean offer(T t) {
    if(t == null) return false;
    elements.add(t);
    return true;
}

@Override
public T poll() {
    Iterator<T> iter = elements.iterator();
    T t = iter.next();
    if(t != null){
        iter.remove();
        return t;
    }
    return null;
}

@Override
public T peek() {
    return elements.getFirst();
}

Excellent, let’s check that it works with a quick unit test:

customQueue.add(7);
customQueue.add(5);

int first = customQueue.poll();
int second = customQueue.poll();

assertEquals(7, first);
assertEquals(5, second);

4. Sub-interfaces

Generally, the Queue interface is inherited by 3 main sub-interfaces. Blocking Queues, Transfer Queues, and Deques.

Together, these 3 interfaces are implemented by the vast majority of Java’s available Queues. Let’s take a quick look at what these interfaces have been set out to do.

4.1. Blocking Queues

The BlockingQueue interface supports additional operations which force threads to wait on the Queue depending on the current state. A thread may wait on the Queue to be non-empty when attempting a retrieval, or for it to become empty when adding a new element.

Standard Blocking Queues include LinkedBlockingQueue, SynchronousQueue, and ArrayBlockingQueue.

For more information, head over to our article on Blocking Queues.

4.2. Transfer Queues

The TransferQueue interface extends the BlockingQueue interface but is tailored toward the producer-consumer pattern. It controls the flow of information from producer to consumer, creating backpressure in the system.

Java ships with one implementation of the TransferQueue interface, LinkedTransferQueue.

4.3. Deques

Deque is short for Double-Ended Queue and is analogous to a deck of cards – elements may be taken from both the start and end of the Deque. Much like the traditional Queue, the Deque provides methods to add, retrieve and peek at elements held at both the top and bottom.

For a detailed guide on how the Deque works, check out our ArrayDeque article.

5. Priority Queues

We saw earlier that most of the Queues that we come across in Java follow the FIFO principle.

One such exception to this rule is the PriorityQueue. When new elements are inserted into the PriorityQueue, they are ordered based on their natural ordering, or by a defined Comparator provided when we construct the PriorityQueue.

Let’s take a look at how this works with a simple unit test:

PriorityQueue<Integer> integerQueue = new PriorityQueue<>();

integerQueue.add(9);
integerQueue.add(2);
integerQueue.add(4);

int first = integerQueue.poll();
int second = integerQueue.poll();
int third = integerQueue.poll();

assertEquals(2, first);
assertEquals(4, second);
assertEquals(9, third);

Despite the order in which our integers were added to the PriorityQueue, we can see that the retrieval order is changed according to the natural order of the numbers.

We can see that the same is also true when applied to Strings:

PriorityQueue<String> stringQueue = new PriorityQueue<>();

stringQueue.add("blueberry");
stringQueue.add("apple");
stringQueue.add("cherry");

String first = stringQueue.poll();
String second = stringQueue.poll();
String third = stringQueue.poll();

assertEquals("apple", first);
assertEquals("blueberry", second);
assertEquals("cherry", third);

6. Thread Safety

Adding items to Queues is particularly useful in multi-threaded environments. A Queue can be shared amongst threads, and be used to block progress until space is available – helping us overcome some common multi-threaded problems.

For example, writing to a single disk from multiple threads creates resource contention and can lead to slow writing times. Creating a single writer thread with a BlockingQueue can alleviate this issue and lead to vastly improved write speeds.

Luckily, Java offers ConcurrentLinkedQueue, ArrayBlockingQueue, and ConcurrentLinkedDeque which are thread-safe and perfect for multi-threaded programs.

7. Conclusion

In this tutorial, we’ve taken a deep dive into the Java Queue interface.

Firstly, we explored what a Queue does, as well as the implementations that Java provides.

Next, we looked at a Queue’s usual FIFO principle, as well as the PriorityQueue which differs in its ordering.

Finally, we explored thread safety and how Queues can be used in a multi-threaded environment.

As always, the code is available over on GitHub.


What is Thread-Safety and How to Achieve it?

$
0
0

1. Overview

Java supports multithreading out of the box. This means that by running bytecode concurrently in separate worker threads the JVM is capable of improving the performance in applications.

Although multithreading is a powerful feature, it comes at a price. In multithreaded environments, we need to write implementations in a thread-safe way. This means that different threads can access the same resources without exposing erroneous behavior or producing unpredictable results.

This programming methodology is known as “thread-safety”.

In this tutorial, we’ll look at different approaches to achieve it.

2. Stateless Implementations

In most cases, errors in multithreaded applications are the result of incorrectly sharing state between several threads.

Therefore, the first approach that we’ll look at is to achieve thread-safety using stateless implementations.

To better understand this approach, let’s consider a simple utility class with a static method that calculates the factorial of a number:

public class MathUtils {
    
    public static BigInteger factorial(int number) {
        BigInteger f = new BigInteger("1");
        for (int i = 2; i <= number; i++) {
            f = f.multiply(BigInteger.valueOf(i));
        }
        return f;
    }
}

The factorial() method is a stateless deterministic function. Given a specific input, it always produces the same output.

The method neither relies on external state nor maintains state at all. Hence, it’s considered to be thread-safe and can be safely called by multiple threads at the same time.

All threads can safely call the factorial() method and will get the expected result without interfering with each other and without altering the output that the method generates for other threads.

Therefore, stateless implementations are the simplest way to achieve thread-safety.

3. Immutable Implementations

If we need to share state between different threads, we can create thread-safe classes by making them immutable.

Immutability is a powerful, language-agnostic concept and it’s fairly easy to achieve in Java.

To put it simply, a class instance is immutable when its internal state can’t be modified after it has been constructed.

The easiest way to create an immutable class in Java is by declaring all the fields private and final and not providing setters:

public class MessageService {
    
    private final String message;

    public MessageService(String message) {
        this.message = message;
    }
    
    // standard getter
    
}

A MessageService object is effectively immutable since its state can’t change after its construction. Hence, it’s thread-safe.

Moreover, if MessageService were actually mutable, but multiple threads only have read-only access to it, it’s thread-safe as well.

Thus, immutability is just another way to achieve thread-safety.

4. Thread-Local Fields

In object-oriented programming (OOP), objects actually need to maintain state through fields and implement behavior through one or more methods.

If we actually need to maintain state, we can create thread-safe classes that don’t share state between threads by making their fields thread-local.

We can easily create classes whose fields are thread-local by simply defining private fields in Thread classes.

We could define, for instance, a Thread class that stores an array of integers:

public class ThreadA extends Thread {
    
    private final List<Integer> numbers = Arrays.asList(1, 2, 3, 4, 5, 6);
    
    @Override
    public void run() {
        numbers.forEach(System.out::println);
    }
}

While another one might hold an array of strings:

public class ThreadB extends Thread {
    
    private final List<String> letters = Arrays.asList("a", "b", "c", "d", "e", "f");
    
    @Override
    public void run() {
        letters.forEach(System.out::println);
    }
}

In both implementations, the classes have their own state, but it’s not shared with other threads. Thus, the classes are thread-safe.

Similarly, we can create thread-local fields by assigning ThreadLocal instances to a field.

Let’s consider, for example, the following StateHolder class:

public class StateHolder {
    
    private final String state;

    // standard constructors / getter
}

We can easily make it a thread-local variable as follows:

public class ThreadState {
    
    public static final ThreadLocal<StateHolder> statePerThread = new ThreadLocal<StateHolder>() {
        
        @Override
        protected StateHolder initialValue() {
            return new StateHolder("active");  
        }
    };

    public static statePerThread getState() {
        return statePerThread.get();
    }
}

Thread-local fields are pretty much like normal class fields, excepting that each thread that accesses them via a setter/getter gets an independently initialized copy of the field so that each thread has its own state.

5. Synchronized Collections

We can easily create thread-safe collections by using the set of synchronization wrappers included within the collections framework.

We can use, for instance, one of these synchronization wrappers to create a thread-safe collection:

Collection<Integer> syncCollection = Collections.synchronizedCollection(new ArrayList<>());
Thread thread1 = new Thread(() -> syncCollection.addAll(Arrays.asList(1, 2, 3, 4, 5, 6)));
Thread thread2 = new Thread(() -> syncCollection.addAll(Arrays.asList(7, 8, 9, 10, 11, 12)));
thread1.start();
thread2.start();

Let’s keep in mind that synchronized collections use intrinsic locking in each method (we’ll look at intrinsic locking later).

This means that the methods can be accessed by only one thread at a time, while other threads will be blocked until the method is unlocked by the first thread.

Thus, synchronization has a penalty in performance, due to the underlying logic of synchronized access.

6. Concurrent Collections

Alternatively to synchronized collections, we can use concurrent collections to create thread-safe collections.

Java provides the java.util.concurrent package, which contains several concurrent collections, such as ConcurrentHashMap:

Map<String,String> concurrentMap = new ConcurrentHashMap<>();
concurrentMap.put("1", "one");
concurrentMap.put("2", "two");
concurrentMap.put("3", "three");

Unlike their synchronized counterparts, concurrent collections achieve thread-safety by dividing their data into segments. In a ConcurrentHashMap, for instance, several threads can acquire locks on different map segments, so multiple threads can access the Map at the same time.

Concurrent collections are much more performant than synchronized collections, due to the inherent advantages of concurrent thread access.

It’s worth mentioning that synchronized and concurrent collections only make the collection itself thread-safe and not the contents.

7. Atomic Objects

It’s also possible to achieve thread-safety using the set of atomic classes that Java provides, including AtomicInteger, AtomicLong, AtomicBoolean, and AtomicReference.

Atomic classes allow us to perform atomic operations, which are thread-safe, without using synchronization. An atomic operation is executed in one single machine level operation.

To understand the problem this solves, let’s look at the following Counter class:

public class Counter {
    
    private int counter = 0;
    
    public void incrementCounter() {
        counter += 1;
    }
    
    public int getCounter() {
        return counter;
    }
}

Let’s suppose that in a race condition, two threads access the incrementCounter() method at the same time.

In theory, the final value of the counter field will be 2. But we just can’t be sure about the result, because the threads are executing the same code block at the same time and incrementation is not atomic.

Let’s create a thread-safe implementation of the Counter class by using an AtomicInteger object:

public class AtomicCounter {
    
    private final AtomicInteger counter = new AtomicInteger();
    
    public void incrementCounter() {
        counter.incrementAndGet();
    }
    
    public int getCounter() {
        return counter.get();
    }
}

This is thread-safe because, while incrementation, ++, takes more than one operation, incrementAndGet is atomic.

8. Synchronized Methods

While the earlier approaches are very good for collections and primitives, we will at times need greater control than that.

So, another common approach that we can use for achieving thread-safety is implementing synchronized methods.

Simply put, only one thread can access a synchronized method at a time while blocking access to this method from other threads. Other threads will remain blocked until the first thread finishes or the method throws an exception.

We can create a thread-safe version of incrementCounter() in another way by making it a synchronized method:

public synchronized void incrementCounter() {
    counter += 1;
}

We’ve created a synchronized method by prefixing the method signature with the synchronized keyword.

Since one thread at a time can access a synchronized method, one thread will execute the incrementCounter() method, and in turn, others will do the same. No overlapping execution will occur whatsoever.

Synchronized methods rely on the use of “intrinsic locks” or “monitor locks”. An intrinsic lock is an implicit internal entity associated with a particular class instance.

In a multithreaded context, the term monitor is just a reference to the role that the lock performs on the associated object, as it enforces exclusive access to a set of specified methods or statements.

When a thread calls a synchronized method, it acquires the intrinsic lock. After the thread finishes executing the method, it releases the lock, hence allowing other threads to acquire the lock and get access to the method.

We can implement synchronization in instance methods, static methods, and statements (synchronized statements).

9. Synchronized Statements

Sometimes, synchronizing an entire method might be overkill if we just need to make a segment of the method thread-safe.

To exemplify this use case, let’s refactor the incrementCounter() method:

public void incrementCounter() {
    // additional unsynced operations
    synchronized(this) {
        counter += 1; 
    }
}

The example is trivial, but it shows how to create a synchronized statement. Assuming that the method now performs a few additional operations, which don’t require synchronization, we only synchronized the relevant state-modifying section by wrapping it within a synchronized block.

Unlike synchronized methods, synchronized statements must specify the object that provides the intrinsic lock, usually the this reference.

Synchronization is expensive, so with this option, we are able to only synchronize the relevant parts of a method.

10. Volatile Fields

Synchronized methods and blocks are handy for addressing variable visibility problems among threads. Even so, the values of regular class fields might be cached by the CPU. Hence, consequent updates to a particular field, even if they’re synchronized, might not be visible to other threads.

To prevent this situation, we can use volatile class fields:

public class Counter {

    private volatile int counter;

    // standard constructors / getter
    
}

With the volatile keyword, we instruct the JVM and the compiler to store the counter variable in main memory. That way, we make sure that every time the JVM reads the value of the counter variable, it will actually read it from main memory, instead of from the CPU cache. Likewise, every time the JVM writes to the counter variable, the value will be written to main memory.

Moreover, the use of a volatile variable ensures that all variables that are visible to a given thread will be read from main memory as well.

Let’s consider the following example:

public class User {

    private String name;
    private volatile int age;

    // standard constructors / getters
    
}

In this case, each time the JVM writes the age volatile variable to main memory, it will write the non-volatile name variable to main memory as well. This assures that the latest values of both variables are stored in main memory, so consequent updates to the variables will automatically be visible to other threads.

Similarly, if a thread reads the value of a volatile variable, all the variables visible to the thread will be read from main memory too.

This extended guarantee that volatile variables provide is known as the full volatile visibility guarantee.

11. Extrinsic Locking

We can slightly improve the thread-safe implementation of the Counter class by using an extrinsic monitor lock instead of an intrinsic one.

An extrinsic lock also provides coordinated access to a shared resource in a multithreaded environment, but it uses an external entity to enforce exclusive access to the resource:

public class ExtrinsicLockCounter {

    private int counter = 0;
    private final Object lock = new Object();
    
    public void incrementCounter() {
        synchronized(lock) {
            counter += 1;
        }
    }
    
    // standard getter
    
}

We use a plain Object instance to create an extrinsic lock. This implementation is slightly better, as it promotes security at the lock level.

With intrinsic locking, where synchronized methods and blocks rely on the this reference, an attacker could cause a deadlock by acquiring the intrinsic lock and triggering a denial of service (DoS) condition.

Unlike its intrinsic counterpart, an extrinsic lock makes use of a private entity, which is not accessible from the outside. This makes it harder for an attacker to acquire the lock and cause a deadlock.

12. Reentrant Locks

Java provides an improved set of Lock implementations, whose behavior is slightly more sophisticated than the intrinsic locks discussed above.

With intrinsic locks, the lock acquisition model is rather rigid: one thread acquires the lock, then executes a method or code block, and finally releases the lock, so other threads can acquire it and access the method.

There’s no underlying mechanism that checks the queued threads and gives priority access to the longest waiting threads.

ReentrantLock instances allow us to do exactly that, hence preventing queued threads from suffering some types of resource starvation:

public class ReentrantLockCounter {

    private int counter;
    private final ReentrantLock reLock = new ReentrantLock(true);
    
    public void incrementCounter() {
        reLock.lock();
        try {
            counter += 1;
        } finally {
            reLock.unlock();
        }
    }
    
    // standard constructors / getter
    
}

The ReentrantLock constructor takes an optional fairness boolean parameter. When set to true, and multiple threads are trying to acquire a lock, the JVM will give priority to the longest waiting thread and grant access to the lock.

13. Read/Write Locks

Another powerful mechanism that we can use for achieving thread-safety is the use of ReadWriteLock implementations.

A ReadWriteLock lock actually uses a pair of associated locks, one for read-only operations and other for writing operations.

As a result, it’s possible to have many threads reading a resource, as long as there’s no thread writing to it. Moreover, the thread writing to the resource will prevent other threads from reading it.

We can use a ReadWriteLock lock as follows:

public class ReentrantReadWriteLockCounter {
    
    private int counter;
    private final ReentrantReadWriteLock rwLock = new ReentrantReadWriteLock();
    private final Lock readLock = rwLock.readLock();
    private final Lock writeLock = rwLock.writeLock();
    
    public void incrementCounter() {
        writeLock.lock();
        try {
            counter += 1;
        } finally {
            writeLock.unlock();
        }
    }
    
    public int getCounter() {
        readLock.lock();
        try {
            return counter;
        } finally {
            readLock.unlock();
        }
    }

   // standard constructors
   
}

14. Conclusion

In this article, we learned what thread-safety is in Java, and took an in-depth look at different approaches for achieving it.

As usual, all the code samples shown in this article are available over on GitHub.

Differences Between ZonedDateTime and OffsetDateTime

$
0
0

1. Overview

ZonedDateTime and OffsetDateTime are pretty popular classes in the Java 8 DateTime API. Furthermore, both store an instant on the timeline up to a precision of nanoseconds. And, at first, it may get confusing to choose between them.

In this quick tutorial, we’re going to look at the differences between ZonedDateTime and OffsetDateTime.

2. ZonedDateTime

A ZonedDateTime is an immutable representation of a date-time with a timezone in the ISO-8601 calendar system, such as 2007-12-03T10:15:30+01:00 Europe/Paris. It holds state equivalent to three separate objects: a LocalDateTime, a ZoneId, and the resolved ZoneOffset

Here, the ZoneId determines how and when the offset changes. So, the offset can’t be freely set, as the zone controls which offsets are valid.

To get the current ZonedDateTime for a specific region, we’ll use:

ZoneId zone = ZoneId.of("Europe/Berlin");
ZonedDateTime zonedDateTime = ZonedDateTime.now(zone);

The ZonedDateTime class also provides built-in methods for converting a given date from one timezone to another:

ZonedDateTime destZonedDateTime = sourceZonedDateTime.withZoneSameInstant(destZoneId);

Finally, it’s fully DST-aware and handles daylight saving time adjustments. It often comes in handy when we want to display a date-time field in a specific timezone.

3. OffsetDateTime

An OffsetDateTime is an immutable representation of a date-time with an offset from UTC/Greenwich in the ISO-8601 calendar system, such as 2007-12-03T10:15:30+01:00. In other words, it stores all date and time fields, to a precision of nanoseconds, as well as the offset from GMT/UTC.

Let’s get the current OffsetDateTime with a two-hour offset from GMT/UTC:

ZoneOffset zoneOffSet= ZoneOffset.of("+02:00");
OffsetDateTime offsetDateTime = OffsetDateTime.now(zoneOffSet);

4. The Main Differences

First, it doesn’t make sense (without conversions) to directly compare two dates with full timezone information. Therefore, we should always prefer storing OffsetDateTime in the database over the ZonedDateTime, as dates with a local time offset always represent the same instants in time.

Moreover, unlike with the ZonedDateTime, adding an index over a column storing the OffsetDateTime won’t change the meaning of the date.

Let’s quickly sum up the key differences.

ZonedDateTime:

  • stores all date and time fields, to a precision of nanoseconds, and a timezone, with a zone offset used to handle ambiguous local date-times
  • can’t freely set offsets, as the zone controls the valid offset values
  • is fully DST-aware and handles daylight savings adjustments
  • comes in handy for displaying date-time fields in a user-specific timezone

OffsetDateTime:

  • stores all date and time fields, to a precision of nanoseconds, as well as the offset from GMT/UTC (no timezone information)
  • should be used for storing a date in the database or communicating it over a network

5. Conclusion

In this tutorial, we covered the differences between the ZonedDateTime and the OffsetDateTime.

As usual, the complete source code is available over on Github.

Attaching Values to Java Enum

$
0
0

1. Introduction

The Java enum type provides a language-supported way to create and use constant values. By defining a finite set of values, the enum is more type-safe than constant literal variables like String or int.

However, enum values are required to be valid identifiers, and we’re encouraged to use SCREAMING_SNAKE_CASE by convention.

Given those limitations, the enum value alone is not suitable for human-readable strings or non-string values.

In this tutorial, we’ll use the enum‘s features as a Java class to attach the values we want.

2. Using Java Enum as a Class

We often create an enum as a simple list of values. For example, here are the first two rows of the periodic table as a simple enum:

public enum Element {
    H, HE, LI, BE, B, C, N, O, F, NE
}

Using the syntax above, we’ve created ten static, final instances of the enum named Element. While this is very efficient, we have only captured the element symbols. And while the upper-case form is appropriate for Java constants, it’s not how we normally write the symbols.

Furthermore, we’re also missing other properties of the periodic table elements, like the name and atomic weight.

Although the enum type has special behavior in Java, we can add constructors, fields, and methods as we do with other classes. Because of this, we can enhance our enum to include the values we need.

3. Adding a Constructor and a Final Field

Let’s start by adding the element names. We’ll set the names into a private final variable using a constructor:

public enum Element {
    H("Hydrogen"),
    HE("Helium"),
    // ...
    NE("Neon");

    public final String label;

    private Element(String label) {
        this.label = label;
    }
}

First of all, we notice the special syntax in the declaration list. This is how a constructor is invoked for enum types. Although it’s illegal to use the new operator for an enum, we can pass constructor arguments in the declaration list.

We then declare an instance variable label. There are a few things to note about that.

Firstly, we chose the label identifier instead of the name. Although the member field name is available to use, let’s choose label to avoid confusion with the predefined Enum.name() method.

Secondly, our label field is final. While fields of an enum do not have to be final, in the majority of cases we don’t want our labels to change. In the spirit of enum values being constant, this makes sense.

Finally, the label field is public. Hence, we can access the label directly:

System.out.println(BE.label);

On the other hand, the field can be private, accessed with a getLabel() method. For the purpose of brevity, this article will continue to use the public field style.

4. Locating Java Enum Values

Java provides a valueOf(String) method for all enum types. Thus, we can always get an enum value based on the declared name:

assertSame(Element.LI, Element.valueOf("LI"));

However, we may want to look up an enum value by our label field as well. To do that we can add a static method:

public static Element valueOfLabel(String label) {
    for (Element e : values()) {
        if (e.label.equals(label)) {
            return e;
        }
    }
    return null;
}

The static valueOfLabel() method iterates the Element values until it finds a match. It returns null if no match is found. Conversely, an exception could be thrown instead of returning null.

Let’s see a quick example using our valueOfLabel() method:

assertSame(Element.LI, Element.valueOfLabel("Lithium"));

5. Caching the Lookup Values

We can avoid iterating the enum values by using a Map to cache the labels. To do this, we define a static final Map and populate it when the class loads:

public enum Element {

    // ... enum values

    private static final Map<String, Element> BY_LABEL = new HashMap<>();
    
    static {
        for (Element e: values()) {
            BY_LABEL.put(e.label, e);
        }
    }

   // ... fields, constructor, methods

    public static Element valueOfLabel(String label) {
        return BY_LABEL.get(label);
    }
}

As a result of being cached, the enum values are iterated only once, and the valueOfLabel() method is simplified.

As an alternative, we can lazily construct the cache when it is first accessed in the valueOfLabel() method. In that case, map access must be synchronized to prevent concurrency problems.

6. Attaching Multiple Values

The Enum constructor can accept multiple values. To illustrate, let’s add the atomic number as an int and the atomic weight as a float:

public enum Element {
    H("Hydrogen", 1, 1.008f),
    HE("Helium", 2, 4.0026f),
    // ...
    NE("Neon", 10, 20.180f);

    private static final Map<String, Element> BY_LABEL = new HashMap<>();
    private static final Map<Integer, Element> BY_ATOMIC_NUMBER = new HashMap<>();
    private static final Map<Float, Element> BY_ATOMIC_WEIGHT = new HashMap<>();
    
    static {
        for (Element e : values()) {
            BY_LABEL.put(e.label, e);
            BY_ATOMIC_NUMBER.put(e.atomicNumber, e);
            BY_ATOMIC_WEIGHT.put(e.atomicWeight, e);
        }
    }

    public final String label;
    public final int atomicNumber;
    public final float atomicWeight;

    private Element(String label, int atomicNumber, float atomicWeight) {
        this.label = label;
        this.atomicNumber = atomicNumber;
        this.atomicWeight = atomicWeight;
    }

    public static Element valueOfLabel(String label) {
        return BY_LABEL.get(label);
    }

    public static Element valueOfAtomicNumber(int number) {
        return BY_ATOMIC_NUMBER.get(number);
    }

    public static Element valueOfAtomicWeight(float weight) {
        return BY_ATOMIC_WEIGHT.get(weight);
    }
}

Similarly, we can add any values we want to the enum, such as the proper case symbols, “He”, “Li”, and “Be”, for example.

Moreover, we can add computed values to our enum by adding methods to perform operations.

7. Controlling the Interface

As a result of adding fields and methods to our enum, we’ve changed its public interface. Therefore, our code, which uses the core Enum name() and valueOf() methods, will be unaware of our new fields.

The static valueOf() method is already defined for us by the Java language. Therefore, we can’t provide our own valueOf() implementation.

Similarly, because the Enum.name() method is final, we can’t override it either.

As a result, there’s no practical way to utilize our extra fields using the standard Enum API. Instead, let’s look at some different ways to expose our fields.

7.1. Overriding toString()

Overriding toString() may be an alternative to overriding name():

@Override 
public String toString() { 
    return this.label; 
}

By default, Enum.toString() returns the same value as Enum.name().

7.2. Implementing an Interface

The enum type in Java can implement interfaces. While this approach is not as generic as the Enum API, interfaces do help us generalize.

Let’s consider this interface:

public interface Labeled {
    String label();
}

For consistency with the Enum.name() method, our label() method does not have a get prefix.

And, because the valueOfLabel() method is static, we do not include it in our interface.

Finally, we can implement the interface in our enum:

public enum Element implements Labeled {

    // ...

    @Override
    public String label() {
        return label;
    }

    // ...
}

One benefit of this approach is that the Labeled interface can be applied to any class, not just enum types. Instead of relying on the generic Enum API, we now have a more context-specific API.

8. Conclusion

In this article, we’ve explored many features of the Java Enum implementation. By adding constructors, fields, and methods, we see that the enum can do a lot more than literal constants.

As always, the full source code for this article can be found over on Github.

Intro to Derive4J

$
0
0

1. Introduction

Derive4J is an annotation processor that enables various functional concepts in Java 8.

In this tutorial, we’ll introduce Derive4J and the most important concepts enabled by the framework:

  • Algebraic data types
  • Structural pattern matching
  • First class laziness

2. Maven Dependency

To use Derive4J, we need to include the dependency to our project:

<dependency>
    <groupId>org.derive4j</groupId>
    <artifactId>derive4j</artifactId>
    <version>1.1.0</version>
    <optional>true</optional>
</dependency>

3. Algebraic Data Types

3.1. Description

Algebraic data types (ADTs) are a kind of composite type – they are combinations of other types or generics.

ADTs generally fall into two main categories:

  • sum
  • product

Algebraic data types are present by default in many languages like Haskell and Scala.

3.2. Sum Type

Sum is the data type representing the logical OR operation. This means it can be one thing or another but not both of them. Simply speaking, sum type is a set of different cases. The name “sum” comes from the fact that the total number of distinct values is the total number of cases.

Enum is the closest thing in Java to the sum type. Enum has a set of possible values but can have only one of them at a time. However, we can’t associate any additional data with Enum in Java, which is the main advantage of algebraic data types over Enum.

3.3. Product Type

Product is the data type representing the logical AND operation. It’s the combination of several values.

Class in Java can be considered as a product type. Product types are defined by the combination of their fields altogether.

We can find more information on ADTs in this Wikipedia article.

3.4. Usage

One of the commonly used algebraic data types is Either. We can think of Either as a more sophisticated Optional that can be used when there is a possibility of missing values or the operation can result in an exception.

We need to annotate an abstract class or interface with at least one abstract method that will be used by Derive4J to generate the structure of our ADT.

To create the Either data type in Derive4J we need to create an interface:

@Data
interface Either<A, B> {
    <X> X match(Function<A, X> left, Function<B, X> right);
}

Our interface is annotated with @Data, which will allow Derive4J to generate the proper code for us. The generated code contains factory methods, lazy constructors, and various other methods.

By default, the generated code gets the name of the annotated class, but in plural form. But, there is a possibility to configure that via the inClass parameter.

Now, we can use the generated code to create the Either ADT and verify that it’s working properly:

public void testEitherIsCreatedFromRight() {
    Either<Exception, String> either = Eithers.right("Okay");
    Optional<Exception> leftOptional = Eithers.getLeft(either);
    Optional<String> rightOptional = Eithers.getRight(either);
    Assertions.assertThat(leftOptional).isEmpty();
    Assertions.assertThat(rightOptional).hasValue("Okay");
}

We can also use the generated match() method to execute a function depending on which side of Either is present:

public void testEitherIsMatchedWithRight() {
    Either<Exception, String> either = Eithers.right("Okay");
    Function<Exception, String> leftFunction = Mockito.mock(Function.class);
    Function<String, String> rightFunction = Mockito.mock(Function.class);
    either.match(leftFunction, rightFunction);
    Mockito.verify(rightFunction, Mockito.times(1)).apply("Okay");
    Mockito.verify(leftFunction, Mockito.times(0)).apply(Mockito.any(Exception.class));
}

4. Pattern Matching

One of the features enabled by the use of algebraic data types is pattern matching.

Pattern matching is the mechanism for checking a value against a pattern. Basically, pattern matching is a more powerful switch statement, but without limitations on the matching type or the requirement for patterns to be constant. For more information, we can check this Wikipedia article on pattern matching.

To use pattern matching, we’ll create a class that will model the HTTP request. The users will be able to use one of the given HTTP methods:

  • GET
  • POST
  • DELETE
  • PUT

Let’s model our request class as an ADT in Derive4J, starting with the HTTPRequest interface:

@Data
interface HTTPRequest {
    interface Cases<R>{
        R GET(String path);
        R POST(String path);
        R PUT(String path);
        R DELETE(String path);
    }

    <R> R match(Cases<R> method);
}

The generated class, HttpRequests (note the plural form), will now allow us to perform pattern matching based on the type of request.

For this purpose, we’ll create a very simple HTTPServer class that will respond with different Status depending on the type of the request.

First, let’s create a simple HTTPResponse class that will serve as a response from our server to our client:

public class HTTPResponse {
    int statusCode;
    String responseBody;

    public HTTPResponse(int statusCode, String responseBody) {
        this.statusCode = statusCode;
        this.responseBody = responseBody;
    }
}

Then we can create the server that will use pattern matching to send the proper response:

public class HTTPServer {
    public static String GET_RESPONSE_BODY = "Success!";
    public static String PUT_RESPONSE_BODY = "Resource Created!";
    public static String POST_RESPONSE_BODY = "Resource Updated!";
    public static String DELETE_RESPONSE_BODY = "Resource Deleted!";

    public HTTPResponse acceptRequest(HTTPRequest request) {
        return HTTPRequests.caseOf(request)
          .GET((path) -> new HTTPResponse(200, GET_RESPONSE_BODY))
          .POST((path,body) -> new HTTPResponse(201, POST_RESPONSE_BODY))
          .PUT((path,body) -> new HTTPResponse(200, PUT_RESPONSE_BODY))
          .DELETE(path -> new HTTPResponse(200, DELETE_RESPONSE_BODY));
    }
}

The acceptRequest() method of our class uses pattern matching on the type of the request and will return different responses based on the type of request:

@Test
public void whenRequestReachesServer_thenProperResponseIsReturned() {
    HTTPServer server = new HTTPServer();
    HTTPRequest postRequest = HTTPRequests.POST("http://test.com/post", "Resource");
    HTTPResponse response = server.acceptRequest(postRequest);
    Assert.assertEquals(201, response.getStatusCode());
    Assert.assertEquals(HTTPServer.POST_RESPONSE_BODY, response.getResponseBody());
}

5. First Class Laziness

Derive4J allows us to introduce the concept of laziness, meaning that our objects will not be initialized until we perform an operation on them. Let’s declare the interface as LazyRequest and configure the generated class to be named LazyRequestImpl:

@Data(value = @Derive(
  inClass = "{ClassName}Impl",
  make = {Make.lazyConstructor, Make.constructors}
))
public interface LazyRequest {
    interface Cases<R>{
        R GET(String path);
        R POST(String path, String body);
        R PUT(String path, String body);
        R DELETE(String path);
    }

    <R> R match(LazyRequest.Cases<R> method);
}

We can now verify that the generated lazy constructor is working as it should:

@Test
public void whenRequestIsReferenced_thenRequestIsLazilyContructed() {
    LazyRequestSupplier mockSupplier = Mockito.spy(new LazyRequestSupplier());
    LazyRequest request = LazyRequestImpl.lazy(() -> mockSupplier.get());
    Mockito.verify(mockSupplier, Mockito.times(0)).get();
    Assert.assertEquals(LazyRequestImpl.getPath(request), "http://test.com/get");
    Mockito.verify(mockSupplier, Mockito.times(1)).get();
}

class LazyRequestSupplier implements Supplier<LazyRequest> {
    @Override
    public LazyRequest get() {
        return LazyRequestImpl.GET("http://test.com/get");
    }
}

We can find more information about first class laziness and examples in the Scala documentation.

6. Conclusion

In this tutorial, we introduced the Derive4J library and used it to implement some functional concepts, like Algebraic Data Types and pattern matching, which are normally not available in Java.

We can find more information about the library can be found in the official Derive4J documentation.

As always, all code samples can be found over on GitHub.

Java instanceof Operator

$
0
0

1. Introduction

In this quick tutorial, we’ll learn about the instanceof operator in Java.

2. What is the instanceof Operator?

instanceof is a binary operator used to test if an object is of a given type. The result of the operation is either true or false. It’s also known as type comparison operator because it compares the instance with type.

Before casting an unknown object, the instanceof check should always be used. Doing this helps in avoiding ClassCastException at runtime.

The instanceof operator’s basic syntax is:

(object) instanceof (type)

Let’s see a basic example for the instanceof operator. First, let’s create a class Round:

public class Round {
    // implementation details
}

Next, let’s create a class Ring that extends Round:

public class Ring extends Round {
    // implementation details
}

We can use instanceof to check if an instance of Ring is of Round type:

@Test
public void givenWhenInstanceIsCorrect_thenReturnTrue() {
    Ring ring = new Ring();
    Assert.assertTrue(ring instanceof Round);
}

3. How Does the instanceof Operator Work?

The instanceof operator works on the principle of the is-a relationship. The concept of an is-a relationship is based on class inheritance or interface implementation.

To demonstrate this, let’s create a Shape interface:

public interface Shape {
    // implementation details
}

Let’s also create a class Circle that implements the Shape interface and also extends the Round class:

public class Circle extends Round implements Shape {
    // implementation details
}

The instanceof result will be true if the object is an instance of the type:

@Test
public void givenWhenObjectIsInstanceOfType_thenReturnTrue() {
    Circle circle = new Circle();
    Assert.assertTrue(circle instanceof Circle);
}

It will also be true if the object is an instance of a subclass of the type:

@Test
public void giveWhenInstanceIsOfSubtype_thenReturnTrue() {
    Circle circle = new Circle();
    Assert.assertTrue(circle instanceof Round);
}

If the type is an interface, it will return true if the object implements the interface:

@Test
public void givenWhenTypeIsInterface_thenReturnTrue() {
    Circle circle = new Circle();
    Assert.assertTrue(circle instanceof Shape);
}

The instanceof operator cannot be used if there is no relationship between the object that is being compared and the type it is being compared with.

Let’s create a new class Triangle that implements Shape but has no relationship with Circle:

public class Triangle implements Shape {
    // implementation details
}

Now, if we use instanceof to check if a Circle is an instance of Triangle:

@Test
public void givenWhenComparingClassInDiffHierarchy_thenCompilationError() {
    Circle circle = new Circle();
    Assert.assertFalse(circle instanceof Triangle);
}

We’ll get a compilation error because there’s no relationship between the Circle and the Triangle classes:

java.lang.Error: Unresolved compilation problem:
  Incompatible conditional operand types Circle and Triangle

4. Using instanceof with the Object Type

In Java, every class implicitly inherits from the Object class. Therefore, using the instanceof operator with the Object type will always evaluate to true:

@Test
public void givenWhenTypeIsOfObjectType_thenReturnTrue() {
    Thread thread = new Thread();
    Assert.assertTrue(thread instanceof Object);
}

5. Using the instanceof Operator When an Object is null

If we use the instanceof operator on any object that is null, it returns false. Also, no null check is needed when using an instanceof operator.

@Test
public void givenWhenInstanceValueIsNull_thenReturnFalse() {
    Circle circle = null;
    Assert.assertFalse(circle instanceof Round);
}

6. Conclusion

In this tutorial, we’ve learned about the instanceof operator and how to use it. The complete code samples are available over on GitHub.

Spring WebClient and OAuth2 Support

$
0
0

1. Overview

Spring Security 5 provides OAuth2 support for Spring Webflux’s non-blocking WebClient class.

In this tutorial, we’ll analyze different approaches to access secured resources using this class.

Also, we’ll have a look under the hood to understand how Spring handles the OAuth2 authorization process.

2. Setting up the Scenario

Inline with the OAuth2 specification, apart from our Client – which is our focus subject in this article – we naturally need an Authorization Server and a Resource Server. 

We can use well-known authorization providers like Google or Github. To better understand the role of the OAuth2 Client, we can also use our own servers, with an implementation available in here. We won’t show the full configuration since it’s not the topic of this tutorial, it’s enough knowing that:

  • the Authorization Server will be:
    • running on port 8081
    • exposing the /oauth/authorize, /oauth/token and oauth/check_token endpoints to carry out the desired functionality
    • configured with sample users (e.g. john/123) and a single OAuth client (fooClientIdPassword/secret)
  • the Resource Server will be separated from the Authentication Server and will be:
    • running on port 8082
    • serving a simple Foo object secured resource accessible using the /foos/{id} endpoint

Note: it’s important to understand that several Spring projects are offering different OAuth-related features and implementations. We can examine what each library provides in this Spring Projects matrix.

The WebClient and all the reactive Webflux related functionality is part of the Spring Security 5 project. Therefore, we’ll mainly be using this framework throughout this article.

3. Spring Security 5 Under the Hood

In order to fully understand the examples coming ahead, it’s good to know how Spring Security manages the OAuth2 features internally.

This framework offers capabilities to:

  • rely on an OAuth2 provider account to login users into the application
  • configure our service as an OAuth2 Client
  • manage the authorization procedures for us
  • refresh tokens automatically
  • store the credentials if necessary

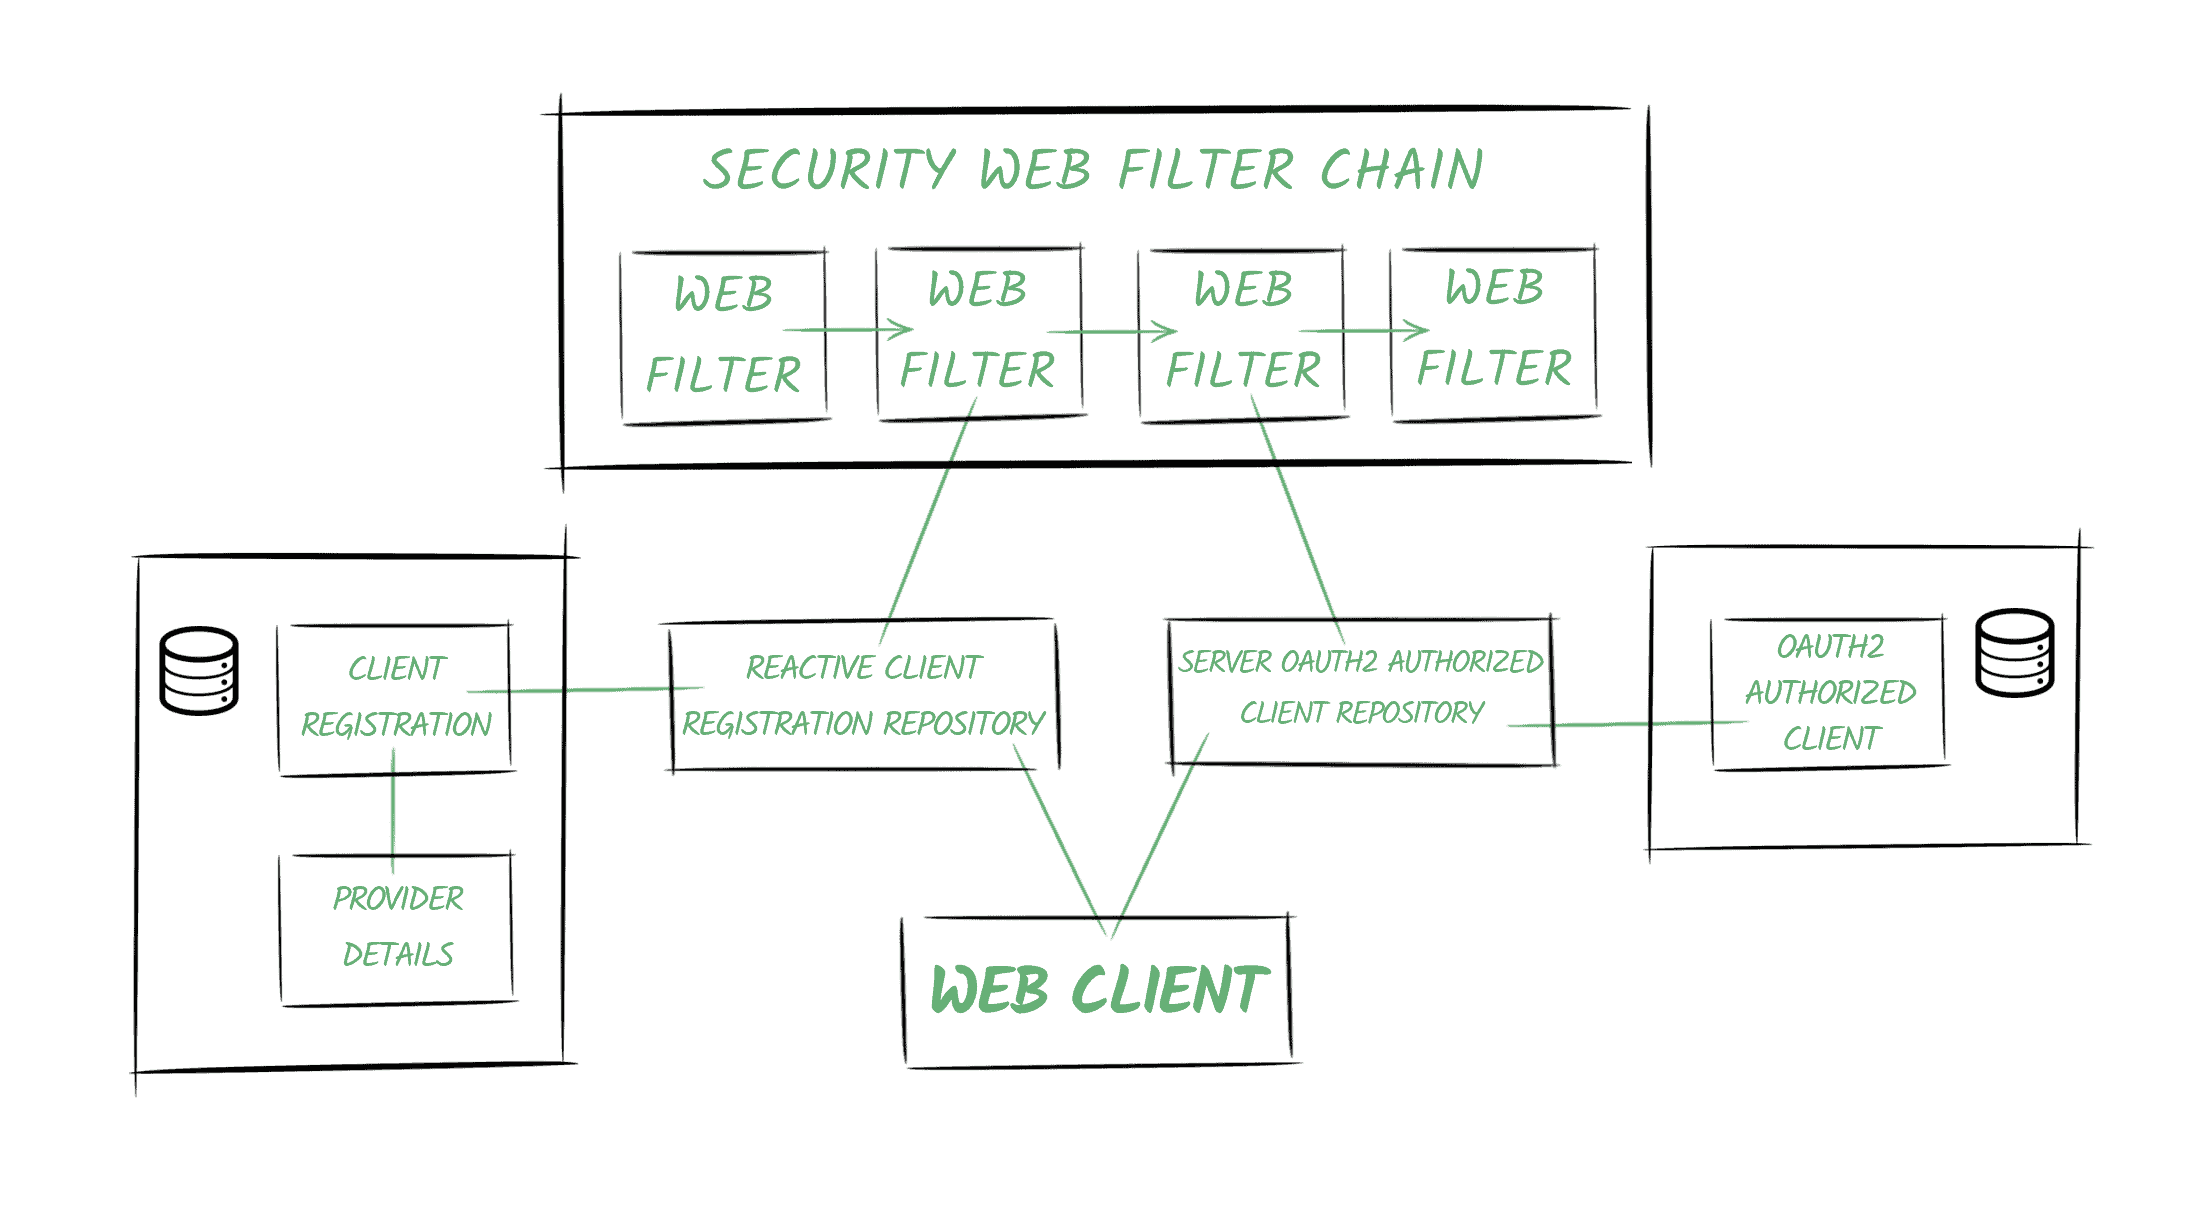
Some of the fundamental concepts of the Spring Security’s OAuth2 world are described in the following diagram:

3.1. Providers

Spring defines the OAuth2 Provider role, responsible for exposing OAuth 2.0 protected resources.

In our example, our Authentication Service will be the one offering the Provider capabilities.

3.2. Client Registrations

ClientRegistration is an entity containing all the relevant information of a specific client registered in an OAuth2 (or an OpenID) provider.

In our scenario, it’ll be the client registered in the Authentication Server, identified by the bael-client-id id.

3.3. Authorized Clients

Once the end-user (aka the Resource Owner) grants permissions to the client to access its resources, an OAuth2AuthorizedClient entity is created.

It’ll be responsible for associating access tokens to client registrations and resource owners (represented by Principal objects).

3.4. Repositories

Furthermore, Spring Security also offers repository classes to access the entities mentioned above.

Particularly, the ReactiveClientRegistrationRepository and the ServerOAuth2AuthorizedClientRepository classes are used in reactive stacks, and they use the in-memory storage by default.

Spring Boot 2.x creates beans of these repository classes and adds them automatically to the context.

3.5. Security Web Filter Chain

One of the key concepts in Spring Security 5 is the reactive SecurityWebFilterChain entity.

As its name indicates, it represents a chained collection of WebFilter objects.

When we enable the OAuth2 features in our application, Spring Security adds two filters to the chain:

  1. One filter responds to authorization requests (the /oauth2/authorization/{registrationId} URI) or throws a ClientAuthorizationRequiredException. It contains a reference to the ReactiveClientRegistrationRepository, and it’s in charge of creating the authorization request to redirect the user-agent.
  2. The second filter differs depending on which feature we’re adding (OAuth2 Client capabilities or the OAuth2 Login functionality). In both cases, the main responsibility of this filter is to create the OAuth2AuthorizedClient instance and store it using the ServerOAuth2AuthorizedClientRepository.

3.6. Web Client

The web client will be configured with an ExchangeFilterFunction containing references to the repositories.

It’ll use them to obtain the access token to add it automatically to the request.

4. Spring Security 5 Support – The Client Credentials Flow

Spring Security allows configuring our application as an OAuth2 Client.

In this write-up, we’ll use a WebClient instance to retrieve resources using the ‘Client Credentials’ grant type first, and then using the ‘Authorization Code’ flow.

The first thing we’ll have to do is configure the client registration and the provider that we’ll use to obtain the access token.

4.1. Client and Provider Configurations

As we’ve seen in the OAuth2 Login article, we can either configure it programmatically or rely on the Spring Boot auto-configuration by using properties to define our registration:

spring.security.oauth2.client.registration.bael.authorization-grant-type=client_credentials
spring.security.oauth2.client.registration.bael.client-id=bael-client-id
spring.security.oauth2.client.registration.bael.client-secret=bael-secret

spring.security.oauth2.client.provider.bael.token-uri=http://localhost:8085/oauth/token

These are all the configurations that we need to retrieve the resource using the client_credentials flow.

4.2. Using the WebClient

We use this grant type in machine-to-machine communications where there’s no end-user interacting with our application.

For example, let’s imagine we have a cron job trying to obtain a secured resource using a WebClient in our application:

@Autowired
private WebClient webClient;

@Scheduled(fixedRate = 5000)
public void logResourceServiceResponse() {

    webClient.get()
      .uri("http://localhost:8084/retrieve-resource")
      .retrieve()
      .bodyToMono(String.class)
      .map(string 
        -> "Retrieved using Client Credentials Grant Type: " + string)
      .subscribe(logger::info);
}

4.3. Configuring the WebClient

Next, let’s set the webClient instance that we’ve autowired in our scheduled task:

@Bean
WebClient webClient(ReactiveClientRegistrationRepository clientRegistrations) {
    ServerOAuth2AuthorizedClientExchangeFilterFunction oauth =
      new ServerOAuth2AuthorizedClientExchangeFilterFunction(
        clientRegistrations,
        new UnAuthenticatedServerOAuth2AuthorizedClientRepository());
    oauth.setDefaultClientRegistrationId("bael");
    return WebClient.builder()
      .filter(oauth)
      .build();
}

As we said, the client registration repository is automatically created and added to the context by Spring Boot.

The next thing to notice here is that we’re using a UnAuthenticatedServerOAuth2AuthorizedClientRepository instance. This is due to the fact that no end-user will take part in the process since it’s a machine-to-machine communication. Finally, we stated that we’d use the bael client registration by default.

Otherwise, we’d have to specify it by the time we define the request in the cron job:

webClient.get()
  .uri("http://localhost:8084/retrieve-resource")
  .attributes(
    ServerOAuth2AuthorizedClientExchangeFilterFunction
      .clientRegistrationId("bael"))
  .retrieve()
  // ...

4.4. Testing

If we run our application with the DEBUG logging level enabled, we’ll be able to see the calls that Spring Security is doing for us:

o.s.w.r.f.client.ExchangeFunctions:
  HTTP POST http://localhost:8085/oauth/token
o.s.http.codec.json.Jackson2JsonDecoder:
  Decoded [{access_token=89cf72cd-183e-48a8-9d08-661584db4310,
    token_type=bearer,
    expires_in=41196,
    scope=read
    (truncated)...]
o.s.w.r.f.client.ExchangeFunctions:
  HTTP GET http://localhost:8084/retrieve-resource
o.s.core.codec.StringDecoder:
  Decoded "This is the resource!"
c.b.w.c.service.WebClientChonJob:
  We retrieved the following resource using Client Credentials Grant Type: This is the resource!

We’ll also notice that the second time the task runs, the application requests the resource without asking for a token first since the last one hasn’t expired.

5. Spring Security 5 Support – Implementation Using the Authorization Code Flow

This grant type is usually used in cases where less-trusted third-party applications need to access resources.

5.1. Client and Provider Configurations

In order to execute the OAuth2 process using the Authorization Code flow, we’ll need to define several more properties for our client registration and the provider:

spring.security.oauth2.client.registration.bael.client-name=bael
spring.security.oauth2.client.registration.bael.client-id=bael-client-id
spring.security.oauth2.client.registration.bael.client-secret=bael-secret
spring.security.oauth2.client.registration.bael
  .authorization-grant-type=authorization_code
spring.security.oauth2.client.registration.bael
  .redirect-uri=http://localhost:8080/login/oauth2/code/bael

spring.security.oauth2.client.provider.bael.token-uri=http://localhost:8085/oauth/token
spring.security.oauth2.client.provider.bael
  .authorization-uri=http://localhost:8085/oauth/authorize
spring.security.oauth2.client.provider.bael.user-info-uri=http://localhost:8084/user
spring.security.oauth2.client.provider.bael.user-name-attribute=name

Apart from the properties, we used in the previous section, this time we also need to include:

  • An endpoint to authenticate on the Authentication Server
  • The URL of an endpoint containing user information
  • The URL of an endpoint in our application to which the user-agent will be redirected after authenticating

Of course, for well-known providers, the first two points don’t need to be specified.

The redirect endpoint is created automatically by Spring Security.

By default, the URL configured for it is /[action]/oauth2/code/[registrationId], with only authorize and login actions permitted (in order to avoid an infinite loop).

This endpoint is in charge of:

  • receiving the authentication code as a query param
  • using it to obtain an access token
  • creating the Authorized Client instance
  • redirecting the user-agent back to the original endpoint

5.2. HTTP Security Configurations

Next, we’ll need to configure the SecurityWebFilterChain.

The most common scenario is using Spring Security’s OAuth2 Login capabilities to authenticate users and give them access to our endpoints and resources.

If that’s our case, then just including the oauth2Login directive in the ServerHttpSecurity definition will be enough for our application to work as an OAuth2 Client too:

@Bean
public SecurityWebFilterChain springSecurityFilterChain(ServerHttpSecurity http) {
    http.authorizeExchange()
      .anyExchange()
      .authenticated()
      .and()
      .oauth2Login();
    return http.build();
}

5.3. Configuring the WebClient

Now it’s time to put in place our WebClient instance:

@Bean
WebClient webClient(
  ReactiveClientRegistrationRepository clientRegistrations,
  ServerOAuth2AuthorizedClientRepository authorizedClients) {
    ServerOAuth2AuthorizedClientExchangeFilterFunction oauth =
      new ServerOAuth2AuthorizedClientExchangeFilterFunction(
        clientRegistrations,
        authorizedClients);
    oauth.setDefaultOAuth2AuthorizedClient(true);
    return WebClient.builder()
      .filter(oauth)
      .build();
}

This time we’re injecting both the client registration repository and the authorized client repository from the context.

We’re also enabling the setDefaultOAuth2AuthorizedClient option. With it, the framework will try to obtain the client information from the current Authentication object managed in Spring Security.

We have to take into account that with it, all HTTP requests will include the access token, which might not be the desired behavior.

Later we’ll analyze alternatives to indicate the client that a specific WebClient transaction will use.

5.4. Using the WebClient

The Authorization Code requires a user-agent that can work out redirections (e.g., a browser) to execute the procedure.

Therefore, we make use of this grant type when the user is interacting with our application, usually calling an HTTP endpoint:

@RestController
public class ClientRestController {

    @Autowired
    WebClient webClient;

    @GetMapping("/auth-code")
    Mono<String> useOauthWithAuthCode() {
        Mono<String> retrievedResource = webClient.get()
          .uri("http://localhost:8084/retrieve-resource")
          .retrieve()
          .bodyToMono(String.class);
        return retrievedResource.map(string ->
          "We retrieved the following resource using Oauth: " + string);
    }
}

5.5. Testing

Finally, we’ll call the endpoint and analyze what’s going on by checking the log entries.

After we call the endpoint, the application verifies that we’re not yet authenticated in the application:

o.s.w.s.adapter.HttpWebHandlerAdapter: HTTP GET "/auth-code"
...
HTTP/1.1 302 Found
Location: /oauth2/authorization/bael

The application redirects to the Authorization Service’s endpoint to authenticate using credentials existing in the Provider’s registries (in our case, we’ll use the bael-user/bael-password):

HTTP/1.1 302 Found
Location: http://localhost:8085/oauth/authorize
  ?response_type=code
  &client_id=bael-client-id
  &state=...
  &redirect_uri=http%3A%2F%2Flocalhost%3A8080%2Flogin%2Foauth2%2Fcode%2Fbael

After authenticating, the user-agent is sent back to the Redirect URI, together with the code as a query param and the state value that was first sent (to avoid CSRF attacks):

o.s.w.s.adapter.HttpWebHandlerAdapter:HTTP GET "/login/oauth2/code/bael?code=...&state=...

The application then uses the code to obtain an access token:

o.s.w.r.f.client.ExchangeFunctions:HTTP POST http://localhost:8085/oauth/token

It obtains users information:

o.s.w.r.f.client.ExchangeFunctions:HTTP GET http://localhost:8084/user

And it redirects the user-agent to the original endpoint:

HTTP/1.1 302 Found
Location: /auth-code

Finally, our WebClient instance can request the secured resource successfully:

o.s.w.r.f.client.ExchangeFunctions:HTTP GET http://localhost:8084/retrieve-resource
o.s.w.r.f.client.ExchangeFunctions:Response 200 OK
o.s.core.codec.StringDecoder :Decoded "This is the resource!"

6. An Alternative – Client Registration in the Call

Earlier, we saw that using the setDefaultOAuth2AuthorizedClient implies that the application will include the access token in any call we realize with the client.

If we remove this command from the configuration, we’ll need to specify the client registration explicitly by the time we define the request.

One way, of course, is by using the clientRegistrationId as we did before when working in the client credentials flow.

Since we associated the Principal with authorized clients, we can obtain the OAuth2AuthorizedClient instance using the @RegisteredOAuth2AuthorizedClient annotation:

@GetMapping("/auth-code-annotated")
Mono<String> useOauthWithAuthCodeAndAnnotation(
  @RegisteredOAuth2AuthorizedClient("bael") OAuth2AuthorizedClient authorizedClient) {
    Mono<String> retrievedResource = webClient.get()
      .uri("http://localhost:8084/retrieve-resource")
      .attributes(
        ServerOAuth2AuthorizedClientExchangeFilterFunction.oauth2AuthorizedClient(authorizedClient))
      .retrieve()
      .bodyToMono(String.class);
    return retrievedResource.map(string -> 
      "Resource: " + string 
        + " - Principal associated: " + authorizedClient.getPrincipalName() 
        + " - Token will expire at: " + authorizedClient.getAccessToken()
          .getExpiresAt());
}

7. Avoiding the OAuth2 Login Features

As we said, the most common scenario is relying on the OAuth2 authorization provider to login users in our application.

But what if we want to avoid this, but still be able to access secured resources using the OAuth2 protocol? Then we’ll need to make some changes in our configuration.

For starters, and just to be clear across the board, we can use the authorize action instead of the login one when defining the redirect URI property:

spring.security.oauth2.client.registration.bael
  .redirect-uri=http://localhost:8080/login/oauth2/code/bael

We can also drop the user-related properties since we won’t be using them to create the Principal in our application.

Now, we’ll configure the SecurityWebFilterChain without including the oauth2Login command, and instead, we’ll include the oauth2Client one.

Even though we don’t want to rely on the OAuth2 Login, we still want to authenticate users before accessing our endpoint. For this reason, we’ll also include the formLogin directive here:

@Bean
public SecurityWebFilterChain springSecurityFilterChain(ServerHttpSecurity http) {
    http.authorizeExchange()
      .anyExchange()
      .authenticated()
      .and()
      .oauth2Client()
      .and()
      .formLogin();
    return http.build();
}

Let’s now run the application and check out what happens when we use the /auth-code-annotated endpoint.

We’ll first have to log in to our application using the form login.

Afterward, the application will redirect us to the Authorization Service login, to grant access to our resources.

Note: after doing this, we should be redirected back to the original endpoint that we called. Nevertheless, Spring Security seems to be redirecting back to the root path “/” instead, which seems to be a bug. The following requests after the one triggering the OAuth2 dance will run successfully.

We can see in the endpoint response that the authorized client this time is associated with a principal named bael-client-id instead of the bael-user, named after the user configured in the Authentication Service.

8. Spring Framework Support – Manual Approach

Out of the box, Spring 5 provides just one OAuth2-related service method to add a Bearer token header to the request easily. It’s the HttpHeaders#setBearerAuth method.

We’ll now see an example to understand what it would take to obtain our secured resource by performing an OAuth2 dance manually.

Simply put, we’ll need to chain two HTTP requests: one to get an authentication token from the Authorization Server, and the other to obtain the resource using this token:

@Autowired
WebClient client;

public Mono<String> obtainSecuredResource() {
    String encodedClientData = 
      Base64Utils.encodeToString("bael-client-id:bael-secret".getBytes());
    Mono<String> resource = client.post()
      .uri("localhost:8085/oauth/token")
      .header("Authorization", "Basic " + encodedClientData)
      .body(BodyInserters.fromFormData("grant_type", "client_credentials"))
      .retrieve()
      .bodyToMono(JsonNode.class)
      .flatMap(tokenResponse -> {
          String accessTokenValue = tokenResponse.get("access_token")
            .textValue();
          return client.get()
            .uri("localhost:8084/retrieve-resource")
            .headers(h -> h.setBearerAuth(accessTokenValue))
            .retrieve()
            .bodyToMono(String.class);
        });
    return resource.map(res ->
      "Retrieved the resource using a manual approach: " + res);
}

This example is mainly to understand how cumbersome it can be to leverage a request following the OAuth2 specification and to see how the setBearerAuth method is used.

In a real-life scenario, we’d let Spring Security take care of all the hard work for us in a transparent manner, as we did in previous sections.

9. Conclusion

In this tutorial, we’ve seen how we can set up our application as an OAuth2 Client, and more particularly, how we can configure and use the WebClient to retrieve a secured resource in a full-reactive stack.

Last but not least, we’ve analyzed how Spring Security 5 OAuth2 mechanisms operate under the hood to comply with the OAuth2 specification.

As always, the full example is available over on Github.

Using Curl in Java

$
0
0

1. Overview

In this tutorial, we’re going to look at how to use the curl tool inside a Java program.

Curl is a networking tool used to transfer data between a server and the curl client using protocols like HTTP, FTP, TELNET, and SCP.

2. Basic Use of Curl

We can execute curl commands from Java by using the ProcessBuilder — a helper class for building instances of the Process class.

Let’s see an example of sending commands directly to the operating system:

String command =
  "curl -X GET https://postman-echo.com/get?foo1=bar1&foo2=bar2";
ProcessBuilder processBuilder = new ProcessBuilder(command.split(" "));

First, we create the command variable before passing it to the ProcessBuilder constructor.

It’s worth noting here that if the curl executable isn’t on our system path, we’ll have to provide its full path in our command string.

We can then set the working directory for the ProcessBuilder and start the process:

processBuilder.directory(new File("/home/"));
Process process = processBuilder.start();

From here on, we can get the InputStream by accessing it from the Process instance:

InputStream inputStream = process.getInputStream();

When the processing is complete, we can get the exit code with:

int exitCode = process.exitValue();

If we need to run additional commands, we can reuse the ProcessBuilder instance by passing new commands and arguments in a String array:

processBuilder.command(
  new String[]{"curl", "-X", "GET", "https://postman-echo.com?foo=bar"});

Finally, to terminate each Process instance, we should use:

process.destroy();

3. A Simple Alternative to the ProcessBuilder

As an alternative to using the ProcessBuilder class, we can use Runtime.getRuntime() to get an instance of the Process class.

Let’s see another sample curl command – this time using a POST request:

curl -X POST https://postman-echo.com/post --data foo1=bar1&foo2=bar2

Now, let’s execute the command by using the Runtime.getRuntime() method:

String command = "curl -X POST https://postman-echo.com/post --data foo1=bar1&foo2=bar2";
Process process = Runtime.getRuntime().exec(command);

Firstly, we create an instance of the Process class again, but this time using Runtime.getRuntime(). We can get an InputStream as in our previous example by calling the getInputStream() method:

process.getInputStream();

When the instance is no longer needed, we should release system resources by calling the destroy() method.

4. Conclusion

In this article, we have shown two ways of using curl in Java.

This and more code examples are available over on GitHub.


Kafka Connect Example with MQTT and MongoDB

$
0
0

1. Overview

In a previous article, we had a quick introduction to Kafka Connect, including the different types of connectors, basic features of Connect, as well as the REST API.

In this tutorial, we’ll use Kafka connectors to build a more “real world” example.

We’ll use a connector to collect data via MQTT, and we’ll write the gathered data to MongoDB.

2. Setup Using Docker

We’ll use Docker Compose to set up the infrastructure. That includes an MQTT broker as the source, Zookeeper, one Kafka broker as well Kafka Connect as middleware, and finally a MongoDB instance including a GUI tool as the sink.

2.1. Connector Installation

The connectors required for our example, an MQTT source as well as a MongoDB sink connector, are not included in plain Kafka or the Confluent Platform.

As we discussed in the previous article, we can download the connectors (MQTT as well as MongoDB) from the Confluent hub. After that, we have to unpack the jars into a folder, which we’ll mount into the Kafka Connect container in the following section.

Let’s use the folder /tmp/custom/jars for that. We have to move the jars there before starting the compose stack in the following section, as Kafka Connect loads connectors online during startup.

2.2. Docker Compose File

We describe our setup as a simple Docker compose file, which consists of six containers:

version: '3.3'

services:
  mosquitto:
    image: eclipse-mosquitto:1.5.5
    hostname: mosquitto
    container_name: mosquitto
    expose:
      - "1883"
    ports:
      - "1883:1883"
  zookeeper:
    image: zookeeper:3.4.9
    restart: unless-stopped
    hostname: zookeeper
    container_name: zookeeper
    ports:
      - "2181:2181"
    environment:
        ZOO_MY_ID: 1
        ZOO_PORT: 2181
        ZOO_SERVERS: server.1=zookeeper:2888:3888
    volumes:
      - ./zookeeper/data:/data
      - ./zookeeper/datalog:/datalog
  kafka:
    image: confluentinc/cp-kafka:5.1.0
    hostname: kafka
    container_name: kafka
    ports:
      - "9092:9092"
    environment:
      KAFKA_LISTENER_SECURITY_PROTOCOL_MAP: PLAINTEXT:PLAINTEXT,PLAINTEXT_HOST:PLAINTEXT
      KAFKA_ADVERTISED_LISTENERS: PLAINTEXT://kafka:9092,PLAINTEXT_HOST://localhost:29092
      KAFKA_ZOOKEEPER_CONNECT: "zookeeper:2181"
      KAFKA_BROKER_ID: 1
      KAFKA_OFFSETS_TOPIC_REPLICATION_FACTOR: 1
    volumes:
      - ./kafka/data:/var/lib/kafka/data
    depends_on:
      - zookeeper
  kafka-connect:
    image: confluentinc/cp-kafka-connect:5.1.0
    hostname: kafka-connect
    container_name: kafka-connect
    ports:
      - "8083:8083"
    environment:
      CONNECT_BOOTSTRAP_SERVERS: "kafka:9092"
      CONNECT_REST_ADVERTISED_HOST_NAME: connect
      CONNECT_REST_PORT: 8083
      CONNECT_GROUP_ID: compose-connect-group
      CONNECT_CONFIG_STORAGE_TOPIC: docker-connect-configs
      CONNECT_OFFSET_STORAGE_TOPIC: docker-connect-offsets
      CONNECT_STATUS_STORAGE_TOPIC: docker-connect-status
      CONNECT_KEY_CONVERTER: org.apache.kafka.connect.json.JsonConverter
      CONNECT_VALUE_CONVERTER: org.apache.kafka.connect.json.JsonConverter
      CONNECT_INTERNAL_KEY_CONVERTER: "org.apache.kafka.connect.json.JsonConverter"
      CONNECT_INTERNAL_VALUE_CONVERTER: "org.apache.kafka.connect.json.JsonConverter"
      CONNECT_CONFIG_STORAGE_REPLICATION_FACTOR: "1"
      CONNECT_OFFSET_STORAGE_REPLICATION_FACTOR: "1"
      CONNECT_STATUS_STORAGE_REPLICATION_FACTOR: "1"
      CONNECT_PLUGIN_PATH: '/usr/share/java,/etc/kafka-connect/jars'
      CONNECT_CONFLUENT_TOPIC_REPLICATION_FACTOR: 1
    volumes:
      - /tmp/custom/jars:/etc/kafka-connect/jars
    depends_on:
      - zookeeper
      - kafka
      - mosquitto
  mongo-db:
    image: mongo:4.0.5
    hostname: mongo-db
    container_name: mongo-db
    expose:
      - "27017"
    ports:
      - "27017:27017"
    command: --bind_ip_all --smallfiles
    volumes:
      - ./mongo-db:/data
  mongoclient:
    image: mongoclient/mongoclient:2.2.0
    container_name: mongoclient
    hostname: mongoclient
    depends_on:
      - mongo-db
    ports:
      - 3000:3000
    environment:
      MONGO_URL: "mongodb://mongo-db:27017"
      PORT: 3000
    expose:
      - "3000"

The mosquitto container provides a simple MQTT broker based on Eclipse Mosquitto.

The containers zookeeper and kafka define a single-node Kafka cluster.

kafka-connect defines our Connect application in distributed mode.

And finally, mongo-db defines our sink database, as well as the web-based mongoclient, which helps us to verify whether the sent data arrived correctly in the database.

We can start the stack using the following command:

docker-compose up

3. Connector Configuration

As Kafka Connect is now up and running,  we can now configure the connectors.

3.1. Configure Source Connector

Let’s configure the source connector using the REST API:

curl -d @<path-to-config-file>/connect-mqtt-source.json -H "Content-Type: application/json" -X POST http://localhost:8083/connectors

Our connect-mqtt-source.json file looks like this:

{
    "name": "mqtt-source",
    "config": {
        "connector.class": "io.confluent.connect.mqtt.MqttSourceConnector",
        "tasks.max": 1,
        "mqtt.server.uri": "tcp://mosquitto:1883",
        "mqtt.topics": "baeldung",
        "kafka.topic": "connect-custom",
        "value.converter": "org.apache.kafka.connect.converters.ByteArrayConverter",
        "confluent.topic.bootstrap.servers": "kafka:9092",
        "confluent.topic.replication.factor": 1
    }
}

There are a few properties, which we haven’t used before:

  • mqtt.server.uri is the endpoint our connector will connect to
  • mqtt.topics is the MQTT topic our connector will subscribe to
  • kafka.topic defines the Kafka topic the connector will send the received data to
  • value.converter defines a converter which will be applied to the received payload. We need the ByteArrayConverter, as the MQTT Connector uses Base64 by default, while we want to use plain text
  • confluent.topic.bootstrap.servers is required by the newest version of the connector
  • The same applies to confluent.topic.replication.factor: it defines the replication factor for a Confluent-internal topic – as we have only one node in our cluster, we have to set that value to 1

3.2. Test Source Connector

Let’s run a quick test by publishing a short message to the MQTT broker:

docker run \
-it --rm --name mqtt-publisher --network 04_custom_default \
efrecon/mqtt-client \
pub -h mosquitto  -t "baeldung" -m "{\"id\":1234,\"message\":\"This is a test\"}"

And if we listen to the topic, connect-custom:

docker run \
--rm \
confluentinc/cp-kafka:5.1.0 \
kafka-console-consumer --network 04_custom_default --bootstrap-server kafka:9092 --topic connect-custom --from-beginning

then we should see our test message.

3.3. Setup Sink Connector

Next, we need our sink connector. Let’s again use the REST API:

curl -d @<path-to-config file>/connect-mongodb-sink.json -H "Content-Type: application/json" -X POST http://localhost:8083/connectors

Our connect-mongodb-sink.json file looks like this:

{
    "name": "mongodb-sink",
    "config": {
        "connector.class": "at.grahsl.kafka.connect.mongodb.MongoDbSinkConnector",
        "tasks.max": 1,
        "topics": "connect-custom",
        "mongodb.connection.uri": "mongodb://mongo-db/test?retryWrites=true",
        "mongodb.collection": "MyCollection",
        "key.converter": "org.apache.kafka.connect.json.JsonConverter",
        "key.converter.schemas.enable": false,
        "value.converter": "org.apache.kafka.connect.json.JsonConverter",
        "value.converter.schemas.enable": false
    }
}

We have the following MongoDB-specific properties here:

  • mongodb.connection.uri contains the connection string for our MongoDB instance
  • mongodb.collection defines the collection
  • Since the MongoDB connector is expecting JSON, we have to set JsonConverter for key.converter and value.converter
  • And we also need schemaless JSON for MongoDB, so we have to set key.converter.schemas.enable and value.converter.schemas.enable to false

3.4. Test Sink Connector

Since our topic connect-custom already contains messages from the MQTT connector test, the MongoDB connector should have fetched them directly after creation.

Hence, we should find them immediately in our MongoDB. We can use the web interface for that, by opening the URL http://localhost:3000/After login, we can select our MyCollection on the left, hit Execute, and our test message should be displayed.

3.5. End-to-end Test

Now, we can send any JSON struct using the MQTT client:

{
    "firstName": "John",
    "lastName": "Smith",
    "age": 25,
    "address": {
        "streetAddress": "21 2nd Street",
        "city": "New York",
        "state": "NY",
        "postalCode": "10021"
    },
    "phoneNumber": [{
        "type": "home",
        "number": "212 555-1234"
    }, {
        "type": "fax",
        "number": "646 555-4567"
    }],
    "gender": {
        "type": "male"
    }
}

MongoDB supports schema-free JSON documents, and as we disabled schemas for our converter, any struct is immediately passed through our connector chain and stored in the database.

Again, we can use the web interface at http://localhost:3000/.

3.6. Clean up

Once we’re done, we can clean up our experiment and remove the two connectors:

curl -X DELETE http://localhost:8083/connectors/mqtt-source
curl -X DELETE http://localhost:8083/connectors/mongodb-sink

After that, we can shut down the Compose stack with Ctrl + C.

4. Conclusion

In this tutorial, we built an example using Kafka Connect, to collect data via MQTT, and to write the gathered data to MongoDB.

As always, the config files can be found over on GitHub.

Enabling TLS v1.2 in Java 7

$
0
0

1. Overview

When it comes to SSL connections, we should be using TLSv1.2. Indeed, it’s the default SSL protocol for Java 8.

And while Java 7 supports TLSv1.2, the default is TLS v1.0, which is too weak these days.

In this tutorial, we’ll discuss various options to configure Java 7 to use TLSv1.2.

2. Using Java VM Arguments

If we are using Java 1.7.0_95 or later, we can add the jdk.tls.client.protocols property as a java command-line argument to support TLSv1.2:

java -Djdk.tls.client.protocols=TLSv1.2 <Main class or the Jar file to run>

But Java 1.7.0_95 is available only to the customers who purchased support from Oracle. So, we’ll review other options below to enable TLSv1.2 on Java 7.

3. Using SSLSocket

In this first example, we’ll enable TLSv1.2 using SSLSocketFactory.

First, we can create a default SSLSocketFactory object by calling the SSLSocketFactory#getDefault factory method.

Then, we simply pass our host and port to SSLSocket#createSocket:

SSLSocketFactory socketFactory = (SSLSocketFactory) SSLSocketFactory.getDefault();
SSLSocket sslSocket = (SSLSocket) socketFactory.createSocket(hosturl, port);

The default SSLSocket created above doesn’t have any SSL protocols associated with it. We can associate the SSL protocols to our SSLSocket in a couple of ways.

In the first approach, we can pass an array of supported SSL protocols to the setEnabledProtocols method on our SSLSocket instance:

sslSocket.setEnabledProtocols(new String[] {"TLSv1.2"});

Alternatively, we can use SSLParameters, using the same array:

SSLParameters params = new SSLParameters();
params.setProtocols(new String[] {"TLSv1.2"});
sslSocket.setSSLParameters(params);

4. Using SSLContext

Setting the SSLSocket directly changes only the one connection. We can use SSLContext to change the way we create the SSLSocketFactory.

So, instead of using SSLSocketFactory#getInstance, let’s do SSLContext#getInstance, giving it “TLSv1.2” as a parameter. We can just get our SSLSocketFactory from that now:

SSLContext sslContext = SSLContext.getInstance("TLSv1.2");
sslContext.init(null, null, new SecureRandom());
SSLSocketFactory socketFactory = sslContext.getSocketFactory();
SSLSocket socket = (SSLSocket) socketFactory.createSocket(url, port);

As a quick side note, always remember to use SecureRandom when working with SSL.

5. Using HttpsURLConnection

Of course, we aren’t always creating sockets directly. Oftentimes, we are at the application protocol level.

So, finally, let’s see how to enable TLSv1.2 on HttpsURLConnection.

First, we’ll need an instance of URL. Let’s imagine that we are connecting to https://example.org:

URL url = new URL("https://" + hosturl + ":" + port);

Now, we can set up our SSLContext as before:

SSLContext sslContext = SSLContext.getInstance("TLSv1.2"); 
sslContext.init(null, null, new SecureRandom());

Then, our last steps are to create the connection and supply it with an SSLSocketFactory:

HttpsURLConnection connection = (HttpsURLConnection) url.openConnection();
connection.setSSLSocketFactory(sslContext.getSocketFactory());

6. Conclusion

In this quick article, we showed a few ways to enable TLSv1.2 on Java 7.

The code samples used in this article are available over on GitHub.

Deserialize Immutable Objects with Jackson

$
0
0

1. Overview

In this quick tutorial, we’ll show two different ways of deserializing immutable Java objects with the Jackson JSON processing library.

2. Why Do We Use Immutable Objects?

An immutable object is an object that keeps its state intact since the very moment of its creation. It means that no matter which methods of the object the end user calls, the object behaves the same way.

Immutable objects come in handy when we design a system that must work in a multithreaded environment, as immutability generally guarantees thread safety.

On the other hand, immutable objects are useful when we need to handle input from external sources. For instance, it can be user input or some data from storage. In that case, it may be critical to preserve the received data and protect it from accidental or unintended changes.

Let’s see how we can deserialize an immutable object.

3. Public Constructor

Let’s consider the Employee class structure. It has two required fields: id and name, thus we define a public all-arguments constructor that has a set of arguments that matches the set of object’s fields:

public class Employee {

    private final long id;
    private final String name;

    public Employee(long id, String name) {
        this.id = id;
        this.name = name;
    }

    // getters
}

This way, we’ll have all the object’s fields initialized at the moment of creation. Final modifiers in fields’ declaration won’t let us change their values in future. To make this object deserializable, we simply need to add a couple of annotations to this constructor:

@JsonCreator(mode = JsonCreator.Mode.PROPERTIES)
public Employee(@JsonProperty("id") long id, @JsonProperty("name") String name) {
    this.id = id;
    this.name = name;
}

Let’s take a closer look at the annotations we have just added.

First of all, @JsonCreator tells Jackson deserializer to use the designated constructor for deserialization.

There are two modes that can be used as a parameter for this annotation – PROPERTIES and DELEGATING.

PROPERTIES is the most suitable when we declare an all-arguments constructor, while DELEGATING may be useful for single-argument constructors.

After that, we need to annotate each of constructor arguments with @JsonProperty stating the name of the respective property as the annotation value. We should be very careful at this step, as all the property names must match with the ones that we used during serialization.

Let’s take a look at a simple unit test that covers the deserialization of an Employee object:

String json = "{\"name\":\"Frank\",\"id\":5000}";
Employee employee = new ObjectMapper().readValue(json, Employee.class);

assertEquals("Frank", employee.getName());
assertEquals(5000, employee.getId());

4. Private Constructor and a Builder

Sometimes it happens that an object has a set of optional fields. Let’s consider another class structure, Person, which has an optional age field:

public class Person {
    private final String name;
    private final Integer age;

    // getters
}

When we have a significant number of such fields, creating a public constructor may become cumbersome. In other words, we’ll need to declare a lot of arguments for the constructor and annotate each of them with @JsonProperty annotations. As a result, many repetitive declarations will make our code bloated and hard to read.

This is the case when a classical Builder pattern comes to the rescue. Let’s see how we can employ its power in deserialization. First of all, let’s declare a private all-arguments constructor and a Builder class:

private Person(String name, Integer age) {
    this.name = name;
    this.age = age;
}

static class Builder {
    String name;
    Integer age;
    
    Builder withName(String name) {
        this.name = name;
        return this;
    }
    
    Builder withAge(Integer age) {
        this.age = age;
        return this;
    }
    
    public Person build() {
        return new Person(name, age);
    } 
}

To make the Jackson deserializer use this Builder, we just need to add two annotations to our code. First of all, we need to mark our class with @JsonDeserialize annotation, passing a builder parameter with a fully qualified domain name of a builder class.

After that, we need to annotate the builder class itself as @JsonPOJOBuilder:

@JsonDeserialize(builder = Person.Builder.class)
public class Person {
    //...
    
    @JsonPOJOBuilder
    static class Builder {
        //...
    }
}

Note, that we can customize names of methods used during the build.

Parameter buildMethodName defaults to “build” and stands for the name of the method that we call when the builder is ready to generate a new object.

Another parameter, withPrefix, stands for the prefix that we add to builder methods responsible for setting properties. The default value for this parameter is “with”. That’s why we didn’t specify any of these parameters in the example.

Let’s take a look at a simple unit test that covers the deserialization of a Person object:

String json = "{\"name\":\"Frank\",\"age\":50}";
Person person = new ObjectMapper().readValue(json, Person.class);

assertEquals("Frank", person.getName());
assertEquals(50, person.getAge().intValue());

5. Conclusion

In this short article, we’ve seen how to deserialize immutable objects using the Jackson library.

All the code related to this article can be found over on Github.

How to Find JAVA_HOME

$
0
0

1. Introduction

In this quick post, we’ll learn how to find JAVA_HOME on Windows, Mac, and Linux.

As we all know, JAVA_HOME is an environment variable that we commonly use to locate java executables like java and javac.

2. Windows-Specific Ways to Find JAVA_HOME

If we’re using Windows as the operating system, first we need to open up our command line (cmd) and type:

echo %JAVA_HOME%

If JAVA_HOME is defined in our environment, then the above command will print it out.

Or, we could try:

where java

Which will show the location of the java executable.

3. macOS and Linux-Specific Ways to Find JAVA_HOME

If we’re using either macOS or Linux, we can open up our terminal and type:

echo $JAVA_HOME

If JAVA_HOME is defined in our environment, then the above command will print it out.

Or, we could try:

which java

Which probably just shows us /usr/bin/java.

But, really this isn’t very helpful since it’s a symbolic link. To unravel this, we’ll use dirname and readlink;

for Linux:

dirname $(dirname $(readlink -f $(which javac)))

and for macOS:

$(dirname $(readlink $(which javac)))/java_home

As a result, this command prints the currently used java folder.

4. Using Java to Find JAVA_HOME

And, if we’re able to run java ourselves, then we have a nearly platform-independent way, too:

java -XshowSettings:properties -version

Running this command outputs numerous properties, one of them being java.home.

To parse it, though, we’ll still need a platform-specific tool.

For Linux and macOSlet’s use grep:

java -XshowSettings:properties -version 2>&1 > /dev/null | grep 'java.home' 

And for Windows, let’s use findstr:

java -XshowSettings:properties -version 2>&1 | findstr "java.home"

5. Conclusion

With this quick post, we’ve learned how to find JAVA_HOME on different operating systems.

If they didn’t work, though, maybe we didn’t set JAVA_HOME variable properly while installing Java.

Converting Between LocalDate and SQL Date

$
0
0

1. Overview

In this quick tutorial, we’ll learn how to convert between java.time.LocalDate and java.sql.Date.

2. Direct Conversion

To convert from LocalDate to java.sql.Date,we can simply use the valueOf() method available in java.sql.Date. Likewise, to convert the current date, we can use:

Date date = Date.valueOf(LocalDate.now());

Or, any other specific date:

Date date = Date.valueOf(LocalDate.of(2019, 01, 10));

Moreover, valueOf() throws NullPointerException in case of a null argument.

Now, let’s convert from java.sql.Date to LocalDate. For that, we can use the toLocalDate() method:

LocalDate localDate = Date.valueOf("2019-01-10").toLocalDate();

3. Using an AttributeConverter

First, let’s understand the problem.

Java 8 has lots of useful features, including the Date/Time API.

However, using it with some databases or persistence frameworks requires a bit more work than expected. For instance, JPA will map the LocalDate property into a blob instead of the java.sql.Date object. As a result, the database won’t recognize the LocalDate property as a Date type.

In general, we don’t want to perform an explicit conversion between the LocalDate and Date.

For example, suppose we have an entity object with a LocalDate field. When persisting this entity, we need to tell the persistence context how to map the LocalDate into the java.sql.Date.

Let’s apply a simple solution by creating an AttributeConverter class:

@Converter(autoApply = true)
public class LocalDateConverter implements AttributeConverter<LocalDate, Date> {

    @Override
    public Date convertToDatabaseColumn(LocalDate localDate) {
        return Optional.ofNullable(localDate)
          .map(Date::valueOf)
          .orElse(null);
    }

    @Override
    public LocalDate convertToEntityAttribute(Date date) {
        return Optional.ofNullable(date)
          .map(Date::toLocalDate)
          .orElse(null);
    }
}

As we can see, the AttributeConverter interface accepts two types: LocalDate and Date in our case.

In short, the convertToDatabaseColumn() and convertToEntityAttribute()  methods will take care of the conversion process. Inside of the implementations, we use Optional to easily handle possible null references.

Moreover, we’re also using the @Converter annotation. With the autoApply=true property, the converter will be applied to all mapped attributes of the entity’s type.

4. Conclusion

In this quick tutorial, we showed two ways to convert between java.time.LocalDate and java.sql.Date. Moreover, we presented examples using direct conversion and using a custom AttributeConverter class.

As usual, the complete code for this article is available over on GitHub.

Map to String Conversion in Java

$
0
0

1. Overview

In this tutorial, we’ll focus on conversion from a Map to a String and the other way around.

First, we’ll see how to achieve these using core Java methods, and afterwards, we’ll use some third-party libraries.

2. Basic Map Example

In all examples, we’re going to use the same Map implementation:

Map<Integer, String> wordsByKey = new HashMap<>();
wordsByKey.put(1, "one");
wordsByKey.put(2, "two");
wordsByKey.put(3, "three");
wordsByKey.put(4, "four");

3. Convert a Map to a String by Iterating

Let’s iterate over all the keys in our Map and, for each of them, append the key-value combination to our resulting StringBuilder object.

For formatting purposes, we can wrap the result in curly brackets:

public String convertWithIteration(Map<Integer, ?> map) {
    StringBuilder mapAsString = new StringBuilder("{");
    for (Integer key : map.keySet()) {
        mapAsString.append(key + "=" + map.get(key) + ", ");
    }
    mapAsString.delete(mapAsString.length()-2, mapAsString.length()).append("}");
    return mapAsString.toString();
}

To check if we converted our Map correctly, let’s run the following test:

@Test
public void givenMap_WhenUsingIteration_ThenResultingStringIsCorrect() {
    String mapAsString = MapToString.convertWithIteration(wordsByKey);
    Assert.assertEquals("{1=one, 2=two, 3=three, 4=four}", mapAsString);
}

4. Convert a Map to a String Using Java Streams

To perform conversion using streams, we first need to create a stream out of the available Map keys.

Secondly, we’re mapping each key to a human-readable String.

Finally, we’re joining those values, and, for the sake of convenience, we’re adding some formatting rules using the Collectors.joining() method:

public String convertWithStream(Map<Integer, ?> map) {
    String mapAsString = map.keySet().stream()
      .map(key -> key + "=" + map.get(key))
      .collect(Collectors.joining(", ", "{", "}"));
    return mapAsString;
}

5. Convert a Map to a String Using Guava

Let’s add Guava into our project and see how we can achieve the conversion in a single line of code:

<dependency>
    <groupId>com.google.guava</groupId>
    <artifactId>guava</artifactId>
    <version>27.0.1-jre</version>
</dependency>

To perform the conversion using Guava’s Joiner class, we need to define a separator between different Map entries and a separator between keys and values:

public String convertWithGuava(Map<Integer, ?> map) {
    return Joiner.on(",").withKeyValueSeparator("=").join(map);
}

6. Convert a Map to a String Using Apache Commons

To use Apache Commons, let’s add the following dependency first:

<dependency>
    <groupId>org.apache.commons</groupId>
    <artifactId>commons-collections4</artifactId>
    <version>4.2</version>
</dependency>

The joining is very straightforward – we just need to call the StringUtils.join method:

public String convertWithApache(Map map) {
    return StringUtils.join(map);
}

One special mention goes to the debugPrint method available in Apache Commons. It is very useful for debugging purposes.

When we call:

MapUtils.debugPrint(System.out, "Map as String", wordsByKey);

The debug text will be written to the console:

Map as String = 
{
    1 = one java.lang.String
    2 = two java.lang.String
    3 = three java.lang.String
    4 = four java.lang.String
} java.util.HashMap

7. Convert a String to a Map Using Streams

To perform conversion from a String to a Map, let’s define where to split on and how to extract keys and values:

public Map<String, String> convertWithStream(String mapAsString) {
    Map<String, String> map = Arrays.stream(mapAsString.split(","))
      .map(entry -> entry.split("="))
      .collect(Collectors.toMap(entry -> entry[0], entry -> entry[1]));
    return map;
}

8. Convert a String to a Map Using Guava

A more compact version of the above is to rely on Guava to do the splitting and conversion for us in a one-line process:

public Map<String, String> convertWithGuava(String mapAsString) {
    return Splitter.on(',').withKeyValueSeparator('=').split(mapAsString);
}

9. Conclusion

In this tutorial, we saw how to convert a Map to a String and the other way around using both core Java methods and third-party libraries.

The implementation of all of these examples can be found over on GitHub.

Deprecated Classes in Spring

$
0
0

1. Introduction

In this tutorial, we’re going to take a look at the deprecated classes in Spring and Spring Boot and explain what these have been replaced with.

We’ll explore classes starting from Spring 4 and Spring Boot 1.4.

2. Deprecated Classes in Spring

For easier reading, we list classes and their replacements based on the Spring release. And, within each grouping of classes, we’ve sorted them by the class name, irrespective of package.

2.1. Spring 4.0.x

  • org.springframework.cache.interceptor.DefaultKeyGenerator  replaced by the SimpleKeyGenerator or custom KeyGenerator implementations based on hash codes
  • org.springframework.jdbc.support.lob.OracleLobHandler  DefaultLobHandler for the Oracle 10g driver and higher; we should consider it even against the Oracle 9i database
  • org.springframework.test.AssertThrows  we should make use of JUnit 4’s @Test(expected=…) support instead
  • org.springframework.http.converter.xml.XmlAwareFormHttpMessageConverter  AllEncompassingFormHttpMessageConverter

The following class was deprecated as of Spring 4.0.2, in favor of CGLIB 3.1’s default strategy, and was removed in Spring 4.1:

  • org.springframework.cglib.transform.impl.MemorySafeUndeclaredThrowableStrategy

All deprecated classes, as well as deprecated interfaces, fields, methods, constructors, and enum constants for this Spring version can be found on the official documentation page.

2.2. Spring 4.1.x

  • org.springframework.jdbc.core.simple.ParameterizedBeanPropertyRowMapper  BeanPropertyRowMapper
  • org.springframework.jdbc.core.simple.ParameterizedSingleColumnRowMapper  SingleColumnRowMapper

We can find the full list in the Spring 4.1.x JavaDoc.

2.3. Spring 4.2.x

  • org.springframework.web.servlet.view.document.AbstractExcelView  AbstractXlsView and its AbstractXlsxView and AbstractXlsxStreamingView variants
  • org.springframework.format.number.CurrencyFormatter  CurrencyStyleFormatter
  • org.springframework.messaging.simp.user.DefaultUserSessionRegistry  we should use the SimpUserRegistry in combination with the ApplicationListener listening for the AbstractSubProtocolEvent events
  • org.springframework.messaging.handler.HandlerMethodSelector  generalized and refined MethodIntrospector
  • org.springframework.core.JdkVersion   we should perform direct checks for the desired JDK API variants via reflection
  • org.springframework.format.number.NumberFormatter  NumberStyleFormatter
  • org.springframework.format.number.PercentFormatter  PercentStyleFormatter
  • org.springframework.test.context.transaction.TransactionConfigurationAttributes  this class is removed along with the @TransactionConfiguration in Spring 5
  • org.springframework.oxm.xmlbeans.XmlBeansMarshaller  following the XMLBeans retirement at Apache

The following classes are deprecated in favor of Apache Log4j 2:

  • org.springframework.web.util.Log4jConfigListener
  • org.springframework.util.Log4jConfigurer
  • org.springframework.web.filter.Log4jNestedDiagnosticContextFilter
  • org.springframework.web.context.request.Log4jNestedDiagnosticContextInterceptor
  • org.springframework.web.util.Log4jWebConfigurer

More details are available in the Spring 4.2.x JavaDoc.

2.4. Spring 4.3.x

This version of Spring brought lots of deprecated classes:

  • org.springframework.web.servlet.mvc.method.annotation.AbstractJsonpResponseBodyAdvice  this class is removed in Spring Framework 5.1; we should use CORS instead
  • org.springframework.oxm.castor.CastorMarshaller  deprecated due to the lack of activity on the Castor project
  • org.springframework.web.servlet.mvc.method.annotation.CompletionStageReturnValueHandler  DeferredResultMethodReturnValueHandler, which now supports CompletionStage return values via an adapter mechanism
  • org.springframework.jdbc.support.incrementer.DB2MainframeSequenceMaxValueIncrementer  renamed to Db2MainframeMaxValueIncrementer
  • org.springframework.jdbc.support.incrementer.DB2SequenceMaxValueIncrementer  renamed to Db2LuwMaxValueIncrementer
  • org.springframework.core.GenericCollectionTypeResolver  deprecated in favor of direct ResolvableType usage
  • org.springframework.web.servlet.mvc.method.annotation.ListenableFutureReturnValueHandler  DeferredResultMethodReturnValueHandler, which now supports ListenableFuture return values via an adapter mechanism
  • org.springframework.jdbc.support.incrementer.PostgreSQLSequenceMaxValueIncrementer  we should use PostgresSequenceMaxValueIncrementer instead
  • org.springframework.web.servlet.ResourceServlet  ResourceHttpRequestHandler

These classes are deprecated in favor of the HandlerMethod-based MVC infrastructure:

  • org.springframework.web.servlet.mvc.support.ControllerClassNameHandlerMapping
  • org.springframework.web.bind.annotation.support.HandlerMethodInvoker
  • org.springframework.web.bind.annotation.support.HandlerMethodResolver

Several classes are deprecated in favor of annotation-driven handler methods:

  • org.springframework.web.servlet.mvc.support.AbstractControllerUrlHandlerMapping
  • org.springframework.web.servlet.mvc.multiaction.AbstractUrlMethodNameResolver
  • org.springframework.web.servlet.mvc.support.ControllerBeanNameHandlerMapping
  • org.springframework.web.servlet.mvc.multiaction.InternalPathMethodNameResolver
  • org.springframework.web.servlet.mvc.multiaction.ParameterMethodNameResolver
  • org.springframework.web.servlet.mvc.multiaction.PropertiesMethodNameResolver

There are also a lot of classes from Spring that we should replace with their Hibernate 4.x/5.x equivalents:

  • org.springframework.orm.hibernate3.support.AbstractLobType
  • org.springframework.orm.hibernate3.AbstractSessionFactoryBean
  • org.springframework.orm.hibernate3.annotation.AnnotationSessionFactoryBean
  • org.springframework.orm.hibernate3.support.BlobByteArrayType
  • org.springframework.orm.hibernate3.support.BlobSerializableType
  • org.springframework.orm.hibernate3.support.BlobStringType
  • org.springframework.orm.hibernate3.support.ClobStringType
  • org.springframework.orm.hibernate3.FilterDefinitionFactoryBean
  • org.springframework.orm.hibernate3.HibernateAccessor
  • org.springframework.orm.hibernate3.support.HibernateDaoSupport
  • org.springframework.orm.hibernate3.HibernateExceptionTranslator
  • org.springframework.orm.jpa.vendor.HibernateJpaSessionFactoryBean
  • org.springframework.orm.hibernate3.HibernateTemplate
  • org.springframework.orm.hibernate3.HibernateTransactionManager
  • org.springframework.orm.hibernate3.support.IdTransferringMergeEventListener
  • org.springframework.orm.hibernate3.LocalDataSourceConnectionProvider
  • org.springframework.orm.hibernate3.LocalJtaDataSourceConnectionProvider
  • org.springframework.orm.hibernate3.LocalRegionFactoryProxy
  • org.springframework.orm.hibernate3.LocalSessionFactoryBean
  • org.springframework.orm.hibernate3.LocalTransactionManagerLookup
  • org.springframework.orm.hibernate3.support.OpenSessionInterceptor
  • org.springframework.orm.hibernate3.support.OpenSessionInViewFilter
  • org.springframework.orm.hibernate3.support.OpenSessionInViewInterceptor
  • org.springframework.orm.hibernate3.support.ScopedBeanInterceptor
  • org.springframework.orm.hibernate3.SessionFactoryUtils
  • org.springframework.orm.hibernate3.SessionHolder
  • org.springframework.orm.hibernate3.SpringSessionContext
  • org.springframework.orm.hibernate3.SpringTransactionFactory
  • org.springframework.orm.hibernate3.TransactionAwareDataSourceConnectionProvider
  • org.springframework.orm.hibernate3.TypeDefinitionBean

Several classes are deprecated in favor of FreeMarker:

  • org.springframework.web.servlet.view.velocity.VelocityConfigurer
  • org.springframework.ui.velocity.VelocityEngineFactory
  • org.springframework.ui.velocity.VelocityEngineFactoryBean
  • org.springframework.ui.velocity.VelocityEngineUtils
  • org.springframework.web.servlet.view.velocity.VelocityLayoutView
  • org.springframework.web.servlet.view.velocity.VelocityLayoutViewResolver
  • org.springframework.web.servlet.view.velocity.VelocityToolboxView
  • org.springframework.web.servlet.view.velocity.VelocityView
  • org.springframework.web.servlet.view.velocity.VelocityViewResolver

These classes are removed in Spring Framework 5.1, and we should use other transports instead:

  • org.springframework.web.socket.sockjs.transport.handler.JsonpPollingTransportHandler
  • org.springframework.web.socket.sockjs.transport.handler.JsonpReceivingTransportHandler

Finally, there are also a couple of classes without an appropriate replacement:

  • org.springframework.core.ControlFlowFactory
  • org.springframework.util.WeakReferenceMonitor

As usual, the Spring 4.3.x JavaDoc contains the complete list.

2.5. Spring 5.0.x

  • org.springframework.web.reactive.support.AbstractAnnotationConfigDispatcherHandlerInitializer  deprecated in favor of AbstractReactiveWebInitializer
  • org.springframework.web.util.AbstractUriTemplateHandler  DefaultUriBuilderFactory
  • org.springframework.web.socket.config.annotation.AbstractWebSocketMessageBrokerConfigurer   deprecated in favor of simply using the WebSocketMessageBrokerConfigurer, which has default methods, made possible by a Java 8 baseline
  • org.springframework.web.client.AsyncRestTemplate   WebClient
  • org.springframework.web.context.request.async.CallableProcessingInterceptorAdapter   deprecated since the CallableProcessingInterceptor has default methods
  • org.springframework.messaging.support.ChannelInterceptorAdapter   deprecated since the ChannelInterceptor has default methods (made possible by a Java 8 baseline) and can be implemented directly without the need for this no-op adapter
  • org.springframework.util.comparator.CompoundComparator  deprecated in favor of the standard JDK 8 Comparator.thenComparing(Comparator)
  • org.springframework.web.util.DefaultUriTemplateHandler   DefaultUriBuilderFactory; we should note that the DefaultUriBuilderFactory has a different default value for the parsePath property (changed from false to true)
  • org.springframework.web.context.request.async.DeferredResultProcessingInterceptorAdapter   since the DeferredResultProcessingInterceptor has default methods
  • org.springframework.util.comparator.InvertibleComparator   deprecated in favor of the standard JDK 8 Comparator.reversed()
  • org.springframework.http.client.Netty4ClientHttpRequestFactory   deprecated in favor of ReactorClientHttpConnector
  • org.apache.commons.logging.impl.SimpleLog   moved to spring-jcl (effectively equivalent to NoOpLog)
  • org.springframework.web.servlet.config.annotation.WebMvcConfigurerAdapter   WebMvcConfigurer has default methods (made possible by a Java 8 baseline) and can be implemented directly without the need for this adapter
  • org.springframework.beans.factory.config.YamlProcessor.StrictMapAppenderConstructor   superseded by SnakeYAML’s own duplicate key handling

We have two classes deprecated in favor of AbstractReactiveWebInitializer:

  • org.springframework.web.reactive.support.AbstractDispatcherHandlerInitializer
  • org.springframework.web.reactive.support.AbstractServletHttpHandlerAdapterInitializer

And, the following classes don’t have replacements:

  • org.springframework.http.client.support.AsyncHttpAccessor
  • org.springframework.http.client.HttpComponentsAsyncClientHttpRequestFactory
  • org.springframework.http.client.InterceptingAsyncClientHttpRequestFactory
  • org.springframework.http.client.support.InterceptingAsyncHttpAccessor
  • org.springframework.mock.http.client.MockAsyncClientHttpRequest

The complete list is available in the Spring 5.0.x JavaDoc.

2.6. Spring 5.1.x

  • org.springframework.http.client.support.BasicAuthorizationInterceptor   deprecated in favor of BasicAuthenticationInterceptor, which reuses the HttpHeaders.setBasicAuth(java.lang.String, java.lang.String) and now shares its default charset ISO-8859-1 instead of using UTF-8 as it did previously
  • org.springframework.jdbc.core.BatchUpdateUtils   no longer used by the JdbcTemplate
  • org.springframework.web.reactive.function.client.ExchangeFilterFunctions.Credentials   we should use the HttpHeaders.setBasicAuth(String, String) method while building the request
  • org.springframework.web.filter.reactive.ForwardedHeaderFilter   this filter is deprecated in favor of using the ForwardedHeaderTransformer, which can be declared as a bean with the name “forwardedHeaderTransformer” or registered explicitly in the WebHttpHandlerBuilder
  • org.springframework.jdbc.core.namedparam.NamedParameterBatchUpdateUtils   not used by the NamedParameterJdbcTemplate any more
  • org.springframework.core.io.PathResource   FileSystemResource.FileSystemResource(Path)
  • org.springframework.beans.factory.annotation.RequiredAnnotationBeanPostProcessor   we should use constructor injection for required settings (or a custom InitializingBean implementation)
  • org.springframework.remoting.caucho.SimpleHessianServiceExporter   HessianServiceExporter
  • org.springframework.remoting.httpinvoker.SimpleHttpInvokerServiceExporter   HttpInvokerServiceExporter
  • org.springframework.remoting.support.SimpleHttpServerFactoryBean   embedded Tomcat/Jetty/Undertow
  • org.springframework.remoting.jaxws.SimpleHttpServerJaxWsServiceExporter   SimpleJaxWsServiceExporter

These are deprecated in favor of EncodedResourceResolver:

  • org.springframework.web.reactive.resource.GzipResourceResolver
  • org.springframework.web.servlet.resource.GzipResourceResolver

There are several classes that are deprecated in favor of Java EE 7’s DefaultManagedTaskScheduler:

  • org.springframework.scheduling.commonj.DelegatingTimerListener
  • org.springframework.scheduling.commonj.ScheduledTimerListener
  • org.springframework.scheduling.commonj.TimerManagerAccessor
  • org.springframework.scheduling.commonj.TimerManagerFactoryBean
  • org.springframework.scheduling.commonj.TimerManagerTaskScheduler

And, a few are deprecated in favor of Java EE 7’s DefaultManagedTaskExecutor:

  • org.springframework.scheduling.commonj.DelegatingWork
  • org.springframework.scheduling.commonj.WorkManagerTaskExecutor

Finally, one class is deprecated without a substitute:

  • org.apache.commons.logging.LogFactoryService

For more details, please see the official Spring 5.1.x JavaDoc on deprecated classes.

3. Deprecated Classes in Spring Boot

Now, let’s take a look at the deprecated classes in Spring Boot back to version 1.4.

We should note here that, for Spring Boot 1.4 and 1.5, most of the replacement classes kept their original names but have been moved to different packages. Therefore, we use fully qualified class names in the next two subsections for both the deprecated and replacement classes.

3.1. Spring Boot 1.4.x

  • org.springframework.boot.actuate.system.ApplicationPidFileWriter   deprecated in favor of org.springframework.boot.system.ApplicationPidFileWriter
  • org.springframework.boot.yaml.ArrayDocumentMatcher   deprecated in favor of exact String-based matching
  • org.springframework.boot.test.ConfigFileApplicationContextInitializer   org.springframework.boot.test.context.ConfigFileApplicationContextInitializer
  • org.springframework.boot.yaml.DefaultProfileDocumentMatcher   it is no longer used
  • org.springframework.boot.context.embedded.DelegatingFilterProxyRegistrationBean   org.springframework.boot.web.servlet.DelegatingFilterProxyRegistrationBean
  • org.springframework.boot.actuate.system.EmbeddedServerPortFileWriter   org.springframework.boot.system.EmbeddedServerPortFileWriter
  • org.springframework.boot.test.EnvironmentTestUtils   org.springframework.boot.test.util.EnvironmentTestUtils
  • org.springframework.boot.context.embedded.ErrorPage   org.springframework.boot.web.servlet.ErrorPage
  • org.springframework.boot.context.web.ErrorPageFilter   org.springframework.boot.web.support.ErrorPageFilter
  • org.springframework.boot.context.embedded.FilterRegistrationBean   org.springframework.boot.web.servlet.FilterRegistrationBean
  • org.springframework.boot.test.IntegrationTestPropertiesListener   it is no longer used by the @IntegrationTest
  • org.springframework.boot.context.embedded.MultipartConfigFactory   org.springframework.boot.web.servlet.MultipartConfigFactory
  • org.springframework.boot.context.web.OrderedCharacterEncodingFilter   org.springframework.boot.web.filter.OrderedCharacterEncodingFilter
  • org.springframework.boot.context.web.OrderedHiddenHttpMethodFilter   org.springframework.boot.web.filter.OrderedHiddenHttpMethodFilter
  • org.springframework.boot.context.web.OrderedHttpPutFormContentFilter   org.springframework.boot.web.filter.OrderedHttpPutFormContentFilter
  • org.springframework.boot.context.web.OrderedRequestContextFilter   org.springframework.boot.web.filter.OrderedRequestContextFilter
  • org.springframework.boot.test.OutputCapture   org.springframework.boot.test.rule.OutputCapture
  • org.springframework.boot.context.web.ServerPortInfoApplicationContextInitializer org.springframework.boot.context.embedded.ServerPortInfoApplicationContextInitializer
  • org.springframework.boot.context.web.ServletContextApplicationContextInitializer   org.springframework.boot.web.support.ServletContextApplicationContextInitializer
  • org.springframework.boot.context.embedded.ServletListenerRegistrationBean   org.springframework.boot.web.servlet.ServletListenerRegistrationBean
  • org.springframework.boot.context.embedded.ServletRegistrationBean   org.springframework.boot.web.servlet.ServletRegistrationBean
  • org.springframework.boot.test.SpringApplicationContextLoader   deprecated in favor of @SpringBootTest; if necessary, we may also use the org.springframework.boot.test.context.SpringBootContextLoader
  • org.springframework.boot.test.SpringBootMockServletContext   org.springframework.boot.test.mock.web.SpringBootMockServletContext
  • org.springframework.boot.context.web.SpringBootServletInitializer   org.springframework.boot.web.support.SpringBootServletInitializer
  • org.springframework.boot.test.TestRestTemplate   org.springframework.boot.test.web.client.TestRestTemplate

Since Velocity support is deprecated in Spring Framework 4.3, the following classes are also deprecated in Spring Boot:

  • org.springframework.boot.web.servlet.view.velocity.EmbeddedVelocityViewResolver
  • org.springframework.boot.autoconfigure.velocity.VelocityAutoConfiguration
  • org.springframework.boot.autoconfigure.velocity.VelocityAutoConfiguration.VelocityConfiguration
  • org.springframework.boot.autoconfigure.velocity.VelocityAutoConfiguration.VelocityNonWebConfiguration
  • org.springframework.boot.autoconfigure.velocity.VelocityAutoConfiguration.VelocityWebConfiguration
  • org.springframework.boot.autoconfigure.velocity.VelocityProperties
  • org.springframework.boot.autoconfigure.velocity.VelocityTemplateAvailabilityProvider

The Spring Boot 1.4.x JavaDoc has the full list.

3.2. Spring Boot 1.5.x

  • org.springframework.boot.context.event.ApplicationStartedEvent   deprecated in favor of org.springframework.boot.context.event.ApplicationStartingEvent
  • org.springframework.boot.autoconfigure.EnableAutoConfigurationImportSelector   deprecated in favor of org.springframework.boot.autoconfigure.AutoConfigurationImportSelector
  • org.springframework.boot.actuate.cache.GuavaCacheStatisticsProvider   following the removal of Guava support in Spring Framework 5
  • org.springframework.boot.loader.tools.Layouts.Module   deprecated in favor of a custom LayoutFactory
  • org.springframework.boot.autoconfigure.MessageSourceAutoConfiguration   deprecated in favor of org.springframework.boot.autoconfigure.context.MessageSourceAutoConfiguration
  • org.springframework.boot.autoconfigure.PropertyPlaceholderAutoConfiguration   deprecated in favor of org.springframework.boot.autoconfigure.context.PropertyPlaceholderAutoConfiguration
  • org.springframework.boot.actuate.autoconfigure.ShellProperties   deprecated since CRaSH is not actively maintained

These two classes are deprecated since CRaSH is not actively maintained:

  • org.springframework.boot.actuate.autoconfigure.CrshAutoConfiguration
  • org.springframework.boot.actuate.autoconfigure.CrshAutoConfiguration.AuthenticationManagerAdapterConfiguration

There also a few classes without a replacement:

  • org.springframework.boot.autoconfigure.cache.CacheProperties.Hazelcast
  • org.springframework.boot.autoconfigure.jdbc.metadata.CommonsDbcpDataSourcePoolMetadata
  • org.springframework.boot.autoconfigure.mustache.MustacheCompilerFactoryBean

To see the entire list of what was deprecated, we can consult the official Spring Boot 1.5.x JavaDoc site.

3.3. Spring Boot 2.0.x

  • org.springframework.boot.test.util.EnvironmentTestUtils   deprecated in favor of TestPropertyValues
  • org.springframework.boot.actuate.metrics.web.reactive.server.RouterFunctionMetrics   deprecated in favor of the auto-configured MetricsWebFilter

And one class doesn’t have a substitute:

  • org.springframework.boot.actuate.autoconfigure.couchbase.CouchbaseHealthIndicatorProperties

Please check out the deprecated list for Spring Boot 2.0.x for more details.

3.4. Spring Boot 2.1.x

  • org.springframework.boot.actuate.health.CompositeHealthIndicatorFactory   deprecated in favor of CompositeHealthIndicator.CompositeHealthIndicator(HealthAggregator, HealthIndicatorRegistry)
  • org.springframework.boot.actuate.health.CompositeReactiveHealthIndicatorFactory   deprecated in favor of CompositeReactiveHealthIndicator.CompositeReactiveHealthIndicator(HealthAggregator, ReactiveHealthIndicatorRegistry)

Finally, we can consult the complete list of deprecated classes and interfaces in Spring Boot 2.1.x.

4. Conclusion

In this tutorial, we explored deprecated classes in Spring since version 4 and Spring Boot from version 1.4, along with their corresponding replacements, where available.


Java 8 Streams peek() API

$
0
0

1. Introduction

The Java Stream API introduces us to a powerful alternative for processing data.

In this short tutorial, we’ll focus on peek(), an often misunderstood method.

2. Quick Example

Let’s get our hands dirty and try to use peek(). We have a stream of names, and we want to print them to the console.

Since peek() expects a Consumer<T> as its only argument, it seems like a good fit, so let’s give it a try:

Stream<String> nameStream = Stream.of("Alice", "Bob", "Chuck");
nameStream.peek(System.out::println);

However, the snippet above produces no output. To understand why, let’s do a quick refresher on aspects of the stream lifecycle.

3. Intermediate vs. Terminal Operations

Recall that streams have three parts: a data source, zero or more intermediate operations, and zero or one terminal operation.

The source provides the elements to the pipeline.

Intermediate operations get elements one-by-one and process them. All intermediate operations are lazy, and, as a result, no operations will have any effect until the pipeline starts to work.

Terminal operations mean the end of the stream lifecycle. Most importantly for our scenario, they initiate the work in the pipeline.

4. peek() Usage

The reason peek() didn’t work in our first example is that it’s an intermediate operation and we didn’t apply a terminal operation to the pipeline. Alternatively, we could have used forEach() with the same argument to get the desired behavior:

Stream<String> nameStream = Stream.of("Alice", "Bob", "Chuck");
nameStream.forEach(System.out::println);

peek()‘s Javadoc page says: “This method exists mainly to support debugging, where you want to see the elements as they flow past a certain point in a pipeline“.

Let’s consider this snippet from the same Javadoc page:

Stream.of("one", "two", "three", "four")
  .filter(e -> e.length() > 3)
  .peek(e -> System.out.println("Filtered value: " + e))
  .map(String::toUpperCase)
  .peek(e -> System.out.println("Mapped value: " + e))
  .collect(Collectors.toList());

It demonstrates, how we observe the elements that passed each operation.

On top of that, peek() can be useful in another scenario: when we want to alter the inner state of an element. For example, let’s say we want to convert all user’s name to lowercase before printing them:

Stream<User> userStream = Stream.of(new User("Alice"), new User("Bob"), new User("Chuck"));
userStream.peek(u -> u.setName(u.getName().toLowerCase()))
  .forEach(System.out::println);

Alternatively, we could have used map(), but peek() is more convenient since we don’t want to replace the element.

5. Conclusion

In this short tutorial, we saw a summary of the stream lifecycle to understand how peek() works. We also saw two everyday use cases when using peek() is the most straightforward option.

And as usual, the examples are available over on GitHub.

Java Weekly, Issue 264

$
0
0

Here we go…

1. Spring and Java

>> Practice Mock Interviews & Coding Problems with Pramp 

If you’re looking to improve your interview game, definitely have a look at the Pramp mock interviews on Data Structures and Algorithms, System Design, etc. Get unlimited tries.

>> Certificate Transparency Verification in Java [techblog.bozho.net]

An interesting write-up about a security measure that’s more difficult to implement than it should be. This should certainly be easier.

>> Bootiful Azure: Global Scale Data Access with CosmosDB (3/6) [spring.io] and >> Bootiful Azure: Integration with Azure Service Bus (4/6) [spring.io]

This week’s offering in the new mini-series exploring the use of Spring Boot with Microsoft Azure features a multi-model, multi-modal database, and an AMQP messaging system.

>> Spring Framework’s Migration from Jira to GitHub Issues [spring.io]

A few notes about the migration of over fifteen years’ worth of Spring Framework Jira issues and comments into the GitHub ecosystem.

>> All You Need To Know About Unit Testing with Spring Boot [reflectoring.io]

A good introductory tutorial demonstrates how to make Spring beans easier to unit test through the use of constructor injection and mocked dependencies. Good stuff.

Also worth reading:

Webinars and presentations:

Time to upgrade:

2. Technical and Musings

>> Learning Clojure: transducers [blog.frankel.ch]

A clever use of Clojure’s transducers lets you define a transformation via a named, ordered pipeline of reductions.

>> Continuous cloud infrastructure with Ansible, Molecule & TravisCI on AWS [blog.codecentric.de]

The third installment in this series outlines how to verify whether our code is able to run on any infrastructure we can imagine.

>> Hiring and Retaining Developers – Creating Great Teams [infoq.com]

A study of what attracts top developers and keeps them motivated, an increasingly challenging endeavor as the demand for IT professionals continues to grow at an aggressive pace.

Also worth reading:

3. Comics

And my favorite Dilberts of the week:

>> Hiring a Millennial [dilbert.com]

>> More Accurate Job Description [dilbert.com]

>> AI Too Stupid to Be Dangerous [dilbert.com]

4. Pick of the Week

>> How to think like a programmer — lessons in problem-solving [freecodecamp.org]

Spring PostConstruct and PreDestroy Annotations

$
0
0

1. Introduction

Spring allows us to attach custom actions to bean creation and destruction. We can, for example, do it by implementing the InitializingBean and DisposableBean interfaces.

In this short tutorial, we’ll look at a second possibility: the @PostConstruct and @PreDestroy annotations.

2. @PostConstruct

Spring calls methods annotated with @PostConstruct only once, just after the initialization of bean properties. Keep in mind that these methods will run even if there is nothing to initialize.

The method annotated with @PostConstruct can have any access level but it can’t be static.

One example usage of @PostConstruct is populating a database. During development, for instance, we might want to create some default users:

@Component
public class DbInit {

    @Autowired
    private UserRepository userRepository;

    @PostConstruct
    private void postConstruct() {
        User admin = new User("admin", "admin password");
        User normalUser = new User("user", "user password");
        userRepository.save(admin, normalUser);
    }
}

The above example will first initialize UserRepository and then run @PostConstruct method.

3. @PreDestroy

A method annotated with @PreDestroy runs only once, just before Spring removes our bean from the application context.

Same as with @PostConstruct, the methods annotated with @PreDestroy can have any access level but can’t be static.

@Component
public class UserRepository {

    private DbConnection dbConnection;
    @PreDestroy
    public void preDestroy() {
        dbConnection.close();
    }
}

The purpose of this method should be to release resources or perform any other cleanup tasks before the bean gets destroyed, for example closing a database connection.

4. Java 9+

Note that both @PostConstruct and @PreDestroy annotations are part of J2EE. And since J2EE has been deprecated in Java 9 and removed in Java 11 we have to add an additional dependency to use these annotations:

<dependency>
    <groupId>javax.annotation</groupId>
    <artifactId>javax.annotation-api</artifactId>
    <version>1.3.2</version>
</dependency>

5. Conclusion

In this short tutorial, we’ve learned how to use @PreConstruct and @PreDestroy annotations.

As always all source code is available on GitHub.

Setting up Lombok with Eclipse and Intellij

$
0
0

1. Overview

Lombok is a library which facilitates many tedious tasks and reduces Java source code verbosity.

Of course, we usually want to be able to use the library in an IDE, which requires additional setup.

In this tutorial, we’ll talk about configuring it in two of the most popular Java IDEs – IntelliJ IDEA and Eclipse.

2. Lombok in IntelliJ IDEA

2.1. Enabling Annotation Processing

Lombok uses annotation processing through APT, so, when the compiler calls it, the library generates new source files based on annotations in the originals.

Annotation processing isn’t enabled by default, though.

So, the first thing for us to do is to enable annotation processing in our project.

We need to go to the Preferences | Build, Execution, Deployment | Compiler | Annotation Processors and make sure of the following:

  • Enable annotation processing box is checked
  • Obtain processors from project classpath option is selected

2.2. Installing the IDE Plugin

As Lombok generates code only during compilation, the IDE highlights errors in raw source code:

There is a dedicated plugin which makes IntelliJ aware of the source code to be generated. After installing it, the errors go away and regular features like Find Usages, Navigate To start working.

We need to go to the Preferences | Plugins, open the Marketplace tab, type lombok and choose Lombok Plugin by Michail Plushnikov:

Next, click the Install button on the plugin page:

After the installation, click the Restart IDE button:

3. Lombok in Eclipse

If we’re using Eclipse IDE, we need to get the Lombok jar first. The latest version is located on Maven Central. For our example, we’re using lombok-1.18.4.jar.

Next, we can run the jar via java -jar command and an installer UI will open. This tries to automatically detect all available Eclipse installations, but it’s also possible to specify the location manually.

Once we’ve selected the installations, then we press the Install/Update button:

If the installation is successful, we can exit the installer.

After installing the plugin, we need to restart the IDE and ensure that Lombok is correctly configured. We can check this in the About dialog:

4. Adding Lombok to the Compile Classpath

The last remaining part is to ensure that Lombok binaries are on the compiler classpath. Using Maven, we can add the dependency to the pom.xml:

<dependencies>
    <dependency>
        <groupId>org.projectlombok</groupId>
        <artifactId>lombok</artifactId>
        <version>1.18.4</version>
        <scope>provided</scope>
    </dependency>
</dependencies>

The most recent version is located on Maven Central.

Everything should be fine now, the source code below should be shown without errors in the IDE, correctly compiled and executed:

public class UserIntegrationTest {

    @Test
    public void givenAnnotatedUser_thenHasGettersAndSetters() {
        User user = new User();
        user.setFirstName("Test");
        assertEquals(user.gerFirstName(), "Test");
    }

    @Getter @Setter
    class User {
        private String firstName;
    }
}

5. Conclusion

Lombok does a great job in reducing Java verbosity and covering boilerplate stuff under the hood. In this article, we checked how to configure the tool for the two most popular Java IDEs.

The source code for the examples is available over on GitHub.

How to Write to a CSV File in Java

$
0
0

1. Overview

In this brief tutorial, we’re going to learn how to write to a CSV file using Java. CSV stands for Comma-Separated-Values and it’s a common format for doing a bulk data transfer between systems.

To write our CSV file, we’ll be using classes in the java.io package.

We’ll talk about special characters and how to handle them. We’ll be targeting our output file to open in Microsoft Excel and Google Sheets.

After our Java example, we’ll take a brief look at some available third-party libraries for working with CSV files.

2. Writing with PrintWriter

We’re going to use a PrintWriter for writing our CSV file. For a more detailed look at using java.io to write to a file, see our article on writing to files.

2.1. Writing the CSV

First, let’s create a method for formatting a single line of data, represented as an array of Strings:

public String convertToCSV(String[] data) {
    return Stream.of(data)
      .map(this::escapeSpecialCharacters)
      .collect(Collectors.joining(","));
}

Before we call this method, though, let’s next build up some example data:

List<String[]> dataLines = new ArrayList<>();
dataLines.add(new String[] 
  { "John", "Doe", "38", "Comment Data\nAnother line of comment data" });
dataLines.add(new String[] 
  { "Jane", "Doe, Jr.", "19", "She said \"I'm being quoted\"" });

And with that data in hand, let’s convert each row with convertToCSV and write it to a file:

public void givenDataArray_whenConvertToCSV_thenOutputCreated() throws IOException {
    File csvOutputFile = new File(CSV_FILE_NAME);
    try (PrintWriter pw = new PrintWriter(csvOutputFile)) {
        dataLines.stream()
          .map(this::convertToCSV)
          .forEach(pw::println);
    }
    assertTrue(csvOutputFile.exists());
}

2.2. Handling Special Characters

In a CSV file, certain characters are problematic and as developers, we rarely have total control over the quality of our data. So let’s look now at how to handle special characters.

For our example, we’ll focus on commas, quotes and new lines. Fields containing commas or quotes will be surrounded by double quotes and double quotes will be escaped with double quotes. We’ll eliminate new lines and replace them each with whitespace.

Which characters are a problem and how they should be handled may vary with the use case.

Our convertToCSV method calls the escapeSpecialCharacters method on each piece of data as it’s building up a String.

Let’s implement our escapeSpecialCharacters method now:

public String escapeSpecialCharacters(String data) {
    String escapedData = data.replaceAll("\\R", " ");
    if (data.contains(",") || data.contains("\"") || data.contains("'")) {
        data = data.replace("\"", "\"\"");
        escapedData = "\"" + data + "\"";
    }
    return escapedData;
}

3. Third-Party Libraries

As we saw with our example, writing a CSV file can become complicated when we start thinking about special characters and how to handle them.

Luckily for us, there are many third-party libraries available for working with CSV files and many of them handle these special characters and other exceptional cases that may occur.

Let’s take a look at a few of them:

  • Apache Commons CSV: Apache’s CSV offering for working with CSV Files
  • Open CSV: Another popular and actively-maintained CSV library
  • Flatpack: An open-source CSV library being actively developed
  • CSVeed: Open-source and actively-maintained

4. Conclusion

In this quick article, we showed how to write a CSV file using Java’s PrintWriter class. Next, we discussed and handled special characters in the data being output.

After our plain Java example, we looked at an overview of available third-party libraries.

The example code is available over on GitHub.

Viewing all 4699 articles
Browse latest View live


<script src="https://jsc.adskeeper.com/r/s/rssing.com.1596347.js" async> </script>