Quantcast
Channel: Baeldung
Viewing all 4700 articles
Browse latest View live

Guide to Creating and Running a Jar File in Java

$
0
0

1. Overview

Usually, it’s convenient to bundle many Java class files into a single archive file.

In this tutorial, we’re going to cover the ins and outs of working with jar – or Java ARchive – files in Java. 

Specifically, we’ll take a simple application and explore different ways to package and run it as a jar. We’ll also answer some curiosities like how to easily read a jar’s manifest file along the way.

2. Java Program Setup

Before we can create a runnable jar file, our application needs to have a class with a main method. This class provides our entry point into the application:

public static void main(String[] args) {
    System.out.println("Hello Baeldung Reader!");
}

3. Jar Command

Now that we’re all set up let’s compile our code and create our jar file.

We can do this with javac from the command line:

javac com/baeldung/jar/*.java

The javac command creates JarExample.class in the com/baeldung/jar directory. We can now package that into a jar file.

3.1. Using the Defaults

To create the jar file, we are going to use the jar command.

To use the jar command to create a jar file, we need to use the c option to indicate that we’re creating a file and the f option to specify the file:

jar cf JarExample.jar com/baeldung/jar/*.class

3.2. Setting the Main Class

It’s helpful for the jar file manifest to include the main class.

The manifest is a special file in a jar located the META-INF directory and named MANIFEST.MFThe manifest file contains special meta information about files within the jar file.

Some examples of what we can use a manifest file for include setting the entry point, setting version information and configuring the classpath.

By using the e option, we can specify our entry point, and the jar command will add it to the generated manifest file.

Let’s run jar with an entry point specified:

jar cfe JarExample.jar com.baeldung.jar.JarExample com/baeldung/jar/*.class

3.3. Updating the Contents

Let’s say we’ve made a change to one of our classes and recompiled it. Now, we need to update our jar file.

Let’s use the jar command with the option to update its contents:

jar uf JarExample.jar com/baeldung/jar/JarExample.class

3.4. Setting a Manifest File

In some cases, we may need to have more control over what goes in our manifest file. The jar command provides functionality for providing our own manifest information.

Let’s add a partial manifest file named example_manifest.txt to our application to set our entry point:

Main-Class: com.baeldung.jar.JarExample

The manifest information we provide we’ll be added to what the jar command generates, so it’s the only line we need in the file.

It’s important that we end our manifest file with a newline. Without the newline, our manifest file will be silently ignored.

With that setup, let’s create our jar again using our manifest information and the option:

jar cfm JarExample.jar com/baeldung/jar/example_manifest.txt com/baeldung/jar/*.class

3.5. Verbose Output

If we want more information out of the jar command, we can simply add the v option for verbose.

Let’s run our jar command with the v option:

jar cvfm JarExample.jar com/baeldung/jar/example_manifest.txt com/baeldung/jar/*.class
added manifest
adding: com/baeldung/jar/JarExample.class(in = 453) (out= 312)(deflated 31%)

4. Using Maven

4.1. Default Configuration

We can also use Maven to create our jar. Since Maven favors convention over configuration, we can just run package to create our jar file.

mvn package

By default, our jar file will be added to the target folder in our project.

4.2. Indicating the Main Class

We can also configure Maven to specify the main class and create an executable jar file.

<plugin>
    <groupId>org.apache.maven.plugins</groupId>
    <artifactId>maven-jar-plugin</artifactId>
    <version>${maven-jar-plugin.version}</version>
    <configuration>
        <archive>
            <manifest>
                <mainClass>com.baeldung.jar.JarExample</mainClass>
            </manifest>
        </archive>
    </configuration>
</plugin>

5. Using Spring Boot

5.1. Using Maven and defaults

If we’re using Spring Boot with Maven, we should first confirm that our packaging setting is set to jar rather than war in our pom.xml file.

<modelVersion>4.0.0</modelVersion>
<artifactId>spring-boot</artifactId>
<packaging>jar</packaging>
<name>spring-boot</name>

Once we know that’s configured, we can run the package goal:

mvn package

5.2. Setting the Entry Point

Setting our main class is where we find differences between creating a jar with a regular Java application and a fat jar for a Spring Boot application. In a Spring Boot application, the main class is actually org.springframework.boot.loader.JarLauncher.

Although our example isn’t a Spring Boot application, we could easily set it up to be a Spring Boot console application.

Our main class should be specified as the start class:

<properties>
    <start-class>com.baeldung.jar.JarExample</start-class>
    <!-- Other properties -->
</properties>

We can also use Gradle to create a Spring Boot fat jar.

6. Running the Jar

Now that we’ve got our jar file, we can run it. We run jar files using the java command.

6.1. Inferring the Main Class

Since we’ve gone ahead and made sure our main class is specified in the manifest, we can use the -jar option of the java command to run our application without specifying the main class:

java -jar JarExample.jar

6.2. Specifying the Main Class

We can also specify the main class when we’re running our application. We can use the -cp option to ensure that our jar file is in the classpath and then provide our main class in the package.className format:

java -cp JarExample.jar com.baeldung.jar.JarExample

Using path separators instead of package format also works:

java -cp JarExample.jar com/baeldung/jar/JarExample

6.3. Listing the Contents of a Jar

We can use the jar command to list the contents of our jar file:

jar tf JarExample.jar
META-INF/
META-INF/MANIFEST.MF
com/baeldung/jar/JarExample.class

6.4. Viewing the Manifest File

Since it can be important to know what’s in our MANIFEST.MF file, let’s look at a quick and easy way we can peek at the contents without leaving the command line.

Let’s use the unzip command with the -p option:

unzip -p JarExample.jar META-INF/MANIFEST.MF
Manifest-Version: 1.0
Created-By: 1.8.0_31 (Oracle Corporation)
Main-Class: com.baeldung.jar.JarExample

7. Conclusion

In this tutorial, we set up a simple Java application with a main class.

Then we looked at three ways of creating jar files: using the jar command, with Maven and with a Maven Spring Boot application.

After we created our jar files, we returned to the command line and ran them with an inferred and a specified main class.

We also learned how to display the contents of a file and how to display the contents of a single file within a jar.

Both the plain Java example and the Spring Boot example are available over on GitHub.


Java Weekly, Issue 267

$
0
0

Here we go…

1. Spring and Java

>> The Complete Guide to the Java SE 12 Extended Switch Statement/Expression [infoq.com]

A comprehensive write-up on the new syntax and semantics of the switch statement, plus updates regarding Project Amber and pattern-matching.

>> JDK 9/JEP 280: String Concatenations Will Never Be the Same [marxsoftware.blogspot.com]

A quick discussion of the bytecode used to make String concatenation via the ‘+’ operator more efficient. Very cool.

>> Improving build times with Gradle build scans [andresalmiray.com]

A deep dive into how the Gradle daemon and Build Cache impact build times.

>> How to map a String JPA property to a JSON column using Hibernate [vladmihalcea.com]

And a brief look at the use of JsonBinaryType from the hibernate-types framework with PostgreSQL’s jsonb data type.

Also worth reading:

Webinars and presentations:

Time to upgrade:

2. Technical and Musings

>> Overcoming RESTlessness [infoq.com]

A reflection on why we should leverage the maturity of the REST ecosystem with newer protocols like GraphQL, gRPC, and Apache Kafka.

>> Engineering to Improve Marketing Effectiveness (Part 3) — Scaling Paid Media campaigns [medium.com]

A fascinating piece about Netflix’s architecture for campaign management and ad budget optimization systems.

Also worth reading:

3. Comics

And my favorite Dilberts of the week:

>> Tweaking Variables [dilbert.com]

>> Dilbert Dooms the Planet [dilbert.com]

>> Take the Stairs [dilbert.com]

4. Pick of the Week

After two years of focusing on just the existing courses, I’m finally announcing a new course.

If you’re focused on the foundations of Spring, have a look at the new course (along with the upcoming price change):

>> The upcoming new Learn Spring

An Introduction to ZGC: A Scalable and Experimental Low-Latency JVM Garbage Collector

$
0
0

1. Introduction

Today, it’s not uncommon for applications to serve thousands or even millions of users concurrently. Such applications need enormous amounts of memory. However, managing all that memory may easily impact application performance.

To address this issue, Java 11 introduced the Z Garbage Collector (ZGC) as an experimental garbage collector (GC) implementation.

In this tutorial, we’ll see how ZGC manages to keep low pause times on even multi-terabyte heaps.

2. Main Concepts

In order to understand ZGC, we need to understand the basic concepts and terminology behind memory management and garbage collectors.

2.1. Memory Management

Physical memory is the RAM that our hardware provides.

The operating system (OS) allocates virtual memory space for each application.

Of course, we store virtual memory in physical memory, and the OS is responsible for maintaining the mapping between the two. This mapping usually involves hardware acceleration.

2.2. Garbage Collection

When we create a Java application, we don’t have to free the memory we allocated, because garbage collectors do it for us. In summary, GC watches which objects can we reach from our application through a chain of references and frees up the ones we can’t reach.

To achieve it, garbage collectors have multiple phases.

2.3. GC Phase Properties

GC phases can have different properties:

  • a parallel phase can run on multiple GC threads
  • a serial phase runs on a single thread
  • a stop the world phase can’t run concurrently with application code
  • a concurrent phase can run in the background, while our application does its work
  • an incremental phase can terminate before finishing all of its work and continue it later

Note, that all of the above techniques have their strengths and weaknesses. For example, let’s say we have a phase which can run concurrently with our application. A serial implementation of this phase requires 1% of the overall CPU performance and runs for 1000ms. In contrast, a parallel implementation utilizes 30% of CPU and completes its work in 50ms.

In this example, the parallel solution uses more CPU overall, because it may be more complex and have to synchronize the threads. For CPU heave applications (for example batch jobs) it’s a problem since we have less computing power to do effective work.

Of course, this example has made-up numbers. However, it’s clear that all applications have their own characteristics, so they have different GC requirements.

For more detailed descriptions, please visit our article on Java memory management.

3. ZGC Concepts

On top of tried and tested GC techniques, ZGC introduces two new concepts: pointer coloring and load barriers.

3.1. Pointer Coloring

A pointer represents the position of a byte in the virtual memory. However, we don’t necessarily have to use all bits of a pointer to do that – some bits can represent properties of the pointer. That’s what we call pointer coloring.

With 32 bits, we can address 4 gigabytes. Since nowadays it’s very common for a configuration to have more memory than this, we obviously can’t use any of these 32 bits for coloring. Therefore, ZGC uses 64-bit pointers. This means ZGC is only available on 64-bit platforms:

ZGC pointers use 42 bits to represent the address itself. As a result, ZGC pointers can address 4 terabytes of memory space.

On top of that, we have 4 bits to store pointer states:

  • finalizable bit – the object is only reachable through a finalizer
  • remap bit – the reference points to the current address of the object (see relocation)
  • marked0 and marked1 bits – these are used to flag reachable objects

We also called these bits metadata bits. In ZGC, exactly one of these metadata bits is 1.

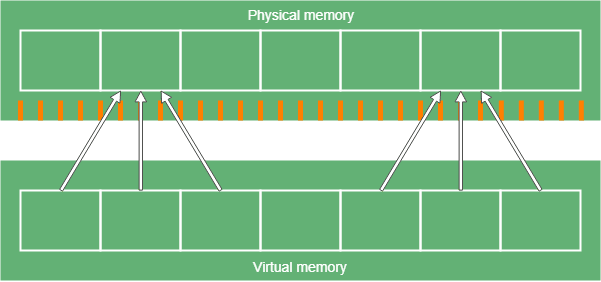
3.2. Multi-Mapping

Multi-mapping means that we map multiple ranges of virtual memory to the physical memory. In ZGC, these ranges only differ in the previously mentioned metadata bits.

Note that pointer coloring makes dereferencing more expensive since we have to mask the useful bits to access the address itself. However, ZGC bypasses this cost with the fact that exactly one of the four metadata bits will be 1. This way we only have four ranges to map, and the mapping is handled by the operating system. Furthermore, we only use three of these ranges, since we never want to dereference a finalizable pointer:

3.3. Load Barriers

A load barrier is a piece of code that runs when a thread loads a reference from a heap – for example, when we access a non-primitive field of an object.

In ZGC, load barriers check the metadata bits of the reference. Depending on these bits, ZGC may perform some processing on the reference before we get it. Therefore, it might produce an entirely different reference.

3.4. Marking

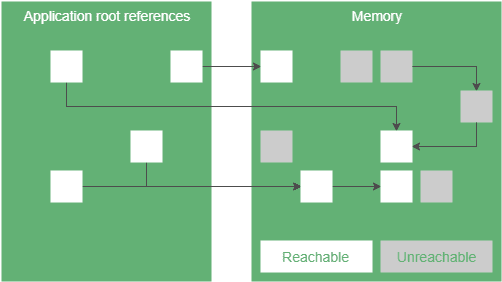
Marking is the process when the garbage collector determines which objects we can reach. The ones we can’t reach are considered garbage. ZGC breaks marking to three phases:

The first phase is a stop the world phase. In this phase, we look for root references and mark them. Root references are the starting points to reach objects in the heap, for example, local variables or static fields. Since the number of root references is usually small, this phase is short.

The next phase is a concurrent phase. In this phase, we traverse the object graph, starting from the root references. We mark every object we reach. Also, when a load barrier detects an unmarked reference, it marks it too.

The last phase is also a stop the world phase to handle some edge cases, like weak references.

At this point, we know which objects we can reach.

ZGC uses the marked0 and marked1 metadata bits for marking.

3.5. Relocation

We can follow two strategies when we have to allocate memory to new objects.

First, we can scan the memory for free space that’s big enough to hold our object. Scanning the memory is an expensive operation. In addition, the memory will be fragmented, since there’ll be gaps between the objects. If we want to minimize these gaps, it uses even more processing power.

The other strategy is to frequently relocate objects from fragmented memory areas to free areas in a more compact format. To be more effective, we split the memory space into blocks. We relocate all objects in a block or none of them. This way memory allocation will be faster since we know there are whole empty blocks in the memory.

In ZGC, relocation also consists of three phases.

  1. A concurrent phase looks for blocks we want to relocate and puts them in the relocation set.
  2. A stop the world phase relocates all root references in the relocation set and updates their references.
  3. A concurrent phase relocates all remaining objects in the relocation set and stores the mapping between the old and new addresses in the forward table.

3.6. Remapping

Note that in the relocation phase, we didn’t rewrite all references to relocated objects. Therefore, using those references, we wouldn’t access the objects we wanted to. Even worse, we could access garbage.

ZGC uses the load barriers to solve this issue. Load barriers fix the references pointing to relocated objects with a technique called remapping.

The following diagram shows how remapping works:

4. How to Enable ZGC?

We can enable ZGC with the following command line options when running our application:

-XX:+UnlockExperimentalVMOptions -XX:+UseZGC

Note that since ZGC is an experimental GC, it’ll take some time to become officially supported.

5. Conclusion

In this article, we saw that ZGC intends to support large heap sizes with low application pause times.

To reach this goal, it uses techniques including colored 64-bit pointers, load barriers, relocation, and remapping.

Reading a File in Groovy

$
0
0

1. Overview

In this quick tutorial, we’ll explore different ways of reading a file in Groovy.

Groovy provides convenient ways to handle files. We’ll concentrate on the File class which has some helper methods for reading files.

Let’s explore them one by one in the following sections.

2. Reading a File Line by Line

There are many Groovy IO methods like readLine and eachLine available for reading files line by line.

2.1. Using File.withReader

Let’s start with the File.withReader method. It creates a new BufferedReader under the covers that we can use to read the contents using the readLine method.

For example, let’s read a file line by line and print each line. We’ll also return the number of lines:

int readFileLineByLine(String filePath) {
    File file = new File(filePath)
    def line, noOfLines = 0;
    file.withReader { reader ->
        while ((line = reader.readLine()) != null) {
            println "${line}"
            noOfLines++
        }
    }
    return noOfLines
}

Let’s create a plain text file fileContent.txt with the following contents and use it for the testing:

Line 1 : Hello World!!!
Line 2 : This is a file content.
Line 3 : String content

Let’s test out our utility method:

def 'Should return number of lines in File given filePath' () {
    given:
        def filePath = "src/main/resources/fileContent.txt"
    when:
        def noOfLines = readFile.readFileLineByLine(filePath)
    then:
        noOfLines
        noOfLines instanceof Integer
        assert noOfLines, 3
}

The withReader method can also be used with a charset parameter like UTF-8 or ASCII to read encoded files. Let’s see an example:

new File("src/main/resources/utf8Content.html").withReader('UTF-8') { reader ->
def line
    while ((line = reader.readLine()) != null) { 
        println "${line}"
    }
}

2.2. Using File.eachLine

We can also use the eachLine method:

new File("src/main/resources/fileContent.txt").eachLine { line ->
    println line
}

2.3. Using File.newInputStream with InputStream.eachLine

Let’s see how we can use the InputStream with eachLine to read a file:

def is = new File("src/main/resources/fileContent.txt").newInputStream()
is.eachLine { 
    println it
}
is.close()

When we use the newInputStream method, we have to deal with closing the InputStream.

If we use the withInputStream method instead, it will handle closing the InputStream for us:

new File("src/main/resources/fileContent.txt").withInputStream { stream ->
    stream.eachLine { line ->
        println line
    }
}

3. Reading a File into a List

Sometimes we need to read the content of a file into a list of lines.

3.1. Using File.readLines

For this, we can use the readLines method which reads the file into a List of Strings.

Let’s have a quick look at an example that reads file content and returns a list of lines:

List<String> readFileInList(String filePath) {
    File file = new File(filePath)
    def lines = file.readLines()
    return lines
}

Let’s write a quick test using fileContent.txt:

def 'Should return File Content in list of lines given filePath' () {
    given:
        def filePath = "src/main/resources/fileContent.txt"
    when:
        def lines = readFile.readFileInList(filePath)
    then:
        lines
        lines instanceof List<String>
        assert lines.size(), 3
}

3.2. Using File.collect

We can also read the file content into a List of Strings using the collect API:

def list = new File("src/main/resources/fileContent.txt").collect {it}

3.3. Using the as Operator

We can even leverage the as operator to read the contents of the file into a String array:

def array = new File("src/main/resources/fileContent.txt") as String[]

4. Reading a File into a Single String

4.1. Using File.text

We can read an entire file into a single String simply by using the text property of the File class.

Let’s have a look at an example:

String readFileString(String filePath) {
    File file = new File(filePath)
    String fileContent = file.text
    return fileContent
}

Let’s verify this with a unit test:

def 'Should return file content in string given filePath' () {
    given:
        def filePath = "src/main/resources/fileContent.txt"
    when:
        def fileContent = readFile.readFileString(filePath)
    then:
        fileContent
        fileContent instanceof String
        fileContent.contains("""Line 1 : Hello World!!!
Line 2 : This is a file content.
Line 3 : String content""")
}

4.2. Using File.getText

If we use the getTest(charset) method, we can read the content of an encoded file into a String by providing a charset parameter like UTF-8 or ASCII:

String readFileStringWithCharset(String filePath) {
    File file = new File(filePath)
    String utf8Content = file.getText("UTF-8")
    return utf8Content
}

Let’s create an HTML file with UTF-8 content named utf8Content.html for the unit testing:

ᚠᛇᚻ᛫ᛒᛦᚦ᛫ᚠᚱᚩᚠᚢᚱ᛫ᚠᛁᚱᚪ᛫ᚷᛖᚻᚹᛦᛚᚳᚢᛗ
ᛋᚳᛖᚪᛚ᛫ᚦᛖᚪᚻ᛫ᛗᚪᚾᚾᚪ᛫ᚷᛖᚻᚹᛦᛚᚳ᛫ᛗᛁᚳᛚᚢᚾ᛫ᚻᛦᛏ᛫ᛞᚫᛚᚪᚾ
ᚷᛁᚠ᛫ᚻᛖ᛫ᚹᛁᛚᛖ᛫ᚠᚩᚱ᛫ᛞᚱᛁᚻᛏᚾᛖ᛫ᛞᚩᛗᛖᛋ᛫ᚻᛚᛇᛏᚪᚾ

Let’s see the unit test:

def 'Should return UTF-8 encoded file content in string given filePath' () {
    given:
        def filePath = "src/main/resources/utf8Content.html"
    when:
        def encodedContent = readFile.readFileStringWithCharset(filePath)
    then:
        encodedContent
        encodedContent instanceof String
}

5. Reading a Binary File with File.bytes

Groovy makes it easy to read non-text or binary files. By using the bytes property, we can get the contents of the File as a byte array:

byte[] readBinaryFile(String filePath) {
    File file = new File(filePath)
    byte[] binaryContent = file.bytes
    return binaryContent
}

We’ll use a png image file, sample.png, with the following contents for the unit testing:


Let’s see the unit test:

def 'Should return binary file content in byte array given filePath' () {
    given:
        def filePath = "src/main/resources/sample.png"
    when:
        def binaryContent = readFile.readBinaryFile(filePath)
    then:
        binaryContent
        binaryContent instanceof byte[]
        binaryContent.length == 329
}

6. Conclusion

In this quick tutorial, we’ve seen different ways of reading a file in Groovy using various methods of the File class along with the BufferedReader and InputStream.

The complete source code of these implementations and unit test cases can be found in the GitHub project.

Filtering Jackson JSON Output Based on Spring Security Role

$
0
0

1. Overview

In this quick tutorial, we’ll show how to filter JSON serialization output depending on a user role defined in Spring Security.

2. Why Do We Need To Filter?

Let’s consider a simple yet common use case where we have a web application that serves users with different roles. For example, let these roles be User and Admin.

To begin with, let’s define a requirement that Admins have full access to the internal state of objects exposed via a public REST API. On the contrary, Users should see only a predefined set of objects’ properties.

We’ll use the Spring Security framework to prevent unauthorized access to web application resources.

Let’s define an object that we’ll return as a REST response payload in our API:

class Item {
    private int id;
    private String name;
    private String ownerName;

    // getters
}

Of course, we could’ve defined a separate data transfer object class for each role present in our application. However, this approach will introduce useless duplications or sophisticated class hierarchies to our codebase.

On the other hand, we can employ the use of the Jackson library’s JSON views feature. As we’ll see in the next section, it makes customizing JSON representation as easy as adding an annotation on a field.

3. @JsonView Annotation

The Jackson library supports defining multiple serialization/deserialization contexts by marking fields we want to include in JSON representation with the @JsonView annotation. This annotation has a required parameter of a Class type that is used to tell contexts apart.

When marking fields in our class with @JsonView, we should keep in mind that, by default, serialization context includes all the properties that are not explicitly marked as being part of a view. In order to override this behavior, we can disable the DEFAULT_VIEW_INCLUSION mapper feature.

Firstly, let’s define a View class with some inner classes that we’ll be using as an argument for the @JsonView annotation:

class View {
    public static class User {}
    public static class Admin extends User {}
}

Next, we add @JsonView annotations to our class, making ownerName accessible to the admin role only:

@JsonView(View.User.class)
private int id;
@JsonView(View.User.class)
private String name;
@JsonView(View.Admin.class)
private String ownerName;

4. How to Integrate @JsonView Annotation With Spring Security

Now, let’s add an enumeration containing all the roles and their names. After that, let’s introduce a mapping between JSON views and security roles:

enum Role {
    ROLE_USER,
    ROLE_ADMIN
}

class View {

    public static final Map<Role, Class> MAPPING = new HashMap<>();

    static {
        MAPPING.put(Role.ADMIN, Admin.class);
        MAPPING.put(Role.USER, User.class);
    }

    //...
}

Finally, we’ve come to the central point of our integration. In order to tie up JSON views and Spring Security roles, we need to define controller advice that applies to all the controller methods in our application.

And so far, the only thing we need to do is to override the beforeBodyWriteInternal method of the AbstractMappingJacksonResponseBodyAdvice class:

@RestControllerAdvice
class SecurityJsonViewControllerAdvice extends AbstractMappingJacksonResponseBodyAdvice {

    @Override
    protected void beforeBodyWriteInternal(
      MappingJacksonValue bodyContainer,
      MediaType contentType,
      MethodParameter returnType,
      ServerHttpRequest request,
      ServerHttpResponse response) {
        if (SecurityContextHolder.getContext().getAuthentication() != null
          && SecurityContextHolder.getContext().getAuthentication().getAuthorities() != null) {
            Collection<? extends GrantedAuthority> authorities
              = SecurityContextHolder.getContext().getAuthentication().getAuthorities();
            List<Class> jsonViews = authorities.stream()
              .map(GrantedAuthority::getAuthority)
              .map(AppConfig.Role::valueOf)
              .map(View.MAPPING::get)
              .collect(Collectors.toList());
            if (jsonViews.size() == 1) {
                bodyContainer.setSerializationView(jsonViews.get(0));
                return;
            }
            throw new IllegalArgumentException("Ambiguous @JsonView declaration for roles "
              + authorities.stream()
              .map(GrantedAuthority::getAuthority).collect(Collectors.joining(",")));
        }
    }
}

This way, every response from our application will go through this advice, and it’ll find the appropriate view representation according to the role mapping we have defined. Note that this approach requires us to be careful when dealing with users that have multiple roles.

5. Conclusion

In this brief tutorial, we’ve learned how to filter JSON output in a web application based on a Spring Security role.

All the related code can be found over on Github.

Defining a Char Stack in Java

$
0
0

1. Overview

In this tutorial, we’ll discuss how to create a char stack in Java. We’ll first see how we can do this by using the Java API, and then we’ll look at some custom implementations.

Stack is a data structure that follows the LIFO (Last In First Out) principle. Some of its common methods are:

  • push(E item) – pushes an item to the top of the stack
  • pop() – removes and returns the object at the top of the stack
  • peek() – returns the object at the top of the stack without removing it

2. Char Stack Using Java API

Java has a built-in API named java.util.Stack. Since char is a primitive datatype, which cannot be used in generics, we have to use the wrapper class of java.lang.Character to create a Stack:

Stack<Character> charStack = new Stack<>();

Now, we can use the push, pop, and peek methods with our Stack.

On the other hand, we may be asked to build a custom implementation of a stack. Therefore, we’ll be looking into a couple of different approaches.

3. Custom Implementation Using LinkedList

Let’s implement a char stack using a LinkedList as our back-end data structure:

public class CharStack {

    private LinkedList<Character> items;

    public CharStack() {
        this.items = new LinkedList<Character>();
    }
}

We created an items variable that gets initialized in the constructor.

Now, we have to provide an implementation of the push, peek, and pop methods:

public void push(Character item) {
    items.push(item);
}

public Character peek() {
    return items.getFirst();
}

public Character pop() {
    Iterator<Character> iter = items.iterator();
    Character item = iter.next();
    if (item != null) {
        iter.remove();
        return item;
    }
    return null;
}

The push and peek methods are using the built-in methods of a LinkedList. For pop, we first used an Iterator to check if there’s an item on the top or not. If it’s there, we remove the item from the list by calling the remove method.

4. Custom Implementation Using an Array

We can also use an array for our data structure:

public class CharStackWithArray {

    private char[] elements;
    private int size;

    public CharStackWithArray() {
        size = 0;
        elements = new char[4];
    }

}

Above, we create a char array, which we initialize in the constructor with an initial capacity of 4. Additionally, we have a size variable to keep track of how many records are present in our stack.

Now, let’s implement the push method:

public void push(char item) {
    ensureCapacity(size + 1);
    elements[size] = item;
    size++;
}

private void ensureCapacity(int newSize) {
    char newBiggerArray[];
    if (elements.length < newSize) {
        newBiggerArray = new char[elements.length * 2];
        System.arraycopy(elements, 0, newBiggerArray, 0, size);
        elements = newBiggerArray;
    }
}

While pushing an item to the stack, we first need to check if our array has the capacity to store it. If not, we create a new array and double its size. We then copy the old elements to the newly created array and assign it to our elements variable.

Note: for an explanation of why we want to double the size of the array, rather than simply increase the size by one, please refer to this StackOverflow post.

Finally, let’s implement the peek and pop methods:

public char peek() {
    if (size == 0) {
        throw new EmptyStackException();
    }
    return elements[size - 1];
}

public char pop() {
    if (size == 0) {
        throw new EmptyStackException();
    }
    return elements[--size];
}

For both methods, after validating that the stack is not empty, we return the element at position size – 1. For pop, in addition to returning the element, we decrement the size by 1.

5. Conclusion

In this article, we learned how to make a char stack using the Java API, and we saw a couple of custom implementation.

The code presented in this article is available over on GitHub.

Building DSLs in Kotlin

$
0
0

1. Overview

In this tutorial, we’ll see how powerful Kotlin language features can be used for building type-safe DSLs.

For our example, we’ll create a simple tool for constructing SQL queries, just big enough to illustrate the concept.

The general idea is to use statically-typed user-provided function literals which modify the query builder state when invoked. After all of them are called, the builder’s state is verified and the resulting SQL string is generated.

2. Defining the Entry Point

Let’s start by defining an entry point for our functionality:

class SqlSelectBuilder {
    fun build(): String {
        TODO("implement")
    }
}

fun query(initializer: SqlSelectBuilder.() -> Unit): SqlSelectBuilder {
    return SqlSelectBuilder().apply(initializer)
}

Then we can simply use the functions defined:

val sql = query {
}.build()

3. Adding Columns

Let’s add support for defining target columns to use. Here’s how that looks in the DSL:

query {
    select("column1", "column2")
}

And the implementation of the select function:

class SqlSelectBuilder {

    private val columns = mutableListOf<String>()

    fun select(vararg columns: String) {
        if (columns.isEmpty()) {
            throw IllegalArgumentException("At least one column should be defined")
        }
        if (this.columns.isNotEmpty()) {
            throw IllegalStateException("Detected an attempt to re-define columns to fetch. " 
              + "Current columns list: "
              + "${this.columns}, new columns list: $columns")
        }
        this.columns.addAll(columns)
    }
}

4. Defining the Table

We also need to allow specifying the target table to use:

query {
    select ("column1", "column2")
    from ("myTable")
}

The from function will simply set the table name received in the class property:

class SqlSelectBuilder {

    private lateinit var table: String

    fun from(table: String) {
        this.table = table
    }
}

5. The First Milestone

Actually, we now have enough for building simple queries and testing them. Let’s do it!

First, we need to implement the SqlSelectBuilder.build method:

class SqlSelectBuilder {

    fun build(): String {
        if (!::table.isInitialized) {
            throw IllegalStateException("Failed to build an sql select - target table is undefined")
        }
        return toString()
    }

    override fun toString(): String {
        val columnsToFetch =
                if (columns.isEmpty()) {
                    "*"
                } else {
                    columns.joinToString(", ")
                }
        return "select $columnsToFetch from $table"
    }
}

Now we can introduce a couple of tests:

private fun doTest(expected: String, sql: SqlSelectBuilder.() -> Unit) {
    assertThat(query(sql).build()).isEqualTo(expected)
}

@Test
fun `when no columns are specified then star is used`() {
    doTest("select * from table1") {
        from ("table1")
    }
}
@Test
fun `when no condition is specified then correct query is built`() {
    doTest("select column1, column2 from table1") {
        select("column1", "column2")
        from ("table1")
    }
}

6. AND Condition

Most of the time we need to specify conditions in our queries.

Let’s start by defining how the DSL should look:

query {
    from("myTable")
    where {
        "column3" eq 4
        "column3" eq null
    }
}

These conditions are actually SQL AND operands, so let’s introduce the same concept in the source code:

class SqlSelectBuilder {
    fun where(initializer: Condition.() -> Unit) {
        condition = And().apply(initializer)
    }
}

abstract class Condition

class And : Condition()

class Eq : Condition()

Let’s implement the classes one by one:

abstract class Condition {
    infix fun String.eq(value: Any?) {
        addCondition(Eq(this, value))
    }
}
class Eq(private val column: String, private val value: Any?) : Condition() {

    init {
        if (value != null && value !is Number && value !is String) {
            throw IllegalArgumentException(
              "Only <null>, numbers and strings values can be used in the 'where' clause")
        }
    }

    override fun addCondition(condition: Condition) {
        throw IllegalStateException("Can't add a nested condition to the sql 'eq'")
    }

    override fun toString(): String {
        return when (value) {
            null -> "$column is null"
            is String -> "$column = '$value'"
            else -> "$column = $value"
        }
    }
}

Finally, we’ll create the And class which holds the list of conditions and implements the addCondition method:

class And : Condition() {

    private val conditions = mutableListOf<Condition>()

    override fun addCondition(condition: Condition) {
        conditions += condition
    }

    override fun toString(): String {
        return if (conditions.size == 1) {
            conditions.first().toString()
        } else {
            conditions.joinToString(prefix = "(", postfix = ")", separator = " and ")
        }
    }
}

The tricky part here is supporting DSL criteria. We declare Condition.eq as an infix String extension function for that. So, we can use it either traditionally like column.eq(value) or without dot and parentheses – column eq value.

The function is defined in a context of the Condition class, that’s why we can use it (remember that SqlSelectBuilder.where receives a function literal which is executed in a context of Condition).

Now we can verify that everything works as expected:

@Test
fun `when a list of conditions is specified then it's respected`() {
    doTest("select * from table1 where (column3 = 4 and column4 is null)") {
        from ("table1")
        where {
            "column3" eq 4
            "column4" eq null
        }
    }
}

7. OR Condition

The last part of our exercise is supporting SQL OR conditions. As usual, let’s define how that should look in our DSL first:

query {
    from("myTable")
    where {
        "column1" eq 4
        or {
            "column2" eq null
            "column3" eq 42
        }
    }
}

Then we’ll provide an implementation. As OR and AND are very similar, we can re-use the existing implementation:

open class CompositeCondition(private val sqlOperator: String) : Condition() {
    private val conditions = mutableListOf<Condition>()

    override fun addCondition(condition: Condition) {
        conditions += condition
    }

    override fun toString(): String {
        return if (conditions.size == 1) {
            conditions.first().toString()
        } else {
            conditions.joinToString(prefix = "(", postfix = ")", separator = " $sqlOperator ")
        }
    }
}

class And : CompositeCondition("and")

class Or : CompositeCondition("or")

Finally, we’ll add the corresponding support to the conditions sub-DSL:

abstract class Condition {
    fun and(initializer: Condition.() -> Unit) {
        addCondition(And().apply(initializer))
    }

    fun or(initializer: Condition.() -> Unit) {
        addCondition(Or().apply(initializer))
    }
}

Let’s verify that everything works:

@Test
fun `when 'or' conditions are specified then they are respected`() {
    doTest("select * from table1 where (column3 = 4 or column4 is null)") {
        from ("table1")
        where {
            or {
                "column3" eq 4
                "column4" eq null
            }
        }
    }
}

@Test
fun `when either 'and' or 'or' conditions are specified then they are respected`() {
    doTest("select * from table1 where ((column3 = 4 or column4 is null) and column5 = 42)") {
        from ("table1")
        where {
            or {
                "column3" eq 4
                "column4" eq null
            }
            "column5" eq 42
        }
    }
}

8. Extra Fun

While out of the scope of this tutorial, the same concepts can be used for expanding our DSL. For example, we could enhance it by adding support for LIKEGROUP BY, HAVING, ORDER BY. Feel free to post solutions in the comments!

9. Conclusion

In this article, we saw an example of building a simple DSL for SQL queries. It’s not an exhaustive guide, but it establishes a good foundation and provides an overview of the whole Kotlin type-safe DSL approach.

As usual, the complete source code for this article is available over on GitHub.

Handle Security in Zuul, with OAuth2 and JWT

$
0
0

1. Introduction

Simply put, a microservice architecture allows us to break up our system and our API into a set of self-contained services, which can be deployed fully independently.

While this is great from a continuous deployment and management point of view, it can quickly become convoluted when it comes to API usability. With different endpoints to manage, dependent applications will need to manage CORS (Cross-Origin Resource Sharing) and a diverse set of endpoints.

Zuul is an edge service that allows us to route incoming HTTP requests into multiple backend microservices. For one thing, this is important for providing a unified API for consumers of our backend resources.

Basically, Zuul allows us to unify all of our services by sitting in front of them and acting as a proxy. It receives all requests and routes them to the correct service. To an external application, our API appears as a unified API surface area.

In this tutorial, we’ll talk about how we can use it for this exact purpose, in conjunction with an OAuth 2.0 and JWTs, to be the front line for securing our web services. Specifically, we’ll be using the Password Grant flow to obtain an Access Token to the protected resources.

A quick but important note is that we’re only using the Password Grant flow to explore a simple scenario; most clients will more likely be using the Authorization Grant flow in production scenarios.

2. Adding Zuul Maven Dependencies

Let’s begin by adding Zuul to our project. We do this by adding the spring-cloud-starter-netflix-zuul artifact:

<dependency>
    <groupId>org.springframework.cloud</groupId>
    <artifactId>spring-cloud-starter-netflix-zuul</artifactId>
    <version>2.0.2.RELEASE</version>
</dependency>

3. Enabling Zuul

The application that we’d like to route through Zuul contains an OAuth 2.0 Authorization Server which grants access tokens and a Resource Server which accepts them. These services live on two separate endpoints.

We’d like to have a single endpoint for all external clients of these services, with different paths branching off to different physical endpoints. To do so, we’ll introduce Zuul as an edge service.

To do this, we’ll create a new Spring Boot application, called GatewayApplication. We’ll then simply decorate this application class with the @EnableZuulProxy annotation, which will cause a Zuul instance to be spawned:

@EnableZuulProxy
@SpringBootApplication
public class GatewayApplication {
    public static void main(String[] args) {
	SpringApplication.run(GatewayApplication.class, args);
    }
}

4. Configuring Zuul Routes

Before we can go any further, we need to configure a few Zuul properties. The first thing we’ll configure is the port on which Zuul is listening for incoming connections. That needs to go into the /src/main/resources/application.yml file:

server:
    port: 8080

Now for the fun stuff, configuring the actual routes that Zuul will forward to. To do that, we need to note the following services, their paths and the ports that they listen on.

The Authorization Server is deployed on: http://localhost:8081/spring-security-oauth-server/oauth

The Resource Server is deployed on: http://localhost:8082/spring-security-oauth-resource

The Authorization Server is an OAuth identity provider. It exists to provide authorization tokens to the Resource Server, which in turn provides some protected endpoints.

The Authorization Server provides an Access Token to the Client, which then uses the token to execute requests against the Resource Server, on behalf of the Resource Owner. A quick run through the OAuth terminology will help us keep these concepts in view.

Now let’s map some routes to each of these services:

zuul:
  routes:
    spring-security-oauth-resource:
      path: /spring-security-oauth-resource/**
      url: http://localhost:8082/spring-security-oauth-resource
    oauth:
      path: /oauth/**
      url: http://localhost:8081/spring-security-oauth-server/oauth	 

At this point, any request reaching Zuul on localhost:8080/oauth/** will be routed to the authorization service running on port 8081. Any request to localhost:8080/spring-security-oauth-resource/** will be routed to the resource server running on 8082.

5. Securing Zuul External Traffic Paths

Even though our Zuul edge service is now routing requests correctly, it’s doing so without any authorization checks. The Authorization Server sitting behind /oauth/*, creates a JWT for each successful authentication. Naturally, it’s accessible anonymously.

The Resource Server – located at /spring-security-oauth-resource/**, on the other hand, should always be accessed with a JWT to ensure that an authorized Client is accessing the protected resources.

First, we’ll configure Zuul to pass through the JWT to services that sit behind it. In our case here, those services themselves need to validate the token.

We do that by adding sensitiveHeaders: Cookie,Set-Cookie.

This completes our Zuul configuration:

server:
  port: 8080
zuul:
  sensitiveHeaders: Cookie,Set-Cookie
  routes:
    spring-security-oauth-resource:
      path: /spring-security-oauth-resource/**
      url: http://localhost:8082/spring-security-oauth-resource
    oauth:
      path: /oauth/**
      url: http://localhost:8081/spring-security-oauth-server/oauth

After we’ve got that out of the way, we need to deal with authorization at the edge. Right now, Zuul will not validate the JWT before passing it on to our downstream services. These services will validate the JWT themselves, but ideally, we’d like to have the edge service do that first and reject any unauthorized requests before they propagate deeper into our architecture.

Let’s set up Spring Security to ensure that authorization is checked in Zuul.

First, we’ll need to bring in the Spring Security dependencies into our project. We want spring-security-oauth2 and spring-security-jwt:

<dependency>
    <groupId>org.springframework.security.oauth</groupId>
    <artifactId>spring-security-oauth2</artifactId>
    <version>2.3.3.RELEASE</version>
</dependency>
<dependency>
    <groupId>org.springframework.security</groupId>
    <artifactId>spring-security-jwt</artifactId>
    <version>1.0.9.RELEASE</version>
</dependency>

Now let’s write a configuration for the routes we want to protect by extending ResourceServerConfigurerAdapter:

@Configuration
@Configuration
@EnableResourceServer
public class GatewayConfiguration extends ResourceServerConfigurerAdapter {
    @Override
    public void configure(final HttpSecurity http) throws Exception {
	http.authorizeRequests()
          .antMatchers("/oauth/**")
          .permitAll()
          .antMatchers("/**")
	  .authenticated();
    }
}

The GatewayConfiguration class defines how Spring Security should handle incoming HTTP requests through Zuul. Inside the configure method, we’ve first matched the most restrictive path using antMatchers and then allowed anonymous access through permitAll.

That is all requests coming into /oauth/** should be allowed through without checking for any authorization tokens. This makes sense because that’s the path from which authorization tokens are generated.

Next, we’ve matched all other paths with /**, and through a call to authenticated insisted that all other calls should contain Access Tokens.

6. Configuring the Key Used for JWT Validation

Now that the configuration is in place, all requests routed to the /oauth/** path will be allowed through anonymously, while all other requests will require authentication.

There is one thing we’re missing here though, and that’s the actual secret required to verify that the JWT is valid. To do that, we need to provide the key (which is symmetric in this case) used to sign the JWT. Rather than writing configuration code manually, we can use spring-security-oauth2-autoconfigure.

Let’s start by adding the artifact to our project:

<dependency>
    <groupId>org.springframework.security.oauth.boot</groupId>
    <artifactId>spring-security-oauth2-autoconfigure</artifactId>
    <version>2.1.2.RELEASE</version>
</dependency>

Next, we need to add a few lines of configuration to our application.yaml file to define the key used to sign the JWT:

security:
  oauth2:
    resource:
      jwt:
        key-value: 123

The line key-value: 123 sets the symmetric key used by the Authorization Server to sign the JWT. This key will be used by spring-security-oauth2-autoconfigure to configure token parsing.

It’s important to note that, in a production system, we shouldn’t use a symmetric key, specified in the source code of the application. That naturally needs to be configured externally.

7. Testing the Edge Service

7.1. Obtaining an Access Token

Now let’s test how our Zuul edge service behaves – with a few curl commands.

First, we’ll see how we can obtain a new JWT from the Authorization Server, using the password grant.

Here we exchange a username and password in for an Access Token. In this case, we use ‘john‘ as the username and ‘123‘ as the password:

curl -X POST \
  http://localhost:8080/oauth/token \
  -H 'Authorization: Basic Zm9vQ2xpZW50SWRQYXNzd29yZDpzZWNyZXQ=' \
  -H 'Cache-Control: no-cache' \
  -H 'Content-Type: application/x-www-form-urlencoded' \
  -d 'grant_type=password&password=123&username=john'

This call yields a JWT token which we can then use for authenticated requests against our Resource Server.

Notice the “Authorization: Basic…” header field. This exists to tell the Authorization Server which client is connecting to it.

It’s to the Client (in this case the cURL request) what the username and password are to the user:

{    
    "access_token":"eyJhbGciOiJIUzI1NiIsInR5cCI6IkpX...",
    "token_type":"bearer",    
    "refresh_token":"eyJhbGciOiJIUzI1NiIsInR5cCI6IkpX...",
    "expires_in":3599,
    "scope":"foo read write",
    "organization":"johnwKfc",
    "jti":"8e2c56d3-3e2e-4140-b120-832783b7374b"
}

7.2. Testing a Resource Server Request

We can then use the JWT we retrieved from the Authorization Server to now execute a query against the Resource Server:

curl -X GET \
curl -X GET \
  http:/localhost:8080/spring-security-oauth-resource/users/extra \
  -H 'Accept: application/json, text/plain, */*' \
  -H 'Accept-Encoding: gzip, deflate' \
  -H 'Accept-Language: en-US,en;q=0.9' \
  -H 'Authorization: Bearer eyJhbGciOiJIUzI1NiIsInR5cCI6IkpXV...' \
  -H 'Cache-Control: no-cache' \

The Zuul edge service will now validate the JWT before routing to the Resource Server.

This then extracts key fields from the JWT and checks for more granular authorization before responding to the request:

{
    "user_name":"john",
    "scope":["foo","read","write"],
    "organization":"johnwKfc",
    "exp":1544584758,
    "authorities":["ROLE_USER"],
    "jti":"8e2c56d3-3e2e-4140-b120-832783b7374b",
    "client_id":"fooClientIdPassword"
}

8. Security Across Layers

It’s important to note that the JWT is being validated by the Zuul edge service before being passed into the Resource Server. If the JWT is invalid, then the request will be denied at the edge service boundary.

If the JWT is indeed valid on the other hand, the request is passed on downstream. The Resource Server then validates the JWT again and extracts key fields such as user scope, organization (in this case a custom field) and authorities. It uses these fields to decide what the user can and can’t do.

To be clear, in a lot of architectures, we won’t actually need to validate the JWT twice – that’s a decision you’ll have to make based on your traffic patterns.

For example, in some production projects, individual Resource Servers may be accessed directly, as well as through the proxy – and we may want to verify the token in both places. In other projects, traffic may be coming only through the proxy, in which case verifying the token there is enough.

9. Summary

As we’ve seen Zuul provides an easy, configurable way to abstract and define routes for services. Together with Spring Security, it allows us to authorize requests at service boundaries.

Finally, as always, the code is available over on Github.


Void Type in Kotlin

$
0
0

1. Introduction

In this tutorial, we’ll learn about Void type in Kotlin and essentially other ways to represent void or nothing in Kotlin.

2. Void vs void – in Java

To understand the use of Void in Kotlin, let’s first review what is a Void type in Java and how it is different from the Java primitive keyword void.

The Void class, as part of the java.lang package, acts as a reference to objects that wrap the Java primitive type voidIt can be considered analogous to other wrapper classes such as Integer — the wrapper for the primitive type int.

Now, Void is not amongst the other popular wrapper classes because there are not many uses cases where we need to return it instead of the primitive void. But, in applications such as generics, where we can not use primitives, we use the Void class instead.

3. Void in Kotlin

Kotlin is designed to be completely interoperable with Java and hence Java code can be used in Kotlin files.

Let’s try to use Java’s Void type as a return type in a Kotlin function:

fun returnTypeAsVoidAttempt1() : Void {
    println("Trying with Void return type")
}

But this function doesn’t compile and results in below error:

Error: Kotlin: A 'return' expression required in a function with a block body ('{...}')

This error makes sense and a similar function would have given a similar error in Java.

To fix this, we’ll try to add a return statement. But, since Void is a non-instantiable final class of Java, we can only return null from such functions:

fun returnTypeAsVoidAttempt2(): Void {
    println("Trying with Void as return type")
    return null
}

This solution doesn’t work either and fails with the following error:

Error: Kotlin: Null can not be a value of a non-null type Void

The reason for the above message is that unlike Java, we cannot return null from non-null return types in Kotlin.

In Kotlin, we need to make the function return type nullable by using the ? operator:

fun returnTypeAsVoidSuccess(): Void? {
    println("Function can have Void as return type")
    return null
}

We finally have a solution that works, but as we’ll see next, there are better ways of achieving the same result.

4. Unit in Kotlin

Unit in Kotlin can be used as the return type of functions that do not return anything meaningful:

fun unitReturnTypeForNonMeaningfulReturns(): Unit {
    println("No meaningful return")
}

By default, Java void is mapped to Unit type in Kotlin. This means that any method that returns void in Java when called from Kotlin will return Unit for example the System.out.println() function.

@Test
fun givenJavaVoidFunction_thenMappedToKotlinUnit() {
    assertTrue(System.out.println() is Unit)
}

Also, Unit is the default return type and declaring it is optional, therefore, the below function is also valid:

fun unitReturnTypeIsImplicit() {
    println("Unit Return type is implicit")
}

5. Nothing in Kotlin

Nothing is a special type in Kotlin that is used to represent a value that never exists. If a function’s return type is Nothing then that function doesn’t return any value not even the default return type Unit.

For example, the function below always throws an exception:

fun alwaysThrowException(): Nothing {
    throw IllegalArgumentException()
}

As we can appreciate, the concept of the Nothing return type is quite different and there is no equivalent in Java. In the latter, a function will always default to void return type even though there may be cases like above example when that function may never return anything.

The Nothing return type in Kotlin saves us from potential bugs and unwarranted code. When any function having Nothing as the return type is invoked, then the compiler will not execute beyond this function call and gives us the appropriate warning:

fun invokeANothingOnlyFunction() {
    alwaysThrowException() // Function that never returns
    var name="Tom" // Compiler warns that this is unreachable code
}

6. Conclusion

In this tutorial, we learned about void vs Void in Java and how to use them in Kotlin. We also learned about Unit and Nothing types and their applicability as return types for different scenarios.

As always, all the code used in this tutorial is available over on Github.

A Guide to the Problem Spring Web Library

$
0
0

1. Overview

In this tutorial, we’re going to explore how to produce application/problem+json responses using the Problem Spring Web library. This library helps us to avoid repetitive tasks related to error handling.

By integrating Problem Spring Web into our Spring Boot application, we can simplify the way we handle exceptions within our project and generate responses accordingly.

2. The Problem Library

Problem is a small library with the purpose of standardizing the way Java-based Rest APIs express errors to their consumers.

A Problem is an abstraction of any error we want to inform about. It contains handy information about the error. Let’s see the default representation of a Problem response:

{
  "title": "Not Found",
  "status": 404
}

In this case, the status code and the title are enough to describe the error. However, we can also add a detailed description of it:

{
  "title": "Service Unavailable",
  "status": 503,
  "detail": "Database not reachable"
}

We can also create custom Problem objects that adapt to our needs:

Problem.builder()
  .withType(URI.create("https://example.org/out-of-stock"))
  .withTitle("Out of Stock")
  .withStatus(BAD_REQUEST)
  .withDetail("Item B00027Y5QG is no longer available")
  .with("product", "B00027Y5QG")
  .build();

In this tutorial we’ll focus on the Problem library implementation for Spring Boot projects.

3. Problem Spring Web Setup

Since this is a Maven based project, let’s add the problem-spring-web dependency to the pom.xml:

<dependency>
    <groupId>org.zalando</groupId>
    <artifactId>problem-spring-web</artifactId>
    <version>0.23.0</version>
</dependency>
<dependency> 
    <groupId>org.springframework.boot</groupId> 
    <artifactId>spring-boot-starter-web</artifactId>
    <version>2.12.RELEASE</version> 
</dependency>
<dependency> 
    <groupId>org.springframework.boot</groupId> 
    <artifactId>spring-boot-starter-security</artifactId>
    <version>2.12.RELEASE</version>  
</dependency>

We also need the spring-boot-starter-web and the spring-boot-starter-security dependencies. Spring Security is required from version 0.23.0 of problem-spring-web.

4. Basic Configuration

As our first step, we need to disable the white label error page so we’ll able to see our custom error representation instead:

@EnableAutoConfiguration(exclude = ErrorMvcAutoConfiguration.class)

Now, let’s register some of the required components in the ObjectMapper bean:

@Bean
public ObjectMapper objectMapper() {
    return new ObjectMapper().registerModules(
      new ProblemModule(),
      new ConstraintViolationProblemModule());
}

After that, we need to add the following properties to the application.properties file:

spring.resources.add-mappings=false
spring.mvc.throw-exception-if-no-handler-found=true
spring.http.encoding.force=true

And finally, we need to implement the ProblemHandling interface:

@ControllerAdvice
public class ExceptionHandler implements ProblemHandling {}

5. Advanced Configuration

In addition to the basic configuration, we can also configure our project to handle security-related problems. The first step is to create a configuration class to enable the library integration with Spring Security:

@Configuration
@EnableWebSecurity
@Import(SecurityProblemSupport.class)
public class SecurityConfiguration extends WebSecurityConfigurerAdapter {

    @Autowired
    private SecurityProblemSupport problemSupport;

    @Override
    protected void configure(HttpSecurity http) throws Exception {
        // Other security-related configuration
        http.exceptionHandling()
          .authenticationEntryPoint(problemSupport)
          .accessDeniedHandler(problemSupport);
    }
}

And finally, we need to create an exception handler for security-related exceptions:

@ControllerAdvice
public class SecurityExceptionHandler implements SecurityAdviceTrait {}

6. The REST Controller

After configuring our application, we are ready to create a RESTful controller:

@RestController
@RequestMapping("/tasks")
public class ProblemDemoController {

    private static final Map<Long, Task> MY_TASKS;

    static {
        MY_TASKS = new HashMap<>();
        MY_TASKS.put(1L, new Task(1L, "My first task"));
        MY_TASKS.put(2L, new Task(2L, "My second task"));
    }

    @GetMapping(produces = MediaType.APPLICATION_JSON_VALUE)
    public List<Task> getTasks() {
        return new ArrayList<>(MY_TASKS.values());
    }

    @GetMapping(value = "/{id}",
      produces = MediaType.APPLICATION_JSON_VALUE)
    public Task getTasks(@PathVariable("id") Long taskId) {
        if (MY_TASKS.containsKey(taskId)) {
            return MY_TASKS.get(taskId);
        } else {
            throw new TaskNotFoundProblem(taskId);
        }
    }

    @PutMapping("/{id}")
    public void updateTask(@PathVariable("id") Long id) {
        throw new UnsupportedOperationException();
    }

    @DeleteMapping("/{id}")
    public void deleteTask(@PathVariable("id") Long id) {
        throw new AccessDeniedException("You can't delete this task");
    }

}

In this controller, we’re intentionally throwing some exceptions. Those exceptions will be converted into Problem objects automatically to produce an application/problem+json response with the details of the failure.

Now, let’s talk about the built-in advice traits and also how to create a custom Problem implementation.

7. Built-in Advice Traits

An advice trait is a small exception handler that catches exceptions and returns the proper problem object.

There are built-in advice traits for common exceptions. Hence, we can use them by simply throwing the exception:

throw new UnsupportedOperationException();

As a result, we’ll get the response:

{
    "title": "Not Implemented",
    "status": 501
}

Since we configured the integration with Spring Security as well, we’re able to throw security-related exceptions:

throw new AccessDeniedException("You can't delete this task");

And get the proper response:

{
    "title": "Forbidden",
    "status": 403,
    "detail": "You can't delete this task"
}

8. Creating a Custom Problem

It’s possible to create a custom implementation of a Problem. We just need to extend the AbstractThrowableProblem class:

public class TaskNotFoundProblem extends AbstractThrowableProblem {

    private static final URI TYPE
      = URI.create("https://example.org/not-found");

    public TaskNotFoundProblem(Long taskId) {
        super(
          TYPE,
          "Not found",
          Status.NOT_FOUND,
          String.format("Task '%s' not found", taskId));
    }

}

And we can throw our custom problem as follows:

if (MY_TASKS.containsKey(taskId)) {
    return MY_TASKS.get(taskId);
} else {
    throw new TaskNotFoundProblem(taskId);
}

As a result of throwing the TaskNotFoundProblem problem, we’ll get:

{
    "type": "https://example.org/not-found",
    "title": "Not found",
    "status": 404,
    "detail": "Task '3' not found"
}

9. Dealing with Stack Traces

If we want to include stack traces within the response, we need to configure our ProblemModule accordingly:

ObjectMapper mapper = new ObjectMapper()
  .registerModule(new ProblemModule().withStackTraces());

The causal chain of causes is disabled by default, but we can easily enable it by overriding the behavior:

@ControllerAdvice
class ExceptionHandling implements ProblemHandling {

    @Override
    public boolean isCausalChainsEnabled() {
        return true;
    }

}

After enabling both features we’ll get a response similar to this one:

{
  "title": "Internal Server Error",
  "status": 500,
  "detail": "Illegal State",
  "stacktrace": [
    "org.example.ExampleRestController
      .newIllegalState(ExampleRestController.java:96)",
    "org.example.ExampleRestController
      .nestedThrowable(ExampleRestController.java:91)"
  ],
  "cause": {
    "title": "Internal Server Error",
    "status": 500,
    "detail": "Illegal Argument",
    "stacktrace": [
      "org.example.ExampleRestController
        .newIllegalArgument(ExampleRestController.java:100)",
      "org.example.ExampleRestController
        .nestedThrowable(ExampleRestController.java:88)"
    ],
    "cause": {
      // ....
    }
  }
}

10. Conclusion

In this article, we explored how to use the Problem Spring Web library to create responses with the errors’ details using an application/problem+json response. We also learned how to configure the library in our Spring Boot application and create a custom implementation of a Problem object.

The implementation of this guide can be found in the GitHub project – this is a Maven based project, so it should be easy to import and run it as is.

How to Test the @Scheduled Annotation

$
0
0

1. Introduction

One of the available annotations in the Spring Framework is @Scheduled. We can use this annotation to execute tasks in a scheduled way.

In this tutorial, we’ll explore how to test the @Scheduled annotation.

2. Dependencies

First, let’s start creating a Spring Boot Maven-based application from the Spring Initializer:

<parent>
    <groupId>org.springframework.boot</groupId>
    <artifactId>spring-boot-starter-parent</artifactId>
    <version>2.1.2.RELEASE</version>
    <relativePath/>
</parent>

We’ll also need to use a couple of Spring Boot starters:

<dependency>
    <groupId>org.springframework.boot</groupId>
    <artifactId>spring-boot-starter</artifactId>
</dependency>
<dependency>
    <groupId>org.springframework.boot</groupId>
    <artifactId>spring-boot-starter-test</artifactId>
    <scope>test</scope>
</dependency>

And, let’s add the dependency for JUnit 5 to our pom.xml:

<dependency>
    <groupId>org.junit.jupiter</groupId>
    <artifactId>junit-jupiter-api</artifactId>
</dependency>

We can find the latest version of Spring Boot on Maven Central.

Additionally, to use Awaitility in our tests, we need to add its dependency:

<dependency>
    <groupId>org.awaitility</groupId>
    <artifactId>awaitility</artifactId>
    <version>3.1.6</version>
    <scope>test</scope>
</dependency>

3. Simple @Scheduled Sample

Let’s start by creating a simple Counter class:

@Component
public class Counter {
    private AtomicInteger count = new AtomicInteger(0);

    @Scheduled(fixedDelay = 5)
    public void scheduled() {
        this.count.incrementAndGet();
    }

    public int getInvocationCount() {
        return this.count.get();
    }
}

We’ll use the scheduled method to increase our count. Note that we’ve also added the @Scheduled annotation to execute it in a fixed period of five milliseconds.

Also, let’s create a ScheduledConfig class to enable scheduled tasks using the @EnableScheduling annotation:

@Configuration
@EnableScheduling
@ComponentScan("com.baeldung.scheduled")
public class ScheduledConfig {
}

4. Using Integration Testing

One of the alternatives to test our class is using integration testing. To do that, we need to use the @SpringJUnitConfig annotation to start the application context and our beans in the testing environment:

@SpringJUnitConfig(ScheduledConfig.class)
public class ScheduledIntegrationTest {

    @Autowired 
    Counter counter;

    @Test
    public void givenSleepBy100ms_whenGetInvocationCount_thenIsGreaterThanZero() 
      throws InterruptedException {
        Thread.sleep(100L);

        assertThat(counter.getInvocationCount()).isGreaterThan(0);
    }
}

In this case, we start our Counter bean and wait for 100 milliseconds to check the invocation count.

5. Using Awaitility

Another approach to testing scheduled tasks is using Awaitility. We can use the Awaitility DSL to make our test more declarative:

@SpringJUnitConfig(ScheduledConfig.class)
public class ScheduledAwaitilityIntegrationTest {

    @SpyBean 
    private Counter counter;

    @Test
    public void whenWaitOneSecond_thenScheduledIsCalledAtLeastTenTimes() {
        await()
          .atMost(Duration.ONE_SECOND)
          .untilAsserted(() -> verify(counter, atLeast(10)).scheduled());
    }
}

In this case, we inject our bean with the @SpyBean annotation to check the number of times that the scheduled method is called in the period of one second.

6. Conclusion

In this tutorial, we showed some approaches to test scheduled tasks using integration testing and the Awaitility library.

We need to take into account that, although integration tests are good, it’s generally better to focus on the unit testing of the logic inside the scheduled method.

As usual, all the code samples shown in this tutorial are available over on GitHub.

Java Weekly, Issue 268

$
0
0

Here we go…

1. Spring and Java

>> Configuring Spring Boot with application.properties file [dolszewski.com]

A comprehensive guide, including how to avoid common mistakes made by newbies and veterans alike.

>> The best way to call a stored procedure with JPA and Hibernate [vladmihalcea.com]

A quick look at the open cursor trap that’s so easy to fall into that a feature request was opened specifically to avoid it!

>> Vert.x Kotlin Coroutines [blog.codecentric.de]

A brief write-up on how to use Kotlin coroutines for asynchronous callback composition. Very cool.

>> Adopting CI/CD in Your Java Project with the Gitflow Branching Model [infoq.com]

And a new twist on this popular Git branching model, centered around feature segregation on isolated branches.

Also worth reading:

Webinars and presentations:

Time to upgrade:

2. Technical and Musings

>> 4 Techniques Serverless Platforms Use to Balance Performance and Cost [infoq.com]

An in-depth look at how to deal with one of the biggest challenges of FaaS: cold starts.

>> Exposing microservices running in AWS EKS with a microservices/API gateway like Solo Gloo [blog.christianposta.com]

And a quick introduction to Gloo, an open-source API gateway for Amazon EKS with native Kubernetes support.

Also worth reading:

3. Comics

And my favorite Dilberts of the week:

>> Lower the Price [dilbert.com]

>> Social Media Mind Control [dilbert.com]

>> Forming Your Own Opinions [dilbert.com]

4. Pick of the Week

Last week, I announced my first new course in over 2 years – Learn Spring.

The announcement period ends on the 22nd, so if you’re working with Spring, definitely have a look at the course before next Friday:

>> Learn Spring

Creating a SOAP Web Service with Spring

$
0
0

1. Overview

In this tutorial, we’ll see how to create a SOAP-based web service with Spring Boot Starter Web Services.

2. SOAP Web Services

A web service is, in short, a machine-to-machine, platform independent service that allows communication over a network.

SOAP is a messaging protocol. Messages (requests and responses) are XML documents over HTTPThe XML contract is defined by the WSDL (Web Services Description Language). It provides a set of rules to define the messages, bindings, operations, and location of the service.

The XML used in SOAP can become extremely complex. For this reason, it is best to use SOAP with a framework like JAX-WS or Spring, as we’ll see in this tutorial.

3. Contract-First Development Style

There are two possible approaches when creating a web service: Contract-Last and Contract-First. When we use a contract-last approach, we start with the Java code, and we generate the web service contract (WSDL) from the classes. When using contract-first, we start with the WSDL contract, from which we generate the Java classes.

Spring-WS only supports the contract-first development style.

4. Setting Up the Spring Boot Project

We’re going to create a Spring Boot project where we’ll define our SOAP WS server.

4.1. Maven Dependencies

Let’s start by adding the spring-boot-starter-parent to our project:

<parent>
    <groupId>org.springframework.boot</groupId>
    <artifactId>spring-boot-starter-parent</artifactId>
    <version>2.1.2.RELEASE</version>
</parent>

Next, let’s add the spring-boot-starter-web-services and wsdl4j dependencies:

<dependency>
    <groupId>org.springframework.boot</groupId>
    <artifactId>spring-boot-starter-web-services</artifactId>
</dependency>
<dependency>
    <groupId>wsdl4j</groupId>
    <artifactId>wsdl4j</artifactId>
</dependency>

4.2. The XSD File

The contract-first approach requires us to create the domain (methods and parameters) for our service first. We’re going to use an XML schema file (XSD) that Spring-WS will export automatically as a WSDL:

<?xml version="1.0" encoding="UTF-8"?>
<xs:schema xmlns:xs="http://www.w3.org/2001/XMLSchema" xmlns:tns="http://www.baeldung.com/springsoap/gen"
           targetNamespace="http://www.baeldung.com/springsoap/gen" elementFormDefault="qualified">

    <xs:element name="getCountryRequest">
        <xs:complexType>
            <xs:sequence>
                <xs:element name="name" type="xs:string"/>
            </xs:sequence>
        </xs:complexType>
    </xs:element>

    <xs:element name="getCountryResponse">
        <xs:complexType>
            <xs:sequence>
                <xs:element name="country" type="tns:country"/>
            </xs:sequence>
        </xs:complexType>
    </xs:element>

    <xs:complexType name="country">
        <xs:sequence>
            <xs:element name="name" type="xs:string"/>
            <xs:element name="population" type="xs:int"/>
            <xs:element name="capital" type="xs:string"/>
            <xs:element name="currency" type="tns:currency"/>
        </xs:sequence>
    </xs:complexType>

    <xs:simpleType name="currency">
        <xs:restriction base="xs:string">
            <xs:enumeration value="GBP"/>
            <xs:enumeration value="EUR"/>
            <xs:enumeration value="PLN"/>
        </xs:restriction>
    </xs:simpleType>
</xs:schema>

In this file, we see the format of the getCountryRequest web service request. We define it to accept one parameter of the type string.

Next, we define the format of the response, which contains an object of the type country.

At last, we see the currency object, used within the country object.

4.3. Generate the Domain Java Classes

We’re now going to generate the Java classes from the XSD file defined in the previous section. The jaxb2-maven-plugin will do this automatically during build time. The plugin uses the XJC tool as code generation engine. XJC compiles the XSD schema file into fully annotated Java classes.

Let’s add and configure the plugin in our pom.xml:

<plugin>
    <groupId>org.codehaus.mojo</groupId>
    <artifactId>jaxb2-maven-plugin</artifactId>
    <version>1.6</version>
    <executions>
        <execution>
            <id>xjc</id>
            <goals>
                <goal>xjc</goal>
            </goals>
        </execution>
    </executions>
    <configuration>
        <schemaDirectory>${project.basedir}/src/main/resources/</schemaDirectory>
        <outputDirectory>${project.basedir}/src/main/java</outputDirectory>
        <clearOutputDir>false</clearOutputDir>
    </configuration>
</plugin>

Here we notice two important configurations:

  • <schemaDirectory>${project.basedir}/src/main/resources</schemaDirectory> – The location of the XSD file
  • <outputDirectory>${project.basedir}/src/main/java</outputDirectory> – Where we want our Java code to be generated to

To generate the Java classes, we could simply use the xjc tool from our Java installation. Though in our Maven project things are even more simple, as the classes will be automatically generated during the usual Maven build:

mvn compile

4.4. Add the SOAP Web Service Endpoint

The SOAP web service endpoint class will handle all the incoming requests for the service. It will initiate the processing and will send the response back.

Before defining this, we create a Country repository in order to provide data to the web service.

@Component
public class CountryRepository {

    private static final Map<String, Country> countries = new HashMap<>();

    @PostConstruct
    public void initData() {
        // initialize countries map
    }

    public Country findCountry(String name) {
        return countries.get(name);
    }
}

Next, let’s configure the endpoint:

@Endpoint
public class CountryEndpoint {

    private static final String NAMESPACE_URI = "http://www.baeldung.com/springsoap/gen";

    private CountryRepository countryRepository;

    @Autowired
    public CountryEndpoint(CountryRepository countryRepository) {
        this.countryRepository = countryRepository;
    }

    @PayloadRoot(namespace = NAMESPACE_URI, localPart = "getCountryRequest")
    @ResponsePayload
    public GetCountryResponse getCountry(@RequestPayload GetCountryRequest request) {
        GetCountryResponse response = new GetCountryResponse();
        response.setCountry(countryRepository.findCountry(request.getName()));

        return response;
    }
}

Here are a few details to notice:

  • @Endpoint – registers the class with Spring WS as a Web Service Endpoint
  • @PayloadRootdefines the handler method according to the namespace and localPart attributes
  • @ResponsePayload – indicates that this method returns a value to be mapped to the response payload
  • @RequestPayload – indicates that this method accepts a parameter to be mapped from the incoming request

4.5. The SOAP Web Service Configuration Beans

Let’s now create a class for configuring the Spring message dispatcher servlet to receive the request:

@EnableWs
@Configuration
public class WebServiceConfig extends WsConfigurerAdapter {
    // bean definitions
}

@EnableWs enables SOAP Web Service features in this Spring Boot application. The WebServiceConfig class extends the WsConfigurerAdapter base class, which configures the annotation-driven Spring-WS programming model.

Let’s create a MessageDispatcherServlet which is used for handling SOAP requests:

@Bean
public ServletRegistrationBean messageDispatcherServlet(ApplicationContext applicationContext) {
    MessageDispatcherServlet servlet = new MessageDispatcherServlet();
    servlet.setApplicationContext(applicationContext);
    servlet.setTransformWsdlLocations(true);
    return new ServletRegistrationBean(servlet, "/ws/*");
}

We set the injected ApplicationContext object of the servlet so that Spring-WS can find other Spring beans.

We also enable the WSDL location servlet transformation. This transforms the location attribute of soap:address in the WSDL so that it reflects the URL of the incoming request.

Finally, let’s create a DefaultWsdl11Definition object. This exposes a standard WSDL 1.1 using an XsdSchema. The WSDL name will be the same as the bean name.

@Bean(name = "countries")
public DefaultWsdl11Definition defaultWsdl11Definition(XsdSchema countriesSchema) {
    DefaultWsdl11Definition wsdl11Definition = new DefaultWsdl11Definition();
    wsdl11Definition.setPortTypeName("CountriesPort");
    wsdl11Definition.setLocationUri("/ws");
    wsdl11Definition.setTargetNamespace("http://www.baeldung.com/springsoap/gen");
    wsdl11Definition.setSchema(countriesSchema);
    return wsdl11Definition;
}

@Bean
public XsdSchema countriesSchema() {
    return new SimpleXsdSchema(new ClassPathResource("countries.xsd"));
}

5. Testing the SOAP Project

Once the project configuration has been completed, we’re ready to test it.

5.1. Build and Run the Project

It would be possible to create a WAR file and deploy it to an external application server. We’ll instead use Spring Boot, which is a faster and easier way to get the application up and running.

First, we add the following class to make the application executable:

@SpringBootApplication
public class Application {
    public static void main(String[] args) {
        SpringApplication.run(Application.class, args);
    }
}

Notice that we’re not using any XML files (like web.xml) to create this application. It’s all pure Java.

Now we’re ready to build and run the application:

mvn spring-boot:run

To check if the application is running properly, we can open the WSDL through the URL: http://localhost:8080/ws/countries.wsdl

5.2. Test a SOAP Request

To test a request, we create the following file and name it request.xml:

<soapenv:Envelope xmlns:soapenv="http://schemas.xmlsoap.org/soap/envelope/"
                  xmlns:gs="http://www.baeldung.com/springsoap/gen">
    <soapenv:Header/>
    <soapenv:Body>
        <gs:getCountryRequest>
            <gs:name>Spain</gs:name>
        </gs:getCountryRequest>
    </soapenv:Body>
</soapenv:Envelope>

To send the request to our test server, we could use external tools like SoapUI or the Google Chrome extension Wizdler. Another way is to run the following command in our shell:

curl --header "content-type: text/xml" -d @request.xml http://localhost:8080/ws

The resulting response might not be easy to read without indentation or line breaks.

To see it formatted, we can copy paste it to our IDE or another tools. If we’ve installed xmllib2, we can pipe the output of our curl command to xmllint:

curl [command-line-options] | xmllint --format -

The response should contain information about Spain:

<SOAP-ENV:Envelope xmlns:SOAP-ENV="http://schemas.xmlsoap.org/soap/envelope/">
<SOAP-ENV:Header/>
<SOAP-ENV:Body>
    <ns2:getCountryResponse xmlns:ns2="http://www.baeldung.com/springsoap/gen">
        <ns2:country>
            <ns2:name>Spain</ns2:name>
            <ns2:population>46704314</ns2:population>
            <ns2:capital>Madrid</ns2:capital>
            <ns2:currency>EUR</ns2:currency>
        </ns2:country>
    </ns2:getCountryResponse>
</SOAP-ENV:Body>
</SOAP-ENV:Envelope>

6. Conclusion

In this article, we learned how to create a SOAP web service using Spring Boot. We also learned how to generate Java code from an XSD file, and we saw how to configure the Spring beans needed to process the SOAP requests.

The complete source code is available over on GitHub.

Hibernate Aggregate Functions

$
0
0

1. Overview

Hibernate aggregate functions calculate the final result using the property values of all objects satisfying the given query criteria.

Hibernate Query Language (HQL) supports various aggregate functions – min(), max(), sum(), avg(), and count() in the SELECT statement. Just like any other SQL keyword, usage of these functions is case-insensitive.

In this quick tutorial, we’ll explore how to use them. Please note that in the examples below we use either the primitive or wrapper types to store the result of aggregate functions. HQL supports both, so it’s a matter of choosing which one to use.

2. Initial Setup

Let’s start by defining a Student entity:

@Entity
public class Student {

    @Id
    @GeneratedValue(strategy = GenerationType.SEQUENCE)
    private long studentId;

    private String name;

    private int age;

    // constructor, getters and setters
}

And populating our database with some students:

public class AggregateFunctionsIntegrationTest {

    private static Session session;
    private static Transaction transaction;

    @BeforeClass
    public static final void setup() throws HibernateException, IOException {
        session = HibernateUtil.getSessionFactory()
          .openSession();
        transaction = session.beginTransaction();

        session.save(new Student("Jonas", 22, 12f));
        session.save(new Student("Sally", 20, 34f));
        session.save(new Student("Simon", 25, 45f));
        session.save(new Student("Raven", 21, 43f));
        session.save(new Student("Sam", 23, 33f));

    }

}

Note that our studentId field has been populated using the SEQUENCE generation strategy.

We can learn more about this in our tutorial on Hibernate Identifier Generation Strategies.

3. min()

Now, suppose we want to find the minimum age among all the students stored in our Student table. We can easily do it by using the min() function:

@Test
public void whenMinAge_ThenReturnValue() {
    int minAge = (int) session.createQuery("SELECT min(age) from Student")
      .getSingleResult();
    assertThat(minAge).isEqualTo(20);
}

The getSingleResult() method returns an Object type. So, we have downcasted the output to an int.

4. max()

Similar to the min() function, we have a max() function:

@Test
public void whenMaxAge_ThenReturnValue() {
    int maxAge = (int) session.createQuery("SELECT max(age) from Student")
      .getSingleResult();
    assertThat(maxAge).isEqualTo(25);
}

Here again, the result is downcasted to an int type.

The min() and max() functions’ return type depends on the field in the context. For us, it’s returning an integer, as the Student’s age is an int type attribute.

5. sum()

We can use the sum() function to find the sum of all ages:

@Test
public void whenSumOfAllAges_ThenReturnValue() {
    Long sumOfAllAges = (Long) session.createQuery("SELECT sum(age) from Student")
      .getSingleResult();
    assertThat(sumOfAllAges).isEqualTo(111);
}

Depending on the field’s data type, the sum() function returns either a Long or a Double.

6. avg()

Similarly, we can use the avg() function to find the average age:

@Test
public void whenAverageAge_ThenReturnValue() {
    Double avgAge = (Double) session.createQuery("SELECT avg(age) from Student")
      .getSingleResult();
    assertThat(avgAge).isEqualTo(22.2);
}

The avg() function always returns a Double value.

7. count()

As in the native SQL, HQL also provides a count() function. Let’s find the number of records in our Student table:

@Test
public void whenCountAll_ThenReturnValue() {
    Long totalStudents = (Long) session.createQuery("SELECT count(*) from Student")
      .getSingleResult();
    assertThat(totalStudents).isEqualTo(5);
}

The count() function returns a Long type.

We can use any of the available variations of the count() function – count(*), count(…), count(distinct …), or count(all …). Each one of them is semantically equivalent to its native SQL counterpart.

8. Conclusion

In this tutorial, we briefly covered the types of aggregate functions available in Hibernate. Hibernate aggregate functions are similar to those available in plain-old SQL.

As usual, the complete source code is available over on Github.

Fixing 401s with CORS Preflights and Spring Security

$
0
0

1. Overview

In this short tutorial, we’re going to learn how to solve the error “Response for preflight has invalid HTTP status code 401”, which can occur in applications that support cross-origin communication and use Spring Security.

First, we’ll see what cross-origin requests are and then we’ll fix a problematic example.

2. Cross-Origin Requests

Cross-origin requests, in short, are HTTP requests where the origin and the target of the request are different. This is the case, for instance, when a web application is served from one domain and the browser sends an AJAX request to a server in another domain.

To manage cross-origin requests, the server needs to enable a particular mechanism known as CORS, or Cross-Origin Resource Sharing.

The first step in CORS is an OPTIONS request to determine whether the target of the request supports it. This is called a pre-flight request.

The server can then respond to the pre-flight request with a collection of headers:

  • Access-Control-Allow-Origin: Defines which origins may have access to the resource. A ‘*’ represents any origin
  • Access-Control-Allow-Methods: Indicates the allowed HTTP methods for cross-origin requests
  • Access-Control-Allow-Headers: Indicates the allowed request headers for cross-origin requests
  • Access-Control-Max-Age: Defines the expiration time of the result of the cached preflight request

So, if the pre-flight request doesn’t meet the conditions determined from these response headers, the actual follow-up request will throw errors related to the cross-origin request.

It’s easy to add CORS support to our Spring-powered service, but if configured incorrectly, this pre-flight request will always fail with a 401.

3. Creating a CORS-enabled REST API

To simulate the problem, let’s first create a simple REST API that supports cross-origin requests:

@RestController
@CrossOrigin("http://localhost:4200")
public class ResourceController {

    @GetMapping("/user")
    public String user(Principal principal) {
        return principal.getName();
    }
}

The @CrossOrigin annotation makes sure that our APIs are accessible only from the origin mentioned in its argument.

4. Securing our REST API

Let’s now secure our REST API with Spring Security:

@EnableWebSecurity
public class WebSecurityConfig extends WebSecurityConfigurerAdapter {

    @Override
    protected void configure(HttpSecurity http) throws Exception {
        http
            .authorizeRequests()
                .anyRequest().authenticated()
                .and()
            .httpBasic();
    }
}

In this configuration class, we’ve enforced authorization to all incoming requests. As a result, it will reject all requests without a valid authorization token.

5. Making a Pre-flight Request

Now that we’ve created our REST API, let’s try a pre-flight request using curl:

curl -v -H "Access-Control-Request-Method: GET" -H "Origin: http://localhost:4200" -X OPTIONS http://localhost:8080/user
...
< HTTP/1.1 401
...
< WWW-Authenticate: Basic realm="Realm"
...
< Vary: Origin
< Vary: Access-Control-Request-Method
< Vary: Access-Control-Request-Headers
< Access-Control-Allow-Origin: http://localhost:4200
< Access-Control-Allow-Methods: POST
< Access-Control-Allow-Credentials: true
< Allow: GET, HEAD, POST, PUT, DELETE, TRACE, OPTIONS, PATCH
...

From the output of this command, we can see that the request was denied with a 401.

Since this is a curl command, we won’t see the error “Response for preflight has invalid HTTP status code 401” in the output.

But we can reproduce this exact error by creating a front end application that consumes our REST API from a different domain and running it in a browser.

6. The Solution

We haven’t explicitly excluded the preflight requests from authorization in our Spring Security configuration. Remember that Spring Security secures all endpoints by default.

As a result, our API expects an authorization token in the OPTIONS request as well.

Spring provides an out of the box solution to exclude OPTIONS requests from authorization checks:

@EnableWebSecurity
public class WebSecurityConfig extends WebSecurityConfigurerAdapter {
    @Override
    protected void configure(HttpSecurity http) throws Exception {
        // ...
        http.cors();
    }
}

The cors() method will add the Spring-provided CorsFilter to the application context which in turn bypasses the authorization checks for OPTIONS requests.

Now we can test our application again and see that it’s working.

7. Conclusion

In this short article, we’ve learned how to fix the error “Response for preflight has invalid HTTP status code 401” which is linked with Spring Security and cross-origin requests.

Note that, with the example, the client and the API should run on different domains or ports to recreate the problem. For instance, we can map the default hostname to the client and the machine IP address to our REST API when running on a local machine.

As always, the example shown in this tutorial can be found over on Github.


Determine If All Elements Are the Same in a Java List

$
0
0

1. Overview

In this quick tutorial, we’ll find out how to determine if all the elements in a List are the same.

We’ll also look at the time complexity of each solution using Big O notation, giving us the worst case scenario.

2. Example

Let’s suppose we have the following 3 lists:

notAllEqualList = Arrays.asList("Jack", "James", "Sam", "James");
emptyList = Arrays.asList();
allEqualList = Arrays.asList("Jack", "Jack", "Jack", "Jack");

Our task is to propose different solutions that return true only for emptyList and allEqualList.

3. Basic Looping

First, it’s true that for all elements to be equal, they all have to equal the first element. Let’s take advantage of that in a loop:

public boolean verifyAllEqualUsingALoop(List<String> list) {
    for (String s : list) {
        if (!s.equals(list.get(0)))
            return false;
    }
    return true;
}

This is nice because, while the time complexity is O(n), it may often exit early.

4. HashSet

We can also use a HashSet since all its elements are distinct.  If we convert a List to a HashSet and the resulting size is less than or equal to 1, then we know that all elements in the list are equal:

public boolean verifyAllEqualUsingHashSet(List<String> list) {
    return new HashSet<String>(list).size() <= 1;
}

Converting a List to HashSet costs O(n) time while calling size takes O(1). Thus, we still have a total time complexity of O(n).

5. Collections API

Another solution is to use the frequency(Collection c, Object o) method of the Collections API. This method returns the number of elements in a Collection c matching an Object o.

So, if the frequency result is equal to the size of the list, we know that all the elements are equal:

public boolean verifyAllEqualUsingFrequency(List<String> list) {
    return list.isEmpty() || Collections.frequency(list, list.get(0)) == list.size();
}

Similar to the previous solutions, the time complexity is O(n) since internally, Collections.frequency() uses basic looping.

6. Streams

The Stream API in Java 8 gives us even more alternative ways of detecting whether all items in a list are equal.

6.1. distinct()

Let’s look at one particular solution making use of the distinct() method.

To verify if all the elements in a list are equal, we count the distinct elements of its stream:

public boolean verifyAllEqualUsingStream(List<String> list) {
    return list.stream()
      .distinct()
      .count() <= 1;
}

If the count of this stream is smaller or equal to 1, then all the elements are equal and we return true.

The total cost of the operation is O(n), which is the time taken to go through all the stream elements.

6.2. allMatch()

The Stream API’s allMatch() method provides a perfect solution to determine whether all elements of this stream match the provided predicate:

public boolean verifyAllEqualAnotherUsingStream(List<String> list) {
    return list.isEmpty() || list.stream()
      .allMatch(list.get(0)::equals);
}

Similar to the previous example using streams, this one has an O(n) time complexity, which is the time to traverse the whole stream.

7. Third-Party Libraries

If we’re stuck on an earlier version of Java and cannot use the Stream API, we can make use of third-party libraries such as Google Guava and Apache Commons.

Here, we have two solutions that are very much alike, iterating through a list of elements and matching it with the first element. Thus, we can easily calculate the time complexity to be O(n).

7.1. Maven Dependencies

To use either, we can add either guava or commons-collections4 respectively to our project:

<dependency>
    <groupId>com.google.guava</groupId>
    <artifactId>guava</artifactId>
    <version>23.0</version>
</dependency>
<dependency>
    <groupId>org.apache.commons</groupId>
    <artifactId>commons-collections4</artifactId>
    <version>4.1</version>
</dependency>

7.2. Google Guava

In Google Guava, the static method Iterables.all() returns true if all elements in the list satisfy the predicate:

public boolean verifyAllEqualUsingGuava(List<String> list) {
    return Iterables.all(list, new Predicate<String>() {
        public boolean apply(String s) {
            return s.equals(list.get(0));
        }
    });
}

7.3. Apache Commons

Similarly, the Apache Commons library also provides a utility class IterableUtils with a set of static utility methods to operate on Iterable instances.

In particular, the static method IterableUtils.matchesAll() returns true if all elements in the list satisfy the predicate:

public boolean verifyAllEqualUsingApacheCommon(List<String> list) {
    return IterableUtils.matchesAll(list, new org.apache.commons.collections4.Predicate<String>() {
        public boolean evaluate(String s) {
            return s.equals(list.get(0));
        }
    });
}

8. Conclusion

In this article, we’ve learned different ways of verifying whether all elements in a List are equal starting with simple Java functionality and then showing alternative ways using the Stream API and the third-party libraries Google Guava and Apache Commons.

We have also learned that each of the solutions gives us the same time complexity of O(n). However, it’s up to us to choose the best one according to how and where it will be used.

And make sure to check out the complete set of samples over on GitHub.

Working With Maps Using Streams

$
0
0

1. Introduction

In this tutorial, we’ll discuss some examples of how to use Java Streams to work with Maps. It’s worth noting that some of these exercises could be solved using a bidirectional Map data structure, but we’re interested here in a functional approach.

First, we explain the basic idea we’ll be using to work with Maps and Streams. Then we present a couple of different problems related to Maps and their concrete solutions using Streams.

2. Basic Idea

The principal thing to notice is that Streams are sequences of elements which can be easily obtained from a Collection.

Maps have a different structure, with a mapping from keys to values, without sequence. This doesn’t mean that we can’t convert a Map structure into different sequences which then allow us to work in a natural way with the Stream API.

Let’s see ways of obtaining different Collections from a Map, which we can then pivot into a Stream:

Map<String, Integer> someMap = new HashMap<>();

We can obtain a set of key-value pairs:

Set<Map.Entry<String, Integer>> entries = someMap.entrySet();

We can also get the key set associated with the Map:

Set<String> keySet = someMap.keySet();

Or we could work directly with the set of values:

Collection<Integer> values = someMap.values();

These each give us an entry point to process those collections by obtaining streams from them:

Stream<Map.Entry<String, Integer>> entriesStream = entries.stream();
Stream<Integer> valuesStream = values.stream();
Stream<String> keysStream = keySet.stream();

3. Getting a Map‘s Keys Using Streams

3.1. Input Data

Let’s assume we have a Map:

Map<String, String> books = new HashMap<>();
books.put("978-0201633610", "Design patterns : elements of reusable object-oriented software");
books.put("978-1617291999", "Java 8 in Action: Lambdas, Streams, and functional-style programming");
books.put("978-0134685991", "Effective Java");

We are interested in finding the ISBN for the book with the title “Effective Java”.

3.2. Retrieving a Match

Since the book title could not exist in our Map, we want to be able to indicate there is no associated ISBN for it. We can use an Optional  to express that:

Let’s assume for this example that we are interested in any key for a book matching that title:

Optional<String> optionalIsbn = books.entrySet().stream()
  .filter(e -> "Effective Java".equals(e.getValue()))
  .map(Map.Entry::getKey)
  .findFirst();

assertEquals("978-0134685991", optionalIsbn.get());

Let’s analyze the code. First, we obtain the entrySet from the Map, as we saw previously.

We want to only consider the entries with “Effective Java” as the title, so the first intermediate operation will be a filter.

We’re not interested in the whole Map entry, but in the key of each entry. So, the next chained intermediate operation does just that: it is a map operation that will generate a new stream as output which will contain only the keys for the entries that matched the title we were looking for.

As we only want one result, we can apply the findFirst() terminal operation, which will provide the initial value in the Stream as an Optional object.

Let’s see a case in which a title does not exist:

Optional<String> optionalIsbn = books.entrySet().stream()
  .filter(e -> "Non Existent Title".equals(e.getValue()))
  .map(Map.Entry::getKey).findFirst();

assertEquals(false, optionalIsbn.isPresent());

3.3. Retrieving Multiple Results

Let’s change the problem now to see how we could deal with returning multiple results instead of one.

To have multiple results returned, let’s add the following book to our Map:

books.put("978-0321356680", "Effective Java: Second Edition");

So now, if we look for all books that start with “Effective Java”, we’ll get more than one result back:

List<String> isbnCodes = books.entrySet().stream()
  .filter(e -> e.getValue().startsWith("Effective Java"))
  .map(Map.Entry::getKey)
  .collect(Collectors.toList());

assertTrue(isbnCodes.contains("978-0321356680"));
assertTrue(isbnCodes.contains("978-0134685991"));

What we have done in this case is to replace the filter condition to verify if the value in the Map starts with “Effective Java” instead of comparing for String equality.

This time, we collect the results – instead of picking the first – putting the matches into a List.

4. Getting a Map‘s Values Using Streams

Now, let’s focus on a different problem with maps: Instead of obtaining ISBNs based on the titles, we’ll try and get titles based on the ISBNs.

Let’s use the original Map. We want to find titles for which their ISBN start with “978-0”.

List<String> titles = books.entrySet().stream()
  .filter(e -> e.getKey().startsWith("978-0"))
  .map(Map.Entry::getValue)
  .collect(Collectors.toList());

assertEquals(2, titles.size());
assertTrue(titles.contains("Design patterns : elements of reusable object-oriented software"));
assertTrue(titles.contains("Effective Java"));

This solution is similar to the solutions to our previous set of problems – we stream the entry set, and then filter, map, and collect.

And like before, if we wanted to return only the first match, we could after the map method call the findFirst() method instead of collecting all the results in a List.

5. Conclusion

We’ve shown how to process a Map in a functional way.

In particular, we have seen that once we switch to using the associated collections to Maps, the processing using Streams becomes much easier and intuitive.

And, of course, all the examples can be found in the GitHub project.

Hibernate Query Plan Cache

$
0
0

1. Introduction

In this quick tutorial, we’ll explore the query plan cache provided by Hibernate and its impact on performance.

2. Query Plan Cache

Every JPQL query or Criteria query is parsed into an Abstract Syntax Tree (AST) prior to execution so that Hibernate can generate the SQL statement. Since query compilation takes time, Hibernate provides a QueryPlanCache for better performance.

For native queries, Hibernate extracts information about the named parameters and query return type and stores it in the ParameterMetadata.

For every execution, Hibernate first checks the plan cache, and only if there’s no plan available, it generates a new plan and stores the execution plan in the cache for future reference.

3. Configuration

The query plan cache configuration is controlled by the following properties:

  • hibernate.query.plan_cache_max_size – controls the maximum number of entries in the plan cache (defaults to 2048)
  • hibernate.query.plan_parameter_metadata_max_size – manages the number of ParameterMetadata instances in the cache (defaults to 128)

So, if our application executes more queries than the size of query plan cache, Hibernate will have to spend extra time in compiling queries. Hence, overall query execution time will increase.

4. Setting Up the Test Case

As the saying goes in the industry, when it comes to performance, never trust the claims. So, let’s test how the query compilation time varies as we change the cache settings.

4.1. Entity Classes Involved in Test

Let’s start by having a look at the entities we’ll use in our example, DeptEmployee and Department:

@Entity
public class DeptEmployee {
    @Id
    @GeneratedValue(strategy = GenerationType.SEQUENCE)
    private long id;

    private String employeeNumber;

    private String title;

    private String name;

    @ManyToOne
    private Department department;

   // standard getters and setters
}
@Entity
public class Department {
    @Id
    @GeneratedValue(strategy = GenerationType.SEQUENCE)
    private long id;

    private String name;

    @OneToMany(mappedBy="department")
    private List<DeptEmployee> employees;

    // standard getters and setters
}

4.2. Hibernate Queries Involved in Test

We’re interested in measuring the overall query compilation time only, so, we can pick any combination of valid HQL queries for our test.

For the purpose of this article, we’ll be using the following three queries:

  •  findEmployeesByDepartmentName
session.createQuery("SELECT e FROM DeptEmployee e " +
  "JOIN e.department WHERE e.department.name = :deptName")
  .setMaxResults(30)
  .setHint(QueryHints.HINT_FETCH_SIZE, 30);
  • findEmployeesByDesignation
session.createQuery("SELECT e FROM DeptEmployee e " +
  "WHERE e.title = :designation")
  .setHint(QueryHints.SPEC_HINT_TIMEOUT, 1000);
  • findDepartmentOfAnEmployee
session.createQuery("SELECT e.department FROM DeptEmployee e " +
  "JOIN e.department WHERE e.employeeNumber = :empId");

5. Measuring the Performance Impact

5.1. Benchmark Code Setup

We’ll vary the cache size from one to three – after that, all three of our queries will already be in the cache. Therefore, there’s no point in increasing it further:

@State(Scope.Thread)
public static class QueryPlanCacheBenchMarkState {
    @Param({"1", "2", "3"})
    public int planCacheSize;
    
    public Session session;

    @Setup
    public void stateSetup() throws IOException {
       session = initSession(planCacheSize);
    }

    private Session initSession(int planCacheSize) throws IOException {
        Properties properties = HibernateUtil.getProperties();
        properties.put("hibernate.query.plan_cache_max_size", planCacheSize);
        properties.put("hibernate.query.plan_parameter_metadata_max_size", planCacheSize);
        SessionFactory sessionFactory = HibernateUtil.getSessionFactoryByProperties(properties);
        return sessionFactory.openSession();
    }
    //teardown...
}

5.2. Code Under Test

Next, let’s have a look at the benchmark code used to measure the average time taken by Hibernate while compiling the queries:

@Benchmark
@BenchmarkMode(Mode.AverageTime)
@OutputTimeUnit(TimeUnit.MICROSECONDS)
@Fork(1)
@Warmup(iterations = 2)
@Measurement(iterations = 5)
public void givenQueryPlanCacheSize_thenCompileQueries(
  QueryPlanCacheBenchMarkState state, Blackhole blackhole) {

    Query query1 = findEmployeesByDepartmentNameQuery(state.session);
    Query query2 = findEmployeesByDesignationQuery(state.session);
    Query query3 = findDepartmentOfAnEmployeeQuery(state.session);

    blackhole.consume(query1);
    blackhole.consume(query2);
    blackhole.consume(query3);
}

Note that we’ve used JMH to write our benchmark.

5.3. Benchmark Results

Now, let’s visualize the compilation time vs cache size graph that we prepared by running the above benchmark:

As we can clearly see in the graph, increasing the number of queries that Hibernate is allowed to cache consequently reduces the compilation time.

For a cache size of one, the average compilation time is the highest at 709 microseconds, then it decreases to 409 microseconds for a cache size of two, and all the way to 0.637 microseconds for a cache size of three.

6. Using Hibernate Statistics

To monitor the effectiveness of the query plan cache, Hibernate exposes the following methods via the Statistics interface:

  • getQueryPlanCacheHitCount
  • getQueryPlanCacheMissCount

So, if the hit count is high and the miss count is low, then most of the queries are served from the cache itself, instead of being compiled over and over again.

7. Conclusion

In this article, we learned what the query plan cache is in Hibernate and how it can contribute to the overall performance of the application. Overall, we should try to keep the query plan cache size in accordance to the number of queries running in the application.

As always, the source code of this tutorial is available over on GitHub.

Java Valhalla Project

$
0
0

1. Overview

In this tutorial, we’ll look at Project Valhalla – the historical reasons for it, the current state of development and what it brings to the table for the day-to-day Java developer once it’s released.

2. Motivation and Reasons for the Valhalla Project

In one of his talks, Brian Goetz, Java language architect at Oracle, said one of the main motivations for the Valhalla Project is the desire to adapt the Java language and runtime to modern hardware. When the Java language was conceived (roughly 25 years ago at the time of writing), the cost of a memory fetch and an arithmetic operation was roughly the same.

Nowadays, this has shifted, with memory fetch operations being from 200 to 1,000 more expensive than arithmetic operations. In terms of language design, this means that indirections leading to pointer fetches have a detrimental effect on overall performance.

Since most Java data structures in an application are objects, we can consider Java a pointer-heavy language (although we usually don’t see or manipulate them directly). This pointer-based implementation of objects is used to enable object identity, which itself is leveraged for language features such as polymorphism, mutability and locking. Those features come by default for every object, no matter if they are really needed or not.

Following the chain of identity leading to pointers and pointers leading to indirections, with indirections having performance drawbacks, a logical conclusion is to remove those for data structures that have no need for them. This is where value types come into play.

3. Value Types

The idea of value types is to represent pure data aggregates. This comes with dropping the features of regular objects. So, we have pure data, without identity. This means, of course, that we’re also losing features we could implement using object identity. Consequentially, equality comparison can only happen based on state. Thus, we can’t use representational polymorphism, and we can’t use immutable or non-nullable objects.

Since we don’t have object identity anymore, we can give up on pointers and change the general memory layout of value types, as compared to an object. Let’s look at a comparison of the memory layout between the class Point and the corresponding value type Point. 

The code and the corresponding memory layout of a regular Point class would be:

final class Point {
  final int x;
  final int y;
}

On the other hand, the code and corresponding memory layout of a value type Point would be:

value class Point {
  int x;
  int y
}

This allows the JVM to flatten value types into arrays and objects, as well as into other value types. In the following diagram, we present the negative effect of indirections when we use the Point class in an array:

On the other hand, here we see the corresponding memory structure of a value type Point[]:

It also enables the JVM to pass value types on the stack instead of having to allocate them on the heap. In the end, this means that we’re getting data aggregates that have runtime behavior similar to Java primitives, such as int or float.

But unlike primitives, value types can have methods and fields. We can also implement interfaces and use them as generic types. So we can look at the value types from two different angles:

  • Faster objects
  • User-defined primitives

As additional icing on the cake, we can use value types as generic types without boxing. This directly leads us to the other big Project Valhalla feature: specialized generics.

4. Specialized Generics

When we want to generify over language primitives, we currently use boxed types, such as Integer for int or Float for float. This boxing creates an additional layer of indirection, thereby defeating the purpose of using primitives for performance enhancement in the first place.

Therefore, we see many dedicated specializations for primitive types in existing frameworks and libraries, like IntStream<T> or ToIntFunction<T>. This is done to keep the performance improvement of using primitives.

So, specialized generics is an effort to remove the needs for those “hacks”. Instead, the Java language strives to enable generic types for basically everything: object references, primitives, value types, and maybe even void.

5. Conclusion

We’ve taken a glimpse at the changes that Project Valhalla will bring to the Java language. Two of the main goals are enhanced performance and less leaky abstractions.

The performance enhancements are tackled by flattening object graphs and removing indirections. This leads to more efficient memory layouts and fewer allocations and garbage collections.

The better abstraction comes with primitives and objects having a more similar behavior when used as Generic types.

An early prototype of Project Valhalla, introducing value types into the existing type system, has the code name LW1.

We can find more information about Project Valhalla in the corresponding project page and JEPs:

Creating a Custom Annotation in Java

$
0
0

1. Introduction

Java annotations are a mechanism for adding metadata information to our source code. They are a powerful part of Java, and were added in JDK5. Annotations offer an alternative to the use of XML descriptors and marker interfaces.

Although we can attach them to packages, classes, interfaces, methods, and fields, annotations by themselves have no effect on the execution of a program.

In this tutorial, we’re going to focus on how to create custom annotations, and how to process them. We can read more about annotations in our article on annotation basics.

2. Creating Custom Annotations

We’re going to create three custom annotations with the goal of serializing an object into a JSON string.

We’ll use the first one on the class level, to indicate to the compiler that our object can be serialized. Next, we’ll apply the second one to the fields that we want to include in the JSON string.

Finally, we’ll use the third annotation on the method level, to specify the method that we’ll use to initialize our object.

2.1. Class Level Annotation Example

The first step toward creating a custom annotation is to declare it using the @interface keyword:

public @interface JsonSerializable {
}

The next step is to add meta-annotations to specify the scope and the target of our custom annotation:

@Retention(RetentionPolicy.RUNTIME)
@Target(ElementType.Type)
public @interface JsonSerializable {
}

As we can see, our first annotation has runtime visibility, and we can apply it to types (classes). Moreover, it has no methods, and thus serves as a simple marker to mark classes that can be serialized into JSON.

2.2. Field Level Annotation Example

In the same fashion, we create our second annotation, to mark the fields that we are going to include in the generated JSON:

@Retention(RetentionPolicy.RUNTIME)
@Target(ElementType.FIELD)
public @interface JsonElement {
    public String key() default "";
}

The annotation declares one String parameter with the name “key” and an empty string as the default value.

When creating custom annotations with methods, we should be aware that these methods must have no parameters, and cannot throw an exception. Also, the return types are restricted to primitives, String, Class, enums, annotations, and arrays of these types, and the default value cannot be null.

2.3. Method Level Annotation Example

Let’s imagine that, before serializing an object to a JSON string, we want to execute some method to initialize an object. For that reason, we’re going to create an annotation to mark this method:

@Retention(RetentionPolicy.RUNTIME)
@Target(ElementType.METHOD)
public @interface Init {
}

We declared a public annotation with runtime visibility that we can apply to our classes’ methods.

2.4. Applying Annotations

Now, let’s see how we can use our custom annotations. For instance, let’s imagine that we have an object of type Person that we want to serialize into a JSON string. This type has a method that capitalizes the first letter of the first and last names. We’ll want to call this method before serializing the object:

@JsonSerializable
public class Person {

    @JsonElement
    private String firstName;

    @JsonElement
    private String lastName;

    @JsonElement(key = "personAge")
    private String age;

    private String address;

    @Init
    private void initNames() {
        this.firstName = this.firstName.substring(0, 1).toUpperCase() 
          + this.firstName.substring(1);
        this.lastName = this.lastName.substring(0, 1).toUpperCase() 
          + this.lastName.substring(1);
    }

    // Standard getters and setters
}

By using our custom annotations, we’re indicating that we can serialize a Person object to a JSON string. In addition, the output should contain only the firstName, lastName, and age fields of that object. Moreover, we want the initializeNames() method to be called before serialization.

By setting the key parameter of the @JsonElement annotation to “personAge”, we are indicating that we’ll use this name as the identifier for the field in the JSON output.

For the sake of demonstration, we made initializeNames() private, so we can’t initialize our object by calling it manually, and our constructors aren’t using it either.

3. Processing Annotations

So far, we have seen how to create custom annotations and how to use them to decorate the Person class. Now, we’re going to see how to take advantage of them by using Java’s Reflection API.

The first step will be to check whether our object is null or not, as well as whether its type has the @JsonSerializable annotation or not:

private void checkIfSerializable(Object object) {
    if (Objects.isNull(object)) {
        throw new JsonSerializationException("The object to serialize is null");
    }
        
    Class<?> clazz = object.getClass();
    if (!clazz.isAnnotationPresent(JsonSerializable.class)) {
        throw new JsonSerializationException("The class " 
          + clazz.getSimpleName() 
          + " is not annotated with JsonSerializable");
    }
}

Then, we look for any method with @Init annotation, and we execute it to initialize our object’s fields:

private void initializeObject(Object object) throws Exception {
    Class<?> clazz = object.getClass();
    for (Method method : clazz.getDeclaredMethods()) {
        if (method.isAnnotationPresent(Init.class)) {
            method.setAccessible(true);
            method.invoke(object);
        }
    }
 }

The call of method.setAccessible(true) allows us to execute the private initializeNames() method.

After the initialization, we iterate over our object’s fields, retrieve the key and value of JSON elements, and put them in a map. Then, we create the JSON string from the map:

private String getJsonString(Object object) throws Exception {	
    Class<?> clazz = object.getClass();
    Map<String, String> jsonElementsMap = new HashMap<>();
    for (Field field : clazz.getDeclaredFields()) {
        field.setAccessible(true);
        if (field.isAnnotationPresent(JsonElement.class)) {
            jsonElementsMap.put(getKey(field), (String) field.get(object));
        }
    }		
     
    String jsonString = jsonElementsMap.entrySet()
        .stream()
        .map(entry -> "\"" + entry.getKey() + "\":\"" 
          + entry.getValue() + "\"")
        .collect(Collectors.joining(","));
    return "{" + jsonString + "}";
}

Again, we used field.setAccessible(true) because the Person object’s fields are private.

Our JSON serializer class combines all the above steps:

public class ObjectToJsonConverter {
    public String convertToJson(Object object) throws JsonSerializationException {
        try {
            checkIfSerializable(object);
            initializeObject(object);
            return getJsonString(object);
        } catch (Exception e) {
            throw new JsonSerializationException(e.getMessage());
        }
    }
}

Finally, we run a unit test to validate that our object was serialized as defined by our custom annotations:

@Test
public void givenObjectSerializedThenTrueReturned() throws JsonSerializationException {
    Person person = new Person("soufiane", "cheouati", "34");
    JsonSerializer serializer = new JsonSerializer();
    String jsonString = serializer.serialize(person);
    assertEquals(
      "{\"personAge\":\"34\",\"firstName\":\"Soufiane\",\"lastName\":\"Cheouati\"}",
      jsonString);
}

4. Conclusion

In this article, we saw how to create different types of custom annotations. Then we discussed how to use them to decorate our objects. Finally, we looked at how to process them using Java’s Reflection API.

As always, the complete code is available over on GitHub.

Viewing all 4700 articles
Browse latest View live


<script src="https://jsc.adskeeper.com/r/s/rssing.com.1596347.js" async> </script>