Quantcast
Channel: Baeldung
Viewing all 4731 articles
Browse latest View live

Multi-Release Jar Files

$
0
0

1. Overview

Java is constantly evolving and adding new features to the JDK. And, if we want to use those features in our APIs, then that can obligate downstream dependencies to upgrade their JDK version.

Sometimes, we are forced to wait on using new language features in order to remain compatible.

In this tutorial, though, we’ll learn about Multi-Release JARs (MRJAR) and how they can simultaneously contain implementations compatible with disparate JDK versions.

2. Simple Example

Let’s take a look at a utility class called DateHelper that has a method to check for leap years. Let’s assume that it was written using JDK 7 and built to run on JRE 7+:

public class DateHelper {
    public static boolean checkIfLeapYear(String dateStr) throws Exception {
        logger.info("Checking for leap year using Java 1 calendar API ");

        Calendar cal = Calendar.getInstance();
        cal.setTime(new SimpleDateFormat("yyyy-MM-dd").parse(dateStr));
        int year = cal.get(Calendar.YEAR);

        return (new GregorianCalendar()).isLeapYear(year);
    }
}

The checkIfLeapYear method would be invoked from the main method of our test app:

public class App {
    public static void main(String[] args) throws Exception {
        String dateToCheck = args[0];
        boolean isLeapYear = DateHelper.checkIfLeapYear(dateToCheck);
        logger.info("Date given " + dateToCheck + " is leap year: " + isLeapYear);
    }
}

Let’s fast forward to today.

We know that Java 8 has a more concise way to parse the date. So, we’d like to take advantage of this and rewrite our logic. For this, we need to switch to JDK 8+. However, that would mean our module would stop working on JRE 7 for which it was originally written.

And we don’t want that to happen unless absolutely required.

3. Multi-Release Jar Files

The solution in Java 9 is to leave the original class untouched and instead create a new version using the new JDK and package them together. At runtime, the JVM (version 9 or above) will call any one of these two versions giving more preference to the highest version that the JVM supports.

For example, if an MRJAR contains Java version 7 (default), 9 and 10 of the same class, then JVM 10+ would execute version 10, and JVM 9 would execute version 9. In both cases, the default version is not executed as a more appropriate version exists for that JVM.

Note that the public definitions of the new version of the class should exactly match the original version. In other words, we’re not allowed to add any new public APIs exclusive to a new version.

4. Folder Structure

As classes in Java map directly to files by their names, creating a new version of DateHelper in the same location is not possible. Hence, we need to create them in a separate folder.

Let us start by creating a folder java9 at the same level as java. After that, let’s clone the DateHelper.java file retaining its package folder structure and place it in java9:

src/
    main/
        java/
            com/
                baeldung/
                    multireleaseapp/
                        App.java
                        DateHelper.java
        java9/
            com/
                baeldung/
                    multireleaseapp/
                        DateHelper.java

Some IDEs that don’t yet support MRJARs may throw errors for duplicate DateHelper.java classes.

Also, official support for MRJARs is not yet available in Maven, so we won’t use Maven for our example.

5. Code Changes

Let’s rewrite the logic of the java9 cloned class:

public class DateHelper {
    public static boolean checkIfLeapYear(String dateStr) throws Exception {
        logger.info("Checking for leap year using Java 9 Date Api");
        return LocalDate.parse(dateStr).isLeapYear();
    }
}

Note here that we’re not making any changes to the public method signatures of the cloned class but only changing the inner logic. At the same time, we’re not adding any new public methods.

This is very important because the jar creation will fail if these two rules are not followed.

6. Cross-Compilation in Java

Cross-compilation is the feature in Java that can compile files for running on earlier versions. This means there is no need for us to install separate JDK versions.

Let’s compile our classes using JDK 9 or above.

Firstly, compile the old code for the Java 7 platform:

javac --release 7 -d classes src\main\java\com\baeldung\multireleaseapp\*.java

Secondly, compile the new code for the Java 9 platform:

javac --release 9 -d classes-9 src\main\java9\com\baeldung\multireleaseapp\*.java

The release option is used to indicate the version of Java compiler and target JRE.

7. Creating the MRJAR

Finally, create the MRJAR file using version 9+:

jar --create --file target/mrjar.jar --main-class com.baeldung.multireleaseapp.App
  -C classes . --release 9 -C classes-9 .

The release option followed by a folder name makes the contents of that folder to be packaged inside the jar file under the version number value:

com/
    baeldung/
        multireleaseapp/
            App.class
            DateHelper.class
META-INF/
    versions/
        9/
            com/
                baeldung/
                    multireleaseapp/
                        DateHelper.class
    MANIFEST.MF

The MANIFEST.MF file has the property set to let the JVM know that this is an MRJAR file:

Multi-Release: true

Consequently, the JVM loads the appropriate class at runtime.

Older JVMs ignore the new property that indicates this is an MRJAR file and treat it as a normal JAR file.

8. Testing

Finally, let’s test our jar against Java 7 or 8:

> java -jar target/mrjar.jar "2012-09-22"
Checking for leap year using Java 1 calendar API 
Date given 2012-09-22 is leap year: true

And then, let’s test the jar again against Java 9 or later:

> java -jar target/mrjar.jar "2012-09-22"
Checking for leap year using Java 9 Date Api
Date given 2012-09-22 is leap year: true

9. Conclusion

In this article, we’ve seen how to create a multi-release jar file using a simple example.

As always, the codebase for multi-release-app is available over on GitHub.


Static Methods Behavior in Kotlin

$
0
0

1. Overview

One way in which the Kotlin language differs from Java is that Kotlin doesn’t contain the static keyword that we’re familiar with.

In this quick tutorial, we’ll see a few ways to achieve Java’s static method behavior in Kotlin.

2. Package-Level Functions

Let’s start by creating a LoggingUtils.kt file. Here, we’ll create a very simple method called debug. Since we don’t care much about the functionality inside our method, we’ll just print a simple message.

Since we are defining our method outside of a class, it represents a package-level function:

fun debug(debugMessage : String) {
    println("[DEBUG] $debugMessage")
}

We’ll also see in the decompiled code that our debug method is now declared as static:

public final class LoggingUtilsKt {
    public static final void debug(@NotNull String debugMessage) {
        Intrinsics.checkParameterIsNotNull(debugMessage, "debugMessage");
        String var1 = "[DEBUG] " + debugMessage;
        System.out.println(var1);
    }
}

3. Companion Objects

Kotlin allows us to create objects that are common to all instances of a class – the companion objects. We can create a singleton instance of an object just by adding the keyword companion.

Let’s define our debug method inside a companion object:

class ConsoleUtils {
    companion object {
        fun debug(debugMessage : String) {
            println("[DEBUG] $debugMessage")
        }
    }
}

Our decompiled code shows us that we can access the debug method via the Companion object:

public final class ConsoleUtils {
    public static final ConsoleUtils.Companion Companion
      = new ConsoleUtils.Companion((DefaultConstructorMarker) null);

    public static final class Companion {
        public final void debug(@NotNull String debugMessage) {
            Intrinsics.checkParameterIsNotNull(debugMessage, "debugMessage");
            String var2 = "[DEBUG] " + debugMessage;
            System.out.println(var2);
        }

        private Companion() {}

        public Companion(DefaultConstructorMarker $constructor_marker) {
            this();
        }
    }
}

To avoid calling the resulting instance by the generic name Companion, we can also give a custom name.

Finally, to make the debug method static again, we should use the @JvmStatic annotation:

class ConsoleUtils {
    companion object {
        @JvmStatic
        fun debug(debugMessage : String) {
            println("[DEBUG] $debugMessage")
        }
    }
}

By using it, we’ll end up with an actual static final void debug method in our decompiled code:

public final class ConsoleUtils {
    public static final ConsoleUtils.Companion Companion
      = new ConsoleUtils.Companion((DefaultConstructorMarker) null);

    @JvmStatic
    public static final void debug(@NotNull String debugMessage) {
        Companion.debug(debugMessage);
    }

    public static final class Companion {
        @JvmStatic
        public final void debug(@NotNull String debugMessage) {
            Intrinsics.checkParameterIsNotNull(debugMessage, "debugMessage");
            String var2 = "[DEBUG] " + debugMessage;
            System.out.println(var2);
        }

        private Companion() {}

        public Companion(DefaultConstructorMarker $constructor_marker) {
            this();
        }
    }
}

Now, we’ll be able to access this new method directly via the ConsoleUtils class.

4. Conclusion

In this short tutorial, we saw how to replicate in Kotlin the behavior of Java static methods. We’ve used package-level functions and also companion objects.

The implementation of all of these snippets can be found over on GitHub.

DB Integration Tests with Spring Boot and Testcontainers

$
0
0

1. Overview

Spring Data JPA provides an easy way to create database queries and test them with an embedded H2 database.

But in some cases, testing on a real database is much more profitable, especially if we use provider-dependent queries.

In this tutorial, we’ll demonstrate how to use Testcontainers for integration testing with Spring Data JPA and the PostgreSQL database.

In our previous tutorial, we created some database queries using mainly the @Query annotation, which we’ll now test.

2. Configuration

To use the PostgreSQL database in our tests, we have to add the Testcontainers dependency with test scope and the PostgreSQL driver to our pom.xml:

<dependency>
    <groupId>org.testcontainers</groupId>
    <artifactId>postgresql</artifactId>
    <version>1.10.6</version>
    <scope>test</scope>
</dependency>
<dependency>
    <groupId>org.postgresql</groupId>
    <artifactId>postgresql</artifactId>
    <version>42.2.5</version>
</dependency>

Let’s also create an application.properties file under the test resources directory in which we instruct Spring to use the proper driver class and to create and drop the scheme at each test run:

spring.datasource.driver-class-name=org.postgresql.Driver
spring.jpa.hibernate.ddl-auto=create-drop

3. Single Test Usage

To start using the PostgreSQL instance in a single test class, we have to create a container definition first and then use its parameters to establish a connection:

@RunWith(SpringRunner.class)
@SpringBootTest
@ContextConfiguration(initializers = {UserRepositoryTCIntegrationTest.Initializer.class})
public class UserRepositoryTCIntegrationTest extends UserRepositoryCommonIntegrationTests {

    @ClassRule
    public static PostgreSQLContainer postgreSQLContainer = new PostgreSQLContainer("postgres:11.1")
      .withDatabaseName("integration-tests-db")
      .withUsername("sa")
      .withPassword("sa");

    static class Initializer
      implements ApplicationContextInitializer<ConfigurableApplicationContext> {
        public void initialize(ConfigurableApplicationContext configurableApplicationContext) {
            TestPropertyValues.of(
              "spring.datasource.url=" + postgreSQLContainer.getJdbcUrl(),
              "spring.datasource.username=" + postgreSQLContainer.getUsername(),
              "spring.datasource.password=" + postgreSQLContainer.getPassword()
            ).applyTo(configurableApplicationContext.getEnvironment());
        }
    }
}

In the above example, we used @ClassRule from JUnit to set up a database container before executing test methods. We also created a static inner class that implements ApplicationContextInitializer. As the last step, we applied the @ContextConfiguration annotation to our test class with the initializer class as a parameter.

By performing these three actions, we can set connection properties before the Spring context is published.

Let’s now use two UPDATE queries from the previous article:

@Modifying
@Query("update User u set u.status = :status where u.name = :name")
int updateUserSetStatusForName(@Param("status") Integer status, 
  @Param("name") String name);

@Modifying
@Query(value = "UPDATE Users u SET u.status = ? WHERE u.name = ?", 
  nativeQuery = true)
int updateUserSetStatusForNameNative(Integer status, String name);

And test them with the configured environment:

@Test
@Transactional
public void givenUsersInDB_WhenUpdateStatusForNameModifyingQueryAnnotationJPQL_ThenModifyMatchingUsers(){
    insertUsers();
    int updatedUsersSize = userRepository.updateUserSetStatusForName(0, "SAMPLE");
    assertThat(updatedUsersSize).isEqualTo(2);
}

@Test
@Transactional
public void givenUsersInDB_WhenUpdateStatusForNameModifyingQueryAnnotationNative_ThenModifyMatchingUsers(){
    insertUsers();
    int updatedUsersSize = userRepository.updateUserSetStatusForNameNative(0, "SAMPLE");
    assertThat(updatedUsersSize).isEqualTo(2);
}

private void insertUsers() {
    userRepository.save(new User("SAMPLE", "email@example.com", 1));
    userRepository.save(new User("SAMPLE1", "email2@example.com", 1));
    userRepository.save(new User("SAMPLE", "email3@example.com", 1));
    userRepository.save(new User("SAMPLE3", "email4@example.com", 1));
    userRepository.flush();
}

In the above scenario, the first test ends with success but the second throws InvalidDataAccessResourceUsageException with the message:

Caused by: org.postgresql.util.PSQLException: ERROR: column "u" of relation "users" does not exist

If we’d run the same tests using the H2 embedded database, both tests would complete successfully, but PostgreSQL does not accept aliases in the SET clause. We can quickly fix the query by removing problematic alias:

@Modifying
@Query(value = "UPDATE Users u SET status = ? WHERE u.name = ?", 
  nativeQuery = true)
int updateUserSetStatusForNameNative(Integer status, String name);

This time both tests complete successfully. In this example, we used Testcontainers to identify a problem with the native query which otherwise would be revealed after switching to a real database on production. We should also notice that using JPQL queries is safer in general because Spring translates them properly depending on the database provider used.

4. Shared Database Instance

In the previous paragraph, we described how to use Testcontainers in a single test. In a real case scenario, we’d like to reuse the same database container in multiple tests because of relatively long startup time.

Let’s now create a common class for database container creation by extending PostgreSQLContainer and overriding the start() and stop() methods:

public class BaeldungPostgresqlContainer extends PostgreSQLContainer<BaeldungPostgresqlContainer> {
    private static final String IMAGE_VERSION = "postgres:11.1";
    private static BaeldungPostgresqlContainer container;

    private BaeldungPostgresqlContainer() {
        super(IMAGE_VERSION);
    }

    public static BaeldungPostgresqlContainer getInstance() {
        if (container == null) {
            container = new BaeldungPostgresqlContainer();
        }
        return container;
    }

    @Override
    public void start() {
        super.start();
        System.setProperty("DB_URL", container.getJdbcUrl());
        System.setProperty("DB_USERNAME", container.getUsername());
        System.setProperty("DB_PASSWORD", container.getPassword());
    }

    @Override
    public void stop() {
        //do nothing, JVM handles shut down
    }
}

By leaving the stop() method empty, we allow the JVM to handle the container shutdown. We also implement a simple singleton pattern, in which only the first test triggers container startup, and each subsequent test uses the existing instance. In the start() method we use System#setProperty to set connection parameters as environment variables.

We can now put them in our application.properties file:

spring.datasource.url=${DB_URL}
spring.datasource.username=${DB_USERNAME}
spring.datasource.password=${DB_PASSWORD}

Let’s now use our utility class in the test definition:

@RunWith(SpringRunner.class)
@SpringBootTest
public class UserRepositoryTCAutoIntegrationTest {

    @ClassRule
    public static PostgreSQLContainer postgreSQLContainer = BaeldungPostgresqlContainer.getInstance();

    // tests
}

As in previous examples, we applied the @ClassRule annotation to a field holding the container definition. This way, the DataSource connection properties are populated with correct values before Spring context creation.

We can now implement multiple tests using the same database instance simply by defining a @ClassRule annotated field instantiated with our BaeldungPostgresqlContainer utility class.

5. Conclusion

In this article, we illustrated ways to perform tests on a real database instance using Testcontainers.

We looked at examples of single test usage, using the ApplicationContextInitializer mechanism from Spring, as well as implementing a class for reusable database instantiation.

We also showed how Testcontainers could help in identifying compatibility problems across multiple database providers, especially for native queries.

As always, the complete code used in this article is available over on GitHub.

Types of Strings in Groovy

$
0
0

1. Overview

In this tutorial, we’ll take a closer look at the several types of strings in Groovy, including single-quoted, double-quoted, triple-quoted, and slashy strings.

We’ll also explore Groovy’s string support for special characters, multi-line, regex, escaping, and variable interpolation.

2. Enhancing java.lang.String

It’s probably good to begin by stating that since Groovy is based on Java, it has all of Java’s String capabilities like concatenation, the String API, and the inherent benefits of the String constant pool because of that.

Let’s first see how Groovy extends some of these basics.

2.1. String Concatenation

String concatenation is just a combination of two strings:

def first = 'first'
def second = "second"        
def concatenation = first + second
assertEquals('firstsecond', concatenation)

Where Groovy builds on this is with its several other string types, which we’ll take a look at in a moment. Note that we can concatenate each type interchangeably.

2.2. String Interpolation

Now, Java offers some very basic templating through printf, but Groovy goes deeper, offering string interpolation, the process of templating strings with variables:

def name = "Kacper"
def result = "Hello ${name}!"
assertEquals("Hello Kacper!", result.toString())

While Groovy supports concatenation for all its string types, it only provides interpolation for certain types.

2.3. GString

But hidden in this example is a little wrinkle – why are we calling toString()?

Actually, result isn’t of type String, even if it looks like it.

Because the String class is final, Groovy’s string class that supports interpolation, GString, doesn’t subclass it. In other words, for Groovy to provide this enhancement, it has its own string class, GString, which can’t extend from String.

Simply put, if we did:

assertEquals("Hello Kacper!", result)

this invokes assertEquals(Object, Object), and we get:

java.lang.AssertionError: expected: java.lang.String<Hello Kacper!>
  but was: org.codehaus.groovy.runtime.GStringImpl<Hello Kacper!>
Expected :java.lang.String<Hello Kacper!> 
Actual   :org.codehaus.groovy.runtime.GStringImpl<Hello Kacper!>

3. Single-Quoted String

Probably the simplest string in Groovy is one with single quotes:

def example = 'Hello world'

Under the hood, these are just plain old Java Strings, and they come in handy when we need to have quotes inside of our string.

Instead of:

def hardToRead = "Kacper loves \"Lord of the Rings\""

We can easily concatenate one string with another:

def easyToRead = 'Kacper loves "Lord of the Rings"'

Because we can interchange quote types like this, it reduces the need to escape quotes.

4. Triple Single-Quote String

A triple single-quote string is helpful in the context of defining multi-line contents.

For example, let’s say we have some JSON to represent as a string:

{
    "name": "John",
    "age": 20,
    "birthDate": null
}

We don’t need to resort to concatenation and explicit newline characters to represent this.

Instead, let’s use a triple single-quoted string:

def jsonContent = '''
{
    "name": "John",
    "age": 20,
    "birthDate": null
}
'''

Groovy stores this as a simple Java String and adds the needed concatenation and newlines for us.

There is one challenge yet to overcome, though.

Typically for code readability, we indent our code:

def triple = '''
    firstline
    secondline
'''

But triple single-quote strings preserve whitespace. This means that the above string is really:

(newline)
    firstline(newline)
    secondline(newline)

not:

1
2
    firstline(newline)
    secondline(newline)

like perhaps we intended.

Stay tuned to see how we get rid of them.

4.1. Newline Character

Let’s confirm that our previous string starts with a newline character:

assertTrue(triple.startsWith("\n"))

It’s possible to strip that character. To prevent this, we need to put a single backslash \ as a first and last character:

def triple = '''\
    firstline
    secondline
'''

Now, we at least have:

1
2
    firstline(newline)
    secondline(newline)

One problem down, one more to go.

4.2. Strip the Code Indentation

Next, let’s take care of the indentation. We want to keep our formatting, but remove unnecessary whitespace characters.

The Groovy String API comes to the rescue!

To remove leading spaces on every line of our string, we can use one of the Groovy default methods, String#stripIndent():

def triple = '''\
    firstline
    secondline'''.stripIndent()
assertEquals("firstline\nsecondline", triple)

Please note, that by moving the ticks up a line, we’ve also removed a trailing newline character. 

4.3. Relative Indentation

We should remember that stripIndent is not called stripWhitespace.

stripIndent determines the amount of indentation from the shortened, non-whitespace line in the string.

So, let’s change the indentation quite a bit for our triple variable:

class TripleSingleQuotedString {

    @Test
    void 'triple single quoted with multiline string with last line with only whitespaces'() {
        def triple = '''\
            firstline
                secondline\
        '''.stripIndent()

        // ... use triple
    }
}

Printing triple would show us:

firstline
    secondline

Since firstline is the least-indented non-whitespace line, it becomes zero-indented with secondline still indented relative to it.

Note also that this time, we are removing the trailing whitespace with a slash, like we saw earlier.

4.4. Strip with stripMargin()

For even more control, we can tell Groovy right where to start the line by using a | and stripMargin:

def triple = '''\
    |firstline
    |secondline'''.stripMargin()

Which would display:

firstline
secondline

The pipe states where that line of the string really starts.

Also, we can pass a Character or CharSequence as an argument to stripMargin with our custom delimiter character.

Great, we got rid of all unnecessary whitespace, and our string contains only what we want!

4.5. Escaping Special Characters

With all the upsides of the triple single-quote string, there is a natural consequence of needing to escape single quotes and backslashes that are part of our string. 

To represent special characters, we also need to escape them with a backslash. The most common special characters are a newline (\n) and tabulation (\t).

For example:

def specialCharacters = '''hello \'John\'. This is backslash - \\ \nSecond line starts here'''

will result in:

hello 'John'. This is backslash - \
Second line starts here

There are a few we need to remember, namely:

  • \t – tabulation
  • \n – newline
  • \b – backspace
  • \r – carriage return
  • \\ – backslash
  • \f – formfeed
  • \’ – single quote

5. Double-Quoted String

While double-quoted strings are also just Java Strings, their special power is interpolation. When a double-quoted string contains interpolation characters, Groovy switches out the Java String for a GString.

5.1. GString and Lazy Evaluation

We can interpolate a double-quoted string by surrounding expressions with ${} or with $ for dotted expressions.

Its evaluation is lazy, though – it won’t be converted to a String until it is passed to a method that requires a String:

def string = "example"
def stringWithExpression = "example${2}"
assertTrue(string instanceof String)
assertTrue(stringWithExpression instanceof GString)
assertTrue(stringWithExpression.toString() instanceof String)

5.2. Placeholder with Reference to a Variable

The first thing we probably want to do with interpolation is send it a variable reference:

def name = "John"
def helloName = "Hello $name!"
assertEquals("Hello John!", helloName.toString())

5.2. Placeholder with an Expression

But, we can also give it expressions:

def result = "result is ${2 * 2}"    
assertEquals("result is 4", result.toString())

We can put even statements into placeholders, but it’s considered as bad practice.

5.3. Placeholders with the Dot Operator

We can even walk object hierarchies in our strings:

def person = [name: 'John']
def myNameIs = "I'm $person.name, and you?"
assertEquals("I'm John, and you?", myNameIs.toString())

With getters, Groovy can usually infer the property name.

But if we call a method directly, we’ll need to use ${} because of the parentheses:

def name = 'John'
def result = "Uppercase name: ${name.toUpperCase()}".toString()
assertEquals("Uppercase name: JOHN", result)

5.4. hashCode in GString and String

Interpolated strings are certainly godsends in comparison to plain java.util.String, but they differ in an important way.

See, Java Strings are immutable, and so calling hashCode on a given string always returns the same value.

But, GString hashcodes can vary since the String representation depends on the interpolated values.

And actually, even for the same resulting string, they won’t have the same hash codes:

def string = "2+2 is 4"
def gstring = "2+2 is ${4}"
assertTrue(string.hashCode() != gstring.hashCode())

Thus, we should never use GString as a key in a Map!

6. Triple Double-Quote String

So, we’ve seen triple single-quote strings, and we’ve seen double-quoted strings.

Let’s combine the power of both to get the best of both worlds – multi-line string interpolation:

def name = "John"
def multiLine = """
    I'm $name.
    "This is quotation from 'War and Peace'"
"""

Also, notice that we didn’t have to escape single or double-quotes!

7. Slashy String

Now, let’s say that we are doing something with a regular expression, and we are thus escaping backslashes all over the place:

def pattern = "\\d{1,3}\\s\\w+\\s\\w+\\\\\\w+"

It’s clearly a mess.

To help with this, Groovy supports regex natively via slashy strings:

def pattern = /\d{3}\s\w+\s\w+\\\w+/
assertTrue("3 Blind Mice\Men".matches(pattern))

Slashy strings may be both interpolated and multi-line:

def name = 'John'
def example = /
    Dear ([A-Z]+),
    Love, $name
/

Of course, we have to escape forward slashes:

def pattern = /.*foobar.*\/hello.*/

And we can’t represent an empty string with Slashy String since the compiler understands // as a comment:

// if ('' == //) {
//     println("I can't compile")
// }

8. Dollar-Slashy String

Slashy strings are great, though it’s a bummer to have to escape the forward slash. To avoid additional escaping of a forward slash, we can use a dollar-slashy string. 

Let’s assume that we have a regex pattern: [0-3]+/[0-3]+. It’s a good candidate for dollar-slashy string because in a slashy string, we would have to write: [0-3]+//[0-3]+.

Dollar-slashy strings are multiline GStrings that open with $/ and close with /$. To escape a dollar or forward slash, we can precede it with the dollar sign ($), but it’s not necessary.

We don’t need to escape $ in GString placeholder.

For example:

def name = "John"

def dollarSlashy = $/
    Hello $name!,

    I can show you a $ sign or an escaped dollar sign: $$ 
    Both slashes work: \ or /, but we can still escape it: $/
            
    We have to escape opening and closing delimiters:
    - $$$/  
    - $/$$
 /$

would output:

Hello John!,

I can show you a $ sign or an escaped dollar sign: $ 
Both slashes work: \ or /, but we can still escape it: /

We have to escape opening and closing delimiter:
- $/  
- /$

9. Character

Those familiar with Java have already wondered what Groovy did with characters since it uses single quotes for strings.

Actually, Groovy doesn’t have an explicit character literal.

There are three ways to make a Groovy string an actual character:

  • explicit use of ‘char’ keyword when declaring a variable
  • using ‘as’ operator
  • by casting to ‘char’

Let’s take a look at them all:

char a = 'A'
char b = 'B' as char
char c = (char) 'C'
assertTrue(a instanceof Character)
assertTrue(b instanceof Character)
assertTrue(c instanceof Character)

The first way is very convenient when we want to keep the character as a variable. The other two methods are more interesting when we want to pass a character as an argument to a function.

10. Summary

Obviously, that was a lot, so let’s quickly summarize some key points:

  • strings created with a single quote (‘) do not support interpolation
  • slashy and tripled double-quote strings can be multi-line
  • multi-line strings contain whitespace characters due to code indentation
  • backslash (\) is used to escape special characters in every type, except dollar-slashy string, where we must use dollar ($) to escape

11. Conclusion

In this article, we discussed many ways to create a string in Groovy and its support for multi-lines, interpolation, and regex.

All these snippets are available over on Github.

And for more information about features of the Groovy language itself, get a good start with our introduction to Groovy.

Ahead of Time Compilation (AoT)

$
0
0

1. Introduction

In this article, we’ll look at the Java Ahead of Time (AOT) Compiler, which is described in JEP-295 and was added as an experimental feature in Java 9.

First, we’ll see what AOT is, and second, we’ll look at a simple example. Third, we’ll see some restrictions of AOT, and lastly, we’ll discuss some possible use cases.

2. What is Ahead of Time Compilation?

AOT compilation is one way of improving the performance of Java programs and in particular the startup time of the JVM. The JVM executes Java bytecode and compiles frequently executed code to native code. This is called Just-in-Time (JIT) Compilation. The JVM decides which code to JIT compile based on profiling information collected during execution.

While this technique enables the JVM to produce highly optimized code and improves peak performance, the startup time is likely not optimal, as the executed code is not yet JIT compiled. AOT aims to improve this so-called warming-up period. The compiler used for AOT is Graal.

In this article, we won’t look at JIT and Graal in detail. Please refer to our other articles for an overview of performance improvements in Java 9 and 10, as well as a deep dive into the Graal JIT Compiler.

3. Example

For this example, we’ll use a very simple class, compile it, and see how to use the resulting library.

3.1. AOT Compilation

Let’s take a quick look at our sample class:

public class JaotCompilation {

    public static void main(String[] argv) {
        System.out.println(message());
    }

    public static String message() {
        return "The JAOT compiler says 'Hello'";
    }
}

Before we can use the AOT compiler, we need to compile the class with the Java compiler:

javac JaotCompilation.java

We then pass the resulting JaotCompilation.class to the AOT compiler, which is located in the same directory as the standard Java compiler:

jaotc --output jaotCompilation.so JaotCompilation.class

This produces the library jaotCompilation.so in the current directory.

3.2. Running the Program

We can then execute the program:

java -XX:AOTLibrary=./jaotCompilation.so JaotCompilation

The argument -XX:AOTLibrary accepts a relative or full path to the library. Alternatively, we can copy the library to the lib folder in the Java home directory and only pass the name of the library.

3.3. Verifying That the Library Is Called and Used

We can see that the library was indeed loaded by adding -XX:+PrintAOT as a JVM argument:

java -XX:+PrintAOT -XX:AOTLibrary=./jaotCompilation.so JaotCompilation

The output will look like:

77    1     loaded    ./jaotCompilation.so  aot library

However, this only tells us that the library was loaded, but not that it was actually used. By passing the argument -verbose, we can see that the methods in the library are indeed called:

java -XX:AOTLibrary=./jaotCompilation.so -verbose -XX:+PrintAOT JaotCompilation 

The output will contain the lines:

11    1     loaded    ./jaotCompilation.so  aot library
116    1     aot[ 1]   jaotc.JaotCompilation.<init>()V
116    2     aot[ 1]   jaotc.JaotCompilation.message()Ljava/lang/String;
116    3     aot[ 1]   jaotc.JaotCompilation.main([Ljava/lang/String;)V
The JAOT compiler says 'Hello'

The AOT compiled library contains a class fingerprint, which must match the fingerprint of the .class file.

Let’s change the code in the class JaotCompilation.java to return a different message:

public static String message() {
    return "The JAOT compiler says 'Good morning'";
}

If we execute the program without AOT compiling the modified class:

java -XX:AOTLibrary=./jaotCompilation.so -verbose -XX:+PrintAOT JaotCompilation

Then the output will contain only:

 11 1 loaded ./jaotCompilation.so aot library
The JAOT compiler says 'Good morning'

We can see that the methods in the library won’t be called, as the bytecode of the class has changed. The idea behind this is that the program will always produce the same result, no matter if an AOT compiled library is loaded or not.

4. More AOT and JVM Arguments

4.1. AOT Compilation of Java Modules

It’s also possible to AOT compile a module:

jaotc --output javaBase.so --module java.base

The resulting library javaBase.so is about 320 MB in size and takes some time to load. The size can be reduced by selecting the packages and classes to be AOT compiled.

We’ll look at how to do that below, however, we’ll not dive deeply into all the details.

4.2. Selective Compilation with Compile Commands

To prevent the AOT compiled library of a Java module from becoming too large, we can add compile commands to limit the scope of what gets AOT compiled. These commands need to be in a text file – in our example, we’ll use the file complileCommands.txt:

compileOnly java.lang.*

Then, we add it to the compile command:

jaotc --output javaBaseLang.so --module java.base --compile-commands compileCommands.txt

The resulting library will only contain the AOT compiled classes in the package java.lang.

To gain real performance improvement, we need to find out which classes are invoked during the warm-up of the JVM.

This can be achieved by adding several JVM arguments:

java -XX:+UnlockDiagnosticVMOptions -XX:+LogTouchedMethods -XX:+PrintTouchedMethodsAtExit JaotCompilation

In this article, we won’t dive deeper into this technique.

4.3. AOT Compilation of a Single Class

We can compile a single class with the argument –class-name:

jaotc --output javaBaseString.so --class-name java.lang.String

The resulting library will only contain the class String.

4.4. Compile for Tiered

By default, the AOT compiled code will always be used, and no JIT compilation will happen for the classes included in the library. If we want to include the profiling information in the library, we can add the argument compile-for-tiered:

jaotc --output jaotCompilation.so --compile-for-tiered JaotCompilation.class

The pre-compiled code in the library will be used until the bytecode becomes eligible for JIT compilation.

5. Possible Use Cases for AOT Compilation

One use case for AOT is short running programs, which finish execution before any JIT compilation occurs.

Another use case is embedded environments, where JIT isn’t possible.

At this point, we also need to note that the AOT compiled library can only be loaded from a Java class with identical bytecode, thus it cannot be loaded via JNI.

6. Conclusion

In this article, we saw how to AOT compile Java classes and modules. As this is still an experimental feature, the AOT compiler isn’t part of all distributions. Real examples are still rare to find, and it will be up to the Java community to find the best use cases for applying AOT.

All the code snippets in this article can be found in our GitHub repository.

Kotlin const, var, and val Keywords

$
0
0

1. Introduction

In this tutorial, we’ll be outlining the key differences between the const, var, and val keywords in the Kotlin language.

To put these keywords into context, we’ll be comparing them to their Java equivalents.

2. Understanding Typing

To understand these keywords, we have to understand two of the major categories of type systems a language can follow – manifest typing and inferred typing.

2.1. Manifest Typing

All languages offer a range of primitive data types to store and manipulate data within a program. Programming languages following the manifest typing discipline must have their data types explicitly defined within the program.

Java, up until version 10, strictly follows this discipline. For example, if we want to store a number within a program, we must define a data type such as int:

int myVariable = 3;

2.2. Inferred Typing

Unlike Java, Kotlin follows the inferred typing discipline. Languages supporting type inference automatically detect data types within the program at compile-time.

This detection means that we, as developers, don’t need to worry about the data types we’re using.

3. var

Firstly, we’ll start with var, Kotlin’s keyword representing mutable, non-final variables. Once initialized, we’re free to mutate the data held by the variable.

Let’s take a look at how this works:

var myVariable = 1

Behind the scenes, myVariable initializes with the Int data type.

Although Kotlin uses type inference, we also have the option to specify the data type when we initialize the variable:

var myVariable: Int = 1

Variables declared as one data type and then initialized with a value of the wrong type will result in an error:

var myVariable: Int = b //ERROR!

4. val

Kotlin’s val keyword works much in the same as the var keyword, but with one key difference – the data is immutable. The use of val is much like declaring a new variable in Java with the final keyword.

For example, in Kotlin, we’d write:

val name: String = "Baeldung"

Whereas in Java, we’d write:

final String name = "Baeldung";

Much like final variables in Java, val variables must be assigned at declaration, or in a Class constructor:

class Address(val street: String) {
    val name: String = "Baeldung"
}

5. const

Like val, variables defined with the const keyword are immutable. The difference here is that const is used for variables that are known at compile-time.

Declaring a variable const is much like using the static keyword in Java.

Let’s see how to declare a const variable in Kotlin:

const val WEBSITE_NAME = "Baeldung"

And the analogous code written in Java would be:

final static String WEBSITE_NAME = "Baeldung";

6. Conclusion

In this article, we’ve taken a quick look at the difference between manifest and inferred typing.

Then, we looked at the difference between Kotlin’s var, val, and const keywords.

Introduction to Leiningen for Clojure

$
0
0

1. Introduction

Leiningen is a modern build system for our Clojure projects. It’s also written and configured entirely in Clojure.

It works similarly to Maven, giving us a declarative configuration that describes our project, without needing to configure exact steps to be executed.

Let’s jump in and see how to get started with Leiningen for building our Clojure projects.

2. Installing Leiningen

Leiningen is available as a standalone download, as well as from a large number of package managers for different systems.

Standalone downloads are available for Windows as well as for Linux and Mac. In all cases, download the file, make it executable if necessary, and then it’s ready to use.

The first time the script is run it will download the rest of the Leiningen application, and then this will be cached from this point forward:

$ ./lein
Downloading Leiningen to /Users/user/.lein/self-installs/leiningen-2.8.3-standalone.jar now...
.....
Leiningen is a tool for working with Clojure projects.

Several tasks are available:
.....

Run `lein help $TASK` for details.

.....

3. Creating a new Project

Once Leiningen is installed, we can use it to create a new project by invoking lein new.

This creates a project using a particular template from a set of options:

  • app – Used to create an application
  • default – Used to create a general project structure, typically for libraries
  • plugin – Used to create a Leiningen Plugin
  • template – Used to create new Leiningen templates for future projects

For example, to create a new application called “my-project” we would execute:

$ ./lein new app my-project
Generating a project called my-project based on the 'app' template.

This gives us a project containing:

  • A build definition – project.clj
  • A source directory – src – including an initial source file – src/my_project/core.clj
  • A test directory – test – including an initial test file – test/my_project/core_test.clj
  • Some additional documentation files – README.md, LICENSE, CHANGELOG.md and doc/intro.md

Looking inside our build definition, we’ll see that it tells us what to build, but not how to build it:

(defproject my-project "0.1.0-SNAPSHOT"
  :description "FIXME: write description"
  :url "http://example.com/FIXME"
  :license {:name "EPL-2.0 OR GPL-2.0-or-later WITH Classpath-exception-2.0"
            :url "https://www.eclipse.org/legal/epl-2.0/"}
  :dependencies [[org.clojure/clojure "1.9.0"]]
  :main ^:skip-aot my-project.core
  :target-path "target/%s"
  :profiles {:uberjar {:aot :all}})

This tells us:

  • The details of the project consisting of the project name, version, description, homepage and license details.
  • The main namespace to use when executing the application
  • The list of dependencies
  • The target path to build the output into
  • A profile for building an uberjar

Note that the main source namespace is my-project.core, and is found in the file my_project/core.clj. It’s discouraged in Clojure to use single-segment namespaces – the equivalent of top-level classes in a Java project.

Additionally, the filenames are generated with underscores instead of hyphens because the JVM has some problems with hyphens in filenames.

The generated code is pretty simple:

(ns my-project.core
  (:gen-class))

(defn -main
  "I don't do a whole lot ... yet."
  [& args]
  (println "Hello, World!"))

Also, notice that Clojure is just a dependency here. This makes it trivial to write projects using whatever version of the Clojure libraries are desired, and especially to have multiple different versions running on the same system.

If we change this dependency, then we’ll get the alternative version instead.

4. Building and Running

Our project isn’t worth much if we can’t build it, run it and package it up for distribution, so let’s look at that next.

4.1. Launching a REPL

Once we have a project, we can launch a REPL inside of it using lein repl. This will give us a REPL that has everything in the project already available on the classpath – including all project files as well as all dependencies.

It also starts us in the defined main namespace for our project:

$ lein repl
nREPL server started on port 62856 on host 127.0.0.1 - nrepl://127.0.0.1:62856
[]REPL-y 0.4.3, nREPL 0.5.3
Clojure 1.9.0
Java HotSpot(TM) 64-Bit Server VM 1.8.0_77-b03

    Docs: (doc function-name-here)
          (find-doc "part-of-name-here")
  Source: (source function-name-here)
 Javadoc: (javadoc java-object-or-class-here)
    Exit: Control+D or (exit) or (quit)
 Results: Stored in vars *1, *2, *3, an exception in *e

my-project.core=> (-main)
Hello, World!
nil

This executes the function -main in the current namespace, which we saw above.

4.2. Running the Application

If we are working on an application project – created using lein new app – then we can simply run the application from the command line. This is done using lein run:

$ lein run
Hello, World!

This will execute the function called -main in the namespace defined as :main in our project.clj file.

4.3. Building a Library

If we are working on a library project – created using lein new default – then we can build the library into a JAR file for inclusion in other projects.

We have two ways that we can achieve this – using lein jar or lein install. The difference is simply in where the output JAR file is placed.

If we use lein jar then it will place it in the local target directory:

$ lein jar
Created /Users/user/source/me/my-library/target/my-library-0.1.0-SNAPSHOT.jar

If we use lein install, then it will build the JAR file, generate a pom.xml file and then place the two into the local Maven repository (typically under .m2/repository in the users home directory)

$ lein install
Created /Users/user/source/me/my-library/target/my-library-0.1.0-SNAPSHOT.jar
Wrote /Users/user/source/me/my-library/pom.xml
Installed jar and pom into local repo.

4.4. Building an Uberjar

If we are working on an application project, Leiningen gives us the ability to build what is called an uberjar. This is a JAR file containing the project itself and all dependencies and set up to allow it to be run as-is.

$ lein uberjar
Compiling my-project.core
Created /Users/user/source/me/my-project/target/uberjar/my-project-0.1.0-SNAPSHOT.jar
Created /Users/user/source/me/my-project/target/uberjar/my-project-0.1.0-SNAPSHOT-standalone.jar

The file my-project-0.1.0-SNAPSHOT.jar is a JAR file containing exactly the local project, and the file my-project-0.1.0-SNAPSHOT-standalone.jar contains everything needed to run the application.

$ java -jar target/uberjar/my-project-0.1.0-SNAPSHOT-standalone.jar
Hello, World!

5. Dependencies

Whilst we can write everything needed for our project ourselves, it’s generally significantly better to re-use the work that others have already done on our behalf. We can do this by having our project depend on these other libraries.

5.1. Adding Dependencies to our Project

To add dependencies to our project, we need to add them correctly to our project.clj file.

Dependencies are represented as a vector consisting of the name and version of the dependency in question. We’ve already seen that Clojure itself is added as a dependency, written in the form [org.clojure/clojure “1.9.0”].

If we want to add other dependencies, we can do so by adding them to the vector next to the :dependencies keyword. For example, if we want to depend on clj-json we would update the file:

  :dependencies [[org.clojure/clojure "1.9.0"] [clj-json "0.5.3"]]

Once done, if we start our REPL – or any other way to build or run our project – then Leiningen will ensure that the dependencies are downloaded and available on the classpath:

$ lein repl
Retrieving clj-json/clj-json/0.5.3/clj-json-0.5.3.pom from clojars
Retrieving clj-json/clj-json/0.5.3/clj-json-0.5.3.jar from clojars
nREPL server started on port 62146 on host 127.0.0.1 - nrepl://127.0.0.1:62146
REPL-y 0.4.3, nREPL 0.5.3
Clojure 1.9.0
Java HotSpot(TM) 64-Bit Server VM 1.8.0_77-b03
    Docs: (doc function-name-here)
          (find-doc "part-of-name-here")
  Source: (source function-name-here)
 Javadoc: (javadoc java-object-or-class-here)
    Exit: Control+D or (exit) or (quit)
 Results: Stored in vars *1, *2, *3, an exception in *e

my-project.core=> (require '(clj-json [core :as json]))
nil
my-project.core=> (json/generate-string {"foo" "bar"})
"{\"foo\":\"bar\"}"
my-project.core=>

We can also use them from inside our project. For example, we could update the generated src/my_project/core.clj file as follows:

(ns my-project.core
  (:gen-class))

(require '(clj-json [core :as json]))

(defn -main
  "I don't do a whole lot ... yet."
  [& args]
  (println (json/generate-string {"foo" "bar"})))

And then running it will do exactly as expected:

$ lein run
{"foo":"bar"}

5.2. Finding Dependencies

Often, it can be difficult to find the dependencies that we want to use in our project. Leiningen comes with a search functionality built in to make this easier. This is done using lein search.

For example, we can find our JSON libraries:

$ lein search json
Searching central ...
[com.jwebmp/json "0.63.0.60"]
[com.ufoscout.coreutils/json "3.7.4"]
[com.github.iarellano/json "20190129"]
.....
Searching clojars ...
[cheshire "5.8.1"]
  JSON and JSON SMILE encoding, fast.
[json-html "0.4.4"]
  Provide JSON and get a DOM node with a human representation of that JSON
[ring/ring-json "0.5.0-beta1"]
  Ring middleware for handling JSON
[clj-json "0.5.3"]
  Fast JSON encoding and decoding for Clojure via the Jackson library.
.....

This searches all of the repositories that our project is working with – in this case, Maven Central and Clojars. It then returns the exact string to put into our project.clj file and, if available, the description of the library.

6. Testing our Project

Clojure has built-in support for unit testing our application, and Leiningen can harness this for our projects.

Our generated project contains test code in the test directory, alongside the source code in the src directory. It also includes a single, failing test by default – found in test/my_project/core-test.clj:

(ns my-project.core-test
  (:require [clojure.test :refer :all]
            [my-project.core :refer :all]))

(deftest a-test
  (testing "FIXME, I fail."
    (is (= 0 1))))

This imports the my-project.core namespace from our project, and the clojure.test namespace from the core Clojure language. We then define a test with the deftest and testing calls.

We can immediately see the names of the test, and the fact that it’s deliberately written to fail – it asserts that 0 == 1.

Let’s run this using the lein test command, and immediately see the tests running and failing:

$ lein test
lein test my-project.core-test

lein test :only my-project.core-test/a-test

FAIL in (a-test) (core_test.clj:7)
FIXME, I fail.
expected: (= 0 1)
  actual: (not (= 0 1))

Ran 1 tests containing 1 assertions.
1 failures, 0 errors.
Tests failed.

If we instead fix the test, changing it to assert that 1 == 1 instead, then we’ll get a passing message instead:

$ lein test
lein test my-project.core-test

Ran 1 tests containing 1 assertions.
0 failures, 0 errors.

This is a much more succinct output, only showing what we need to know. This means that when there are failures, they immediately stand out.

If we want to, we can also run a specific subset of the tests. The command line allows for a namespace to be provided, and only tests in that namespace are executed:

$ lein test my-project.core-test

lein test my-project.core-test

Ran 1 tests containing 1 assertions.
0 failures, 0 errors.

$ lein test my-project.unknown

lein test my-project.unknown

Ran 0 tests containing 0 assertions.
0 failures, 0 errors.

7. Summary

This article has shown how to get started with the Leiningen build tool, and how to use it to manage our Clojure based projects – both executable applications and shared libraries.

Why not try it for out on the next project and see how well it can work.

Formatting JSON Dates in Spring Boot

$
0
0

1. Overview

In this tutorial, we’ll show how to format JSON date fields in a Spring Boot application.

We’ll explore various ways of formatting dates using Jackson, which is used by Spring Boot as its default JSON processor.

2.Using @JsonFormat on a Date Field

2.1. Setting the Format

We can use the @JsonFormat annotation in order to format a specific field:

public class Contact {

    // other fields

    @JsonFormat(pattern="yyyy-MM-dd")
    private LocalDate birthday;
     
    @JsonFormat(pattern="yyyy-MM-dd HH:mm:ss")
    private LocalDateTime lastUpdate;

    // standard getters and setters

}

On the birthday field, we use a pattern which renders only the date while on the lastUpdate field we also include the time.

We used the Java 8 date types which are quite handy for dealing with temporal types. Of course, if we need to use the legacy types like java.util.Date, we can use the annotation in the same way:

public class ContactWithJavaUtilDate {

     // other fields

     @JsonFormat(pattern="yyyy-MM-dd")
     private Date birthday;
     
     @JsonFormat(pattern="yyyy-MM-dd HH:mm:ss")
     private Date lastUpdate;

     // standard getters and setters
}

Finally, let’s take a look at the output rendered by using the @JsonFormat with the given date format:

{
    "birthday": "2019-02-03",
    "lastUpdate": "2019-02-03 10:08:02"
}

As we can see, using the @JsonFormat annotation is an excellent way to format a particular date field.

However, we should only use it when we need specific formatting for fields. If we want to have a general format for all dates in our application, there are betters way how to achieve this, as we’ll see later.

2.2. Setting the Time Zone

Also, if we need to use a particular time zone, we can set the timezone attribute of the @JsonFormat:

@JsonFormat(pattern="yyyy-MM-dd HH:mm:ss", timezone="Europe/Zagreb")
private LocalDateTime lastUpdate;

We don’t need to use it if a type already contains the time zone, for example with java.time.ZonedDatetime.

3. Configuring the Default Format

And while @JsonFormat is powerful on its own, hardcoding the format and timezone can bite us down the road.

If we want to configure a default format for all dates in our application, a more flexible way is to configure it in application.properties:

spring.jackson.date-format=yyyy-MM-dd HH:mm:ss

And if we want to use a specific time zone in our JSON dates, there’s also a property for that:

spring.jackson.time-zone=Europe/Zagreb

Although setting the default format like this is quite handy and straightforward, there’s a drawback to this approach. Unfortunately, it doesn’t work with the Java 8 date types, like LocalDate and LocalDateTime – we can use it only to format fields of the type java.util.Date or the java.util.CalendarThere is hope, though, as we’ll soon see.

4. Customizing Jackson’s ObjectMapper

So, if we want to use Java 8 date types and set a default date format, then we need to look at creating a Jackson2ObjectMapperBuilderCustomizer bean:

@Configuration
public class ContactAppConfig {

    private static final String dateFormat = "yyyy-MM-dd";
    private static final String dateTimeFormat = "yyyy-MM-dd HH:mm:ss";

    @Bean
    public Jackson2ObjectMapperBuilderCustomizer jsonCustomizer() {
        return builder -> {
            builder.simpleDateFormat(dateTimeFormat);
            builder.serializers(new LocalDateSerializer(DateTimeFormatter.ofPattern(dateFormat)));
            builder.serializers(new LocalDateTimeSerializer(DateTimeFormatter.ofPattern(dateTimeFormat)));
        };
    }

}

The above example shows how to configure a default format in our application. We have to define a bean and override its customize method to set the desired format.

Although this approach might look a bit cumbersome, the nice thing about it is that it works for both the Java 8 and the legacy date types.

5. Conclusion

In this article, we explored a number of different ways to format JSON dates in a Spring Boot application.

As always, we can find the source code for the examples over on GitHub.


A Quick Guide to Iterating a Map in Groovy

$
0
0

1. Introduction

In this short tutorial, we’ll look at ways to iterate over a map in Groovy using standard language features like eacheachWithIndex, and a for-in loop.

2. The each Method

Let’s imagine we have the following map:

def map = [
    'FF0000' : 'Red',
    '00FF00' : 'Lime',
    '0000FF' : 'Blue',
    'FFFF00' : 'Yellow'
]

We can iterate over the map by providing the each method with a simple closure:

map.each { println "Hex Code: $it.key = Color Name: $it.value" }

We can also improve the readability a bit by giving a name to the entry variable:

map.each { entry -> println "Hex Code: $entry.key = Color Name: $entry.value" }

Or, if we’d rather address the key and value separately, we can list them separately in our closure:

map.each { key, val ->
    println "Hex Code: $key = Color Name $val"
}

In Groovy, maps created with the literal notation are ordered. We can expect our output to be in the same order as we defined in our original map.

3. The eachWithIndex Method

Sometimes we want to know the index while we’re iterating.

For example, let’s say we want to indent every other row in our map. To do that in Groovy, we’ll use the eachWithIndex method with entry and index variables:

map.eachWithIndex { entry, index ->
    def indent = ((index == 0 || index % 2 == 0) ? "   " : "")
    println "$index Hex Code: $entry.key = Color Name: $entry.value"
}

As with the each method, we can choose to use the key and value variables in our closure instead of the entry:

map.eachWithIndex { key, val, index ->
    def indent = ((index == 0 || index % 2 == 0) ? "   " : "")
    println "$index Hex Code: $key = Color Name: $val"
}

4. Using a For-in Loop

On the other hand, if our use case lends itself better to imperative programming, we can also use a for-in statement to iterate over our map:

for (entry in map) {
    println "Hex Code: $entry.key = Color Name: $entry.value"
}

5. Conclusion

In this short tutorial, we learned how to iterate a map using Groovy’s each and eachWithIndex methods and a for-in loop.

The example code is available over on GitHub.

Performance Comparison of Primitive Lists in Java

$
0
0

1. Overview

In this tutorial, we’re going to compare the performance of some popular primitive list libraries in Java.

For that, we’ll test the add(), get(), and contains() methods for each library.

2. Performance Comparison

Now, let’s find out which library offers a fast working primitive collections API.

For that, let’s compare the List analogs from Trove, Fastutil, and Colt. We’ll use the JMH (Java Microbenchmark Harness) tool to write our performance tests.

2.1. JMH Parameters

We’ll run our benchmark tests with the following parameters:

@BenchmarkMode(Mode.SingleShotTime)
@OutputTimeUnit(TimeUnit.MILLISECONDS)
@Measurement(batchSize = 100000, iterations = 10)
@Warmup(batchSize = 100000, iterations = 10)
@State(Scope.Thread)
public class PrimitivesListPerformance {
}

Here, we want to measure the execution time for each benchmark method. Also, we want to display our results in milliseconds.

The @State annotation indicates that the variables declared in the class won’t be the part of running benchmark tests. However, we can then use them in our benchmark methods.

Additionally, let’s define our lists of primitives:

public static class PrimitivesListPerformance {
    private List<Integer> arrayList = new ArrayList<>();
    private TIntArrayList tList = new TIntArrayList();
    private cern.colt.list.IntArrayList coltList = new cern.colt.list.IntArrayList();
    private IntArrayList fastUtilList = new IntArrayList();

    private int getValue = 10;
}

Now, we’re ready to write our benchmarks.

3. add()

First, let’s test adding the elements into our primitive lists. We’ll also add one for ArrayList as our control.

3.1. Benchmark Tests

The first micro-benchmark is for the ArrayLists add() method:

@Benchmark
public boolean addArrayList() {
    return arrayList.add(getValue);
}

Similarly, for the Trove’s TIntArrayList.add():

@Benchmark
public boolean addTroveIntList() {
    return tList.add(getValue);
}

Likewise, Colt’s IntArrayList.add() looks like:

@Benchmark
public void addColtIntList() {
    coltList.add(getValue);
}

And, for Fastutil library, the IntArrayList.add() method benchmark will be:

@Benchmark
public boolean addFastUtilIntList() {
    return fastUtilList.add(getValue);
}

3.2. Test Results

Now, we run and compare results:

Benchmark           Mode  Cnt  Score   Error  Units
addArrayList          ss   10  4.527 ± 4.866  ms/op
addColtIntList        ss   10  1.823 ± 4.360  ms/op
addFastUtilIntList    ss   10  2.097 ± 2.329  ms/op
addTroveIntList       ss   10  3.069 ± 4.026  ms/op

From the results, we can clearly see that ArrayList’s add() is the slowest option.

This is logical, as we explained in the primitive list libraries article, ArrayList will use boxing/autoboxing to store the int values inside the collection. Therefore, we have significant slowdown here.

On the other hand, the add() methods for Colt and Fastutil were the fastest.

Under the hood, all three libraries store the values inside of an int[]. So why do we have different running times for their add() methods?

The answer is how they grow the int[] when the default capacity is full:

  • Colt will grow its internal int[] only when it becomes full
  • In contrast, Trove and Fastutil will use some additional calculations while expanding the int[] container

That’s why Colt is winning in our test results.

4. get()

Now, let’s add the get() operation micro-benchmark.

4.1. Benchmark Tests

First, for the ArrayList’s get() operation:

@Benchmark
public int getArrayList() {
    return arrayList.get(getValue);
}

Similarly, for the Trove’s TIntArrayList we’ll have:

@Benchmark
public int getTroveIntList() {
    return tList.get(getValue);
}

And, for Colt’s cern.colt.list.IntArrayList, the get() method will be:

@Benchmark
public int getColtIntList() {
    return coltList.get(getValue);
}

Finally, for the Fastutil’s IntArrayList we’ll test the getInt() operation:

@Benchmark
public int getFastUtilIntList() {
    return fastUtilList.getInt(getValue);
}

4.2. Test Results

After, we run the benchmarks and see the results:

Benchmark           Mode  Cnt  Score   Error  Units
getArrayList        ss     20  5.539 ± 0.552  ms/op
getColtIntList      ss     20  4.598 ± 0.825  ms/op
getFastUtilIntList  ss     20  4.585 ± 0.489  ms/op
getTroveIntList     ss     20  4.715 ± 0.751  ms/op

Although the score difference isn’t much, we can notice that getArrayList() works slower.

For the rest of the libraries, we have almost identical get() method implementations. They will retrieve the value immediately from the int[] without any further work. That’s why Colt, Fastutil, and Trove have similar performances for the get() operation.

5. contains()

Finally, let’s test the contains() method for each type of the list.

5.1. Benchmark Tests

Let’s add the first micro-benchmark for ArrayList’s contains() method:

@Benchmark
public boolean containsArrayList() {
    return arrayList.contains(getValue);
}

Similarly, for the Trove’s TIntArrayList the contains() benchmark will be:

@Benchmark
public boolean containsTroveIntList() {
    return tList.contains(getValue);
}

Likewise, the test for Colt’s cern.colt.list.IntArrayList.contains() is:

@Benchmark
public boolean containsColtIntList() {
    return coltList.contains(getValue);
}

And, for Fastutil’s IntArrayList, the contains() method test looks like:

@Benchmark
public boolean containsFastUtilIntList() {
    return fastUtilList.contains(getValue);
}

5.2. Test Results

Finally, we run our tests and compare the results:

Benchmark                  Mode  Cnt   Score    Error  Units
containsArrayList          ss     20   2.083  ± 1.585  ms/op
containsColtIntList        ss     20   1.623  ± 0.960  ms/op
containsFastUtilIntList    ss     20   1.406  ± 0.400  ms/op
containsTroveIntList       ss     20   1.512  ± 0.307  ms/op

As usual, the containsArrayList method has the worst performance. In contrast, Trove, Colt, and Fastutil have better performance compared to Java’s core solution.

This time, it’s up to the developer which library to choose. The results for all three libraries are close enough to consider them identical.

6. Conclusion

In this article, we investigated the actual runtime performance of primitive lists through the JVM benchmark tests. Moreover, we compared the test results with the JDK’s ArrayList.

Also, keep in mind that the numbers we present here are just JMH benchmark results – always test in the scope of a given system and runtime.

As usual, the complete code for this article is available over on GitHub.

Using WireMock Scenarios

$
0
0

1. Overview

This quick tutorial will show how we can test a stateful HTTP-based API with WireMock.

To get started with the library, have a look at our Introduction to WireMock tutorial first.

2. Maven Dependencies

In order to be able to take advantage of the WireMock library, we need to include the following dependency in the POM:

<dependency>
    <groupId>com.github.tomakehurst</groupId>
    <artifactId>wiremock</artifactId>
    <version>2.21.0</version>
    <scope>test</scope>
</dependency>

3. The Example API We Want to Mock

The concept of Scenarios in Wiremock is to help simulate the different states of a REST API. This enables us to create tests in which the API that we’re using behaves differently depending on the state it’s in.

To illustrate this, we’ll have a look at a practical example: a “Java Tip” service which gives us a different tip about Java whenever we request its /java-tip endpoint.

If we ask for a tip, we’d get one back in text/plain:

"use composition rather than inheritance"

If we called it again, we’d get a different tip.

4. Creating the Scenario States

We need to get WireMock to create stubs for the “/java-tip” endpoint. The stubs will each return a certain text that corresponds to one of the 3 states of the mock API:

public class WireMockScenarioExampleIntegrationTest {
    private static final String THIRD_STATE = "third";
    private static final String SECOND_STATE = "second";
    private static final String TIP_01 = "finally block is not called when System.exit()" 
      + " is called in the try block";
    private static final String TIP_02 = "keep your code clean";
    private static final String TIP_03 = "use composition rather than inheritance";
    private static final String TEXT_PLAIN = "text/plain";
    
    static int port = 9999;
    
    @Rule
    public WireMockRule wireMockRule = new WireMockRule(port);    

    @Test
    public void changeStateOnEachCallTest() throws IOException {
        createWireMockStub(Scenario.STARTED, SECOND_STATE, TIP_01);
        createWireMockStub(SECOND_STATE, THIRD_STATE, TIP_02);
        createWireMockStub(THIRD_STATE, Scenario.STARTED, TIP_03);
        
    }

    private void createWireMockStub(String currentState, String nextState, String responseBody) {
        stubFor(get(urlEqualTo("/java-tip"))
          .inScenario("java tips")
          .whenScenarioStateIs(currentState)
          .willSetStateTo(nextState)
          .willReturn(aResponse()
            .withStatus(200)
            .withHeader("Content-Type", TEXT_PLAIN)
            .withBody(responseBody)));
    }

}

In the above class, we use WireMock’s JUnit rule class WireMockRule. This sets up the WireMock server when the JUnit test is run.

We then use WireMock’s stubFor method to create the stubs that we’ll use later.

The key methods used when creating the stubs are:

  • whenScenarioStateIs: defines which state the scenario needs to be in for WireMock to use this stub
  • willSetStateTo: gives the value that WireMock sets the state to after this stub has been used

The initial state of any scenario is Scenario.STARTED. So, we create a stub which is used when the state is Scenario.STARTED. This moves the state on to SECOND_STATE.

We also add stubs to move from SECOND_STATE to THIRD_STATE and finally from THIRD_STATE back to Scenario.STARTED. So if we keep calling the /java-tip endpoint the state changes as follows:

Scenario.STARTED -> SECOND_STATE -> THIRD_STATE -> Scenario.STARTED

5. Using the Scenario

In order to use the WireMock Scenario, we simply make repeated calls to the /java-tip endpoint. So we need to modify our test class as follows:

    @Test
    public void changeStateOnEachCallTest() throws IOException {
        createWireMockStub(Scenario.STARTED, SECOND_STATE, TIP_01);
        createWireMockStub(SECOND_STATE, THIRD_STATE, TIP_02);
        createWireMockStub(THIRD_STATE, Scenario.STARTED, TIP_03);

        assertEquals(TIP_01, nextTip());
        assertEquals(TIP_02, nextTip());
        assertEquals(TIP_03, nextTip());
        assertEquals(TIP_01, nextTip());        
    }

    private String nextTip() throws ClientProtocolException, IOException {
        CloseableHttpClient httpClient = HttpClients.createDefault();
        HttpGet request = new HttpGet(String.format("http://localhost:%s/java-tip", port));
        HttpResponse httpResponse = httpClient.execute(request);
        return firstLineOfResponse(httpResponse);
    }

    private static String firstLineOfResponse(HttpResponse httpResponse) throws IOException {
        try (BufferedReader reader = new BufferedReader(
          new InputStreamReader(httpResponse.getEntity().getContent()))) {
            return reader.readLine();
        }
    }

The nextTip() method calls the /java-tip endpoint and then returns the response as a String. So we use that in each assertEquals() call to check that the calls do indeed get the scenario to cycle around the different states.

6. Conclusion

In this article, we saw how to use WireMock Scenarios in order to mock an API which changes its response depending on the state it is in.

As always, all the code used in this tutorial is available over on GitHub.

Guide to Apache Commons MultiValuedMap

$
0
0

1. Overview

In this quick tutorial, we’ll have a look at the MultiValuedMap interface provided in the Apache Commons Collections library

MultiValuedMap provides a simple API for mapping each key to a collection of values in Java. It’s the successor to org.apache.commons.collections4.MultiMapwhich was deprecated in Commons Collection 4.1.

2. Maven Dependency

For Maven projects, we need to add the commons-collections4 dependency:

<dependency>
    <groupId>org.apache.commons</groupId>
    <artifactId>commons-collections4</artifactId>
    <version>4.2</version>
</dependency>

3. Adding Elements into a MultiValuedMap

We can add elements using the put and putAll methods.

Let’s start by creating an instance of MultiValuedMap:

MultiValuedMap<String, String> map = new ArrayListValuedHashMap<>();

Next, let’s see how we can add elements one at a time using the put method:

map.put("fruits", "apple");
map.put("fruits", "orange");

In addition, let’s add some elements using the putAll method, which maps a key to multiple elements in a single call:

map.putAll("vehicles", Arrays.asList("car", "bike"));
assertThat((Collection<String>) map.get("vehicles"))
  .containsExactly("car", "bike");

4. Retrieving Elements from a MultiValuedMap

MultiValuedMap provides methods to retrieve keys, values, and key-value mappings. Let’s take a look at each of those.

4.1. Get All Values of a Key

To get all values associated with a key, we can use the get method, which returns a Collection:

assertThat((Collection<String>) map.get("fruits"))
  .containsExactly("apple", "orange");

4.2. Get All Key-Value Mappings

Or, we can use the entries method to get a Collection of all key-value mappings contained in the map:

Collection<Map.Entry<String, String>> entries = map.entries();

4.3. Get All Keys

There are two methods for retrieving all the keys contained in a MultiValuedMap.

Let’s use the keys method to get a MultiSet view of the keys:

MultiSet<String> keys = map.keys();
assertThat(keys).contains("fruits", "vehicles");

Alternatively, we can get a Set view of the keys using the keySet method:

Set<String> keys = map.keySet();
assertThat(keys).contains("fruits", "vehicles");

4.4. Get All Values of a Map

Finally, if we want to get a Collection view of all values contained in the map, we can use the values method:

Collection<String> values = map.values();
assertThat(values).contains("apple", "orange", "car", "bike");

5. Removing Elements from a MultiValuedMap

Now, let’s look at all the methods for removing elements and key-value mappings.

5.1. Remove All Elements Mapped to a Key

First, let’s see how to remove all values associated with a specified key using the remove method:

Collection<String> removedValues = map.remove("fruits");
assertThat(map.containsKey("fruits")).isFalse();
assertThat(removedValues).contains("apple", "orange");

This method returns a Collection view of the removed values.

5.2. Remove a Single Key-Value Mapping

Now, suppose we have a key mapped to multiple values, but we want to remove only one of the mapped values, leaving the others. We can easily do this using the removeMapping method:

boolean isRemoved = map.removeMapping("fruits","apple");
assertThat(map.containsMapping("fruits","apple")).isFalse();

5.3. Remove All Key-Value Mappings

And finally, we can use the clear method to remove all mappings from the map:

map.clear();
assertThat(map.isEmpty()).isTrue();

6. Checking Elements from a MultiValuedMap

Next, let’s take a look at the various methods for checking whether a specified key or value exists in our map.

6.1. Check If a Key Exists

To find out whether our map contains a mapping for a specified key, we can use the containsKey method:

assertThat(map.containsKey("vehicles")).isTrue();

6.2. Check If a Value Exists

Next, suppose we want to check if at least one key in our map contains a mapping for a particular value. We can do this using the containsValue method:

assertThat(map.containsValue("orange")).isTrue();

6.3. Check If a Key-Value Mapping Exists

Similarly, if we want to check whether a map contains a mapping for a specific key and value pair, we can use the containsMapping method:

assertThat(map.containsMapping("fruits","orange")).isTrue();

6.4. Check If a Map Is Empty

To check if a map does not contain any key-value mappings at all, we can use the isEmpty method:

assertThat(map.isEmpty()).isFalse;

6.5. Check the Size of a Map

Finally, we can use the size method to get the total size of the map. When a map has keys with multiple values, then the total size of the map is the count of all the values from all keys:

assertEquals(4, map.size());

7. Implementations

The Apache Commons Collections Library also provides multiple implementations of this interface. Let’s have a look at them.

7.1. ArrayListValuedHashMap

An ArrayListValuedHashMap uses an ArrayList internally for storing the values associated with each key, so it allows duplicate key-values pairs:

MultiValuedMap<String, String> map = new ArrayListValuedHashMap<>();
map.put("fruits", "apple");
map.put("fruits", "orange");
assertThat((Collection<String>) map.get("fruits"))
  .containsExactly("apple", "orange", "orange");

Now, it’s worth noting that this class is not thread-safe. Therefore, if we want to use this map from multiple threads, we must be sure to use proper synchronization.

7.2. HashSetValuedHashMap

A HashSetValuedHashMap uses a HashSet for storing the values for each given key. Therefore, it doesn’t allow duplicate key-value pairs.

Let’s see a quick example, where we add the same key-value mapping twice:

MultiValuedMap<String, String> map = new HashSetValuedHashMap<>();
map.put("fruits", "apple");
assertThat((Collection<String>) map.get("fruits"))
  .containsExactly("apple");

Notice how, unlike our previous example that used ArrayListValuedHashMap, the HashSetValuedHashMap implementation ignores the duplicate mapping.

The HashSetValuedHashMap class is also not thread-safe.

7.3. UnmodifiableMultiValuedMap

The UnmodifiableMultiValuedMap is a decorator class that is useful when we need an immutable instance of a MultiValuedMap – that is, it shouldn’t allow further modifications:

@Test(expected = UnsupportedOperationException.class)
public void givenUnmodifiableMultiValuedMap_whenInserting_thenThrowingException() {
    MultiValuedMap<String, String> map = new ArrayListValuedHashMap<>();
    map.put("fruits", "apple");
    map.put("fruits", "orange");
    MultiValuedMap<String, String> immutableMap =
      MultiMapUtils.unmodifiableMultiValuedMap(map);
    immutableMap.put("fruits", "banana"); // throws exception
}

And again, it’s worth noting that modifying the final put will result in an UnsupportedOperationException.

8. Conclusion

We’ve seen various methods of the MultiValuedMap interface from the Apache Commons Collections library. In addition, we’ve explored a few popular implementations.

And, as always, the full source code is available over on Github.

An Introduction to Traits in Groovy

$
0
0

1. Overview

In this tutorial, we’ll explore the concept of traits in Groovy. They were introduced in the Groovy 2.3 release.

2. What are Traits?

Traits are reusable components representing a set of methods or behaviors that we can use to extend the functionality of multiple classes.

For this reason, they’re considered as interfaces, carrying both default implementations and state. All traits are defined using the trait keyword.

3. Methods

Declaring a method in a trait is similar to declaring any regular method in a class. However, we cannot declare protected or package-private methods in a trait.

Let’s see how public and private methods are implemented.

3.1. Public Methods

To start, we’ll explore how public methods are implemented in a trait.

Let’s create a trait named UserTrait and a public sayHello method:

trait UserTrait {
    String sayHello() {
        return "Hello!"
    }
}

After that, we’ll create an Employee class, which implements UserTrait:

class Employee implements UserTrait {}

Now, let’s create a test to verify that an Employee instance can access the sayHello method of the UserTrait:

def 'Should return msg string when using Employee.sayHello method provided by User trait' () {
    when:
        def msg = employee.sayHello()
    then:
        msg
        msg instanceof String
        assert msg == "Hello!"
}

3.2. Private Methods

We can also create a private method in a trait and refer to it in another public method.

Let’s see the code implementation in the UserTrait:

private String greetingMessage() {
    return 'Hello, from a private method!'
}
    
String greet() {
    def msg = greetingMessage()
    println msg
    return msg
}

Note that if we access the private method in the implementation class, it will throw a MissingMethodException:

def 'Should return MissingMethodException when using Employee.greetingMessage method' () {
    when:
        def exception
        try {
            employee.greetingMessage()
        } catch(Exception e) {
            exception = e
        }
        
    then:
        exception
        exception instanceof groovy.lang.MissingMethodException
        assert exception.message == "No signature of method: com.baeldung.traits.Employee.greetingMessage()"
          + " is applicable for argument types: () values: []"
}

In a trait, a private method may be essential for any implementation that should not be overriden by any class, though required by other public methods.

3.3. Abstract Methods

A trait can also contain abstract methods that can then be implemented in another class:

trait UserTrait {
    abstract String name()
    
    String showName() {
       return "Hello, ${name()}!"
    }
}
class Employee implements UserTrait {
    String name() {
        return 'Bob'
    }
}

3.4. Overriding Default Methods

Usually, a trait contains default implementations of its public methods, but we can override them in the implementation class:

trait SpeakingTrait {
    String speak() {
        return "Speaking!!"
    }
}
class Dog implements SpeakingTrait {
    String speak() {
        return "Bow Bow!!"
    }
}

Traits do not support protected and private scopes.

4. this Keyword

The behavior of the this keyword is similar to that in Java. We can consider the trait as a super class.

For instance, we’ll create a method which returns this in a trait:

trait UserTrait {
    def self() {
        return this 
    }
}

5. Interfaces

A trait can also implement interfaces, just like regular classes do.

Let’s create an interface and implement it in a trait:

interface Human {
    String lastName()
}
trait UserTrait implements Human {
    String showLastName() {
        return "Hello, ${lastName()}!"
    }
}

Now, let’s implement the abstract method of the interface in the implementation class:

class Employee implements UserTrait {
    String lastName() {
        return "Marley"
    }
}

6. Properties

We can add properties to a trait just like we would in any regular class:

trait UserTrait implements Human { 
    String email
    String address
}

7. Extending Traits

Similar to a regular Groovy class, a trait may extend another trait using the extends keyword:

trait WheelTrait {
    int noOfWheels
}

trait VehicleTrait extends WheelTrait {
    String showWheels() {
        return "Num of Wheels $noOfWheels" 
    } 
}

class Car implements VehicleTrait {}

We can also extend multiple traits with the implements clause:

trait AddressTrait {                                      
    String residentialAddress
}

trait EmailTrait {                                    
    String email
}

trait Person implements AddressTrait, EmailTrait {}

8. Multiple Inheritance Conflicts

When a class implements two or more traits that have methods with the same signature, we need to know how to resolve the conflicts. Let’s look at how Groovy resolves such conflicts by default, as well as a way that we can override the default resolution.

8.1. Default Conflict Resolution

By default, the method from the last declared trait in the implements clause will be picked up.

Therefore, traits help us to implement multiple inheritances without encountering the Diamond Problem.

First, let’s create two traits with a method having the same signature:

trait WalkingTrait {
    String basicAbility() {
        return "Walking!!"
    }
}

trait SpeakingTrait {
    String basicAbility() {
        return "Speaking!!"
    }
}

Next, let’s write a class that implements both traits:

class Dog implements WalkingTrait, SpeakingTrait {}

Because SpeakingTrait is declared last, its basicAbility method implementation would be picked up by default in the Dog class.

8.2. Explicit Conflict Resolution

Now, if we don’t want to simply take the default conflict resolution provided by the language, we can override it by explicitly choosing which method to call using the trait.super.method reference.

For instance, let’s add another method with the same signature to our two traits:

String speakAndWalk() {
    return "Walk and speak!!"
}
String speakAndWalk() {
    return "Speak and walk!!"
}

Now, let’s override the default resolution of multiple inheritance conflicts in our Dog class using the super keyword:

class Dog implements WalkingTrait, SpeakingTrait {
    String speakAndWalk() {
        WalkingTrait.super.speakAndWalk()
    }
}

9. Implementing Traits at Runtime

To implement a trait dynamically, we can use the as keyword to coerce an object to a trait at runtime.

For instance, let’s create an AnimalTrait with the basicBehavior method:

trait AnimalTrait {
    String basicBehavior() {
        return "Animalistic!!"
    }
}

To implement several traits at once, we can use the withTraits method instead of the as keyword:

def dog = new Dog()
def dogWithTrait = dog.withTraits SpeakingTrait, WalkingTrait, AnimalTrait

10. Conclusion

In this article, we’ve seen how to create traits in Groovy and explored some of their useful features.

A trait is a really effective way to add common implementations and functionalities throughout our classes. In addition, it allows us to minimize redundant code and makes code maintenance easier.

As usual, the code implementations and unit tests for this article are available in the Github project.

Validating RequestParams and PathVariables in Spring

$
0
0

1. Introduction

In this tutorial, we’ll take a look at how to validate HTTP request parameters and path variables in Spring MVC.

Specifically, we’ll validate String and Number parameters with JSR 303 annotations.

To explore validation of other types, refer to our tutorials about Java Bean Validation and method constraints or learn how to create your own validator.

2. Configuration

To use the Java Validation API, we have to add the validation-api dependency:

<dependency>
    <groupId>javax.validation</groupId>
    <artifactId>validation-api</artifactId>
    <version>2.0.1.Final</version>
</dependency>

Also, we have to enable validation for both request parameters and path variables in our controllers by adding the @Validated annotation:

@RestController
@RequestMapping("/")
@Validated
public class Controller {
    // ...
}

3. Validating a RequestParam

Let’s consider an example where we pass a numeric weekday into a controller method as a request parameter:

@GetMapping("/name-for-day")
public String getNameOfDayByNumber(@RequestParam Integer dayOfWeek) {
    // ...
}

Our goal is to make sure that the value of dayOfWeek is between 1 and 7. And to do so we’ll use the @Min and @Max annotations:

@GetMapping("/name-for-day")
public String getNameOfDayByNumber(@RequestParam @Min(1) @Max(7) Integer dayOfWeek) {
    // ...
}

Any request that does not match these conditions will return HTTP status 500 with a default error message.

If we call http://localhost:8080/name-for-day?dayOfWeek=24, for instance, the response message will be:

There was an unexpected error (type=Internal Server Error, status=500).
getNameOfDayByNumber.dayOfWeek: must be less than or equal to 7

We can change the default message by adding a custom one:

@Max(value = 1, message = “day number has to be less than or equal to 7”)

4. Validating a PathVariable

Just as with @RequestParam, we can use any annotation from the javax.validation.constraints package to validate a @PathVariable.

Let’s consider an example where we validate that a String parameter is not blank and has a length of less than or equal to 10:

@GetMapping("/valid-name/{name}")
public void createUsername(@PathVariable("name") @NotBlank @Size(max = 10) String username) {
    // ...
}

Any request with a name parameter longer than 10 characters, for instance, will result in an error with a message:

There was an unexpected error (type=Internal Server Error, status=500).
createUser.name:size must be between 0 and 10

The default message can be easily overwritten by setting the message parameter in the @Size annotation.

5. Conclusion

In this article, we’ve learned how to validate both request parameters and path variables in Spring applications.

As always all source code is available on GitHub.

Java Weekly, Issue 269

$
0
0

Here we go…

1. Spring and Java

>> A categorized list of all Java and JVM features since JDK 8 [advancedweb.hu]

A handy reference covering everything from new language features down to the new version naming scheme. Good stuff.

>> Tap Compare Testing with Diferencia and Java Microservices [infoq.com]

A good introduction to the “tap compare” testing technique for validating whether a new version of a service is backward-compatible with the existing version. Definitely worth reading if you’re doing any work with APIs.

>> TomEE on Azure cloud [tomitribe.com]

And a complete guide to configuring, building, and deploying a TomEE application to Microsoft’s Azure cloud.

Also worth reading:

Webinars and presentations:

Time to upgrade:

2. Technical and Musings

>> How to Calculate a Cumulative Percentage in SQL [blog.jooq.org]

A clever way to build this report uses a simple ‘GROUP BY’ clause and SQL window functions.

>> Managing passwords in teams with Gopass [blog.codecentric.de]

A good write-up on this basic yet secure password manager for teams who must share access to passwords and other secrets.

Also worth reading:

3. Comics

And my favorite Dilberts of the week:

>> Adjust the Data [dilbert.com]

>> Health Problems [dilbert.com]

>> Dumb Questions [dilbert.com]

4. Pick of the Week

>> Performance Under Load [medium.com]


Iterating Over an Instance of org.json.JSONObject

$
0
0

1. Introduction

In this tutorial, we’ll look at a couple of approaches for iterating over a JSONObject, a simple JSON representation for Java.

We’ll start with a naive solution and then look at something a little more robust.

2. Iterating Through a JSONObject

Let’s start with the simple case of iterating a JSON of name-value pairs:

{
  "name": "Cake",
  "cakeId": "0001",
  "cakeShape": "Heart"
}

For this, we can simply iterate through the keys using the keys() method:

void handleJSONObject(JSONObject jsonObject) {
    jsonObject.keys().forEachRemaining(key -> {
        Object value = jsonObject.get(key);
        logger.info("Key: {0}\tValue: {1}", key, value);
    }
}

And our output will be:

Key: name      Value: Cake
Key: cakeId    Value: 0001
Key: cakeShape Value: Heart

3. Traversing Through a JSONObject

But let’s say that we have a more complex structure:

{
  "batters": [
    {
      "type": "Regular",
      "id": "1001"
    },
    {
      "type": "Chocolate",
      "id": "1002"
    },
    {
      "type": "BlueBerry",
      "id": "1003"
    }
  ],
  "name": "Cake",
  "cakeId": "0001"
}

What does iterating through the keys mean in this case?

Let’s take a look at what our naive keys() approach would give us:

Key: batters    Value: [{"type":"Regular","id":"1001"},{"type":"Chocolate","id":"1002"},
  {"type":"BlueBerry","id":"1003"}]
Key: name       Value: Cake
Key: cakeId     Value: 0001

This, perhaps, isn’t quite as helpful. It seems like what we want in this case is not iteration, but instead traversal.

Traversing through a JSONObject is different from iterating through a JSONObject‘s key set.

For this, we actually need to check the value type, too. Let imagine we do this in a separate method:

void handleValue(Object value) {
    if (value instanceof JSONObject) {
        handleJSONObject((JSONObject) value);
    } else if (value instanceof JSONArray) {
        handleJSONArray((JSONArray) value);
    } else {
        logger.info("Value: {0}", value);
    }
}

Then, our approach is still fairly similar:

void handleJSONObject(JSONObject jsonObject) {
    jsonObject.keys().forEachRemaining(key -> {
        Object value = jsonObject.get(key);
        logger.info("Key: {0}", key);
        handleValue(value);
    });
}

The only thing is that we need to think about how to handle arrays.

4. Traversing Through a JSONArray

Let’s try and keep a similar approach of using an iterator. Instead of calling keys(), though, we’ll call iterator():

void handleJSONArray(JSONArray jsonArray) {
    jsonArray.iterator().forEachRemaining(element -> {
        handleValue(element)
    });
}

Now, this solution is limiting because we are combining traversal with the action we want to take. A common approach to separating the two would be using the Visitor pattern.

5. Conclusion

In this article, we saw a way to iterate over a JSONObject for simple name-value pairs, the problem associated with complex structures, and a traversal technique to solve it.

Of course, this was a depth-first traversal method, but we could do breadth-first in a similar way.

The complete code for the example is available over on Github.

Testing Web APIs with Postman Collections

$
0
0

 1. Introduction

To thoroughly test a web API, we need some kind of web client to access the API’s endpoints. Postman is a standalone tool that exercises web APIs by making HTTP requests from outside the service.

When using Postman, we don’t need to write any HTTP client infrastructure code just for the sake of testing. Instead, we create test suites called collections and let Postman interact with our API.

In this tutorial, we’ll see how to create a Postman Collection that can test a REST API.

2. Setup

Before we get started with our collection, we’ll need to set up the environment.

2.1. Installing Postman

Postman is available for Linux, Mac, and Windows. The tool can be downloaded and installed from the Postman website.

After dismissing the splash screen, we can see the user interface:

Postman Startup

2.2. Running the Server

Postman needs a live HTTP server to process its requests. For this tutorial, we’ll use a previous Baeldung project, spring-boot-rest, which is available on GitHub.

As we might guess from the title, spring-boot-rest is a Spring Boot application. We build the app with the Maven goal install. Once built, we launch the server with the custom Maven goal spring-boot:run.

To verify that the server is running, we can hit this URL in our browser:

http://localhost:8082/spring-boot-rest/auth/foos

This service uses an in-memory database. All records are cleared when the server is stopped.

3. Creating a Postman Collection

A collection in Postman is a series of HTTP requests. Postman saves every aspect of the requests, including headers and message bodies. Therefore, we can run the requests in sequence as semi-automated tests.

Let’s begin by creating a new collection. We can click the dropdown arrow on the New button and select Collection:

When the CREATE A NEW COLLECTION dialog appears, we can name our collection “foo API test. Finally, we click the Create button to see our new collection appear in the list to the left:

Once our collection is created, we can hover the cursor over it to reveal two menu buttons. The arrow button opens a pull-right panel that provides access to the Collection Runner. Conversely, the ellipsis button opens a dropdown menu containing a number of operations on the collection.

4. Adding a POST Request

4.1. Creating a New Request

Now that we have an empty collection, let’s add a request that hits our API. Specifically, let’s send a POST message to the URI /auth/foos. To do that, we open the ellipsis menu on our collection and select Add Request.

When the SAVE REQUEST dialog appears, let’s provide a descriptive name, such as “add a foo”. Then, click the button Save to foo API test.

Once the request is created, we can see that our collection indicates one request. However, if our collection has not been expanded, then we can’t see the request yet. In that case, we can click the collection to expand it.

Now, we should see the new request listed under our collection. We can observe that the new request, by default, is an HTTP GET, which is not what we want. We’ll fix that in the next section:

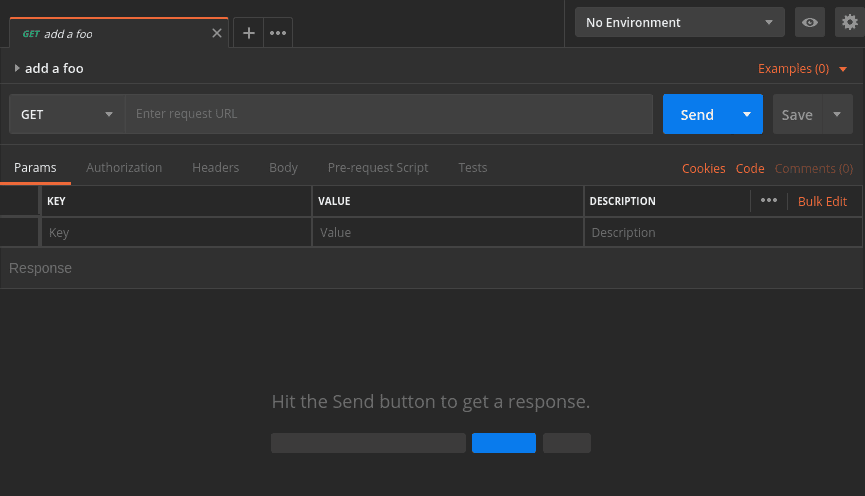
4.2. Editing the Request

To edit the request, let’s click it, thus loading it into the request editor tab:

Although the request editor has numerous options, we only need a few of them for now.

Firstly, let’s use the dropdown to change the method from GET to POST.

Secondly, we need a URL. To the right of the method dropdown is a text box for the request URL. So, let’s enter that now:

http://localhost:8082/spring-boot-rest/auth/foos

The last step is to provide a message body. Below the URL address is a row of tab headers. We’ll click the Body tab header to get to the body editor.

In the Body tab, just above the text area, there’s a row of radio buttons and a dropdown. These control the formatting and content type of the request.

Our service accepts JSON data, so we select the raw radio button. In the dropdown to the right, we apply the JSON (application/json) content type.

Once the encoding and content-type have been set, we add our JSON content to the text area:

{
    "name": "Transformers"
}

Finally, let’s be sure to save our changes by pressing Ctrl-S or hitting the Save button. The Save button is located to the right of the Send button. Once we save, we can see that the request has been updated to POST in the list on the left:

5. Running the Request

5.1. Running a Single Request

To run a single request, we just click the Send button to the right of the URL address. Once we click Send, the response panel will open below the request panel. It may be necessary to scroll down to see it:

Let’s examine our results. Specifically, in the header bar, we see that our request succeeded with the status 201 Created. Furthermore, the response body shows that our Transformers record received an id of 1.

5.2. Using the Collection Runner

In contrast to the Send button, the collection runner can execute an entire collection. To launch the collection runner, we hover the cursor over our foo API test collection and click the pull-right arrow. In the pull-right panel we can see a Run button, so let’s click that:

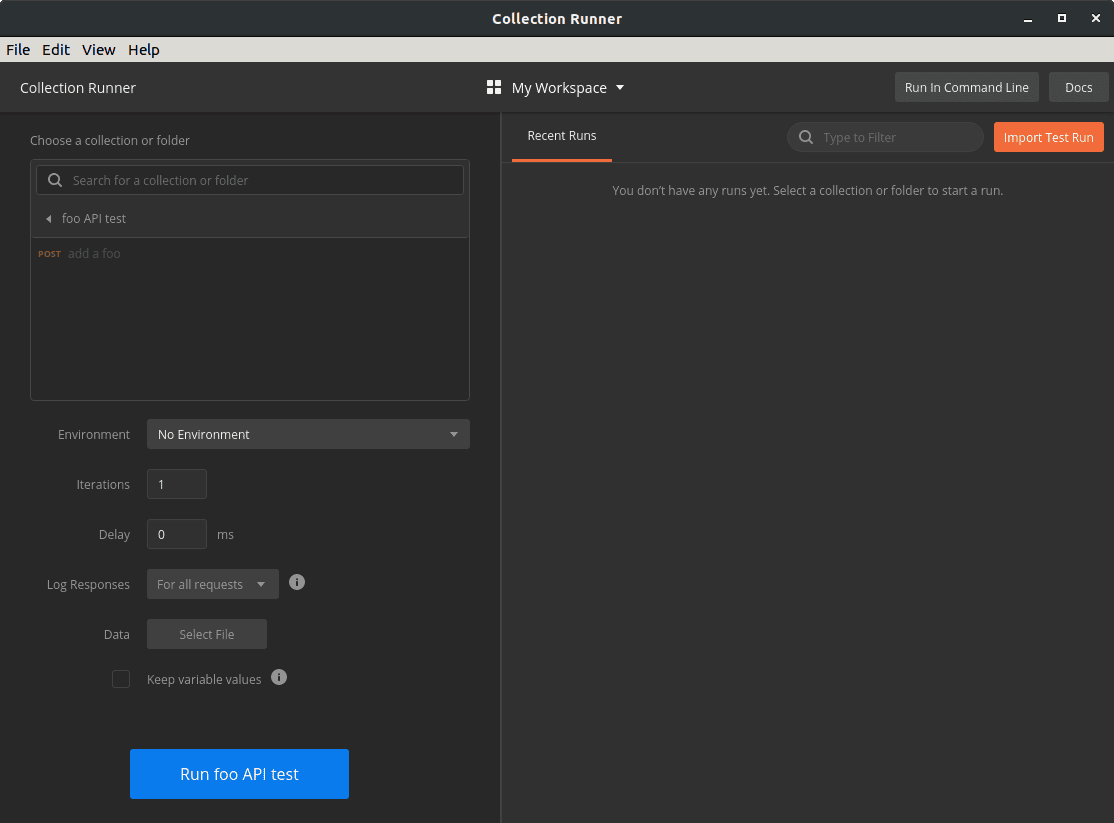
When we click the Run button the collection runner opens in a new window. Because we launched it from our collection, the runner is already initialized to our collection:

The collection runner offers options that affect the test run, but we won’t need them for this exercise. Let’s go directly to the Run foo API test button at the bottom and click that.

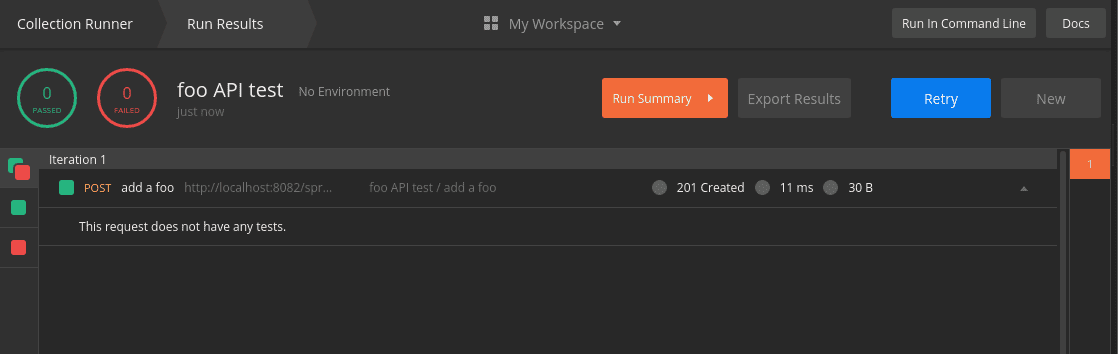
When we run the collection, the view changes to Run Results. In this view, we see a list of tests that are marked green for success and red for failure.

Even though our request was sent, the runner indicates that zero tests passed and zero tests failed. This is because we haven’t added tests to our request yet:

6. Testing the Response

6.1. Adding Tests to a Request

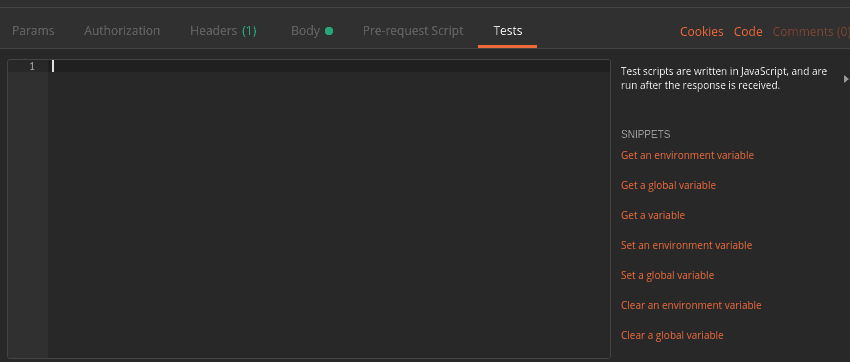
To create a test, let’s return to the request editing panel where we built our POST method. We click the Tests tab which is located under the URL. When we do that, the Tests panel appears:

In the Tests panel, we write JavaScript that will be executed when the response is received from the server.

Postman offers built-in variables that provide access to the request and response. Furthermore, a number of JavaScript libraries can be imported using the require() syntax.

There are far too many scripting features to cover in this tutorial. However, the official Postman documentation is an excellent resource on this topic.

Let’s continue by adding three tests to our request:

pm.test("success status", () => pm.response.to.be.success );
pm.test("name is correct", () => 
  pm.expect(pm.response.json().name).to.equal("Transformers"));
pm.test("id was assigned", () => 
  pm.expect(pm.response.json().id).to.be.not.null );

As we can see, these tests make use of the global pm module provided by Postman. In particular, the tests use pm.test(), pm.expect(), and pm.response.

The pm.test() function accepts a label and an assertion function, such as expect(). We’re using pm.expect() to assert conditions on the contents of the response JSON.

The pm.response object provides access to various properties and operations on the response returned from the server. Available properties include the response status and JSON content, among others.

As always, we save our changes with Ctrl-S or the Save button.

6.2. Running the Tests

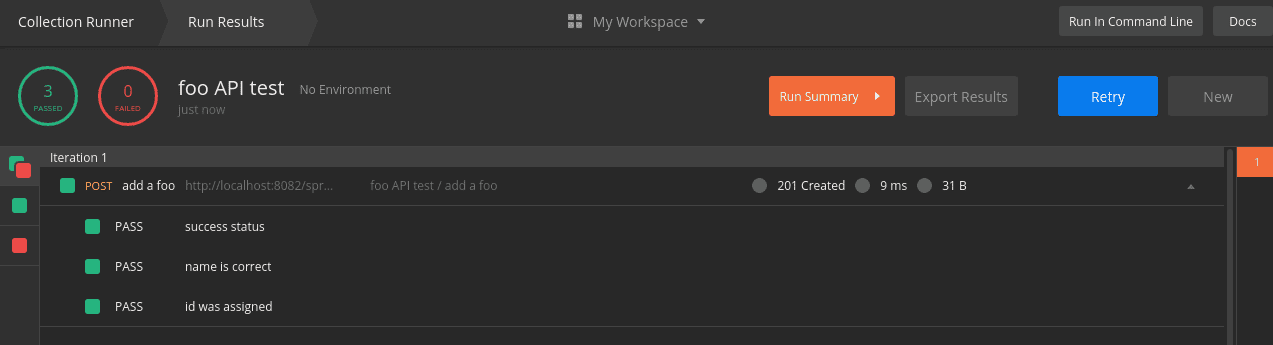
Now that we have our tests, let’s run the request again. Pressing the Send button displays the results in the Test Results tab of the response panel:

Likewise, the collection runner now displays our test results. Specifically, the summary at the top left shows the updated passed and failed totals. Below the summary is a list that shows each test with its status:

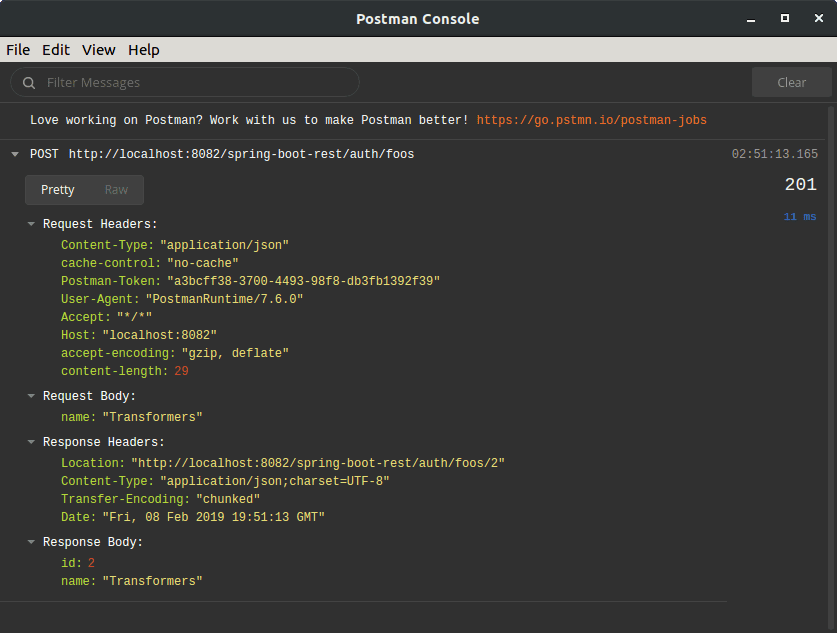
6.3. Viewing the Postman Console

The Postman Console is a useful tool for creating and debugging scripts. We can find the console under the View menu with the item name Show Postman Console. When launched, the console opens in a new window.

While the console is open, it records all HTTP requests and responses. Furthermore, when scripts use console.log(), the Postman Console displays those messages:

7. Creating a Sequence of Requests

So far, we’ve focused on a single HTTP request. Now, let’s see what we can do with multiple requests. By chaining together a series of requests, we can simulate and test a client-server workflow.

In this section, let’s apply what we’ve learned in order to create a sequence of requests. Specifically, we’ll add three more requests to execute after the POST request we have already created. These will be a GET, a DELETE, and finally, another GET.

7.1. Capturing Response Values in Variables

Before we create our new requests, let’s make a modification to our existing POST request. Because we don’t know which id the server will assign each foo instance, we can use a variable to capture the id returned by the server.

To capture that id, we’ll add one more line to the end of the POST request’s test script:

pm.variables.set("id", pm.response.json().id);

The pm.variables.set() function takes a value and assigns it to a temporary variable. In this case, we’re creating an id variable to store our object’s id value. Once set, we can access this variable in later requests.

7.2. Adding a GET Request

Now, using the techniques from previous sections, let’s add a GET request after the POST request.

With this GET request, we’ll retrieve the same foo instance that the POST request created. Let’s name this GET request as “get a foo“.

The URL of the GET request is:

http://localhost:8082/spring-boot-rest/auth/foos/{{id}}

In this URL, we’re referencing the id variable that we previously set during the POST request. Thus, the GET request should retrieve the same instance that was created by the POST.

Variables, when appearing outside of scripts, are referenced using the double-brace syntax {{id}}.

Since there’s no body for a GET request, let’s proceed directly to the Tests tab. Because the tests are similar, we can copy the tests from the POST request, then make a few changes.

Firstly, we don’t need to set the id variable again, so let’s not copy that line.

Secondly, we know which id to expect this time, so let’s verify that id. We can use the id variable to do that:

pm.test("success status", () => pm.response.to.be.success );
pm.test("name is correct", () => 
  pm.expect(pm.response.json().name).to.equal("Transformers"));
pm.test("id is correct", () => 
  pm.expect(pm.response.json().id).to.equal(pm.variables.get("id")) );

Since the double-brace syntax is not valid JavaScript, we use the pm.variables.get() function to access the id variable.

Finally, let’s save the changes as we’ve done before.

7.3. Adding a DELETE Request

Next, we’ll add a DELETE request that will remove the foo object from the server.

We’ll proceed by adding a new request after the GET, and setting its method to DELETE. We can name this request “delete a foo“.

The URL of the delete is identical to the GET URL:

http://localhost:8082/spring-boot-rest/auth/foos/{{id}}

The response will not have a body to test, but we can test the response code. Therefore, the DELETE request will have only one test:

pm.test("success status", () => pm.response.to.be.success );

7.4. Verifying the DELETE

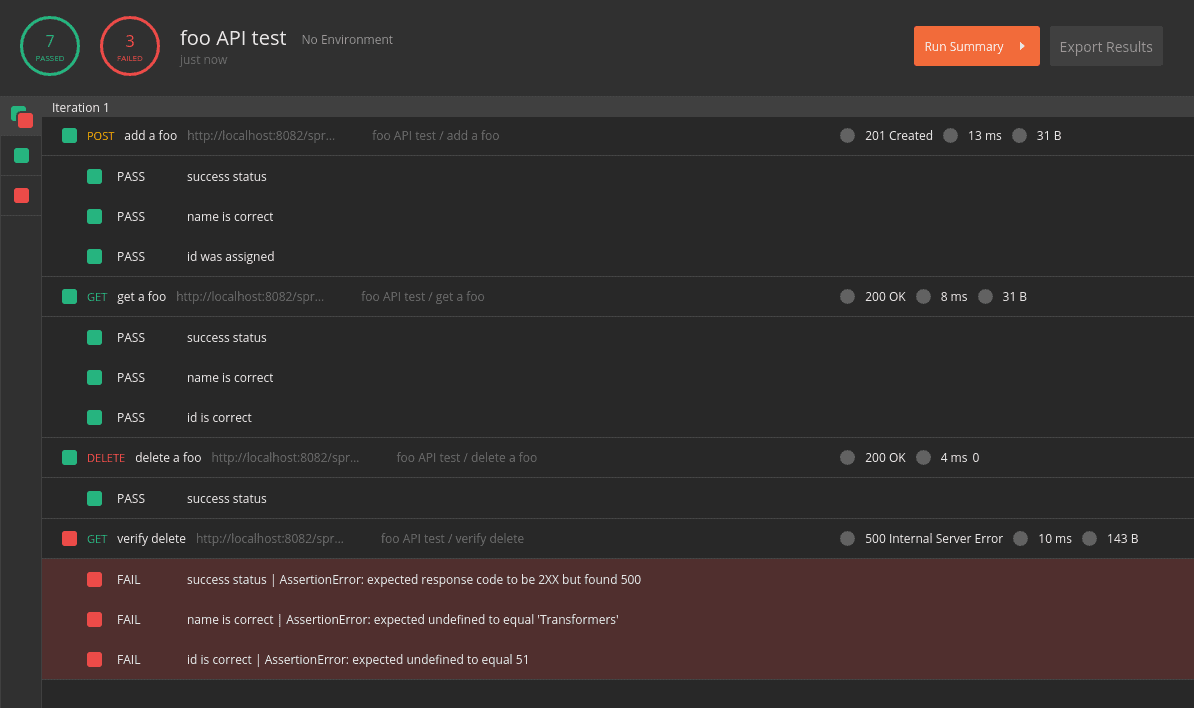
Finally, let’s add another copy of the GET request to verify that the DELETE really worked. This time, let’s duplicate our first GET request instead of creating a request from scratch.

To duplicate a request, we right click on the request to show the dropdown menu. Then, we select Duplicate.

The duplicate request will have the word Copy appended to its name. Let’s rename it to “verify delete” to avoid confusion. The Rename option is available by right-clicking the request.

By default, the duplicate request appears immediately after the original request. As a result, we’ll need to drag it below the DELETE request.

The final step is to modify the tests. However, before we do that, let’s take an opportunity to see a failed test.

We have copied the GET request and moved it after the DELETE, but we haven’t updated the tests yet. Since the DELETE request should have deleted the object, the tests should fail.

Let’s make sure to save all of our requests, then hit Retry in the collection runner. As expected, our tests have failed:

Now that our brief detour is complete, let’s fix the tests.

By reviewing the failed tests, we can see that the server responds with a 500 status. Therefore, we’ll change the status in our test.

Furthermore, by viewing the failed response in the Postman Console, we learn that the response includes a cause property. Moreover, the cause property contains the string “No value present“. We can test for that as well:

pm.test("status is 500", () => pm.response.to.have.status(500) );
pm.test("no value present", () => 
  pm.expect(pm.response.json().cause).to.equal("No value present"));

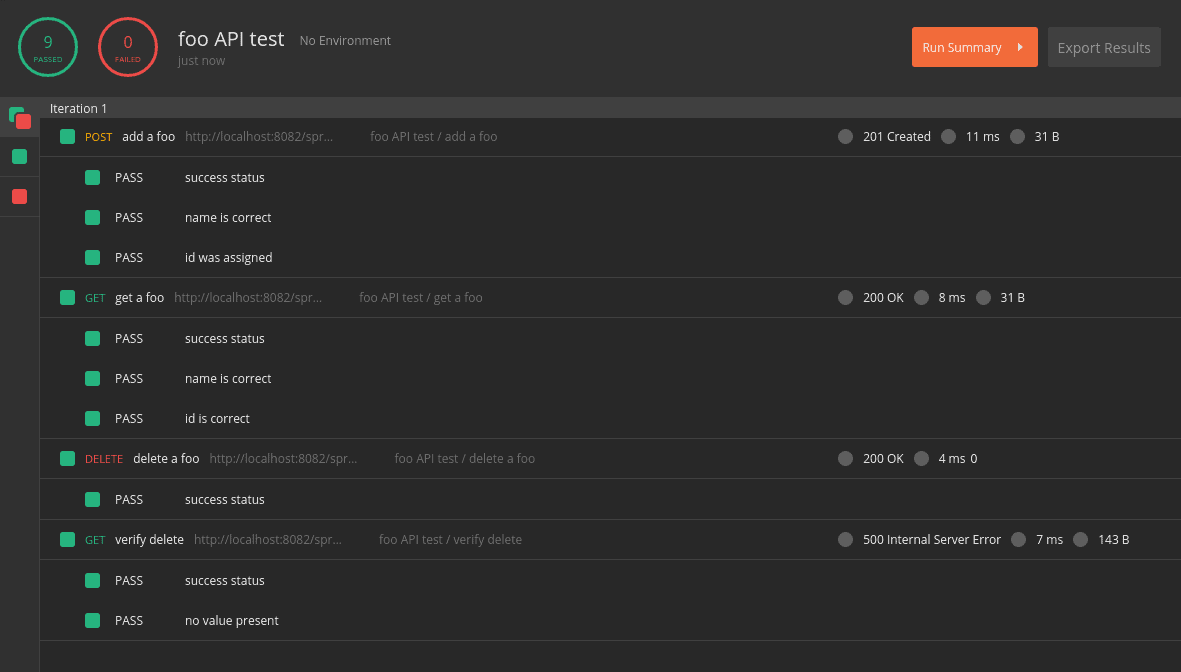
7.5. Running the Full Collection

Now that we’ve added all of the requests, let’s run the full collection in the collection runner:

If everything has gone according to plan, we should have nine successful tests.

8. Exporting and Importing the Collection

While Postman stores our collections in a private, local location, we may want to share the collection. To do that, we export the collection to a JSON file.

The Export command is available within the ellipsis menu of the collection. When prompted for a JSON file version, let’s choose the latest recommended version.

After we select the file version, Postman will prompt for a file name and location for the exported collection. We can choose a folder within our GitHub project, for example.

To import a previously exported collection, we use the Import button. We can find it in the toolbar of the main Postman window. When Postman prompts for a file location, we can navigate to the JSON file we wish to import.

It’s worth noting that Postman does not track exported files. As a result, Postman doesn’t show external changes until we re-import the collection.

9. Conclusion

In this article, we have used Postman to create semi-automated tests for a REST API. While this article serves as an introduction to Postman’s basic features, we have barely scratched the surface of its capabilities. The Postman online documentation is a valuable resource for deeper exploration.

The collection created in this tutorial is available over on GitHub.

SQL Injection and How to Prevent It?

$
0
0

1. Introduction

Despite being one of the best-known vulnerabilities, SQL Injection continues to rank on the top spot of the infamous OWASP Top 10’s list – now part of the more general Injection class.

In this tutorial, we’ll explore common coding mistakes in Java that lead to a vulnerable application and how to avoid them using the APIs available in the JVM’s standard runtime library. We’ll also cover what protections we can get out of ORMs like JPA, Hibernate and others and which blind spots we’ll still have to worry about.

2. How Applications Become Vulnerable to SQL Injection?

Injection attacks work because, for many applications, the only way to execute a given computation is to dynamically generate code that is in turn run by another system or component. If in the process of generating this code we use untrusted data without proper sanitization, we leave an open door for hackers to exploit.

This statement may sound a bit abstract, so let’s take look at how this happens in practice with a textbook example:

public List<AccountDTO>
  unsafeFindAccountsByCustomerId(String customerId)
  throws SQLException {
    // UNSAFE !!! DON'T DO THIS !!!
    String sql = "select "
      + "customer_id,acc_number,branch_id,balance "
      + "from Accounts where customer_id = '"
      + customerId 
      + "'";
    Connection c = dataSource.getConnection();
    ResultSet rs = c.createStatement().executeQuery(sql);
    // ...
}

The problem with this code is obvious: we’ve put the customerId‘s value into the query with no validation at all. Nothing bad will happen if we’re sure that this value will only come from trusted sources, but can we?

Let’s imagine that this function is used in a REST API implementation for an account resource. Exploiting this code is trivial: all we have to do is to send a value that, when concatenated with the fixed part of the query, change its intended behavior:

curl -X GET \
  'http://localhost:8080/accounts?customerId=abc%27%20or%20%271%27=%271' \

Assuming the customerId parameter value goes unchecked until it reaches our function, here’s what we’d receive:

abc' or '1' = '1

When we join this value with the fixed part, we get the final SQL statement that will be executed:

select customer_id, acc_number,branch_id, balance
  from Accounts where customerId = 'abc' or '1' = '1'

Probably not what we’ve wanted…

A smart developer (aren’t we all?) would now be thinking: “That’s silly! I’d never use string concatenation to build a query like this”.

Not so fast… This canonical example is silly indeed but there are situations where we might still need to do it:

  • Complex queries with dynamic search criteria: adding UNION clauses depending on user-supplied criteria
  • Dynamic grouping or ordering: REST APIs used as a backend to a GUI data table

2.1. I’m using JPA. I’m Safe, Right?

This is a common misconception. JPA and other ORMs relieves us from creating hand-coded SQL statements, but they won’t prevent us from writing vulnerable code.

Let’s see how the JPA version of the previous example looks:

public List<AccountDTO> unsafeJpaFindAccountsByCustomerId(String customerId) {    
    String jql = "from Account where customerId = '" + customerId + "'";        
    TypedQuery<Account> q = em.createQuery(jql, Account.class);        
    return q.getResultList()
      .stream()
      .map(this::toAccountDTO)
      .collect(Collectors.toList());        
}

The same issue we’ve pointed before is also present here: we’re using unvalidated input to create a JPA query, so we’re exposed to the same kind of exploit here.

3. Prevention Techniques

Now that we know what a SQL injection is, let’s see how we can protect our code from this kind of attack. Here we’re focusing on a couple of very effective techniques available in Java and other JVM languages, but similar concepts are available to other environments, such as PHP, .Net, Ruby and so forth.

For those looking for a complete list of available techniques, including database-specific ones, the OWASP Project maintains a SQL Injection Prevention Cheat Sheet, which is a good place to learn more about the subject.

3.1. Parameterized Queries

This technique consists of using prepared statements with the question mark placeholder (“?”) in our queries whenever we need to insert a user-supplied value. This is very effective and, unless there’s a bug in the JDBC driver’s implementation, immune to exploits.

Let’s rewrite our example function to use this technique:

public List<AccountDTO> safeFindAccountsByCustomerId(String customerId)
  throws Exception {
    
    String sql = "select "
      + "customer_id, acc_number, branch_id, balance from Accounts"
      + "where customer_id = ?";
    
    Connection c = dataSource.getConnection();
    PreparedStatement p = c.prepareStatement(sql);
    p.setString(1, customerId);
    ResultSet rs = p.executeQuery(sql)); 
    // omitted - process rows and return an account list
}

Here we’ve used the prepareStatement() method available in the Connection instance to get a PreparedStatement. This interface extends the regular Statement interface with several methods that allow us to safely insert user-supplied values in a query before executing it.

For JPA, we have a similar feature:

String jql = "from Account where customerId = :customerId";
TypedQuery<Account> q = em.createQuery(jql, Account.class)
  .setParameter("customerId", customerId);
// Execute query and return mapped results (omitted)

When running this code under Spring Boot, we can set the property logging.level.sql to DEBUG and see what query is actually built in order to execute this operation:

// Note: Output formatted to fit screen
[DEBUG][SQL] select
  account0_.id as id1_0_,
  account0_.acc_number as acc_numb2_0_,
  account0_.balance as balance3_0_,
  account0_.branch_id as branch_i4_0_,
  account0_.customer_id as customer5_0_ 
from accounts account0_ 
where account0_.customer_id=?

As expected, the ORM layer creates a prepared statement using a placeholder for the customerId parameter. This is the same we’ve done in the plain JDBC case – but with a few statements less, which is nice.

As a bonus, this approach usually results in a better performing query, since most databases can cache the query plan associated with a prepared statement.

Please note that this approach only works for placeholders used as values. For instance, we can’t use placeholders to dynamically change the name of a table:

// This WILL NOT WORK !!!
PreparedStatement p = c.prepareStatement("select count(*) from ?");
p.setString(1, tableName);

Here, JPA won’t help either:

// This WILL NOT WORK EITHER !!!
String jql = "select count(*) from :tableName";
TypedQuery q = em.createQuery(jql,Long.class)
  .setParameter("tableName", tableName);
return q.getSingleResult();

In both cases, we’ll get a runtime error.

The main reason behind this is the very nature of a prepared statement: database servers use them to cache the query plan required to pull the result set, which usually is the same for any possible value. This is not true for table names and other constructs available in the SQL language such as columns used in an order by clause.

3.2. JPA Criteria API

Since explicit JQL query building is the main source of SQL Injections, we should favor the use of the JPA’s Query API, when possible.

For a quick primer on this API, please refer to the article on Hibernate Criteria queries. Also worth reading is our article about JPA Metamodel, which shows how to generate metamodel classes that will help us to get rid of string constants used for column names – and the runtime bugs that arise when they change.

Let’s rewrite our JPA query method to use the Criteria API:

CriteriaBuilder cb = em.getCriteriaBuilder();
CriteriaQuery<Account> cq = cb.createQuery(Account.class);
Root<Account> root = cq.from(Account.class);
cq.select(root).where(cb.equal(root.get(Account_.customerId), customerId));

TypedQuery<Account> q = em.createQuery(cq);
// Execute query and return mapped results (omitted)

Here, we’ve used more code lines to get the same result, but the upside is that now we don’t have to worry about JQL syntax.

Another important point: despite its verbosity, the Criteria API makes creating complex query services more straightforward and safer. For a complete example that shows how to do it in practice, please take a look at the approach used by JHipster-generated applications.

3.3. User Data Sanitization

Data Sanitization is a technique of applying a filter to user supplied-data so it can be safely used by other parts of our application. A filter’s implementation may vary a lot, but we can generally classify them in two types: whitelists and blacklists.

Blacklists, which consist of filters that try to identify an invalid pattern, are usually of little value in the context of SQL Injection prevention – but not for the detection! More on this later.

Whitelists, on the other hand, work particularly well when we can define exactly what is a valid input.

Let’s enhance our safeFindAccountsByCustomerId method so now the caller can also specify the column used to sort the result set. Since we know the set of possible columns, we can implement a whitelist using a simple set and use it to sanitize the received parameter:

private static final Set<String> VALID_COLUMNS_FOR_ORDER_BY
  = Collections.unmodifiableSet(Stream
      .of("acc_number","branch_id","balance")
      .collect(Collectors.toCollection(HashSet::new)));

public List<AccountDTO> safeFindAccountsByCustomerId(
  String customerId,
  String orderBy) throws Exception { 
    String sql = "select "
      + "customer_id,acc_number,branch_id,balance from Accounts"
      + "where customer_id = ? ";
    if (VALID_COLUMNS_FOR_ORDER_BY.contains(orderBy)) {
        sql = sql + " order by " + orderBy;
    } else {
        throw new IllegalArgumentException("Nice try!");
    }
    Connection c = dataSource.getConnection();
    PreparedStatement p = c.prepareStatement(sql);
    p.setString(1,customerId);
    // ... result set processing omitted
}

Here, we’re combining the prepared statement approach and a whitelist used to sanitize the orderBy argument. The final result is a safe string with the final SQL statement. In this simple example, we’re using a static set, but we could also have used database metadata functions to create it.

We can use the same approach for JPA, also taking advantage of the Criteria API and Metadata to avoid using String constants in our code:

// Map of valid JPA columns for sorting
final Map<String,SingularAttribute<Account,?>> VALID_JPA_COLUMNS_FOR_ORDER_BY = Stream.of(
  new AbstractMap.SimpleEntry<>(Account_.ACC_NUMBER, Account_.accNumber),
  new AbstractMap.SimpleEntry<>(Account_.BRANCH_ID, Account_.branchId),
  new AbstractMap.SimpleEntry<>(Account_.BALANCE, Account_.balance))
  .collect(Collectors.toMap(Map.Entry::getKey, Map.Entry::getValue));

SingularAttribute<Account,?> orderByAttribute = VALID_JPA_COLUMNS_FOR_ORDER_BY.get(orderBy);
if (orderByAttribute == null) {
    throw new IllegalArgumentException("Nice try!");
}

CriteriaBuilder cb = em.getCriteriaBuilder();
CriteriaQuery<Account> cq = cb.createQuery(Account.class);
Root<Account> root = cq.from(Account.class);
cq.select(root)
  .where(cb.equal(root.get(Account_.customerId), customerId))
  .orderBy(cb.asc(root.get(orderByAttribute)));

TypedQuery<Account> q = em.createQuery(cq);
// Execute query and return mapped results (omitted)

This code has the same basic structure as in the plain JDBC. First, we use a whitelist to sanitize the column name, then we proceed to create a CriteriaQuery to fetch the records from the database.

3.4. Are We Safe Now?

Let’s assume that we’ve used parameterized queries and/or whitelists everywhere. Can we now go to our manager and guarantee we’re safe?

Well… not so fast. Without even considering Turing’s halting problem, there are other aspects we must consider:

  1. Stored Procedures: These are also prone to SQL Injection issues; whenever possible please apply sanitation even to values that will be sent to the database via prepared statements
  2. Triggers: Same issue as with procedure calls, but even more insidious because sometimes we have no idea they’re there…
  3. Insecure Direct Object References: Even if our application is SQL-Injection free, there’s still a risk that associated with this vulnerability category – the main point here is related to different ways an attacker can trick the application, so it returns records he or she was not supposed to have access to – there’s a good cheat sheet on this topic available at OWASP’s GitHub repository

In short, our best option here is caution. Many organizations nowadays use a “red team” exactly for this. Let them do their job, which is exactly to find any remaining vulnerabilities.

4. Damage Control Techniques

As a good security practice, we should always implement multiple defense layers – a concept known as defense in depth. The main idea is that even if we’re unable to find all possible vulnerabilities in our code – a common scenario when dealing with legacy systems – we should at least try to limit the damage an attack would inflict.

Of course, this would be a topic for a whole article or even a book but let’s name a few measures:

  1. Apply the principle of least privilege: Restrict as much as possible the privileges of the account used to access the database
  2. Use database-specific methods available in order to add an additional protection layer; for example, the H2 Database has a session-level option that disables all literal values on SQL Queries
  3. Use short-lived credentials: Make the application rotate database credentials often; a good way to implement this is by using Spring Cloud Vault
  4. Log everything: If the application stores customer data, this is a must; there are many solutions available that integrate directly to the database or work as a proxy, so in case of an attack we can at least assess the damage
  5. Use WAFs or similar intrusion detection solutions: those are the typical blacklist examples – usually, they come with a sizeable database of known attack signatures and will trigger a programmable action upon detection. Some also include in-JVM agents that can detect intrusions by applying some instrumentation – the main advantage of this approach is that an eventual vulnerability becomes much easier to fix since we’ll have a full stack trace available.

5. Conclusion

In this article, we’ve covered SQL Injection vulnerabilities in Java applications –  a very serious threat to any organization that depends on data for their business – and how to prevent them using simple techniques.

As usual, full code for this article is available on Github.

How to use Kotlin Range Expressions

$
0
0

1. Introduction

A range is a sequence of values defined by a start, an end, and a step.

In this quick tutorial, we’ll have a look at how we can define and use ranges in Kotlin.

2. Using Kotlin Ranges

In Kotlin, we can create ranges using the rangeTo() and downTo() functions or the .. operator.

We can use ranges for any comparable type.

By default, they’re inclusive, which means that the 1..4 expression corresponds to the values 1,2,3 and 4.

In addition, there’s another default: the distance between two values, called a step, with an implicit value of 1.

So now, let’s take a look at a few examples of creating ranges and using other useful methods to manipulate them.

2.1. Creating Ranges

Ranges implement a common interface – ClosedRange<T>. The result of a ClosedRange is a progression (such as IntProgression, LongProgression, or CharProgression).

This progression contains a start, an inclusive end, and a step and it’s a subtype of Iterable<N> where N is Int, Long or Char.

Let’s start by looking at the simplest way to create a range, using the “..” and in operators:

(i in 1..9)

Also, if we want to define a backward range we can use the downTo operator:

(i in 9 downTo 1)

We can also use this expression as part of an if statement to check if a value belongs to a range:

if (3 in 1..9)
  print("yes")

2.2. Iterating Ranges

Now, while we can use ranges with anything comparable, if we want to iterate, then we need an integral type range.

Now let’s take a look at the code to iterate through a range:

for (i in 1.rangeTo(9)) {
    print(i) // Print 123456789
}
  
for (i in 9.downTo(1)) {
    print(i) // Print 987654321
}

The same use case applies to chars:

for (ch in 'a'..'f') {
    print(ch) // Print abcdef
}
  
for (ch in 'f' downTo 'a') {
    print(ch) // Print fedcba
}

3. Using the step() Function

The use of the step() function is fairly intuitive: we can use it to define a distance between the values of the range:

for(i in 1..9 step 2) {
    print(i) // Print 13579
}

for (i in 9 downTo 1 step 2) {
    print(i) // Print 97531
}

In this example, we’re iterating forward and backward through the values from 1-9, with a step value of 2.

4. Using the reversed() Function

As the name suggests, the reversed() function will reverse the order of the range:

(1..9).reversed().forEach {
    print(it) // Print 987654321
}

(1..9).reversed().step(3).forEach {
    print(it) // Print 963
}

5. Using the until() Function

When we want to create a range that excludes the end element we can use until():

for (i in 1 until 9) {
    print(i) // Print 12345678
}

6. The last, first, step Elements

If we need to find the first, the step or the last value of the range, there are functions that will return them to us:

print((1..9).first) // Print 1
print((1..9 step 2).step) // Print 2
print((3..9).reversed().last) // Print 3

7. Filtering Ranges

The filter() function will return a list of elements matching a given predicate:

val r = 1..10
val f = r.filter { it -> it % 2 == 0 } // Print [2, 4, 6, 8, 10]

We can also apply other functions such as map() and reduce() to our range:

val m = r.map { it -> it * it } // Print [1, 4, 9, 16, 25, 36, 49, 64, 81, 100]
val rdc = r.reduce{a, b -> a + b} // Print 55

8. Other Utility Functions

There are many other functions we can apply to our range, like min, max, sum, average, count, distinct:

val r = 1..20
print(r.min()) // Print 1
print(r.max()) // Print 20
print(r.sum()) // Print 210
print(r.average()) // Print 10.5
print(r.count()) // Print 20

val repeated = listOf(1, 1, 2, 4, 4, 6, 10)
print(repeated.distinct()) // Print [1, 2, 4, 6, 10]

9. Custom Objects

It’s also possible to create a range over custom objects. For that, the only requirement is to extend the Comparable interface.

An enum is a good example. All enums in Kotlin extend Comparable which means that, by default, the elements are sorted in the sequence they appear.

Let’s create a quick Color enum:

enum class Color(val rgb: Int) : Comparable<Color> {
    BLUE(0x0000FF),
    GREEN(0x008000),
    RED(0xFF0000),
    MAGENTA(0xFF00FF),
    YELLOW(0xFFFF00);
}

And then use it in some if statements:

val range = red..yellow
if (range.contains(Color.MAGENTA)) println("true") // Print true
if (Color.RED in Color.GREEN..Color.YELLOW) println("true") // Print true
if (Color.RED !in Color.MAGENTA..Color.YELLOW) println("true") // Print true

However, as this is not an integral type, we can’t iterate over it. If we try, we’ll get a compilation error:

fun main(args: Array<String>) {
    for (c in Color.BLUE.rangeTo(Color.YELLOW)) println(c) // for-loop range must have an iterator() method
}

And if we do want to have a custom range that we can iterate over, we just need to implement ClosedRange as well as Iterator.

10. Conclusion

In this article, we demonstrated how we can use range expressions in Kotlin and different functions we can apply.

As always the source code is available over on GitHub.

The Adapter Pattern in Java

$
0
0

1. Overview

In this quick tutorial, we’ll have a look at the Adapter pattern and its Java implementation.

2. Adapter Pattern

An Adapter pattern acts as a connector between two incompatible interfaces that otherwise cannot be connected directly. An Adapter wraps an existing class with a new interface so that it becomes compatible with the client’s interface.

The main motive behind using this pattern is to convert an existing interface into another interface that the client expects. It’s usually implemented once the application is designed.

2.1. Adapter Pattern Example

Consider a scenario in which there is an app that’s developed in the US which returns the top speed of luxury cars in miles per hour (MPH). Now we need to use the same app for our client in the UK that wants the same results but in kilometers per hour (km/h).

To deal with this problem, we’ll create an adapter which will convert the values and give us the desired results:

First, we’ll create the original interface Movable which is supposed to return the speed of some luxury cars in miles per hour:

public interface Movable {
    // returns speed in MPH 
    double getSpeed();
}

We’ll now create one concrete implementation of this interface:

public class BugattiVeyron implements Movable {
 
    @Override
    public double getSpeed() {
        return 268;
    }
}

Now we’ll create an adapter interface MovableAdapter that will be based on the same Movable class. It may be slightly modified to yield different results in different scenarios:

public interface MovableAdapter {
    // returns speed in KM/H 
    double getSpeed();
}

The implementation of this interface will consist of private method convertMPHtoKMPH() that will be used for the conversion:

public class MovableAdapterImpl implements MovableAdapter {
    private Movable luxuryCars;
    
    // standard constructors

    @Override
    public double getSpeed() {
        return convertMPHtoKMPH(luxuryCars.getSpeed());
    }
    
    private double convertMPHtoKMPH(double mph) {
        return mph * 1.60934;
    }
}

Now we’ll only use the methods defined in our Adapter, and we’ll get the converted speeds. In this case, the following assertion will be true:

@Test
public void whenConvertingMPHToKMPH_thenSuccessfullyConverted() {
    Movable bugattiVeyron = new BugattiVeyron();
    MovableAdapter bugattiVeyronAdapter = new MovableAdapterImpl(bugattiVeyron);
 
    assertEquals(bugattiVeyronAdapter.getSpeed(), 431.30312, 0.00001);
}

As we can notice here, our adapter converts 268 mph to 431 km/h for this particular case.

2.2. When to Use Adapter Pattern

  • When an outside component provides captivating functionality that we’d like to reuse, but it’s incompatible with our current application. A suitable Adapter can be developed to make them compatible with each other
  • When our application is not compatible with the interface that our client is expecting
  • When we want to reuse legacy code in our application without making any modification in the original code

3. Conclusion

In this article, we had a look at the Adapter design pattern in Java.

The full source code for this example is available over on GitHub.

Viewing all 4731 articles
Browse latest View live


<script src="https://jsc.adskeeper.com/r/s/rssing.com.1596347.js" async> </script>