Quantcast
Channel: Baeldung
Viewing all 4757 articles
Browse latest View live

Creating New Roles and Authorities in JHipster

$
0
0

1. Overview

JHipster comes with two default roles – USER and ADMIN – but sometimes we need to add our own.

In this tutorial, we’ll create a new role named MANAGER that we can use to provide additional privileges to a user.

Note that JHipster uses the term authorities somewhat interchangeably with roles. Either way, we essentially mean the same thing.

2. Code Changes

The first step for creating a new role is to update the class AuthoritiesConstants. This file is automatically generated when we create a new JHipster application and contains constants for all the roles and authorities in the application.

To create our new MANAGER role, we simply add a new constant into this file:

public static final String MANAGER = "ROLE_MANAGER";

3. Schema Changes

The next step is to define the new role in our data store.

JHipster supports a variety of persistent data stores and creates an initial setup task that populates the data store with users and authorities.

To add a new role into the database setup, we must edit the InitialSetupMigration.java file. It already has a method called addAuthorities, and we simply add our new role into the existing code:

public void addAuthorities(MongoTemplate mongoTemplate) {
    // Add these lines after the existing, auto-generated code
    Authority managerAuthority = new Authority();
    managerAuthority.setName(AuthoritiesConstants.MANAGER);
    mongoTemplate.save(managerAuthority);
}

This example uses MongoDB, but the steps are very similar for the other persistent stores that JHipster supports.

Note that some data stores, such as H2, rely solely on a file named authorities.csv, and thus do not have any generated code that requires updating.

4. Using Our New Role

Now that we have a new role defined let’s look at how to use it in our code.

4.1. Java Code

On the backend, there are two primary ways to check if a user has the authority to perform an operation.

First, we can modify SecurityConfiguration if we want to limit access to a particular API:

public void configure(HttpSecurity http) throws Exception {
    http
        .authorizeRequests()
            .antMatchers("/management/**").hasAuthority(AuthoritiesConstants.MANAGER);
}

Second, we can use SecurityUtils anywhere in our application to check if a user is in a role:

if (SecurityUtils.isCurrentUserInRole(AuthoritiesConstants.MANAGER)) {
    // perform some logic that is applicable to manager role
}

4.2. Front-End

JHipster provides two ways to check for roles on the front-end. Note that these examples use Angular, but similar constructs exist for React.

First, any element in a template can use the *jhiHasAnyAuthority directive. It accepts a single string or array of strings:

<div *jhiHasAnyAuthority="'ROLE_MANAGER'">
    <!-- manager related code here -->
</div>

Second, the Principal class can check if a user has a particular role:

isManager() {
    return this.principal.identity()
      .then(account => this.principal.hasAnyAuthority(['ROLE_MANAGER']));
}

5. Conclusion

In this article, we’ve seen how simple it is to create new roles and authorities in JHipster. While the default USER and ADMIN roles are a great starting point for most applications, additional roles provide more flexibility.

With additional roles, we have greater control over which users can access APIs and what data they can see in the front-end.

As always, the code is available over on GitHub.


Spring Data JPA @Modifying Annotation

$
0
0

1. Introduction

In this short tutorial, we’ll learn how to create update queries with the Spring Data JPA @Query annotation. We’ll achieve this by using the @Modifying annotation.

First, we’ll refresh our memory and see how to make queries using Spring Data JPA. After that, we’ll deep dive into the use of @Query and @Modifying annotations. Finally, we’ll see how to manage the state of our persistence context when using modifying queries.

2. Querying in Spring Data JPA

First, let’s recap the 3 mechanisms that Spring Data JPA provides for querying data in a database:

  • Query methods
  • @Query annotation
  • Custom repository implementation

Let’s create a User class and a matching Spring Data JPA repository to illustrate these mechanisms:

@Entity
@Table(name = "users", schema = "users")
public class User {

    @Id
    @GeneratedValue(strategy = GenerationType.IDENTITY)
    private int id;
    private String name;
    private LocalDate creationDate;
    private LocalDate lastLoginDate;
    private boolean active;
    private String email;

}
public interface UserRepository extends JpaRepository<User, Integer> {}

The query methods mechanism allows us to manipulate the data by deriving the queries from the method names:

List<User> findAllByName(String name);
void deleteAllByCreationDateAfter(LocalDate date);

In this example, we can find a query that retrieves users by their names, or yet a query that removes users having a creation date after a certain date.

As for the @Query annotation, it provides us with the possibility to write a specific JPQL or SQL query in the @Query annotation:

@Query("select u from User u where u.email like '%@gmail.com'")
List<User> findUsersWithGmailAddress();

In this code snippet, we can see a query retrieving users having an @gmail.com email address.

The first mechanism enables us to retrieve or delete data. As for the second one, it allows us to execute pretty much any query. However, for updating queries, we must add the @Modifying annotation. This will be the topic of this tutorial.

3. Using the @Modifying Annotation

The @Modifying annotation is used to enhance the @Query annotation to execute not only SELECT queries but also INSERT, UPDATE, DELETE, and even DDL queries.

Let’s play with this annotation a little and see what it’s made of.

First, let’s see an example of a @Modifying UPDATE query:

@Modifying
@Query("update User u set u.active = false where u.lastLoginDate < :date")
void deactivateUsersNotLoggedInSince(@Param("date") LocalDate date);

Here, we’re deactivating the users that didn’t log in since a given date.

Let’s try another one where we’ll delete deactivated users:

@Modifying
@Query("delete User u where u.active = false")
int deleteDeactivatedUsers();

As we can see, this method returns an integer. It’s a feature of Spring Data JPA @Modifying queries that provides us with the number of updated entities.

We should note that executing a delete query with @Query works differently from Spring Data JPA’s deleteBy name-derived query methods. The latter first fetches the entities from the database and then deletes them one by one. Thus, this means that the lifecycle method @PreRemove will be called on those entities. However, with the former, a single query is executed against the database.

Finally, let’s add a deleted column to our USERS table with a DDL query:

@Modifying
@Query(value = "alter table USERS.USERS add column deleted int(1) not null default 0", nativeQuery = true)
void addDeletedColumn();

Unfortunately, using modifying queries leaves the underlying persistence context outdated. However, it is possible to manage this situation. That’s the subject of the next section.

4. Managing the Persistence Context

If our modifying query changes entities contained in the persistence context, then this context becomes outdated. One way to manage this situation is to clear the persistence context. By doing that, we make sure that the persistence context will fetch the entities from the database next time.

However, we don’t have to explicitly call the clear() method on the EntityManager. We can just use the clearAutomatically property from the @Modifying annotation:

@Modifying(clearAutomatically = true)

That way, we make sure that the persistence context is cleared after our query execution.

But, what if our persistence context contained unflushed changes? Therefore, clearing it would mean dropping unsaved changes. Fortunately, there’s another property of the annotation we can use – flushAutomatically:

@Modifying(flushAutomatically = true)

Now, the EntityManager is flushed before our query is executed.

5. Conclusion

That concludes this short article about the @Modifying annotation. We’ve seen how to use this annotation to execute updating queries like INSERT, UPDATE, DELETE, and even DDL. After that, we learned how to manage the state of the persistence context with the clearAutomatically and flushAutomatically properties.

As usual, the full code for this article is available over on GitHub.

Ratpack with RxJava

$
0
0

1. Introduction

RxJava is one of the most popular reactive programming libraries out there.

And Ratpack is a collection of Java libraries for creating lean and powerful web applications built on Netty.

In this tutorial, we’ll discuss the incorporation of RxJava in a Ratpack application to create a nice reactive web app.

2. Maven Dependencies

Now, we first need the ratpack-core and ratpack-rx dependencies:

<dependency>
    <groupId>io.ratpack</groupId>
    <artifactId>ratpack-core</artifactId>
    <version>1.6.0</version>
</dependency>
<dependency>
    <groupId>io.ratpack</groupId>
    <artifactId>ratpack-rx</artifactId>
    <version>1.6.0</version>
</dependency>

Note, by the way, that ratpack-rx imports the rxjava dependency for us.

3. Initial Setup

RxJava supports the integration of 3rd party libraries, using its plugin system. So, we can incorporate different execution strategies into RxJava’s execution model. 

Ratpack plugs into this execution model via RxRatpack, which we initialize at startup:

RxRatpack.initialise();

Now, it’s important to note that the method needs to be called only once per JVM run.

The result is that we’ll be able to map RxJava’s Observables into RxRatpack’s Promise types and vice versa.

4. Observables to Promises

We can convert an Observable in RxJava into a Ratpack Promise.

However, there is a bit of a mismatch. See, a Promise emits a single value, but an Observable can emit a stream of them.

RxRatpack handles this by offering two different methods: promiseSingle() and promise().

So, let’s assume we have a service named MovieService that emits a single promise on getMovie(). We’d use promiseSingle() since we know it will only emit once:

Handler movieHandler = (ctx) -> {
    MovieService movieSvc = ctx.get(MovieService.class);
    Observable<Movie> movieObs = movieSvc.getMovie();
    RxRatpack.promiseSingle(movieObs)
      .then(movie -> ctx.render(Jackson.json(movie)));
};

On the other hand, if getMovies() can return a stream of movie results, we’d use promise():

Handler moviesHandler = (ctx) -> {
    MovieService movieSvc = ctx.get(MovieService.class);
    Observable<Movie> movieObs = movieSvc.getMovies();
    RxRatpack.promise(movieObs)
      .then(movie -> ctx.render(Jackson.json(movie)));
};

Then, we can add these handlers to our Ratpack server like normal:

RatpackServer.start(def -> def.registryOf(rSpec -> rSpec.add(MovieService.class, new MovieServiceImpl()))
  .handlers(chain -> chain
    .get("movie", movieHandler)
    .get("movies", moviesHandler)));

5. Promises to Observables

Conversely, we can map a Promise type in Ratpack back to an RxJava Observable. 

RxRatpack again has two methods: observe() and observeEach().

In this case, we’ll imagine we have a movie service that returns Promises instead of Observables.

With our getMovie(), we’d use observe():

Handler moviePromiseHandler = ctx -> {
    MoviePromiseService promiseSvc = ctx.get(MoviePromiseService.class);
    Promise<Movie> moviePromise = promiseSvc.getMovie();
    RxRatpack.observe(moviePromise)
      .subscribe(movie -> ctx.render(Jackson.json(movie)));
};

And when we get back a list, like with getMovies(), we’d use observeEach():

Handler moviesPromiseHandler = ctx -> {
    MoviePromiseService promiseSvc = ctx.get(MoviePromiseService.class);
    Promise<List<Movie>> moviePromises = promiseSvc.getMovies();
    RxRatpack.observeEach(moviePromises)
        .toList()
        .subscribe(movie -> ctx.render(Jackson.json(movie)));
};

Then, again, we can add the handlers as expected:

RatpackServer.start(def -> def.registryOf(regSpec -> regSpec
  .add(MoviePromiseService.class, new MoviePromiseServiceImpl()))
    .handlers(chain -> chain
      .get("movie", moviePromiseHandler)
      .get("movies", moviesPromiseHandler)));

6. Parallel Processing

RxRatpack supports parallelism with the help of the fork() and forkEach() methods.

And it follows a pattern we’ve already seen with each.

fork() takes a single Observable and parallelizes its execution onto a different compute thread. Then, it automatically binds the data back to the original execution.

On the other hand, forkEach() does the same for each element emitted by an Observable‘s stream of values.

Let’s imagine for a moment that we want to capitalize our movie titles and that such is an expensive operation.

Simply put, we can use forkEach() to off-load the execution of each onto a thread pool:

Observable<Movie> movieObs = movieSvc.getMovies();
Observable<String> upperCasedNames = movieObs.compose(RxRatpack::forkEach)
  .map(movie -> movie.getName().toUpperCase())
  .serialize();

7. Implicit Error Handling

Lastly, implicit error handling is one of the key features in RxJava integration.

By default, RxJava observable sequences will forward any exception to the execution context exception handler. For this reason, error handlers don’t need to be defined in observable sequences.

So, we can configure Ratpack to handle these errors raised by RxJava.

Let’s say, for example, that we wanted each error to be printed in the HTTP response.

Note that the exception we throw via the Observable gets caught and handled by our ServerErrorHandler:

RatpackServer.start(def -> def.registryOf(regSpec -> regSpec
  .add(ServerErrorHandler.class, (ctx, throwable) -> {
        ctx.render("Error caught by handler : " + throwable.getMessage());
    }))
  .handlers(chain -> chain
    .get("error", ctx -> {
        Observable.<String> error(new Exception("Error from observable")).subscribe(s -> {});
    })));

Note that any subscriber-level error handling takes precedence, though. If our Observable wanted to do its own error handling, it could, but since it doesn’t, the exception percolates up to Ratpack.

8. Conclusion

In this article, we talked about how to configure RxJava with Ratpack.

We explored the conversions of Observables in RxJava to Promise types in Ratpack and vice versa. We also looked into the parallelism and implicit error handling features supported by the integration.

All code samples used for the article can be found over at Github.

Maven Enforcer Plugin

$
0
0

1. Overview

In this tutorial, we’re going to learn about the Maven Enforcer Plugin and how we can use it to guarantee the level of compliance in our project.

The plugin is especially handy when we have distributed teams, scattered across the globe.

2. Dependency

To make use of the plugin in our project, we need to add the following dependency to our pom.xml:

<plugin>
    <groupId>org.apache.maven.plugins</groupId>
    <artifactId>maven-enforcer-plugin</artifactId>
    <version>3.0.0-M2</version>
</plugin>

The latest version of the plugin is available on Maven Central.

3. Plugin Configuration and Goals

Maven Enforcer has two goals: enforcer:enforce and enforcer:display-info.

The enforce goal runs during a project build to execute rules specified in the configuration, while the display-info goal shows current information about the built-in rules that are present in the project’s pom.xml.

Let’s define the enforce goal in the executions tag. Furthermore, we’ll add the configuration tag that holds the rules definitions for the project:

...
<executions>
    <execution>
        <id>enforce</id>
        <goals>
            <goal>enforce</goal>
        </goals>
        <configuration>
            <rules>
                <banDuplicatePomDependencyVersions/>
            </rules>
        </configuration>
    </execution>
</executions>
...

4. Maven Enforcer Rules

The keyword enforce gives a subtle suggestion of the existence of rules to abide by. This is how the Maven Enforcer plugin works. We configure it with some rules that are to be enforced during the build phase of the project.

In this section, we’re going to look at the available rules that we can apply to our projects to enhance their quality.

4.1. Ban Duplicate Dependency

In a multi-module project, where a parent-child relationship exists among POMs, ensuring there’s no duplicate of dependency in the effective final POM for a project can be a tricky task. But, with the banDuplicatePomDependencyVersions rule, we can easily make sure that our project is free of such glitch.

All we need to do is to add the banDuplicatePomDependencyVersions tag to the rules section of the plugin configuration:

...
<rules>
    <banDuplicatePomDependencyVersions/>
</rules>
...

To check the rule’s behavior, we can duplicate one dependency in pom.xml and run mvn clean compile. It’ll produce the following error lines on the console:

...
[WARNING] Rule 0: org.apache.maven.plugins.enforcer.BanDuplicatePomDependencyVersions failed with message:
Found 1 duplicate dependency declaration in this project:
 - dependencies.dependency[io.vavr:vavr:jar] ( 2 times )

[INFO] ------------------------------------------------------------------------
[INFO] BUILD FAILURE
[INFO] ------------------------------------------------------------------------
[INFO] Total time:  1.370 s
[INFO] Finished at: 2019-02-19T10:17:57+01:00
...

4.2. Require Maven and Java Version

The requireMavenVersion and requireJavaVersion rules enable a project-wide lock-in of required Maven and Java versions, respectively. This will help eliminate the disparity that might arise from using different versions of Maven and JDK in development environments.

Let’s update the rules section of the plugin configuration:

<requireMavenVersion>
    <version>3.0</version>
</requireMavenVersion>
<requireJavaVersion>
    <version>1.8</version>
</requireJavaVersion>

These allow us to specify the version numbers in a flexible manner, as long as they comply with the plugin’s version range specification pattern.

Furthermore, both rules also accept a message parameter for specifying a custom message:

...
<requireMavenVersion>
    <version>3.0</version>
    <message>Invalid Maven version. It should, at least, be 3.0</message>
</requireMavenVersion>
...

4.3. Require Environment Variable

With the requireEnvironmentVariable rule, we can ensure that a certain environment variable is set in the execution environment.

It can be repeated to accommodate more than one required variable:

<requireEnvironmentVariable>
    <variableName>ui</variableName>
</requireEnvironmentVariable>
<requireEnvironmentVariable>
    <variableName>cook</variableName>
</requireEnvironmentVariable>

4.4. Require Active Profile

Profiles in Maven help us to configure properties that’ll be active when our application is deployed to different environments.

Consequently, we can use the requireActiveProfile rule when we need to ensure that one or more specified profiles are active, thus guaranteeing the successful execution of our application:

<requireActiveProfile>
    <profiles>local,base</profiles>
    <message>Missing active profiles</message>
</requireActiveProfile>

In the snippet above, we used the message property to provide a custom message to show if the rule-check fails.

4.5. Other Rules

The Maven Enforcer plugin has many other rules to promote project quality and consistency irrespective of the development environment.

Also, the plugin has a command to display info about some currently configured rules:

mvn enforcer:display-info

5. Custom Rules

So far, we’ve been exploring the built-in rules of the plugin. Now, it’s time to look at creating our own custom rule.

First, we need to create a new Java project that’ll contain our custom rule. A custom rule is a class Object that implements the EnforceRule interface and overrides the execute() method:

public void execute(EnforcerRuleHelper enforcerRuleHelper) throws EnforcerRuleException {
    try {
        String groupId = (String) enforcerRuleHelper.evaluate("${project.groupId}");
        if (groupId == null || !groupId.startsWith("org.baeldung")) {
            throw new EnforcerRuleException("Project group id does not start with org.baeldung");
        }
    }
    catch (ExpressionEvaluationException ex) {
        throw new EnforcerRuleException( "Unable to lookup an expression " 
          + ex.getLocalizedMessage(), ex );
    }
}

Our custom rule simply checks if the target project’s groupId starts with org.baeldung or not.

Notice how we don’t have to return boolean or anything as such to indicate the rule is not satisfied. We just throw an EnforcerRuleException with a description of what is wrong.

We can use our custom rule by adding it as a dependency to the Maven Enforcer plugin:

...
<rules>
    <myCustomRule implementation="com.baeldung.enforcer.MyCustomRule"/>
</rules>
...

Please note that if the custom rule project is not a published artifact on Maven Central, we can install it into the local Maven repo by running the mvn clean install.

This will make it available when compiling the target project that has the Maven Enforcer Plugin. Please see the plugin’s documentation for the custom rule to learn more.

To see it in action, we can set the groupId property of the project with the Enforcer Plugin to anything other than “org.baeldung” and run mvn clean compile.

6. Conclusion

In this quick tutorial, we saw how the Maven Enforcer Plugin can be a useful addition to our existing chest of plugins. The ability to write custom rules enhance its range of application.

Please note that we need to uncomment the dependencies and rule for the custom-rule example in the complete example source code that’s available over on GitHub.

How to Change Java Version in an Eclipse Project

$
0
0

1. Overview

In the Java ecosystem, as the new releases of JDK are introduced at least once a year, we’ll probably need to switch to a newer version at some point.

In this quick tutorial, we’ll show how to check the available JREs, add a JRE to Eclipse, and change a Java version in an Eclipse project, so we’ll be ready when that time comes.

2. Check Whether the JRE is Available in Eclipse

After being sure that we have installed the version that we want to use, we’ll need ensure that it’s available to use in Eclipse.

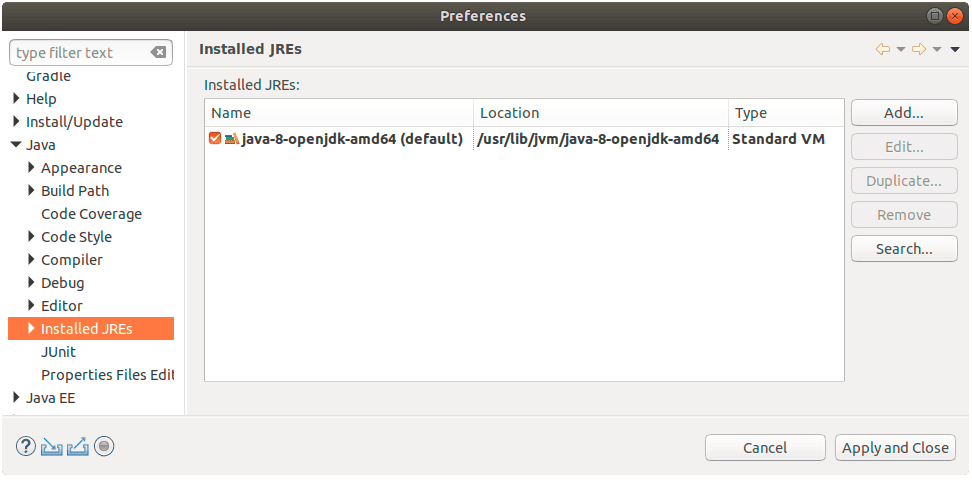
Let’s take a look at Window -> Preferences, and within that, Java -> Installed JREs:

If the JRE we want is listed, then we’re good to go.

But, suppose we need to use JRE 9, 10, or 11. Since we only have JDK 8 installed, we’ll have to add it to Eclipse.

3. Adding a JRE to Eclipse

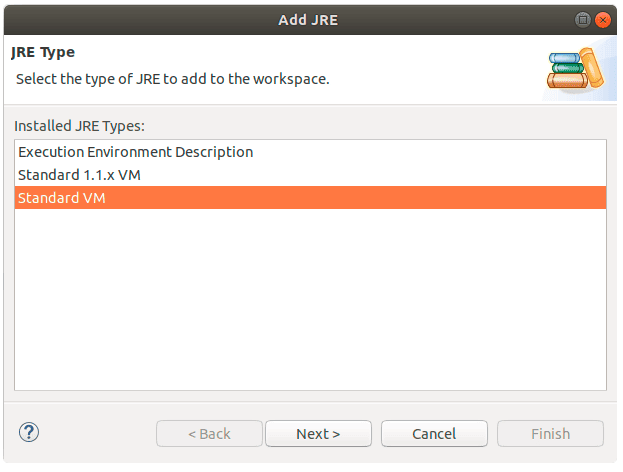
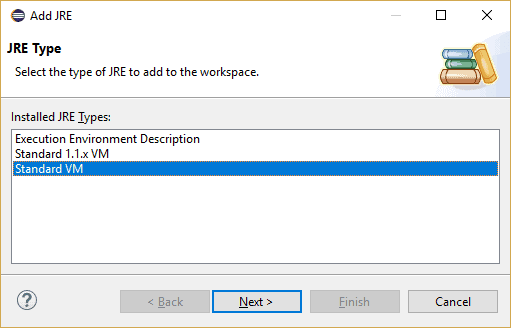
Next, from the Window -> Preferences dialog, let’s click the Add… button. From here, we need to specify the JRE type. We’ll choose Standard VM:

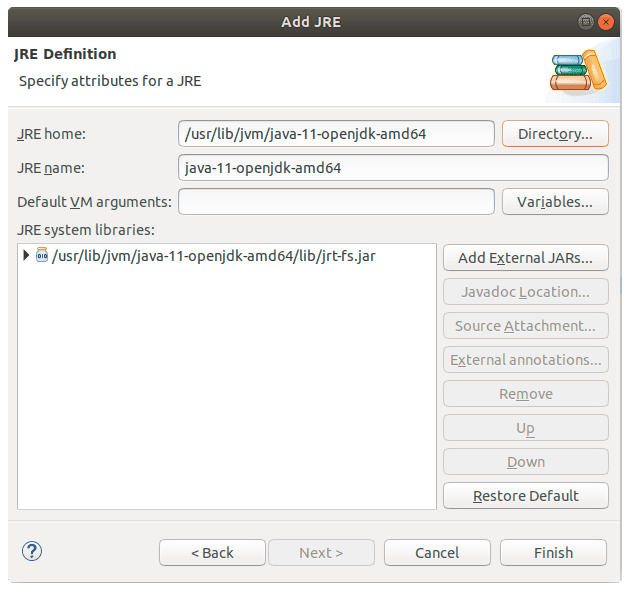
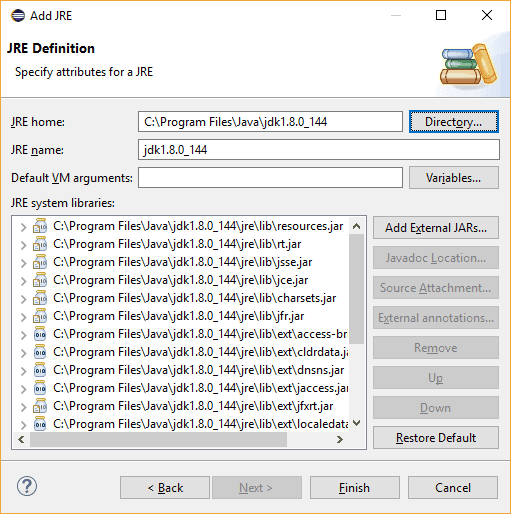
And finally, let’s specify the location of the new JRE (under the JRE home) and click Finish:

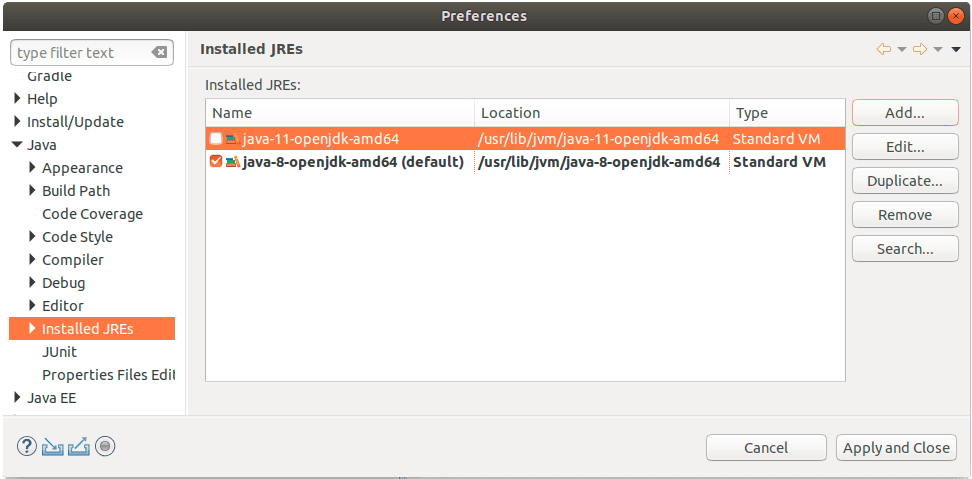
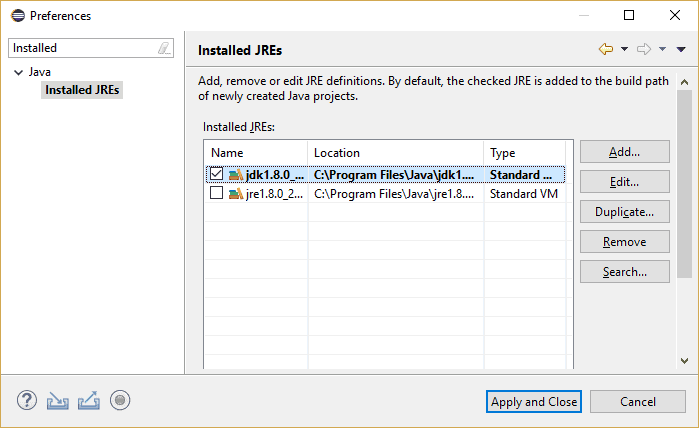
As a result, we now have two JREs configured in our IDE:

4. Change the Java Version of Our Project

Now, let’s suppose that we were using Java 8 in our project and now we want to change it to Java 10:

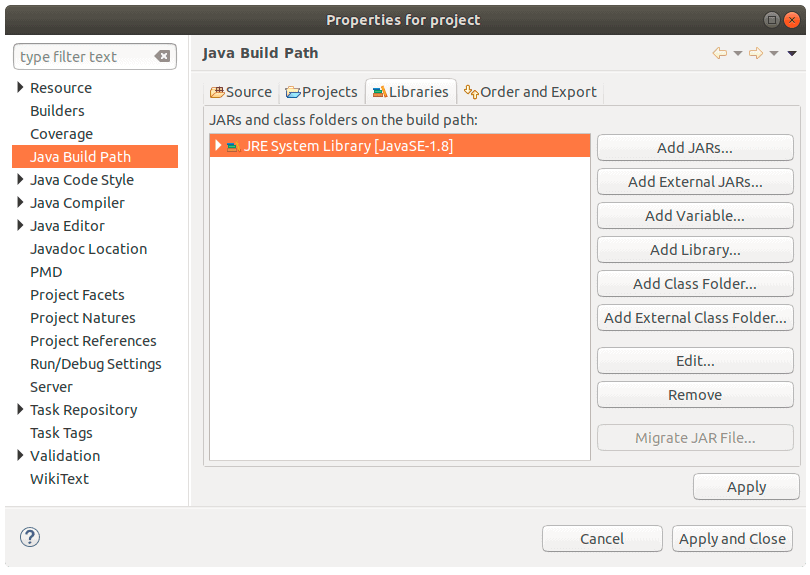
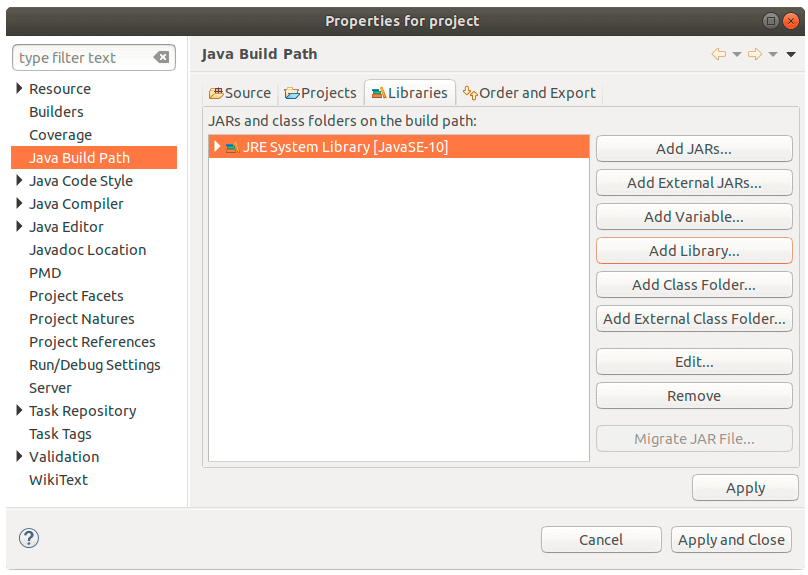
First, we’ll navigate to the Project properties and then to the Java Build Path:

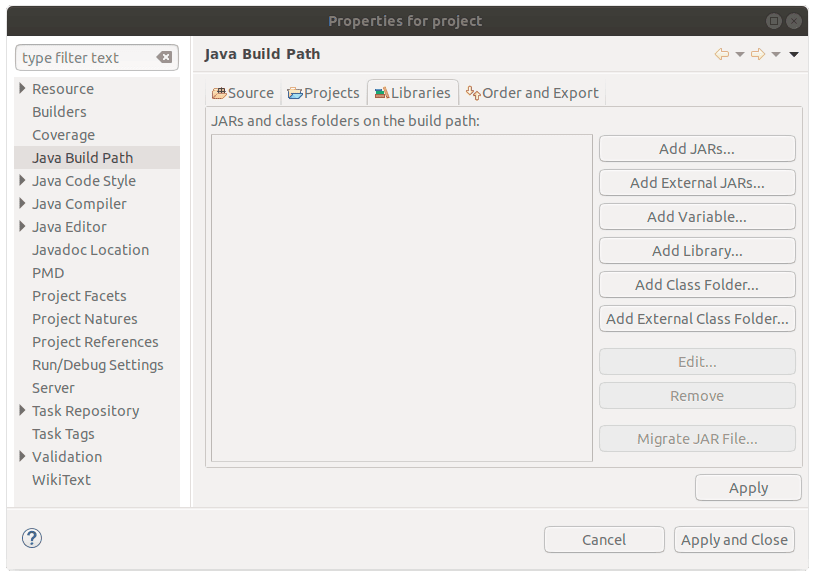
and hit the Remove button on the existing JRE:

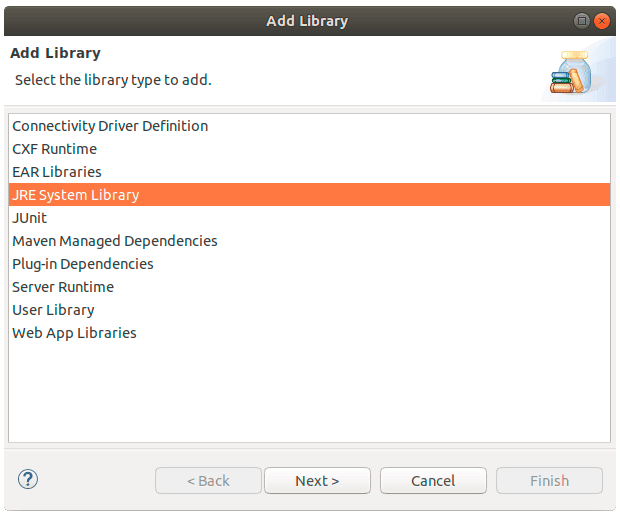
Now, we’ll use the Add Library button and choose the JRE System Library:

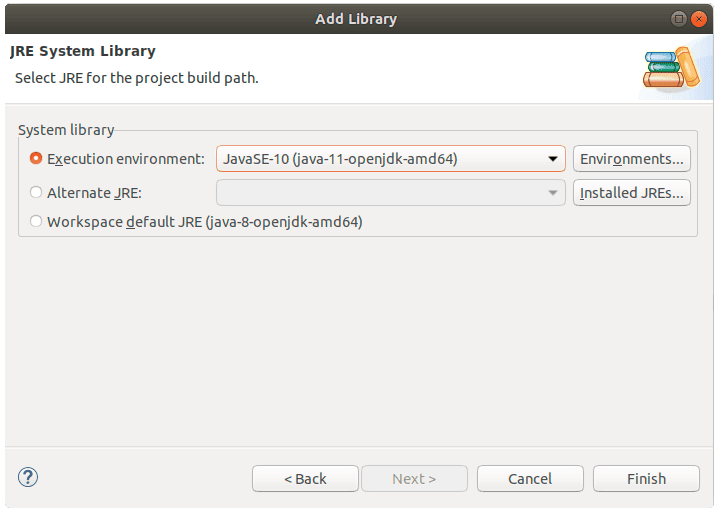
Let’s choose JavaSE-10 from the JDK that we recently installed and click the Finish button:

Now, as we can see, we’ve correctly configured our project’s Java Build Path:

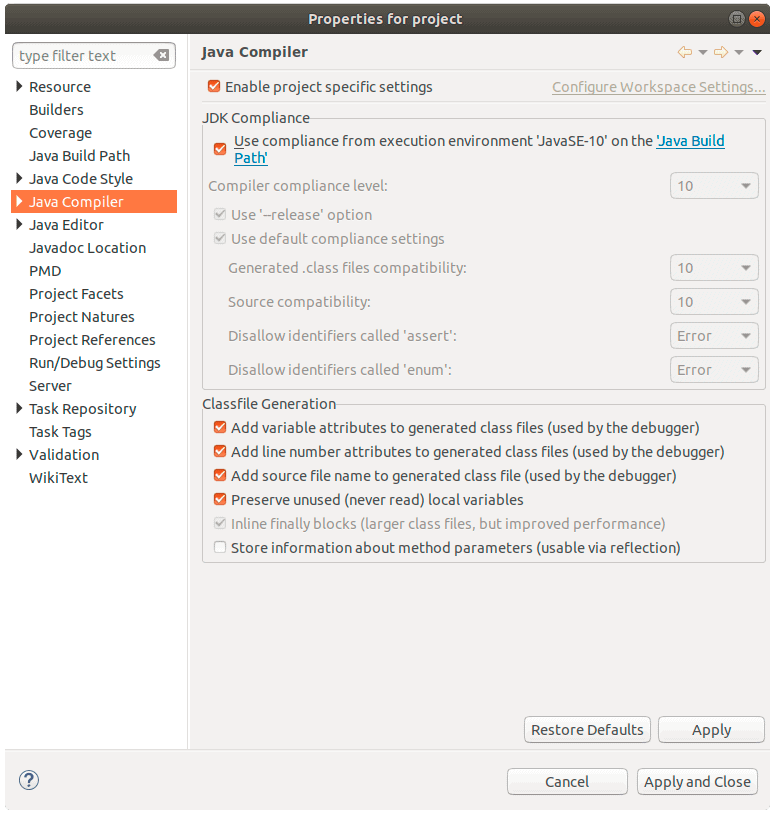
We need to do one additional step — make sure we’re using the correct Compiler Compliance Level for the Java Compiler:

In our case it says Java 10, so we’re all good:

In case the Compiler Compliance Level is not the correct one, we can simply uncheck the Use compliance from execution environment option and choose the correct one.

5. Conclusion

In this quick article, we learned how to add a new JRE into our Eclipse workspace and how to switch to a different Java version in our current Eclipse project.

A Guide to the Reflections Library

$
0
0

1. Introduction

The Reflections library works as a classpath scanner. It indexes the scanned metadata and allows us to query it at runtime. It can also save this information, so we can collect and use it at any point during our project, without having to re-scan the classpath again.

In this tutorial, we’ll show how to configure the Reflections library and use it in our Java projects.

2. Maven Dependency

To use Reflections, we need to include its dependency in our project:

<dependency>
    <groupId>org.reflections</groupId>
    <artifactId>reflections</artifactId>
    <version>0.9.11</version>
</dependency>

We can find the latest version of the library on Maven Central.

3. Configuring Reflections

Next, we need to configure the library. The main elements of the configuration are the URLs and scanners.

The URLs tell the library which parts of the classpath to scan, whereas the scanners are the objects that scan the given URLs.

In the event that no scanner is configured, the library uses TypeAnnotationsScanner and SubTypesScanner as the default ones.

3.1. Adding URLs

We can configure Reflections either by providing the configuration’s elements as the varargs constructor’s parameters, or by using the ConfigurationBuilder object.

For instance, we can add URLs by instantiating Reflections using a String representing the package name, the class, or the class loader:

Reflections reflections = new Reflections("com.baeldung.reflections");
Reflections reflections = new Reflections(MyClass.class);
Reflections reflections = new Reflections(MyClass.class.getClassLoader());

Moreover, because Reflections has a varargs constructor, we can combine all the above configurations’ types to instantiate it:

Reflections reflections = new Reflections("com.baeldung.reflections", MyClass.class);

Here, we are adding URLs by specifying the package and the class to scan.

We can achieve the same results by using the ConfigurationBuilder:

Reflections reflections = new Reflections(new ConfigurationBuilder()
  .setUrls(ClasspathHelper.forPackage("com.baeldung.reflections"))));

Together with the forPackage() method, ClasspathHelper provides other methods, such as forClass() and forClassLoader(), to add URLs to the configuration.

3.2. Adding Scanners

The Reflections library comes with many built-in scanners:

  • FieldAnnotationsScanner – looks for field’s annotations
  • MethodParameterScanner – scans methods/constructors, then indexes parameters, and returns type and parameter annotations
  • MethodParameterNamesScanner – inspects methods/constructors, then indexes parameter names
  • TypeElementsScanner – examines fields and methods, then stores the fully qualified name as a key, and elements as values
  • MemberUsageScanner – scans methods/constructors/fields usages
  • TypeAnnotationsScanner – looks for class’s runtime annotations
  • SubTypesScanner – searches for super classes and interfaces of a class, allowing a reverse lookup for subtypes
  • MethodAnnotationsScanner – scans for method’s annotations
  • ResourcesScanner – collects all non-class resources in a collection

We can add scanners to the configuration as parameters of Reflections‘ constructor.

For instance, let’s add the first two scanners from the above list:

Reflections reflections = new Reflections("com.baeldung.reflections"), 
  new FieldAnnotationsScanner(), 
  new MethodParameterScanner());

Again, the two scanners can be configured by using the ConfigurationBuilder helper class:

Reflections reflections = new Reflections(new ConfigurationBuilder()
  .setUrls(ClasspathHelper.forPackage("com.baeldung.reflections"))
  .setScanners(new FieldAnnotationsScanner(), new MethodParameterScanner()));

3.3. Adding the ExecutorService

In addition to URLs and scanners, Reflections gives us the possibility to asynchronously scan the classpath by using the ExecutorService.

We can add it as a parameter of Reflections‘ constructor, or through the ConfigurationBuilder:

Reflections reflections = new Reflections(new ConfigurationBuilder()
  .setUrls(ClasspathHelper.forPackage("com.baeldung.reflections"))
  .setScanners(new SubTypesScanner(), new TypeAnnotationsScanner())
  .setExecutorService(Executors.newFixedThreadPool(4)));

Another option is to simply call the useParallelExecutor() method. This method configures a default FixedThreadPool ExecutorService with a size equal to the number of the available core processors.

3.4. Adding Filters

Another important configurations element is a filter. A filter tells the scanners what to include, and what to exclude, when scanning the classpath.

As an illustration, we can configure the filter to exclude scanning of the test package:

Reflections reflections = new Reflections(new ConfigurationBuilder()
  .setUrls(ClasspathHelper.forPackage("com.baeldung.reflections"))
  .setScanners(new SubTypesScanner(), new TypeAnnotationsScanner())
  .filterInputsBy(new FilterBuilder().excludePackage("com.baeldung.reflections.test")));

Now, up to this point, we’ve made a quick overview of the different elements of Reflections‘ configuration. Next, we’ll see how to use the library.

4. Querying Using Reflections

After calling one of the Reflections constructors, the configured scanners scan all the provided URLs. Then, for each scanner, the library puts the results in Multimap stores. As a result, in order to use Reflections, we need to query these stores by calling the provided query methods.

Let’s see some examples of these query methods.

4.1. Subtypes

Let’s start by retrieving all the scanners provided by Reflections:

public Set<Class<? extends Scanner>> getReflectionsSubTypes() {
    Reflections reflections = new Reflections(
      "org.reflections", new SubTypesScanner());
    return reflections.getSubTypesOf(Scanner.class);
}

4.2. Annotated Types

Next, we can get all the classes and interfaces that implement a given annotation.

So, let’s retrieve all the functional interfaces of the java.util.function package:

public Set<Class<?>> getJDKFunctinalInterfaces() {
    Reflections reflections = new Reflections("java.util.function", 
      new TypeAnnotationsScanner());
    return reflections.getTypesAnnotatedWith(FunctionalInterface.class);
}

4.3. Annotated Methods

Now, let’s use the MethodAnnotationsScanner to get all the methods annotated with a given annotation:

public Set<Method> getDateDeprecatedMethods() {
    Reflections reflections = new Reflections(
      "java.util.Date", 
      new MethodAnnotationsScanner());
    return reflections.getMethodsAnnotatedWith(Deprecated.class);
}

4.4. Annotated Constructors

Also, we can get all the deprecated constructors:

public Set<Constructor> getDateDeprecatedConstructors() {
    Reflections reflections = new Reflections(
      "java.util.Date", 
      new MethodAnnotationsScanner());
    return reflections.getConstructorsAnnotatedWith(Deprecated.class);
}

4.5. Methods’ Parameters

Additionally, we can use MethodParameterScanner to find all the methods with a given parameter type:

public Set<Method> getMethodsWithDateParam() {
    Reflections reflections = new Reflections(
      java.text.SimpleDateFormat.class, 
      new MethodParameterScanner());
    return reflections.getMethodsMatchParams(Date.class);
}

4.6. Methods’ Return Type

Furthermore, we can also use the same scanner to get all the methods with a given return type.

Let’s imagine that we want to find all the methods of the SimpleDateFormat that return void:

public Set<Method> getMethodsWithVoidReturn() {
    Reflections reflections = new Reflections(
      "java.text.SimpleDateFormat", 
      new MethodParameterScanner());
    return reflections.getMethodsReturn(void.class);
}

4.7. Resources

Finally, let’s use the ResourcesScanner to look for a given filename in our classpath:

public Set<String> getPomXmlPaths() {
    Reflections reflections = new Reflections(new ResourcesScanner());
    return reflections.getResources(Pattern.compile(".*pom\\.xml"));
}

4.8. Additional Query Methods

The above were but a handful of examples showing how to use Reflections’ query methods. Yet, there are other query methods that we haven’t covered here:

  • getMethodsWithAnyParamAnnotated
  • getConstructorsMatchParams
  • getConstructorsWithAnyParamAnnotated
  • getFieldsAnnotatedWith
  • getMethodParamNames
  • getConstructorParamNames
  • getFieldUsage
  • getMethodUsage
  • getConstructorUsage

5. Integrating Reflections into a Build Lifecycle

We can easily integrate Reflections into our Maven build using the gmavenplus-plugin.

Let’s configure it to save the result of scans to a file:

<plugin>
    <groupId>org.codehaus.gmavenplus</groupId>
    <artifactId>gmavenplus-plugin</artifactId>
    <version>1.5</version>
    <executions>
        <execution>
            <phase>generate-resources</phase>
            <goals>
                <goal>execute</goal>
            </goals>
            <configuration>
                <scripts>
                    <script><![CDATA[
                        new org.reflections.Reflections(
                          "com.baeldung.refelections")
                            .save("${outputDirectory}/META-INF/reflections/reflections.xml")]]>
                    </script>
                </scripts>
            </configuration>
        </execution>
    </executions>
</plugin>

Later on, by calling the collect() method, we can retrieve the saved results and make them available for further use, without having to perform a new scan:

Reflections reflections
  = isProduction() ? Reflections.collect() : new Reflections("com.baeldung.reflections");

6. Conclusion

In this article, we explored the Reflections library. We covered different configuration elements and their usages. And, finally, we saw how to integrate Reflections into a Maven project’s build lifecycle.

As always, the complete code is available over on GitHub.

Java Weekly, Issue 270

$
0
0

Here we go…

1. Spring and Java

>> What’s new with Spring Initializr [spring.io]

A quick look at the improved API for generating new projects, which now lets you customize project generation without forking the library. Very cool.

>> Integration Tests with @SpringBootTest [reflectoring.io]

A good write-up on several annotations that can help set up an application context for integration tests.

>> It’s Easy! Remote Debugging with Eclipse and TomEE [tomitribe.com]

And a comprehensive tutorial to get you up and running with an environment for debugging server-side Java EE code from the IDE.

Also worth reading:

Webinars and presentations:

Time to upgrade:

2. Technical and Musings

>> AWS: How to secure access keys with MFA [advancedweb.hu]

A brief overview of a multi-factor authentication policy to protect your AWS developer accounts.

>> Going serverless: How to move files from on-prem SFTP to AWS S3 [blog.codecentric.de]

And a clever solution using CloudWatch Event with a Lambda that polls an SFTP server and moves new files into an S3 bucket.

Also worth reading:

3. Comics

And my favorite Dilberts of the week:

>> Hard Work is the Key [dilbert.com]

>> Darkest Before the Dawn [dilbert.com]

>> Gut Feeling [dilbert.com]

4. Pick of the Week

>> The secret to being a top developer is building things! Here’s a list of fun apps to build! [medium.freecodecamp.org]

JUnit 5 Conditional Test Execution with Annotations

$
0
0

1. Overview

In this tutorial, we’re going to take a look at conditional test execution with annotations in JUnit 5.

These annotations are from the JUnit Jupiter library’s condition package and allow us to specify different types of conditions under which our tests should or should not run.

2. Operating System Conditions

Sometimes, we need to change our test scenarios depending on the operating systems (OS) they’re running on. In these cases, the @EnabledOnOs annotation comes in handy.

The usage of @EnabledOnOs is simple – we just need to give it a value for the OS type. Furthermore, it also accepts an array argument for when we want to target multiple operating systems.

For example, let’s say we want to enable a test to run only on Windows and MacOS:

@Test
@EnabledOnOs({OS.WINDOWS, OS.MAC})
public void shouldRunBothWindowsAndMac() {
    //...
}

Now, in contrast to the @EnabledOnOs, there is @DisabledOnOs. As the name implies, it disables tests according to the OS type argument:

@Test
@DisabledOnOs(OS.LINUX)
public void shouldNotRunAtLinux() {
    //...
}

3. Java Runtime Environment Conditions

We can also target our tests to run on specific JRE versions using the @EnableOnJre and @DisableOnJre annotations. These annotations also accept an array to enable or disable multiple Java versions:

@Test
@EnabledOnJre({JRE.JAVA_10, JRE.JAVA_11})
public void shouldOnlyRunOnJava10And11() {
    //...
}

Moreover, if we want to disable our tests running with Java versions other than 8, 9, 10, and 11, we can use the JRE.OTHER enum property:

@Test
@DisabledOnJre(JRE.OTHER)
public void thisTestOnlyRunsWithUpToDateJREs() {
    // this test will only run on Java 8, 9, 10, and 11.
}

4. System Property Conditions

Now, if we want to enable our tests based on JVM system properties, we can use the @EnabledIfSystemProperty annotation.

To use it, we must provide named and matches arguments. The named argument is used to specify an exact system property. The matches is used for defining the pattern of property value with a regular expression.

For instance, let’s say we want to enable a test to run only when the virtual machine vendor name starts with “Oracle”:

@Test
@EnabledIfSystemProperty(named = "java.vm.vendor", matches = "Oracle.*")
public void onlyIfVendorNameStartsWithOracle() {
    //...
}

Likewise, we have the @DisabledIfSystemProperty to disable tests based on JVM system properties. To demonstrate this annotation, let’s take a look at an example:

@Test
@DisabledIfSystemProperty(named = "file.separator", matches = "[/]")
public void disabledIfFileSeperatorIsSlash() {
    //...
}

5. Environment Variable Conditions

We can also specify environment variable conditions for our tests with @EnabledIfEnvironmentVariable and @DisabledIfEnvironmentVariable annotations.

And, just like the annotations for system property conditions, these annotations take two arguments — named and matches — for specifying the environment variable name and regular expression to match against environment variable values:

@Test
@EnabledIfEnvironmentVariable(named = "GDMSESSION", matches = "ubuntu")
public void onlyRunOnUbuntuServer() {
    //...
}

@Test
@DisabledIfEnvironmentVariable(named = "LC_TIME", matches = ".*UTF-8.")
public void shouldNotRunWhenTimeIsNotUTF8() {
    //...
}

Furthermore, we can consult one of our other tutorials to learn more about system properties and system environment variables.

6. Script Based Conditions

Additionally, JUnit 5 Jupiter gives us the ability to decide our test’s running conditions by writing scripts within @EnabledIf and @DisabledIf annotations.

These annotations accept three arguments:

  • value – contains the actual script to run.
  • engine (optional) – specifies the scripting engine to use; the default is Oracle Nashorn.
  • reason (optional) – for logging purposes, specifies the message JUnit should print if our test fails.

So, let’s see a simple example where we specify only a one-line script, without additional arguments on the annotation:

@Test
@EnabledIf("'FR' == systemProperty.get('user.country')")
public void onlyFrenchPeopleWillRunThisMethod() {
    //...
}

Also, the usage of @DisabledIf is exactly the same:

@Test
@DisabledIf("java.lang.System.getProperty('os.name').toLowerCase().contains('mac')")
public void shouldNotRunOnMacOS() {
    //...
}

Furthermore, we can write multi-line scripts with the value argument.

Let’s write a brief example to check the month name before running the test.

We’ll define a sentence for reason with supported placeholders:

  • {annotation} – the string for representing annotation instance.
  • {script} – the script text that evaluated inside value argument.
  • {result} – the string for representing the return value of the evaluated script.

For this instance, we will have a multi-line script in the value argument and values for engine and reason:

@Test
@EnabledIf(value = {
    "load('nashorn:mozilla_compat.js')",
    "importPackage(java.time)",
    "",
    "var thisMonth = LocalDate.now().getMonth().name()",
    "var february = Month.FEBRUARY.name()",
    "thisMonth.equals(february)"
},
    engine = "nashorn",
    reason = "On {annotation}, with script: {script}, result is: {result}")
public void onlyRunsInFebruary() {
    //...
}

We can use several script bindings when writing our scripts:

  • systemEnvironment – to access system environment variables.
  • systemProperty – to access system property variables.
  • junitConfigurationParameter – to access configuration parameters.
  • junitDisplayName – test or container display name.
  • junitTags – to access tags on test or container.
  • anotherUniqueId – to get the unique id of test or container.

Finally, let’s look at another example to see how to use scripts with bindings:

@Test
@DisabledIf("systemEnvironment.get('XPC_SERVICE_NAME') != null" +
        "&& systemEnvironment.get('XPC_SERVICE_NAME').contains('intellij')")
public void notValidForIntelliJ() {
    //this method will not run on intelliJ
}

Moreover, please consult one of our other tutorials to learn more about @EnabledIf and @DisabledIf annotations.

7. Creating Custom Conditional Annotations

A very powerful feature that comes with JUnit 5 is the ability to create custom annotations. We can define custom conditional annotations by using a combination of existing conditional annotations.

For instance, suppose we want to define all our tests to run for specific OS types with specific JRE versions. We can write a custom annotation for this:

@Target(ElementType.METHOD)
@Retention(RetentionPolicy.RUNTIME)
@Test
@DisabledOnOs({OS.WINDOWS, OS.SOLARIS, OS.OTHER})
@EnabledOnJre({JRE.JAVA_9, JRE.JAVA_10, JRE.JAVA_11})
@interface ThisTestWillOnlyRunAtLinuxAndMacWithJava9Or10Or11 {
}

@ThisTestWillOnlyRunAtLinuxAndMacWithJava9Or10Or11
public void someSuperTestMethodHere() {
    // this method will run with Java9, 10, 11 and Linux or macOS.
}

Furthermore, we can use script-based annotations to create a custom annotation:

@Target(ElementType.METHOD)
@Retention(RetentionPolicy.RUNTIME)
@DisabledIf("Math.random() >= 0.5")
@interface CoinToss {
}

@RepeatedTest(2)
@CoinToss
public void gamble() {
    // this method run run roughly 50% of the time
}

8. Conclusion

In this tutorial, we learned about conditional test execution with annotations in JUnit 5. Also, we walked through some examples of their usages.

Next, we showed how to create custom conditional annotations.

To learn more about this topic, we can consult JUnit’s own documentation about conditional test execution with annotations.

As usual, all the example code can be found in our GitHub project.


Convert String to JsonObject with Gson

$
0
0

1. Overview

When working with JSON in Java using the Gson library, we have several options at our disposal for converting raw JSON into other classes or data structures that we can work with more easily.

For example, we can convert JSON strings to a Map<String, Object> or create a custom class with mappings.

Sometimes, however, it’s handy to be able to convert our JSON into a generic object. In this tutorial, we’ll see how Gson can give us a JsonObject from a String.

2. Maven Dependency

First of all, we need to include the gson dependency in our pom.xml:

<dependency>
    <groupId>com.google.code.gson</groupId>
    <artifactId>gson</artifactId>
    <version>2.8.5</version>
</dependency>

We can find the latest version of gson on Maven Central.

3. Using JsonParser

The first approach we’ll see for converting a JSON String to a JsonObject is a two-step process that uses the JsonParser class.

In the first step, we need to parse our original String.

Gson provides us a parser called JsonParser, which parses the specified JSON String into a parse tree of JsonElements:

public JsonElement parse(String json) throws JsonSyntaxException

Once we have our String parsed in a JsonElement tree, we’ll use the getAsJsonObject() method, which will return the desired result.

Let’s see how we get our final JsonObject:

String json = "{ \"name\": \"Baeldung\", \"java\": true }";
JsonObject jsonObject = new JsonParser().parse(json).getAsJsonObject();

Assert.assertTrue(jsonObject.isJsonObject());
Assert.assertTrue(jsonObject.get("name").getAsString().equals("Baeldung"));
Assert.assertTrue(jsonObject.get("java").getAsBoolean() == true);

4. Using fromJson 

In our second approach, we’ll see how to create a Gson instance and use the fromJson method. This method deserializes the specified JSON String into an object of the specified class:

public <T> T fromJson(String json, Class<T> classOfT) throws JsonSyntaxException

Let’s see how we can use this method to parse our JSON String, passing the JsonObject class as the second parameter:

String json = "{ \"name\": \"Baeldung\", \"java\": true }";
JsonObject convertedObject = new Gson().fromJson(json, JsonObject.class);

Assert.assertTrue(convertedObject.isJsonObject());
Assert.assertTrue(convertedObject.get("name").getAsString().equals("Baeldung"));
Assert.assertTrue(convertedObject.get("java").getAsBoolean() == true);

5. Conclusion

In this basic tutorial, we’ve learned two different ways to use the Gson library to get a JsonObject from a JSON-formatted String in Java. Consequently, we should use the one that fits better with our intermediate JSON operations.

As usual, the source code for these examples is available over on GitHub.

Static Content in Spring WebFlux

$
0
0

1. Overview

Sometimes, we have to serve static content in our web applications. It might be an image, HTML, CSS, or a JavaScript file.

In this tutorial, we’ll show how to serve static content using Spring WebFlux. We also assume that our web application will be configured using Spring Boot.

2. Overriding the Default Configuration

By default, Spring Boot serves static content from the following locations:

  • /public
  • /static
  • /resources
  • /META-INF/resources

All files from these paths are served under the /[resource-file-name] path.

If we want to change the default path for Spring WebFlux, we need to add this property to our application.properties file:

spring.webflux.static-path-pattern=/assets/**

Now, the static resources will be located under /assets/[resource-file-name].

Please note that this won’t work when the @EnableWebFlux annotation is present.

3. Routing Example

It’s also possible to serve static content using the WebFlux routing mechanism.

Let’s look at an example of a routing definition to serve the index.html file:

@Bean
public RouterFunction<ServerResponse> htmlRouter(
  @Value("classpath:/public/index.html") Resource html) {
    return route(GET("/"), request
      -> ok().contentType(MediaType.TEXT_HTML).syncBody(html)
    );
}

We can also serve static content from custom locations with the help of RouterFunction.

Let’s see how to serve images from the src/main/resources/img directory using the /img/** path:

@Bean
public RouterFunction<ServerResponse> imgRouter() {
    return RouterFunctions
      .resources("/img/**", new ClassPathResource("img/"));
}

4. Custom Web Resources Path Example

Another way to serve static assets stored in custom locations, instead of the default src/main/resources path, is to use the maven-resources-plugin and an additional Spring WebFlux property.

First, let’s add the plugin to our pom.xml:

<plugin>
    <artifactId>maven-resources-plugin</artifactId>
    <version>3.1.0</version>
    <executions>
        <execution>
            <id>copy-resources</id>
            <phase>validate</phase>
            <goals>
                <goal>copy-resources</goal>
            </goals>
            <configuration>
                <resources>
                    <resource>
                        <directory>src/main/assets</directory>
                        <filtering>true</filtering>
                    </resource>
                </resources>
                <outputDirectory>${basedir}/target/classes/assets</outputDirectory>
            </configuration>
        </execution>
    </executions>
</plugin>

Then, we simply need to set the static locations property:

spring.resources.static-locations=classpath:/assets/

After these actions, the index.html will be available under the http://localhost:8080/index.html URL.

5. Conclusion

In this article, we learned how to serve static content in Spring WebFlux.

As always, the sample code presented is available over on Github.

Native Memory Tracking in JVM

$
0
0

1. Overview

Ever wondered why Java applications consume much more memory than the specified amount via the well-known -Xms and -Xmx tuning flags? For a variety of reasons and possible optimizations, the JVM may allocate extra native memory. These extra allocations can eventually raise the consumed memory beyond the -Xmx limitation.

In this tutorial we’re going to enumerate a few common sources of native memory allocations in the JVM, along with their sizing tuning flags, and then learn how to use Native Memory Tracking to monitor them.

2. Native Allocations

The heap usually is the largest consumer of memory in Java applications, but there are others. Besides the heap, the JVM allocates a fairly large chunk from the native memory to maintain its class metadata, application code, the code generated by JIT, internal data structures, etc. In the following sections, we’ll explore some of those allocations.

2.1. Metaspace

In order to maintain some metadata about the loaded classes, The JVM uses a dedicated non-heap area called Metaspace. Before Java 8, the equivalent was called PermGen or Permanent Generation. Metaspace or PermGen contains the metadata about the loaded classes rather than the instances of them, which are kept inside the heap.

The important thing here is that the heap sizing configurations won’t affect the Metaspace size since the Metaspace is an off-heap data area. In order to limit the Metaspace size, we use other tuning flags:

  •  -XX:MetaspaceSize and -XX:MaxMetaspaceSize to set the minimum and maximum Metaspace size
  • Before Java 8, -XX:PermSize and -XX:MaxPermSize to set the minimum and maximum PermGen size

2.2. Threads

One of the most memory-consuming data areas in the JVM is the stack, created at the same time as each thread. The stack stores local variables and partial results, playing an important role in method invocations.

The default thread stack size is platform-dependent, but in most modern 64-bit operating systems, it’s around 1 MB. This size is configurable via the -Xss tuning flag.

In contrast with other data areas, the total memory allocated to stacks is practically unbounded when there is no limitation on the number of threads. It’s also worth mentioning that the JVM itself needs a few threads to perform its internal operations like GC or just-in-time compilations.

2.3. Code Cache

In order to run JVM bytecode on different platforms, it needs to be converted to machine instructions. The JIT compiler is responsible for this compilation as the program is executed.

When the JVM compiles bytecode to assembly instructions, it stores those instructions in a special non-heap data area called Code Cache. The code cache can be managed just like other data areas in the JVM. The -XX:InitialCodeCacheSize and -XX:ReservedCodeCacheSize tuning flags determine the initial and maximum possible size for the code cache.

2.4. Garbage Collection

The JVM is shipped with a handful of GC algorithms, each suitable for different use cases. All those GC algorithms share one common trait: they need to use some off-heap data structures to perform their tasks. These internal data structures consume more native memory.

2.5. Symbols

Let’s start with Strings, one of the most commonly used data types in application and library code. Because of their ubiquity, they usually occupy a large portion of the Heap. If a large number of those strings contain the same content, then a significant part of the heap will be wasted.

In order to save some heap space, we can store one version of each String and make others refer to the stored version. This process is called String Interning. Since the JVM can only intern Compile Time String Constants, we can manually call the intern() method on strings we intend to intern.

JVM stores interned strings in a special native fixed-sized hashtable called the String Table, also known as the String Pool. We can configure the table size (i.e. the number of buckets) via the -XX:StringTableSize tuning flag.

In addition to the string table, there’s another native data area called the Runtime Constant Pool. JVM uses this pool to store constants like compile-time numeric literals or method and field references that must be resolved at runtime.

2.6. Native Byte Buffers

The JVM is the usual suspect for a significant number of native allocations, but sometimes developers can directly allocate native memory, too. Most common approaches are the malloc call by JNI and NIO’s direct ByteBuffers.

2.7. Additional Tuning Flags

In this section, we used a handful of JVM tuning flags for different optimization scenarios. Using the following tip, we can find almost all tuning flags related to a particular concept:

$ java -XX:+PrintFlagsFinal -version | grep <concept>

The PrintFlagsFinal prints all the –XX options in JVM. For example, to find all Metaspace related flags:

$ java -XX:+PrintFlagsFinal -version | grep Metaspace
      // truncated
      uintx MaxMetaspaceSize                          = 18446744073709547520                    {product}
      uintx MetaspaceSize                             = 21807104                                {pd product}
      // truncated

3. Native Memory Tracking (NMT)

Now that we know the common sources of native memory allocations in the JVM, it’s time to find out how to monitor them. First, we should enable the native memory tracking using yet another JVM tuning flag: -XX:NativeMemoryTracking=off|sumary|detail. By default, the NMT is off but we can enable it to see a summary or detailed view of its observations.

Let’s suppose we want to track native allocations for a typical Spring Boot application:

$ java -XX:NativeMemoryTracking=summary -Xms300m -Xmx300m -XX:+UseG1GC -jar app.jar

Here, we’re enabling the NMT while allocating 300 MB of heap space, with G1 as our GC algorithm.

3.1. Instant Snapshots

When NMT is enabled, we can get the native memory information at any time using the jcmd command:

$ jcmd <pid> VM.native_memory

In order to find the PID for a JVM application, we can use the jps command:

$ jps -l                    
7858 app.jar // This is our app
7899 sun.tools.jps.Jps

Now if we use jcmd with the appropriate pid, the VM.native_memory makes the JVM print out the information about native allocations:

$ jcmd 7858 VM.native_memory

Let’s analyze the NMT output section by section.

3.2. Total Allocations

NMT reports the total reserved and committed memory as follows:

Native Memory Tracking:
Total: reserved=1731124KB, committed=448152KB

Reserved memory represents the total amount of memory our app can potentially use. Conversely, the committed memory is equal to the amount of memory our app is using right now.

Despite allocating 300 MB of heap, the total reserved memory for our app is almost 1.7 GB, much more than that. Similarly, the committed memory is around 440 MB, which is, again, much more than that 300 MB.

After the total section, NMT reports memory allocations per allocation source. So, let’s explore each source in depth.

3.3. Heap

NMT reports our heap allocations as we expected:

Java Heap (reserved=307200KB, committed=307200KB)
          (mmap: reserved=307200KB, committed=307200KB)

300 MB of both reserved and committed memory, which matches our heap size settings.

3.4. Metaspace

Here’s what the NMT says about the class metadata for loaded classes:

Class (reserved=1091407KB, committed=45815KB)
      (classes #6566)
      (malloc=10063KB #8519) 
      (mmap: reserved=1081344KB, committed=35752KB)

Almost 1 GB reserved and 45 MB committed to loading 6566 classes.

3.5. Thread

And here’s the NMT report on thread allocations:

Thread (reserved=37018KB, committed=37018KB)
       (thread #37)
       (stack: reserved=36864KB, committed=36864KB)
       (malloc=112KB #190) 
       (arena=42KB #72)

In total, 36 MB of memory is allocated to stacks for 37 threads – almost 1 MB per stack. JVM allocates the memory to threads at the time of creation, so the reserved and committed allocations are equal.

3.6. Code Cache

Let’s see what NMT says about the generated and cached assembly instructions by JIT:

Code (reserved=251549KB, committed=14169KB)
     (malloc=1949KB #3424) 
     (mmap: reserved=249600KB, committed=12220KB)

Currently, almost 13 MB of code is being cached, and this amount can potentially go up to approximately 245 MB.

3.7. GC

Here’s the NMT report about G1 GC’s memory usage:

GC (reserved=61771KB, committed=61771KB)
   (malloc=17603KB #4501) 
   (mmap: reserved=44168KB, committed=44168KB)

As we can see, almost 60 MB is reserved and committed to helping G1.

Let’s see how the memory usage looks like for a much simpler GC, say Serial GC:

$ java -XX:NativeMemoryTracking=summary -Xms300m -Xmx300m -XX:+UseSerialGC -jar app.jar

The Serial GC barely uses 1 MB:

GC (reserved=1034KB, committed=1034KB)
   (malloc=26KB #158) 
   (mmap: reserved=1008KB, committed=1008KB)

Obviously, we shouldn’t pick a GC algorithm just because of its memory usage, as the stop-the-world nature of the Serial GC may cause performance degradations. There are, however, several GCs to choose from, and they each balance memory and performance differently.

3.8. Symbol

Here is the NMT report about the symbol allocations, such as the string table and constant pool:

Symbol (reserved=10148KB, committed=10148KB)
       (malloc=7295KB #66194) 
       (arena=2853KB #1)

Almost 10 MB is allocated to symbols.

3.9. NMT over Time

The NMT allows us to track how memory allocations change over time. First, we should mark the current state of our application as a baseline:

$ jcmd <pid> VM.native_memory baseline
Baseline succeeded

Then, after a while, we can compare the current memory usage with that baseline:

$ jcmd <pid> VM.native_memory summary.diff

NMT, using + and – signs, would tell us how the memory usage changed over that period:

Total: reserved=1771487KB +3373KB, committed=491491KB +6873KB
-             Java Heap (reserved=307200KB, committed=307200KB)
                        (mmap: reserved=307200KB, committed=307200KB)
 
-             Class (reserved=1084300KB +2103KB, committed=39356KB +2871KB)
// Truncated

The total reserved and committed memory increased by 3 MB and 6 MB, respectively. Other fluctuations in memory allocations can be spotted as easily.

3.10. Detailed NMT

NMT can provide very detailed information about a map of the entire memory space. To enable this detailed report, we should use the -XX:NativeMemoryTracking=detail tuning flag.

4. Conclusion

In this article, we enumerated different contributors to native memory allocations in the JVM. Then, we learned how to inspect a running application to monitor its native allocations. With these insights, we can more effectively tune our applications and size our runtime environments.

JDK Configuration for Maven Build in Eclipse

$
0
0

1. Overview

The Eclipse IDE is one of the most common tools for Java application development. It comes with default settings that enable us to build and execute our code right away within the IDE.

However, these default settings are sometimes not sufficient when we try to build using Maven in Eclipse. Consequently, we’ll encounter build errors.

In this quick tutorial, we’ll demonstrate the configuration changes we need to make so that we can build Maven-based Java projects within the IDE.

2. Java Compilation in Eclipse

Before we start, let’s try to understand a little bit about the compilation process in Eclipse.

The Eclipse IDE comes bundled with its own Java compiler called Eclipse Compiler for Java (ECJ). This is an incremental compiler that can compile only the modified files instead of having to always compile the entire application.

This capability makes it possible for code changes that we make through the IDE to be compiled and checked for errors instantaneously as we type.

Due to the usage of Eclipse’s internal Java compiler, we don’t need to have a JDK installed in our system for Eclipse to work.

3. Compiling Maven Projects in Eclipse

The Maven build tool helps us to automate our software build process, and Eclipse comes bundled with Maven as a plugin. However, Maven doesn’t come bundled with any Java compilers. Instead, it expects that we have the JDK installed.

To see what happens when we try to build a Maven project inside Eclipse, assuming that Eclipse has the default settings, let’s open any Maven project in Eclipse.

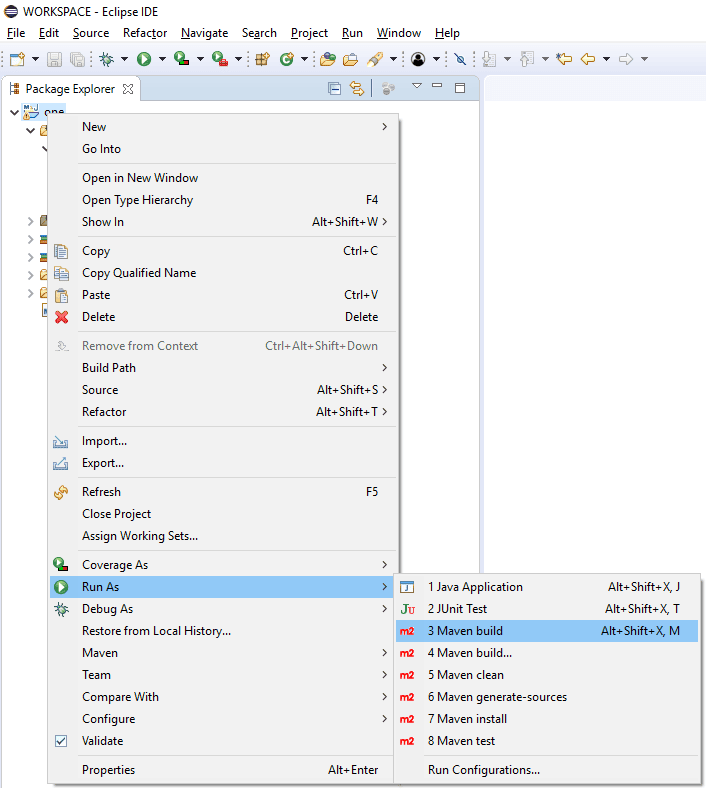
Then, from the Package Explorer window, let’s right-click on the project folder and then left-click on Run As > 3 Maven build:

This will trigger the Maven build process. As expected, we’ll get a failure:

[INFO] BUILD FAILURE
[INFO] ------------------------------------------------------------------------
[ERROR] Failed to execute goal org.apache.maven.plugins:maven-compiler-plugin:3.8.0:compile
  (default-compile) on project one: Compilation failure
[ERROR] No compiler is provided in this environment. Perhaps you are running on a JRE rather than a JDK?

The error message indicates that Maven is unable to find the Java compiler, which comes only with a JDK and not with a JRE.

4. JDK Configuration in Eclipse

Let’s now fix the Maven build issue in Eclipse.

First, we need to download the latest version of JDK and install it in our system.

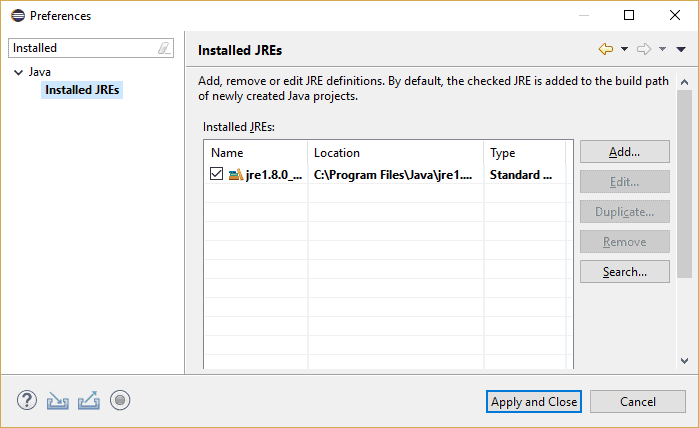
After that, let’s add the JDK as a runtime in Eclipse by navigating to Window > Preferences > Java > Installed JREs:

We can see that Eclipse already has Java configured. However, this is the JRE and not the JDK so let’s proceed with the next steps.

Now, let’s click on the Add… button to invoke the Add JRE wizard. This will ask us to select the type of JRE.

Here, we’ve selected the default option, Standard VM:

Clicking on Next will take us to the window where we’ll specify the location of the JRE home as the home directory of our JDK installation.

Following this, the wizard will validate the path and fetch the other details:

We can now click on Finish to close the wizard.

This will bring us back to the Installed JREs window, where we can see our newly added JDK and select it as our runtime in Eclipse:

Let’s click on Apply and Close to save our changes.

5. Testing the JDK Configuration

Let’s now trigger the Maven build one more time, in the same way as before.

We can see that it’s successful:

[INFO] ------------------------------------------------------------------------
[INFO] BUILD SUCCESS
[INFO] ------------------------------------------------------------------------

6. Conclusion

In this tutorial, we saw how we could configure Eclipse for Maven builds to work within the IDE.

By doing this one-time configuration, we’re able to leverage the IDE itself for our builds without having to set up Maven externally.

String Comparison in Kotlin

$
0
0

1. Overview

In this tutorial, we’ll discuss different ways of comparing Strings in Kotlin.

2. Comparison Operators

Let’s start with the “==” operator. This operator can be used to check if the strings are structurally equal. It’s the equivalent of using the equals method in Java:

val first = "kotlin"
val second = "kotlin"
val firstCapitalized = "KOTLIN"
assertTrue { first == second }
assertFalse { first == firstCapitalized }

Now, if we consider the referential equality operator “===”, it returns true if the two variables are pointing to the same object. It’s the equivalent of using == in Java.

When we initialize string values using quotes, they point to the same object. However, if we build a string separately, the variable will point to a separate object:

val copyOfFirst = buildString { "kotlin" }
assertTrue { first === second }
assertFalse { first === copyOfFirst }

3. Comparing with equals

The equals method returns the same result as the “==” operator:

assertTrue { first.equals(second) }
assertFalse { first.equals(firstCapitalized) }

When we want to do a case-insensitive comparison, we can use the equals method and pass true for the second optional parameter ignoreCase:

assertTrue { first.equals(firstCapitalized, true) }

4. Comparing with compareTo

Kotlin has a compareTo method which can be used to compare the order of the two strings. Like the equals method, the compareTo method also comes with an optional ignoreCase argument:

assertTrue { first.compareTo(second) == 0 }
assertTrue { first.compareTo(firstCapitalized) == 32 }
assertTrue { firstCapitalized.compareTo(first) == -32 }
assertTrue { first.compareTo(firstCapitalized, true) == 0 }

The compareTo method returns zero for equal strings, a positive value if the argument’s ASCII value is smaller, and a negative value if the argument’s ASCII value is greater. In a way, we can read it like we read subtraction.

In the last example, due to the ignoreCase argument, the two strings are considered equal

5. Conclusion

In this quick article, we saw different ways of comparing strings in Kotlin using some basic examples.

As always, please check out all the code over on GitHub.

Spring Data JPA Batch Inserts

$
0
0

1. Overview

Going out to the database is expensive. We may be able to improve performance and consistency by batching multiple inserts into one.

In this tutorial, we’ll look at how to do this with Spring Data JPA.

2. Spring JPA Repository

First, we’ll need a simple entity. Let’s call it Customer:

@Entity
public class Customer {

    @Id
    @GeneratedValue(strategy = GenerationType.AUTO)
    private Long id;
    private String firstName;
    private String lastName;

    // constructor, getters, setters 
}

And then, we need our repository:

public interface CustomerRepository extends CrudRepository<Customer, Long> {
}

This exposes a saveAll method for us, which will batch several inserts into one.

So, let’s leverage that in a controller:

@RestController
public class CustomerController {   
    @Autowired
    CustomerRepository customerRepository;   

    @PostMapping("/customers")
    public ResponseEntity<String> insertCustomers() {        
        Customer c1 = new Customer("James", "Gosling");
        Customer c2 = new Customer("Doug", "Lea");
        Customer c3 = new Customer("Martin", "Fowler");
        Customer c4 = new Customer("Brian", "Goetz");
        List<Customer> customers = Arrays.asList(c1, c2, c3, c4);
        customerRepository.saveAll(customers);
        return ResponseEntity.created("/customers");
    }

    // ... @GetMapping to read customers
}

3. Testing Our Endpoint

Testing our code is simple with MockMvc:

@Autowired
private MockMvc mockMvc;

@Test 
public void whenInsertingCustomers_thenCustomersAreCreated() throws Exception {
    this.mockMvc.perform(post("/customers"))
      .andExpect(status().isCreated()));
}

4. Are We Sure We’re Batching?

So, actually, there is a just a bit more configuration to do – let’s do a quick demo to illustrate the difference.

First, let’s add the following property to application.properties to see some statistics:

spring.jpa.properties.hibernate.generate_statistics=true

At this point, if we run the test, we’ll see stats like the following:

11232586 nanoseconds spent preparing 4 JDBC statements;
4076610 nanoseconds spent executing 4 JDBC statements;
0 nanoseconds spent executing 0 JDBC batches;

So, we created four customers, which is great, but note that none of them were inside a batch.

The reason is that batching isn’t switched on by default in some cases.

In our case, it’s because we are using id auto-generation. So, by default, saveAll does each insert separately.

So, let’s switch it on:

spring.jpa.properties.hibernate.jdbc.batch_size=4
spring.jpa.properties.hibernate.order_inserts=true

The first property tells Hibernate to collect inserts in batches of four. The order_inserts property tells Hibernate to take the time to group inserts by entity, creating larger batches.

So, the second time we run our test, we’ll see the inserts were batched:

16577314 nanoseconds spent preparing 4 JDBC statements;
2207548 nanoseconds spent executing 4 JDBC statements;
2003005 nanoseconds spent executing 1 JDBC batches;

We can apply the same approach to deletes and updates (remembering that Hibernate also has an order_updates property).

5. Conclusion

With the ability to batch inserts, we can see some performance gains.

We, of course, need to be aware that batching is automatically disabled in some cases, and we should check and plan for this before we ship.

Make sure to check out all these code snippets over on GitHub.

Java’s Time-Based Releases

$
0
0

1. Introduction

In this article, we’ll discuss the new time-based releases of Java and the impact on all types of developers.

Changes to the release schedule include updating the feature delivery and support levels for versions of Java. Overall, these changes are distinctly different from the Java that has been supported by Oracle since 2010.

2. Why Six-Month Releases?

For those of us used to Java’s historically slow release cadence, this is a pretty significant departure. Why such a dramatic change?

Originally, Java defined its major releases around the introduction of large features. This had a tendency to create delays, like those we all experienced with Java 8 and 9. It also slowed language innovation while other languages with tighter feedback cycles evolved.

Simply put, shorter release periods lead to smaller, more manageable steps forward. And smaller features are easier to adopt.

Such a pattern pairs well in current conditions and allows JDK development to work in agile methodologies akin to the community it supports. Also, it makes Java more competitive with runtimes like NodeJS and Python.

Of course, the slower pace also has its benefits, and so the six-month release cycle also plays a role in a larger Long Term Support framework, which we take a look at in Section 4.

3. Version Number Change

A mechanical aspect of this change is a new version-number scheme.

3.1. JEP 223 Version-String Scheme

We’re all familiar with the old one, codified in JEP 223. This scheme made version numbers incremental and relayed extra information.

   Actual                    Hypothetical
Release Type           long               short
------------           ------------------------ 
Security 2013/06       1.7.0_25-b15       7u25
Minor    2013/09       1.7.0_40-b43       7u40
Security 2013/10       1.7.0_45-b18       7u45
Security 2014/01       1.7.0_51-b13       7u51
Minor    2014/05       1.7.0_60-b19       7u60

If we run java -version on a JVM for version 8 or older, we’ll see something like:

>java -version
java version "1.6.0_27"
Java(TM) 2 Runtime Environment, Standard Edition (build 1.6.0_27-b07)
Java HotSpot(TM) Client VM (build 1.6.0_27-b13, mixed mode, sharing)

In this case, we might guess this is for Java 6, which is correct, and the 27th update, which is wrong. The numbering scheme isn’t as intuitive as it appears.

Minor releases were multiples of 10, and security releases filled everything else. Typically, we would see the short string appended onto our local installations, such as JDK 1.8u174. The next release may be JDK 1.8u180, which would be a minor release with new fixes.

3.2. New Version-String Scheme

The new version-string scheme will “recast version numbers to encode not compatibility and significance but, rather, the passage of time, in terms of release cycles,according to Mark Reinhold in the JEP.

Let’s take a look at some:

9.0.4
11.0.2
10.0.1

At a quick glance this appears to be semantic versioning; however, this is not the case. 

With semantic versioning, the typical structure is $MAJOR.$MINOR.$PATCH, but Java’s new version structure is:

$FEATURE.$INTERIM.$UPDATE.$PATCH

$FEATURE is what we might think of as the major version, but will increment every six months regardless of compatibility guarantees. And $PATCH is for maintenance releases. But, this is where the similarities stop.

First, $INTERIM is a placeholder, reserved by Oracle for future needs. For the time being, it will always be zero.

And second, $UPDATE is time-based like $FEATURE, updating monthly after the latest feature release.

And finally, trailing zeros are truncated.

This means that 11 is the release number for Java 11, released in September 2018, 11.0.1 is its first monthly update release in October, and 11.0.1.3 would be a hypothetical third patch release from October’s version.

4. Multiple Version Distributions

Next, let’s look at how to pick the right version.

4.1. Stability

Simply put, Java now has a fast channel, every six months, and a slow channel, every three years. Each third-year release is called an LTS release.

On the fast channel, the language releases features in incubation. These language features stabilize in the LTS release.

So, for companies that can embrace volatility in exchange for using new features, they can use the fast channel. For enterprises that appreciate stability and can wait to upgrade, they can upgrade at each LTS release.

Experimentation with JDK versions enables developers to find the best fit.

4.2. Support

There’s also, of course, the matter of support. Now that Java 8 support has sunset, what do we do?

And as discussed earlier, the answer comes in LTS versions, Java 11 being the most recent LTS release and 17 being the next. Updates will be available and supported by vendors such as Oracle and Azul.

If we can trust the support of the community, then Redhat, IBM, and others have stated their support for applying bug fixes for OpenJDK.

4.3. Licensing

One area of confusion for some is the difference between OpenJDK and Oracle JDK.

Actually, they are nearly identical, differing only in which bug fixes and security patches have been picked up, according to Brain Goetz.

OpenJDK acts as the source of most derived JDKs and remains free. Starting with Java 11, Oracle will charge commercial license fees for the Oracle JDK with additional support and services included.

4.4. Fragmentation

With more frequent releases, fragmentation may become an issue. Hypothetically, everyone could be running on different versions of Java with different features even more so than now.

Of course, containerization could help address this. From Docker and CoreOS to Red Hat’s OpenShift, containerization provides the needed isolation and no longer forces one installation location for Java to be used across the server.

5. Conclusion

In conclusion, we can expect a lot more from the Java team at Oracle with a regular release of Java every six months. As a Java developer, the prospect of new language features every six months is exciting.

Let’s keep in mind some of the implications as we decide what our upgrade channel is if we need support and licensing, and how to cope with fragmentation.


Guide to I/O in Groovy

$
0
0

1. Introduction

Although in Groovy we can work with I/O just as we do in Java, Groovy expands on Java’s I/O functionality with a number of helper methods.

In this tutorial, we’ll look at reading and writing files, traversing file systems and serializing data and objects via Groovy’s File extension methods.

Where applicable, we’ll be linking to our relevant Java articles for easy comparison to the Java equivalent.

2. Reading Files

Groovy adds convenient functionality for reading files in the form of the eachLine methods, methods for getting BufferedReaders and InputStreams, and ways to get all the file data with one line of code.

Java 7 and Java 8 have similar support for reading files in Java.

2.1. Reading with eachLine

When dealing with text files, we often need to read each line and process it. Groovy provides a convenient extension to java.io.File with the eachLine method:

def lines = []

new File('src/main/resources/ioInput.txt').eachLine { line ->
    lines.add(line)
}

The closure provided to eachLine also has a useful optional line number. Let’s use the line number to get only specific lines from a file:

def lineNoRange = 2..4
def lines = []

new File('src/main/resources/ioInput.txt').eachLine { line, lineNo ->
    if (lineNoRange.contains(lineNo)) {
        lines.add(line)
    }
}

By default, the line numbering starts at one. We can provide a value to use as the first line number by passing it as the first parameter to the eachLine method.

Let’s start our line numbers at zero:

new File('src/main/resources/ioInput.txt').eachLine(0, { line, lineNo ->
    if (lineNoRange.contains(lineNo)) {
        lines.add(line)
    }
})

If an exception is thrown in eachLine, Groovy makes sure the file resource gets closed. Much like a try-with-resources or a try-finally in Java.

2.2. Reading with Reader

We can also easily get a BufferedReader from a Groovy File object. We can use withReader to get a BufferedReader to the file object and pass it to a closure:

def actualCount = 0
new File('src/main/resources/ioInput.txt').withReader { reader ->
    while(reader.readLine()) {
        actualCount++
    }
}

As with eachLine, the withReader method will automatically close the resource when an exception is thrown.

Sometimes, we might want to have the BufferedReader object available. For example, we might plan to call a method that takes one as a parameter. We can use the newReader method for this:

def outputPath = 'src/main/resources/ioOut.txt'
def reader = new File('src/main/resources/ioInput.txt').newReader()
new File(outputPath).append(reader)
reader.close()

Unlike the other methods we’ve looked at so far, we’re responsible for closing the BufferedReader resource when we acquire a BufferedReader this way.

2.3. Reading with InputStreams

Similar to withReader and newReader, Groovy also provides methods for easily working with InputStreams. Although we can read text with InputStreams and Groovy even adds functionality for it, InputStreams are most commonly used for binary data.

Let’s use withInputStream to pass an InputStream to a closure and read in the bytes:

byte[] data = []
new File("src/main/resources/binaryExample.jpg").withInputStream { stream ->
    data = stream.getBytes()
}

If we need to have the InputStream object, we can get one using newInputStream:

def outputPath = 'src/main/resources/binaryOut.jpg'
def is = new File('src/main/resources/binaryExample.jpg').newInputStream()
new File(outputPath).append(is)
is.close()

As with the BufferedReader, we need to close our InputStream resource ourselves when we use newInputStream, but not when using withInputStream.

2.4. Reading Other Ways

Let’s finish the subject of reading by looking at a few methods Groovy has for grabbing all the file data in one statement.

If we want the lines of our file in a List, we can use collect with an iterator it passed to the closure:

def actualList = new File('src/main/resources/ioInput.txt').collect {it}

To get the lines of our file into an array of Strings, we can use as String[]:

def actualArray = new File('src/main/resources/ioInput.txt') as String[]

For short files, we can get the entire contents in a String using text:

def actualString = new File('src/main/resources/ioInput.txt').text

And when working with binary files, there’s the bytes method:

def contents = new File('src/main/resources/binaryExample.jpg').bytes

3. Writing Files

Before we start writing to files, let’s set up the text we’ll be outputting:

def outputLines = [
    'Line one of output example',
    'Line two of output example',
    'Line three of output example'
]

3.1. Writing with Writer

As with reading a file, we can also easily get a BufferedWriter out of a File object.

Let’s use withWriter to get a BufferedWriter and pass it to a closure:

def outputFileName = 'src/main/resources/ioOutput.txt'
new File(outputFileName).withWriter { writer ->
    outputLines.each { line ->
        writer.writeLine line
    }
}

Using withReader will close the resource should an exception occur.

Groovy also has a method for getting the BufferedWriter object. Let’s get a BufferedWriter using newWriter:

def outputFileName = 'src/main/resources/ioOutput.txt'
def writer = new File(outputFileName).newWriter()
outputLines.forEach {line ->
    writer.writeLine line
}
writer.flush()
writer.close()

We’re responsible for flushing and closing our BufferedWriter object when we use newWriter.

3.2. Writing with Output Streams

If we’re writing out binary data, we can get an OutputStream using either withOutputStream or newOutputStream.

Let’s write some bytes to a file using withOutputStream:

byte[] outBytes = [44, 88, 22]
new File(outputFileName).withOutputStream { stream ->
    stream.write(outBytes)
}

Let’s get an OutputStream object with newOutputStream and use it to write some bytes:

byte[] outBytes = [44, 88, 22]
def os = new File(outputFileName).newOutputStream()
os.write(outBytes)
os.close()

Similarly to InputStream, BufferedReader, and BufferedWriter, we’re responsible for closing the OutputStream ourselves when we use newOutputStream.

3.3. Writing with the << Operator

As writing text to files is so common, the << operator provides this feature directly.

Let’s use the << operator to write some simple lines of text:

def ln = System.getProperty('line.separator')
def outputFileName = 'src/main/resources/ioOutput.txt'
new File(outputFileName) << "Line one of output example${ln}" + 
  "Line two of output example${ln}Line three of output example"

3.4. Writing Binary Data with Bytes

We saw earlier in the article that we can get all the bytes out of a binary file simply by accessing the bytes field.

Let’s write binary data the same way:

def outputFileName = 'src/main/resources/ioBinaryOutput.bin'
def outputFile = new File(outputFileName)
byte[] outBytes = [44, 88, 22]
outputFile.bytes = outBytes

4. Traversing File Trees

Groovy also provides us with easy ways to work with file trees. In this section, we’re going to do that with eachFile, eachDir and their variants and the traverse method.

4.1. Listing Files with eachFile

Let’s list all of the files and directories in a directory using eachFile:

new File('src/main/resources').eachFile { file ->
    println file.name
}

Another common scenario when working with files is the need to filter the files based on file name. Let’s list only the files that start with “io” and end in “.txt” using eachFileMatch and a regular expression:

new File('src/main/resources').eachFileMatch(~/io.*\.txt/) { file ->
    println file.name
}

The eachFile and eachFileMatch methods only list the contents of the top-level directory. Groovy also allows us to restrict what the eachFile methods return by passing a FileType to the methods. The options are ANY, FILES, and DIRECTORIES.

Let’s recursively list all the files using eachFileRecurse and providing it with a FileType of FILES:

new File('src/main').eachFileRecurse(FileType.FILES) { file ->
    println "$file.parent $file.name"
}

The eachFile methods throw an IllegalArgumentException if we provide them with a path to a file instead of a directory.

Groovy also provides the eachDir methods for working with only directories. We can use eachDir and its variants to accomplish the same thing as using eachFile with a FileType of DIRECTORIES.

Let’s recursively list directories with eachFileRecurse:

new File('src/main').eachFileRecurse(FileType.DIRECTORIES) { file ->
    println "$file.parent $file.name"
}

Now, let’s do the same thing with eachDirRecurse:

new File('src/main').eachDirRecurse { dir ->
    println "$dir.parent $dir.name"
}

4.2. Listing Files with Traverse

For more complicated directory traversal use cases, we can use the traverse method. It functions similarly to eachFileRecurse but provides the ability to return FileVisitResult objects to control the processing.

Let’s use traverse on our src/main directory and skip processing the tree under the groovy directory:

new File('src/main').traverse { file ->
   if (file.directory && file.name == 'groovy') {
        FileVisitResult.SKIP_SUBTREE
    } else {
        println "$file.parent - $file.name"
    }
}

5. Working with Data and Objects

5.1. Serializing Primitives

In Java, we can use DataInputStream and DataOutputStream to serialize primitive data fields. Groovy adds useful expansions here as well.

Let’s set up some primitive data:

String message = 'This is a serialized string'
int length = message.length()
boolean valid = true

Now, let’s serialize our data to a file using withDataOutputStream:

new File('src/main/resources/ioData.txt').withDataOutputStream { out ->
    out.writeUTF(message)
    out.writeInt(length)
    out.writeBoolean(valid)
}

And read it back in using withDataInputStream:

String loadedMessage = ""
int loadedLength
boolean loadedValid

new File('src/main/resources/ioData.txt').withDataInputStream { is ->
    loadedMessage = is.readUTF()
    loadedLength = is.readInt()
    loadedValid = is.readBoolean()
}

Similar to the other with* methods, withDataOutputStream and withDataInputStream pass the stream to the closure and ensure it’s closed properly.

5.2. Serializing Objects

Groovy also builds upon Java’s ObjectInputStream and ObjectOutputStream to allow us to easily serialize objects that implement Serializable.

Let’s first define a class that implements Serializable:

class Task implements Serializable {
    String description
    Date startDate
    Date dueDate
    int status
}

Now let’s create an instance of Task that we can serialize to a file:

Task task = new Task(description:'Take out the trash', startDate:new Date(), status:0)

With our Task object in hand, let’s serialize it to a file using withObjectOutputStream:

new File('src/main/resources/ioSerializedObject.txt').withObjectOutputStream { out ->
    out.writeObject(task)
}

Finally, let’s read our Task back in using withObjectInputStream:

Task taskRead

new File('src/main/resources/ioSerializedObject.txt').withObjectInputStream { is ->
    taskRead = is.readObject()
}

The methods we used, withObjectOutputStream and withObjectInputStream, pass the stream to a closure and handle closing the resources appropriately, just as with seen with the other with* methods.

6. Conclusion

In this article, we explored functionality that Groovy adds onto existing Java File I/O classes. We used this functionality to read and write files, work with directory structures, and serialize data and objects.

We only touched on a few of the helper methods, so it’s worth digging into Groovy’s documentation to see what else it adds to Java’s I/O functionality.

The example code is available over on GitHub.

Time Comparison of Arrays.sort(Object[]) and Arrays.sort(int[])

$
0
0

1. Overview

In this quick tutorial, we’ll compare the two Arrays.sort(Object[]) and Arrays.sort(int[]) sorting operations.

First, we’ll describe each method separately. After that, we’ll write performance tests to measure their running times.

2. Arrays.sort(Object[])

Before we move ahead, it’s important to keep in mind that Arrays.sort() works for both primitive and reference type arrays.

Arrays.sort(Object[]) accepts reference types.

For example, we have an array of Integer objects:

Integer[] numbers = {5, 22, 10, 0};

To sort the array, we can simply use:

Arrays.sort(numbers);

Now, the numbers array has all its elements in ascending order:

[0, 5, 10, 22]

Arrays.sort(Object[]) is based on the TimSort algorithm, giving us a time complexity of O(n log(n)). In short, TimSort makes use of the Insertion sort and the MergeSort algorithms. However, it is still slower compared to other sorting algorithms like some of the QuickSort implementations.

3. Arrays.sort(int[])

On the other hand, Arrays.sort(int[]) works with primitive int arrays.

Similarly, we can define an int[] array of primitives:

int[] primitives = {5, 22, 10, 0};

And sort it with another implementation of Arrays.sort(int[]). This time, accepting an array of primitives:

Arrays.sort(primitives);

The result of this operation will be no different from the previous example. And the items in the primitives array will look like:

[0, 5, 10, 22]

Under the hood, it uses a Dual-Pivot Quicksort algorithm. Its internal implementation from the JDK 10 is typically faster than traditional one-pivot Quicksort.

This algorithm offers O(n log(n)) average time complexity. That’s a great average sorting time for many collections to have. Moreover, it has the advantage of being completely in place, so it does not require any additional storage.

Though, in the worst case, its time complexity is O(n2)

4. Time Comparison

So, which algorithm is faster and why? Let’s first do some theory, and then we’ll run some concrete tests with JMH.

4.1. Qualitative Analysis

Arrays.sort(Object[]) is typically slower compared to Arrays.sort(int[]) for a few different reasons.

The first is the different algorithms. QuickSort is often faster than Timsort.

Second is how each method compares the values.

See, since Arrays.sort(Object[]) needs to compare one object against another, it needs to call each element’s compareTo method. At the very least, this requires a method lookup and pushing a call onto the stack in addition to whatever the comparison operation actually is.

On the other hand, Arrays.sort(int[]) can simply use primitive relational operators like < and >, which are single bytecode instructions.

4.2. JMH Parameters

Finally, let’s find out which sorting method runs faster with actual data. For that, we’ll use the JMH (Java Microbenchmark Harness) tool to write our benchmark tests.

So, we are just going to do a very simple benchmark here. It’s not comprehensive but will give us an idea of how we can approach comparing Arrays.sort(int[]) and Arrays.sort(Integer[]) sorting methods.

In our benchmark class we’ll use configuration annotations:

@BenchmarkMode(Mode.AverageTime)
@OutputTimeUnit(TimeUnit.MILLISECONDS)
@Measurement(batchSize = 100000, iterations = 10)
@Warmup(batchSize = 100000, iterations = 10)
public class ArraySortBenchmark {
}

Here, we want to measure the average time for a single operation (Mode.AverageTime) and display our results in milliseconds (TimeUnit.MILLISECONDS). Furthermore, with the batchSize parameter, we’re telling JMH to perform 100,000 iterations to make sure our results have high precision.

4.3. Benchmark Tests

Before running the tests, we need to define the data containers which we want to sort:

@State(Scope.Thread)
public static class Initialize {
    Integer[] numbers = {-769214442, -1283881723, 1504158300, -1260321086, -1800976432, 1278262737, 
      1863224321, 1895424914, 2062768552, -1051922993, 751605209, -1500919212, 2094856518, 
      -1014488489, -931226326, -1677121986, -2080561705, 562424208, -1233745158, 41308167 };
    int[] primitives = {-769214442, -1283881723, 1504158300, -1260321086, -1800976432, 1278262737, 
      1863224321, 1895424914, 2062768552, -1051922993, 751605209, -1500919212, 2094856518, 
      -1014488489, -931226326, -1677121986, -2080561705, 562424208, -1233745158, 41308167};
}

Let’s choose the Integer[] numbers and the int[] primitives array of primitive elements. The @State annotation indicates that the variables declared in the class won’t be the part of running benchmark tests. However, we can then use them in our benchmark methods.

Now, we’re ready to add the first micro-benchmark for Arrays.sort(Integer[]):

@Benchmark
public Integer[] benchmarkArraysIntegerSort(ArraySortBenchmark.Initialize state) {
    Arrays.sort(state.numbers);
    return state.numbers;
}

Next, for Arrays.sort(int[]):

@Benchmark
public int[] benchmarkArraysIntSort(ArraySortBenchmark.Initialize state) {
    Arrays.sort(state.primitives);
    return state.primitives;
}

4.4. Test Results

Finally, we run our tests and compare the results:

Benchmark                   Mode  Cnt  Score   Error  Units
benchmarkArraysIntSort      avgt   10  1.095 ± 0.022  ms/op
benchmarkArraysIntegerSort  avgt   10  3.858 ± 0.060  ms/op

From the results, we can see that Arrays.sort(int[]) method performed better than to Arrays.sort(Object[]) in our test, likely for the earlier reasons we identified.

And even though the numbers appear to support our theory, though we’d need to do testing with a greater variety of inputs to get a better idea.

Also, keep in mind that the numbers we present here are just JMH benchmark results – so we should always test in the scope of our own system and runtime.

4.5. Why Timsort then?

We should probably ask ourselves a question, then. If QuickSort is faster, why not use it for both implementations?

See, QuickSort isn’t stable, so we can’t use it to sort Objects. Basically, if two ints are equal, it doesn’t matter that their relative order stays the same since one is no different from another 2. With objects though, we can sort by one attribute and then another, making the starting order matter.

5. Conclusion

In this article, we compared two sorting methods available in Java: Arrays.sort(int[]) and Arrays.sort(Integer[]). Additionally, we discussed the sorting algorithms used in their implementations.

Finally, with the help of benchmark performance tests, we showed a sample run time of each sorting option.

As usual, the complete code for this article is available over on GitHub.

Converting a String to a Date in Groovy

$
0
0

1. Overview

In this short tutorial, we’ll learn how to convert a String representing a date into a real Date object in Groovy.

However, we should keep in mind that this language is an enhancement of Java. Therefore, we can still use every plain old Java method, in addition to the new Groovy ones.

2. Using DateFormat

Firstly, we can parse Strings into Dates, as usual, using a Java DateFormat:

def pattern = "yyyy-MM-dd"
def input = "2019-02-28"

def date = new SimpleDateFormat(pattern).parse(input)

Groovy, however, allows us to perform this operation more easily. It encapsulates the same behavior inside the convenience static method Date.parse(String format, String input):

def date = Date.parse(pattern, input)

In short, that method is an extension of the java.util.Date object, and internally it instantiates a java.text.DateFormat upon every invocation, for thread safety.

2.1. Compatibility Issues

To clarify, the Date.parse(String format, String input) method is available since version 1.5.7 of Groovy.

Version 2.4.1 introduced a variant accepting a third parameter indicating a timezone: Date.parse(String format, String input, TimeZone zone).

From 2.5.0, however, there has been a breaking change and those enhancements are not shipped anymore with groovy-all.

So, going forward, they need to be included as a separate module, named groovy-dateutil:

<dependency>
    <groupId>org.codehaus.groovy</groupId>
    <artifactId>groovy-dateutil</artifactId>
    <version>2.5.6</version>
</dependency>

There’s also version 3.0.0, but it’s currently in the Alpha stage.

3. Using JSR-310 LocalDate

Since version 8, Java introduced a whole new set of tools to handle with dates: the Date/Time API.

These APIs are better for several reasons and should be preferred over the legacy ones.

Let’s see how to exploit the java.time.LocalDate parsing capabilities from Groovy:

def date = LocalDate.parse(input, pattern)

4. Conclusion

We’ve seen how to transform a String into a Date in the Groovy language, paying attention the peculiarities between the specific versions.

As always, the source code and unit tests are available over on GitHub.

Generate Combinations in Java

$
0
0

1. Introduction

In this tutorial, we’ll discuss the solution of the k-combinations problem in Java.

First, we’ll discuss and implement both recursive and iterative algorithms to generate all combinations of a given size. Then we’ll review solutions using common Java libraries.

2. Combinations Overview

Simply put, a combination is a subset of elements from a given set.

Unlike permutations, the order in which we choose the individual elements doesn’t matter. Instead, we only care whether a particular element is in the selection.

For example, in a card game, we have to deal 5 cards out of the pack consisting of 52 cards. We have no interest in the order in which the 5 cards were selected. Rather, we only care which cards are present in the hand.

Some problems require us to evaluate all possible combinations. In order to do this, we enumerate the various combinations.

The number of distinct ways to choose “r” elements from the set of “n” elements can be expressed mathematically with the following formula:

Therefore, the number of ways to choose elements can grow exponentially in the worst case. Hence, for large populations, it may not be possible to enumerate the different selections.

In such cases, we may randomly select a few representative selections. The process is called sampling.

Next, we’ll review the various algorithms to list combinations.

3. Recursive Algorithms to Generate Combinations

Recursive algorithms usually work by partitioning a problem into similar smaller problems. This process continues until we reach the terminating condition, which is also the base case. Then we solve the base case directly.

We’ll discuss two ways to subdivide the task of choosing elements from a set. The first approach divides the problem in terms of the elements in the set. The second approach divides the problem by tracking the selected elements only.

3.1. Partitioning by Elements in the Entire Set

Let’s divide the task of selecting “r” elements from “n” items by inspecting the items one by one. For each item in the set, we can either include it in the selection or exclude it.

If we include the first item, then we need to choose “r – 1″ elements from the remaining “n – 1″ items. On the other hand, if we discard the first item, then we need to select “r” elements out of the remaining “n – 1″ items.

This can be mathematically expressed as:

Now, let’s look into the recursive implementation of this approach:

private void helper(List<int[]> combinations, int data[], int start, int end, int index) {
    if (index == data.length) {
        int[] combination = data.clone();
        combinations.add(combination);
    } else if (start <= end) {
        data[index] = start;
        helper(combinations, data, start + 1, end, index + 1);
        helper(combinations, data, start + 1, end, index);
    }
}

The helper method makes two recursive calls to itself. The first call includes the current element. The second call discards the current element.

Next, let’s write the combination generator using this helper method:

public List<int[]> generate(int n, int r) {
    List<int[]> combinations = new ArrayList<>();
    helper(combinations, new int[r], 0, n-1, 0);
    return combinations;
}

In the above code, the generate method sets up the first call to the helper method and passes the appropriate parameters.

Next, let’s call this method to generate combinations:

List<int[]> combinations = generate(N, R);
for (int[] combination : combinations) {
    System.out.println(Arrays.toString(combination));
}
System.out.printf("generated %d combinations of %d items from %d ", combinations.size(), R, N);

On executing the program, we get the following output:

[0, 1]
[0, 2]
[0, 3]
[0, 4]
[1, 2]
[1, 3]
[1, 4]
[2, 3]
[2, 4]
[3, 4]
generated 10 combinations of 2 items from 5

Finally, let’s write the test case:

@Test
public void givenSetAndSelectionSize_whenCalculatedUsingSetRecursiveAlgorithm_thenExpectedCount() {
    SetRecursiveCombinationGenerator generator = new SetRecursiveCombinationGenerator();
    List<int[]> selection = generator.generate(N, R);
    assertEquals(nCr, selection.size());
}

It is easy to observe that the stack size required is the number of elements in the set. When the number of elements in the set is large, say, greater than the maximum call stack depth, we’ll overflow the stack and get a StackOverflowError.

Therefore, this approach doesn’t work if the input set is large.

3.2. Partitioning by Elements in the Combination

Instead of tracking the elements in the input set, we’ll divide the task by tracking the items in the selection.

First, let’s order the items in the input set using indices “1” to “n”. Now, we can choose the first item from the first “n-r+1″ items.

Let’s assume that we chose the kth item. Then, we need to choose “r – 1″ items from the remaining “n – k” items indexed “k + 1″ to “n”.

We express this process mathematically as:

Next, let’s write the recursive method to implement this approach:

private void helper(List<int[]> combinations, int data[], int start, int end, int index) {
    if (index == data.length) {
        int[] combination = data.clone();
        combinations.add(combination);
    } else {
        int max = Math.min(end, end + 1 - data.length + index);
        for (int i = start; i <= max; i++) {
            data[index] = i;
            helper(combinations, data, i + 1, end, index + 1);
        }
    }
}

In the above code, the for loop chooses the next item, Then, it calls the helper() method recursively to choose the remaining items. We stop when the required number of items have been selected.

Next, let’s use the helper method to generate selections:

public List<int[]> generate(int n, int r) {
    List<int[]> combinations = new ArrayList<>();
    helper(combinations, new int[r], 0, n - 1, 0);
    return combinations;
}

Finally, let’s write a test case:

@Test
public void givenSetAndSelectionSize_whenCalculatedUsingSelectionRecursiveAlgorithm_thenExpectedCount() {
    SelectionRecursiveCombinationGenerator generator = new SelectionRecursiveCombinationGenerator();
    List<int[]> selection = generator.generate(N, R);
    assertEquals(nCr, selection.size());
}

The call stack size used by this approach is the same as the number of elements in the selection. Therefore, this approach can work for large inputs so long as the number of elements to be selected is less than the maximum call stack depth.

If the number of elements to be chosen is also large, this method won’t work.

4. Iterative Algorithm

In the iterative approach, we start with an initial combination. Then, we keep generating the next combination from the current one until we have generated all combinations.

Let’s generate the combinations in lexicographic order. We start with the lowest lexicographic combination.

In order to get the next combination from the current one, we find the rightmost location in the current combination that can be incremented. Then, we increment the location and generate the lowest possible lexicographic combination to the right of that location.

Let’s write the code which follows this approach:

public List<int[]> generate(int n, int r) {
    List<int[]> combinations = new ArrayList<>();
    int[] combination = new int[r];

    // initialize with lowest lexicographic combination
    for (int i = 0; i < r; i++) {
        combination[i] = i;
    }

    while (combination[r - 1] < n) {
        combinations.add(combination.clone());

         // generate next combination in lexicographic order
        int t = r - 1;
        while (t != 0 && combination[t] == n - r + t) {
            t--;
        }
        combination[t]++;
        for (int i = t + 1; i < r; i++) {
            combination[i] = combination[i - 1] + 1;
        }
    }

    return combinations;
}

Next, let’s write the test case:

@Test
public void givenSetAndSelectionSize_whenCalculatedUsingIterativeAlgorithm_thenExpectedCount() {
    IterativeCombinationGenerator generator = new IterativeCombinationGenerator();
    List<int[]> selection = generator.generate(N, R);
    assertEquals(nCr, selection.size());
}

Now, let us use some Java libraries to solve the problem.

5. Java Libraries Implementing Combinations

As far as possible, we should reuse existing library implementations instead of rolling out our own. In this section, we’ll explore the following Java libraries that implement combinations:

  • Apache Commons
  • Guava
  • CombinatoricsLib

5.1. Apache Commons

The CombinatoricsUtils class from Apache Commons provides many combination utility functions. In particular, the combinationsIterator method returns an iterator that will generate combinations in lexicographic order.

First, let’s add the Maven dependency commons-math3 to the project:

<dependency>
    <groupId>org.apache.commons</groupId>
    <artifactId>commons-math3</artifactId>
    <version>3.6.1</version>
</dependency>

Next, let’s use the combinationsIterator method to print the combinations:

public static void generate(int n, int r) {
    Iterator<int[]> iterator = CombinatoricsUtils.combinationsIterator(n, r);
    while (iterator.hasNext()) {
        final int[] combination = iterator.next();
        System.out.println(Arrays.toString(combination));
    }
}

5.2. Google Guava

The Sets class from Guava library provides utility methods for set-related operations. The combinations method returns all subsets of a given size.

First, let’s add the maven dependency for the Guava library to the project:

<dependency>
    <groupId>com.google.guava</groupId>
    <artifactId>guava</artifactId>
    <version>27.0.1-jre</version>
</dependency>

Next, let’s use the combinations method to generate combinations:

Set<Set<Integer>> combinations = Sets.combinations(ImmutableSet.of(0, 1, 2, 3, 4, 5), 3);

Here, we are using the ImmutableSet.of method to create a set from the given numbers.

5.3. CombinatoricsLib

CombinatoricsLib is a small and simple Java library for permutations, combinations, subsets, integer partitions, and cartesian product.

To use it in the project, let’s add the combinatoricslib3 Maven dependency:

<dependency>
    <groupId>com.github.dpaukov</groupId>
    <artifactId>combinatoricslib3</artifactId>
    <version>3.3.0</version>
</dependency>

Next, let’s use the library to print the combinations:

Generator.combination(0, 1, 2, 3, 4, 5)
  .simple(3)
  .stream()
  .forEach(System.out::println);

This produces the following output on execution:

[0, 1, 2]
[0, 1, 3]
[0, 1, 4]
[0, 1, 5]
[0, 2, 3]
[0, 2, 4]
[0, 2, 5]
[0, 3, 4]
[0, 3, 5]
[0, 4, 5]
[1, 2, 3]
[1, 2, 4]
[1, 2, 5]
[1, 3, 4]
[1, 3, 5]
[1, 4, 5]
[2, 3, 4]
[2, 3, 5]
[2, 4, 5]
[3, 4, 5]

More examples are available at combinatoricslib3-example.

6. Conclusion

In this article, we implemented a few algorithms to generate combinations.

We also reviewed a few library implementations. Typically, we’d use these instead of rolling our own.

As usual, the full source code can be found over on GitHub.

Lists in Groovy

$
0
0

1. Overview

In Groovy, we can work with lists just like we do in Java. But, with its support for extension methods, it ships with quite a bit more.

In this tutorial, we’ll look at Groovy’s take on mutating, filtering and sorting lists.

2. Creating Groovy Lists

Groovy provides certain interesting shortcuts when working with collections which makes use of its support for dynamic typing and literal syntax.

Let’s begin by creating a list with some values using the shorthand syntax:

def list = [1,2,3]

Similarly, we can create an empty list:

def emptyList = []

By default, Groovy creates an instance of java.util.ArrayList. However, we can also specify the type of list to create:

def linkedList = [1,2,3] as LinkedList
ArrayList arrList = [1,2,3]

Next, lists can be used to create other lists by using a constructor argument:

def copyList = new ArrayList(arrList)

or by cloning:

def cloneList = arrList.clone()

Note that cloning creates a shallow copy of the list.

Groovy uses the “==” operator to compare the elements in two lists for equality. Continuing with the previous example, on comparing cloneList with arrlist the result is true:

assertTrue(cloneList == arrList)

Now, let’s look at how to perform some common operations on lists.

3. Retrieving Items from a List

We can get an item from a list using the literal syntax such as:

def list = ["Hello", "World"]
assertTrue(list[1] == "World")

or using the get() and getAt() methods:

assertTrue(list.get(1) == "World")
assertTrue(list.getAt(1) == "World")

We can also get items from a list using both positive and negative indices. When a negative index is used, the list is read from right to left:

assertTrue(list[-1] == "World")
assertTrue(list.getAt(-2) == "Hello")

Note that the get() method doesn’t support negative indexes.

4. Adding Items to a List

There are multiple shorthand ways for adding items to list. Let’s define an empty list and add a few items to it:

def list = []

list << 1
list.add("Apple")
assertTrue(list == [1, "Apple"])

Next, we can also specify the index to place the item at. Also, if the length of the list is less than the index specified, then Groovy adds as many null values as the difference:

list[2] = "Box"
list[4] = true
assertTrue(list == [1, "Apple", "Box", null, true])

Lastly, we can use the  “+=” operator to add new items to the list. Compared to the other approaches, this operator creates a new list object and assigns it to the variable list:

def list2 = [1,2]
list += list2
list += 12        
assertTrue(list == [1, 6.0, "Apple", "Box", null, true, 1, 2, 12])

5. Updating Items in a List

We can update items in a list using the literal syntax or the set() method:

def list =[1, "Apple", 80, "App"]
list[1] = "Box"
list.set(2,90)
assertTrue(list == [1, "Box", 90,  "App"])

In this example, the items at index 1 and 2 are updated with new values.

6. Removing Items from a List

We can remove an item at a particular index using the remove() method:

def list = [1,2,3,4,5,5,6,6,7]
list.remove(3)
assertTrue(list == [1,2,3,5,5,6,6,7])

Or we can also remove an element by using the removeElement() method. This removes the first occurrence of the element from the list:

list.removeElement(5)
assertTrue(list == [1,2,3,5,6,6,7])

Additionally, we can use the minus operator to remove all occurrences of an element from the list. This operator, however, does not mutate the underlying list – it returns a new list:

assertTrue(list - 6 == [1,2,3,5,7])

7. Iterating on a List

Groovy has added new methods to the existing Java Collections API. These methods simplify operations such as filtering, searching, sorting, aggregating etc by encapsulating the boilerplate code. Also they support a wide range of inputs including closures and output data structures.

Lets start by looking at the two methods for iterating over a list.

The each() method accepts a closure and is very similar to the foreach() method in Java. Groovy passes an implicit parameter it which corresponds to the current element in each iteration:

def list = [1,"App",3,4]
list.each {println it * 2}

The other method, eachWithIndex() provides the current index value in addition to the current element:

list.eachWithIndex{ it, i -> println "$i : $it" }

8. Filtering

Filtering is another operation that is frequently performed on lists, and Groovy provides many different methods to choose from.

Let’s define a list to operate on:

def filterList = [2,1,3,4,5,6,76]

To find the first object that matches a condition we can use find:

assertTrue(filterList.find {it > 3} == 4)

To find all objects that match a condition we can use findAll:

assertTrue(filterList.findAll {it > 3} == [4,5,6,76])

Let’s look at another example. Here, we want a list of all elements which are numbers:

assertTrue(filterList.findAll {it instanceof Number} == [2,1,3,4,5,6,76])

Alternatively, we can use the grep method to do the same thing:

assertTrue(filterList.grep( Number ) == [2,1,3,4,5,6,76])

The difference between grep and find methods is that grep can accept an Object or a Closure as an argument. Thus, it allows further reducing the condition statement to the bare minimum:

assertTrue(filterList.grep {it > 6} == [76])

Additionally, grep uses Object#isCase(java.lang.Object) to evaluate the condition on each element of the list.

Sometimes we may only be interested in the unique items in a list. There are two overloaded methods which we can use for this purpose.

The unique() method optionally accepts a closure and keeps in the underlying list only elements that match the closure conditions while discarding others. It uses natural ordering by default to determine uniqueness:

def uniqueList = [1,3,3,4]
uniqueList.unique()
assertTrue(uniqueList == [1,3,4])

Alternatively, if the requirement is not to mutate the underlying list, then we can use the toUnique() method:

assertTrue(["A", "B", "Ba", "Bat", "Cat"].toUnique {it.size()} == ["A", "Ba", "Bat"])

If we want to check that some or all items in a list satisfy a certain condition, we can use the every() and any() methods.

The every() method evaluates the condition in the closure against every element in the list. Then, it only returns true if all elements in the list satisfy the condition:

def conditionList = [2,1,3,4,5,6,76]
assertFalse(conditionList.every {it < 6})

The any() method, on the other hand, returns true if any element in the list satisfies the condition:

assertTrue(conditionList.any {it % 2 == 0})

9. Sorting

By default, Groovy sorts the items in a list based on their natural ordering:

assertTrue([1,2,1,0].sort() == [0,1,1,2])

But we can also pass a Comparator with custom sorting logic:

Comparator mc = {a,b -> a == b? 0: a < b? 1 : -1}
def list = [1,2,1,0]
list.sort(mc)
assertTrue(list == [2,1,1,0])

Additionally, we can use the min() or max() methods to find the maximum or minimum value without explicitly calling sort():

def strList = ["na", "ppp", "as"]
assertTrue(strList.max() == "ppp")
Comparator minc = {a,b -> a == b? 0: a < b? -1 : 1}
def numberList = [3, 2, 0, 7]
assertTrue(numberList.min(minc) == 0)

10. Collecting

Sometimes we may want to modify the items in a list and return another list with updated values. This can be done using the collect() method:

def list = ["Kay","Henry","Justin","Tom"]
assertTrue(list.collect{"Hi " + it} == ["Hi Kay","Hi Henry","Hi Justin","Hi Tom"])

11. Joining

At times, we may need to join the items in a list. To do that we can the join() method:

assertTrue(["One","Two","Three"].join(",") == "One,Two,Three")

12. Conclusion

In this article, we covered a few of the extensions Groovy adds to the Java Collections API.

We started off by looking at the literal syntax and then its usage in creating, updating, removing and retrieving items in a list.

Finally, we looked at Groovy’s support for iterating, filtering, searching, collecting, joining and sorting lists.

As always all the examples discussed in the article are available over on GitHub.

Viewing all 4757 articles
Browse latest View live


<script src="https://jsc.adskeeper.com/r/s/rssing.com.1596347.js" async> </script>