Quantcast
Channel: Baeldung
Viewing all 4460 articles
Browse latest View live

Using a Byte Array as Map Key in Java

$
0
0

1. Introduction

In this tutorial, we'll learn how to use a byte array as a key in HashMap. Because of how HashMap works, we, unfortunately, can't do that directly. We'll investigate why is that and look at several ways to solve that problem.

2. Designing a Good Key for HashMap

2.1. How HashMap Works

HashMap uses the mechanism of hashing for storing and retrieving values from itself. When we invoke the put(key, value) method, HashMap calculates the hash code based on the key's hashCode() method. This hash is used to identify a bucket in which the value is finally stored:

public V put(K key, V value) {
    if (key == null)
        return putForNullKey(value);
    int hash = hash(key.hashCode());
    int i = indexFor(hash, table.length);
    for (Entry e = table[i]; e != null; e = e.next) {
        Object k;
        if (e.hash == hash && ((k = e.key) == key || key.equals(k))) {
            V oldValue = e.value;
            e.value = value;
            e.recordAccess(this);
            return oldValue;
        }
    }
 
    modCount++;
    addEntry(hash, key, value, i);
    return null;
}

When we retrieve a value using the get(key) method, a similar process is involved. The key is used to compute the hash code and then to find the bucket. Then each entry in the bucket is checked for equality using the equals() method. Finally, the value of the matching entry is returned:

public V get(Object key) {
    if (key == null)
        return getForNullKey();
    int hash = hash(key.hashCode());
    for (Entry e = table[indexFor(hash, table.length)]; e != null; e = e.next) {
        Object k;
        if (e.hash == hash && ((k = e.key) == key || key.equals(k)))
            return e.value;
    }
    return null;
}

2.2. Contract Between equals() and hashCode()

Both equals and hashCode methods have contracts that should be observed. In the context of HashMaps, one aspect is especially important: objects that are equal to each other must return the same hashCode. However, objects that return the same hashCode don't need to be equal to each other. That's why we can store several values in one bucket.

2.3. Immutability

The hashCode of the key in HashMap should not change. While it's not mandatory, it's highly recommended for keys to be immutable. If an object is immutable, its hashCode won't have an opportunity to change, regardless of the implementation of the hashCode method.

By default, the hash is computed based on all fields of the object. If we would like to have a mutable key, we'd need to override the hashCode method to ensure that mutable fields aren't used in its computation. To maintain the contract, we would also need to change the equals method.

2.4. Meaningful Equality

To be able to successfully retrieve values from the map, equality must be meaningful. In most cases, we need to be able to create a new key object that will be equal to some existing key in the map. For that reason, object identity isn't very useful in this context.

This is also the main reason why using a primitive byte array isn't really an option. Arrays in Java use object identity to determine equality. If we create HashMap with byte array as the key, we'll be able to retrieve a value only using exactly the same array object.

Let's create a naive implementation with a byte array as a key:

byte[] key1 = {1, 2, 3};
byte[] key2 = {1, 2, 3};
Map<byte[], String> map = new HashMap<>();
map.put(key1, "value1");
map.put(key2, "value2");

Not only do we have two entries with virtually the same key, but also, we can't retrieve anything using a newly created array with the same values:

String retrievedValue1 = map.get(key1);
String retrievedValue2 = map.get(key2);
String retrievedValue3 = map.get(new byte[]{1, 2, 3});
assertThat(retrievedValue1).isEqualTo("value1");
assertThat(retrievedValue2).isEqualTo("value2");
assertThat(retrievedValue3).isNull();

3. Using Existing Containers

Instead of the byte array, we can use existing classes whose equality implementation is based on content, not object identity.

3.1. String

String equality is based on the content of the character array:

public boolean equals(Object anObject) {
    if (this == anObject) {
        return true;
    }
    if (anObject instanceof String) {
        String anotherString = (String)anObject;
        int n = count;
        if (n == anotherString.count) {
            char v1[] = value;
            char v2[] = anotherString.value;
            int i = offset;
            int j = anotherString.offset;
            while (n-- != 0) {
                if (v1[i++] != v2[j++])
                   return false;
            }
            return true;
        }
    }
    return false;
}

Strings are also immutable, and creating a String based on a byte array is fairly straightforward. We can easily encode and decode a String using the Base64 scheme:

String key1 = Base64.getEncoder().encodeToString(new byte[]{1, 2, 3});
String key2 = Base64.getEncoder().encodeToString(new byte[]{1, 2, 3});

Now we can create a HashMap with String as keys instead of byte arrays. We'll put values into the Map in a manner similar to the previous example:

Map<String, String> map = new HashMap<>();
map.put(key1, "value1");
map.put(key2, "value2");

Then we can retrieve a value from the map. For both keys, we'll get the same, second value. We can also check that the keys are truly equal to each other:

String retrievedValue1 = map.get(key1);
String retrievedValue2 = map.get(key2);
assertThat(key1).isEqualTo(key2);
assertThat(retrievedValue1).isEqualTo("value2");
assertThat(retrievedValue2).isEqualTo("value2");

3.2. Lists

Similarly to String, the List#equals method will check for equality of each of its elements. If these elements have a sensible equals() method and are immutable, List will work correctly as the HashMap key. We only need to make sure we're using an immutable List implementation:

List<Byte> key1 = ImmutableList.of((byte)1, (byte)2, (byte)3);
List<Byte> key2 = ImmutableList.of((byte)1, (byte)2, (byte)3);
Map<List<Byte>, String> map = new HashMap<>();
map.put(key1, "value1");
map.put(key2, "value2");
assertThat(map.get(key1)).isEqualTo(map.get(key2));

Mind that the List of the Byte object will take a lot more memory than the array of byte primitives. So that solution, while convenient, isn't viable for most scenarios.

4. Implementing Custom Container

We can also implement our own wrapper to take full control of hash code computation and equality. That way we can make sure the solution is fast and doesn't have a big memory footprint.

Let's make a class with one final, private byte array field. It'll have no setter, and its getter will make a defensive copy to ensure full immutability:

public final class BytesKey {
    private final byte[] array;
    public BytesKey(byte[] array) {
        this.array = array;
    }
    public byte[] getArray() {
        return array.clone();
    }
}

We also need to implement our own equals and hashCode methods. Fortunately, we can use the Arrays utility class for both of these tasks:

@Override
public boolean equals(Object o) {
    if (this == o) return true;
    if (o == null || getClass() != o.getClass()) return false;
    BytesKey bytesKey = (BytesKey) o;
    return Arrays.equals(array, bytesKey.array);
}
@Override
public int hashCode() {
    return Arrays.hashCode(array);
}

Finally, we can use our wrapper as a key in a HashMap:

BytesKey key1 = new BytesKey(new byte[]{1, 2, 3});
BytesKey key2 = new BytesKey(new byte[]{1, 2, 3});
Map<BytesKey, String> map = new HashMap<>();
map.put(key1, "value1");
map.put(key2, "value2");

Then, we can retrieve the second value using either of the declared keys or we may use one created on the fly:

String retrievedValue1 = map.get(key1);
String retrievedValue2 = map.get(key2);
String retrievedValue3 = map.get(new BytesKey(new byte[]{1, 2, 3}));
assertThat(retrievedValue1).isEqualTo("value2");
assertThat(retrievedValue2).isEqualTo("value2");
assertThat(retrievedValue3).isEqualTo("value2");

5. Conclusion

In this tutorial, we looked at different problems and solutions for using a byte array as a key in HashMap. First, we investigated why we can't use arrays as keys. Then we used some built-in containers to mitigate that problem and, finally, implemented our own wrapper.

As usual, the source code for this tutorial can be found over on GitHub.

The post Using a Byte Array as Map Key in Java first appeared on Baeldung.
        

Determine if an Integer’s Square Root Is an Integer in Java

$
0
0

1. Overview

A perfect square is a number that can be expressed as the product of two equal integers.

In this article, we'll discover multiple ways to determine if an integer is a perfect square in Java. Also, we'll discuss the advantages and disadvantages of each technique to determine its efficiency and which is the fastest.

2. Checking if an Integer Is a Perfect Square

As we know, Java gives us two data types for defining an integer. The first one is int, which represents the number in 32 bits, and the other is long, which represents the number in 64 bits. In this article, we'll use the long data type to handle the worst case (the largest possible integer).

Since Java represents the long number in 64 bits, the range of the long number is from -9,223,372,036,854,775,808 to 9,223,372,036,854,775,807. And, since we're handling perfect squares, we're only concerned with handling the set of positive integers because multiplying any integer by itself will always produce a positive number.

In addition, since the largest number is about  263, that means there are about 231.5 integers whose square is less than 263. Also, we can suppose that having a lookup table of those numbers is inefficient.

2.1. Using the sqrt Method in Java

The easiest and most straightforward way to check whether an integer is a perfect square is to use the sqrt function. As we know, the sqrt function returns a double value. So, what we need to do is to cast the result to int and multiply it by itself. Then, we check if the result is equal to the integer we started with:

public static boolean isPerfectSquareByUsingSqrt(long n) {
    if (n <= 0) {
        return false;
    }
    double squareRoot = Math.sqrt(n);
    long tst = (long)(squareRoot + 0.5);
    return tst*tst == n;
}

Note that we may need to add 0.5 to the result due to the precision errors we can encounter when dealing with double values. Sometimes, integers could be represented with a decimal point when assigned to a double variable.

For example, if we assign the number 3 to a double variable, then the value of it maybe 3.00000001 or 2.99999999. So, to avoid this representation, we add 0.5 before casting it to a long to make sure that we're getting the actual value.

In addition, if we test the sqrt function with one number, we'll notice that the execution time is fast. On the other hand, if we need to call the sqrt function many times, and we try to reduce the number of operations executed by the sqrt function, this kind of micro-optimization could actually make a difference.

2.2. Using Binary Search

We can use a binary search to find the square root of a number without using the sqrt function.

Since the range of the number is from 1 to 263, the root is between 1 and 231.5. So, the binary search algorithm needs about 16 iterations to get the square root:

public boolean isPerfectSquareByUsingBinarySearch(long low, long high, long number) {
    long check = (low + high) / 2L;
    if (high < low) {
        return false;
    }
    if (number == check * check) {
        return true;
    }
    else if (number < check * check) {
        high = check - 1L;
        return isPerfectSquareByUsingBinarySearch(low, high, number);
    }
    else {
        low = check + 1L;
        return isPerfectSquareByUsingBinarySearch(low, high, number);
    }
}

2.3. Enhancements on Binary Search

To enhance the binary search, we can notice that if we determine the number of digits of the basic number, that gives us the range of the root.

For example, if the number consists of one digit only, then the range of the square root is between 1 and 4. The reason is that the maximum integer from one digit is 9 and its root is 3. In addition, if the number is composed of two digits, the range is between 4 and 10, and so on.

So, we can build a lookup table to specify the range of the square root based on the number of digits of the number we start with. That will reduce the range of the binary search. So, it'll need fewer iterations to get the square root:

public class BinarySearchRange {
    private long low;
    private long high;
    // standard constructor and getters
}
private void initiateOptimizedBinarySearchLookupTable() {
    lookupTable.add(new BinarySearchRange());
    lookupTable.add(new BinarySearchRange(1L, 4L));
    lookupTable.add(new BinarySearchRange(3L, 10L));
    for (int i = 3; i < 20; i++) {
        lookupTable.add(
          new BinarySearchRange(
            lookupTable.get(i - 2).low * 10,
            lookupTable.get(i - 2).high * 10));
    }
}
public boolean isPerfectSquareByUsingOptimizedBinarySearch(long number) {
    int numberOfDigits = Long.toString(number).length();
    return isPerfectSquareByUsingBinarySearch(
      lookupTable.get(numberOfDigits).low,
      lookupTable.get(numberOfDigits).high,
     number);
}

2.4. Newton's Method With Integer Arithmetic

In general, we can use Newton's method to get the square root of any number, even non-integers. The basic idea of Newton's method is to suppose a number X is the square root of a number N. After that, we can start a loop and keep calculating the root, which will surely move towards the correct square root of N.

However, with some modifications to Newton's method, we can use it to check whether an integer is a perfect square:

public static boolean isPerfectSquareByUsingNewtonMethod(long n) {
    long x1 = n;
    long x2 = 1L;
    while (x1 > x2) {
        x1 = (x1 + x2) / 2L;
        x2 = n / x1;
    }
    return x1 == x2 && n % x1 == 0L;
}

3. Optimizing Integer Square Root Algorithms

As we discussed, there are multiple algorithms to check the square roots of an integer. Nevertheless, we can always optimize any algorithm by using some tricks.

Tricks should consider avoiding executing the main operations that will determine the square root. For example, we can exclude negative numbers directly.

One of the facts that we can use is “perfect squares can only end in 0, 1, 4, or 9 in base 16”. So, we can convert an integer to base 16 before starting the computations. After that, we exclude the cases that consider the number as a non-perfect square root:

public static boolean isPerfectSquareWithOptimization(long n) {
    if (n < 0) {
        return false;
    }
    switch((int)(n & 0xF)) {
        case 0: case 1: case 4: case 9:
            long tst = (long)Math.sqrt(n);
            return tst*tst == n;
        default:
            return false;
    }
}

4. Conclusion

In this article, we discussed multiple ways to determine whether an integer is a perfect square or not. As we've seen, we can always enhance the algorithms by using some tricks.

These tricks will exclude a large number of cases before starting the main operation of the algorithm. The reason is that a lot of integers can be determined as non-perfect squares easily.

As always, the code presented in this article is available over on GitHub.

The post Determine if an Integer’s Square Root Is an Integer in Java first appeared on Baeldung.
        

Java Weekly, Issue 368

$
0
0

1. Spring and Java

>> Pattern Matching in the Java Object Model [github.com]

Java language architects on how pattern matching may get integrated into the Java language!

>> Creating self-contained executable JARs [blog.frankel.ch]

Different approaches to creating executable and fat JARs – assembling, shading, and Spring Boot.

>> Guards and Pattern Matching [mail.openjdk.java.net]

Meet Guards – the proposal for having guards and conditions as part of Pattern Matching!

Also worth reading:

Webinars and presentations:

Time to upgrade:

2. Technical

>> Patterns of Distributed Systems: Lease [martinfowler.com]

Hogging resources indefinitely? Let's see how leasing can help us to ensure progress in a distributed system!

Also worth reading:

3. Musings

>> Book Notes: Hell Yeah or No [reflectoring.io]

On what is worth doing or what isn't – defining yourself, staying away from distractions, being a slow-thinker, and many more hidden gems!

Also worth reading:

4. Comics

And my favorite Dilberts of the week:

>> Understanding Science [dilbert.com]

>> Keyboard Upgrades [dilbert.com]

>> Incoming Message [dilbert.com]

5. Pick of the Week

>> The Law of Unintended Consequences [markmanson.net]

The post Java Weekly, Issue 368 first appeared on Baeldung.
        

Evaluating a Math Expression in Java

$
0
0

1. Overview

In this tutorial, we'll discuss various approaches to evaluate a math expression using Java. This feature could come in handy in projects where we want to evaluate math expressions provided in string format.

To begin with, we'll discuss a few third-party libraries and their usage. Next, we'll see how we can use the built-in Java Scripting API to achieve this task.

2. exp4j

exp4j is an open-source library that can be used to evaluate mathematical expressions and functions. The library implements Dijkstra's Shunting Yard Algorithm, a method for parsing mathematical expressions specified in infix notation.

In addition to using standard operators and functions, exp4j allows us to create custom operators and functions.

2.1. Adding the Maven Dependency

To use exp4j, we'll need to add the Maven dependency in our project:

<dependency>
    <groupId>net.objecthunter</groupId>
    <artifactId>exp4j</artifactId>
    <version>0.4.8</version>
</dependency>

2.2. Evaluating Simple Expressions

We can evaluate a simple math expression provided in String format:

@Test
public void givenSimpleExpression_whenCallEvaluateMethod_thenSuccess() {
    Expression expression = new ExpressionBuilder("3+2").build();
    double result = expression.evaluate();
    Assertions.assertEquals(5, result);
}

In the above code snippet, we first create an instance of ExpressionBuilder. Then we assign it to an Expression reference, which we use to evaluate our expression.

2.3. Using Variables in Expressions

Now that we know how to evaluate simple expressions, let's add some variables to our expression:

@Test
public void givenTwoVariables_whenCallEvaluateMethod_thenSuccess() {
    Expression expression = new ExpressionBuilder("3x+2y")
      .variables("x", "y")
      .build()
      .setVariable("x", 2)
      .setVariable("y", 3);
 
    double result = expression.evaluate();
 
    Assertions.assertEquals(12, result);
}

In the above example, we introduce two variables, x and y, using the variables method. We can add as many variables as we need in the expression using this method. Once we've declared the variables, we can assign values to them using the setVariable method.

2.4. Evaluating Expressions Containing Math Functions

Let's now see a short example of how we can evaluate some standard math functions:

@Test
public void givenMathFunctions_whenCallEvaluateMethod_thenSuccess() {
    Expression expression = new ExpressionBuilder("sin(x)*sin(x)+cos(x)*cos(x)")
      .variables("x")
      .build()
      .setVariable("x", 0.5);
 
    double result = expression.evaluate();
 
    Assertions.assertEquals(1, result);
}

3. Javaluator

Javaluator is another independent and lightweight library that is available for free. Like exp4j, Javaluator is also used to evaluate infix expressions.

3.1. Adding the Maven Dependency

We can use the following Maven dependency to use Javaluator in our project:

<dependency>
    <groupId>com.fathzer</groupId>
    <artifactId>javaluator</artifactId>
    <version>3.0.3</version>
</dependency>

3.2. Evaluating Simple Expressions

To evaluate expressions using Javaluator, we first need to create an instance of DoubleEvaluator:

@Test
public void givenExpression_whenCallEvaluateMethod_thenSuccess() {
    String expression = "3+2";
    DoubleEvaluator eval = new DoubleEvaluator();
 
    Double result = eval.evaluate(expression);
 
    Assertions.assertEquals(5, result);
}

3.3. Evaluating Expressions Containing Variables

To evaluate expressions containing variables, we use the StaticVariableSet:

@Test
public void givenVariables_whenCallEvaluateMethod_thenSuccess() {
    String expression = "3*x+2*y";
    DoubleEvaluator eval = new DoubleEvaluator();
    StaticVariableSet<Double> variables = new StaticVariableSet<Double>();
    variables.set("x", 2.0);
    variables.set("y", 3.0);
 
    Double result = eval.evaluate(expression, variables);
 
    Assertions.assertEquals(12, result);
}

We then use the StaticVariableSet#set method to assign values to the variables.

3.4. Evaluating Expressions Containing Math Functions

We can also solve expressions containing math functions using the Javaluator library:

@Test
public void givenMathFunction_whenCallEvaluateMethod_thenSuccess() {
    String expression = "sin(x)*sin(x)+cos(x)*cos(x)";
    DoubleEvaluator eval = new DoubleEvaluator();
    StaticVariableSet<Double> variables = new StaticVariableSet<Double>();
    variables.set("x", 0.5);
 
    Double result = eval.evaluate(expression, variables);
 
    Assertions.assertEquals(1, result);
}

4. The Java Scripting API

Now that we've discussed third-party libraries, let's now discuss how we can achieve this using the built-in API. Java already comes with a small but powerful scripting API. All the classes and interfaces of this API are in the javax.script package.

It contains the ScriptEngineManager and ScriptEngine interfaces that allow us to evaluate JavaScript. Before Java 8, Java came with the Rhino engine. However, from Java 8 onward, Java comes with the newer and more powerful Nashorn engine.

4.1. Getting ScriptEngine Instance

To create a ScriptEngine, we first have to create an instance of ScriptEngineManager. Once we have the instance, we need to call the ScriptEngineManager#getEngineByName method to get the ScriptEngine:

ScriptEngineManager scriptEngineManager = new ScriptEngineManager();
ScriptEngine scriptEngine = scriptEngineManager.getEngineByName("JavaScript");

Note that Nashorn is the default JavaScript engine that comes packaged with the JDK.

4.2. Evaluating Simple Expressions

We can now use the above scriptEngine instance to call the ScriptEngine#eval method:

String expression = "3+2";
Integer result = (Integer) scriptEngine.eval(expression);
Assertions.assertEquals(5, result);

4.3. Evaluating Expressions Containing Variables

To evaluate expressions containing variables we need to declare and initialize variables:

String expression = "x=2; y=3; 3*x+2*y;";
Double result = (Double) scriptEngine.eval(expression);
Assertions.assertEquals(12, result);

Since we are using the JavaScript engine, we can directly add variables to the expressions as we do in JavaScript.

Note – JavaScript doesn't have direct methods to perform math operations and requires access to the Math object. Thus, we cannot solve math expressions using the Java Scripting API.

5. Conclusion

In this article, we've seen various techniques for evaluating math expressions using Java.

As always, the complete code for this example is available over on GitHub.

The post Evaluating a Math Expression in Java first appeared on Baeldung.
        

Experimental Garbage Collectors in the JVM

$
0
0

1. Introduction

In this tutorial, we'll cover the basic problems with Java memory management and the need to constantly find better ways to achieve it. This will primarily cover the new experimental garbage collector introduced in Java called Shenandoah and how it compares against other garbage collectors.

2. Understanding Challenges in Garbage Collection

A garbage collector is a form of automatic memory management where a runtime like JVM manages allocation and reclamation of memory for the user programs running on it. There are several algorithms to implement a garbage collector. These include reference counting, mark-sweep, mark-compact, and copying.

2.1. Considerations for a Garbage Collector

Depending upon the algorithm we use for garbage collection, it can either run while the user program is suspended or run concurrently with the user program. The former achieves higher throughput at the cost of high latency due to long pauses, also known as stop-the-world pauses. The latter aims for better latency but compromises on throughput.

In fact, most modern-day collectors use a hybrid strategy, where they apply both stop-the-world and concurrent approaches. It usually works by dividing the heap space into young and old generations. Generational collectors then use the stop-the-world collection in the young generation and concurrent collection in the old generation, possibly in increments to reduce pauses.

Nevertheless, the sweet spot really is to find a garbage collector that runs with minimal pauses and provides high throughput — all this with a predictable behavior on heap size that can vary from small to very large! This is a constant struggle that has kept the pace of innovation in the Java garbage collection alive since the early days.

2.2. Existing Garbage Collectors in Java

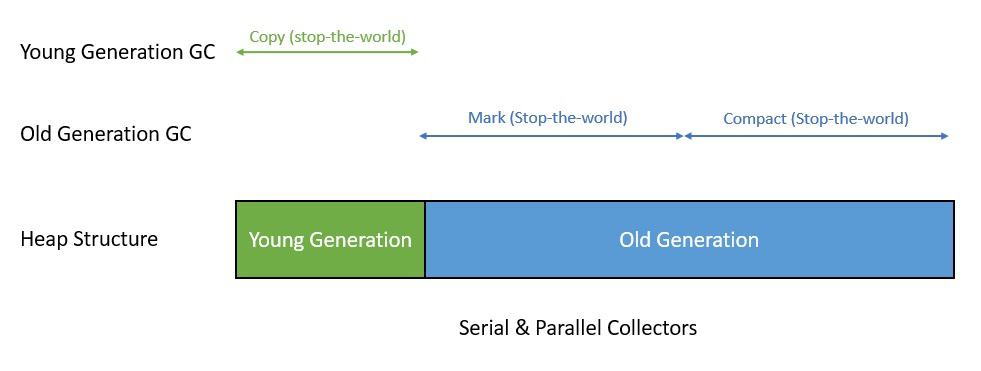
Some of the traditional garbage collectors include serial and parallel collectors. They are generational collectors and use copying in the young and mark-compact in the old generation:

While providing good throughput, they suffer from the problem of long stop-the-world pauses.

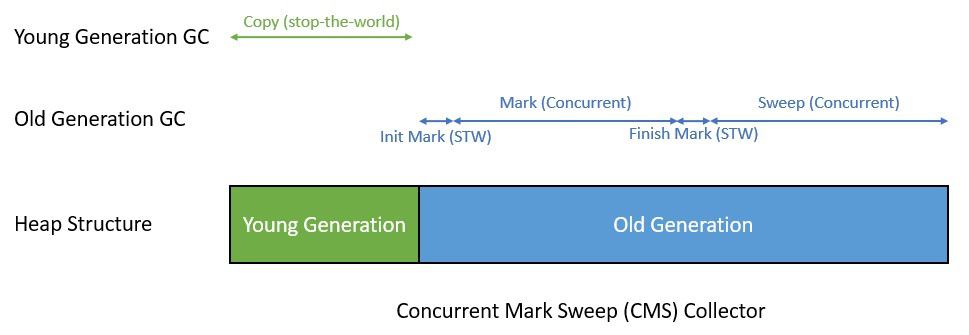
The Concurrent Mark Sweep (CMS) collector introduced in Java 1.4 is a generational, concurrent, low-pause collector. It works with copying in the young generation and mark-sweep in the old generation:

It tries to minimize the pause time by doing most of the work concurrently with the user program. Nevertheless, it still has problems leading to unpredictable pauses, requires more CPU time, and is not suitable for a heap larger than 4 GB in size.

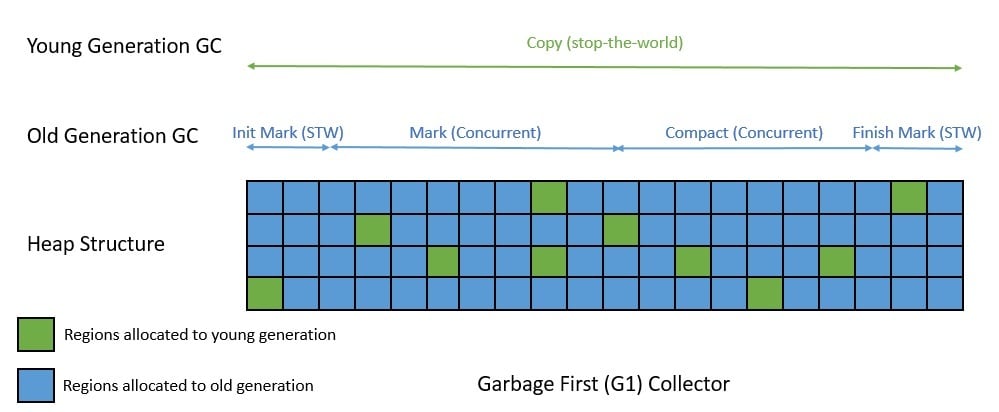
As a long-term replacement for CMS, the Garbage First (G1) collector was introduced in Java 7. G1 is a generational, parallel, concurrent, and incrementally compacting low-pause collector. It works with copying in the young generation and mark-compact in the old generation:

G1, however, is also a regionalized collector and structures the heap area into smaller regions. This gives it the benefit of more predictable pauses. Targeted for multiprocessor machines with a large amount of memory, G1 is also not free from the pauses.

So, the race to find a better garbage collector continues, especially one that reduces the pause time further. There's a series of experimental collectors that JVM has introduced lately, like Z, Epsilon, and Shenandoah. Apart from that, G1 continues to get more improvements.

The objective is really to get as close as possible to a pauseless Java!

3. Shenandoah Garbage Collector

Shenandoah is an experimental collector that has been introduced in Java 12 and is being positioned as a latency specialist. It tries to reduce pause times by doing more of its garbage collection work concurrently with the user program.

For instance, Shenendoah attempts to perform object relocation and compaction concurrently. This essentially means that the pause time in Shenandoah is no longer directly proportional to the heap size. Hence, it can provide consistent low-pause behavior, irrespective of the heap size.

3.1. Heap Structure

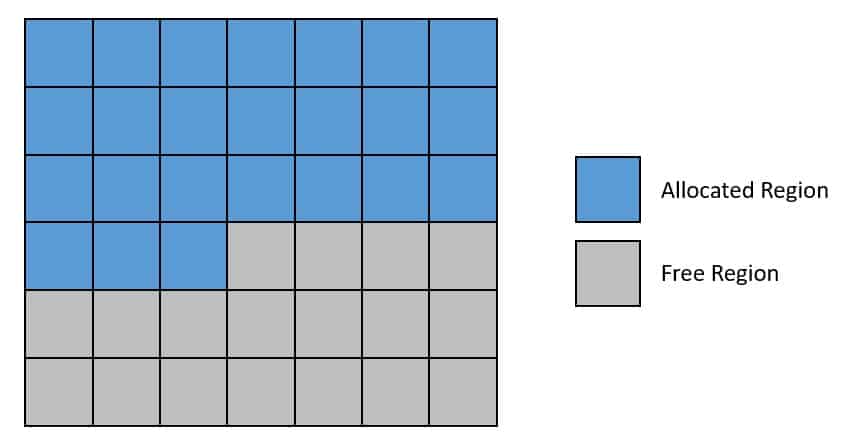
Shenandoah, like G1, is a regionalized collector. This means that it divides the heap area into a collection of equal-sized regions. A region is basically a unit of memory allocation or reclamation:

But, unlike G1 and other generational collectors, Shenandoah doesn't divide the heap area into generations. Therefore, it has to mark most of the live objects every cycle, which generational collectors can avoid.

3.2. Object Layout

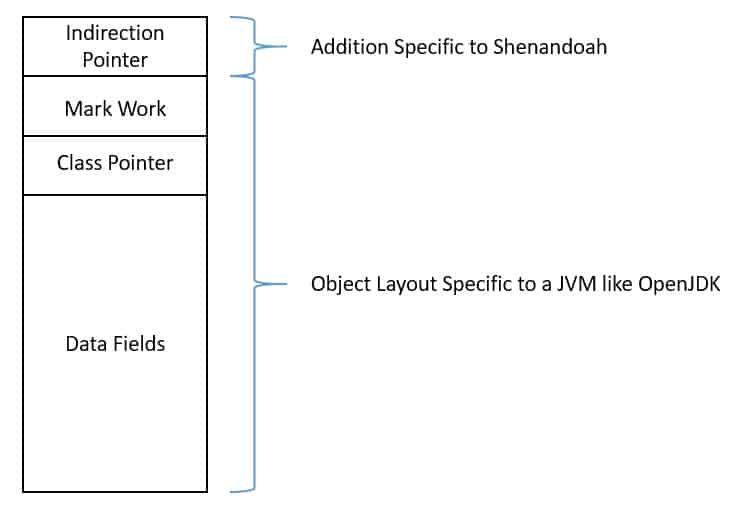
In Java, objects in memory don't only include data fields — they carry some extra information as well. This extra information consists of the header, which contains a pointer to the object's class, and the mark word. There are several uses for the mark word, like forwarding pointers, age bits, locking, and hashing:

Shenandoah adds an additional word to this object layout. This serves as the indirection pointer and allows Shenandoah to move objects without updating all of the references to them. This is also known as the Brooks pointer.

3.3. Barriers

Performing a collection cycle in the stop-the-world mode is simpler, but the complexity just shoots up when we do that concurrently with the user program. It presents different challenges to the collection phases like concurrent marking and compaction.

The solution lies in intercepting all heap accesses through what we call barriers. Shenandoah and other concurrent collectors like G1 make use of barriers to ensure heap consistency. However, barriers are costly operations and generally tend to reduce the throughput of a collector.

For instance, the read and write operations to an object may be intercepted by the collector using barriers:

Shenandoah makes use of multiple barriers in different phases, like the SATB barrier, read barrier, and write barrier. We'll see where these are used in later sections.

3.4. Modes, Heuristics, and Failure Modes

Modes define the way Shenandoah runs, like which barriers it uses, and they also define its performance characteristics. There are three modes available: normal/satb, iu, and passive. The normal/satb mode is the default.

Heuristics determine when a collection should start and which regions it should include. These include adaptive, static, compact, and aggressive, with adaptive as the default heuristic. For instance, it may choose to select regions with 60 percent or more garbage and start a collection cycle when 75 percent of regions have been allocated.

Shenandoah needs to collect heap faster than the user program that allocates it. But, at times, it may fall behind, leading to one of the failure modes. These failure modes include pacing, degenerated collection, and in the worst case, a full collection.

4. Shenandoah Collection Phases

Shenandoah's collection cycle consists primarily of three phases: mark, evacuate, and update references. Although most of the work in these phases happens concurrently with the user program, there are still small parts that must happen in a stop-the-world mode.

4.1. Marking

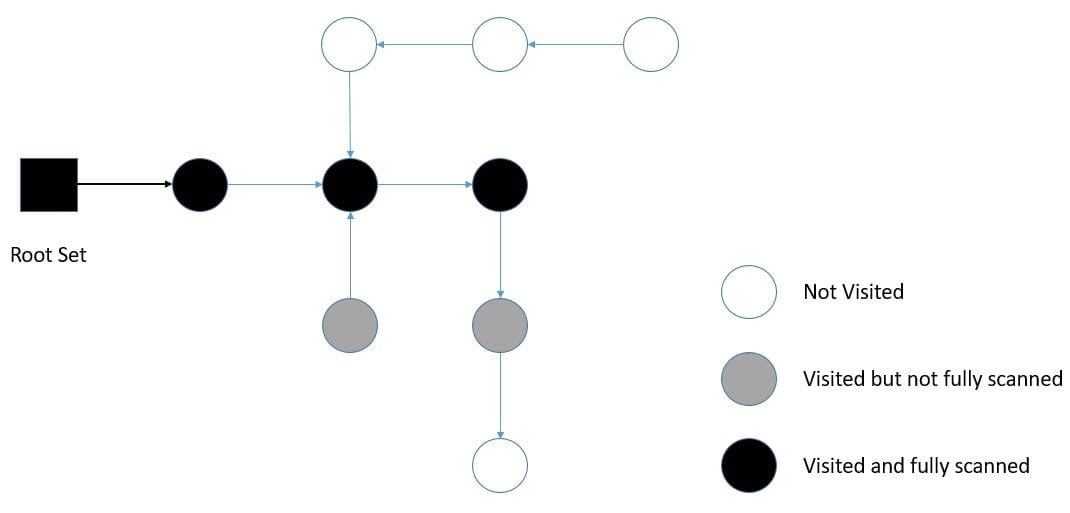
Marking is the process of identifying all objects in the heap or parts of it that are unreachable. We can do this by starting from the root objects and traversing the object graph to find reachable objects. While traversing, we also assign each object one of three colors: white, grey, or black:

Marking in the stop-the-world mode is simpler, but it gets complicated in concurrent mode. This is because the user program concurrently mutates the object graph while marking is in progress. Shenandoah solves this by using the Snapshot At the Beginning (SATB) algorithm.

This means that any object that was alive at the beginning of the marking or that has been allocated since the beginning of marking is considered live. Shenandoah makes use of the SATB barrier to maintain the SATB view of the heap.

While most of the marking is done concurrently, there are still some parts that are done in stop-the-world mode. The parts that happen in the stop-the-world mode are the init-mark to scan the root set and the final-mark to drain all pending queues and re-scan the root set. The final-mark also prepares the collection set that indicates the regions to be evacuated.

4.2. Cleanup and Evacuation

Once the marking is complete, the garbage regions are ready to be reclaimed. The garbage regions are the regions where no live objects are present. The cleanup happens concurrently.

Now, the next step is to move the live objects in the collection set to other regions. This is done to reduce the fragmentation in memory allocation and, hence, is also known as compacting. Evacuation or compacting happens entirely concurrently.

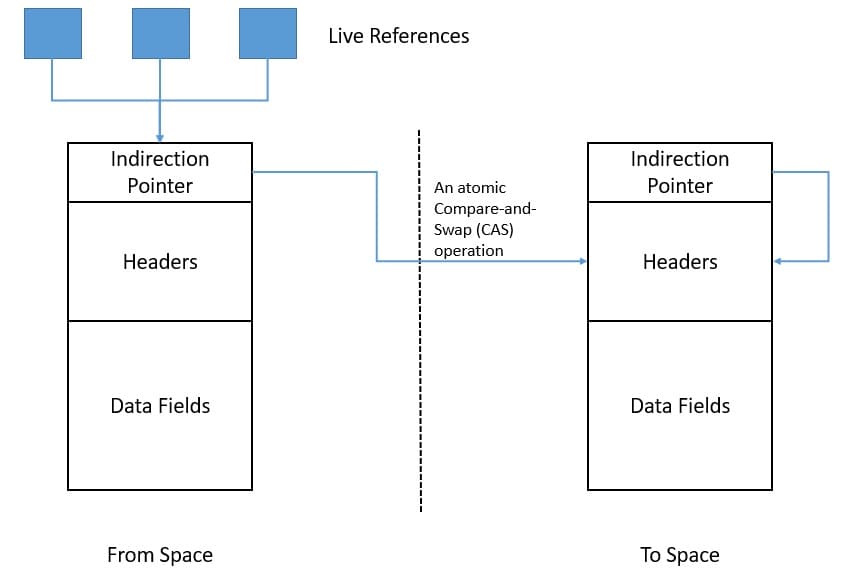
Now, this is where Shenandoah is different from other collectors. A concurrent relocation of objects is tricky as the user program continues to read and write them. Shenandoah manages to achieve this by performing a compare-and-swap operation on the Brooks pointer of an object to point to its to-space version:

Further, Shenandoah uses the read and write barriers to ensure that a strict “to-space” invariant is maintained during the concurrent evacuation. What this means is that the read and write must happen from the to-space that is guaranteed to survive the evacuation.

4.3. Reference Update

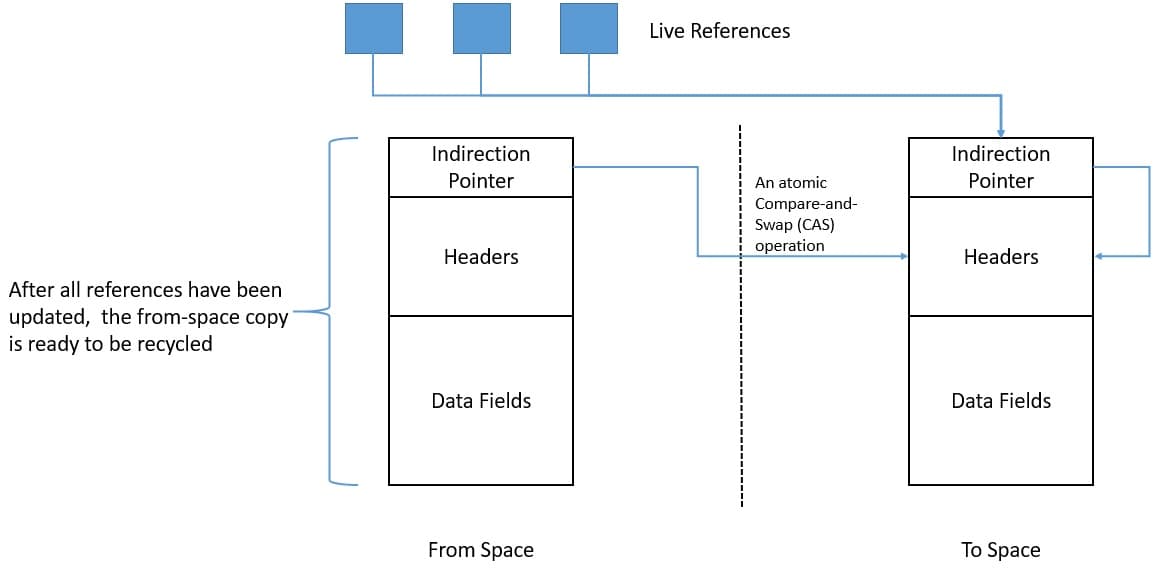
This phase in the collection cycle is to traverse through the heap and update the references to objects that were moved during the evacuation:

The update reference phase is, again, mostly done concurrently. There are brief periods of init-update-refs that initialize the update reference phase and final-update-refs that re-update the root set and recycle the regions from the collection set. Only these require the stop-the-world mode.

5. Comparision With Other Experimental Collectors

Shenandoah is not the only experimental garbage collector that has been introduced recently in Java. Others include Z and Epsilon. Let's understand how they compare against Shenandoah.

5.1. Z Collector

Introduced in Java 11, the Z collector is a single-generation, low-latency collector designed for very large heap sizes — we're talking multi-terabyte territory. The Z collector does most of its work concurrently with the user program and leverages the load barrier for heap references.

Further, the Z collector takes advantage of 64-bit pointers with a technique called pointer coloring. Here, the colored pointers store extra information about objects on the heap. The Z collector remaps objects using the extra information stored in the pointer to reduce memory fragmentation.

Broadly speaking, the Z collector's goals are similar to those of Shenandoah. They both aim to achieve low pause times that are not directly proportional to the heap size. However, there are more tuning options available with Shenandoah than with the Z collector.

5.2. Epsilon Collector

Epsilon, also introduced in Java 11, has a very different approach to garbage collection. It's basically a passive or “no-op” collector, which means that it handles memory allocation but doesn't recycle it! So, when the heap runs out of memory, the JVM simply shuts down.

But why would we ever want to use a collector like that? Basically, any garbage collector has an indirect impact on the performance of the user program. It's very difficult to benchmark an application and understand the impact of garbage collection on it.

Epsilon serves exactly that purpose. It simply removes the impact of a garbage collector and lets us run the application in isolation. But, this expects us to have a very clear understanding of the memory requirements of our application. Consequently, we can achieve better performance from the application.

Clearly, Epsilon has a very different goal from that of Shenandoah.

6. Conclusion

In this article, we went through the basics of garbage collection in Java and the need to constantly improve it. We discussed in detail the most recent experimental collector introduced in Java — Shenandoah. We also went through how it fares against the other experimental collectors available in Java.

The pursuit of a universal garbage collector isn't going to be realized anytime soon! So, while G1 remains the default collector, these new additions provide us with options to use Java in low-latency situations. However, we shouldn't consider them as a drop-ship replacement of other high-throughput collectors.

The post Experimental Garbage Collectors in the JVM first appeared on Baeldung.
        

How to Convert a Hibernate Proxy to a Real Entity Object

$
0
0

1. Overview

In this tutorial, we'll learn how to convert a Hibernate proxy to a real entity object. Before that, we'll understand when Hibernate creates a proxy object. Then, we'll talk about why Hibernate proxy is useful. And finally, we'll simulate a scenario where there's a need to unproxy an object.

2. When Does Hibernate Create a Proxy Object?

Hibernate uses proxy objects to allow lazy loading. To better visualize the scenario, let's look at the PaymentReceipt and Payment entities:

@Entity
public class PaymentReceipt {
    ...
    @OneToOne(fetch = FetchType.LAZY)
    private Payment payment;
    ...
}
@Entity
@Inheritance(strategy = InheritanceType.TABLE_PER_CLASS)
public abstract class Payment {
    ...
    @ManyToOne(fetch = FetchType.LAZY)
    protected WebUser webUser;
    ...
}

For instance, loading either of these entities will result in Hibernate creating a proxy object for the associated field with FetchType.LAZY.

To demonstrate, let's create and run an integration test:

@Test
public void givenPaymentReceipt_whenAccessingPayment_thenVerifyType() {
    PaymentReceipt paymentReceipt = entityManager.find(PaymentReceipt.class, 3L);
    Assert.assertTrue(paymentReceipt.getPayment() instanceof HibernateProxy);
}

From the test, we've loaded a PaymentReceipt and verified that the payment object isn't an instance of CreditCardPaymentit's a HibernateProxy object.

In contrast, without lazy loading, the previous test would fail as the returned payment object would be an instance of CreditCardPayment.

Additionally, it's worth mentioning that Hibernate is using bytecode instrumentation to create a proxy object.

To verify this, we can add a breakpoint on the line of the integration test's assertion statement and run it in debug mode. Now, let's see what the debugger shows:

paymentReceipt = {PaymentReceipt@5042} 
 payment = {Payment$HibernateProxy$CZIczfae@5047} "com.baeldung.jpa.hibernateunproxy.CreditCardPayment@2"
  $$_hibernate_interceptor = {ByteBuddyInterceptor@5053} 

From the debugger, we can see that Hibernate is using Byte Buddy, which is a library for generating Java classes dynamically at run-time.

3. Why Is Hibernate Proxy Useful?

3.1. Hibernate Proxy for Lazy Loading

We've learned a bit about this earlier. To give more significance to it, let's try removing the lazy loading mechanism from both PaymentReceipt and Payment entities:

public class PaymentReceipt {
    ...
    @OneToOne
    private Payment payment;
    ...
}
public abstract class Payment {
    ...
    @ManyToOne
    protected WebUser webUser;
    ...
}

Now, let's quickly retrieve a PaymentReceipt and check the generated SQL from the logs:

select
    paymentrec0_.id as id1_2_0_,
    paymentrec0_.payment_id as payment_3_2_0_,
    paymentrec0_.transactionNumber as transact2_2_0_,
    payment1_.id as id1_1_1_,
    payment1_.amount as amount2_1_1_,
    payment1_.webUser_id as webuser_3_1_1_,
    payment1_.cardNumber as cardnumb1_0_1_,
    payment1_.clazz_ as clazz_1_,
    webuser2_.id as id1_3_2_,
    webuser2_.name as name2_3_2_ 
from
    PaymentReceipt paymentrec0_ 
left outer join
    (
        select
            id,
            amount,
            webUser_id,
            cardNumber,
            1 as clazz_ 
        from
            CreditCardPayment 
    ) payment1_ 
        on paymentrec0_.payment_id=payment1_.id 
left outer join
    WebUser webuser2_ 
        on payment1_.webUser_id=webuser2_.id 
where
    paymentrec0_.id=?

As we can see from the logs, the query for the PaymentReceipt contains multiple join statements. 

Now, let's run it with lazy loading in place:

select
    paymentrec0_.id as id1_2_0_,
    paymentrec0_.payment_id as payment_3_2_0_,
    paymentrec0_.transactionNumber as transact2_2_0_ 
from
    PaymentReceipt paymentrec0_ 
where
    paymentrec0_.id=?

Clearly, the generated SQL is simplified by omitting all the unnecessary join statements.

3.2. Hibernate Proxy for Writing Data

To illustrate, let's use it for creating a Payment and assigning a WebUser to it. Without using a proxy, this would result in two SQL statements: a SELECT statement to retrieve the WebUser and an INSERT statement for Payment creation.

Let's create a test using the proxy:

@Test
public void givenWebUserProxy_whenCreatingPayment_thenExecuteSingleStatement() {
    entityManager.getTransaction().begin();
    WebUser webUser = entityManager.getReference(WebUser.class, 1L);
    Payment payment = new CreditCardPayment(new BigDecimal(100), webUser, "CN-1234");
    entityManager.persist(payment);
    entityManager.getTransaction().commit();
    Assert.assertTrue(webUser instanceof HibernateProxy);
}

It's worth highlighting that we're using entityManager.getReference(…) to obtain a proxy object.

Next, let's run the test and check the logs:

insert 
into
    CreditCardPayment
    (amount, webUser_id, cardNumber, id) 
values
    (?, ?, ?, ?)

Here, we can see that, when using the proxy, Hibernate only executed a single statement: an INSERT statement for Payment creation.

4. Scenario: The Need for Unproxying

Given our domain model, let's suppose we're retrieving a PaymentReceipt. As we already know, it's associated with a Payment entity that has an inheritance strategy of Table-per-Class and a lazy fetch type.

In our case, based on the populated data, the associated Payment of the PaymentReceipt is of type CreditCardPayment. However, since we're using lazy loading, it would be a proxy object.

Now, let's look at the CreditCardPayment entity:

@Entity
public class CreditCardPayment extends Payment {
    
    private String cardNumber;
    ...
}

Indeed, it wouldn't be possible to retrieve the cardNumber field from the CreditCardPayment class without unproxying the payment object. Regardless, let's try casting the payment object into a CreditCardPayment and see what will happen:

@Test
public void givenPaymentReceipt_whenCastingPaymentToConcreteClass_thenThrowClassCastException() {
    PaymentReceipt paymentReceipt = entityManager.find(PaymentReceipt.class, 3L);
    assertThrows(ClassCastException.class, () -> {
        CreditCardPayment creditCardPayment = (CreditCardPayment) paymentReceipt.getPayment();
    });
}

From the test, we saw the need to cast the payment object into a CreditCardPayment. However, because the payment object is still a Hibernate proxy object, we've encountered a ClassCastException.

5. Hibernate Proxy to Entity Object

Since Hibernate 5.2.10, we can use the built-in static method for unproxying Hibernate entities:

Hibernate.unproxy(paymentReceipt.getPayment());

Let's create a final integration test using this approach:

@Test
public void givenPaymentReceipt_whenPaymentIsUnproxied_thenReturnRealEntityObject() {
    PaymentReceipt paymentReceipt = entityManager.find(PaymentReceipt.class, 3L);
    Assert.assertTrue(Hibernate.unproxy(paymentReceipt.getPayment()) instanceof CreditCardPayment);
}

From the test, we can see that we've successfully converted a Hibernate proxy to a real entity object.

On the other hand, here's a solution before Hibernate 5.2.10:

HibernateProxy hibernateProxy = (HibernateProxy) paymentReceipt.getPayment();
LazyInitializer initializer = hibernateProxy.getHibernateLazyInitializer();
CreditCardPayment unproxiedEntity = (CreditCardPayment) initializer.getImplementation();

6. Conclusion

In this tutorial, we've learned how to convert a Hibernate proxy to a real entity object. In addition to that, we've discussed how the Hibernate proxy works and why it's useful. Then, we simulated a situation where there's a need to unproxy an object.

Lastly, we ran several integration tests to demonstrate our examples and verify our solution.

As always, the full source code of the article is available over on GitHub.

The post How to Convert a Hibernate Proxy to a Real Entity Object first appeared on Baeldung.
        

How to Analyze Java Thread Dumps

$
0
0

1. Introduction

Applications sometimes hang up or run slowly, and identifying the root cause is not always a simple task. A thread dump provides a snapshot of the current state of a running Java process. However, the generated data includes multiple long files. Thus, we'll need to analyze Java thread dumps and dig for the issue in a big chunk of unrelated information.

In this tutorial, we'll see how to filter out that data to efficiently diagnose performance issues. Also, we'll learn to detect bottlenecks or even simple bugs.

2. Threads in the JVM

The JVM uses threads to execute every internal and external operation. As we know, the garbage collection process has its own thread, but also the tasks inside a Java application create their own.

During its lifetime, the thread goes through a variety of states. Each thread has an execution stack tracking the current operation. Besides, the JVM also stores all the previous methods successfully called. Therefore, it is possible to analyze the complete stack to study what happened with the application when things go wrong.

To showcase the topic of this tutorial, we'll use as an example a simple Sender-Receiver application (NetworkDriver). The Java program sends and receives data packets so we'll be able to analyze what is happening behind the scenes.

2.1. Capturing the Java Thread Dump

Once the application is running, there are multiple ways to generate a Java thread dump for diagnostics. In this tutorial, we'll use two utilities included in JDK7+ installations. Firstly, we'll execute JVM Process Status (jps) command to discover the PID process of our application:

$ jps 
80661 NetworkDriver
33751 Launcher
80665 Jps
80664 Launcher
57113 Application

Secondly, we get the PID for our application, in this case, the one next to the NetworkDriver. Then, we'll capture the thread dump using jstack. Finally, we'll store the result in a text file:

$ jstack -l 80661 > sender-receiver-thread-dump.txt

2.2. Structure of a sample dump

Let's have a look at the generated thread dump. The first line displays the timestamp while the second line informs about the JVM:

2021-01-04 12:59:29
Full thread dump OpenJDK 64-Bit Server VM (15.0.1+9-18 mixed mode, sharing):

Next section shows the Safe Memory Reclamation (SMR) and non-JVM internal threads:

Threads class SMR info:
_java_thread_list=0x00007fd7a7a12cd0, length=13, elements={
0x00007fd7aa808200, 0x00007fd7a7012c00, 0x00007fd7aa809800, 0x00007fd7a6009200,
0x00007fd7ac008200, 0x00007fd7a6830c00, 0x00007fd7ab00a400, 0x00007fd7aa847800,
0x00007fd7a6896200, 0x00007fd7a60c6800, 0x00007fd7a8858c00, 0x00007fd7ad054c00,
0x00007fd7a7018800
}

Then, the dump displays the list of threads. Each thread contains the following information:

  • Name: it can provide useful information if developers include a meaningful thread name
  • Priority (prior): the priority of the thread
  • Java ID (tid): the unique ID given by the JVM
  • Native ID (nid): the unique ID given by the OS, useful to extract correlation with CPU or memory processing
  • State: the actual state of the thread
  • Stack trace: the most important source of information to decipher what is happening with our application

We can see from top to bottom what the different threads are doing at the time of the snapshot. Let's focus only on the interesting bits of the stack waiting to consume the message:

"Monitor Ctrl-Break" #12 daemon prio=5 os_prio=31 cpu=17.42ms elapsed=11.42s tid=0x00007fd7a6896200 nid=0x6603 runnable  [0x000070000dcc5000]
   java.lang.Thread.State: RUNNABLE
	at sun.nio.ch.SocketDispatcher.read0(java.base@15.0.1/Native Method)
	at sun.nio.ch.SocketDispatcher.read(java.base@15.0.1/SocketDispatcher.java:47)
	at sun.nio.ch.NioSocketImpl.tryRead(java.base@15.0.1/NioSocketImpl.java:261)
	at sun.nio.ch.NioSocketImpl.implRead(java.base@15.0.1/NioSocketImpl.java:312)
	at sun.nio.ch.NioSocketImpl.read(java.base@15.0.1/NioSocketImpl.java:350)
	at sun.nio.ch.NioSocketImpl$1.read(java.base@15.0.1/NioSocketImpl.java:803)
	at java.net.Socket$SocketInputStream.read(java.base@15.0.1/Socket.java:981)
	at sun.nio.cs.StreamDecoder.readBytes(java.base@15.0.1/StreamDecoder.java:297)
	at sun.nio.cs.StreamDecoder.implRead(java.base@15.0.1/StreamDecoder.java:339)
	at sun.nio.cs.StreamDecoder.read(java.base@15.0.1/StreamDecoder.java:188)
	- locked <0x000000070fc949b0> (a java.io.InputStreamReader)
	at java.io.InputStreamReader.read(java.base@15.0.1/InputStreamReader.java:181)
	at java.io.BufferedReader.fill(java.base@15.0.1/BufferedReader.java:161)
	at java.io.BufferedReader.readLine(java.base@15.0.1/BufferedReader.java:326)
	- locked <0x000000070fc949b0> (a java.io.InputStreamReader)
	at java.io.BufferedReader.readLine(java.base@15.0.1/BufferedReader.java:392)
	at com.intellij.rt.execution.application.AppMainV2$1.run(AppMainV2.java:61)
   Locked ownable synchronizers:
	- <0x000000070fc8a668> (a java.util.concurrent.locks.ReentrantLock$NonfairSync)

At a first glance, we see that the main stack trace is executing java.io.BufferedReader.readLine which is the expected behavior. If we look further down we'll see all the JVM methods executed by our application behind the scenes. Therefore, we are able to identify the root of the problem by looking at the source code or other internal JVM processing.

At the end of the dump, we'll notice there are several additional threads performing background operations such as Garbage Collection (GC) or object termination:

"VM Thread" os_prio=31 cpu=1.85ms elapsed=11.50s tid=0x00007fd7a7a0c170 nid=0x3603 runnable  
"GC Thread#0" os_prio=31 cpu=0.21ms elapsed=11.51s tid=0x00007fd7a5d12990 nid=0x4d03 runnable  
"G1 Main Marker" os_prio=31 cpu=0.06ms elapsed=11.51s tid=0x00007fd7a7a04a90 nid=0x3103 runnable  
"G1 Conc#0" os_prio=31 cpu=0.05ms elapsed=11.51s tid=0x00007fd7a5c10040 nid=0x3303 runnable  
"G1 Refine#0" os_prio=31 cpu=0.06ms elapsed=11.50s tid=0x00007fd7a5c2d080 nid=0x3403 runnable  
"G1 Young RemSet Sampling" os_prio=31 cpu=1.23ms elapsed=11.50s tid=0x00007fd7a9804220 nid=0x4603 runnable  
"VM Periodic Task Thread" os_prio=31 cpu=5.82ms elapsed=11.42s tid=0x00007fd7a5c35fd0 nid=0x9903 waiting on condition

Finally, the dump displays the Java Native Interface (JNI) references. We should pay special attention to this when memory leak occurs because they aren't  automatically garbage collected:

JNI global refs: 15, weak refs: 0

Thread dumps are fairly similar in their structure, but we'll want to get rid of the non-important data generated for our use case. On the other hand, we'll need to keep and group the important information from the tons of logs produced by the stack trace. Let's see how to do it!

3. Recommendations to Analyze a Thread Dump

In order to understand what is happening with our application, we'll need to efficiently analyze the generated snapshot. We'll have a lot of information with precise data of all the threads at the time of the dump. However, we'll need to curate the log files, making some filtering and grouping to extract useful hints from the stack trace. Once we prepared the dump we'll be able to analyze the problem using different tools. Let's see how to decipher the content of a sample dump.

3.1. Synchronization Issues

One interesting tip to filter out the stack trace is the state of the thread. We'll mainly focus on RUNNABLE or BLOCKED threads and eventually TIMED_WAITING ones. Those states will point us in the direction of a conflict between two or more threads:

  • In a deadlock situation in which several threads running hold a synchronized block on a shared object
  • In thread contention, when a thread is blocked waiting for others to finish. For example, the dump generated in the previous section

3.2. Execution Issues

As a rule of thumb, for abnormally high CPU usage we only need to look at RUNNABLE threads. We'll use thread dumps together with other commands to acquire extra information. One of these commands is top -H -p PID, which displays what threads are consuming the OS resources within that particular process. We also need to look at the internal JVM threads such as GC just in case. On the other hand, when the processing performance is abnormally low, we'll look at BLOCKED threads.

In those cases, a single dump will most surely not be enough to understand what is happening. We'll need a number of dumps at close intervals in order to compare the stacks of the same threads at different times. On the one hand, one snapshot is not always enough to find out the root of the problem. On the other hand, we need to avoid noise between snapshots (too much information).

To understand the threads' evolution over time, a recommended best practice is to take at least 3 dumps, one at every 10 seconds. Another useful tip is to split the dumps into small chunks to avoid crashes loading the files.

3.3. Recommendations

In order to efficiently decipher the root of the problem, we'll need to organize the huge amount of information in the stack trace. Therefore, we'll take into consideration the following recommendations:

  • In execution issues, capture several snapshots with an interval of 10 seconds will help to focus on the actual problems. It is also recommended to split the files if needed to avoid loading crashes
  • Use naming when creating new threads to better identify your source code
  • Depending on the issue, ignore internal JVM processing (for instance GC)
  • Focus on long-running or blocked threads when issuing abnormal CPU or memory usage
  • Correlate the thread's stack with CPU processing by using top -H -p PID
  • And most importantly, use Analyzer tools

Analyzing the Java thread dumps manually could be a tedious activity. For simple applications, it is possible to identify the threads generating the problem. On the other hand, for complex situations, we'll need tools to ease this task. We'll showcase how to use the tools in the next sections, using the dump generated for the sample thread contention.

4. Online Tools

There are several online tools available. When using this kind of software we need to take into account security issues. Remember that we could be sharing the logs with third-party entities.

4.1. FastThread

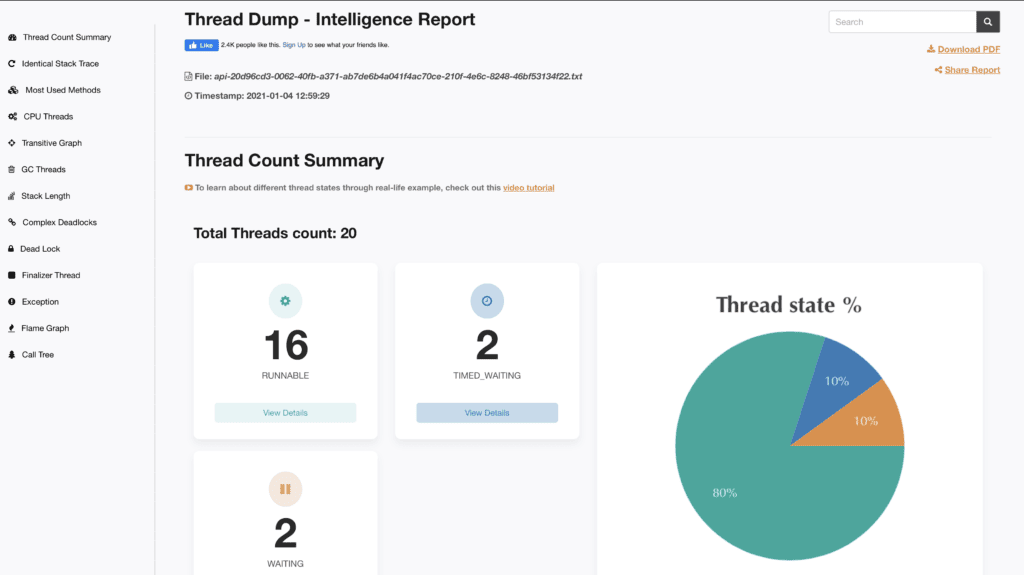
FastThread is probably the best online tool to analyze thread dumps for production environments. It provides a very nice graphical user interface. It also includes multiple functionalities such as CPU usage by threads, stack length, and most used and complex methods:

FastThread incorporates a REST API feature to automate the analysis of the thread dumps. With a simple cURL command it's possible to instantly send the results. The main drawback is security because it stores the stack trace in the cloud.

4.2. JStack Review

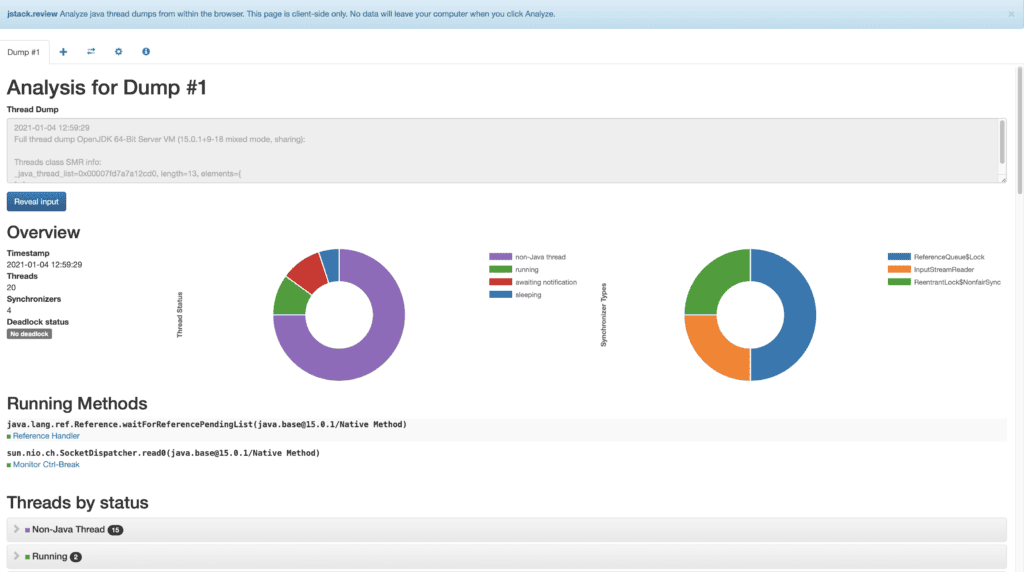
JStack Review is an online tool that analyzes the dumps within the browser. It is client-side only, thus no data is stored outside your computer. From the security perspective, this is a major advantage to use it. It provides a graphical overview of all the threads, displaying the running methods but also grouping them by status. JStack Review separates threads producing stack from the rest which is very important to ignore, for instance, internal processes. Finally, it also includes the synchronizers and the ignored lines:

4.3. Spotify Online Java Thread Dump Analyzer

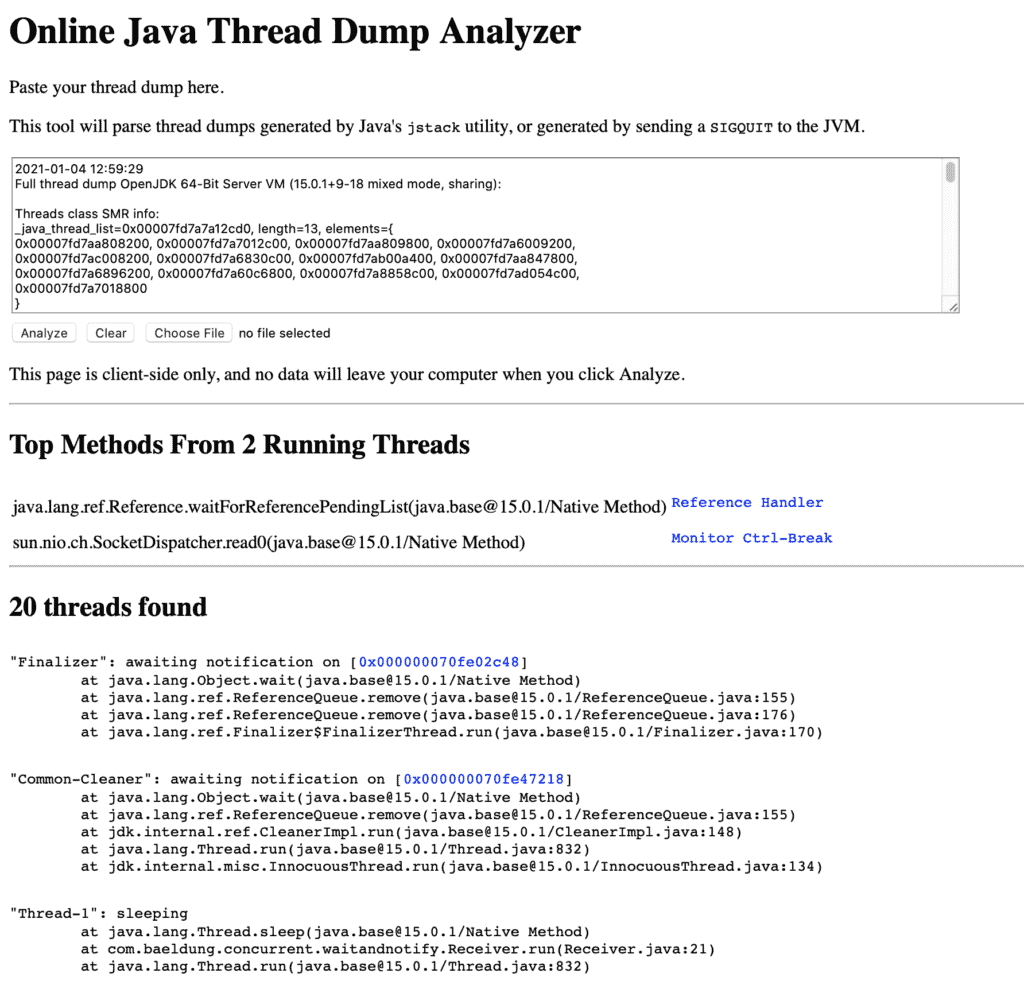
Spotify Online Java Thread Dump Analyser is an online open-source tool written in JavaScript. It shows the results in plain text separating the threads with and without the stack. It also displays the top methods from the running threads:

5. Standalone Applications

There are also several standalone applications that we can use locally.

5.1. JProfiler

JProfiler is the most powerful tool in the market, and well-known among the Java developer community. It is possible to test the functionality with a 10-day trial license. JProfiler allows the creation of profiles and attaches running applications to them. It includes multiple functionalities to identify problems on the spot, such as CPU and memory usage and database analysis. It supports also integration with IDEs:

5.2. IBM Thread Monitor and Dump Analyzer for Java (TMDA)

IBM TMDA can be used to identify thread contention, deadlocks, and bottlenecks. It is freely distributed and maintained but it does not offer any guarantee or support from IBM:

5.3. Irockel Thread Dump Analyser (TDA)

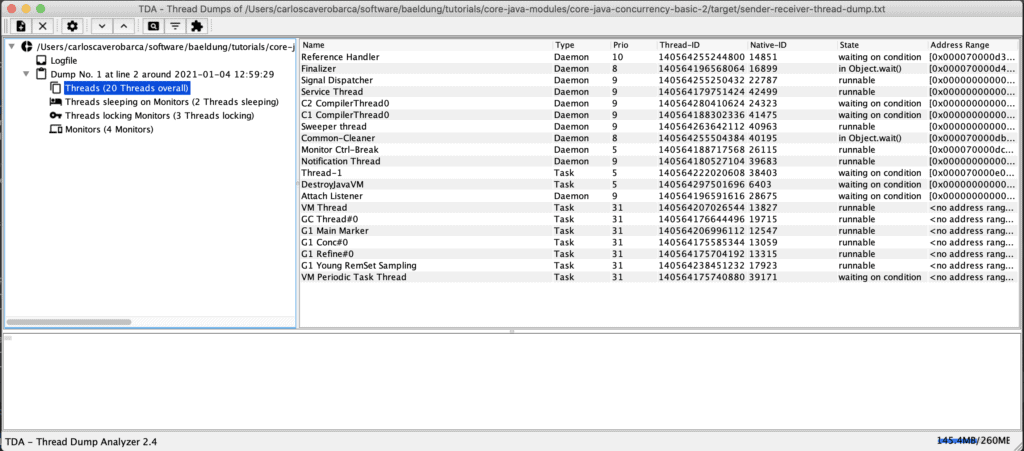
Irockel TDA is a standalone open-source tool licensed with LGPL v2.1. The last version (v2.4) was released in August 2020 so it is well maintained. It displays the thread dump as a tree providing also some statistics to ease the navigation:

Finally, IDEs support basic analysis of thread dumps so it is possible to debug the application during development time.

5. Conclusion

In this article, we demonstrated how Java thread dump analysis can help us pinpoint synchronization or execution issues.

Most importantly, we reviewed how to analyze them properly including recommendations to organize the enormous amount of information embedded in the snapshot.

The post How to Analyze Java Thread Dumps first appeared on Baeldung.
        

Clean Architecture with Spring Boot

$
0
0

1. Overview

When we're developing long-term systems, we should expect a mutable environment.

In general, our functional requirements, frameworks, I/O devices, and even our code design may all change for various reasons. With this in mind, the Clean Architecture is a guideline to a high maintainable code, considering all the uncertainties around us.

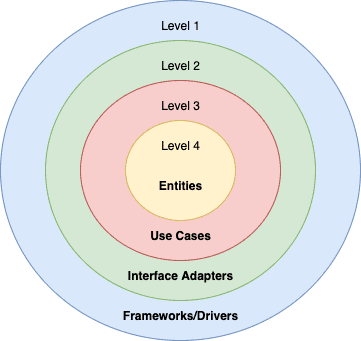
In this article, we'll create an example of a user registration API  following Robert C. Martin's Clean Architecture. We'll use his original layers  – entities, use cases, interface adapters, and frameworks/drivers.

2. Clean Architecture Overview

The clean architecture compiles many code designs and principles, like SOLID, stable abstractions, and others. But, the core idea is to divide the system into levels based on the business value. Hence, the highest level has business rules, with each lower one getting closer to the I/O devices.

Also, we can translate the levels into layers. In this case, it is the opposite. The inner layer is equal to the highest level, and so on:

With this in mind, we can have as many levels as our business requires. But, always considering the dependency rule – a higher level must never depend on a lower one.

3. The Rules

Lets's start defining the system rules for our user registration API. First, business rules:

  • The user's password must have more than five characters

Second, we have the application rules. They can be in different formats, as use cases or stories. We'll use a storytelling phrase:

  • The system receives the user name and password, validates if the user doesn't exist, and saves the new user along with the creation time

Notice how there is no mention of any database, UI, or similar. Because our business doesn't care about these details, neither should our code.

4. The Entity Layer

As the clean architecture suggests, let's start with our business rule:

interface User {
    boolean passwordIsValid();
    String getName();
    String getPassword();
}

And, a UserFactory:

interface UserFactory {
    User create(String name, String password);
}

We created a user factory method because of two reasons. To stock to the stable abstractions principle and to isolate the user creation.

Next, let's implement both:

class CommonUser implements User {
    String name;
    String password;
    @Override
    public boolean passwordIsValid() {
        return password != null && password.length() > 5;
    }
    // Constructor and getters
}
class CommonUserFactory implements UserFactory {
    @Override
    public User create(String name, String password) {
        return new CommonUser(name, password);
    }
}

If we have a complex business, then we should build our domain code as clear as possible. So, this layer is a great place to apply design patterns. Particularly, the domain-driven design should be taken into account.

4.1. Unit Testing

Now, let's test our CommonUser:

@Test
void given123Password_whenPasswordIsNotValid_thenIsFalse() {
    User user = new CommonUser("Baeldung", "123");
    assertThat(user.passwordIsValid()).isFalse();
}

As we can see, the unit tests are very clear. After all, the absence of mocks is a good signal for this layer.

In general, if we start thinking about mocks here, maybe we're mixing our entities with our use cases.

5. The Use Case Layer

The use cases are the rules related to the automatization of our system. In Clean Architecture, we call them Interactors.

5.1. UserRegisterInteractor

First, we'll build our UserRegisterInteractor so we can see where we're going. Then, we'll create and discuss all used parts:

class UserRegisterInteractor implements UserInputBoundary {
    final UserRegisterDsGateway userDsGateway;
    final UserPresenter userPresenter;
    final UserFactory userFactory;
    // Constructor
    @Override
    public UserResponseModel create(UserRequestModel requestModel) {
        if (userDsGateway.existsByName(requestModel.getName())) {
            return userPresenter.prepareFailView("User already exists.");
        }
        User user = userFactory.create(requestModel.getName(), requestModel.getPassword());
        if (!user.passwordIsValid()) {
            return userPresenter.prepareFailView("User password must have more than 5 characters.");
        }
        LocalDateTime now = LocalDateTime.now();
        UserDsRequestModel userDsModel = new UserDsRequestModel(user.getName(), user.getPassword(), now);
        userDsGateway.save(userDsModel);
        UserResponseModel accountResponseModel = new UserResponseModel(user.getName(), now.toString());
        return userPresenter.prepareSuccessView(accountResponseModel);
    }
}

As we can see, we're doing all the use case steps. Also, this layer is responsible for controlling the entity's dance. Still, we're not making any assumptions on how the UI or database works. But, we're using the UserDsGateway and UserPresenter. So, how can we not know them? Because, along with the UserInputBoundary, these are our input and output boundaries.

5.2. Input and Output Boundaries

The boundaries are contracts defining how components can interact. The input boundary exposes our use case to outer layers:

interface UserInputBoundary {
    UserResponseModel create(UserRequestModel requestModel);
}

Next, we have our output boundaries for making use of the outer layers. First, let's define the data source gateway:

interface UserRegisterDsGateway {
    boolean existsByName(String name);
    void save(UserDsRequestModel requestModel);
}

Second, the view presenter:

interface UserPresenter {
    UserResponseModel prepareSuccessView(UserResponseModel user);
    UserResponseModel prepareFailView(String error);
}

Note we're using the dependency inversion principle to make our business free from details such as databases and UIs.

5.3. Decoupling Mode

Before proceeding, notice how the boundaries are contracts defining the natural divisions of the system. But we must also decide how our application will be delivered:

  • Monolithic – likely organized using some package structure
  • By using Modules
  • By using Services/Microservices

With this in mind, we can reach clean architecture goals with any decoupling mode. Hence, we should prepare to change between these strategies depending on our current and future business requirements. After picking up our decoupling mode, the code division should happen based on our boundaries.

5.4. Request and Response Models

So far, we have created the operations across layers using interfaces. Next, let's see how to transfer data across these boundaries.

Notice how all our boundaries are dealing only with String or Model objects:

class UserRequestModel {
    String login;
    String password;
    // Getters, setters, and constructors
}

Basically, only simple data structures can cross boundaries. Also,  all Models have only fields and accessors. Plus, the data object belongs to the inner side. So, we can keep the dependency rule.

But why do we have so many similar objects? When we get repeated code, it can be of two types:

  • False or accidental duplication – the code similarity is an accident, as each object has a different reason to change. If we try to remove it, we”ll risk violating the single responsibility principle.
  • True duplication – the code changes for the same reasons. Hence, we should remove it

As each Model has a different responsibility, we got all these objects.

5.5. Testing the UserRegisterInteractor

Now, let's create our unit test:

@Test
void givenBaeldungUserAnd12345Password_whenCreate_thenSaveItAndPrepareSuccessView() {
    given(userDsGateway.existsByIdentifier("identifier"))
        .willReturn(true);
    interactor.create(new UserRequestModel("baeldung", "123"));
    then(userDsGateway).should()
        .save(new UserDsRequestModel("baeldung", "12345", now()));
    then(userPresenter).should()
        .prepareSuccessView(new UserResponseModel("baeldung", now()));
}

As we can see, most of the use case test is about controlling the entities and boundaries requests. And, our interfaces allow us to easily mock the details.

6. The Interface Adapters

At this point, we finished all our business. Now, let's start plugging in our details.

Our business should deal only with the most convenient data format for it, and so should our external agents, as DBs or UIs. But, this format usually is different. For this reason, the interface adapter layer is responsible for converting the data.

6.1. UserRegisterDsGateway Using JPA

First, let's use JPA to map our user table:

@Entity
@Table(name = "user")
class UserDataMapper {
    @Id
    String name;
    String password;
    LocalDateTime creationTime;
    //Getters, setters, and constructors
}

As we can see, the Mapper goal is to map our object to a database format.

Next, the JpaRepository using our entity:

@Repository
interface JpaUserRepository extends JpaRepository<UserDataMapper, String> {
}

Given that we'll be using spring-boot, then this is all it takes to save a user.

Now, it's time to implement our UserRegisterDsGateway:

class JpaUser implements UserRegisterDsGateway {
    final JpaUserRepository repository;
    // Constructor
    @Override
    public boolean existsByName(String name) {
        return repository.existsById(name);
    }
    @Override
    public void save(UserDsRequestModel requestModel) {
        UserDataMapper accountDataMapper = new UserDataMapper(requestModel.getName(), requestModel.getPassword(), requestModel.getCreationTime());
        repository.save(accountDataMapper);
    }
}

For the most part, the code speaks for itself. Besides our methods, note the UserRegisterDsGateway's name. If we chose UserDsGateway instead, then other User use cases would be tempted to violate the interface segregation principle.

6.2. User Register API

Now, let's create our HTTP adapter:

@RestController
class UserRegisterController {
    final UserInputBoundary userInput;
    // Constructor
    @PostMapping("/user")
    UserResponseModel create(@RequestBody UserRequestModel requestModel) {
        return userInput.create(requestModel);
    }
}

As we can see, the only goal here is to receive the request and send the response to the client.

6.3. Preparing the Response

Before responding back, we should format our response:

class UserResponseFormatter implements UserPresenter {
    @Override
    public UserResponseModel prepareSuccessView(UserResponseModel response) {
        LocalDateTime responseTime = LocalDateTime.parse(response.getCreationTime());
        response.setCreationTime(responseTime.format(DateTimeFormatter.ofPattern("hh:mm:ss")));
        return response;
    }
    @Override
    public UserResponseModel prepareFailView(String error) {
        throw new ResponseStatusException(HttpStatus.CONFLICT, error);
    }
}

Our UserRegisterInteractor forced us to create a presenter. Still, the presentation rules concerns only within the adapter. Besides, whenever something is hard to test, we should divide it into a testable and a humble object. So, UserResponseFormatter easily allows us to verify our presentation rules:

@Test
void givenDateAnd3HourTime_whenPrepareSuccessView_thenReturnOnly3HourTime() {
    UserResponseModel modelResponse = new UserResponseModel("baeldung", "2020-12-20T03:00:00.000");
    UserResponseModel formattedResponse = userResponseFormatter.prepareSuccessView(modelResponse);
    assertThat(formattedResponse.getCreationTime()).isEqualTo("03:00:00");
}

As we can see, we tested all our logic before sending it to the view. Hence, only the humble object is in the less testable part.

7. Drivers and Frameworks

In truth, we usually don't code here. That is because this layer represents the lowest level of connection to external agents. For example, the H2 driver to connect to the database or the web framework. In this case, we're going to use spring-boot as the web and dependency injection framework.  So, we need its start-up point:

@SpringBootApplication
public class CleanArchitectureApplication {
    public static void main(String[] args) {
      SpringApplication.run(CleanArchitectureApplication.class);
    }
}

Until now, we didn't use any spring annotation in our business. Except for the spring-specifics adapters, as our UserRegisterController. This is because we should treat spring-boot as any other detail.

8. The Terrible Main Class

At last, the final piece!

So far, we followed the stable abstractions principle. Also, we protected our inner layers from the external agents with the inversion of control. Lastly, we separated all object creation from its use. At this point, it's up to us to create our remaining dependencies and inject them into our project:

@Bean
BeanFactoryPostProcessor beanFactoryPostProcessor(ApplicationContext beanRegistry) {
    return beanFactory -> {
        genericApplicationContext(
          (BeanDefinitionRegistry) ((AnnotationConfigServletWebServerApplicationContext) beanRegistry)
            .getBeanFactory());
    };
}
void genericApplicationContext(BeanDefinitionRegistry beanRegistry) {
    ClassPathBeanDefinitionScanner beanDefinitionScanner = new ClassPathBeanDefinitionScanner(beanRegistry);
    beanDefinitionScanner.addIncludeFilter(removeModelAndEntitiesFilter());
    beanDefinitionScanner.scan("com.baeldung.pattern.cleanarchitecture");
}
static TypeFilter removeModelAndEntitiesFilter() {
    return (MetadataReader mr, MetadataReaderFactory mrf) -> !mr.getClassMetadata()
      .getClassName()
      .endsWith("Model");
}

In our case, we're using the spring-boot dependency injection to create all our instances. As we're not using @Component, we're scanning our root package and ignoring only the Model objects.

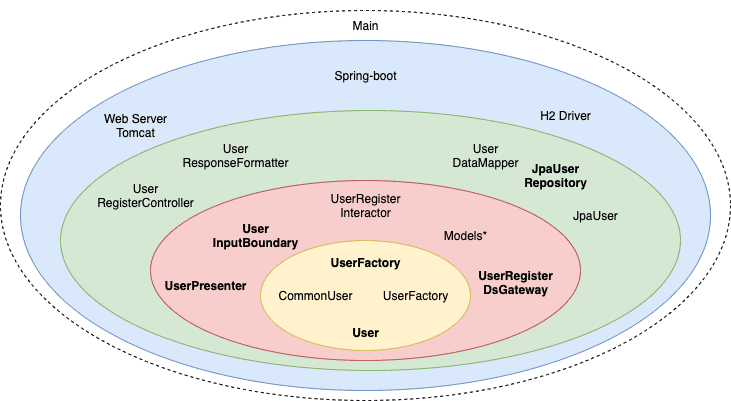
Although this strategy may look more complex, it decouples our business from the DI framework. On the other hand, the main class got power over all our system. That is why clean architecture considers it in a special layer embracing all others:

9. Conclusion

In this article, we learned how Uncle Bob's clean architecture is built on top of many design patterns and principles. Also, we created a use case applying it using Spring Boot.

Still, we left some principles aside. But, all of them lead in the same direction. We can summarize it by quoting its creator: “A good architect must maximize the number of decisions not made.”, and we did it by protecting our business code from the details using boundaries.

As usual, the complete code is available over on GitHub.

The post Clean Architecture with Spring Boot first appeared on Baeldung.
        

Java Weekly, Issue 369

$
0
0

1. Spring and Java

>> Quarkus 1.11 released – RESTEasy Reactive, Dev UI, and more! [quarkus.io]

Fully reactive JAX-RS implementation, Dev UI, enhanced Micrometer support, and many more features in a new Quarkus version!

>> Proposal for Primitive Objects for Java [openjdk.java.net]

Towards objects without identities – the proposal for primitive and inline objects for the Java platform!

>> GraalVM 21.0: Introducing a New Way to Run Java [medium.com]

Run Java on Java, serialization in native images, and enhanced JS support, all in a new GraalVM version.

Also worth reading:

Webinars and presentations:

Time to upgrade:

2. Technical

>> Patterns of Distributed Systems: State Watch [martinfowler.com]

Event-driven communications between distributed nodes – notify clients when specific values change on the server!

Also worth reading:

3. Musings

>> Pairing Guidelines [blog.cleancoder.com]

A more effective pair programming – guidelines to have a better pairing experience from uncle bob!

Also worth reading:

4. Comics

And my favorite Dilberts of the week:

>> Every Expert Says [dilbert.com]

>> Captcha [dilbert.com]

>> Vaccine [dilbert.com]

5. Pick of the Week

>> No “yes.” Either “HELL YEAH!” or “no.” [sive.rs]

The post Java Weekly, Issue 369 first appeared on Baeldung.
        

Introduction to JVM Intrinsics

$
0
0

1. Introduction

In this article, we're going to learn what intrinsics are and how they work in Java and other JVM-based languages.

2. What Are Intrinsics?

An intrinsic function is a function that has special handling by the compiler or interpreter for our programming language. More specifically, it's a special case where the compiler or interpreter can replace the function with an alternative implementation for various reasons.

The programming language typically handles this by understanding that a specific method call is special, and whenever we call this method, then the resulting behavior is different. This then allows our code to look no different from normal, but the programming language's implementation can intervene in special cases to give additional benefits.

The exact way that it works varies between programming languages and also between operating systems and hardware. However, because these are handled for us, we typically don't need to know any of these details.

Intrinsics can give various benefits. Replacing particular algorithms with native code can make them perform better or even leverage the operating system's specific features or underlying hardware.

3. Intrinsics on the JVM

The JVM implements intrinsics by replacing the exact method call on an exact class with an alternative version. The JVM handles this itself, so it will only work for core classes and particular architectures. It also allows only certain methods to be swapped out, rather than entire classes.

Exactly how this works will vary between JVMs. This includes not only different versions of the JVM – Java 8 vs. Java 11, for example. This also includes different JVM targets – Linux vs. Windows, for example – and especially JVM vendors – Oracle vs. IBM. In some cases, certain command-line flags passed to the JVM can affect them.

This variety means that there's no way to determine, based only on the application, which methods will be replaced with intrinsics and which won't. It'll be different based on the JVM running the application. But this can lead to surprising results in some cases – including significant performance benefits achieved simply by changing the JVM used.

4. Performance Benefits

Intrinsics are often used to implement a more efficient version of the same code, for example, by leveraging implementation details of the running OS or CPU. Sometimes this is because it can use a more efficient implementation, and other times it can go as far as using hardware-specific functionality.

For example, the HotSpot JDK has an intrinsic implementation for many of the methods in java.lang.Math. Depending on the exact JVM, these are potentially implemented using CPU instructions to do the exact calculations required.

A simple test will demonstrate this. For example, take java.lang.Math.sqrt(). We can write a test:

for (int a = 0; a < 100000; ++a) {
    double result = Math.sqrt(a);
}

This test is performing a square root operation 100,000 times, which takes approx 123ms. However, if we replace this code with a copy of the implementation of Math.sqrt() instead:

double result = StrictMath.sqrt(a);

This code does the same thing but executes in 166ms instead. That's an increase of 35% by copying the implementation instead of allowing the JVM to replace it with the intrinsic version.

5. Impossible Implementations

In other cases, intrinsics are used for situations where the code can't be implemented in Java. These are typically reserved for very low-level cases.

For example, let's look at the method onSpinWait() in the java.lang.Thread class. This method indicates that this thread is currently performing no work and that CPU time can be given to another thread. To implement this, it needs to work at the lowest level possible.

The HotSpot JDK for x86 architectures implements this directly on the CPU, using the PAUSE opcode. The only other way to achieve this would've been to use a JNI call to native code, and the overhead involved in this would defeat the benefits of the call in the first place.

6. Identifying Intrinsics in Java

There is, unfortunately, no guaranteed way to identify methods that might be replaced with intrinsic versions. This is because different JVMs or even the same JVM on different platforms will do this for different methods.

However, when using Hotspot JVM as of Java 9, the @HotSpotIntrinsicCandidate annotation is used on all methods that may be replaced. Adding this annotation doesn't automatically cause the method to be replaced. In reality, that happens within the underlying JVM. Instead, JVM developers know that these methods are special and to be careful with them.

Other JVMs might handle this differently if they are identified at all. This includes the Hotspot JVM in Java 8 or older.

7. Summary

We can't write our programs to rely on the presence of intrinsics because there's no way to know if they'll be available or not on the runtime JVM. However, they are a compelling approach that the JVM can use to improve the way that programs will work.

These intrinsics can be – and often are – added to newer versions of the JVM. This, then, allows for improvements to our already running code simply by upgrading the JVM that we're running on, so this is another reason to ensure that we stay up-to-date with our dependencies and runtime.

The post Introduction to JVM Intrinsics first appeared on Baeldung.
        

Overview of Mockito MockSettings

$
0
0

1.Overview

More often than not, the default settings provided by Mockito for our mock objects should be more than sufficient.

However, there may be occasions when we need to provide additional mock settings during mock creation. This might be useful when debugging, dealing with legacy code, or covering some corner cases.

In a previous tutorial, we learned how to work with lenient mocks. In this quick tutorial, we'll learn how to use some other useful features the MockSettings interface provides.

2. Mock Settings

Put simply, the MockSettings interface provides a Fluent API that allows us to easily add and combine additional mock settings during mock creation.

When we create a mock object, all our mocks carry a set of default settings. Let's take a look at a simple mock example:

List mockedList = mock(List.class);

Behind the scenes the Mockito mock method delegates to another overloaded method with a set of default settings for our mock:

public static <T> T mock(Class<T> classToMock) {
    return mock(classToMock, withSettings());
}

Let's have a look at our default settings:

public static MockSettings withSettings() {
    return new MockSettingsImpl().defaultAnswer(RETURNS_DEFAULTS);
}

As we can see, our standard set of settings for our mock objects is very simple. We configure the default answer for our mock interactions. Typically, using RETURNS_DEFAULTS will return some empty value.

The important point to take away from this is that we can provide our own set of custom settings to our mock objects if the need arises.

In the next sections, we'll see some examples of when this might come in handy.

3. Providing a Different Default Answer

Now that we understand a bit more about mock settings, let's see seeing how we can change the default return value for a mock object.

Let's imagine we have a very simple setup for a mock:

PizzaService service = mock(PizzaService.class);
Pizza pizza = service.orderHouseSpecial();
PizzaSize size = pizza.getSize();

When we run this code as expected, we'll get a NullPointerException because our unstubbed method orderHouseSpecial returns null.

This is OK, but sometimes when working with legacy code, we might need to handle a complicated hierarchy of mock objects, and it can be time-consuming to locate where these types of exceptions occur.

To help us combat this, we can provide a different default answer via our mock settings during mock creation:

PizzaService pizzaService = mock(PizzaService.class, withSettings().defaultAnswer(RETURNS_SMART_NULLS));

By using the RETURNS_SMART_NULLS as our default answer, Mockito gives us a much more meaningful error message that shows us exactly where the incorrect stubbing occurred:

org.mockito.exceptions.verification.SmartNullPointerException: 
You have a NullPointerException here:
-> at com.baeldung.mockito.mocksettings.MockSettingsUnitTest.whenServiceMockedWithSmartNulls_thenExceptionHasExtraInfo(MockSettingsUnitTest.java:45)
because this method call was *not* stubbed correctly:
-> at com.baeldung.mockito.mocksettings.MockSettingsUnitTest.whenServiceMockedWithSmartNulls_thenExceptionHasExtraInfo(MockSettingsUnitTest.java:44)
pizzaService.orderHouseSpecial();

This can really save us some time when debugging our test code. The Answers enumeration also supplies some other preconfigured mock answers of note:

  • RETURNS_DEEP_STUBS – an answer that returns deep stubsthis can be useful when working with Fluent APIs
  • RETURNS_MOCKS – using this answer will return ordinary values such as empty collections or empty strings, and thereafter, it tries to return mocks
  • CALLS_REAL_METHODS – as the name suggests, when we use this implementation, unstubbed methods will delegate to the real implementation

4. Naming Mocks and Verbose Logging

We can give our mock a name by using the name method of MockSettings. This can be particularly useful for debugging as the name we provide is used in all verification errors:

PizzaService service = mock(PizzaService.class, withSettings()
  .name("pizzaServiceMock")
  .verboseLogging()
  .defaultAnswer(RETURNS_SMART_NULLS));

In this example, we combine this naming feature with verbose logging by using the method verboseLogging().

Using this method enables real-time logging to the standard output stream for method invocations on this mock. Likewise, it can be used during test debugging in order to find wrong interactions with a mock.

When we run our test, we'll see some output on the console:

pizzaServiceMock.orderHouseSpecial();
   invoked: -> at com.baeldung.mockito.mocksettings.MockSettingsUnitTest.whenServiceMockedWithNameAndVerboseLogging_thenLogsMethodInvocations(MockSettingsUnitTest.java:36)
   has returned: "Mock for Pizza, hashCode: 366803687" (com.baeldung.mockito.fluentapi.Pizza$MockitoMock$168951489)

It's interesting to note that if we're using the @Mock annotation, our mocks automatically take the field name as the mock name.

5. Mocking Extra Interfaces

Occasionally, we might want to specify extra interfaces our mock should implement. Again, this might be useful when working with legacy code that we cannot refactor.

Let's imagine we have a special interface:

public interface SpecialInterface {
    // Public methods
}

And a class that uses this interface:

public class SimpleService {
    public SimpleService(SpecialInterface special) {
        Runnable runnable = (Runnable) special;
        runnable.run();
    }
    // More service methods
}

Of course, this is not clean code, but if we're forced to write a unit test for this, we'll more than likely have problems:

SpecialInterface specialMock = mock(SpecialInterface.class);
SimpleService service = new SimpleService(specialMock);

When we run this code, we'll get a ClassCastException. In order to rectify this, we can create our mock with multiple types using the extraInterfaces method:

SpecialInterface specialMock = mock(SpecialInterface.class, withSettings()
  .extraInterfaces(Runnable.class));

Now, our mock creation code won't fail, but we should really emphasize that casting to an undeclared type is not cool.

6. Supplying Constructor Arguments

In this last example, we'll see how we can use MockSettings to call a real constructor with an argument value:

@Test
public void whenMockSetupWithConstructor_thenConstructorIsInvoked() {
    AbstractCoffee coffeeSpy = mock(AbstractCoffee.class, withSettings()
      .useConstructor("espresso")
      .defaultAnswer(CALLS_REAL_METHODS));
    assertEquals("Coffee name: ", "espresso", coffeeSpy.getName());
}

This time around, Mockito attempts to use the constructor with a String value when creating the instance of our AbstractCoffee mock. We also configure the default answer to delegate to the real implementation.

This might be useful if we have some logic inside our constructor that we want to test or trigger to leave our class under test in some certain state. It's also useful when spying on abstract classes.

7. Conclusion

In this quick tutorial, we've seen how we can create our mocks with additional mock settings.

However, we should reiterate that although this is sometimes useful and probably unavoidable, we should strive in most cases to write simple tests using simple mocks.

As always, the full source code of the article is available over on GitHub.

The post Overview of Mockito MockSettings first appeared on Baeldung.
        

Using Custom User Providers with Keycloak

$
0
0

1. Introduction

In this tutorial, we'll show how to add a custom provider to Keycloak, a popular open-source identity management solution, so we can use it with existing and/or non-standard user stores.

2. Overview of Custom Providers with Keycloak

Out-of-the-box, Keycloak provides a range of standard-based integrations based on protocols like SAML, OpenID Connect, and OAuth2. While this built-in functionality is quite powerful, sometimes it's not enough. A common requirement, especially when legacy systems are involved, is to integrate users from those systems into Keycloak. To accommodate for this and similar integration scenarios, Keycloak supports the concept of custom providers.

Custom providers play a key role in Keycloak's architecture. For every major functionality, like the login flow, authentication, authorization, there's a corresponding Service Provider Interface. This approach allows us to plug custom implementations for any of those services, which Keycloak will then use as it were one of its own.

2.1. Custom Provider Deployment and Discovery

In its simplest form, a custom provider is just a standard jar file containing one or more service implementations. At startup, Keycloak will scan its classpath and pick all available providers using the standard java.util.ServiceLoader mechanism. This means all we have to do is to create a file named after the specific service interface we want to provide in the META-INF/services folder of our jar and put the fully qualified name of our implementation in it.

But, what kind of services can we add to Keycloak? If we go to the server info page, available at Keycloak's management console, we'll see quite a lot of them:

In this picture, the left column corresponds to a given Service Provider Interface (SPI, for short), and the right one shows the available providers for that particular SPI.

2.2. Available SPIs

Keycloak's main documentation lists the following SPIs:

  • org.keycloak.authentication.AuthenticatorFactory: Defines actions and interaction flows required to authenticate a user or client application
  • org.keycloak.authentication.actiontoken.ActionTokenHandlerFactory: Allows us to create custom actions that Keycloak will perform upon reaching the /auth/realms/master/login-actions/action-token endpoint. As an example, this mechanism is behind the standard password reset flow. The link included in the e-mail includes such an action token
  • org.keycloak.events.EventListenerProviderFactory: Creates a provider that listens for Keycloak events. The EventType Javadoc page contains a list of the available events custom a provider can handle. A typical use for using this SPI would be creating an audit database
  • org.keycloak.adapters.saml.RoleMappingsProvider: Maps SAML roles received from an external identity provider into Keycloak's ones. This mapping very flexible, allowing us to rename, remove, and/or add roles in the context of a given Realm
  • org.keycloak.storage.UserStorageProviderFactory: Allows Keycloak to access custom user stores
  • org.keycloak.vault.VaultProviderFactory: Allows us to use a custom vault to store Realm-specific secrets. Those can include information like encryption keys, database credentials, etc.

Now, this list by no means covers all the available SPIs: they're just the most well documented and, in practice, most likely to require customization.

3. Custom Provider Implementation

As we've mentioned in this article's introduction, our provider example will allow us to use Keycloak with a read-only custom user repository. For instance, in our case, this user repository is just a regular SQL table with a few attributes:

create table if not exists users(
    username varchar(64) not null primary key,
    password varchar(64) not null,
    email varchar(128),
    firstName varchar(128) not null,
    lastName varchar(128) not null,
    birthDate DATE not null
);

To support this custom user store, we have to implement the UserStorageProviderFactory SPI and deploy it into an existing Keycloak instance.

A key point here is the read-only part. By that, we mean that users will be able to use their credentials to log in to Keycloak, but not to change any information in the custom store, including their passwords. This, however, is not a Keycloak limitation, as it actually supports bi-directional updates. The built-in LDAP provider is a good example of a provider that supports this functionality.

3.1. Project Setup

Our custom provider project is just a regular Maven project that creates a jar file. To avoid a time-consuming compile-deploy-restart cycle of our provider into a regular Keycloak instance, we'll use a nice trick: embed Keycloak in our project as a test-time dependency.

We've already covered how to embed Keycloack in a SpringBoot application, so we won't go into details on how it's done here. By adopting this technique, we'll get faster start times, and hot reload capabilities, providing a smoother developer experience. Here, we'll reuse the example SpringBoot application to run our tests directly from our custom provider, so we'll add it in as a test dependency:

<dependency>
    <groupId>org.keycloak</groupId>
    <artifactId>keycloak-core</artifactId>
    <version>12.0.2</version>
</dependency>
<dependency>
    <groupId>org.keycloak</groupId>
    <artifactId>keycloak-server-spi</artifactId>
    <version>12.0.2</version>
</dependency>
<dependency>
    <groupId>com.baeldung</groupId>
    <artifactId>oauth-authorization-server</artifactId>
    <version>0.1.0-SNAPSHOT</version>
    <scope>test</scope>
</dependency>

We're using the latest 11-series version for the keycloak-core and keycloak-server-spi Keycloak dependencies.

The oauth-authorization-server dependency, however, must be built locally from Baeldung's Spring Security OAuth repository.

3.2. UserStorageProviderFactory Implementation

Let's start our provider by creating the UserStorageProviderFactory implementation and make it available for discovery by Keycloak.

This interface contains eleven methods, but we need to implement just two of them:

  • getId(): Returns a unique identifier for this provider that Keycloak will show on its administration page.
  • create(): Returns the actual Provider implementation.

Keycloak invokes the create() method for every transaction, passing a KeycloakSession and a ComponentModel as arguments. Here, a transaction means any action that requires access to the user store. The prime example is the login flow: at some point, Keycloak will invoke every configured user storage for a given Realm to validate a credential. Therefore, we should avoid doing any costly initialization actions at this point, as the create() method is called all the time.

That said, the implementation is quite trivial:

public class CustomUserStorageProviderFactory
  implements UserStorageProviderFactory<CustomUserStorageProvider> {
    @Override
    public String getId() {
        return "custom-user-provider";
    }
    @Override
    public CustomUserStorageProvider create(KeycloakSession ksession, ComponentModel model) {
        return new CustomUserStorageProvider(ksession,model);
    }
}

We've chosen “custom-user-provider” for our provider id, and our create() implementation simply returns a new instance of our UserStorageProvider implementation. Now, we must not forget to create a service definition file and add it to our project. This file should be named org.keycloak.storage.UserStorageProviderFactory and placed in the META-INF/services folder of our final jar.

Since we're using a standard Maven project, this means we'll add it in the src/main/resources/META-INF/services folder:

The content of this file is just the fully qualified name of the SPI implementation:

# SPI class implementation
com.baeldung.auth.provider.user.CustomUserStorageProviderFactory

3.3. UserStorageProvider Implementation

At first sight, the UserStorageProvider implementation doesn't look as we'd expect. It contains just a few callback methods, none of which relates to actual users. The reason for this is that Keycloak expects our provider to also implement other mix-in interfaces that support specific user management aspects.

The full list of available interfaces is available in Keycloak's documentation, where they're referred to as Provider Capabilities. For a simple, read-only provider, the only interface we need to implement is UserLookupProvider. It provides just lookup capabilities, meaning that Keycloak will automatically import a user to its internal database when required. The original user's password, however, will not be used for authentication. To do so, we also need to implement CredentialInputValidator.

Finally, a common requirement is the ability to display the existing users in our custom store in Keycloak's admin interface. This requires that we implement yet another interface: UserQueryProvider. This one adds some query methods and acts as a DAO for our store.

So, given those requirements, this is how our implementation should look:

public class CustomUserStorageProvider implements UserStorageProvider, 
  UserLookupProvider,
  CredentialInputValidator, 
  UserQueryProvider {
  
    // ... private members omitted
    
    public CustomUserStorageProvider(KeycloakSession ksession, ComponentModel model) {
      this.ksession = ksession;
      this.model = model;
    }
    // ... implementation methods for each supported capability
}

Note that we're saving the values passed to our constructor. We'll later see how they play an important role in our implementation.

3.4. UserLookupProvider Implementation

Keycloak uses the methods in this interface to recover a UserModel instance given its id, username, or email. The id, in this case, is the unique identifier for this user, formatted as this: ‘f:' unique_id ‘:' external_id

  • ‘f:' is just a fixed prefix that indicates that this is a federated user
  • unique_id is Keycloak's id for the user
  • external_id is the user identifier used by a given user store. In our case, that would be the value of the username column

Let's go ahead and implement this interface's methods, starting with getUserByUsername():

@Override
public UserModel getUserByUsername(String username, RealmModel realm) {
    try ( Connection c = DbUtil.getConnection(this.model)) {
        PreparedStatement st = c.prepareStatement(
          "select " +
          "  username, firstName, lastName, email, birthDate " + 
          "from users " + 
          "where username = ?");
        st.setString(1, username);
        st.execute();
        ResultSet rs = st.getResultSet();
        if ( rs.next()) {
            return mapUser(realm,rs);
        }
        else {
            return null;
        }
    }
    catch(SQLException ex) {
        throw new RuntimeException("Database error:" + ex.getMessage(),ex);
    }
}

As expected, this is a simple database query using the provided username to lookup its information. There are two interesting points that need some explanation: DbUtil.getConnection() and mapUser().

The DbUtil is a helper class that somehow returns a JDBC Connection from information contained in the ComponentModel that we've acquired in the constructor. We'll cover its details later on.

As for mapUser(), it's job is to map database record containing user data to a UserModel instance. A UserModel represents a user entity, as seen by Keycloak, and has methods to read its attributes. Our implementation of this interface, available here, extends the AbstractUserAdapter class provided by Keycloak. We've also added a Builder inner class to our implementation, so mapUser() can create UserModel instances easily:

private UserModel mapUser(RealmModel realm, ResultSet rs) throws SQLException {
    CustomUser user = new CustomUser.Builder(ksession, realm, model, rs.getString("username"))
      .email(rs.getString("email"))
      .firstName(rs.getString("firstName"))
      .lastName(rs.getString("lastName"))
      .birthDate(rs.getDate("birthDate"))
      .build();
    return user;
}

Similarly, the other methods basically follow the same pattern described above, so we'll not cover them in detail. Please refer to the provider's code and check all the getUserByXXX and searchForUser methods.

3.5. Getting a Connection

Now, let's take a look at the DbUtil.getConnection() method:

public class DbUtil {
    public static Connection getConnection(ComponentModel config) throws SQLException{
        String driverClass = config.get(CONFIG_KEY_JDBC_DRIVER);
        try {
            Class.forName(driverClass);
        }
        catch(ClassNotFoundException nfe) {
           // ... error handling omitted
        }
        
        return DriverManager.getConnection(
          config.get(CONFIG_KEY_JDBC_URL),
          config.get(CONFIG_KEY_DB_USERNAME),
          config.get(CONFIG_KEY_DB_PASSWORD));
    }
}

We can see that ComponentModel is where all required parameters to create are. But, how Keycloak knows which parameters our custom provider requires? To answer this question, we need to go back to CustomUserStorageProviderFactory.

3.6. Configuration Metadata

The basic contract for CustomUserStorageProviderFactory, UserStorageProviderFactory, contains methods that allow Keycloak to query for configuration properties metadata and, also important, to validate assigned values. In our case, we'll define a few configuration parameters required to establish a JDBC Connection. Since this metadata is static, we'll create it in the constructor, and getConfigProperties() will simply return it.

public class CustomUserStorageProviderFactory
  implements UserStorageProviderFactory<CustomUserStorageProvider> {
    protected final List<ProviderConfigProperty> configMetadata;
    
    public CustomUserStorageProviderFactory() {
        configMetadata = ProviderConfigurationBuilder.create()
          .property()
            .name(CONFIG_KEY_JDBC_DRIVER)
            .label("JDBC Driver Class")
            .type(ProviderConfigProperty.STRING_TYPE)
            .defaultValue("org.h2.Driver")
            .helpText("Fully qualified class name of the JDBC driver")
            .add()
          // ... repeat this for every property (omitted)
          .build();
    }
    // ... other methods omitted
    
    @Override
    public List<ProviderConfigProperty> getConfigProperties() {
        return configMetadata;
    }
    @Override
    public void validateConfiguration(KeycloakSession session, RealmModel realm, ComponentModel config)
      throws ComponentValidationException {
       try (Connection c = DbUtil.getConnection(config)) {
           c.createStatement().execute(config.get(CONFIG_KEY_VALIDATION_QUERY));
       }
       catch(Exception ex) {
           throw new ComponentValidationException("Unable to validate database connection",ex);
       }
    }
}

In validateConfiguration(), we'll get everything we need to validate the parameters passed on when our provided was added to a Realm. In our case, we use this information to establish a database connection and execute the validation query. If something goes wrong, we just throw a ComponentValidationException, signaling Keycloak that the parameters are invalid.

Moreover, although not shown here, we can also use the onCreated() method to attach logic that will be executed every time an administrator adds our provider to a Realm. This allows us to execute one-time initialization-time logic to prepare our store for use, which may be necessary for certain scenarios. For instance, we could use this method to modify our database and add a column to record whether a given user already used Keycloak.

3.7. CredentialInputValidator Implementation

This interface contains methods that validate user credentials. Since Keycloak supports different types of credentials (password, OTP tokens, X.509 certificates, etc.), our provider must inform if it supports a given type in supportsCredentialType() and is configured for it in the context of a given Realm in isConfiguredFor().

In our case, we just have support to passwords and, since they do not require any extra configuration, we can delegate the later method to the former:

@Override
public boolean supportsCredentialType(String credentialType) {
    return PasswordCredentialModel.TYPE.endsWith(credentialType);
}
@Override
public boolean isConfiguredFor(RealmModel realm, UserModel user, String credentialType) {
    return supportsCredentialType(credentialType);
}

The actual password validation happens in the isValid() method:

@Override
public boolean isValid(RealmModel realm, UserModel user, CredentialInput credentialInput) {
    if(!this.supportsCredentialType(credentialInput.getType())) {
        return false;
    }
    StorageId sid = new StorageId(user.getId());
    String username = sid.getExternalId();
    
    try (Connection c = DbUtil.getConnection(this.model)) {
        PreparedStatement st = c.prepareStatement("select password from users where username = ?");
        st.setString(1, username);
        st.execute();
        ResultSet rs = st.getResultSet();
        if ( rs.next()) {
            String pwd = rs.getString(1);
            return pwd.equals(credentialInput.getChallengeResponse());
        }
        else {
            return false;
        }
    }
    catch(SQLException ex) {
        throw new RuntimeException("Database error:" + ex.getMessage(),ex);
    }
}

Here, there are a couple of points worth discussing. First, notice how we're extracting the external id from the UserModel, using a StorageId object initialized from Keycloak's id. We could use the fact that this id has a well-known format and extract the username from there, but it's better to play safe here and let this knowledge encapsulated in a Keycloak-provided class.

Next, there's the actual password validation. For our simplistic and, granted, very much insecure database, password checking is trivial: just compare the database value with the user-supplied value, available through getChallengeResponse(), and we're done. Of course, a real-world provider would require some more steps, such as generating a hash informed password and salt value from the database and compare hashes.

Finally, user stores usually have some lifecycle associated with passwords: maximum age, blocked and/or inactive status, and so on. Regardless, when implementing a provider, the isValid() method is the place to add this logic.

3.8. UserQueryProvider Implementation

The UserQueryProvider capability interface tells Keycloak that our provider can search users in its store. This comes in handy as, by supporting this capability, we'll be able to see users in the admin console.

The methods of this interface include getUsersCount(), to get the total number of users in the store, and several getXXX() and searchXXX() methods. This query interface supports looking up not only users but also groups, which we'll not cover this time.

As the implementation of those methods is quite similar, let's take a look at just one of them, searchForUser():

@Override
public List<UserModel> searchForUser(String search, RealmModel realm, int firstResult, int maxResults) {
    try (Connection c = DbUtil.getConnection(this.model)) {
        PreparedStatement st = c.prepareStatement(
          "select " + 
          "  username, firstName, lastName, email, birthDate " +
          "from users " + 
          "where username like ? + 
          "order by username limit ? offset ?");
        st.setString(1, search);
        st.setInt(2, maxResults);
        st.setInt(3, firstResult);
        st.execute();
        ResultSet rs = st.getResultSet();
        List<UserModel> users = new ArrayList<>();
        while(rs.next()) {
            users.add(mapUser(realm,rs));
        }
        return users;
    }
    catch(SQLException ex) {
        throw new RuntimeException("Database error:" + ex.getMessage(),ex);
    }
}

As we can see, there's nothing special here: just regular JDBC code. An implementation note worth mentioning: UserQueryProvider methods usually come in paged and non-paged versions. Since a user store can potentially have a large number of records, the non-paged versions should simply delegate to the paged versions, using a sensible default. Even better, we can add a configuration parameter that defines what a “sensible default” is.

4. Testing

Now that we've implemented our provider, it's time to test it locally using an embedded Keycloak instance. The project's code contains a live test class that we've used to bootstrap the Keycloak and custom user database and then just print the access URLs on the console before sleeping for one hour.

Using this setup, we can verify that our custom provider works as intended simply by opening the printed URL in a browser:

To access the administration console, we'll use the administrator credentials, which we can get by looking at the application-test.yml file. Once logged in, let's navigate to the “Server Info” page:

On the “Providers” tab, we can see our custom provider displayed alongside other built-in storage providers:

We can also check that the Baeldung realm is already using this provider. For this, we can select it on the top-left drop-down menu and then navigate to the User Federation page:

Next, let's test an actual login into this realm. We'll use the realm's account management page, where a user can manage its data. Our Live Test will print this URL before going into sleep, so we can just copy it from the console and paste it into the browser's address bar.

The test data contains three users: user1, user2, and user3. The password for all of them is the same: “changeit”. Upon successful login, we'll see the account management page displaying the imported user's data:

However, if we try to modify any data, we'll get an error. This is expected, as our provider is read-only, so Keycloak doesn't allow to modify it. For now, we'll leave it as is since supporting bi-directional synchronization is beyond the scope of this article.

5. Conclusion

In this article, we've shown how to create a custom provider for Keycloak, using a User Storage Provider as a concrete example. The full source code of the examples can be found over on GitHub.

The post Using Custom User Providers with Keycloak first appeared on Baeldung.
        

Structural Patterns in Core Java

$
0
0

1. Overview

Structural design patterns are those that simplify the design of large object structures by identifying relationships between them. They describe common ways of composing classes and objects so that they become repeatable as solutions.

The Gang of Four has described seven such structural ways or patterns. In this quick tutorial, we'll see examples of how some core libraries in Java have adopted each one of them.

2. Adapter

An adapter, as the name suggests, acts as an intermediary to convert an otherwise incompatible interface to one that a client expects.

This is useful in cases where we want to take an existing class whose source code cannot be modified and make it work with another class.

JDK's collection framework offers many examples of the adapter pattern:

List<String> musketeers = Arrays.asList("Athos", "Aramis", "Porthos");

Here, Arrays#asList is helping us adapt an Array to a List.

The I/O framework also makes extensive use of this pattern. As an example, let's consider this snippet, which is mapping an InputStream to a Reader object:

InputStreamReader input = new InputStreamReader(new FileInputStream("input.txt"));

3. Bridge

A bridge pattern allows separation between abstractions and implementations so that they can be developed independently from each other but still have a way, or bridge, to coexist and interact.

An example of this in Java would be the JDBC API. It acts as a link between the database such as Oracle, MySQL, and PostgreSQL, and their particular implementations.

The JDBC API is a set of standard interfaces such as Driver, Connection, and ResultSet, to name a few. This enables different database vendors to have their separate implementations.

For example, to create a connection to a database, we'd say:

Connection connection = DriverManager.getConnection(url);

Here, url is a String that can represent any database vendor.

As an example, for PostgreSQL, we might have:

String url = "jdbc:postgresql://localhost/demo";

And for MySQL:

String url = "jdbc:mysql://localhost/demo";

4. Composite

This pattern deals with a tree-like structure of objects. In this tree, the individual object, or even the entire hierarchy, is treated the same way. In simpler words, this pattern arranges objects in a hierarchical fashion so that a client can work seamlessly with either the part of the whole.

Nested containers in AWT/Swing are great examples of usages of the composite pattern in core Java. The java.awt.Container object is basically a root component that can contain other components, forming a tree structure of nested components.

Consider this code snippet:

JTabbedPane pane = new JTabbedPane();
pane.addTab("1", new Container());
pane.addTab("2", new JButton());
pane.addTab("3", new JCheckBox());

All the classes used here – namely, JTabbedPane, JButton, JCheckBox, and JFrame – are descendants of Container. As we can see, this code snippet handles the root of the tree or Container, in the second line, in the same way as it handles its children.

5. Decorator

This pattern comes into play when we want to enhance the behavior of an object without modifying the original object itself. This is achieved by adding a wrapper of the same type to the object to attach additional responsibility to it.

One of the most ubiquitous usages of this pattern can be found in the java.io package:

BufferedInputStream bis = new BufferedInputStream(new FileInputStream(new File("test.txt")));
while (bis.available() > 0) {
    char c = (char) bis.read();
    System.out.println("Char: " + c);
}

Here, BufferedInputStream is decorating the FileInputStream to add the capability to buffer the input. Notably, both these classes have InputStream as a common ancestor. This implies that both the object that decorates and the object that's being decorated are of the same type. This is an unmistakable indicator of decorator pattern.

6. Facade

By definition, the word facade means an artificial or false appearance of an object. Applied to programming, it similarly means providing another face – or rather, interface – to a complex set of objects.

This pattern comes into play when we want to simplify or hide the complexity of a subsystem or framework.

Faces API's ExternalContext is an excellent example of the facade pattern. It uses classes such as HttpServletRequest, HttpServletResponse, and HttpSession internally. Basically, it's a class that allows the Faces API to be blissfully unaware of its underlying application environment.

Let's look at how Primefaces uses it to write an HttpResponse, without actually knowing about it:

protected void writePDFToResponse(ExternalContext externalContext, ByteArrayOutputStream baos, String fileName)
  throws IOException, DocumentException {
    externalContext.setResponseContentType("application/pdf");
    externalContext.setResponseHeader("Expires", "0");
    // set more relevant headers
    externalContext.setResponseContentLength(baos.size());
    externalContext.addResponseCookie(
      Constants.DOWNLOAD_COOKIE, "true", Collections.<String, Object>emptyMap());
    OutputStream out = externalContext.getResponseOutputStream();
    baos.writeTo(out);
    // do cleanup
}

As we can see here, we're setting the response headers, the actual response, and the cookie directly using ExternalContext as a facade. HTTPResponse is not in the picture.

7. Flyweight

The flyweight pattern takes the weight, or memory footprint, off of our objects by recycling them. In other words, if we have immutable objects that can share state, as per this pattern, we can cache them to improve system performance.

Flyweight can be spotted all over the Number classes in Java.

The valueOf methods used to create an object of any data type's wrapper class are designed to cache values and return them when required.

For example, Integer has a static class, IntegerCache, which helps its valueOf method to always cache values in the range -128 to 127:

public static Integer valueOf(int i) {
    if (i >= IntegerCache.low && i <= IntegerCache.high) {
        return IntegerCache.cache[i + (-IntegerCache.low)];
    }
    return new Integer(i);
}

8. Proxy

This pattern offers a proxy, or a substitute, to another complex object. While it sounds similar to a facade, it's actually different in the sense that a facade offers a different interface to the client to interact with. In the case of a proxy, the interface is the same as that of the object it hides.

Using this pattern, it becomes easy to perform any operation on the original object before or after its creation.

JDK provides a java.lang.reflect.Proxy class out-of-the-box for proxy implementations:

Foo proxyFoo = (Foo) Proxy.newProxyInstance(Foo.class.getClassLoader(),
  new Class<?>[] { Foo.class }, handler);

The above code snippet creates a proxy, proxyFoo, for an interface Foo.

9. Conclusion

In this short tutorial, we saw practical usages of structural design patterns implemented in core Java.

To summarize, we briefly defined what each of the seven patterns stands for and then understood them one by one with code snippets.

The post Structural Patterns in Core Java first appeared on Baeldung.
        

Setting a Request Timeout for a Spring REST API

$
0
0

1. Overview

In this tutorial, we'll explore a few possible ways to implement request timeouts for a Spring REST API.

We'll discuss the benefits and drawbacks of each. Request timeouts are useful for preventing a poor user experience, especially if there is an alternative that we can default to when a resource is taking too long. This design pattern is called the Circuit Breaker pattern, but we won't elaborate on that here.

2. @Transactional Timeouts

One way we can implement a request timeout on database calls is to take advantage of Spring's @Transactional annotation. It has a timeout property that we can set. The default value for this property is -1, which is equivalent to not having any timeout at all. For external configuration of the timeout value, a different property – timeoutString – must be used instead.

For example, let's assume we set this timeout to 30. If the execution time of the annotated method exceeds this number of seconds, an exception would be thrown. This might be useful for rolling back long-running database queries.

To see this in action, let's write a very simple JPA repository layer that will represent an external service that takes too long to complete and causes a timeout to occur. This JpaRepository extension has a time-costly method in it:

public interface BookRepository extends JpaRepository<Book, String> {
    default int wasteTime() {
        int i = Integer.MIN_VALUE;
        while(i < Integer.MAX_VALUE) {
            i++;
        }
        return i;
    }
}

If we invoke our wasteTime() method while inside of a transaction with a timeout of 1 second, the timeout will elapse before the method finishes executing:

@GetMapping("/author/transactional")
@Transactional(timeout = 1)
public String getWithTransactionTimeout(@RequestParam String title) {
    bookRepository.wasteTime();
    return bookRepository.findById(title)
      .map(Book::getAuthor)
      .orElse("No book found for this title.");
}

Calling this endpoint results in a 500 HTTP error, which we could transform into a more meaningful response. It also requires very little setup to implement.

However, there are a few drawbacks to this timeout solution.

Firstly, it is dependent on having a database with Spring-managed transactions. It also is not globally applicable to a project since the annotation must be present on each method or class that needs it. It also doesn't allow sub-second precision. Finally, it doesn't cut the request short when the timeout is reached, so the requesting entity still has to wait the full amount of time.

Let's consider some other options.

3. Resilience4j TimeLimiter

Resilience4j is a library primarily dedicated to managing fault-tolerance for remote communications. Its TimeLimiter module is what we are interested in here.

First, we must include the resilience4j-timelimiter dependency in our project:

<dependency>
    <groupId>io.github.resilience4j</groupId>
    <artifactId>resilience4j-timelimiter</artifactId>
    <version>1.6.1</version>
</dependency>

Next, let's define a simple TimeLimiter that has a timeout duration of 500 milliseconds:

private TimeLimiter ourTimeLimiter = TimeLimiter.of(TimeLimiterConfig.custom()
  .timeoutDuration(Duration.ofMillis(500)).build());

This could easily be externally configured.

We can use our TimeLimiter to wrap the same logic that our @Transactional example used:

@GetMapping("/author/resilience4j")
public Callable<String> getWithResilience4jTimeLimiter(@RequestParam String title) {
    return TimeLimiter.decorateFutureSupplier(ourTimeLimiter, () ->
      CompletableFuture.supplyAsync(() -> {
        bookRepository.wasteTime();
        return bookRepository.findById(title)
          .map(Book::getAuthor)
          .orElse("No book found for this title.");
    }));
}

The TimeLimiter offers several benefits over the @Transactional solution. Namely, it supports sub-second precision and immediate notification of the timeout response. However, it still must be manually included in all endpoints that require a timeout, it requires some lengthy wrapping code, and the error it produces is still a generic 500 HTTP error. Also, it requires returning a Callable<String> instead of a raw String.

The TimeLimiter comprises only a subset of features from Resilience4j and interfaces nicely with a Circuit Breaker pattern.

4. Spring MVC request-timeout

Spring provides us with a property called spring.mvc.async.request-timeout. This property allows us to define a request timeout with millisecond precision.

Let's define the property with a 750-millisecond timeout:

spring.mvc.async.request-timeout=750

This property is global and externally configurable, but like the TimeLimiter solution, it only applies to endpoints that return a Callable. Let's define an endpoint that is similar to the TimeLimiter example, but without needing to wrap the logic in Futures or supplying a TimeLimiter:

@GetMapping("/author/mvc-request-timeout")
public Callable<String> getWithMvcRequestTimeout(@RequestParam String title) {
    return () -> {
        bookRepository.wasteTime();
        return bookRepository.findById(title)
          .map(Book::getAuthor)
          .orElse("No book found for this title.");
    };
}

We can see that the code is less verbose, and the configuration is automatically implemented by Spring when we define the application property. The response is returned immediately once the timeout has been reached, and it even returns a more descriptive 503 HTTP error instead of a generic 500. Also, every endpoint in our project will inherit this timeout configuration automatically.

Let's consider another option that will allow us to define timeouts with a little more granularity.

5. WebClient Timeouts

Rather than setting a timeout for an entire endpoint, perhaps we want to simply have a timeout for a single external call. WebClient is Spring's reactive web client and allows us to configure a response timeout.

It is also possible to configure timeouts on Spring's older RestTemplate object. However, most developers now prefer WebClient over RestTemplate.

To use WebClient, we must first add Spring's WebFlux dependency to our project:

<dependency>
    <groupId>org.springframework.boot</groupId>
    <artifactId>spring-boot-starter-webflux</artifactId>
    <version>2.4.2</version>
</dependency>

Let's define a WebClient with a response timeout of 250 milliseconds that we can use to call ourselves via localhost in its base URL:

@Bean
public WebClient webClient() {
    return WebClient.builder()
      .baseUrl("http://localhost:8080")
      .clientConnector(new ReactorClientHttpConnector(
        HttpClient.create().responseTimeout(Duration.ofMillis(250))
      ))
      .build();
}

Clearly, we could easily configure this timeout value externally. We could also configure the base URL externally, as well as several other optional properties.

Now we can inject our WebClient into our controller and use it to call our own /transactional endpoint, which still has a timeout of 1 second. Since we configured our WebClient to timeout in 250 milliseconds, we should see it fail much faster than 1 second.

Here is our new endpoint:

@GetMapping("/author/webclient")
public String getWithWebClient(@RequestParam String title) {
    return webClient.get()
      .uri(uriBuilder -> uriBuilder
        .path("/author/transactional")
        .queryParam("title", title)
        .build())
      .retrieve()
      .bodyToMono(String.class)
      .block();
}

After calling this endpoint, we see that we do receive the WebClient‘s timeout in the form of a 500 HTTP error response. We can also check the logs to see the downstream @Transactional timeout. But of course, its timeout would have been printed remotely if we called an external service instead of localhost.

Configuring different request timeouts for different backend services may be necessary and is possible with this solution. Also, the Mono or Flux response publishers returned by WebClient contain plenty of error handling methods for handling the generic timeout error response.

6. Conclusion

We've just explored several different solutions for implementing a request timeout in this article. There are several factors to consider when deciding which one to use.

If we want to place a timeout on our database requests, we might want to use Spring's @Transactional method and its timeout property. If we are trying to integrate with a broader Circuit Breaker pattern, using Resilience4j's TimeLimiter would make sense. Using the Spring MVC request-timeout property is best for setting a global timeout for all requests, but we can easily define more granular timeouts per resource with WebClient.

For a working example of all of these solutions, the code is ready and runnable out of the box over on GitHub.

The post Setting a Request Timeout for a Spring REST API first appeared on Baeldung.
        

Is Java a Compiled or Interpreted Language?

$
0
0

1. Overview

Programming languages are classified based on their levels of abstraction. We differentiate high-level languages (Java, Python, JavaScript, C++, Go), low-level (Assembler), and finally, machine code.

Every high-level language code, like Java, needs to be translated to machine native code for execution. This translation process can be either compilation or interpretation. However, there is also a third option. A combination that seeks to take advantage of both approaches.

In this tutorial, we'll explore how Java code gets compiled and executed on multiple platforms. We'll look at some Java and JVM design specifics. These will help us determine whether Java is compiled, interpreted, or a hybrid of both.

2. Compiled vs. Interpreted

Let's start by looking into some basic differences between compiled and interpreted programming languages.

2.1. Compiled Languages

Compiled languages (C++, Go) are converted directly into machine native code by a compiler program.

They require an explicit build step before execution. That is why we need to rebuild the program every time we make a code change.

Compiled languages tend to be faster and more efficient than interpreted languages. However, their generated machine code is platform-specific.

2.2. Interpreted Languages

On the other hand, in interpreted languages (Python, JavaScript), there are no build steps. Instead, interpreters operate on the source code of the program while executing it.

Interpreted languages were once considered significantly slower than compiled languages. However, with the development of just-in-time (JIT) compilation, the performance gap is shrinking. We should note, however, that JIT compilers turn code from the interpreted language into machine native code as the program runs.

Furthermore, we can execute interpreted language code on multiple platforms like Windows, Linux, or Mac. Interpreted code has no affinity with a particular type of CPU architecture.

3. Write Once Run Anywhere

Java and the JVM were designed with portability in mind. Therefore, most popular platforms today can run Java code.

This might sound like a hint that Java is a purely interpreted language. However, before execution, Java source code needs to be compiled into bytecode. Bytecode is a special machine language native to the JVM. The JVM interprets and executes this code at runtime.

It is the JVM that is built and customized for each platform that supports Java, rather than our programs or libraries.

Modern JVMs also have a JIT compiler. This means that the JVM optimizes our code at runtime to gain similar performance benefits to a compiled language.

4. Java Compiler

The javac command-line tool compiles Java source code into Java class files containing platform-neutral bytecode:

$ javac HelloWorld.java

Source code files have .java suffixes, while the class files containing bytecode get generated with .class suffixes.

5. Java Virtual Machine

The compiled class files (bytecode) can be executed by the Java Virtual Machine (JVM):

$ java HelloWorld
Hello Java!

Let's now take a deeper look into the JVM architecture. Our goal is to determine how bytecode gets converted to machine native code at runtime.

5.1. Architecture Overview

The JVM is composed of five subsystems:

  • ClassLoader
  • JVM memory
  • Execution engine
  • Native method interface and
  • Native method library

5.2. ClassLoader

The JVM makes use of the ClassLoader subsystems to bring the compiled class files into JVM memory.

Besides loading, the ClassLoader also performs linking and initialization. That includes:

  • Verifying the bytecode for any security breaches
  • Allocating memory for static variables
  • Replacing symbolic memory references with the original references
  • Assigning original values to static variables
  • Executing all static code blocks

5.3. Execution Engine

The execution engine subsystem is in charge of reading the bytecode, converting it into machine native code, and executing it.

Three major components are in charge of execution, including both an interpreter and a compiler:

  • Since the JVM is platform-neutral, it uses an interpreter to execute bytecode
  • The JIT compiler improves performance by compiling bytecode to native code for repeated method calls
  • The Garbage collector collects and removes all unreferenced objects

The execution engine makes use of the Native method interface (JNI) to call native libraries and applications.

5.4. Just In Time Compiler

The main disadvantage of an interpreter is that every time a method is called, it requires interpretation, which can be slower than compiled native code. Java makes use of the JIT compiler to overcome this issue.

The JIT compiler doesn't completely replace the interpreter. The execution engine still uses it. However, the JVM uses the JIT compiler based on how frequently a method is called.

The JIT compiler compiles the entire method's bytecode to machine native code, so it can be reused directly. As with a standard compiler, there's the generation to intermediate code, optimization, and then the production of machine native code.

A profiler is a special component of the JIT compiler responsible for finding hotspots. The JVM decides which code to JIT compile based on the profiling information collected during runtime.

One effect of this is that a Java program can become faster at performing its job after a few cycles of execution. Once the JVM has learned the hotspots, it is able to create the native code allowing things to run faster.

6. Performance Comparison

Let's take a look at how the JIT compilation improves Java's runtime performance.

6.1. Fibonacci Performance Test

We'll use a simple recursive method to calculate the n-th Fibonacci number:

private static int fibonacci(int index) {
    if (index <= 1) {
        return index;
    }
    return fibonacci(index-1) + fibonacci(index-2);
}

In order to measure performance benefits for repeated method calls, we'll run the Fibonacci method 100 times:

for (int i = 0; i < 100; i++) {
    long startTime = System.nanoTime();
    int result = fibonacci(12);
    long totalTime = System.nanoTime() - startTime;
    System.out.println(totalTime);
}

First, we'll compile and execute the Java code normally:

$ java Fibonacci.java

Then, we'll execute the same code with the JIT compiler disabled:

$ java -Djava.compiler=NONE Fibonacci.java

Finally, we'll implement and run the same algorithm in C++ and JavaScript for comparison.

6.2. Performance Test Results

Let's take a look at the measured average performances in nanoseconds after running the Fibonacci recursive test:

  • Java using JIT compiler – 2726 ns – fastest
  • Java without JIT compiler  –  17965 ns – 559% slower
  • C++ without O2 optimization –  9435 ns – 246% slower
  • C++ with O2 optimization –  3639 ns – 33% slower
  • JavaScript –  22998 ns – 743% slower

In this example, Java's performance is more than 500% better using the JIT compiler. However, it does take a few runs for the JIT compiler to kick-in.

Interestingly, Java performed 33% better than C++ code, even when C++ is compiled with the O2 optimization flag enabled. As expected, C++ performed much better in the first few runs, when Java was still interpreted.

Java also outperformed the equivalent JavaScript code run with Node, which also uses a JIT compiler. Results show more than 700% better performance. The main reason is that Java's JIT compiler kicks-in much faster.

7. Things to Consider

Technically, it's possible to compile any static programming language code to machine code directly. It's also possible to interpret any programming code step-by-step.

Similar to many other modern programming languages, Java uses a combination of a compiler and interpreter. The goal is to make use of the best of both worlds, enabling high performance and platform-neutral execution.

In this article, we focused on explaining how things work in HotSpot. HotSpot is the default open-source JVM implementation by Oracle. Graal VM is also based on HotSpot, so the same principles apply.

Most popular JVM implementations nowadays use a combination of an interpreter and a JIT compiler. However, it's possible that some of them use a different approach.

8. Conclusion

In this article, we looked into Java and the JVM internals. Our goal was to determine if Java is a compiled or interpreted language. We explored the Java compiler and the JVM execution engine internals.

Based on that, we concluded that Java uses a combination of both approaches. 

The source code we write in Java is first compiled into bytecode during the build process. The JVM then interprets the generated bytecode for execution. However, the JVM also makes use of a JIT compiler during runtime to improve performances.

As always, the source code is available over on GitHub.

The post Is Java a Compiled or Interpreted Language? first appeared on Baeldung.
        

Guide to Docker Volumes

$
0
0

1. Overview

Docker containers are used to run applications in an isolated environment. By default, all the changes inside the container are lost when the container stops. If we want to keep data between runs, Docker volumes and bind mounts can help. 

In this tutorial, we’ll learn about Docker Volumes, and how to manage and connect them to containers.

2. What Is a Volume?

2.1. The Docker File System

A docker container runs the software stack defined in an image. Images are made of a set of read-only layers that work on a file system called the Union File System. When we start a new container, Docker adds a read-write layer on the top of the image layers allowing the container to run as though on a standard Linux file system.

So, any file change inside the container creates a working copy in the read-write layer. However, when the container is stopped or deleted, that read-write layer is lost.

docker layers system

We can try this out by running a command that writes and then reads a file:

$ docker run bash:latest \ 
  bash -c "echo hello > file.txt && cat file.txt"

The result is:

hello

But if we run the same image with just the command to output the file's contents:

$ docker run bash:latest bash -c "cat file.txt" 
cat: can't open 'file.txt': No such file or directory

The second run of the container runs on a clean file system, so the file is not found.

2.2. Bind Mounts

A Docker bind mount is a high-performance connection from the container to a directory on the host machine. It allows the host to share its own file system with the container, which can be made read-only or read-write.

This allows us to use a container to run tools that we don't want to install on our host, and yet still work with our host's files. For example, if we wanted to use a custom version of bash for a particular script, we might execute that script in a bash container, mounted to our current working directory:

$ docker run -v $(pwd):/var/opt/project bash:latest \ 
  bash -c "echo Hello > /var/opt/project/file.txt"

The –v option can be used for all forms of mounting and specifies, in this instance, the source on the host – the working directory in the output of $(pwd)  – and the target mount point in the container – /var/opt/project.

After running this command, we will find file.txt in the working directory of our host machine. This is a simple way to provide persistent files between invocations of a Docker container, though it is most useful for when the container is doing work on behalf of the host.

One good use case for this would be executing various versions of a language's build tools in Docker to avoid having conflicting installations on a developer machine.

We should note that $(pwd -W) is sometimes needed on Windows bash shells to provide the working directory in a form that the bash shell can pass to Docker.

2.3. Docker Volumes

A bind mount uses the host file system, but Docker volumes are native to Docker. The data is kept somewhere on storage attached to the host – often the local filesystem. The volume itself has a lifecycle that's longer than the container's, allowing it to persist until no longer needed. Volumes can be shared between containers.

In some cases, the volume is in a form that is not usable by the host directly.

3. Managing Volumes

Docker allows us to manage volumes via the docker volume set of commands. We can give a volume an explicit name (named volumes), or allow Docker to generate a random one (anonymous volumes).

3.1. Creating Volumes

We can create a volume by using the create subcommand and passing a name as an argument:

$ docker volume create data_volume
data_volume

If a name is not specified, Docker generates a random name:

$ docker volume create  
d7fb659f9b2f6c6fd7b2c796a47441fa77c8580a080e50fb0b1582c8f602ae2f

3.2. Listing Volumes

The ls subcommand shows all the volumes known to Docker:

$ docker volume ls
DRIVER 	VOLUME NAME
local 	data_volume
local   d7fb659f9b2f6c6fd7b2c796a47441fa77c8580a080e50fb0b1582c8f602ae2f

We can filter using the -f or –filter flag and passing key=value parameters for more precision:

$ docker volume ls -f name=data
DRIVER 	VOLUME NAME
local 	data_volume

3.3. Inspecting Volumes

To display detailed information on one or more volumes, we use the inspect subcommand:

$ docker volume inspect ca808e6fd82590dd0858f8f2486d3fa5bdf7523ac61d525319742e892ef56f59
[
  {
    "CreatedAt": "2020-11-13T17:04:17Z",
    "Driver": "local",
    "Labels": null,
    "Mountpoint": "/var/lib/docker/volumes/ca808e6fd82590dd0858f8f2486d3fa5bdf7523ac61d525319742e892ef56f59/_data",
    "Name": "ca808e6fd82590dd0858f8f2486d3fa5bdf7523ac61d525319742e892ef56f59",
    "Options": null,
    "Scope": "local"
  }
]

We should note that the Driver of the volume describes how the Docker host locates the volume. Volumes can be on remote storage via nfs, for example. In this example, the volume is in local storage.

3.4. Removing Volumes

To remove one or more volumes individually, we can use the rm subcommand:

$ docker volume rm data_volume
data_volume

3.5. Pruning Volumes

We can remove all the unused volumes with the prune subcommand:

$ docker volume prune
WARNING! This will remove all local volumes not used by at least one container.
Are you sure you want to continue? [y/N] y
Deleted Volumes:
data_volume

4. Starting a Container with a Volume

4.1. Using -v

As we saw with the earlier example, we can start a container with a bind mount using the -v option:

$ docker run -v $(pwd):/var/opt/project bash:latest \
  bash -c "ls /var/opt/project"

This syntax also supports mounting a volume:

$ docker run -v data-volume:/var/opt/project bash:latest \
  bash -c "ls /var/opt/project"

As our volume is empty, this lists nothing from the mount point. However, if we were to write to the volume during one invocation of the container:

$ docker run -v data-volume:/var/opt/project bash:latest \
  bash -c "echo Baeldung > /var/opt/project/Baeldung.txt"

Then our subsequent use of a container with this volume mounted would be able to access the file:

$ docker run -v data-volume:/var/opt/project bash -c "ls /var/opt/project"
Baeldung.txt

The -v option contains three components, separated by colons:

  • Source directory or volume name
  • Mount point within the container
  • (Optional) ro if the mount is to be read-only

4.2. Using the –mount Option

We may prefer to use the more self-explanatory –mount option to specify the volume we wish to mount:

$ docker run --mount \
  'type=volume,src=data-volume,\
  dst=/var/opt/project,volume-driver=local,\
  readonly' \ 
  bash -c "ls /var/opt/project"

The input to –mount is a string of key-value pairs, separated by commas. Here we've set:

  • type – as volume to indicate a volume mount
  • src – to the name of the volume, though this could have been a source directory if we'd been making a bind mount
  • dst – as the destination mount point in the container
  • volume-driver – the local driver in this case
  • readonly – to make this mount read-only; we could have chosen rw for read/write

We should note that the above command will also create a volume if it does not already exist.

4.3. Using –volumes-from to Share Volumes

We should note that attaching a volume to a container creates a long-term connection between the container and the volume. Even when the container has exited, the relationship still exists. This allows us to use a container that has exited as a template for mounting the same set of volumes to a new one.

Let's say we ran our echo script in a container with the data-volume mount. Later on, we could list all containers we have used:

$ docker ps -a
CONTAINER ID   IMAGE             COMMAND                  CREATED              STATUS                          PORTS      NAMES
4920602f8048   bash              "docker-entrypoint.s…"   7 minutes ago        Exited (0) 7 minutes ago                   exciting_payne

We could run our next container, by copying the volumes used by this one:

$ docker run --volumes-from 4920 \
  bash:latest \
  bash -c "ls /var/opt/project"
Baeldung.txt

In practice –volumes-from is usually used to link volumes between running containers. Jenkins uses it to share data between agents running as Docker containers.

5. Conclusion

In this article, we saw how Docker normally creates a container with a fresh filesystem, but how bind mounts and volumes allow long-term storage of data beyond the container's lifecycle.

We saw how to list and manage Docker volumes, and how to connect volumes to a running container via the command line.

The post Guide to Docker Volumes first appeared on Baeldung.

Where Should the Spring @Service Annotation Be Kept?

$
0
0

1. Introduction

As software developers, we're always looking for the best practices for using a given technology or library. Naturally, there are debates sometimes.

One such debate is regarding the placement of Spring's @Service annotation. Since Spring provides alternative ways to define beans, it's worth paying attention to the whereabouts of stereotype annotations.

In this tutorial, we'll look at the @Service annotation and examine whether it works best to place it on interfaces, abstract classes, or concrete classes.

2. @Service on Interfaces

Some developers may decide to put @Service on interfaces because they want to:

  • Explicitly show that an interface should only be used for service-level purposes
  • Define new service implementations and have them automatically detected as Spring beans during startup

Let's see how it looks if we annotate an interface:

@Service
public interface AuthenticationService {
    boolean authenticate(String username, String password);
}

As we notice, AuthenticationService becomes more self-descriptive now. The @Service mark advises developers to use it only for the business layer services and not for the data access layer or any other layers.

Normally, that's fine, but there's a drawback. By putting Spring's @Service on interfaces, we create an extra dependency and couple our interfaces with an outside library.

Next, to test the autodetection of our new service beans, let's create an implementation of our AuthenticationService:

public class InMemoryAuthenticationService implements AuthenticationService {
    @Override
    public boolean authenticate(String username, String password) {
        //...
    }
}

We should pay attention that our new implementation, InMemoryAuthenticationService, doesn't have the @Service annotation on it. We left @Service only on the interface, AuthenticationService.

So, let's run our Spring context with the help of a basic Spring Boot setup:

@SpringBootApplication
public class AuthApplication {
    @Autowired
    private AuthenticationService authService;
    public static void main(String[] args) {
        SpringApplication.run(AuthApplication.class, args);
    }
}

When we run our app, we get the infamous NoSuchBeanDefinitionException, and the Spring context fails to start:

org.springframework.beans.factory.NoSuchBeanDefinitionException: 
No qualifying bean of type 'com.baeldung.annotations.service.interfaces.AuthenticationService' available: 
expected at least 1 bean which qualifies as autowire candidate. Dependency annotations: 
...

Therefore, placing @Service on interfaces isn't enough for the auto-detection of Spring components.

3. @Service on Abstract Classes

Using the @Service annotation on abstract classes isn't common.

Let's test it out to see if it achieves our objective of causing Spring to autodetect our implementation classes.

We'll start by defining an abstract class from scratch and putting the @Service annotation on it:

@Service
public abstract class AbstractAuthenticationService {
    public boolean authenticate(String username, String password) {
        return false;
    }
}

Next, we extend AbstractAuthenticationService to create a concrete implementation without annotating it:

public class LdapAuthenticationService extends AbstractAuthenticationService {
    @Override
    public boolean authenticate(String username, String password) { 
        //...
    }
}

Accordingly, we also update our AuthApplication, to inject the new service class:

@SpringBootApplication
public class AuthApplication {
    @Autowired
    private AbstractAuthenticationService authService;
    public static void main(String[] args) {
        SpringApplication.run(AuthApplication.class, args);
    }
}

We should notice that we don't try to inject the abstract class directly here, which is not possible. Instead, we intend to acquire an instance of the concrete class LdapAuthenticationService, depending only on the abstract type. This is a good practice, as the Liskov Substitution Principle also suggests.

So, we run our AuthApplication, again:

org.springframework.beans.factory.NoSuchBeanDefinitionException: 
No qualifying bean of type 'com.baeldung.annotations.service.abstracts.AbstractAuthenticationService' available: 
expected at least 1 bean which qualifies as autowire candidate. Dependency annotations: 
...

As we can see, the Spring context doesn't start. It ends up with the same NoSuchBeanDefinitionException exception.

Certainly, using @Service annotation on abstract classes doesn't have any effect in Spring.

4. @Service on Concrete Classes

Contrary to what we've seen above, it's quite a common practice to annotate the implementation classes instead of abstract classes or interfaces.

In this way, our goal is mostly to tell Spring this class is going to be a @Component and mark it with a special stereotype, which is @Service in our case.

Therefore, Spring will autodetect those classes from the classpath and automatically define them as managed beans.

So, let's put @Service on our concrete service classes this time around. We'll have one class that implements our interface and a second that extends the abstract class that we defined previously:

@Service
public class InMemoryAuthenticationService implements AuthenticationService {
    @Override
    public boolean authenticate(String username, String password) {
        //...
    }
}
@Service
public class LdapAuthenticationService extends AbstractAuthenticationService {
    @Override
    public boolean authenticate(String username, String password) {
        //...
    }
}

We should take notice here that our AbstractAuthenticationService doesn't implement the AuthenticationService here. Hence, we can test them independently.

Finally, we add both of our service classes into the AuthApplication and give it a try:

@SpringBootApplication
public class AuthApplication {
    @Autowired
    private AuthenticationService inMemoryAuthService;
    @Autowired
    private AbstractAuthenticationService ldapAuthService;
    public static void main(String[] args) {
        SpringApplication.run(AuthApplication.class, args);
    }
}

Our final test gives us a successful result, and the Spring context boots up with no exceptions. Both of the services are automatically registered as beans.

5. The Result

Eventually, we saw the only working way is putting @Service on our implementation classes to make them auto-detectable. Spring's component scanning doesn't pick up the classes unless they are annotated separately, even they're derived from another @Service annotated interface or abstract class.

Plus, Spring's documentation also states that using @Service on implementation classes allows them to be autodetected by the component scan.

6. Conclusion

In this article, we examined different places of using Spring's @Service annotation and learned where to keep @Service to define service-level Spring beans so that they'll be autodetected during component scanning.

Specifically, we saw that placing the @Service annotation on interfaces or abstract classes has no effect and that only concrete classes will be picked up by component scanning when they're annotated with @Service.

As always, all the code samples and more are available over on GitHub.

The post Where Should the Spring @Service Annotation Be Kept? first appeared on Baeldung.
        

An Introduction to the Constant Pool in the JVM

$
0
0

1. Introduction

When we compile a .java file, we get a separate class file with a .class extension. The .class file consists of several sections and a constant pool is one of them.

In this quick tutorial, we're going to explore the details of a constant pool. Also, we'll see what are types it supports and how it formats the information.

2. Constant Pool in Java

Simply put, a constant pool contains the constants that are needed to run the code of a specific class. Basically, it's a runtime data structure similar to the symbol table. It is a per-class or per-interface runtime representation in a Java class file.

The content of the constant pool consists of symbolic references generated by the compiler. These references are names of variables, methods, interfaces, and classes referenced from the code. The JVM uses them to link the code with other classes it depends on.

Let's understand the structure of a constant pool using a simple Java class:

public class ConstantPool {
    
    public void sayHello() {
        System.out.println("Hello World");
    }
}

To view the constant pool's content, we need to first compile the file and then run the command:

javap -v name.class

The above command will yield:

   #1 = Methodref          #6.#14         // java/lang/Object."<init>":()V
   #2 = Fieldref           #15.#16        // java/lang/System.out:Ljava/io/PrintStream;
   #3 = String             #17            // Hello World
   #4 = Methodref          #18.#19        // java/io/PrintStream.println:(Ljava/lang/String;)V
   #5 = Class              #20            // com/baeldung/jvm/ConstantPool
   #6 = Class              #21            // java/lang/Object
   #7 = Utf8               <init>
   #8 = Utf8               ()V
   #9 = Utf8               Code
  #10 = Utf8               LineNumberTable
  #11 = Utf8               sayHello
  #12 = Utf8               SourceFile
  #13 = Utf8               ConstantPool.java
  #14 = NameAndType        #7:#8          // "<init>":()V
  #15 = Class              #22            // java/lang/System
  #16 = NameAndType        #23:#24        // out:Ljava/io/PrintStream;
  #17 = Utf8               Hello World
  #18 = Class              #25            // java/io/PrintStream
  #19 = NameAndType        #26:#27        // println:(Ljava/lang/String;)V
  #20 = Utf8               com/baeldung/jvm/ConstantPool
  #21 = Utf8               java/lang/Object
  #22 = Utf8               java/lang/System
  #23 = Utf8               out
  #24 = Utf8               Ljava/io/PrintStream;
  #25 = Utf8               java/io/PrintStream
  #26 = Utf8               println
  #27 = Utf8               (Ljava/lang/String;)V

#n indicates the references to the constant pool. #17 is a symbolic reference to the “Hello World” String, #18 is System.out, and #19 is a println. Similarly, #8 highlights that the return type of method is void and #20 is a fully qualified class name.

It is important to note that the constant pool table starts from index 1. The index value 0 is regarded as an invalid index.

2.1. Types

The constant pool supports several types:

  • Integer, Float: with 32-bit constants
  • Double, Long: with 64-bit constants
  • String: a 16-bit string constant that points at another entry in the pool which contains the actual bytes
  • Class: contains the fully qualified class name
  • Utf8: a stream of bytes
  • NameAndType: a colon-separated pair of values, first entry represents the name while the second entry indicates the type
  • Fieldref, Methodref, InterfaceMethodref: a dot-separated pair of values, first value points at Class entry whereas the second value points as NameAndType entry

What about the other types like boolean, short, and byte? These types are represented as Integer constant in the pool.

2.2. Format

Each entry in the table obeys a general format:

cp_info {
    u1 tag;
    u1 info[];
}

The initial 1-byte tag indicates the kind of constant. Once a JVM grabs and intercepts the tags, it knows what follows the tag. Usually, the tag is followed by two or more bytes to carry the information about that constant.

Let's look at some of the types and their tag indexes:

  • Utf8: 1
  • Integer: 3
  • Float: 4
  • Long: 5
  • Double: 6
  • Class reference: 7
  • String reference: 8

The constant pool of any class or interface is created only when the JVM has completed its loading.

3. Conclusion

In this quick article, we learned about the constant pool in JVM. We've seen that it contains symbolic references that are used to locate the actual objects. Also, we look at how the pool format the information about constants and their types.

As always, the code snippet can be found over on Github.

The post An Introduction to the Constant Pool in the JVM first appeared on Baeldung.
        

Java Weekly, Issue 370

$
0
0

1. Spring and Java

>> Java 1.0 Turns 25 [infoq.com]

Write once, run everywhere turns 25 – a brief history of Java evolution throughout these 25 years!

>> Interview with Brian Goetz [manning.com]

Becoming the Java language architect – how it was started for Brain Goetz and how it's going!

>> Spring Batch on Kubernetes: Efficient batch processing at scale [spring.io]

Creating fault-tolerant, robust, cost-efficient, observable, and scalable batch processes using Spring Batch!

Also worth reading:

Webinars and presentations:

Time to upgrade:

2. Technical

>> Patterns of Distributed Systems: Idempotent Receiver [martinfowler.com]

The art of handling duplicate requests: designing robust distributed systems with idempotency in mind.

Also worth reading:

3. Musings

>> Latency Numbers Every Team Should Know [benjiweber.co.uk]

Rethinking teams as systems – more effective operations by shortening the feedback loops and minimizing delays!

Also worth reading:

4. Comics

And my favorite Dilberts of the week:

>> Doing Nothing Is A Decision [dilbert.com]

>> Customers Are Dead People [dilbert.com]

>> Teamwork But [dilbert.com]

5. Pick of the Week

>> Do Things That Don't Scale [paulgraham.com]

The post Java Weekly, Issue 370 first appeared on Baeldung.
        

Using the Map.Entry Java Class

$
0
0

1. Overview

We often use maps to store a collection of key-value pairs. Then, at some point, we often need to iterate over them.

In this tutorial, we'll compare different methods of map iteration, highlighting when it may be beneficial to use Map.Entry. Then, we'll learn how Map.Entry can be used to create a tuple. Finally, we'll create an ordered list of tuples.

2. Optimizing Map Iteration

Suppose that we have a map of book titles with the author's name as the key:

Map<String, String> map = new HashMap<>();
map.put("Robert C. Martin", "Clean Code");
map.put("Joshua Bloch", "Effective Java");

Let's compare two methods of getting all the keys and values from our map.

2.1. Using Map.keySet

First, consider the following:

for (String key : bookMap.keySet()) {
    System.out.println("key: " + key + " value: " + bookMap.get(key));
}

Here, the loop iterates over keySet. For each key, we get the corresponding value using Map.get. While this is an obvious way to use all of the entries in the map, it requires two operations for each entry — one to get the next key and one to look up the value with get.

If we need just the keys in a map, keySet is a good option. However, there's a faster way to get both the keys and values.

2.2. Using Map.entrySet Instead

Let's rewrite our iteration to use entrySet:

for (Map.Entry<String, String> book: bookMap.entrySet()) {
    System.out.println("key: " + book.getKey() + " value: " + book.getValue());
}

In this example, our loop is over a collection of Map.Entry objects. As Map.Entry stores both the key and value together in one class, we get them both in a single operation.

The same rules apply to using Java 8 stream operations. Streaming over the entrySet and working with Entry objects is more efficient and can require less code.

3. Working With Tuples

A tuple is a data structure that has a fixed number and order of elements. We can think of Map.Entry as a tuple that stores two elements – a key and a value. However, as Map.Entry is an interface, we require an implementation class. In this section, we'll explore one implementation provided by the JDK: AbstractMap.SimpleEntry.

3.1. Creating a Tuple

First, consider the Book class:

public class Book {
    private String title;
    private String author;
    public Book(String title, String author) {
        this.title = title;
        this.author = author;
    }
    ...

Next, let's create a Map.Entry tuple with the ISBN as the key and the Book object as the value:

Map.Entry<String, Book> tuple;

Finally, let's instantiate our tuple with AbstractMap.SimpleEntry:

tuple = new AbstractMap.SimpleEntry<>("9780134685991", new Book("Effective Java 3d Edition", "Joshua Bloch"));

3.2. Creating an Ordered List of Tuples

When working with tuples, it's often useful to have them as an ordered list.

First, we'll define our list of tuples:

List<Map.Entry<String, Book>> orderedTuples = new ArrayList<>();

Secondly, let's add some entries to our list:

orderedTuples.add(new AbstractMap.SimpleEntry<>("9780134685991", 
  new Book("Effective Java 3d Edition", "Joshua Bloch")));
orderedTuples.add(new AbstractMap.SimpleEntry<>("9780132350884", 
  new Book("Clean Code","Robert C Martin")));

3.3. Comparing With a Map

In order to compare the differences with a Map, let's add a new entry with a key that already exists:

orderedTuples.add(new AbstractMap.SimpleEntry<>("9780132350884", 
  new Book("Clean Code", "Robert C Martin")));

Secondly, we'll iterate over our list, displaying all the keys and values:

for (Map.Entry<String, Book> tuple : orderedTuples) {
    System.out.println("key: " + tuple.getKey() + " value: " + tuple.getValue());
}

Finally, let's see the output:

key: 9780134685991 value: Book{title='Effective Java 3d Edition', author='Joshua Bloch'}
key: 9780132350884 value: Book{title='Clean Code', author='Robert C Martin'}

Notice that we can have duplicate keys, unlike a basic Map, where each key has to be unique. This is because we've used a List implementation to store our SimpleEntry objects, which means all the objects are independent of each other.

3.4. Lists of Entry Objects

We should note that the purpose of Entry is not to act as a generic tuple. Library classes often provide a generic Pair class for this purpose.

However, we may find that we need to temporarily work with lists of entries while preparing data for a Map or extracting data from one.

4. Conclusion

In this article, we looked at Map.entrySet as an alternative to iterating over a map's keys.

We then looked at how Map.Entry can be used as a tuple.

Finally, we created a list of ordered tuples, comparing the differences to a basic Map.

As always, the example code is available over on GitHub.

The post Using the Map.Entry Java Class first appeared on Baeldung.
        
Viewing all 4460 articles
Browse latest View live


<script src="https://jsc.adskeeper.com/r/s/rssing.com.1596347.js" async> </script>