Quantcast
Channel: Baeldung
Viewing all 4463 articles
Browse latest View live

Configuring Message Retention Period in Apache Kafka

$
0
0

1. Overview

When a producer sends a message to Apache Kafka, it appends it in a log file and retains it for a configured duration.

In this tutorial, we'll learn to configure time-based message retention properties for Kafka topics.

2. Time-Based Retention

With retention period properties in place, messages have a TTL (time to live). Upon expiry, messages are marked for deletion, thereby freeing up the disk space.

The same retention period property applies to all messages within a given Kafka topic. Furthermore, we can set these properties either before topic creation or alter them at runtime for a pre-existing topic.

In the following sections, we'll learn how to tune this through broker configuration for setting the retention period for new topics and topic-level configuration to control it at runtime.

3. Server-Level Configuration

Apache Kafka supports a server-level retention policy that we can tune by configuring exactly one of the three time-based configuration properties:

  • log.retention.hours
  • log.retention.minutes
  • log.retention.ms

It's important to understand that Kafka overrides a lower-precision value with a higher one. So, log.retention.ms would take the highest precedence.

3.1. Basics

First, let's inspect the default value for retention by executing the grep command from the Apache Kafka directory:

$ grep -i 'log.retention.[hms].*\=' config/server.properties
log.retention.hours=168

We can notice here that the default retention time is seven days.

To retain messages only for ten minutes, we can set the value of the log.retention.minutes property in the config/server.properties:

log.retention.minutes=10

3.2. Retention Period for New Topic

The Apache Kafka package contains several shell scripts that we can use to perform administrative tasks. We'll use them to create a helper script, functions.sh, that we'll use during the course of this tutorial.

Let's start by adding two functions in functions.sh to create a topic and describe its configuration, respectively:

function create_topic {
    topic_name="$1"
    bin/kafka-topics.sh --create --topic ${topic_name} --if-not-exists \
      --partitions 1 --replication-factor 1 \
      --zookeeper localhost:2181
}
function describe_topic_config {
    topic_name="$1"
    ./bin/kafka-configs.sh --describe --all \
      --bootstrap-server=0.0.0.0:9092 \
      --topic ${topic_name}
}

Next, let's create two standalone scripts, create-topic.sh and get-topic-retention-time.sh:

bash-5.1# cat create-topic.sh
#!/bin/bash
. ./functions.sh
topic_name="$1"
create_topic "${topic_name}"
exit $?
bash-5.1# cat get-topic-retention-time.sh
#!/bin/bash
. ./functions.sh
topic_name="$1"
describe_topic_config "${topic_name}" | awk 'BEGIN{IFS="=";IRS=" "} /^[ ]*retention.ms/{print $1}'
exit $?

We must note that describe_topic_config will give all the properties configured for the topic. So, we used the awk one-liner to add a filter for the retention.ms property.

Finally, let's start the Kafka environment and verify retention period configuration for a new sample topic:

bash-5.1# ./create-topic.sh test-topic
Created topic test-topic.
bash-5.1# ./get-topic-retention-time.sh test-topic
retention.ms=600000

Once the topic is created and described, we'll notice that retention.ms is set to 600000 (ten minutes). That's actually derived from the log.retention.minutes property that we had earlier defined in the server.properties file.

4. Topic-Level Configuration

Once the Broker server is started, log.retention.{hours|minutes|ms} server-level properties become read-only. On the other hand, we get access to the retention.ms property, which we can tune at the topic-level.

Let's add a method in our functions.sh script to configure a property of a topic:

function alter_topic_config {
    topic_name="$1"
    config_name="$2"
    config_value="$3"
    ./bin/kafka-configs.sh --alter \
      --add-config ${config_name}=${config_value} \
      --bootstrap-server=0.0.0.0:9092 \
      --topic ${topic_name}
}

Then, we can use this within an alter-topic-config.sh script:

#!/bin/sh
. ./functions.sh
alter_topic_retention_config $1 $2 $3
exit $?

Finally, let's set retention time to five minutes for the test-topic and verify the same:

bash-5.1# ./alter-topic-config.sh test-topic retention.ms 300000
Completed updating config for topic test-topic.
bash-5.1# ./get-topic-retention-time.sh test-topic
retention.ms=300000

5. Validation

So far, we've seen how we can configure the retention period of a message within a Kafka topic. It's time to validate that a message indeed expires after the retention timeout.

5.1. Producer-Consumer

Let's add produce_message and consume_message functions in the functions.sh. Internally, these use the kafka-console-producer.sh and kafka-console-consumer.sh, respectively, for producing/consuming a message:

function produce_message {
    topic_name="$1"
    message="$2"
    echo "${message}" | ./bin/kafka-console-producer.sh \
    --bootstrap-server=0.0.0.0:9092 \
    --topic ${topic_name}
}
function consume_message {
    topic_name="$1"
    timeout="$2"
    ./bin/kafka-console-consumer.sh \
    --bootstrap-server=0.0.0.0:9092 \
    --from-beginning \
    --topic ${topic_name} \
    --max-messages 1 \
    --timeout-ms $timeout
}

We must note that the consumer is always reading messages from the beginning as we need a consumer that reads any available message in Kafka.

Next, let's create a standalone message producer:

bash-5.1# cat producer.sh
#!/bin/sh
. ./functions.sh
topic_name="$1"
message="$2"
produce_message ${topic_name} ${message}
exit $?

Finally, let's have a standalone message consumer:

bash-5.1# cat consumer.sh
#!/bin/sh
. ./functions.sh
topic_name="$1"
timeout="$2"
consume_message ${topic_name} $timeout
exit $?

5.2. Message Expiry

Now that we have our basic setup ready, let's produce a single message and consume it twice instantly:

bash-5.1# ./producer.sh "test-topic-2" "message1"
bash-5.1# ./consumer.sh test-topic-2 10000
message1
Processed a total of 1 messages
bash-5.1# ./consumer.sh test-topic-2 10000
message1
Processed a total of 1 messages

So, we can see that the consumer is repeatedly consuming any available message.

Now, let's introduce a sleep delay of five minutes and then attempt to consume the message:

bash-5.1# sleep 300 && ./consumer.sh test-topic 10000
[2021-02-06 21:55:00,896] ERROR Error processing message, terminating consumer process:  (kafka.tools.ConsoleConsumer$)
org.apache.kafka.common.errors.TimeoutException
Processed a total of 0 messages

As expected, the consumer didn't find any message to consume because the message has crossed its retention period.

6. Limitations

Internally, the Kafka Broker maintains another property called log.retention.check.interval.ms. This property decides the frequency at which messages are checked for expiry.

So, to keep the retention policy effective, we must ensure that the value of the log.retention.check.interval.ms is lower than the property value of retention.ms for any given topic.

7. Conclusion

In this tutorial, we explored Apache Kafka to understand the time-based retention policy for messages. In the process, we created simple shell scripts to simplify the administrative activities. Later, we created a standalone consumer and producer to validate the message expiry after the retention period.

The post Configuring Message Retention Period in Apache Kafka first appeared on Baeldung.
       

How To Configure Java Heap Size Inside a Docker Container

$
0
0

1. Overview

When we run Java within a container, we may wish to tune it to make the best use of the available resources.

In this tutorial, we'll see how to set JVM parameters in a container that runs a Java process. Although the following applies to any JVM setting, we'll focus on the common -Xmx and -Xms flags.

We'll also look at common issues containerizing programs that run with certain versions of Java and how to set flags in some popular containerized Java applications.

2. Default Heap Settings in Java Containers

The JVM is pretty good at determining appropriate default memory settings.

In the past, the JVM was not aware of the memory and CPU allocated to the container. So, Java 10 introduced a new setting: +UseContainerSupport (enabled by default) to fix the root cause, and developers backported the fix to Java 8 in 8u191. The JVM now calculates its memory based on the memory allocated to the container.

However, we may still wish to change the settings from their defaults in certain applications.

2.1. Automatic Memory Calculation

When we don't set -Xmx and -Xmx parameters, the JVM sizes the heap based on the system specifications.

Let's look at that heap size:

$ java -XX:+PrintFlagsFinal -version | grep -Ei "maxheapsize|maxram"

This outputs:

openjdk version "15" 2020-09-15
OpenJDK Runtime Environment AdoptOpenJDK (build 15+36)
OpenJDK 64-Bit Server VM AdoptOpenJDK (build 15+36, mixed mode, sharing)
   size_t MaxHeapSize      = 4253024256      {product} {ergonomic}
 uint64_t MaxRAM           = 137438953472 {pd product} {default}
    uintx MaxRAMFraction   = 4               {product} {default}
   double MaxRAMPercentage = 25.000000       {product} {default}
   size_t SoftMaxHeapSize  = 4253024256   {manageable} {ergonomic}

Here, we see that the JVM sets its heap size to approximately 25% of the available RAM. In this example, it allocated 4GB on a system with 16GB.

For the purposes of testing, let's create a program that prints the heap sizes in megabytes:

public static void main(String[] args) {
  int mb = 1024 * 1024;
  MemoryMXBean memoryBean = ManagementFactory.getMemoryMXBean();
  long xmx = memoryBean.getHeapMemoryUsage().getMax() / mb;
  long xms = memoryBean.getHeapMemoryUsage().getInit() / mb;
  LOGGER.log(Level.INFO, "Initial Memory (xms) : {0}mb", xms);
  LOGGER.log(Level.INFO, "Max Memory (xmx) : {0}mb", xmx);
}

Let's place that program in an empty directory, in a file named PrintXmxXms.java.

We can test it on our host, assuming we have an installed JDK. In a Linux system, we can compile our program and run it from a terminal opened on that directory:

$ javac ./PrintXmxXms.java
$ java -cp . PrintXmxXms

On a system with 16Gb of RAM, the output is:

INFO: Initial Memory (xms) : 254mb
INFO: Max Memory (xmx) : 4,056mb

Now, let's try that in some containers.

2.2. Before JDK 8u191

Let's add the following Dockerfile in the folder that contains our Java program:

FROM openjdk:8u92-jdk-alpine
COPY *.java /src/
RUN mkdir /app \
    && ls /src \
    && javac /src/PrintXmxXms.java -d /app
CMD ["sh", "-c", \
     "java -version \
      && java -cp /app PrintXmxXms"]

Here we're using a container that uses an older version of Java 8, which predates the container support that's available in more up-to-date versions. Let's build its image:

$ docker build -t oldjava .

The CMD line in the Dockerfile is the process that gets executed by default when we run the container. Since we didn't provide the -Xmx or -Xms JVM flags, the memory settings will be defaulted.

Let's run that container:

$ docker run --rm -ti oldjava
openjdk version "1.8.0_92-internal"
OpenJDK Runtime Environment (build 1.8.0_92-...)
OpenJDK 64-Bit Server VM (build 25.92-b14, mixed mode)
Initial Memory (xms) : 198mb
Max Memory (xmx) : 2814mb

Let's now constrain the container memory to 1GB.

$ docker run --rm -ti --memory=1g oldjava
openjdk version "1.8.0_92-internal"
OpenJDK Runtime Environment (build 1.8.0_92-...)
OpenJDK 64-Bit Server VM (build 25.92-b14, mixed mode)
Initial Memory (xms) : 198mb
Max Memory (xmx) : 2814mb

As we can see, the output is exactly the same. This proves the older JVM does not respect the container memory allocation.

2.3. After JDK 8u130

With the same test program, let's use a more up to date JVM 8 by changing the first line of the Dockerfile:

FROM openjdk:8-jdk-alpine

We can then test it again:

$ docker build -t newjava .
$ docker run --rm -ti newjava
openjdk version "1.8.0_212"
OpenJDK Runtime Environment (IcedTea 3.12.0) (Alpine 8.212.04-r0)
OpenJDK 64-Bit Server VM (build 25.212-b04, mixed mode)
Initial Memory (xms) : 198mb
Max Memory (xmx) : 2814mb

Here again, it is using the whole docker host memory to calculate the JVM heap size. However, if we allocate 1GB of RAM to the container:

$ docker run --rm -ti --memory=1g newjava
openjdk version "1.8.0_212"
OpenJDK Runtime Environment (IcedTea 3.12.0) (Alpine 8.212.04-r0)
OpenJDK 64-Bit Server VM (build 25.212-b04, mixed mode)
Initial Memory (xms) : 16mb
Max Memory (xmx) : 247mb

This time, the JVM calculated the heap size based on the 1GB of RAM available to the container.

Now we understand how the JVM calculates its defaults and why we need an up-to-date JVM to get the correct defaults, let's look at customizing the settings.

3. Memory Settings in Popular Base Images

3.1. OpenJDK and AdoptOpenJDK

Instead of hard-coding the JVM flags directly on our container's command, it's good practice to use an environment variable such as JAVA_OPTS. We use that variable within our Dockerfile, but it can be modified when the container is launched:

FROM openjdk:8u92-jdk-alpine
COPY src/ /src/
RUN mkdir /app \
 && ls /src \
 && javac /src/com/baeldung/docker/printxmxxms/PrintXmxXms.java \
    -d /app
ENV JAVA_OPTS=""
CMD java $JAVA_OPTS -cp /app \ 
    com.baeldung.docker.printxmxxms.PrintXmxXms

Let's now build the image:

$ docker build -t openjdk-java .

We can choose our memory settings at runtime by specifying the JAVA_OPTS environment variable:

$ docker run --rm -ti -e JAVA_OPTS="-Xms50M -Xmx50M" openjdk-java
INFO: Initial Memory (xms) : 50mb
INFO: Max Memory (xmx) : 48mb

We should note that there is a slight difference between the -Xmx parameter and the Max memory reported by the JVM. This is because Xmx sets the maximum size of the memory allocation pool, which includes the heap, the garbage collector's survivor space, and other pools.

3.2. Tomcat 9

A Tomcat 9 container has its own startup scripts, so to set JVM parameters, we need to work with those scripts.

The bin/catalina.sh script requires us to set the memory parameters in the environment variable CATALINA_OPTS.

Let's first create a war file to deploy to Tomcat.

Then, we'll containerize it using a simple Dockerfile, where we declare the CATALINA_OPTS environment variable:

FROM tomcat:9.0
COPY ./target/*.war /usr/local/tomcat/webapps/ROOT.war
ENV CATALINA_OPTS="-Xms1G -Xmx1G"

Then we build the container image and run it:

$ docker build -t tomcat .
$ docker run --name tomcat -d -p 8080:8080 \
  -e CATALINA_OPTS="-Xms512M -Xmx512M" tomcat

We should note that when we run this, we're passing a new value to CATALINA_OPTS. If we don't provide this value, though, we gave some defaults in line 3 of the Dockerfile.

We can check the runtime parameters applied and verify that our options -Xmx and -Xms are there:

$ docker exec -ti tomcat jps -lv
1 org.apache.catalina.startup.Bootstrap <other options...> -Xms512M -Xmx512M

4. Using Build Plugins

Maven and Gradle offer plugins that allow us to create container images without a Dockerfile. The generated images can generally be parameterized at runtime through environment variables.

Let's look at a few examples.

4.1. Using Spring Boot

Since Spring Boot 2.3, the Spring Boot Maven and Gradle plugins can build an efficient container without a Dockerfile.

With Maven, we add them to a <configuration> block within the spring-boot-maven-plugin:

<?xml version="1.0" encoding="UTF-8"?>
<project xmlns="http://maven.apache.org/POM/4.0.0" xmlns:xsi="http://www.w3.org/2001/XMLSchema-instance"
         xsi:schemaLocation="http://maven.apache.org/POM/4.0.0 http://maven.apache.org/xsd/maven-4.0.0.xsd">
  <groupId>com.baeldung.docker</groupId>
  <artifactId>heapsizing-demo</artifactId>
  <version>0.0.1-SNAPSHOT</version>
  <!-- dependencies... -->
  <build> 
    <plugins> 
      <plugin> 
        <groupId>org.springframework.boot</groupId> 
        <artifactId>spring-boot-maven-plugin</artifactId> 
        <configuration>
          <image>
            <name>heapsizing-demo</name>
          </image>
   <!-- 
    for more options, check:
    https://docs.spring.io/spring-boot/docs/2.4.2/maven-plugin/reference/htmlsingle/#build-image 
   -->
        </configuration>
      </plugin>
    </plugins>
  </build>
</project>

To build the project, run:

$ ./mvnw clean spring-boot:build-image

This will result in an image named <artifact-id>:<version>. In this example demo-app:0.0.1-SNAPSHOT. Under the hood, Spring Boot uses Cloud Native Buildpacks as the underlying containerization technology.

The plugin hard-codes the memory settings of the JVM. However, we can still override them by setting the environment variables JAVA_OPTS or JAVA_TOOL_OPTIONS:

$ docker run --rm -ti -p 8080:8080 \
  -e JAVA_TOOL_OPTIONS="-Xms20M -Xmx20M" \
  --memory=1024M heapsizing-demo:0.0.1-SNAPSHOT

The output will be similar to this:

Setting Active Processor Count to 8
Calculated JVM Memory Configuration: [...]
[...]
Picked up JAVA_TOOL_OPTIONS: -Xms20M -Xmx20M 
[...]

4.2. Using Google JIB

Just like the Spring Boot maven plugin, Google JIB creates efficient Docker images without a Dockerfile. The Maven and Gradle plugins are configured in a similar fashion. Google JIB also uses the environment variable JAVA_TOOL_OPTIONS as the JVM parameters' overriding mechanism.

We can use the Google JIB Maven plugin in any Java framework capable of generating executable jar files. For example, it's possible to use it in a Spring Boot application in place of the spring-boot-maven plugin to generate container images:

<?xml version="1.0" encoding="UTF-8"?>
<project xmlns="http://maven.apache.org/POM/4.0.0" xmlns:xsi="http://www.w3.org/2001/XMLSchema-instance"
         xsi:schemaLocation="http://maven.apache.org/POM/4.0.0 https://maven.apache.org/xsd/maven-4.0.0.xsd">
    
    <!-- dependencies, ... -->
    <build>
        <plugins>
            <!-- [ other plugins ] -->
            <plugin>
                <groupId>com.google.cloud.tools</groupId>
                <artifactId>jib-maven-plugin</artifactId>
                <version>2.7.1</version>
                <configuration>
                    <to>
                        <image>heapsizing-demo-jib</image>
                    </to>
                </configuration>
            </plugin>
        </plugins>
    </build>
</project>

The image is built using the maven jib:DockerBuild target:

$ mvn clean install && mvn jib:dockerBuild

We can now run it as usual:

$ docker run --rm -ti -p 8080:8080 \
-e JAVA_TOOL_OPTIONS="-Xms50M -Xmx50M" heapsizing-demo-jib
Picked up JAVA_TOOL_OPTIONS: -Xms50M -Xmx50M
[...]
2021-01-25 17:46:44.070  INFO 1 --- [           main] c.baeldung.docker.XmxXmsDemoApplication  : Started XmxXmsDemoApplication in 1.666 seconds (JVM running for 2.104)
2021-01-25 17:46:44.075  INFO 1 --- [           main] c.baeldung.docker.XmxXmsDemoApplication  : Initial Memory (xms) : 50mb
2021-01-25 17:46:44.075  INFO 1 --- [           main] c.baeldung.docker.XmxXmsDemoApplication  : Max Memory (xmx) : 50mb

5. Conclusion

In this article, we covered the need to use an up to date JVM to get default memory settings that work well in a container.

We then looked at best practices for setting -Xms and -Xmx in custom container images and how to work with existing Java application containers to set the JVM options in them.

Finally, we saw how to advantage of build tools to manage the containerization of a Java application.

As always, the source code for the examples is available over on GitHub.

The post How To Configure Java Heap Size Inside a Docker Container first appeared on Baeldung.

Override Maven Plugin Configuration from Parent

$
0
0

1. Overview

In a Maven multi-module project, the effective POM is the result of merging all configurations defined within a module and its parents.

In order to avoid redundancies and duplication between modules, we often keep common configurations in the shared parent. However, there can be a challenge if we need to have a custom configuration for a child module without impacting all its siblings.

In this tutorial, we'll learn how to override the parent plugin configuration.

2. Default Configuration Inheritance

Plugin configurations allow us to reuse a common build logic across projects. If the parent has a plugin, the child will automatically have it without additional configuration. This is like inheritance.

To achieve this, Maven merges the XML files at the element level. If the child defines an element with a different value, it replaces the one from the parent. Let's see this in action.

2.1. Project Structure

First, let's define a multi-module Maven project to experiment on. Our project will consist of one parent and two children:

+ parent
     + child-a
     + child-b

Let's say we want to configure the maven-compiler-plugin to use different Java versions between modules. Let's configure our project to use Java 11 in general, but have child-a use Java 8.

We'll start with the parent configuration:

<plugin>
    <groupId>org.apache.maven.plugins</groupId>
    <artifactId>maven-compiler-plugin</artifactId>
    <configuration>
        <source>11</source>
        <target>11</target>
        <maxmem>512m</maxmem>
    </configuration>
</plugin>

Here we've specified an additional property, maxmem, that we also want to use. However, we want child-a to have its own compiler settings.

So, let's configure child-a to use Java 8:

<plugin>
    <groupId>org.apache.maven.plugins</groupId>
    <artifactId>maven-compiler-plugin</artifactId>
    <configuration>
        <source>1.8</source>
        <target>1.8</target>
    </configuration>
</plugin>

Now that we have our example, let's see what this does to the effective POM.

2.2. Understanding the Effective POM

The effective POM is affected by various factors, like inheritance, profiles, external settings, and so on. In order to see the actual POM, let's run mvn help:effective-pom from the child-a directory:

mvn help:effective-pom
...
<plugin>
    <groupId>org.apache.maven.plugins</groupId>
    <artifactId>maven-compiler-plugin</artifactId>
    <configuration>
        <source>1.8</source>
        <target>1.8</target>
        <maxmem>512m</maxmem>
    </configuration>
</plugin>

As expected, child-a has its own variation of source and target values. However, one additional surprise is that it also has the maxmem property from its parent.

This means if any child property is defined, it will win, otherwise, the parent one will be used.

3. Advanced Configuration Inheritance

When we want to fine-tune the merging strategy, we can use attributes. These attributes are placed on the XML element that we want to control. Also, they will be inherited and will affect only the first-level children.

3.1. Working with Lists

In the previous example, we saw what happens if the child has a different value. Now, we'll see the case when the child has a different list of elements. As an example, let's look at including multiple resource directories, with the maven-resources-plugin.

As a baseline, let's configure the parent to include resources from the parent-resources directory:

<plugin>
    <artifactId>maven-resources-plugin</artifactId>
    <configuration>
        <resources>
            <resource>
                <directory>parent-resources</directory>
            </resource>
        </resources>
    </configuration>
</plugin>

At this point, child-a will inherit this plugin configuration from its parent. However, let's say we wanted to define an alternative resource directory for child-a:

<plugin>
    <artifactId>maven-resources-plugin</artifactId>
    <configuration>
        <resources>
            <resource>
                <directory>child-a-resources</directory>
            </resource>
        </resources>
    </configuration>
</plugin>

Now, let's review the effective POM:

mvn help:effective-pom
...
<configuration>
    <resources>
        <resource>
            <directory>child-a-resources</directory>
        </resource>
    </resources>
</configuration>

In this case, the entire list is overridden by the child configuration.

3.2. Append Parent Configuration

Perhaps we want some children to use a common resource directory and also define additional ones. For this, we can append the parent configuration by using combine.children=”append” on the resources element in the parent:

<resources combine.children="append">
    <resource>
        <directory>parent-resources</directory>
    </resource>
</resources>

Consequently, the effective POM will contain both of them:

mvn help:effective-pom
....
<resources combine.children="append">
    <resource>
        <directory>parent-resources</directory>
    </resource>
    <resource>
        <directory>child-a-resources</directory>
    </resource>
</resources>

The combine attributes are not be propagated to any nested elements. So, had the resources section been a complex structure, the nested elements would be merged using the default strategy.

3.3. Override Child Configuration

In the previous example, the child was not entirely in control of the final POM, owing to a parent combine strategy. A child can overrule the parent by adding combine.self=”override” on its resources element:

<resources combine.self="override">
    <resource>
        <directory>child-a-resources</directory>
    </resource>
</resources>

In this instance, the child regains control:

mvn help:effective-pom
...
<resources combine.self="override">
    <resource>
        <directory>child-a-resources</directory>
    </resource>
</resources>

4. Non-Inheritable Plugins

The previous attributes are suitable for fine-tuning, but they're not appropriate when the child completely disagrees with its parent.

To avoid a plugin being inherited at all, we can add the property <inherited>false</inherited> at the parent level:

<plugin>
    <inherited>false</inherited>
    <groupId>org.apache.maven.plugins</groupId>
    ...
</plugin>

This means the plugin will be applied only for the parent and will not be propagated to its children.

5. Conclusion

In this article, we saw how to override the parent plugin configuration.

First, we explored the default behavior. Then we saw how a parent can define a merging policy and how a child can reject it. Finally, we saw how to mark a plugin as non-inheritable to avoid all children having to override it.

As always, the code is available over on GitHub.

The post Override Maven Plugin Configuration from Parent first appeared on Baeldung.
       

Where Does Java’s String Constant Pool Live, the Heap or the Stack?

$
0
0

1. Introduction

Whenever we declare a variable or create an object, it is stored in the memory. At a high level, Java divides the memory into two blocks: stack and heap. Both memories store specific types of data and have different patterns for their storage and access.

In this tutorial, we'll look at different parameters and learn which is the most appropriate area to store the String constant pool.

2. String Constant Pool

The String constant pool is a special memory area. When we declare a String literal, the JVM creates the object in the pool and stores its reference on the stack. Before creating each String object in memory, the JVM performs some steps to decrease the memory overhead.

The String constant pool uses a Hashmap in its implementation. Each bucket of the Hashmap contains a list of Strings with the same hash code. In earlier versions of Java, the storage area for the pool was a fixed size and could often lead to the Could not reserve enough space for object heap” error.

When the system loads the classes, String literals of all classes go to the application-level pool. It is because of the fact that equal String literals of different classes have to be the same Object. In these situations, data in the pool should be available to each class without any dependency.

Usually, the stack stores the data that is short-lived. It includes local primitive variables, references of heap objects, and methods in execution. Heap allows dynamic memory allocation, stores the Java objects and JRE classes at the runtime.

The heap allows global access and  data stores in the heap are available to all threads during the lifetime of the application, whereas the data stores on the stack have the private scope and only the owner thread can access them.

The stack stores the data in contiguous memory blocks and permits random access. If a class needs a random String from the pool, it might not be available due to the LIFO (last-in-first-out) rule of the stack. In contrast, the heap allocates the memory dynamically and allows us to access the data in any way.

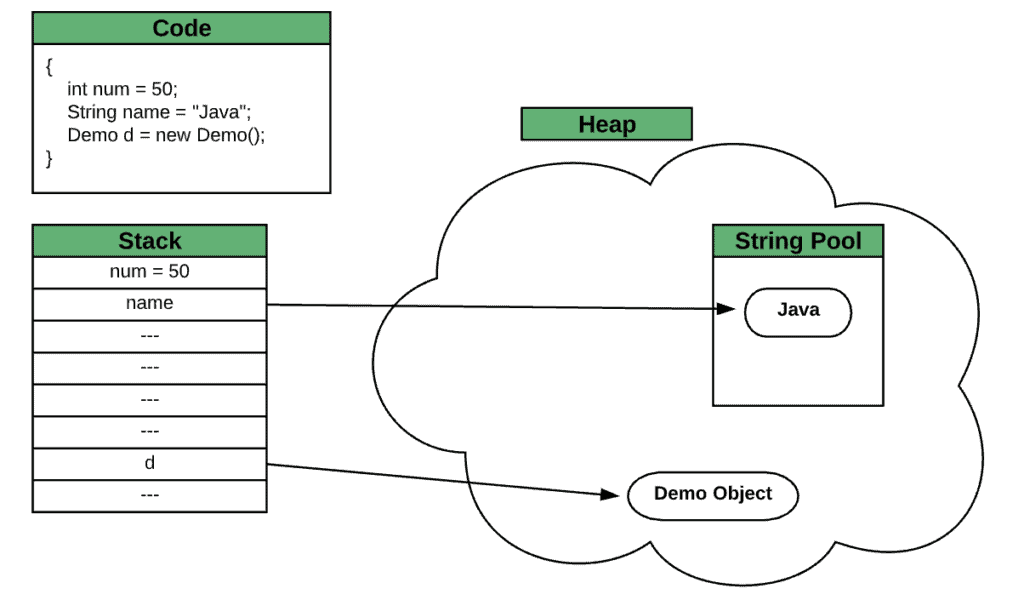
Let's assume we have a code snippet consisting of different types of variables. The stack will store the value of the int literal and references of String and Demo objects. The value of any object will be stored in the heap, and all the String literals go in the pool inside the heap:

The variables created on the stack are deallocated as soon as the thread completes execution. In contrast, a garbage collector reclaims the resources in the heap. Similarly, the garbage collector collects the un-referenced items from the pool.

The default size of the pool may differ on the different platforms. In any case, it is still much bigger than the available stack size. Before JDK 7, the pool was part of permgen space, and from JDK 7 to now, it is part of the main heap memory.

3. Conclusion

In this short article, we learned about the storage area for String constant pool. Stack and heap have different characteristics to store and access data. From memory allocation to its access and availability, a heap is the most suitable area to store the String constant pool.

In fact, the pool has never been a part of stack memory.

The post Where Does Java’s String Constant Pool Live, the Heap or the Stack? first appeared on Baeldung.
       

How to Use Visual Studio Code with Java?

$
0
0

1. Overview

In this article, we'll learn how to configure Visual Studio Code with Java, and how to use its basic features for this language.

Then, we'll see the Maven and Gradle integrations and conclude with the strengths and the drawbacks of this editor.

2. Visual Studio Code Setup for Java

Microsoft improved a lot the developer experience to configure their editor for Java. We can download the Coding Pack for Java, which is a set of essential extensions (the equivalent of JDT for Eclipse).

Even if we haven't installed anything yet, this executable package will check missing software and install them for us:

  • Visual Studio Code
  • Java Development Kit (JDK)
  • Java Extension Pack, which includes:
    • Language Support for Java™ by Red Hat: navigate, write, refactor, and read Java files
    • Debugger for Java, by Microsoft: launch/attach, breakpoints, evaluation, show call stack
    • Maven for Java, by Microsoft: generate projects from Archetype, run Maven goals
    • Java Test Runner, by Microsoft: run Junit, TestNG
    • Project Manager for Java, by Microsoft: show project view, create a new project, export jar
    • Visual Studio IntelliCode, by Microsoft: advanced auto-completion features

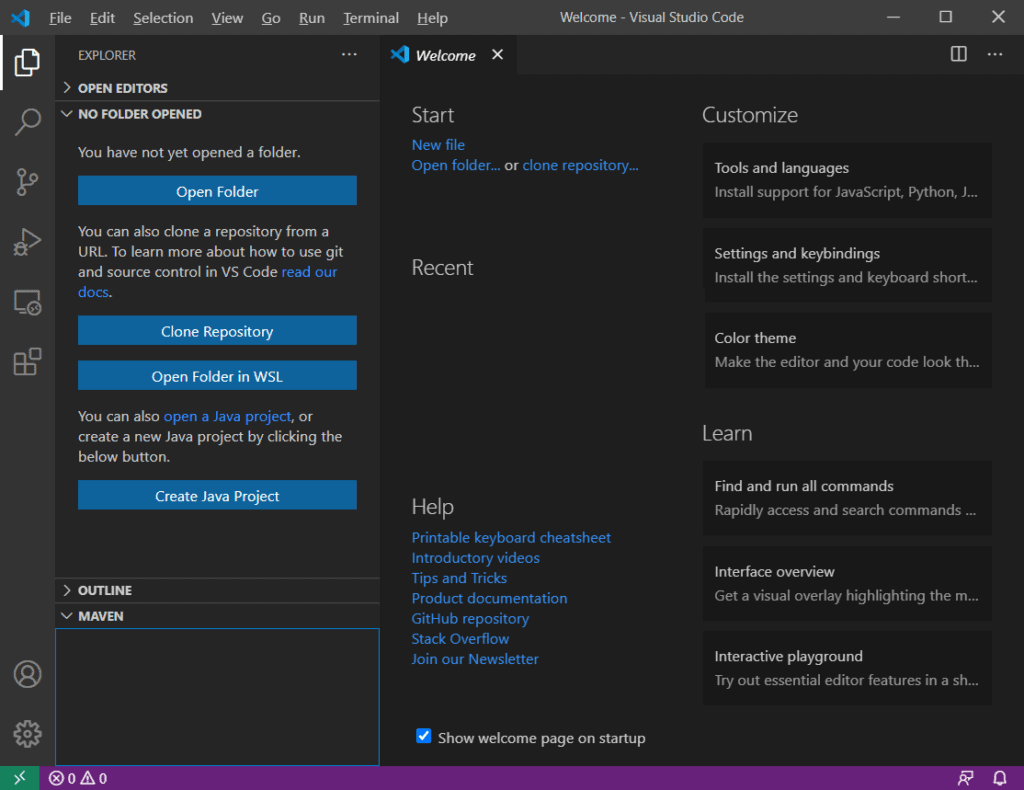
If we already have Visual Studio Code installed, we just have to install the Java Extension Pack from the Extensions button in the sidebar. Now, we're able to view the Create Java Project button and the Maven view on the left:

We can also browse the Java features through the View > Command Palette menu:

Next, we'll learn how to use the features included in these extensions.

3. Working with a Basic Java Project

3.1. Create or Open a Java Project

If we want to create a new Java project, we'll find the Java: Create Java Project command in the Command Palette menu, which opens a top menu where we can pick our project type:

  • No build tools creates a blank project with src and lib directories
  • Maven lets us pick an archetype from a large library collection, as we'll see in a later section
  • Spring Boot, Quarkus, and MicroProfile require that we install their respective extensions to create a project

If we need to open an existing project, Visual Studio Code will show a small popup at the bottom-right corner to import the folder as a Java project. If we missed it, we can open any Java source file to show it again.

3.2. Run and Debug the Project

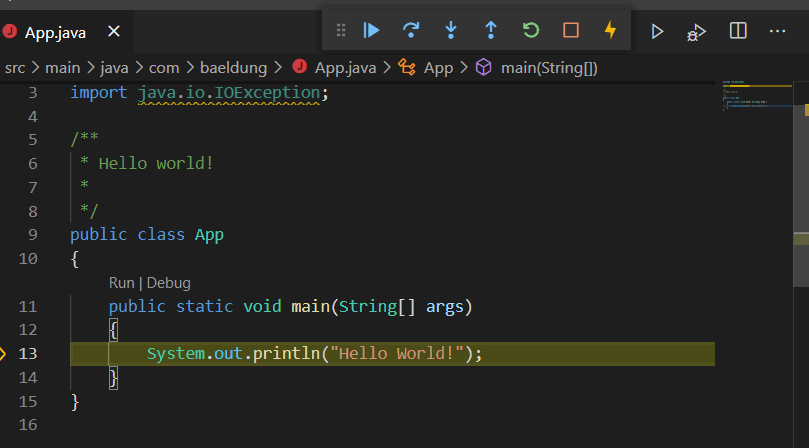
To run the project, we just have to press F5 (debug) or Ctrl-F5 (run). We can also use the Run|Debug shortcuts just above the main methods or the unit tests:

We can also see the debug toolbar at the top of the window to stop, rerun, or continue execution.
Then, the Terminal view at the bottom will show the output logs.

3.3. Manage Java Packages and Imports

The first pain point we'll notice is that Visual Studio Code does not provide dedicated features to create a class or package.

To create the whole directory structure of our package, we must first create a Java file and declare the required package at the top. After that, Visual Studio Code will show an error: we just have to roll over it to display the Quick Fix link. This link will create the appropriate directory structure if it doesn't exist.

However, the package management works like in other Java IDE: just press Ctrl+Space and it will propose, for example, to pick an existing class and import it on-the-fly. We can also use the quick fix popup to add missing imports or to remove unused ones.

3.4. Code Navigation and Auto-Completion

The most useful shortcuts to know are Ctrl+P to open a file and Ctrl+T to open a class or interface. Similar to other Java IDEs, we can navigate to a method call or a class implementation with Ctrl+click. There is also the Outline view from the sidebar, which helps us to navigate through large files.

The auto-completion is also working like in other IDEs: we just press Ctrl+space to display options. For example, we can see the possible implementations of an interface or the available methods and attributes of a class, including their Javadoc. The auto-completion can also generate a code snippet if we press Ctrl+space after statements like while, for, if, switch, or try.

However, we can't generate Javadoc for method arguments.

3.5. Compilation Errors and Warnings

We'll see compilation errors at first with underlined code. Unused variables are grayed-out, We can also display the full list of errors and warnings from the View > Problems menu. Both propose quick fixes for the basic ones.

4. Maven and Gradle Integration

4.1. Maven

If we choose to create a new Maven project, the Command Palette provides a large collection of Maven archetypes. Once we select one, we're prompted to pick the destination folder, and then the configuration takes place in an interactive terminal, not in a graphical wizard, like in other Java IDEs.

The Java import popup will be displayed first, then the Maven configuration will start. The extensions will use the global Maven client defined in our PATH variable. However, if the Maven Wrapper is configured in our project, a popup will let us choose if the wrapper should be used instead of the global Maven client.

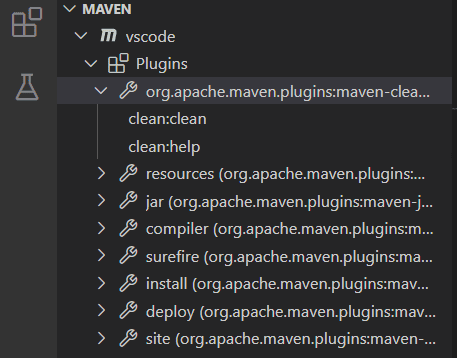
Then, from the Maven side-view, we'll see the Maven plugins and goals that can be launched:

If not, we need to check for errors in the following locations:

  • From the View > Problems menu, which contains every problem related to the pom.xml file and JDK compatibility problems
  • From the View > Output menu, select Maven For Java from the bottom-right list to show Maven client and wrapper problems

4.2. Gradle

To work with Gradle, we must install the Gradle Extension Pack from the Extensions panel. This extension manages projects only if Gradle Wrapper is configured.

After opening a Gradle project, we'll see the status bar at the bottom indicating the download and installation progress. We check if any error occurred by clicking this bar. We can also display the Output view and choose Gradle Tasks option from it.

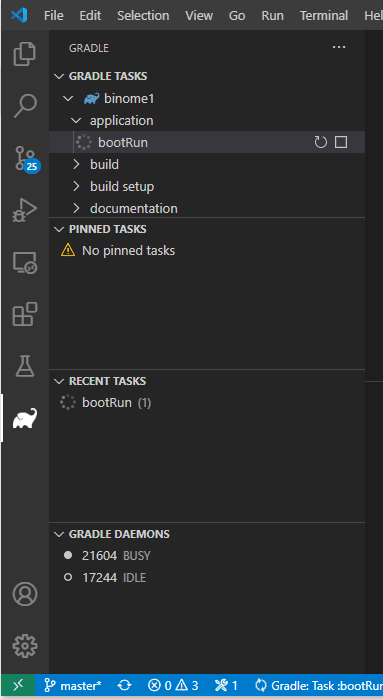
Then, we'll be able to see the Gradle elephant icon in the sidebar, which displays dedicated Gradle panels to control tasks:

If this icon is not shown, we have to check that our Gradle project is in a sub-directory. In this case, we have to enable the gradle.nestedProjects setting to discover it.

5. Strengths and Drawbacks

First, we have to admit that this lightweight editor offers fewer features than its counterparts: no wizard, Maven and Gradle integration is not very handy, and basic features are missing, such as tools to manage packages and dependencies. Visual Studio Code wasn't designed for Java, and that's something we can easily notice, especially if we're familiar with other Java IDEs.

However, core capabilities such as error detection and auto-completion are very complete, as they're using the Eclipse JDT language server. Moreover, the popularity of Visual Studio Code comes from its fast launch speed, its limited use of resources, and its better user experience.

6. Conclusion

In this article, we learned how to configure Visual Studio Code for Java, its supported features for this language, and saw its strengths and drawbacks.

In conclusion, if we're already familiar with Visual Studio Code, it can be a good editor to start learning Java. But if we're already advanced Java IDE users and satisfied to work with them, we might be disappointed to lose some of the comforts we've taken for granted.

The post How to Use Visual Studio Code with Java? first appeared on Baeldung.
       

Write Extracted Data to a File Using JMeter

$
0
0

1. Overview

In this tutorial, let's explore two methods to extract data from Apache JMeter and write it into an external file.

2. Setting up a Basic JMeter Script

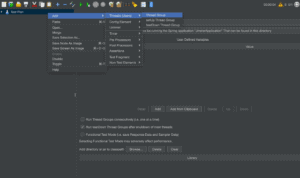
Let's now start by creating a basic JMeter script. Let's create a Thread Group with a single thread (this is the default when creating a Thread Group):

JMeter create thread group

Within this Thread Group, let's now create an HTTP Sampler:

JMeter create Http sampler

Let's set up our HTTP Sampler to call an API running on localhost. We can start by defining the API with a simple REST controller:

@RestController
public class RetrieveUuidController {
    @GetMapping("/api/uuid")
    public Response uuid() {
        return new Response(format("Test message... %s.", UUID.randomUUID()));
    }
}

In addition, let's also define the Response instance that is returned by our controller as referenced above:

public class Response {
    private Instant timestamp;
    private UUID uuid;
    private String message;
    // getters, setters, and constructor omitted
}

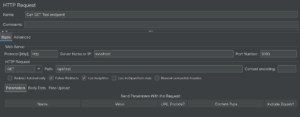
Let's now use this to test our JMeter script. By default, this will run on port 8080. If we're unable to use port 8080, then we'll need to update the Port Number field in the HTTP Sampler accordingly.

The HTTP Sampler request should look like this:

JMeter http sampler details

3. Writing the Extracted Output Using a Listener

Next, let's use a listener of type Save Responses to a file to extract the data we want to a file:

JMeter write listener

Using this listener is convenient but doesn't allow much flexibility in what we can extract to a file. For our case, this will produce a JSON file that is saved to the location where JMeter is currently running (though the path can be configured in the Filename Prefix field).

4. Writing the Extracted Output Using PostProcessor

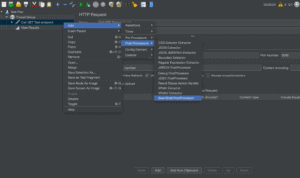
Another way we can extract data to a file is by creating a BeanShell PostProcessor. BeanShell is a very flexible scripting processor that allows us to write our script using Java code as well as make use of some built-in variables provided by JMeter.

BeanShell can be used for a variety of different use cases. In this case, let's create a BeanShell post-processor and add a script to help us extract some data to a file:

JMeter BeanShell PostProcessor

Let's now add the following script to the Script section:

FileWriter fWriter = new FileWriter("/<path>/result.txt", true);
BufferedWriter buff = new BufferedWriter(fWriter);
buff.write("data");
buff.close();
fWriter.close();

We now have a simple script that will output the string data to a file called result. One important point to note here is the 2nd parameter of the FileWriter constructor. This must be set to true so that our BeanShell will append to the file instead of overwriting it. This is very important when using multiple threads in JMeter.

Next, we want to extract something more meaningful to our use case. Let's make use of the ctx variable that is provided by JMeter. This will allow us to access the context held by our single thread that is running the HTTP request.

From ctx, let's get the response code, response headers, and response body and extract these to our file:

buff.write("Response Code : " + ctx.getPreviousResult().getResponseCode());
buff.write(System.getProperty("line.separator"));
buff.write("Response Headers : " + ctx.getPreviousResult().getResponseHeaders());
buff.write(System.getProperty("line.separator"));
buff.write("Response Body : " + new String(ctx.getPreviousResult().getResponseData()));

If we want to gather specific field data and write it to our file, we can make use of the vars variable. It is a map we can use in PostProcessors to store and retrieve string data.

For this more complex example, let's create another PostProcessor before our file extractor. This will do a search through the JSON response from the HTTP request:

JMeter JSON Exctractor

This extractor will create a variable called message. All that is left to do is to reference this variable in our file extractor to output it to our file:

buff.write("More complex extraction : " + vars.get("message"));

Note: We can use this approach in conjunction with other post-processors such as “Regular Expression Extractor” to gather information in a more bespoke manner.

5. Conclusion

In this tutorial, we covered how to extract data from JMeter to an external file using a BeanShell post-processor and a write listener. The JMeter Script and Spring REST application we used can be found over on GitHub.

The post Write Extracted Data to a File Using JMeter first appeared on Baeldung.
       

Optimizing HashMap’s Performance

$
0
0

1. Introduction

HashMap is a powerful data structure that has a broad application, especially when fast lookup time is needed. Yet, if we don't pay attention to details, it can get suboptimal.

In this tutorial, we'll take a look at how to make HashMap as fast as possible.

2. HashMap‘s Bottleneck

HashMap‘s optimistic constant time of element retrieval (O(1)) comes from the power of hashing. For each element, HashMap computes the hash code and puts the element in the bucket associated with that hash code. Because non-equal objects can have the same hash codes (a phenomenon called hash code collision), buckets can grow in size.

The bucket is actually a simple linked list. Finding elements in the linked list isn't very fast (O(n)) but that's not a problem if the list is very small. Problems start when we have a lot of hash code collisions, so instead of a big number of small buckets, we have a small number of big buckets.

In the worst-case scenario, in which we put everything inside one bucket, our HashMap is downgraded to a linked list. Consequently, instead of O(1) lookup time, we get a very unsatisfactory O(n).

3. Tree Instead of LinkedList

Starting from Java 8, one optimization is built-in in HashMapWhen buckets are getting too large, they're transformed into trees, instead of linked lists. That brings the pessimistic time of O(n) to O(log(n)), which is much better. For that to work, the keys of HashMap need to implement the Comparable interface.

That's a nice and automatic solution, but it's not perfect. O(log(n)) is still worse than desired constant time, and transforming and storing trees takes additional power and memory.

4. Best hashCode Implementation

There are two factors we need to take into consideration when choosing a hashing function: quality of produced hash codes and speed.

4.1. Measuring hashCode Quality

Hash codes are stored inside int variables, so the number of possible hashes is limited to the capacity of the int type. It must be so because hashes are used to compute indexes of an array with buckets. That means there's also a limited number of keys that we can store in a HashMap without hash collision.

To avoid collisions as long as we can, we want to spread hashes as evenly as possible. In other words, we want to achieve uniform distribution. That means that each hash code value has the same chance of occurring as any other.

Similarly, a bad hashCode method would have a very unbalanced distribution. In the very worst-case scenario, it would always return the same number.

4.2. Default Object‘s hashCode

In general, we shouldn't use the default Object's hashCode method because we don't want to use object identity in the equals method. However, in that very unlikely scenario in which we really want to use object identity for keys in a HashMap, the default hashCode function will work fine. Otherwise, we'll want a custom implementation.

4.3. Custom hashCode

Usually, we want to override the equals method, and then we also need to override hashCode. Sometimes, we can take advantage of the specific identity of the class and easily make a very fast hashCode method.

Let's say our object's identity is purely based on its integer id. Then, we can just use this id as a hash function:

@Override
public boolean equals(Object o) {
    if (this == o) return true;
    if (o == null || getClass() != o.getClass()) return false;
    MemberWithId that = (MemberWithId) o;
    return id.equals(that.id);
}
@Override
public int hashCode() {
    return id;
}

It will be extremely fast and won't produce any collisions. Our HashMap will behave like it has an integer key instead of a complex object.

The situation will get more complicated if we have more fields that we need to take into account. Let's say we want to base equality on both id and name:

@Override
public boolean equals(Object o) {
    if (this == o) return true;
    if (o == null || getClass() != o.getClass()) return false;
    MemberWithIdAndName that = (MemberWithIdAndName) o;
    if (!id.equals(that.id)) return false;
    return name != null ? name.equals(that.name) : that.name == null;
}

Now, we need to somehow combine hashes of id and name.

First, we'll get id‘s hash the same as before. Then, we'll multiple it by some carefully chosen number and add the name‘s hash:

@Override
public int hashCode() {
    int result = id.hashCode();
    result = PRIME * result + (name != null ? name.hashCode() : 0);
    return result;
}

How to choose that number isn't an easy question to answer sufficiently. Historically, the most popular number was 31. It's prime, it results in a good distribution, it's small, and multiplying by it can be optimized using a bit-shift operation:

31 * i == (i << 5) - i

However, now that we don't need to fight for every CPU cycle, some bigger primes can be used. For example, 524287 also can be optimized:

524287 * i == i << 19 - i

And, it may provide a hash of better quality resulting in a lesser chance of collision. Mind that these bit-shift optimizations are done automatically by the JVM, so we don't need to obfuscate our code with them.

4.4. Objects Utility Class

The algorithm we just implemented is well established, and we don't usually need to recreate it by hand every time. Instead, we can use the helper method provided by the Objects class:

@Override
public int hashCode() {
    return Objects.hash(id, name);
}

Under-the-hood, it uses exactly the algorithm described earlier with the number 31 as a multiplier.

4.5. Other Hash Functions

There are many hash functions that provide a lesser collision chance than the one described earlier. The problem is that they're computationally heavier and thus don't provide the speed gain we seek.

If for some reason we really need quality and don't care much for speed, we can take a look at the Hashing class from the Guava library:

@Override
public int hashCode() {
    HashFunction hashFunction = Hashing.murmur3_32();
    return hashFunction.newHasher()
      .putInt(id)
      .putString(name, Charsets.UTF_8)
      .hash().hashCode();
}

It's important to choose a 32-bit function because we can't store longer hashes anyway.

5. Conclusion

Modern Java's HashMap is a powerful and well-optimized data structure. Its performance can, however, be worsened by a badly designed hashCode method. In this tutorial, we looked at possible ways to make hashing fast and effective.

As always, the code examples for this article are available over on GitHub.

The post Optimizing HashMap’s Performance first appeared on Baeldung.
       

Java Deque vs. Stack

$
0
0

1. Overview

The Java Stack class implements the stack data structure. Java 1.6 introduced the Deque interface, which is for implementing a “double-ended queue” that supports element insertion and removal at both ends.

Now, we can use the Deque interface as a LIFO (Last-In-First-Out) stack as well. Moreover, if we have a look at the Javadoc of the Stack class, we'll see:

A more complete and consistent set of LIFO stack operations is provided by the Deque interface and its implementations, which should be used in preference to this class.

In this tutorial, we're going to compare the Java Stack class and the Deque interface. Further, we'll discuss why we should use Deque over Stack for LIFO stacks.

2. Class vs. Interface

Java's Stack is a Class:

public class Stack<E> extends Vector<E> { ... }

That is to say, if we want to create our own Stack type, we have to inherit the java.util.Stack class.

Since Java doesn't support multiple-inheritance, it can sometimes be hard to extend the Stack class if our class is already a subclass of another type:

public class UserActivityStack extends ActivityCollection { ... }

In the example above, the UserActivityStack class is a sub-class of an ActivityCollection class. Therefore, it cannot also extend the java.util.Stack class. To use the Java Stack class, we may need to redesign our data models.

On the other hand, Java's Deque is an interface:

public interface Deque<E> extends Queue<E> { ... }

We know a class can implement multiple interfaces in Java. Therefore, implementing an interface is more flexible than extending a class for inheritance.

For example, we can easily make our UserActivityStack implement the Deque interface:

public class UserActivityStack extends ActivityCollection implements Deque<UserActivity> { ... }

Therefore, from the object-oriented design point-of-view, the Deque interface brings us more flexibility than the Stack class.

3. synchronized Methods and Performance

We've seen that the Stack class is a subclass of java.util.Vector. The Vector class is synchronized. It uses the traditional way to achieve thread-safety: making its methods “synchronized.

As its subclass, the Stack class is synchronized as well.

On the other hand, the Deque interface is not thread-safe.

So, if thread-safety is not a requirement, a Deque can bring us better performance than a Stack.

4. Iteration Orders

Since both Stack and Deque are subtypes of the java.util.Collection interface, they are also Iterable.

However, what's interesting is that if we push the same elements in the same order into a Stack object and a Deque instance, their iteration orders are different.

Let's take a closer look at them through examples.

First, let's push some elements into a Stack object and check what its iteration order is:

@Test
void givenAStack_whenIterate_thenFromBottomToTop() {
    Stack<String> myStack = new Stack<>();
    myStack.push("I am at the bottom.");
    myStack.push("I am in the middle.");
    myStack.push("I am at the top.");
    Iterator<String> it = myStack.iterator();
    assertThat(it).toIterable().containsExactly(
      "I am at the bottom.",
      "I am in the middle.",
      "I am at the top.");
}

If we execute the test method above, it'll pass. It means, when we iterate over the elements in a Stack object, the order is from stack bottom to stack top.

Next, let's do the same test on a Deque instance. We'll take the ArrayDeque class as the Deque implementation in our test.

Also, we'll use the ArrayDeque as a LIFO stack:

@Test
void givenADeque_whenIterate_thenFromTopToBottom() {
    Deque<String> myStack = new ArrayDeque<>();
    myStack.push("I am at the bottom.");
    myStack.push("I am in the middle.");
    myStack.push("I am at the top.");
    Iterator<String> it = myStack.iterator();
    assertThat(it).toIterable().containsExactly(
      "I am at the top.",
      "I am in the middle.",
      "I am at the bottom.");
}

This test will pass as well if we give it a run.

Therefore, the iteration order of Deque is from top to bottom.

When we're talking about a LIFO stack data structure, the proper sequence of iterating over elements in the stack should be from top to bottom.

That is, Deque‘s iterator works the way we expect for a stack.

5. Invalid LIFO Stack Operations

A classic LIFO stack data structure supports only push(), pop(), and peek() operations. Both the Stack class and the Deque interface support them. So far, so good.

However, it's not allowed to access or manipulate elements by indexes in a LIFO stack since it breaks the LIFO rule.

In this section, let's see if we can call invalid stack operations with Stack and Deque.

5.1. The java.util.Stack Class

Since its parent Vector is an array-based data structure, the Stack class has the ability to access elements by indexes:

@Test
void givenAStack_whenAccessByIndex_thenElementCanBeRead() {
    Stack<String> myStack = new Stack<>();
    myStack.push("I am the 1st element."); //index 0
    myStack.push("I am the 2nd element."); //index 1
    myStack.push("I am the 3rd element."); //index 2
 
    assertThat(myStack.get(0)).isEqualTo("I am the 1st element.");
}

The test will pass if we run it.

In the test, we push three elements into a Stack object. After that, we want to access the element sitting at the bottom of the stack.

Following the LIFO rule, we have to pop all elements above to access the bottom element.

However, here, with the Stack object, we can just access an element by its index.

Moreover, with a Stack object, we can even insert and remove an element by its index. Let's create a test method to prove it:

@Test
void givenAStack_whenAddOrRemoveByIndex_thenElementCanBeAddedOrRemoved() {
    Stack<String> myStack = new Stack<>();
    myStack.push("I am the 1st element.");
    myStack.push("I am the 3rd element.");
    assertThat(myStack.size()).isEqualTo(2);
    myStack.add(1, "I am the 2nd element.");
    assertThat(myStack.size()).isEqualTo(3);
    assertThat(myStack.get(1)).isEqualTo("I am the 2nd element.");
    myStack.remove(1);
    assertThat(myStack.size()).isEqualTo(2);
}

The test will also pass if we give it a run.

Therefore, using the Stack class, we can manipulate elements in it just like working with an array. This has broken the LIFO contract.

5.2. The java.util.Deque Interface

Deque doesn't allow us to access, insert, or remove an element by its index. It sounds better than the Stack class.

However, since Deque is a “double-ended queue,” we can insert or remove an element from both ends.

In other words, when we use Deque as a LIFO stack, we can insert/remove an element to/from the bottom of the stack directly.

Let's build a test method to see how this happens. Again, we'll continue using the ArrayDeque class in our test:

@Test
void givenADeque_whenAddOrRemoveLastElement_thenTheLastElementCanBeAddedOrRemoved() {
    Deque<String> myStack = new ArrayDeque<>();
    myStack.push("I am the 1st element.");
    myStack.push("I am the 2nd element.");
    myStack.push("I am the 3rd element.");
    assertThat(myStack.size()).isEqualTo(3);
    //insert element to the bottom of the stack
    myStack.addLast("I am the NEW element.");
    assertThat(myStack.size()).isEqualTo(4);
    assertThat(myStack.peek()).isEqualTo("I am the 3rd element.");
    //remove element from the bottom of the stack
    String removedStr = myStack.removeLast();
    assertThat(myStack.size()).isEqualTo(3);
    assertThat(removedStr).isEqualTo("I am the NEW element.");
}

In the test, first, we insert a new element to the bottom of a stack using the addLast() method. If the insertion succeeds, we attempt to remove it with the removeLast() method.

If we execute the test, it passes.

Therefore, Deque doesn't obey the LIFO contract either.

5.3. Implementing a LifoStack Based on Deque

We can create a simple LifoStack interface to obey the LIFO contract:

public interface LifoStack<E> extends Collection<E> {
    E peek();
    E pop();
    void push(E item);
}

When we create implementations of our LifoStack interface, we can wrap Java standard Deque implementations.

Let's create an ArrayLifoStack class as an example to understand it quickly:

public class ArrayLifoStack<E> implements LifoStack<E> {
    private final Deque<E> deque = new ArrayDeque<>();
    @Override
    public void push(E item) {
        deque.addFirst(item);
    }
    @Override
    public E pop() {
        return deque.removeFirst();
    }
    @Override
    public E peek() {
        return deque.peekFirst();
    }
    // forward methods in Collection interface
    // to the deque object
    @Override
    public int size() {
        return deque.size();
    }
...
}

As the ArrayLifoStack class shows, it only supports the operations defined in our LifoStack interface and the java.util.Collection interface.

In this way, it won't break the LIFO rule.

6. Conclusion

Since Java 1.6, both java.util.Stack and java.util.Deque can be used as LIFO stacks. This article addressed the difference between these two types.

We've also analyzed why we should use the Deque interface over the Stack class to work with LIFO stacks.

Additionally, as we've discussed through examples, both Stack and Deque break the LIFO rule, more or less.

Finally, we've shown one way to create a stack interface obeying the LIFO contract.

As always, the complete source code is available over on GitHub.

The post Java Deque vs. Stack first appeared on Baeldung.
       

REST API: JAX-RS vs Spring

$
0
0

1. Overview

In this tutorial, we'll see the difference between JAX-RS and Spring MVC for REST API development.

2. Jakarta RESTful Web Services

To become part of the JAVA EE world, a feature must have a specification, a compatible implementation, and a TCK. Accordingly, JAX-RS is a set of specifications for building REST services. Its best-known reference implementations are RESTEasy and Jersey.

Now, let's get a little familiar with Jersey by implementing a simple controller:

@Path("/hello")
public class HelloController {
    @GET
    @Path("/{name}")
    @Produces(MediaType.TEXT_PLAIN)
    public Response hello(@PathParam("name") String name) {
        return Response.ok("Hello, " + name).build();
    }
}

Above, the endpoint returns a simple “text/plain” response as the annotation @Produces states. Particularly, we are exposing a hello HTTP resource that accepts a parameter called name with two @Path annotations. We also need to specify that it is a GET request, using the annotation @GET.

3. REST With Spring MVC

Spring MVC is a module of Spring Framework for creating web applications. It adds REST capability to Spring Framework.

Let's make the equivalent GET request example as above, using Spring MVC:

@RestController
@RequestMapping("/hello")
public class HelloController {
    @GetMapping(value = "/{name}", produces = MediaType.TEXT_PLAIN_VALUE)
    public ResponseEntity<?> hello(@PathVariable String name) {
        return new ResponseEntity<>("Hello, " + name, HttpStatus.OK);
    }
}

Looking at the code, @RequestMapping states that we're dealing with a hello HTTP resource. In particular, through the @GetMapping annotation, we're specifying that it is a GET request. It accepts a parameter called name and returns a “text/plain” response.

4. Differences

JAX-RS hinges on providing a set of Java Annotations and applying them to plain Java objects. Indeed, those annotations help us to abstract the low-level details of the client-server communication. To simplify their implementations, it offers annotations to handle HTTP requests and responses and bind them in the code. JAX-RS is only a specification and it needs a compatible implementation to be used.

On the other hand, Spring MVC is a complete framework with REST capabilities. Like JAX-RS, it also provides us with useful annotations to abstract from low-level details. Its main advantage is being a part of the Spring Framework ecosystem. Thus, it allows us to use dependency injection like any other Spring module. Furthermore, it integrates easily with other components like Spring AOP, Spring Data REST, and Spring Security.

5. Conclusion

In this quick article, we looked at the main differences between JAX-RS and Spring MVC.

As usual, the source code for this article is available over on GitHub.

The post REST API: JAX-RS vs Spring first appeared on Baeldung.
       

Java Weekly, Issue 374

$
0
0

1. Spring and Java

>> Optional.stream() [blog.frankel.ch]

Streaming optional values – simplifying optional pipelines by converting them to streams!

>> Initialization Strategies With Testcontainers For Integration Tests [rieckpil.de]

Setting up containers with TestContainers – executing commands, mounting files, init scripts, and prepopulating databases.

>> Faster Charset Decoding [cl4es.github.io]

Better decoding for Java 17: optimizing ASCII-compatible charset decoders for a 10x performance boost!

Also worth reading:

Webinars and presentations:

Time to upgrade:

2. Technical

>> Beyond REST [netflixtechblog.medium.com]

Rapid development for GraphQL microservices – documentation, graphile, database views as API, and many more!

Also worth reading:

3. Musings

>> Moving from Management to Enablement [morethancoding.com]

Becoming an effective enabler manager – clarifying the mission, autonomy delegation, responsibility audit, anti-patterns, and measurement.

Also worth reading: 

4. Comics

And my favorite Dilberts of the week:

>> Worst Place To Work [dilbert.com]

>> You Make Luck [dilbert.com]

>> Simulation Nonsense [dilbert.com]

5. Pick of the Week

>>  Maker's Schedule, Manager's Schedule [paulgraham.com]

The post Java Weekly, Issue 374 first appeared on Baeldung.
       

The java.security.egd JVM Option

$
0
0

1.Overview

When launching the Java Virtual Machine (JVM), there are various properties we can define that will alter how our JVM behaves. One such property is java.security.egd.

In this tutorial, we'll examine what it is, how to use it, and what effect it has.

2. What Is java.security.egd?

As a JVM property, we can use java.security.egd to affect how the SecureRandom class initializes.

Like all JVM properties, we declare it using the -D parameter in our command line when launching the JVM:

java -Djava.security.egd=file:/dev/urandom -cp . com.baeldung.java.security.JavaSecurityEgdTester

Typically, if we're running Java 8 or later and are running on Linux, then our JVM will use file:/dev/urandom by default.

3. What Effect Does java.security.egd Have?

When we make our first call to read bytes from SecureRandom we cause it to initialize and read the JVM's java.security configuration file. This file contains a securerandom.source property:

securerandom.source=file:/dev/random

Security Providers such as the default sun.security.provider.Sun read this property when initializing.

When we set our java.security.egd JVM property, the Security Provider may use it to override the one configured in securerandom.source.

Together, java.security.egd and securerandom.source control which entropy gathering device (EGD) will be used as the main source of seed data when we use SecureRandom to generate random numbers.

Up to Java 8, we find java.security in $JAVA_HOME/jre/lib/security, but in later implementations, it's in $JAVA_HOME/conf/security.

Whether or not the egd option has any effect depends on the Security Provider's implementation.

4. What Values Can java.security.egd Take?

We can specify java.security.egd in a URL format with values such as:

  • file:/dev/random
  • file:/dev/urandom
  • file:/dev/./urandom

Whether this setting has any effect, or any other value makes a difference, depends on the platform and the version of Java we're using, and how our JVM's security has been configured.

On Unix-based operating systems (OS), /dev/random is a special file path that appears in the filesystem as a normal file, but reads from it actually interact with the OS's device driver for random number generation. Some device implementations also provide access via /dev/urandom and even /dev/arandom URIs.

5. What's So Special About file:/dev/./urandom?

First, let's understand the difference between the files /dev/random and /dev/urandom:

  • /dev/random gathers entropy from various sources; /dev/random will block until it has enough entropy to satisfy our read request with unpredictable data
  • /dev/urandom will derive pseudo-randomness from whatever is available, without blocking.

When we first use SecureRandom, our default Sun SeedGenerator initializes.

When we use either of the special values file:/dev/random or file:/dev/urandom, we cause the Sun SeedGenerator to use a native (platform) implementation.

Provider implementations on Unix may block by still reading from /dev/random. In Java 1.4, some implementations were discovered to have this issue. The bug was subsequently fixed under Java 8's JDK Enhancement Proposal (JEP 123).

Using a URL such as file:/dev/./urandom, or any other value, causes the SeedGenerator to treat it as the URL to the seed source we want to use.

On Unix-like systems, our file:/dev/./urandom URL resolves to the same non-blocking /dev/urandom file.

However, we don't always want to use this value. On Windows, we don't have this file, so our URL fails to resolve. This triggers a final mechanism to generate randomness and can delay our initialization by around 5 seconds.

6. The Evolution Of SecureRandom

The effect of java.security.egd has changed through the various Java releases.

So, let's see some of the more significant events that impacted the behavior of SecureRandom:

Understanding how SecureRandom has changed gives us an insight into the likely effect of the java.security.egd property.

7. Testing the Effect of java.security.egd

The best way to be certain of the effect of a JVM property is to try it. So, let's see the effect of java.security.egd by running some code to create a new SecureRandom and timing how long it takes to get some random bytes.

First, let's create a JavaSecurityEgdTester class with a main() method. We'll time our call to secureRandom.nextBytes() using System.nanoTime() and display the results:

public class JavaSecurityEgdTester {
    public static final double NANOSECS = 1000000000.0;
    public static void main(String[] args) {
        SecureRandom secureRandom = new SecureRandom();
        long start = System.nanoTime();
        byte[] randomBytes = new byte[256];
        secureRandom.nextBytes(randomBytes);
        double duration = (System.nanoTime() - start) / NANOSECS;
        System.out.println("java.security.egd = " + System.getProperty("java.security.egd") + " took " + duration + " seconds and used the " + secureRandom.getAlgorithm() + " algorithm");
    }
}

Now, let's run a JavaSecurityEgdTester test by launching a new Java instance and specifying a value for the java.security.egd property:

java -Djava.security.egd=file:/dev/random -cp . com.baeldung.java.security.JavaSecurityEgdTester

Let's check the output to see how long our test took and which algorithm was used:

java.security.egd=file:/dev/random took 0.692 seconds and used the SHA1PRNG algorithm

Since our System Property is only read at initialization, let's launch our class in a new JVM for each different value of java.security.egd:

java -Djava.security.egd=file:/dev/urandom -cp . com.baeldung.java.security.JavaSecurityEgdTester
java -Djava.security.egd=file:/dev/./urandom -cp . com.baeldung.java.security.JavaSecurityEgdTester
java -Djava.security.egd=baeldung -cp . com.baeldung.java.security.JavaSecurityEgdTester

On Windows using Java 8 or Java 11, tests with the values file:/dev/random or file:/dev/urandom give sub-second times. Using anything else, such as file:/dev/./urandom, or even baeldung, makes our tests take over 5 seconds!

See our earlier section for an explanation of why this happens. On Linux, we might get different results.

8. What About SecureRandom.getInstanceStrong()?

Java 8 introduced a SecureRandom.getInstanceStrong() method. Let's see how that affects our results.

First, let's replace our new SecureRandom() with SecureRandom.getInstanceStrong():

SecureRandom secureRandom = SecureRandom.getInstanceStrong();

Now, let's run the tests again:

java -Djava.security.egd=file:/dev/random -cp . com.baeldung.java.security.JavaSecurityEgdTester

When run on Windows, the value of the java.security.egd property has no discernible effect when we use SecureRandom.getInstanceStrong(). Even an unrecognized value gives us a fast response.

Let's check our output again and notice the under 0.01 seconds time. Let's also observe that the algorithm is now Windows-PRNG:

java.security.egd=baeldung took 0.003 seconds and used the Windows-PRNG algorithm

Note that the PRNG in the names of the algorithms stands for Pseudo-Random Number Generator.

9. Seeding the Algorithm

Because random numbers are used heavily in cryptography for secure keys, they need to be unpredictable.

So, how we seed our algorithms directly affects the predictability of the random numbers they produce.

To generate unpredictability, SecureRandom implementations use entropy gathered from accumulated input to seed their algorithms. This comes from IO devices such as mice and keyboards.

On Unix-like systems, our entropy is accumulated in the file /dev/random.

There's no /dev/random file on Windows. Setting -Djava.security.egd to either file:/dev/random or file:/dev/urandom causes the default algorithm (SHA1PRNG) to seed using the native Microsoft Crypto API.

10. What About Virtual Machines?

Sometimes, our application may be running in a virtual machine that has little or no entropy gathering in /dev/random.

Virtual machines have no physical mouse or keyboard to generate data, so the entropy in /dev/random accumulates much more slowly. This may cause our default SecureRandom call to block until there is enough entropy for it to generate an unpredictable number.

There are steps we can take to mitigate this. When running a VM in RedHat Linux, for example, the system administrator can configure a virtual IO random number generator, virtio-rng. This reads entropy from the physical machine that it's hosted on.

11. Troubleshooting Tips

If our application hangs when it, or its dependencies, generates SecureRandom numbers, consider java.security.egd — in particular, when we run on Linux, and if we're running on pre-Java 8.

Our Spring Boot applications often use embedded Tomcat. This uses SecureRandoms to generate session keys. When we see Tomcat's “Creation of SecureRandom instance” operation taking 5 seconds or more, we should try different values for java.security.egd.

12. Conclusion

In this tutorial, we learned what the JVM property java.security.egd is, how to use it, and what effect it has. We also discovered that its effects can vary based on the platform we're running on, and the version of Java we're using.

As a final note, we can read more about SecureRandom and how it works in the SecureRandom section of the JCA Reference Guide and the SecureRandom API Specification and be aware of some of the myths about urandom.

As usual, the code can be found over on GitHub.

The post The java.security.egd JVM Option first appeared on Baeldung.
       

Introduction to ZeroCode

$
0
0

1. Overview

In this article, we will introduce the ZeroCode automated testing framework. We'll learn the fundamentals through an example of REST API testing.

2. The Approach

The ZeroCode framework takes the following approaches:

  • Multi-faceted testing support
  • The declarative style of testing

Let's discuss them both.

2.1. Multi-Faceted Testing Support

The framework is designed to support automated testing of multiple facets of our applications. Among other things, it gives us the ability to test:

  • REST
  • SOAP
  • Security
  • Load/Stress
  • Database
  • Apache Kafka
  • GraphQL
  • Open API Specifications

Testing is done via the framework's DSL that we will discuss shortly.

2.2. Declarative Style

ZeroCode uses a declarative style of testing, which means that we don't have to write actual testing code. We declare scenarios in JSON/YAML files, and the framework will ‘translate' them into test code behind-the-scenes. This helps us to concentrate on what we want to test instead of how to test it.

3. Setup

Let's add the Maven dependency in our pom.xml file:

 <dependency>
      <groupId>org.jsmart</groupId>
      <artifactId>zerocode-tdd</artifactId>
      <version>1.3.27</version>
      <scope>test</scope>
 </dependency>

The latest version is available on Maven Central. We can use Gradle as well. If we're using IntelliJ, we can download the ZeroCode plugin from Jetbrains Marketplace.

4. REST API testing

As we said above, ZeroCode can support testing multiple parts of our applications. In this article, we'll focus on REST API testing. For that reason, we'll create a small Spring Boot web app and expose a single endpoint:

@PostMapping
public ResponseEntity create(@RequestBody User user) {
    if (!StringUtils.hasText(user.getFirstName())) {
        return new ResponseEntity("firstName can't be empty!", HttpStatus.BAD_REQUEST);
    }
    if (!StringUtils.hasText(user.getLastName())) {
        return new ResponseEntity("lastName can't be empty!", HttpStatus.BAD_REQUEST);
    }
    user.setId(UUID.randomUUID().toString());
    users.add(user);
    return new ResponseEntity(user, HttpStatus.CREATED);
}

Let's see the User class that's referenced in our controller:

public class User {
    private String id;
    private String firstName;
    private String lastName;
    // standard getters and setters
}

When we create a user, we set a unique id and return the whole User object back to the client. The endpoint is reachable at the /api/users path. We'll be saving users in memory to keep things simple.

5. Writing a Scenario

The scenario plays a central role in ZeroCode. It consists of one or more steps, which are the actual things we want to test. Let's write a scenario with a single step that tests the successful path of user creation:

{
  "scenarioName": "test user creation endpoint",
  "steps": [
    {
      "name": "test_successful_creation",
      "url": "/api/users",
      "method": "POST",
      "request": {
        "body": {
          "firstName": "John",
          "lastName": "Doe"
        }
      },
      "verify": {
        "status": 201,
        "body": {
          "id": "$NOT.NULL",
          "firstName": "John",
          "lastName": "Doe"
        }
      }
    }
  ]
}

Let's explain what each of the properties represents:

  • scenarioName – This is the name of the scenario; we can use any name we want
  • steps – an array of JSON objects, where we describe what we want to test
    • name –  the name that we give to the step
    • url –  relative URL of the endpoint; we can also put an absolute URL, but generally, it's not a good idea
    • method – HTTP method
    • request – HTTP request
      • body – HTTP request body
    • verify – here, we verify/assert the response that the server returned
      • status – HTTP response status code
      • body (inside verify property) – HTTP response body

In this step, we check if user creation is successful. We check the firstName and lastName values that the server returns. Also, we verify that the id is not null with ZeroCode's assertion token.

Generally, we have more than one step in scenarios. Let's add another step inside our scenario's steps array:

{
  "name": "test_firstname_validation",
  "url": "/api/users",
  "method": "POST",
  "request": {
    "body": {
      "firstName": "",
      "lastName": "Doe"
    }
  },
  "verify": {
    "status": 400,
    "rawBody": "firstName can't be empty!"
  }
}

In this step, we supply an empty first name that should result in a bad request. Here, the response body will not be in JSON format, so we use the rawbody property to refer to it as a plain string.

ZeroCode can't directly run the scenario — for that, we need a corresponding test case.

6. Writing a Test Case

To execute our scenario, let's write a corresponding test case:

@RunWith(ZeroCodeUnitRunner.class)
@TargetEnv("rest_api.properties")
public class UserEndpointIT {
    @Test
    @Scenario("rest/user_create_test.json")
    public void test_user_creation_endpoint() {
    }
}

Here, we declare a method and mark it as a test using the @Test annotation from JUnit 4. We can use JUnit 5 with ZeroCode for load testing only.

We also specify the location of our scenario with the @Scenario annotation, which comes from the ZeroCode framework. The method body is empty. As we said, we don't write actual testing code. What we want to test is described in our scenario. We just reference the scenario in a test case method. Our UserEndpointIT class has two annotations:

  • @RunWith – here, we specify which ZeroCode class is responsible for running our scenarios
  • @TargetEnv – this points to the property file that will be used when our scenario runs

When we declared the url property above, we specified the relative path. Obviously, the ZeroCode framework needs an absolute path, so we create a rest_api.properties file with a few properties that define how our test should run:

  • web.application.endpoint.host – the host of REST API; In our case, it's http://localhost
  • web.application.endpoint.port – the port of the application server where our REST API is exposed; In our case, it's 8080
  • web.application.endpoint.context – the context of the API; in our case, it's empty

The properties that we declare in the property file depend on what kind of testing we're doing. For example, if we want to test a Kafka producer/consumer, we'll have different properties.

7. Executing a Test

We've created a scenario, property file, and test case. Now, we're ready to run our test. Since ZeroCode is an integration testing tool, we can leverage Maven's failsafe plugin:

<plugin>
    <groupId>org.apache.maven.plugins</groupId>
    <artifactId>maven-failsafe-plugin</artifactId>
    <version>3.0.0-M5</version>
    <dependencies>
        <dependency>
            <groupId>org.apache.maven.surefire</groupId>
            <artifactId>surefire-junit47</artifactId>
            <version>3.0.0-M5</version>
        </dependency>
    </dependencies>
    <executions>
        <execution>
            <goals>
                <goal>integration-test</goal>
                <goal>verify</goal>
            </goals>
        </execution>
    </executions>
</plugin>

To run the test, we can use the following command:

mvn verify -Dskip.it=false

 ZeroCode creates multiple types of logs that we can check out in the ${project.basedir}/target folder.

8. Conclusion

In this article, we took a look at the ZeroCode automated testing framework. We showed how the framework works with the example of REST API testing. We also learned that ZeroCode DSL eliminates the need for writing actual testing code.

As always, the source code of the article is available over on GitHub.

The post Introduction to ZeroCode first appeared on Baeldung.
       

Converting java.util.Properties to HashMap

$
0
0

1. Introduction

Many developers decide to store application parameters outside the source code. One of the ways to do so in Java is to use an external configuration file and read them via the java.util.Properties class.

In this tutorial, we'll focus on various approaches to convert java.util.Properties into a HashMap<String, String>. We'll implement different methods to achieve our goal, using plain Java, lambdas, or external libraries. Through examples, we'll discuss the pros and cons of each solution.

2. HashMap Constructor

Before we implement our first code, let's check the Javadoc for java.util.Properties. As we see, this utility class inherits from Hashtable<Object, Object>, which also implements the Map interface. Moreover, Java wraps its Reader and Writer classes to work directly on String values.

According to that information, we can convert Properties into HashMap<String, String> using typecasting and constructor calls.

Assuming that we've loaded our Properties correctly, we can implement:

public static HashMap<String, String> typeCastConvert(Properties prop) {
    Map step1 = prop;
    Map<String, String> step2 = (Map<String, String>) step1;
    return new HashMap<>(step2);
}

Here, we implement our conversion in three simple steps.

First, according to the inheritance graph, we need to cast our Properties into a raw Map. This action will force the first compiler warning, which can be disabled by using the @SuppressWarnings(“rawtypes”) annotation.

After that, we cast our raw Map into Map<String, String>, causingf another compiler warning, which can be omitted by using @SupressWarnings(“unchecked”).

Finally, we build our HashMap using the copy constructor. This is the fastest way to convert our Properties, but this solution also has a big disadvantage related to type safety: Our Properties might be compromised and modified before the conversion.

According to the documentation, the Properties class has the setProperty() and getProperty() methods that force the use of String values. But also there are put() and putAll() methods inherited from Hashtable that allow using any type as keys or values in our Properties:

properties.put("property4", 456);
properties.put(5, 10.11);
HashMap<String, String> hMap = typeCastConvert(properties);
assertThrows(ClassCastException.class, () -> {
    String s = hMap.get("property4");
});
assertEquals(Integer.class, ((Object) hMap.get("property4")).getClass());
assertThrows(ClassCastException.class, () -> {
    String s = hMap.get(5);
});
assertEquals(Double.class, ((Object) hMap.get(5)).getClass());

As we can see, our conversion executes without any error, but not all elements in the HashMap are strings. So, even if this method looks the easiest, we must keep in mind some safety-related checks in the future.

3. The Guava API

If we can use third-party libraries, the Google Guava API comes in handy. This library delivers a static Maps.fromProperties() method, which does almost everything for us. According to the documentation, this call returns an ImmutableMap, so if we want to have the HashMap, we can use:

public HashMap<String, String> guavaConvert(Properties prop) {
    return Maps.newHashMap(Maps.fromProperties(prop));
}

As previously, this method works fine when we're completely sure that the Properties contain only String values. Having some non-conforming values will lead to unexpected behavior:

properties.put("property4", 456);
assertThrows(NullPointerException.class, 
    () -> PropertiesToHashMapConverter.guavaConvert(properties));
properties.put(5, 10.11);
assertThrows(ClassCastException.class, 
    () -> PropertiesToHashMapConverter.guavaConvert(properties));

The Guava API doesn't perform any additional mappings. As a result, it doesn't allow us to convert those Properties, throwing exceptions.

In the first case, the NullPointerException is thrown due to the Integer value, which cannot be retrieved by the Properties.getProperty() method and, as a result, is interpreted as null. The second example throws the ClassCastException related to the non-string key occurring on the input property map.

This solution gives us better type control and also informs us of violations that occur during the conversion process.

4. Custom Type Safety Implementation

It's now time to resolve our type safety problems from the previous examples. As we know, the Properties class implements methods inherited from the Map interface. We'll use one of the possible ways of iterating over a Map to implement a proper solution and enrich it with type checks.

4.1. for-Loop Iteration

Let's implement a simple for-loop:

public HashMap<String, String> loopConvert(Properties prop) {
    HashMap<String, String> retMap = new HashMap<>();
    for (Map.Entry<Object, Object> entry : prop.entrySet()) {
        retMap.put(String.valueOf(entry.getKey()), String.valueOf(entry.getValue()));
    }
    return retMap;
}

In this method, we iterate over the Properties in the same way as we do for a typical Map. As a result, we have one-by-one access to every single key-pair value represented by the Map.Entry class.

Before putting values in a returned HashMap, we can perform additional checks, so we decide to use the String.valueOf() method.

4.2. Stream and Collectors API

We can even refactor our method using the modern Java 8 way:

public HashMap<String, String> streamConvert(Properties prop) {
    return prop.entrySet().stream().collect(
      Collectors.toMap(
        e -> String.valueOf(e.getKey()),
        e -> String.valueOf(e.getValue()),
        prev, next) -> next, HashMap::new
    ));
}

In this case, we're using Java 8 Stream Collectors without explicit HashMap construction. This method implements exactly the same logic introduced in the previous example.

Both solutions are slightly more complex because they require some custom implementation that the typecasting and Guava examples don't.

However, we have access to the values before putting them on the resulting HashMap, so we can implement additional checks or mappings:

properties.put("property4", 456);
properties.put(5, 10.11);
HashMap<String, String> hMap1 = loopConvert(properties);
HashMap<String, String> hMap2 = streamConvert(properties);
assertDoesNotThrow(() -> {
    String s1 = hMap1.get("property4");
    String s2 = hMap2.get("property4");
});
assertEquals("456", hMap1.get("property4"));
assertEquals("456", hMap2.get("property4"));
assertDoesNotThrow(() -> {
    String s1 = hMap1.get("property4");
    String s2 = hMap2.get("property4");
});
assertEquals("10.11", hMap1.get("5"));
assertEquals("10.11", hMap2.get("5"));
assertEquals(hMap2, hMap1);

As we can see, we solved our problems related to non-string values. Using this approach, we can manually adjust the mapping logic to achieve a proper implementation.

5. Conclusion

In this tutorial, we checked different approaches to convert java.util.Properties into a HashMap<String, String>.

We started with a typecasting solution that is perhaps the fastest conversion but also brings compiler warnings and potential type safety errors.

Then we took a look at a solution using Guava API, which resolves compiler warnings and brings some improvements for handling errors.

Finally, we implemented our custom methods, which deal with type safety errors and give us the most control.

All code snippets from this tutorial are available over on GitHub.

The post Converting java.util.Properties to HashMap first appeared on Baeldung.
       

Insert a Row in Excel Using Apache POI

$
0
0

1. Overview

Sometimes, we might need to manipulate Excel files in a Java application.

In this tutorial, we'll look specifically at inserting a new row between two rows in an Excel file using the Apache POI library.

2. Maven Dependency

First, we have to add the poi-ooxml Maven dependency to our pom.xml file:

<dependency>
    <groupId>org.apache.poi</groupId>
    <artifactId>poi-ooxml</artifactId>
    <version>5.0.0</version>
</dependency>

3. Inserting Rows Between Two Rows

3.1. Apache POI Related Classes

Apache POI is a collection of libraries — each one dedicated to manipulating a particular type of file. The XSSF library contains the classes for handling the xlsx Excel format. The figure below shows the Apache POI related interfaces and classes for manipulating xlsx Excel files:

3.2. Implementing the Row Insert

For inserting m rows in the middle of an existing Excel sheet, all the rows from the insertion point to the last row should be moved down by m rows.

First of all, we need to read the Excel file. For this step, we use the XSSFWorkbook class:

Workbook workbook = new XSSFWorkbook(fileLocation);

The second step is accessing the sheet in the workbook by using the getSheet() method:

Sheet sheet = workbook.getSheetAt(0);

The third step is shifting the rows, from the row currently positioned where we want to begin the insertion of new rows, through the last row of the sheet:

int lastRow = sheet.getLastRowNum(); 
sheet.shiftRows(startRow, lastRow, rowNumber, true, true);

In this step, we get the last row number by using the getLastRowNum() method and shift the rows using the shiftRows() method. This method shifts rows between startRow and lastRow by the size of rowNumber.

Finally, we insert the new rows by using the createRow() method:

sheet.createRow(startRow);

It's worth noting that the above implementation will keep the formatting of the rows being moved. Also, if there are hidden rows in the range we're moving, they move during the insertion of new rows.

3.3. Unit Test

Let's write a test case that reads a workbook in the resource directory, then inserts a row at position 2 and writes the content to a new Excel file. Finally, we assert the row number of the result file with the main file.

Let's define a test case:

public void givenWorkbook_whenInsertRowBetween_thenRowCreated() {
    int startRow = 2;
    int rowNumber = 1;
    Workbook workbook = new XSSFWorkbook(fileLocation);
    Sheet sheet = workbook.getSheetAt(0);
    int lastRow = sheet.getLastRowNum();
    if (lastRow < startRow) {
        sheet.createRow(startRow);
    }
    sheet.shiftRows(startRow, lastRow, rowNumber, true, true);
    sheet.createRow(startRow);
    FileOutputStream outputStream = new FileOutputStream(NEW_FILE_NAME);
    workbook.write(outputStream);
    File file = new File(NEW_FILE_NAME);
    final int expectedRowResult = 5;
    Assertions.assertEquals(expectedRowResult, workbook.getSheetAt(0).getLastRowNum());
    outputStream.close();
    file.delete();
    workbook.close();
}

4. Conclusion

In summary, we've learned how to insert a row between two rows in an Excel file using the Apache POI library. As always, the full source code of the article is available over on GitHub.

The post Insert a Row in Excel Using Apache POI first appeared on Baeldung.
       

A Quick Intro to the Kubernetes Java Client

$
0
0

1. Introduction

In this tutorial, we'll show how to use the Kubernetes API from Java applications using its official client library.

2. Why Use the Kubernetes API?

Nowadays, it is safe to say that Kubernetes became the de facto standard for managing containerized applications. It offers a rich API that allows us to deploy, scale and monitor applications and associated resources, such as storage, secrets, and environment variables. In fact, one way to think about this API is the distributed analog of the system calls available in a regular operating system.

Most of the time, our applications can ignore the fact that they're running under Kubernetes. This is a good thing, as it allows us to develop them locally and, with a few commands and YAML incantations, quickly deploy them to multiple cloud providers with just minor changes.

However, there are some interesting use cases where we need to talk to the Kubernetes API to achieve specific functionality:

  • Start an external program to perform some task and, later on, retrieve its completion status
  • Dynamically create/modify some service in response to some customer request
  • Create a custom monitoring dashboard for a solution running across multiple Kubernetes clusters, even across cloud providers

Granted, those use-cases are not that common but, thanks to its API, we'll see that they're quite straightforward to achieve.

Furthermore, since the Kubernetes API is an open specification, we can be quite confident that our code will run without any modifications on any certified implementation.

3. Local Development Environment

The very first thing we need to do before we move on to create an application is to get access to a functioning Kubernetes cluster. While we can either use a public cloud provider for this, a local environment usually provides more control on all the aspects of its setup.

There are a few lightweight distributions that are suitable for this task:

The actual setup steps are beyond the scope of this article but, whatever option you choose, just make sure kubectl runs fine before starting any development.

4. Maven Dependencies

First, let's add the Kubernetes Java API dependency to our project's pom.xml:

<dependency>
    <groupId>io.kubernetes</groupId>
    <artifactId>client-java</artifactId>
    <version>11.0.0</version>
</dependency>

The latest version of client-java can be downloaded from Maven Central.

5. Hello, Kubernetes

Now, let's create a very simple Kubernetes application that will list the available nodes, along with some information about them.

Despite its simplicity, this application illustrates the necessary steps we must go through to connect to a running cluster and perform an API call. Regardless of which API we use in a real application, those steps will always be the same.

5.1. ApiClient Initialization

The ApiClient class one of the most important classes in the API since it contains all the logic to perform a call to the Kubernetes API server. The recommended way to create an instance of this class is using one of the available static methods from the Config class. In particular, the easiest way of doing that is using the defaultClient() method:

ApiClient client = Config.defaultClient();

Using this method ensures that our code will work both remotely and in-cluster scenarios. Also, it will automatically follow the same steps used by the kubectl utility to locate the configuration file

  • Config file defined by KUBECONFIG environment variable
  • $HOME/.kube/config file
  • Service account token under /var/run/secrets/kubernetes.io/serviceaccount
  • Direct access to http://localhost:8080

The third step is the one that makes it possible for our app to run inside the cluster as part of any pod, as long the appropriate service account is made available to it.

Also, notice that if we have multiple contexts defined in the config file, this procedure will pick the “current” context, as defined using the kubectl config set-context command.

5.2. Creating an API Stub

Once we've got hold of an ApiClient instance, we can use it to create a stub for any of the available APIs. In our case, we'll use the CoreV1Api class, which contains the method we need to list the available nodes:

CoreV1Api api = new CoreV1Api(client);

Here, we're using the already existing ApiClient to create the API stub.

Notice that there's also a no-args constructor available, but in general, we should refrain from using it. The reasoning for not using it is the fact that, internally, it will use a global ApiClient that must be previously set through Configuration.setDefaultApiClient(). This creates an implicit dependency on someone calling this method before using the stub, which, in turn, may lead to runtime errors and maintenance issues.

A better approach is to use any dependency injection framework to do this initial wiring, injecting the resulting stub wherever needed.

5.3. Calling a Kubernetes API

Finally, let's get into the actual API call that returns the available nodes. The CoreApiV1 stub has a method that does precisely this, so this becomes trivial:

V1NodeList nodeList = api.listNode(null, null, null, null, null, null, null, null, 10, false);
nodeList.getItems()
  .stream()
  .forEach((node) -> System.out.println(node));

In our example, we pass null for most of the method's parameters, as they're optional. The last two parameters are relevant for all listXXX calls, as they specify the call timeout and whether this is a Watch call or not. Checking the method's signature reveals the remaining arguments:

public V1NodeList listNode(
  String pretty,
  Boolean allowWatchBookmarks,
  String _continue,
  String fieldSelector,
  String labelSelector,
  Integer limit,
  String resourceVersion,
  String resourceVersionMatch,
  Integer timeoutSeconds,
  Boolean watch) {
    // ... method implementation
}

For this quick intro, we'll just ignore the paging, watch and filter arguments. The return value, in this case, is a POJO with a Java representation of the returned document. For this API call, the document contains a list of V1Node objects with several pieces of information about each node. Here's a typical output produced on the console by this code:

class V1Node {
    metadata: class V1ObjectMeta {
        labels: {
            beta.kubernetes.io/arch=amd64,
            beta.kubernetes.io/instance-type=k3s,
            // ... other labels omitted
        }
        name: rancher-template
        resourceVersion: 29218
        selfLink: null
        uid: ac21e09b-e3be-49c3-9e3a-a9567b5c2836
    }
    // ... many fields omitted
    status: class V1NodeStatus {
        addresses: [class V1NodeAddress {
            address: 192.168.71.134
            type: InternalIP
        }, class V1NodeAddress {
            address: rancher-template
            type: Hostname
        }]
        allocatable: {
            cpu=Quantity{number=1, format=DECIMAL_SI},
            ephemeral-storage=Quantity{number=18945365592, format=DECIMAL_SI},
            hugepages-1Gi=Quantity{number=0, format=DECIMAL_SI},
            hugepages-2Mi=Quantity{number=0, format=DECIMAL_SI},
            memory=Quantity{number=8340054016, format=BINARY_SI}, 
            pods=Quantity{number=110, format=DECIMAL_SI}
        }
        capacity: {
            cpu=Quantity{number=1, format=DECIMAL_SI},
            ephemeral-storage=Quantity{number=19942490112, format=BINARY_SI}, 
            hugepages-1Gi=Quantity{number=0, format=DECIMAL_SI}, 
            hugepages-2Mi=Quantity{number=0, format=DECIMAL_SI}, 
            memory=Quantity{number=8340054016, format=BINARY_SI}, 
            pods=Quantity{number=110, format=DECIMAL_SI}}
        conditions: [
            // ... node conditions omitted
        ]
        nodeInfo: class V1NodeSystemInfo {
            architecture: amd64
            kernelVersion: 4.15.0-135-generic
            kubeProxyVersion: v1.20.2+k3s1
            kubeletVersion: v1.20.2+k3s1
            operatingSystem: linux
            osImage: Ubuntu 18.04.5 LTS
            // ... more fields omitted
        }
    }
}

As we can see, there's quite a lot of information available. For comparison, this is the equivalent kubectl output with default settings:

root@rancher-template:~# kubectl get nodes
NAME               STATUS   ROLES                  AGE   VERSION
rancher-template   Ready    control-plane,master   24h   v1.20.2+k3s1

6. Conclusion

In this article, we've presented a quick intro to the Kubernetes API for Java. In future articles, we'll dig deeper into this API and explore some of its additional features:

  • Explain the difference between the available API call variants
  • Using Watch to monitor cluster events in realtime
  • How to use paging to efficiently retrieve a large volume of data from a cluster

As usual, the full source code of the examples can be found over on GitHub.

The post A Quick Intro to the Kubernetes Java Client first appeared on Baeldung.
       

Spring @EntityScan vs. @ComponentScan

$
0
0

1. Introduction

When writing our Spring application we might need to specify a certain list of packages that contain our entity classes. Similarly, at some point, we would need only a specific list of our Spring beans to be initialized. This is where we can make use of @EntityScan or @ComponentScan annotations.

To clarify the terms we use here, components are classes with @Controller, @Service, @Repository, @Component, @Bean, etc. annotations. Entities are classes marked with @Entity annotation.

In this short tutorial, we'll discuss the usage of @EntityScan and @ComponentScan in Spring, explain what are they used for, and then point out their differences.

2. The @EntityScan Annotation

When writing our Spring application we will usually have entity classes – those annotated with @Entity annotation. We can consider two approaches to placing our entity classes:

  • Under the application main package or its sub-packages
  • Use a completely different root package

In the first scenario, we could use @EnableAutoConfiguration to enable Spring to auto-configure the application context.

In the second scenario, we would provide our application with the information where these packages could be found. For this purpose, we would use @EntityScan.

@EntityScan annotation is used when entity classes are not placed in the main application package or its sub-packages. In this situation, we would declare the package or list of packages in the main configuration class within @EntityScan annotation. This will tell Spring where to find entities used in our application:

@Configuration
@EntityScan("com.baeldung.demopackage")
public class EntityScanDemo {
    // ...
}

We should be aware that using @EntityScan will disable Spring Boot auto-configuration scanning for entities.

3. @ComponentScan Annotation

Similar to @EntityScan and entities, if we want Spring to use only a specific set of bean classes, we would use @ComponentScan annotation. It'll point to the specific location of bean classes we would want Spring to initialize.

This annotation could be used with or without parameters. Without parameters, Spring will scan the current package and its sub-packages, while, when parameterized, it'll tell Spring where exactly to search for packages.

Concerning parameters, we can provide a list of packages to be scanned (using basePackages parameter) or we can name specific classes where packages they belong to will also be scanned (using basePackageClasses parameter).

Let's see an example of @ComponentScan annotation usage:

@Configuration
@ComponentScan(
  basePackages = {"com.baeldung.demopackage"}, 
  basePackageClasses = DemoBean.class)
public class ComponentScanExample {
    // ...
}

4. @EntityScan vs. @ComponentScan

In the end, we can say that these two annotations are intended for completely different purposes.

Their similarity is that they both contribute to our Spring application configuration. @EntityScan should specify which packages do we want to scan for entity classes. On the other hand, @ComponentScan is a choice when specifying which packages should be scanned for Spring beans.

5. Conclusion

In this short tutorial, we discussed the usage of @EntityScan and @ComponentScan annotations and also pointed to their differences.

The post Spring @EntityScan vs. @ComponentScan first appeared on Baeldung.
       

Invoking a Private Method in Java

$
0
0

1. Overview

While methods are made private in Java to prevent them from being called from outside the owning class, we may still need to invoke them for some reason.

To achieve this, we need to work around Java's access controls. This may help us reach a corner of a library or allow us to test some code that should normally remain private.

In this short tutorial, we'll look at how we can verify the functionality of a method regardless of its visibility. We'll consider two different approaches: the Java Reflection API and Spring's ReflectionTestUtils.

2. Visibility Out of Our Control

For our example, let's use a utility class LongArrayUtil that operates on long arrays. Our class has two indexOf methods:

public static int indexOf(long[] array, long target) {
    return indexOf(array, target, 0, array.length);
}
private static int indexOf(long[] array, long target, int start, int end) {
    for (int i = start; i < end; i++) {
        if (array[i] == target) {
            return i;
        }
    }
    return -1;
}

Let's assume that the visibility of these methods cannot be changed, and yet we want to call the private indexOf method.

3. Java Reflection API

3.1. Finding the Method with Reflection

While the compiler prevents us from calling a function that is not visible to our class, we can invoke functions via reflection. First, we need to access the Method object that describes the function we want to call:

Method indexOfMethod = LongArrayUtil.class.getDeclaredMethod(
  "indexOf", long[].class, long.class, int.class, int.class);

We have to use getDeclaredMethod in order to access non-private methods. We call it on the type that has the function, in this case, LongArrayUtil, and we pass in the types of the parameters to identify the correct method.

The function may fail and throw an exception if the method does not exist.

3.2. Allow the Method to be Accessed

Now we need to elevate the method's visibility temporarily:

indexOfMethod.setAccessible(true);

This change will last until the JVM stops, or the accessible property is set back to false.

3.3. Invoke the Method with Reflection

Finally, we call invoke on the Method object:

int value = (int) indexOfMethod.invoke(
  LongArrayUtil.class, someLongArray, 2L, 0, someLongArray.length);

We have now successfully accessed a private method.

The first argument to invoke is the target object, and the remaining arguments need to match our method's signature. As in this case, our method is static, and the target object is the parent class – LongArrayUtil. For calling instance methods, we'd pass the object whose method we're calling.

We should also note that invoke returns Object, which is null for void functions, and which needs casting to the right type in order to use it.

4. Spring ReflectionTestUtils

Reaching internals of classes is a common problem in testing. Spring's test library provides some shortcuts to help unit tests reach classes. This often solves problems specific to unit tests, where a test needs to access a private field which Spring might instantiate at runtime.

First, we need to add the spring-test dependency in our pom.xml:

<dependency>
    <groupId>org.springframework</groupId>
    <artifactId>spring-test</artifactId>
    <version>5.3.4</version>
    <scope>test</scope>
</dependency>

Now we can use the invokeMethod function in ReflectionTestUtils, which uses the same algorithm as above, and saves us writing as much code:

int value = ReflectionTestUtils.invokeMethod(
  LongArrayUtil.class, "indexOf", someLongArray, 1L, 1, someLongArray.length);

As this is a test library, we wouldn't expect to use this outside of test code.

5. Considerations

Using reflection to bypass function visibility comes with some risks and may not even be possible. We ought to consider:

  • Whether the Java Security Manager will allow this in our runtime
  • Whether the function we're calling, without compile-time checking, will continue to exist for us to call in the future
  • Refactoring our own code to make things more visible and accessible

6. Conclusion

In this article, we looked at how to access private methods using the Java Reflection API and using Spring's ReflectionTestUtils.

As always, the example code for this article can be found over on GitHub.

The post Invoking a Private Method in Java first appeared on Baeldung.
       

Java Weekly, Issue 375

$
0
0

1. Spring and Java

>> Monitoring Deserialization to Improve Application Security [inside.java]

Meet JFR deserialization event – a new addition in Java 17 to monitor deserialization events in a Java application.

>> Welcome 20% less memory usage for G1 remembered sets [tschatzl.github.io]

Aiming for G1GC with better memory usage – reducing the remembered set footprint by 20%!

>> Creating and Analyzing Java Heap Dumps [reflectoring.io]

Investigating memory problems by taking a memory snapshot from a running JVM instance!

Also worth reading:

Webinars and presentations:

Time to upgrade:

2. Technical

>> Merge Join Algorithm [vladmihalcea.com]

Sort and merge using Merge Join – an efficient algorithm to join tables on indexed columns.

Also worth reading:

3. Musings

>> Do I Make Myself Clear? [blogs.vmware.com]

Words matter – the importance of good words on communication, inclusion, and respect.

Also worth reading:

4. Comics

And my favorite Dilberts of the week:

>> Remote Workforce [dilbert.com]

>> Destroy The Competition [dilbert.com]

>> Feedback To Boss [dilbert.com]

5. Pick of the Week

Finally announcing a new course focused on Spring Data JPA:

>> Learn Spring Data JPA

As with all of my courses, the intro-level pricing will only be available during the launch – so, it will go up at the end of next week.

The post Java Weekly, Issue 375 first appeared on Baeldung.
       

Adding Interceptors in OkHTTP

$
0
0

1. Overview

Typically when managing the request and response cycle of the HTTP requests in our web applications, we'll want a way to tap into this chain. Usually, this is to add some custom behaviour before we fulfil our requests or simply after our servlet code has completed.

OkHttp is an efficient HTTP & HTTP/2 client for Android and Java applications. In a previous tutorial, we looked at the basics of how to work with OkHttp.

In this tutorial, we'll learn all about how we can intercept our HTTP request and response objects.

2. Interceptors

As the name suggests, interceptors are pluggable Java components that we can use to intercept and process requests before they are sent to our application code.

Likewise, they provide a powerful mechanism for us to process the server response before the container sends the response back to the client.

This is particularly useful when we want to change something in an HTTP request, like adding a new control header, changing the body of our request, or simply producing logs to help us debug.

Another nice feature of using interceptors is that they let us encapsulate common functionality in one place. Let's imagine we want to apply some logic globally to all our request and response objects, such as error handling.

There are at least a couple of advantages of putting this kind of logic into an interceptor:

  • We only need to maintain this code in one place rather than all of our endpoints
  • Every request made deals with the error in the same way

Finally, we can also monitor, rewrite, and retry calls from our interceptors as well.

3. Common Usage

Some other common tasks when an inceptor might be an obvious choice include:

  • Logging request parameters and other useful information
  • Adding authentication and authorization headers to our requests
  • Formatting our request and response bodies
  • Compressing the response data sent to the client
  • Altering our response headers by adding some cookies or extra header information

We'll see a few examples of these in action in the proceeding sections.

4. Dependencies

Of course, we'll need to add the standard okhttp dependency to our pom.xml:

<dependency>
    <groupId>com.squareup.okhttp3</groupId>
    <artifactId>okhttp</artifactId>
    <version>4.9.1</version>
</dependency>

We'll also need another dependency specifically for our tests. Let's add the OkHttp mockwebserver artifact:

<dependency>
    <groupId>com.squareup.okhttp3</groupId>
    <artifactId>mockwebserver</artifactId>
    <version>4.9.1</version>
    <scope>test</scope>
</dependency>

Now that we have all the necessary dependencies configured, we can go ahead and write our first interceptor.

5. Defining a Simple Logging Interceptor

Let's start by defining our own interceptor. To keep things really simple, our interceptor will log the request headers and the request URL:

public class SimpleLoggingInterceptor implements Interceptor {
    private static final Logger LOGGER = LoggerFactory.getLogger(SimpleLoggingInterceptor.class);
    @Override
    public Response intercept(Chain chain) throws IOException {
        Request request = chain.request();
        LOGGER.info("Intercepted headers: {} from URL: {}", request.headers(), request.url());
        return chain.proceed(request);
    }
}

As we can see, to create our interceptor, all we need to is inherit from the Interceptor interface, which has one mandatory method intercept(Chain chain). Then we can go ahead and override this method with our own implementation.

First, we get the incoming request by called chain.request() before printing out the headers and request URL.

It is important to note that a critical part of every interceptor’s implementation is the call to chain.proceed(request).

This simple-looking method is where we signal that we want to hit our application code, producing a response to satisfy the request.

5.1. Plugging It Together

To actually make use of this interceptor, all we need to do is call the addInterceptor method when we build our OkHttpClient instance, and it should just work:

OkHttpClient client = new OkHttpClient.Builder() 
  .addInterceptor(new SimpleLoggingInterceptor())
  .build();

We can continue to call the addInterceptor method for as many interceptors as we require. Just remember that they will be called in the order they added.

5.2. Testing the Interceptor

Now, we have defined our first interceptor; let's go ahead and write our first integration test:

@Rule
public MockWebServer server = new MockWebServer();
@Test
public void givenSimpleLogginInterceptor_whenRequestSent_thenHeadersLogged() throws IOException {
    server.enqueue(new MockResponse().setBody("Hello Baeldung Readers!"));
        
    OkHttpClient client = new OkHttpClient.Builder()
      .addInterceptor(new SimpleLoggingInterceptor())
      .build();
    Request request = new Request.Builder()
      .url(server.url("/greeting"))
      .header("User-Agent", "A Baeldung Reader")
      .build();
    try (Response response = client.newCall(request).execute()) {
        assertEquals("Response code should be: ", 200, response.code());
        assertEquals("Body should be: ", "Hello Baeldung Readers!", response.body().string());
    }
}

First of all, we are using the OkHttp MockWebServer JUnit rule.

This is a lightweight, scriptable web server for testing HTTP clients that we're going to use to test our interceptors. By using this rule, we'll create a clean instance of the server for every integration test.

With that in mind, let's now walk through the key parts of our test:

  • First of all, we set up a mock response that contains a simple message in the body
  • Then, we build our OkHttpClient and configure our SimpleLoggingInterceptor
  • Next, we set up the request we are going to send with one User-Agent header
  • The last step is to send the request and verify the response code and body received is as expected

5.3. Running the Test

Finally, when we run our test, we'll see our HTTP User-Agent header logged:

16:07:02.644 [main] INFO  c.b.o.i.SimpleLoggingInterceptor - Intercepted headers: User-Agent: A Baeldung Reader
 from URL: http://localhost:54769/greeting

5.4. Using the Built-in HttpLoggingInterceptor

Although our logging interceptor demonstrates well how we can define an interceptor, it's worth mentioning that OkHttp has a built-in logger that we can take advantage of.

In order to use this logger, we need an extra Maven dependency:

<dependency>
    <groupId>com.squareup.okhttp3</groupId>
    <artifactId>logging-interceptor</artifactId>
    <version>4.9.1</version>
</dependency>

Then we can go ahead and instantiate our logger and define the logging level we are interested in:

HttpLoggingInterceptor logger = new HttpLoggingInterceptor();
logger.setLevel(HttpLoggingInterceptor.Level.HEADERS);

In this example, we are only interested in seeing the headers.

6. Adding a Custom Response Header

Now that we understand the basics behind creating interceptors. Let's now take a look at another typical use case where we modify one of the HTTP response headers.

This can be useful if we want to add our own proprietary application HTTP header or rewrite one of the headers coming back from our server:

public class CacheControlResponeInterceptor implements Interceptor {
    @Override
    public Response intercept(Chain chain) throws IOException {
        Response response = chain.proceed(chain.request());
        return response.newBuilder()
          .header("Cache-Control", "no-store")
          .build();
    }
}

As before, we call the chain.proceed method but this time without using the request object beforehand. When the response comes back, we use it to create a new response and set the Cache-Control header to no-store.

In reality, it's unlikely we'll want to tell the browser to pull from the server each time, but we can use this approach to set any header in our response.

7. Error Handling Using Interceptors

As mentioned previously, we can also use interceptors to encapsulate some logic that we want to apply globally to all our request and response objects, such as error handling.

Let's imagine we want to return a lightweight JSON response with the status and message when the response is not an HTTP 200 response.

With that in mind, we'll start by defining a simple bean for holding the error message and status code:

public class ErrorMessage {
    private final int status;
    private final String detail;
    public ErrorMessage(int status, String detail) {
        this.status = status;
        this.detail = detail;
    }
    
    // Getters and setters
}

Next, we'll create our interceptor:

public class ErrorResponseInterceptor implements Interceptor {
    
    public static final MediaType APPLICATION_JSON = MediaType.get("application/json; charset=utf-8");
    @Override
    public Response intercept(Chain chain) throws IOException {
        Response response = chain.proceed(chain.request());
        
        if (!response.isSuccessful()) {
            Gson gson = new Gson();
            String body = gson.toJson(
              new ErrorMessage(response.code(), "The response from the server was not OK"));
            ResponseBody responseBody = ResponseBody.create(body, APPLICATION_JSON);
            
            return response.newBuilder().body(responseBody).build();
        }
        return response;
    }
}

Quite simply, our interceptor checks to see if the response was successful and if it wasn't, creates a JSON response containing the response code and a simple message:

{
    "status": 500,
    "detail": "The response from the server was not OK"
}

8. Network Interceptors

So far, the interceptors we have covered are what OkHttp refers to as Application Interceptors. However, OkHttp also has support for another type of interceptor called Network Interceptors.

We can define our network interceptors in exactly the same way as explained previously. However, we'll need to call the addNetworkInterceptor method when we create our HTTP client instance:

OkHttpClient client = new OkHttpClient.Builder()
  .addNetworkInterceptor(new SimpleLoggingInterceptor())
  .build();

Some of the important differences between application and network inceptors include:

  • Application interceptors are always invoked once, even if the HTTP response is served from the cache
  • A network interceptor hooks into the network level and is an ideal place to put retry logic
  • Likewise, we should consider using a network interceptor when our logic doesn't rely on the actual content of the response
  • Using a network interceptor gives us access to the connection that carries the request, including information like the IP address and TLS configuration that was used to connect to the webserver.
  • Application interceptors don’t need to worry about intermediate responses like redirects and retries
  • On the contrary, a network interceptor might be invoked more than once if we have a redirection in place

As we can see, both options have their own merits. So it really depends on our own particular use case for which one we'll choose.

However, more often than not, application interceptors will do the job just fine.

9. Conclusion

In this article, we've learned all about how to create interceptors using OkHttp. First, we began by explaining what an interceptor is and how we can define a simple logging interceptor to inspect our HTTP request headers.

Then we saw how to set a header and also a different body into our response objects. Finally, we took a quick look at some of the differences between application and network interceptors.

As always, the full source code of the article is available over on GitHub.

The post Adding Interceptors in OkHTTP first appeared on Baeldung.
       

A Guide to SAML with Spring Security

$
0
0

1. Overview

In this tutorial, we'll explore Spring Security SAML with Okta as an identity provider (IdP).

2. What Is SAML?

Security Assertion Markup Language (SAML) is an open standard that allows an IdP to securely send the user's authentication and authorization details to the Service Provider (SP). It uses XML-based messages for the communication between the IdP and the SP.

In other words, when a user attempts to access a service, he's required to log in with the IdP. Once logged in, the IdP sends the SAML attributes with authorization and authentication details in the XML format to the SP.

Apart from providing a secured authentication-transmission mechanism, SAML also promotes Single Sign-On (SSO), allowing users to log in once and reuse the same credentials to log into other service providers.

3. Okta SAML Setup

First, as a prerequisite, we should set up an Okta developer account.

3.1. Create New Application

Then, we'll create a new Web application integration with SAML 2.0 support:

Next, we'll fill in the general information like App name and App logo:

3.2. Edit SAML Integration

In this step, we'll provide SAML settings like SSO URL and Audience URI:

Last, we can provide feedback about our integration:

3.3. View Setup Instructions

Once finished, we can view setup instructions for our Spring Boot App:

Note: we should copy the instructions like IdP Issuer URL and IdP metadata XML that will be required further in the Spring Security configurations:

4. Spring Boot Setup

Other than usual Maven dependencies like spring-boot-starter-web and spring-boot-starter-security, we'll require the spring-security-saml2-core dependency:

<dependency>
    <groupId>org.springframework.boot</groupId>
    <artifactId>spring-boot-starter-web</artifactId>
    <version>2.4.2</version>
</dependency>
<dependency>
    <groupId>org.springframework.boot</groupId>
    <artifactId>spring-boot-starter-security</artifactId>
    <version>2.4.2</version>
</dependency>
<dependency>
    <groupId>org.springframework.security.extensions</groupId>
    <artifactId>spring-security-saml2-core</artifactId>
    <version>1.0.10.RELEASE</version>
</dependency>

Also, make sure to add the Shibboleth repository to download the latest opensaml jar required by the spring-security-saml2-core dependency:

<repository>
    <id>Shibboleth</id>
    <name>Shibboleth</name>
    <url>https://build.shibboleth.net/nexus/content/repositories/releases/</url>
</repository>

Alternatively, we can set up the dependencies in a Gradle project:

compile group: 'org.springframework.boot', name: 'spring-boot-starter-web', version: "2.4.2" 
compile group: 'org.springframework.boot', name: 'spring-boot-starter-security', version: "2.4.2"
compile group: 'org.springframework.security.extensions', name: 'spring-security-saml2-core', version: "1.0.10.RELEASE"

5. Spring Security Configuration

Now that we have Okta SAML Setup and Spring Boot project ready, let's start with the Spring Security configurations required for SAML 2.0 integration with Okta.

5.1. SAML Entry Point

First, we'll create a bean of the SAMLEntryPoint class that will work as an entry point for SAML authentication:

@Bean
public WebSSOProfileOptions defaultWebSSOProfileOptions() {
    WebSSOProfileOptions webSSOProfileOptions = new WebSSOProfileOptions();
    webSSOProfileOptions.setIncludeScoping(false);
    return webSSOProfileOptions;
}
@Bean
public SAMLEntryPoint samlEntryPoint() {
    SAMLEntryPoint samlEntryPoint = new SAMLEntryPoint();
    samlEntryPoint.setDefaultProfileOptions(defaultWebSSOProfileOptions());
    return samlEntryPoint;
}

Here, the WebSSOProfileOptions bean allows us to set up parameters of the request sent from SP to IdP asking for user authentication.

5.2. Login and Logout

Next, let's create a few filters for our SAML URIs like /discovery, /login, and /logout:

@Bean
public FilterChainProxy samlFilter() throws Exception {
    List<SecurityFilterChain> chains = new ArrayList<>();
    chains.add(new DefaultSecurityFilterChain(new AntPathRequestMatcher("/saml/SSO/**"),
        samlWebSSOProcessingFilter()));
    chains.add(new DefaultSecurityFilterChain(new AntPathRequestMatcher("/saml/discovery/**"),
        samlDiscovery()));
    chains.add(new DefaultSecurityFilterChain(new AntPathRequestMatcher("/saml/login/**"),
        samlEntryPoint));
    chains.add(new DefaultSecurityFilterChain(new AntPathRequestMatcher("/saml/logout/**"),
        samlLogoutFilter));
    chains.add(new DefaultSecurityFilterChain(new AntPathRequestMatcher("/saml/SingleLogout/**"),
        samlLogoutProcessingFilter));
    return new FilterChainProxy(chains);
}

Then, we'll add a few corresponding filters and handlers:

@Bean
public SAMLProcessingFilter samlWebSSOProcessingFilter() throws Exception {
    SAMLProcessingFilter samlWebSSOProcessingFilter = new SAMLProcessingFilter();
    samlWebSSOProcessingFilter.setAuthenticationManager(authenticationManager());
    samlWebSSOProcessingFilter.setAuthenticationSuccessHandler(successRedirectHandler());
    samlWebSSOProcessingFilter.setAuthenticationFailureHandler(authenticationFailureHandler());
    return samlWebSSOProcessingFilter;
}
@Bean
public SAMLDiscovery samlDiscovery() {
    SAMLDiscovery idpDiscovery = new SAMLDiscovery();
    return idpDiscovery;
}
@Bean
public SavedRequestAwareAuthenticationSuccessHandler successRedirectHandler() {
    SavedRequestAwareAuthenticationSuccessHandler successRedirectHandler = new SavedRequestAwareAuthenticationSuccessHandler();
    successRedirectHandler.setDefaultTargetUrl("/home");
    return successRedirectHandler;
}
@Bean
public SimpleUrlAuthenticationFailureHandler authenticationFailureHandler() {
    SimpleUrlAuthenticationFailureHandler failureHandler = new SimpleUrlAuthenticationFailureHandler();
    failureHandler.setUseForward(true);
    failureHandler.setDefaultFailureUrl("/error");
    return failureHandler;
}

So far, we've configured the entry point for the authentication (samlEntryPoint) and a few filter chains. So, let's take a deep dive into their details.

When the user tries to log in for the first time, the samlEntryPoint will handle the entry request. Then, the samlDiscovery bean (if enabled) will discover the IdP to contact for authentication.

Next, when the user logs in, the IdP redirects the SAML response to the /saml/sso URI for processing, and corresponding samlWebSSOProcessingFilter will authenticate the associated auth token.

When successful, the successRedirectHandler will redirect the user to the default target URL (/home). Otherwise, the authenticationFailureHandler will redirect the user to the /error URL.

Last, let's add the logout handlers for single and global logouts:

@Bean
public SimpleUrlLogoutSuccessHandler successLogoutHandler() {
    SimpleUrlLogoutSuccessHandler successLogoutHandler = new SimpleUrlLogoutSuccessHandler();
    successLogoutHandler.setDefaultTargetUrl("/");
    return successLogoutHandler;
}
@Bean
public SecurityContextLogoutHandler logoutHandler() {
    SecurityContextLogoutHandler logoutHandler = new SecurityContextLogoutHandler();
    logoutHandler.setInvalidateHttpSession(true);
    logoutHandler.setClearAuthentication(true);
    return logoutHandler;
}
@Bean
public SAMLLogoutProcessingFilter samlLogoutProcessingFilter() {
    return new SAMLLogoutProcessingFilter(successLogoutHandler(), logoutHandler());
}
@Bean
public SAMLLogoutFilter samlLogoutFilter() {
    return new SAMLLogoutFilter(successLogoutHandler(),
        new LogoutHandler[] { logoutHandler() },
        new LogoutHandler[] { logoutHandler() });
}

5.3. Metadata Handling

Now, we'll provide IdP metadata XML to the SP. It'll help to let our IdP know which SP endpoint it should redirect to once the user is logged in.

So, we'll configure the MetadataGenerator bean to enable Spring SAML to handle the metadata:

public MetadataGenerator metadataGenerator() {
    MetadataGenerator metadataGenerator = new MetadataGenerator();
    metadataGenerator.setEntityId(samlAudience);
    metadataGenerator.setExtendedMetadata(extendedMetadata());
    metadataGenerator.setIncludeDiscoveryExtension(false);
    metadataGenerator.setKeyManager(keyManager());
    return metadataGenerator;
}
@Bean
public MetadataGeneratorFilter metadataGeneratorFilter() {
    return new MetadataGeneratorFilter(metadataGenerator());
}
@Bean
public ExtendedMetadata extendedMetadata() {
    ExtendedMetadata extendedMetadata = new ExtendedMetadata();
    extendedMetadata.setIdpDiscoveryEnabled(false);
    return extendedMetadata;
}

The MetadataGenerator bean requires an instance of the KeyManager to encrypt the exchange between SP and IdP:

@Bean
public KeyManager keyManager() {
    DefaultResourceLoader loader = new DefaultResourceLoader();
    Resource storeFile = loader.getResource(samlKeystoreLocation);
    Map<String, String> passwords = new HashMap<>();
    passwords.put(samlKeystoreAlias, samlKeystorePassword);
    return new JKSKeyManager(storeFile, samlKeystorePassword, passwords, samlKeystoreAlias);
}

Here, we have to create and provide a keystore to the KeyManager bean. We can create a self-signed key and keystore with the JRE command:

keytool -genkeypair -alias baeldungspringsaml -keypass baeldungsamlokta -keystore saml-keystore.jks

5.4. MetadataManager

Then, we'll configure the IdP metadata into our Spring Boot application using the ExtendedMetadataDelegate instance:

@Bean
@Qualifier("okta")
public ExtendedMetadataDelegate oktaExtendedMetadataProvider() throws MetadataProviderException {
    File metadata = null;
    try {
        metadata = new File("./src/main/resources/saml/metadata/sso.xml");
    } catch (Exception e) {
        e.printStackTrace();
    }
    FilesystemMetadataProvider provider = new FilesystemMetadataProvider(metadata);
    provider.setParserPool(parserPool());
    return new ExtendedMetadataDelegate(provider, extendedMetadata());
}
@Bean
@Qualifier("metadata")
public CachingMetadataManager metadata() throws MetadataProviderException, ResourceException {
    List<MetadataProvider> providers = new ArrayList<>(); 
    providers.add(oktaExtendedMetadataProvider());
    CachingMetadataManager metadataManager = new CachingMetadataManager(providers);
    metadataManager.setDefaultIDP(defaultIdp);
    return metadataManager;
}

Here, we've parsed the metadata from the sso.xml file that contains the IdP metadata XML, copied from the Okta developer account while viewing the setup instructions.

Similarly, the defaultIdp variable contains the IdP Issuer URL, copied from the Okta developer account.

5.5. XML Parsing

For XML parsing, we can use an instance of the StaticBasicParserPool class:

@Bean(initMethod = "initialize")
public StaticBasicParserPool parserPool() {
    return new StaticBasicParserPool();
}
@Bean(name = "parserPoolHolder")
public ParserPoolHolder parserPoolHolder() {
    return new ParserPoolHolder();
}

5.6. SAML Processor

Then, we require a processor to parse the SAML message from the HTTP request:

@Bean
public HTTPPostBinding httpPostBinding() {
    return new HTTPPostBinding(parserPool(), VelocityFactory.getEngine());
}
@Bean
public HTTPRedirectDeflateBinding httpRedirectDeflateBinding() {
    return new HTTPRedirectDeflateBinding(parserPool());
}
@Bean
public SAMLProcessorImpl processor() {
    ArrayList<SAMLBinding> bindings = new ArrayList<>();
    bindings.add(httpRedirectDeflateBinding());
    bindings.add(httpPostBinding());
    return new SAMLProcessorImpl(bindings);
}

Here, we've used POST and Redirect bindings with respect to our configuration in the Okta developer account.

5.7. SAMLAuthenticationProvider Implementation

Last, we require a custom implementation of the SAMLAuthenticationProvider class to check the instance of the ExpiringUsernameAuthenticationToken class and set the obtained authorities:

public class CustomSAMLAuthenticationProvider extends SAMLAuthenticationProvider {
    @Override
    public Collection<? extends GrantedAuthority> getEntitlements(SAMLCredential credential, Object userDetail) {
        if (userDetail instanceof ExpiringUsernameAuthenticationToken) {
            List<GrantedAuthority> authorities = new ArrayList<GrantedAuthority>();
            authorities.addAll(((ExpiringUsernameAuthenticationToken) userDetail).getAuthorities());
            return authorities;
        } else {
            return Collections.emptyList();
        }
    }
}

Also, we should configure the CustomSAMLAuthenticationProvider as a bean in the SecurityConfig class:

@Bean
public SAMLAuthenticationProvider samlAuthenticationProvider() {
    return new CustomSAMLAuthenticationProvider();
}

5.8. SecurityConfig

Finally, we'll configure a basic HTTP security using the already discussed samlEntryPoint and samlFilter:

@Override
protected void configure(HttpSecurity http) throws Exception {
    http.csrf().disable();
    http.httpBasic().authenticationEntryPoint(samlEntryPoint);
    http
      .addFilterBefore(metadataGeneratorFilter(), ChannelProcessingFilter.class)
      .addFilterAfter(samlFilter(), BasicAuthenticationFilter.class)
      .addFilterBefore(samlFilter(), CsrfFilter.class);
    http
      .authorizeRequests()
      .antMatchers("/").permitAll()
      .anyRequest().authenticated();
    http
      .logout()
      .addLogoutHandler((request, response, authentication) -> {
          response.sendRedirect("/saml/logout");
      });
}

Voila! We finished our Spring Security SAML configuration that allows the user to log in to the IdP and then receive the user's authentication details in XML format from the IdP. Last, it authenticates the user token to allow access to our web app.

6. HomeController

Now that our Spring Security SAML configurations are ready along with the Okta developer account setup, we can set up a simple controller to provide a landing page and home page.

6.1. Index and Auth Mapping

First, let's add mappings to the default target URI (/) and /auth URI:

@RequestMapping("/")
public String index() {
    return "index";
}
@GetMapping(value = "/auth")
public String handleSamlAuth() {
    Authentication auth = SecurityContextHolder.getContext().getAuthentication();
    if (auth != null) {
        return "redirect:/home";
    } else {
        return "/";
    }
}

Then, we'll add a simple index.html that allows the user to redirect Okta SAML authentication using the login link:

<!doctype html>
<html>
<head>
<title>Baeldung Spring Security SAML</title>
</head>
<body>
    <h3><Strong>Welcome to Baeldung Spring Security SAML</strong></h3>
    <a th:href="https://feeds.feedblitz.com/~/t/0/_/baeldung/~@{/auth}">Login</a>
</body>
</html>

Now, we're ready to run our Spring Boot App and access it at http://localhost:8080/:


An Okta Sign-In page should open when clicking on the Login link:

6.2. Home Page

Next, let's add the mapping to the /home URI to redirect the user when successfully authenticated:

@RequestMapping("/home")
public String home(Model model) {
    Authentication authentication = SecurityContextHolder.getContext().getAuthentication();
    model.addAttribute("username", authentication.getPrincipal());
    return "home";
}

Also, we'll add the home.html to show the logged-in user and a logout link:

<!doctype html>
<html>
<head>
<title>Baeldung Spring Security SAML: Home</title>
</head>
<body>
    <h3><Strong>Welcome!</strong><br/>You are successfully logged in!</h3>
    <p>You are logged as <span th:text="${username}">null</span>.</p>
    <small>
        <a th:href="https://feeds.feedblitz.com/~/t/0/_/baeldung/~@{/logout}">Logout</a>
    </small>
</body>
</html>

Once logged in successfully, we should see the home page:

7. Conclusion

In this tutorial, we discussed Spring Security SAML integration with Okta.

First, we set up an Okta developer account with SAML 2.0 web integration. Then, we created a Spring Boot project with required Maven dependencies.

Next, we did all the required setup for the Spring Security SAML like samlEntryPoint, samlFilter, metadata handling, and SAML processor.

Last, we created a controller and a few pages like index and home to test our SAML integration with Okta.

As usual, the source code is available over on GitHub.

The post A Guide to SAML with Spring Security first appeared on Baeldung.
       
Viewing all 4463 articles
Browse latest View live