Quantcast
Channel: Baeldung
Viewing all 4464 articles
Browse latest View live

Guide to Purging an Apache Kafka Topic

$
0
0

1. Overview

In this article, we'll explore a few strategies to purge data from an Apache Kafka topic.

2. Clean-Up Scenario

Before we learn the strategies to clean-up the data, let's acquaint ourselves with a simple scenario that demands a purging activity.

2.1. Scenario

Messages in Apache Kafka automatically expire after a configured retention time. Nonetheless, in a few cases, we might want the message deletion to happen immediately.

Let's imagine that a defect has been introduced in the application code that is producing messages in a Kafka topic. By the time a bug-fix is integrated, we already have many corrupt messages in the Kafka topic that are ready for consumption.

Such issues are most common in a development environment, and we want quick results. So, bulk deletion of messages is a rational thing to do.

2.2. Simulation

To simulate the scenario, let's start by creating a purge-scenario topic from the Kafka installation directory:

$ bin/kafka-topics.sh \
  --create --topic purge-scenario --if-not-exists \
  --partitions 2 --replication-factor 1 \
  --zookeeper localhost:2181

Next, let's use the shuf command to generate random data and feed it to the kafka-console-producer.sh script:

$ /usr/bin/shuf -i 1-100000 -n 50000000 \
  | tee -a /tmp/kafka-random-data \
  | bin/kafka-console-producer.sh \
  --bootstrap-server=0.0.0.0:9092 \
  --topic purge-scenario

We must note that we've used the tee command to save the simulation data for later use.

Finally, let's verify that a consumer can consume messages from the topic:

$ bin/kafka-console-consumer.sh \
  --bootstrap-server=0.0.0.0:9092 \
  --from-beginning --topic purge-scenario \
  --max-messages 3
76696
49425
1744
Processed a total of 3 messages

3. Message Expiry

The messages produced in the purge-scenario topic will have a default retention period of seven days. To purge messages, we can temporarily reset the retention.ms topic-level property to ten seconds and wait for messages to expire:

$ bin/kafka-configs.sh --alter \
  --add-config retention.ms=10000 \
  --bootstrap-server=0.0.0.0:9092 \
  --topic purge-scenario \
  && sleep 10

Next, let's verify that the messages have expired from the topic:

$ bin/kafka-console-consumer.sh  \
  --bootstrap-server=0.0.0.0:9092 \
  --from-beginning --topic purge-scenario \
  --max-messages 1 --timeout-ms 1000
[2021-02-28 11:20:15,951] ERROR Error processing message, terminating consumer process:  (kafka.tools.ConsoleConsumer$)
org.apache.kafka.common.errors.TimeoutException
Processed a total of 0 messages

Finally, we can restore the original retention period of seven days for the topic:

$ bin/kafka-configs.sh --alter \
  --add-config retention.ms=604800000 \
  --bootstrap-server=0.0.0.0:9092 \
  --topic purge-scenario

With this approach, Kafka will purge messages across all the partitions for the purge-scenario topic.

4. Selective Record Deletion

At times, we might want to delete records selectively within one or more partitions from a specific topic. We can satisfy such requirements by using the kafka-delete-records.sh script.

First, we need to specify the partition-level offset in the delete-config.json configuration file.

Let's purge all messages from the partition=1 by using offset=-1:

{
  "partitions": [
    {
      "topic": "purge-scenario",
      "partition": 1,
      "offset": -1
    }
  ],
  "version": 1
}

Next, let's proceed with record deletion:

$ bin/kafka-delete-records.sh \
  --bootstrap-server localhost:9092 \
  --offset-json-file delete-config.json

We can verify that we're still able to read from partition=0:

$ bin/kafka-console-consumer.sh \
  --bootstrap-server=0.0.0.0:9092 \
  --from-beginning --topic purge-scenario --partition=0 \
  --max-messages 1 --timeout-ms 1000
  44017
  Processed a total of 1 messages

However, when we read from partition=1, there will be no records to process:

$ bin/kafka-console-consumer.sh \
  --bootstrap-server=0.0.0.0:9092 \
  --from-beginning --topic purge-scenario \
  --partition=1 \
  --max-messages 1 --timeout-ms 1000
[2021-02-28 11:48:03,548] ERROR Error processing message, terminating consumer process:  (kafka.tools.ConsoleConsumer$)
org.apache.kafka.common.errors.TimeoutException
Processed a total of 0 messages

5. Delete and Recreate the Topic

Another workaround to purge all messages of a Kafka topic is to delete and recreate it. However, this is only possible if we set the delete.topic.enable property to true while starting the Kafka server:

$ bin/kafka-server-start.sh config/server.properties \
  --override delete.topic.enable=true

To delete the topic, we can use the kafka-topics.sh script:

$ bin/kafka-topics.sh \
  --delete --topic purge-scenario \
  --zookeeper localhost:2181
Topic purge-scenario is marked for deletion.
Note: This will have no impact if delete.topic.enable is not set to true.

Let's verify it by listing the topic:

$ bin/kafka-topics.sh --zookeeper localhost:2181 --list

After confirming that the topic is no longer listed, we can now go ahead and recreate it.

6. Conclusion

In this tutorial, we simulated a scenario where we'd need to purge an Apache Kafka topic. Moreover, we explored multiple strategies to purge it completely or selectively across partitions.

The post Guide to Purging an Apache Kafka Topic first appeared on Baeldung.
       

Generate WSDL Stubs with Maven

$
0
0

1. Introduction

In this tutorial, we'll show how to configure the JAX-WS maven plugin to generate Java classes from a WSDL (web service description language) file. As a result, we'll be able to easily call web services using the generated classes.

2. Configuring Our Maven Plugin

First, let's include our JAX-WS Maven plugin with the wsimport goal in the build plugins section of our pom.xml file:

<build>
    <plugins>
        <plugin>
            <groupId>org.codehaus.mojo</groupId>
            <artifactId>jaxws-maven-plugin</artifactId>
            <version>2.6</version>
            <executions>
                <execution>
                    <goals>
                        <goal>wsimport</goal>
                    </goals>
                </execution>
            </executions>
        </plugin>
    </plugins>
</build>

In short, the wsimport goal generates JAX-WS portable artifacts for use in JAX-WS clients and services. The tool reads a WSDL file and generates all the required artifacts for web service development, deployment, and invocation.

2.1. WSDL Directory Configuration

Within our Maven plugin section, the wsdlDirectory configuration property informs the plugin where our WSDL files are located. In this example, we'll tell the plugin to get all WSDL files in our project's src/main/resources directory:

<plugin>
    ...
    <configuration>
        <wsdlDirectory>${project.basedir}/src/main/resources/</wsdlDirectory>
    </configuration>
</plugin>

2.2. WSDL Directory-Specific Files Configuration

Additionally, we can use the wsdlFiles configuration property to define a list of WSDL files to consider when generating the classes:

<plugin>
    ...
    <configuration>
        <wsdlDirectory>${project.basedir}/src/main/resources/</wsdlDirectory>
        <wsdlFiles>
            <wsdlFile>file1.wsdl</wsdlFile>
            <wsdlFile>file2.wsdl</wsdlFile>
            ...
        </wsdlFiles>
    </configuration>
</plugin>

However, when the wsdlFiles property isn't set, all the files in the directory specified by the wsdlDirectory property will be considered.

2.3. WSDL URLs Configuration

Alternatively, we can configure the plugin's wsdlUrl configuration property:

<plugin>
    ...
    <configuration>
        <wsdlUrls>
            <wsdlUrl>http://localhost:8888/ws/country?wsdl</wsdlUrl>
        ...
        </wsdlUrls>
    </configuration>
</plugin>

To use this option, the server hosting the URL for the WSDL file must be up and running so that our plugin can read it.

2.4. Configuring the Generated Classes Directory

Next, in the packageName property, we can set up the generated classes package name, and in the sourceDestDir, the output directory:

<plugin>
    ...
    <configuration>
        <packageName>com.baeldung.soap.ws.client</packageName>
        <sourceDestDir>
            ${project.build.directory}/generated-sources/
        </sourceDestDir>
    </configuration>   
</plugin>

As a result, our final version of the plugin configuration using the wsdlDirectory option is:

<plugin>
    <groupId>org.codehaus.mojo</groupId>
    <artifactId>jaxws-maven-plugin</artifactId>
    <version>2.6</version>
    <executions>
        <execution>
            <goals>
                <goal>wsimport</goal>
            </goals>
        </execution>
    </executions>
    <configuration>
        <wsdlDirectory>${project.basedir}/src/main/resources/</wsdlDirectory>
        <packageName>com.baeldung.soap.ws.client</packageName>
        <sourceDestDir>
            ${project.build.directory}/generated-sources/
        </sourceDestDir>
    </configuration>
</plugin>

3. Running the JAX-WS Plugin

Finally, with our plugin configured, we can generate our classes with Maven and check the output logs:

mvn clean install
[INFO] --- jaxws-maven-plugin:2.6:wsimport (default) @ jaxws ---
[INFO] Processing: file:/D:/projetos/baeldung/tutorials/maven-modules/maven-plugins/jaxws/src/main/resources/country.wsdl
[INFO] jaxws:wsimport args: [-keep, -s, 'D:\projetos\baeldung\tutorials\maven-modules\maven-plugins\jaxws\target\generated-sources', -d, 'D:\projetos\baeldung\tutorials\maven-modules\maven-plugins\jaxws\target\classes', -encoding, UTF-8, -Xnocompile, -p, com.baeldung.soap.ws.client, "file:/D:/projetos/baeldung/tutorials/maven-modules/maven-plugins/jaxws/src/main/resources/country.wsdl"]
parsing WSDL...
Generating code...

4. Check Generated Classes

After running our plugin, we can check the output in the folder target/generated-sources configured in the sourceDestDir property.

The generated classes can be found in com.baeldung.soap.ws.client as configured in the packageName property:

com.baeldung.soap.ws.client.Country.java
com.baeldung.soap.ws.client.CountryService.java  
com.baeldung.soap.ws.client.CountryServiceImplService.java
com.baeldung.soap.ws.client.Currency.java
com.baeldung.soap.ws.client.ObjectFactory.java

5. Conclusion

In this article, we saw how to generate Java classes from a WSDL file using the JAX-WS plugin. As a result, we're now able to create a web service client and use the generated classes to call our services.

The source code for our application is available over on GitHub.

The post Generate WSDL Stubs with Maven first appeared on Baeldung.
       

Java Weekly, Issue 376

$
0
0

1. Spring and Java

>> FizzBuzz – SIMD Style! [morling.dev]

Java 16's Vector API for mere mortals – taking advantage of the single instruction, multiple data (SIMD) capabilities with a new Java API.

>> Code-First Unix Domain Socket Tutorial [nipafx.dev]

A solid look at interprocess communication with Java 16 and UNIX domain sockets – faster and more secure IPC on the same host!

>> JEP 400: UTF-8 by Default [openjdk.java.net]

No more StandardCharsets.UTF_8 this is a proposal to make UTF-8 the default charset for all Java APIs.

Also worth reading:

Webinars and presentations:

Time to upgrade:

2. Technical

>> Goodbye minikube [blog.frankel.ch]

An interesting journey from Minikube to Kind – spinning up a local Kubernetes cluster in a blink of an eye via Kind.

Also worth reading:

3. Musings

>> We got lucky [benjiweber.co.uk]

Getting prepared to increase our luck and chance to deal with unexpected incidents.

Also worth reading:

4. Comics

And my favorite Dilberts of the week:

>> Think About Long Term [dilbert.com]

>> Focus Or Spread [dilbert.com]

>> Garbled Audio [dilbert.com]

5. Pick of the Week

>> Satisficing vs Maximizing [asmartbear.com]

The post Java Weekly, Issue 376 first appeared on Baeldung.
       

Spring Security OAuth Authorization Server

$
0
0

1. Introduction

OAuth is an open standard that describes a process of authorization. It can be used to authorize user access to an API. For example, a REST API can restrict access only for registered users with a proper role.

An OAuth authorization server is responsible for authenticating the users and issuing access tokens containing the user data and proper access policies.

In this tutorial, we'll implement a simple OAuth server using the Spring Security OAuth Authorization Server experimental module.

In the process, we'll create a client-server application that will fetch a list of Baeldung articles from a REST API. Both the client services and server services will require an OAuth authentication.

2. Authorization Server Implementation

Let's start by looking at the OAuth authorization server configuration. It'll serve as an authentication source for both the article resource and client servers.

2.1. Dependencies

First, we'll need to add a few dependencies to our pom.xml file:

<dependency>
    <groupId>org.springframework.boot</groupId>
    <artifactId>spring-boot-starter-web</artifactId>
    <version>2.4.3</version>
</dependency>
<dependency>
    <groupId>org.springframework.boot</groupId>
    <artifactId>spring-boot-starter-security</artifactId>
    <version>2.4.3</version>
</dependency>
<dependency>
    <groupId>org.springframework.security.experimental</groupId>
    <artifactId>spring-security-oauth2-authorization-server</artifactId>
    <version>0.1.0</version>
</dependency>

2.2. Configuration

Now, let's configure the port that our auth server will run on by setting the server.port property in the application.yml file:

server:
  port: 9000

After that, we can move to the Spring beans configuration. First, we'll need a @Configuration class and import the OAuthAuthorizationServerConfiguration. Inside the configuration class, we'll create a few OAuth-specific beans. The first one will be the repository of client services. In our example, we'll have a single client, created using the RegisteredClient builder class:

@Configuration
@Import(OAuth2AuthorizationServerConfiguration.class)
public class AuthorizationServerConfig {
    @Bean
    public RegisteredClientRepository registeredClientRepository() {
        RegisteredClient registeredClient = RegisteredClient.withId(UUID.randomUUID().toString())
          .clientId("article-client")
          .clientSecret("secret")
          .clientAuthenticationMethod(ClientAuthenticationMethod.BASIC)
          .authorizationGrantType(AuthorizationGrantType.AUTHORIZATION_CODE)
          .authorizationGrantType(AuthorizationGrantType.REFRESH_TOKEN)
          .redirectUri("http://localhost:8080/login/oauth2/code/articles-client-oidc")
          .scope("articles.read")
          .build();
        return new InMemoryRegisteredClientRepository(registeredClient);
    }
}

The properties we're configuring are:

  • Client ID – Spring will use it to identify which client is trying to access the resource
  • Client secret code – a secret known to the client and server that provides trust between the two
  • Authentication method – in our case, we'll use basic authentication which is just a username and password
  • Authorization grant type – we want to allow the client to generate both an authorization code and a refresh token
  • Redirect URI – the client will use it in a redirect-based flow
  • Scope – this parameter defines authorizations that the client may have. In our case, we'll have just one – articles.read

Each authorization server needs its signing key for tokens to keep a proper boundary between security domains. Let's generate a 2048-byte RSA key:

@Bean
public JWKSource<SecurityContext> jwkSource() {
    RSAKey rsaKey = generateRsa();
    JWKSet jwkSet = new JWKSet(rsaKey);
    return (jwkSelector, securityContext) -> jwkSelector.select(jwkSet);
}
private static RSAKey generateRsa() {
    KeyPair keyPair = generateRsaKey();
    RSAPublicKey publicKey = (RSAPublicKey) keyPair.getPublic();
    RSAPrivateKey privateKey = (RSAPrivateKey) keyPair.getPrivate();
    return new RSAKey.Builder(publicKey)
      .privateKey(privateKey)
      .keyID(UUID.randomUUID().toString())
      .build();
}
private static KeyPair generateRsaKey() {
    KeyPairGenerator keyPairGenerator = KeyPairGenerator.getInstance("RSA");
    keyPairGenerator.initialize(2048);
    return keyPairGenerator.generateKeyPair();
}

Except for the signing key, each authorization server needs to have a unique issuer URL as well. We'll set it up as a http://127.0.0.1 on port 9000 by creating the ProviderSettings bean:

@Bean
public ProviderSettings providerSettings() {
    return new ProviderSettings().issuer("http://127.0.0.1:9000");
}

Finally, we'll enable the Spring web security module with an @EnableWebSecurity annotated configuration class:

@EnableWebSecurity
public class DefaultSecurityConfig {
    @Bean
    SecurityFilterChain defaultSecurityFilterChain(HttpSecurity http) throws Exception {
        http.authorizeRequests(authorizeRequests ->
          authorizeRequests.anyRequest().authenticated()
        )
          .formLogin(withDefaults());
        return http.build();
    }
    // ...
}

Here, we're calling authorizeRequests.anyRequest().authenticated() to require authentication for all requests, and we're providing a form-based authentication by invoking the formLogin(defaults()) method.

Additionally, we'll define a set of example users that we'll use for testing. For the sake of this example, let's create a repository with just a single admin user:

@Bean
UserDetailsService users() {
    UserDetails user = User.withDefaultPasswordEncoder()
      .username("admin")
      .password("password")
      .build();
    return new InMemoryUserDetailsManager(user);
}

3. Resource Server

Now, we'll create a resource server that will return a list of articles from a GET endpoint. The endpoints should allow only requests that are authenticated against our OAuth server.

3.1. Dependencies

First, let's include the required dependencies:

<dependency>
    <groupId>org.springframework.boot</groupId>
    <artifactId>spring-boot-starter-web</artifactId>
    <version>2.4.3</version>
</dependency>
<dependency>
    <groupId>org.springframework.boot</groupId>
    <artifactId>spring-boot-starter-security</artifactId>
    <version>2.4.3</version>
</dependency>
<dependency>
    <groupId>org.springframework.boot</groupId>
    <artifactId>spring-boot-starter-oauth2-resource-server</artifactId>
    <version>2.4.3</version>
</dependency>

3.2. Configuration

Before we start with the implementation code, we should configure some properties in the application.yml file. The first one is the server port:

server:
  port: 8090

Next, it's time for the security configuration. We need to set up the proper URL for our authentication server with the host and the port we've configured in the ProviderSettings bean earlier:

spring:
  security:
    oauth2:
      resourceserver:
        jwt:
          issuer-uri: http://127.0.0.1:9000

Now, we can set up our web security configuration. Again, we want to explicitly say that every request to article resources should be authorized and have a proper article.read authority:

@EnableWebSecurity
public class ResourceServerConfig {
    @Bean
    SecurityFilterChain securityFilterChain(HttpSecurity http) throws Exception {
        http.mvcMatcher("/articles/**")
          .authorizeRequests()
          .mvcMatchers("/articles/**").access("hasAuthority('SCOPE_article.read')")
          .and()
          .oauth2ResourceServer()
          .jwt();
        return http.build();
    }
}

As shown here, we're also invoking the oauth2ResourceServer() method, which will configure the OAuth server connection based on the application.yml configuration.

3.3. Articles Controller

Finally, we'll create a REST controller that will return a list of articles under the GET /articles endpoint:

@RestController
public class ArticlesController {
    @GetMapping("/articles")
    public String[] getArticles() {
        return new String[] { "Article 1", "Article 2", "Article 3" };
    }
}

4. API Client

For the last part, we'll create a REST API client that will fetch the list of articles from the resource server.

4.1. Dependencies

To start, let's include the needed dependencies:

<dependency>
    <groupId>org.springframework.boot</groupId>
    <artifactId>spring-boot-starter-web</artifactId>
    <version>2.4.3</version>
</dependency>
<dependency>
    <groupId>org.springframework.boot</groupId>
    <artifactId>spring-boot-starter-security</artifactId>
    <version>2.4.3</version>
</dependency>
<dependency>
    <groupId>org.springframework.boot</groupId>
    <artifactId>spring-boot-starter-oauth2-client</artifactId>
    <version>2.4.3</version>
</dependency>
<dependency>
    <groupId>org.springframework</groupId>
    <artifactId>spring-webflux</artifactId>
    <version>5.3.4</version>
</dependency>
<dependency>
    <groupId>io.projectreactor.netty</groupId>
    <artifactId>reactor-netty</artifactId>
    <version>1.0.4</version>
</dependency>

4.2. Configuration

As we did earlier, we'll define some configuration properties for authentication purposes:

server:
  port: 8080
spring:
  security:
    oauth2:
      client:
        registration:
          articles-client-oidc:
            provider: spring
            client-id: articles-client
            client-secret: secret
            authorization-grant-type: authorization_code
            redirect-uri: "{baseUrl}/login/oauth2/code/{registrationId}"
            scope: openid
            client-name: articles-client-oidc
          articles-client-authorization-code:
            provider: spring
            client-id: articles-client
            client-secret: secret
            authorization-grant-type: authorization_code
            redirect-uri: "{baseUrl}/authorized"
            scope: articles.read
            client-name: articles-client-authorization-code
        provider:
          spring:
            issuer-uri: http://127.0.0.1:9000

Now, let's create a WebClient instance to perform HTTP requests to our resource server. We'll use the standard implementation with just one addition of the OAuth authorization filter:

@Bean
WebClient webClient(OAuth2AuthorizedClientManager authorizedClientManager) {
    ServletOAuth2AuthorizedClientExchangeFilterFunction oauth2Client =
      new ServletOAuth2AuthorizedClientExchangeFilterFunction(authorizedClientManager);
    return WebClient.builder()
      .apply(oauth2Client.oauth2Configuration())
      .build();
}

The WebClient requires an OAuth2AuthorizedClientManager as a dependency. Let's create a default implementation:

@Bean
OAuth2AuthorizedClientManager authorizedClientManager(
        ClientRegistrationRepository clientRegistrationRepository,
        OAuth2AuthorizedClientRepository authorizedClientRepository) {
    OAuth2AuthorizedClientProvider authorizedClientProvider =
      OAuth2AuthorizedClientProviderBuilder.builder()
        .authorizationCode()
        .refreshToken()
        .build();
    DefaultOAuth2AuthorizedClientManager authorizedClientManager = new DefaultOAuth2AuthorizedClientManager(
      clientRegistrationRepository, authorizedClientRepository);
    authorizedClientManager.setAuthorizedClientProvider(authorizedClientProvider);
    return authorizedClientManager;
}

Lastly, we'll configure web security:

@EnableWebSecurity
public class SecurityConfig {
    @Bean
    SecurityFilterChain securityFilterChain(HttpSecurity http) throws Exception {
        http
          .authorizeRequests(authorizeRequests ->
            authorizeRequests.anyRequest().authenticated()
          )
          .oauth2Login(oauth2Login ->
            oauth2Login.loginPage("/oauth2/authorization/articles-client-oidc"))
          .oauth2Client(withDefaults());
        return http.build();
    }
}

Here, as well as in other servers, we'll need every request to be authenticated. Additionally, we need to configure the login page URL (defined in .yml config) and the OAuth client.

4.3. Articles Client Controller

Finally, we can create the data access controller. We'll use the previously configured WebClient to send an HTTP request to our resource server:

@RestController
public class ArticlesController {
    private WebClient webClient;
    @GetMapping(value = "/articles")
    public String[] getArticles(
      @RegisteredOAuth2AuthorizedClient("articles-client-authorization-code") OAuth2AuthorizedClient authorizedClient
    ) {
        return this.webClient
          .get()
          .uri("http://localhost:8090/articles")
          .attributes(oauth2AuthorizedClient(authorizedClient))
          .retrieve()
          .bodyToMono(String[].class)
          .block();
    }
}

In the above example, we're taking the OAuth authorization token from the request in a form of OAuth2AuthorizedClient class. It's automatically bound by Spring using the @RegisterdOAuth2AuthorizedClient annotation with proper identification. In our case, it's pulled from the article-client-authorizaiton-code that we configured previously in the .yml file.

This authorization token is further passed to the HTTP request.

4.4. Accessing the Articles List

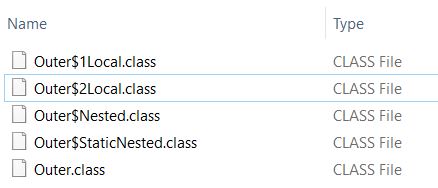
Now, when we go into the browser and try to access the http://localhost:8080/articles page, we'll be automatically redirected to the OAuth server login page under http://127.0.0.1:900/login URL:

After providing the proper username and password, the authorization server will redirect us back to the requested URL – the list of articles.

Further requests to the articles endpoint won't require logging in, as the access token will be stored in a cookie.

5. Conclusion

In this article, we've learned how to set up, configure, and use the Spring Security OAuth Authorization Server.

As always, all the source code is available over on GitHub.draf

The post Spring Security OAuth Authorization Server first appeared on Baeldung.
       

How Many Threads Can a Java VM Support?

$
0
0

1. Overview

Throughout the years, the performance of the systems that we use has increased exponentially. Hence, the number of threads that the Java VM supports has increased as well.

But, how many are we actually able to create? The answer isn't an exact number because it depends on numerous factors.

We'll discuss a couple of these factors and how they influence the number of threads that we can create in a Java VM.

2. Stack Memory

One of the most important components of a thread is its stack. The maximum stack size and the number of threads that we create have a direct correlation to the amount of system memory available.

Thus, increasing the memory capacity also increases the maximum number of threads that we can run on a system. More details about the stack size can be found in our article Configuring Stack Sizes in the JVM.

Finally, it's worth mentioning that, since Java 11, the JVM doesn't aggressively commit all of the reserved memory for a stack. This helps to increase the number of threads that we can run. In other words, even if we increase the maximum stack size, the amount of memory used by the thread will be based on the actual stack size.

3. Heap Memory

The heap doesn't directly affect the number of threads that we can execute. But, it's also using the same system memory.

Thus, increasing the heap size limits the available memory for the stack, thereby decreasing the maximum number of threads we can create.

4. Operating System Choice

When creating a new Java thread, a new native OS thread is created and directly linked to the one from the VM.

Therefore, the Operating System is in control of managing the thread.

Moreover, a variety of limits may be applied, based on the type of the operating system.

In the following subsections, we'll cover these aspects for the most common systems.

4.1. Linux

Linux-based systems, at the kernel level, treat threads as processes. Thus, process limits like the pid_max kernel parameter will directly affect the number of threads that we can create.

Another kernel parameter is threads-max, which describes the overall maximum number of threads.

We can retrieve all these parameters by executing sysctl kernel.<parameter-name>.

Finally, there's the limit for the maximum processes per user, retrievable using the ulimit -u command.

4.2. Windows

On Windows machines, there's no limit specified for threads. Thus, we can create as many threads as we want, until our system runs out of available system memory.

4.3. macOS

There are two main limitations on systems that run macOS, defined by two kernel parameters:

  • num_threads represents the overall maximum number of threads that can be created
  • num_taskthreads represents the maximum number of threads per process

The values of these parameters can be accessed by executing sysctl kern.<parameter-name>.

One point worth mentioning is that when one of these limits is reached, an OutOfMemoryError will be thrown, which can be misleading.

5. Virtual Threads

We can further increase the number of threads that we can create by leveraging lightweight Virtual Threads that come with Project Loom, which is not yet publicly available.

Virtual threads are created by the JVM and do not utilize OS threads, which means that we can literally create millions of them at the same time.

6. Conclusion

In this article, we looked into the most important aspects that might affect the maximum number of threads that can be created in a Java Virtual Machine.

However, in most cases, increasing the limit is unlikely to permanently solve scalability issues. We'll need to consider rethinking the implementation of the application or even applying horizontal scaling.

The post How Many Threads Can a Java VM Support? first appeared on Baeldung.
       

The Java final Keyword – Impact on Performance

$
0
0

 1. Overview

The performance benefit of using the final keyword is a very popular debate topic among Java developers. Depending on where we apply it, the final keyword can have a different purpose and different performance implications.

In this tutorial, we'll explore if there are any performance benefits from using the final keyword in our code. We'll look at the performance implications of using final on a variable, method, and class level.

Alongside performance, we'll also mention the design aspects of using the final keyword. Finally, we'll recommend whether and for what reason we should use it.

2. Local Variables

When final is applied to a local variable, its value must be assigned exactly once.

We can assign the value in the final variable declaration or in the class constructor. In case we try to change the final variable value later, the compiler will throw an error.

2.1. Performance Test

Let's see if applying the final keyword to our local variables can improve performance.

We'll make use of the JMH tool in order to measure the average execution time of a benchmark method. In our benchmark method, we'll do a simple string concatenation of non-final local variables:

@Benchmark
@OutputTimeUnit(TimeUnit.NANOSECONDS)
@BenchmarkMode(Mode.AverageTime)
public static String concatNonFinalStrings() {
    String x = "x";
    String y = "y";
    return x + y;
}

Next, we'll repeat the same performance test, but this time with final local variables:

@Benchmark
@OutputTimeUnit(TimeUnit.NANOSECONDS)
@BenchmarkMode(Mode.AverageTime)
public static String concatFinalStrings() {
    final String x = "x";
    final String y = "y";
    return x + y;
}

JMH will take care of running warmup iterations in order to let the JIT compiler optimizations kick in. Finally, let's take a look at the measured average performances in nanoseconds:

Benchmark                              Mode  Cnt  Score   Error  Units
BenchmarkRunner.concatFinalStrings     avgt  200  2,976 ± 0,035  ns/op
BenchmarkRunner.concatNonFinalStrings  avgt  200  7,375 ± 0,119  ns/op

In our example, using final local variables enabled 2.5 times faster execution.

2.2. Static Code Optimization

The string concatenation example demonstrates how the final keyword can help the compiler optimize the code statically.

Using non-final local variables, the compiler generated the following bytecode to concatenate the two strings:

NEW java/lang/StringBuilder
DUP
INVOKESPECIAL java/lang/StringBuilder.<init> ()V
ALOAD 0
INVOKEVIRTUAL java/lang/StringBuilder.append (Ljava/lang/String;)Ljava/lang/StringBuilder;
ALOAD 1
INVOKEVIRTUAL java/lang/StringBuilder.append (Ljava/lang/String;)Ljava/lang/StringBuilder;
INVOKEVIRTUAL java/lang/StringBuilder.toString ()Ljava/lang/String;
ARETURN

By adding the final keyword, we helped the compiler conclude that the string concatenation result will actually never change. Thus, the compiler was able to avoid string concatenation altogether and statically optimize the generated bytecode:

LDC "xy"
ARETURN

We should note that most of the time, adding final to our local variables will not result in significant performance benefits as in this example.

3. Instance and Class Variables

We can apply the final keyword to instance or class variables. That way, we ensure that their value assignment can be done only once. We can assign the value upon final instance variable declaration, in the instance initializer block or in the constructor.

A class variable is declared by adding the static keyword to a member variable of a class. Additionally, by applying the final keyword to a class variable, we're defining a constant. We can assign the value upon constant declaration or in the static initializer block:

static final boolean doX = false;
static final boolean doY = true;

Let's write a simple method with conditions that use these boolean constants:

Console console = System.console();
if (doX) {
    console.writer().println("x");
} else if (doY) {
    console.writer().println("y");
}

Next, let's remove the final keyword from the boolean class variables and compare the class generated bytecode:

  • Example using non-final class variables – 76 lines of bytecode
  • Example using final class variables (constants) – 39 lines of bytecode

By adding the final keyword to a class variable, we again helped the compiler to perform static code optimization. The compiler will simply replace all references of final class variables with their actual values.

However, we should note that an example like this one would rarely be used in real-life Java applications. Declaring variables as final can only have a minor positive impact on the performances of real-life applications.

4. Effectively Final

The term effectively final variable was introduced in Java 8. A variable is effectively final if it isn't explicitly declared final but its value is never changed after initialization.

The main purpose of effectively final variables is to enable lambdas to use local variables that are not explicitly declared final. However, the Java compiler won't perform static code optimization for effectively final variables the way it does for final variables.

5. Classes and Methods

The final keyword has a different purpose when applied to classes and methods. When we apply the final keyword to a class, then that class cannot be subclassed. When we apply it to a method, then that method cannot be overridden.

There are no reported performance benefits of applying final to classes and methods. Moreover, final classes and methods can be a cause of great inconvenience for developers, as they limit our options for reusing existing code. Thus, reckless use of final can compromise good object-oriented design principles.

There are some valid reasons for creating final classes or methods, such as enforcing immutability. However, performance benefit is not a good reason for using final on class and method levels.

6. Performance vs. Clean Design

Besides performance, we might consider other reasons for using final. The final keyword can help improve code readability and understandability. Let's look into a few examples of how final can communicate design choices:

  • final classes are immutable by design
  • methods are declared final to prevent incompatibility of child classes
  • method arguments are declared final to prevent side effects
  • final variables are read-only by design

Thus, we should use final for communicating design choices to other developers. Furthermore, the final keyword applied to variables can serve as a helpful hint for the compiler to perform minor performance optimizations.

7. Conclusion

In this article, we looked into the performance benefits of using the final keyword. In the examples, we showed that applying the final keyword to variables can have a minor positive impact on performance. Nevertheless, applying the final keyword to classes and methods will not result in any performance benefits.

We demonstrated that, unlike final variables, effectively final variables are not used by the compiler for performing static code optimization. Finally, besides performance, we looked at the design implications of applying the final keyword on different levels.

As always, the source code is available over on GitHub.

The post The Java final Keyword – Impact on Performance first appeared on Baeldung.
       

Clearing the Maven Cache

$
0
0

1. Overview

In this short tutorial, we'll explore ways to clear our local Maven cache. We may want to do this in order to save disk space or clear up artifacts that we no longer reference.

We'll first clear the cache manually, where we physically delete the directory. Then, we'll clear our cache using the Maven Dependency Plugin, using some of the different plugin options available to us.

2. Deleting the Local Cache Directory

Our local Maven repositories are stored in different locations based on the operating system. Also, as the .m2 directory is likely to be hidden, we'll need to change the directory properties in order to display it.

In Windows, the default location is:

C:\Users\<user_name>\.m2

And on the Mac:

/Users/<user_name>/.m2

And on Linux-based systems:

/home/<user_name>/.m2

Once we locate the directory, we can simply delete it. With Unix-based systems like MacOS or Linux, we can delete the directory with one command:

rm -rf ~/.m2

If our cache directory isn't in the default location, we can use the Maven Help Plugin to locate it:

mvn help:evaluate -Dexpression=settings.localRepository -q -DforceStdout

3. Using the Maven Dependency Plugin

Instead of deleting the cache directory directly, we can use the Maven Dependency Plugin with the purge-local-repository goal.

First, we need to navigate to the root of our Maven project. Then, we can run:

mvn dependency:purge-local-repository

When we run this plugin without any additional flags, it may download artifacts that aren't present in our cache to resolve the dependency tree. This is known as transitive dependency resolution. Next, it deletes our local cache and, finally, re-downloads the artifacts.

Alternatively, in order to delete our cache and avoid the first step of pre-downloading the missing dependencies, we can pass in the flag actTransitively=false:

mvn dependency:purge-local-repository -DactTransitively=false

Finally, if we just want to clear out our cache, without pre-downloading or re-resolving the artifacts:

mvn dependency:purge-local-repository -DactTransitively=false -DreResolve=false

Here, we pass in an additional flag of reResolve=false, which tells the plugin to avoid re-downloading the dependencies.

4. Conclusion

In this short article, we looked at two ways to clear our local Maven cache.

First, we looked at manually emptying our local cache directory. Then, we used the Maven Dependency Plugin, exploring different options to achieve our desired outcome.

The post Clearing the Maven Cache first appeared on Baeldung.
       

Decode a JWT Token in Java

$
0
0

1. Overview

A JSON Web Token (JWT) is often used in REST API security. Though the token can be parsed by frameworks such as Spring Security OAuth, we may wish to process the token in our own code.

In this tutorial, we'll decode and verify the integrity of a JWT.

2. Structure of JWT Token

First, let's understand the structure of a JWT token:

  • header
  • payload (often referred to as body)
  • signature

The signature is optional. A valid JWT token can consist of just the header and payload sections. However, we use the signature section to verify the contents of the header and payload for security authorization.

Sections are represented as base64 encoded strings separated by a period (‘.') delimiter. By design, anyone can decode a JWT token and read the contents of the header and payload sections. However, we need access to the secret key used to create the signature to verify a token's integrity.

Most commonly, the JWT contains a user's “claims”. These represent data about the user, which the API can use to grant permissions or trace the user providing the token. Decoding the token allows the application to use the data, and validation allows the application to trust that the JWT was generated by a trusted source.

Let's look at how we can decode and valid a token in Java.

3. Decoding a JWT Token

We can decode a token using built-in Java functions.

First, let's split up the token into its sections:

String[] chunks = token.split("\\.");

We should note that the regular expression passed to String.split uses an escaped ‘.' character to avoid ‘.' meaning “any character”.

Our chunks array should now have 2 or 3 elements corresponding to the sections of the JWT.

Next, let's decode the header and payload parts using a base64 decoder:

Base64.Decoder decoder = Base64.getDecoder();
String header = new String(decoder.decode(chunks[0]));
String payload = new String(decoder.decode(chunks[1]));

Let's run this code with a JWT token (we can decode online to compare results):

eyJhbGciOiJIUzI1NiIsInR5cCI6IkpXVCJ9.eyJzdWIiOiIxMjM0NTY3ODkwIiwibmFtZSI6IkJhZWxkdW5nIFVzZXIiLCJpYXQiOjE1MTYyMzkwMjJ9.qH7Zj_m3kY69kxhaQXTa-ivIpytKXXjZc1ZSmapZnGE

The output will give us the decoded header any payload:

{"alg":"HS256","typ":"JWT"}{"sub":"1234567890","name":"Baeldung User","iat":1516239022}

If only the header and payload sections are defined in a JWT token, then we are finished and have the information decoded successfully.

4. Verifying JWT Token

Next, we can verify the integrity of the header and payload to ensure that they have not been altered by using the signature section.

4.1. Dependencies

For the verification, we can add jjwt to our pom.xml:

<dependency>
    <groupId>io.jsonwebtoken</groupId>
    <artifactId>jjwt</artifactId>
    <version>0.7.0</version>
</dependency>

We should note that we need a version of this library from version 0.7.0 onwards.

4.2. Configuring Signature Algorithm and Key Specification

To begin verifying the payload and header, we need both the signature algorithm that was used originally to sign the token and the secret key:

SignatureAlgorithm sa = HS256;
SecretKeySpec secretKeySpec = new SecretKeySpec(secretKey.getBytes(), sa.getJcaName());

In this example, we've hard-coded our signature algorithm to HS256. However, we could decode the JSON of the header and read the alg field to get this value.

We should also note that the variable secretKey is a String representation of the secret key. We might provide this to our application via its configuration or via a REST API exposed by the service which issues the JWT.

4.3. Performing The Verification

Now that we have the signature algorithm and secret key, we can begin to perform the verification. Let's recombine the header and payload into an unsigned JWT, joining them with the ‘.' delimiter:

String tokenWithoutSignature = chunks[0] + "." + chunks[1];
String signature = chunks[2];

Now we have the unsigned token and the provided signature. We can use the library to validate it:

DefaultJwtSignatureValidator validator = new DefaultJwtSignatureValidator(sa, secretKeySpec);
if (!validator.isValid(tokenWithoutSignature, signature)) {
    throw new Exception("Could not verify JWT token integrity!");
}

Let's break this down.

First, we create a validator with the chosen algorithm and secret. Then we provide it the unsigned token data and the provided signature.

Then. the validator generates a fresh signature and compares it against the provided signature. If they are equal, then we have verified the integrity of the header and payload.

5. Conclusion

In this tutorial, we looked at the structure of a JWT and how to decode it into JSON.

Then we used a library to verify the integrity of a token using its signature, algorithm, and secret key.

As always, the code examples from this tutorial can be found over on GitHub.

The post Decode a JWT Token in Java first appeared on Baeldung.
       

Get All Endpoints in Spring Boot

$
0
0

1. Overview

When working with a REST API, it's common to retrieve all of the REST endpoints. For example, we might need to save all request mapping endpoints in a database. In this tutorial, we'll look at how to get all the REST endpoints in a Spring Boot application.

2. Mapping Endpoints

In a Spring Boot application, we expose a REST API endpoint by using the @RequestMapping annotation in the controller class. For getting these endpoints, there are three options: an event listener, Spring Boot Actuator, or the Swagger library.

3. Event Listener Approach

For creating a REST API service, we use @RestController and @RequestMapping in the controller class. These classes register in the spring application context as a spring bean. Therefore, we can get the endpoints by using the event listener when the application context is ready at startup. There are two ways to define a listener. We can either implement the ApplicationListener interface or use the @EventListener annotation.

3.1. ApplicationListener Interface

When implementing the ApplicationListener, we must define the onApplicationEvent() method:

@Override
public void onApplicationEvent(ContextRefreshedEvent event) {
    ApplicationContext applicationContext = event.getApplicationContext();
    RequestMappingHandlerMapping requestMappingHandlerMapping = applicationContext
        .getBean("requestMappingHandlerMapping", RequestMappingHandlerMapping.class);
    Map<RequestMappingInfo, HandlerMethod> map = requestMappingHandlerMapping
        .getHandlerMethods();
    map.forEach((key, value) -> LOGGER.info("{} {}", key, value));
}

In this way, we use the ContextRefreshedEvent class. This event is published when the ApplicationContext is either initialized or refreshed. Spring Boot provides many HandlerMapping implementations. Among these is the RequestMappingHandlerMapping class, which detects request mappings and is used by the @RequestMapping annotation. Therefore, we use this bean in the ContextRefreshedEvent event.

3.2. @EventListener Annotation

The other way to map our endpoints is to use the @EventListener annotation. We use this annotation directly on the method that handles the ContextRefreshedEvent:

@EventListener
public void handleContextRefresh(ContextRefreshedEvent event) {
    ApplicationContext applicationContext = event.getApplicationContext();
    RequestMappingHandlerMapping requestMappingHandlerMapping = applicationContext
        .getBean("requestMappingHandlerMapping", RequestMappingHandlerMapping.class);
    Map<RequestMappingInfo, HandlerMethod> map = requestMappingHandlerMapping
        .getHandlerMethods();
    map.forEach((key, value) -> LOGGER.info("{} {}", key, value));
}

4. Actuator Approach

A second approach for retrieving a list of all our endpoints is via the Spring Boot Actuator feature.

4.1. Maven Dependency

For enabling this feature, we'll add the spring-boot-actuator Maven dependency to our pom.xml file:

<dependency>
    <groupId>org.springframework.boot</groupId>
    <artifactId>spring-boot-starter-actuator</artifactId>
</dependency>

4.2. Configuration

When we add the spring-boot-actuator dependency, only /health and /info endpoints are available by default. To enable all the actuator endpoints, we can expose them by adding a property to our application.properties file:

management.endpoints.web.exposure.include=*

Or, we can simply expose the endpoint for retrieving the mappings:

management.endpoints.web.exposure.include=mappings

Once enabled, the REST API endpoints of our application are available at http://host/actuator/mappings.

5. Swagger

The Swagger library can also be used to list all endpoints of a REST API.

5.1. Maven Dependency

To add it to our project, we need a springfox-boot-starter dependency in the pom.xml file:

<dependency>
    <groupId>io.springfox</groupId>
    <artifactId>springfox-boot-starter</artifactId>
    <version>3.0.0</version>
</dependency>

5.2. Configuration

Let's create the configuration class by defining the Docket bean:

@Bean
public Docket api() {
    return new Docket(DocumentationType.SWAGGER_2)
      .select()
      .apis(RequestHandlerSelectors.any())
      .paths(PathSelectors.any())
      .build();
}

The Docket is a builder class that configures the generation of Swagger documentation. To access the REST API endpoints, we can visit this URL in our browser:

http://host/v2/api-docs

6. Conclusion

In this article, we describe how to retrieve request mapping endpoints in a Spring Boot application by using the Event listener, Spring Boot Actuator, and Swagger library.

As usual, all code samples used in this tutorial are available over on GitHub.

The post Get All Endpoints in Spring Boot first appeared on Baeldung.
       

Creating a Read-Only Repository with Spring Data

$
0
0

1. Overview

In this short tutorial, we'll discuss how to create a read-only Spring Data Repository.

It's sometimes necessary to read data out of a database without having to modify it. In this case, having a read-only Repository interface would be perfect.

It'll provide the ability to read data without the risk of anyone changing it.

2. Extending Repository

Let's begin with a Spring Boot project that includes the spring-boot-starter-data-jpa dependency:

<dependency>
    <groupId>org.springframework.boot</groupId>
    <artifactId>spring-boot-starter-data-jpa</artifactId>
    <version>2.4.3</version>
</dependency>

Included in this dependency is Spring Data's popular CrudRepository interface, which comes with methods for all the basic CRUD operations (create, read, update, delete) that most applications need. However, it includes several methods that modify data, and we need a repository that only has the ability to read data.

CrudRepository actually extends another interface called Repository. We can also extend this interface to fit our needs.

Let's create a new interface that extends Repository:

@NoRepositoryBean
public interface ReadOnlyRepository<T, ID> extends Repository<T, ID> {
    Optional<T> findById(ID id);
    List<T> findAll();
}

Here, we've only defined two read-only methods. The entity that is accessed by this repository will be safe from any modification.

It is also important to note that we must use the @NoRepositoryBean annotation to tell Spring that we want this repository to remain generic. This allows us to reuse our read-only repository for as many different entities as we want.

Next, we'll see how to tie an entity to our new ReadOnlyRepository.

3. Extending ReadOnlyRepository

Let's assume we have a simple Book entity that we would like to access:

@Entity
public class Book {
    @Id
    @GeneratedValue
    private Long id;
    private String author;
    private String title;
    //getters and setters
}

Now that we have a persistable entity, we can create a repository interface that inherits from our ReadOnlyRepository:

public interface BookReadOnlyRepository extends ReadOnlyRepository<Book, Long> {
    List<Book> findByAuthor(String author);
    List<Book> findByTitle(String title);
}

In addition to the two methods that it inherits, we've added two more Book-specific read-only methods: findByAuthor() and findByTitle(). In total, this repository has access to four read-only methods.

Finally, let's write a test that will ensure the functionality of our BookReadOnlyRepository:

@Test
public void givenBooks_whenUsingReadOnlyRepository_thenGetThem() {
    Book aChristmasCarolCharlesDickens = new Book();
    aChristmasCarolCharlesDickens.setTitle("A Christmas Carol");
    aChristmasCarolCharlesDickens.setAuthor("Charles Dickens");
    bookRepository.save(aChristmasCarolCharlesDickens);
    Book greatExpectationsCharlesDickens = new Book();
    greatExpectationsCharlesDickens.setTitle("Great Expectations");
    greatExpectationsCharlesDickens.setAuthor("Charles Dickens");
    bookRepository.save(greatExpectationsCharlesDickens);
    Book greatExpectationsKathyAcker = new Book();
    greatExpectationsKathyAcker.setTitle("Great Expectations");
    greatExpectationsKathyAcker.setAuthor("Kathy Acker");
    bookRepository.save(greatExpectationsKathyAcker);
    List<Book> charlesDickensBooks = bookReadOnlyRepository.findByAuthor("Charles Dickens");
    Assertions.assertEquals(2, charlesDickensBooks.size());
    List<Book> greatExpectationsBooks = bookReadOnlyRepository.findByTitle("Great Expectations");
    Assertions.assertEquals(2, greatExpectationsBooks.size());
    List<Book> allBooks = bookReadOnlyRepository.findAll();
    Assertions.assertEquals(3, allBooks.size());
    
    Long bookId = allBooks.get(0).getId();
    Book book = bookReadOnlyRepository.findById(bookId).orElseThrow(NoSuchElementException::new);
    Assertions.assertNotNull(book);
}

In order to save the books into the database before reading them back out, we created a BookRepository that extends CrudRepository in the test scope. This repository is not needed in the main project scope but was necessary for this test.

public interface BookRepository
  extends BookReadOnlyRepository, CrudRepository<Book, Long> {}

We were able to test all four of our read-only methods and can now reuse the ReadOnlyRepository interface for other entities.

4. Conclusion

We learned how to extend Spring Data's Repository interface in order to create a reusable read-only repository. After that, we tied it to a simple Book entity and wrote a test that proved its functionality works as we would expect.

As always, a working example of this code can be found over on GitHub.

The post Creating a Read-Only Repository with Spring Data first appeared on Baeldung.
       

Java Weekly, Issue 377

$
0
0

1. Spring and Java

>> The Arrival of Java 16! [inside.java]

Java 16 is released – pattern matching, records, Unix-domain sockets, packaging tool, Vector API, and many more!

>> Announcing Spring Native Beta! [spring.io]

Building native images for Spring projects – taking advantage of GraalVM native images in Spring projects with the Spring Native module!

>> Backpressure in Reactive Systems [blog.frankel.ch]

An overview of backpressure in different implementations: RxJava, Project Reactor, and Kotlin Coroutines.

Also worth reading:

Webinars and presentations:

Time to upgrade:

2. Technical

>> Stop re-writing pipelines! Why GitHub Actions drive the future of CI/CD [blog.codecentric.de]

On different generations of CI/CD platforms: reducing the boilerplate when creating CI/CD pipelines!

Also worth reading:

3. Musings

>> CUPID – The Back Story [dannorth.net]

A critical take on SOLID principles: why SOLID principles aren't a good fit for today's standards and what are the alternatives!

Also worth reading:

4. Comics

And my favorite Dilberts of the week:

>> Non-Covid Cough [dilbert.com]

>> Closing Credits [dilbert.com]

>> Disinfecting Keyboard [dilbert.com]

5. Pick of the Week

>> The Virtue of Delayed Gratification [markmanson.net]

The post Java Weekly, Issue 377 first appeared on Baeldung.
       

Paging and Async Calls with the Kubernetes API

$
0
0

1. Introduction

In this tutorial, we continue to explore the Kubernetes API for Java. This time, we'll focus on two of its features: paging and asynchronous calls.

2. Paging

In a nutshell, paging allows us to iterate over a large result set in chunks, a.k.a pages – hence the name of this method. In the context of the Kubernetes Java API, this feature is available in all methods that return a list of resources. Those methods always include two optional parameters that we can use to iterate over the results:

  • limit: maximum number of items returned in a single API call
  • continue: A continuation token that tells the server the starting point for the returned result set

Using those parameters, we can iterate over an arbitrary number of items without putting too much pressure on the server. Even better, the amount of memory required on the client-side to hold the results is also bounded.

Now, let's see how to use those parameters to get a list of all available pods in a cluster using this method:

ApiClient client = Config.defaultClient();
CoreV1Api api = new CoreV1Api(client);
String continuationToken = null;
do {
    V1PodList items = api.listPodForAllNamespaces(
      null,
      continuationToken, 
      null,
      null, 
      2, 
      null, 
      null,
      null,
      10,
      false);
    continuationToken = items.getMetadata().getContinue();
    items.getItems()
      .stream()
      .forEach((node) -> System.out.println(node.getMetadata()));
} while (continuationToken != null);

Here, the second parameter to the listPodForAllNamespaces() API call contains the continuation token, and the fifth is the limit parameter. While the limit is usually just a fixed value, continue requires a little extra effort.

For the first call, we send a null value, signaling the server that this is the first call of paged request sequence. Upon receiving the response, we get the new value for the next continue value to use from the corresponding list metadata field.

This value will be null when there are no more results available, so we use this fact to define the exit condition for the iteration loop.

2.1. Pagination Gotchas

The paging mechanism is quite straightforward, but there are a few details we must keep in mind:

  • Currently, the API does not support server-side sorting. Given the current lack of storage-level support for sorting, this is unlikely to change anytime soon
  • All call parameters, except for continue, must be the same between calls
  • The continue value must be treated as an opaque handle. We should never make any assumptions about its value
  • Iteration is one-way. We cannot go back in the result set using a previously received continue token
  • Even though the returned list metadata contains a remainingItemCount field, its value is neither reliable nor supported by all implementations

2.2. List Data Consistency

Since a Kubernetes cluster is a very dynamic environment, there's a possibility that the result set associated with a paginated call sequence gets modified while being read by the client. How does the Kubernetes API behave in this case?

As explained in Kubernetes documentation, list APIs support a resourceVersion parameter which, together with resourceVersionMatch, define how a particular version is selected for inclusion. However, for the paged result set case, the behavior is always the same: “Continue Token, Exact”.

This means that the returned resource versions corresponded to those available when the paginated list call started. While this approach provides consistency, it will not include results modified afterward. For instance, by the time we finish iterating over all pods in a large cluster, some of them may already have terminated.

3. Async Calls

So far, we've used the Kubernetes API in a synchronous way, which is fine for simple programs but not very efficient from a resource usage viewpoint, as it blocks the calling thread until we receive a response from the cluster and process it. This behavior will hurt the responsiveness of an application badly if, for instance, we start to make those calls in a GUI thread.

Fortunately, the library supports an asynchronous mode based on callbacks, which returns the control to the caller immediately.

Inspecting the CoreV1Api class, we'll notice that, for each synchronous xxx() method, there's also a xxxAsync() variant. For example, the async method for listPodForAllNamespaces() is listPodForAllNamespacesAsync(). The arguments are the same, with the addition of an extra parameter for the callback implementation.

3.1. Callback Details

The callback parameter object must implement the generic interface ApiCallback<T>, which contains just four methods:

  • onSuccess: Called if and only if the call succeeded. The first argument type is the same that would be returned by the synchronous version
  • onFailure: Called there was an error calling the server or the reply contains an error code
  • onUploadProgress: Called during an upload. We can use this callback to provide feedback to a user during a lengthy operation
  • onDownloadProgress: Same as onUploadProgress, but for downloads

Async calls also don't return a regular result. Instead, they return an OkHttp's (the underlying REST client used by the Kubernetes API) Call instance, which works as a handle to the undergoing call. We can use this object to poll the completion state or, if we want, cancel it before completion.

3.2. Async Call Example

As we can imagine, implementing callbacks everywhere requires a lot of boilerplate code. To avoid this, we'll use an invocation helper that simplifies this task a bit:

// Start async call
CompletableFuture<V1NodeList> p = AsyncHelper.doAsync(api,(capi,cb) ->
  capi.listNodeAsync(null, null, null, null, null, null, null, null, 10, false, cb)
);
p.thenAcceptAsync((nodeList) -> {
    nodeList.getItems()
      .stream()
      .forEach((node) -> System.out.println(node.getMetadata()));
});
// ... do something useful while we wait for results

Here, the helper wraps the asynchronous call invocation and adapts it to a more standard CompletableFuture. This allows us to use it with other libraries, such as those from the Reactor Project. In this example, we've added a completion stage that prints all metadata to the standard output.

As usual, when dealing with futures, we must be aware of concurrency issues that may arise. The online version of this code contains some debugging logs that clearly show that, even for this simple code, at least three threads were used:

  • The main thread, which kicks the async call
  • OkHttp's threads used to make the actual HTTP call
  • The completion thread, where the results are processed

4. Conclusion

In this article, we have seen how to use paging and asynchronous calls with the Kubernetes Java API.

As usual, the full source code of the examples can be found over on GitHub.

The post Paging and Async Calls with the Kubernetes API first appeared on Baeldung.
       

Spring Reactive Guide

$
0
0

Returning Stream vs. Collection

$
0
0

1. Overview

The Java 8 Stream API offers an efficient alternative over Java Collections to render or process a result set. However, it's a common dilemma to decide which one to use when.

In this article, we'll explore Stream and Collection and discuss various scenarios that suit their respective uses.

2. Collection vs. Stream

Java Collections offer efficient mechanisms to store and process the data by providing data structures like ListSet, and Map.

However, the Stream API is useful for performing various operations on the data without the need for intermediate storage. Therefore, a Stream works similarly to directly accessing the data from the underlying storage like collections and I/O resources.

Additionally, the collections are primarily concerned with providing access to the data and ways to modify it. On the other hand, streams are concerned with transmitting data efficiently.

Although Java allows easy conversion from Collection to Stream and vice-versa, it's handy to know which is the best possible mechanism to render/process a result set.

For instance, we can convert a Collection into a Stream using the stream and parallelStream methods:

public Stream<String> userNames() {
    ArrayList<String> userNameSource = new ArrayList<>();
    userNameSource.add("john");
    userNameSource.add("smith");
    userNameSource.add("tom");
    return userNames.stream();
}

Similarly, we can convert a Stream into a Collection using the collect method of the Stream API:

public List<String> userNameList() {
    return userNames().collect(Collectors.toList());
}

Here, we've converted a Stream into a List using the Collectors.toList() method. Similarly, we can convert a Stream into a Set or into a Map:

public static Set<String> userNameSet() {
    return userNames().collect(Collectors.toSet());
}
public static Map<String, String> userNameMap() {
    return userNames().collect(Collectors.toMap(u1 -> u1.toString(), u1 -> u1.toString()));
}

3. When to Return a Stream?

3.1. High Materialization Cost

The Stream API offers lazy execution and filtering of the results on the go, the most effective ways to lower the materialization cost.

For instance, the readAllLines method in the Java NIO Files class renders all the lines of a file, for which the JVM has to hold the entire file contents in memory. So, this method has a high materialization cost involved in returning the list of lines.

However, the Files class also provides the lines method that returns a Stream that we can use to render all the lines or even better restrict the size of the result set using the limit method – both with lazy execution:

Files.lines(path).limit(10).collect(toList());

Also, a Stream doesn't perform the intermediate operations until we invoke terminal operations like forEach over it:

userNames().filter(i -> i.length() >= 4).forEach(System.out::println);

Therefore, a Stream avoids the costs associated with premature materialization.

3.2. Large or Infinite Result

Streams are designed for better performance with large or infinite results. Therefore, it's always a good idea to use a Stream for such a use case.

Also, in the case of infinite results, we usually don't process the entire result set. So, Stream API's built-in features like filter and limit prove handy in processing the desired result set, making the Stream a preferable choice.

3.3. Flexibility

Streams are very flexible in allowing the processing of the results in any form or order.

A Stream is an obvious choice when we don't want to enforce a consistent result set to the consumer. Additionally, the Stream is a great choice when we want to offer much-needed flexibility to the consumer.

For instance, we can filter/order/limit the results using various operations available on the Stream API:

public static Stream<String> filterUserNames() {
    return userNames().filter(i -> i.length() >= 4);
}
public static Stream<String> sortUserNames() {
    return userNames().sorted();
}
public static Stream<String> limitUserNames() {
    return userNames().limit(3);
}

3.4. Functional Behavior

A Stream is functional. It doesn't allow any modification to the source when processed in different ways. Therefore, it's a preferred choice to render an immutable result set.

For instance, let's filter and limit a set of results received from the primary Stream:

userNames().filter(i -> i.length() >= 4).limit(3).forEach(System.out::println);

Here, operations like filter and limit on the Stream return a new Stream every time and don't modify the source Stream provided by the userNames method.

4. When to Return a Collection?

4.1. Low Materialization Cost

We can choose collections over streams when rendering or processing the results involving low materialization cost.

In other words, Java constructs a Collection eagerly by computing all the elements at the beginning. Hence, a Collection with a large result set puts a lot of pressure on the heap memory in materialization.

Therefore, we should consider a Collection to render a result set that doesn't put much pressure on the heap memory for its materialization.

4.2. Fixed Format

We can use a Collection to enforce a consistent result set for the user. For instance, Collections like TreeSet and TreeMap return naturally ordered results.

In other words, with the use of the Collection, we can ensure each consumer receives and processes the same result set in identical order.

4.3. Reuseable Result

When a result is returned in the form of a Collection, it can be easily traversed multiple times. However, a Stream is considered consumed once traversed and throws IllegalStateException when reused:

public static void tryStreamTraversal() {
    Stream<String> userNameStream = userNames();
    userNameStream.forEach(System.out::println);
    
    try {
        userNameStream.forEach(System.out::println);
    } catch(IllegalStateException e) {
        System.out.println("stream has already been operated upon or closed");
    }
}

Therefore, returning a Collection is a better choice when it's obvious that a consumer will traverse the result multiple times.

4.4. Modification

A Collection, unlike a Stream, allows modification of the elements like adding or removing elements from the result source. Hence, we can consider using collections to return the result set to allow modifications by the consumer.

For example, we can modify an ArrayList using add/remove methods:

userNameList().add("bob");
userNameList().add("pepper");
userNameList().remove(2);

Similarly, methods like put and remove allow modification on a map:

Map<String, String> userNameMap = userNameMap();
userNameMap.put("bob", "bob");
userNameMap.remove("alfred");

4.5. In-Memory Result

Additionally, it's an obvious choice to use a Collection when a materialized result in the form of the collection is already present in memory.

5. Conclusion

In this article, we compared Stream vs. Collection and examined various scenarios that suit them.

We can conclude that Stream is a great candidate to render large or infinite result sets with benefits like lazy initialization, much-needed flexibility, and functional behavior.

However, when we require a consistent form of the results, or when low materialization is involved, we should choose a Collection over a Stream.

As usual, the source code is available over on GitHub.

The post Returning Stream vs. Collection first appeared on Baeldung.
       

Mocking Static Methods With Mockito

$
0
0

1. Overview

More often than not, when writing unit tests, we'll encounter a situation where we need to mock a static method. Previous to version 3.4.0 of Mockito, it wasn't possible to mock static methods directly – only with the help of PowerMockito.

In this tutorial, we'll take a look at how we can now mock static methods using the latest version of Mockito. To learn more about testing with Mockito, check out our comprehensive Mockito series.

2. A Simple Static Utility Class

Throughout this tutorial, the focus of our tests will be a simple static utility class:

public class StaticUtils {
    private StaticUtils() {}
    public static List<Integer> range(int start, int end) {
        return IntStream.range(start, end)
          .boxed()
          .collect(Collectors.toList());
    }
    public static String name() {
        return "Baeldung";
    }
}

For demonstration purposes, we have one method with some arguments and another one that simply returns a String.

3. Dependencies

Let's get started by adding the mockito-inline dependency to our pom.xml:

<dependency>
    <groupId>org.mockito</groupId>
    <artifactId>mockito-inline</artifactId>
    <version>3.8.0</version>
    <scope>test</scope>
</dependency>

It's worth noting that at some point, as per the documentation, this functionality may well be integrated into the more familiar mockito-core dependency.

4. A Quick Word on Testing Static Methods

Generally speaking, some might say that when writing clean object-orientated code, we shouldn't need to mock static classes. This could typically hint at a design issue or code smell in our application.

Firstly because a class depending on a static method has tight coupling, and secondly, it nearly always leads to code that is difficult to test. Ideally, a class should not be responsible for obtaining its dependencies, and if possible, they should be externally injected.

Therefore, it's always worth investigating if we can refactor our code to make it more testable. Of course, this is not always possible, and sometimes we're obliged to mock static methods.

5. Mocking a No Argument Static Method

Let's go ahead and see how we can mock the name method from our StaticUtils class:

@Test
void givenStaticMethodWithNoArgs_whenMocked_thenReturnsMockSuccessfully() {
    assertThat(StaticUtils.name()).isEqualTo("Baeldung");
    try (MockedStatic<StaticUtils> utilities = Mockito.mockStatic(StaticUtils.class)) {
        utilities.when(StaticUtils::name).thenReturn("Eugen");
        assertThat(StaticUtils.name()).isEqualTo("Eugen");
    }
    assertThat(StaticUtils.name()).isEqualTo("Baeldung");
}

As previously mentioned, since Mockito 3.4.0, we can use the Mockito.mockStatic(Class<T> classToMock) method to mock invocations to static method calls. This method returns a MockedStatic object for our type, which is a scoped mock object.

Therefore in our unit test above, the utilities variable represents a mock with a thread-local explicit scope. It's important to note that scoped mocks must be closed by the entity that activates the mock. This is why we define our mock within a try-with-resources construct so that the mock is closed automatically when we finish with our scoped block.

This is a particularly nice feature as it assures that our static mock remains temporary. As we know, if we're playing around with static method calls during our test runs, this will likely lead to adverse effects in our test results due to the concurrent and sequential nature of running tests.

On top of this, another nice side effect is that our tests will still run super fast as Mockito doesn't need to replace the classloader for every test.

In our example, we re-iterate this point by checking, before and after our scoped block, that our static method name returns a real value.

6. Mocking a Static Method With Arguments

Now, let's see another common use case when we need to mock a method that has arguments:

@Test
void givenStaticMethodWithArgs_whenMocked_thenReturnsMockSuccessfully() {
    assertThat(StaticUtils.range(2, 6)).containsExactly(2, 3, 4, 5);
    try (MockedStatic<StaticUtils> utilities = Mockito.mockStatic(StaticUtils.class)) {
        utilities.when(() -> StaticUtils.range(2, 6))
          .thenReturn(Arrays.asList(10, 11, 12));
        assertThat(StaticUtils.range(2, 6)).containsExactly(10, 11, 12);
    }
    assertThat(StaticUtils.range(2, 6)).containsExactly(2, 3, 4, 5);
}

As we can see, we follow the same approach as previously, except this time around, we use a lambda expression inside our when clause where we specify the method along with any arguments that we want to mock. Pretty straightforward!

7. Conclusion

In this quick article, we've seen a couple of examples of how we can use Mockito to mock static methods. In conclusion, Mockito provides a graceful solution using a narrower scope for mocked static objects via one small lambda.

As always, the full source code of the article is available over on GitHub.

The post Mocking Static Methods With Mockito first appeared on Baeldung.
       

Java Weekly, Issue 378

$
0
0

1. Spring and Java

>> JEP 401: Primitive Objects (Preview) [openjdk.java.net]

Efficiency or abstraction? Pick two! – the proposal for user-defined primitive objects for Java and JVM. Good stuff coming.

>> What's new in JDK 16 for ZGC [malloc.se]

Squeezing the last bit of performance for ZGC in Java 16 – introducing sub-millisecond max pause times and in-place relocations.

>> Kicking Spring Native's tires [blog.frankel.ch]

And the first look at native images for Spring Boot – using a non-trivial application to demonstrate the great Spring-GraalVM integration.

Also worth reading:

Webinars and presentations:

Time to upgrade:

2. Technical

>> Optimistic vs. Pessimistic Locking [vladmihalcea.com]

Evaluating the optimistic and pessimistic concurrency models from the perspective of different anomalies!

Also worth reading:

3. Musings

>> Happy 15th Birthday Amazon S3 [allthingsdistributed.com]

The service that started AWS – Amazon's CTO reflects on the challenges that triggered the creation of S3.

Also worth reading:

4. Comics

And my favorite Dilberts of the week:

>> Tina Asks For Help [dilbert.com]

>> Because Of The Pandemic [dilbert.com]

>> Mask During Zoom [dilbert.com]

5. Pick of the Week

Spring has been the way to go to build a web application in the Java ecosystem for almost two decades at this point. Adding Kotlin into the mix, along with Java, can be quite powerful. 

The interoperability between Kotlin and Java is a no-brainer – making incremental, small steps very easy to do.  

Here's a great starting point to explore the language

>> Getting Started with Kotlin

And, for a deep dive into Kotlin with Spring, definitely have a look at the official (and ongoing) ‘Spring time in Kotlin video series here

Enjoy.

The post Java Weekly, Issue 378 first appeared on Baeldung.
       

How to Check if a Database Table Exists with JDBC

$
0
0

1. Introduction

In this tutorial, we'll look at how we can check if a table exists in the database using JDBC and pure SQL.

2. Using DatabaseMetaData

JDBC gives us tools to read and write data to the database. Besides actual data stored in tables, we can read metadata describing the database. To do that, we'll use the DatabaseMetaData object that we can obtain from the JDBC connection:

DatabaseMetaData databaseMetaData = connection.getMetaData();

DatabaseMetaData provides a lot of informative methods, but we will need only one: getTables. Let's use it to print all available tables:

ResultSet resultSet = databaseMetaData.getTables(null, null, null, new String[] {"TABLE"});
while (resultSet.next()) {
    String name = resultSet.getString("TABLE_NAME");
    String schema = resultSet.getString("TABLE_SCHEM");
    System.out.println(name + " on schema " + schema);
}

Because we didn't provide the first three parameters, we got all tables in all catalogs and schemas. We could also narrow our query to, for example, only one schema:

ResultSet resultSet = databaseMetaData.getTables(null, "PUBLIC", null, new String[] {"TABLE"});

3. Checking if Table Exists With DatabaseMetaData

If we want to check if a table exists, we don't need to iterate over the result set. We only need to check if the result set isn't empty. Let's first create an “EMPLOYEE” table:

connection.createStatement().executeUpdate("create table EMPLOYEE (id int primary key auto_increment, name VARCHAR(255))");

Now we can use the metadata object to assert that the table we just created actually exists:

boolean tableExists(Connection connection, String tableName) throws SQLException {
    DatabaseMetaData meta = connection.getMetaData();
    ResultSet resultSet = meta.getTables(null, null, tableName, new String[] {"TABLE"});
    return resultSet.next();
}

Mind that while SQL isn't case-sensitive, the implementation of the getTables method is. Even if we define a table with lowercase letters, it will be stored in uppercase. Because of that, the getTables method will operate on uppercase table names, so we need to use “EMPLOYEE” and not “employee”.

4. Check if Table Exists With SQL

While DatabaseMetaData is convenient, we may need to use pure SQL to achieve the same goal. To do so, we need to take a look at the “tables” table located in schema “information_schema“. It's a part of the SQL-92 standard, and it's implemented by most major database engines (with the notable exception of Oracle).

Let's query the “tables” table and count how many results are fetched. We expect one if the table exists and zero if it doesn't:

SELECT count(*) FROM information_schema.tables
WHERE table_name = 'EMPLOYEE' 
LIMIT 1;

Using it with JDBC is a matter of creating a simple prepared statement and then checking if the resulting count isn't equal to zero:

static boolean tableExistsSQL(Connection connection, String tableName) throws SQLException {
    PreparedStatement preparedStatement = connection.prepareStatement("SELECT count(*) "
      + "FROM information_schema.tables "
      + "WHERE table_name = ?"
      + "LIMIT 1;");
    preparedStatement.setString(1, tableName);
    ResultSet resultSet = preparedStatement.executeQuery();
    resultSet.next();
    return resultSet.getInt(1) != 0;
}

5. Conclusion

In this tutorial, we learned how to find information about table existence in the database. We used both JDBC's DatabaseMetaData and pure SQL.

As usual, all the code examples are available over on GitHub.

The post How to Check if a Database Table Exists with JDBC first appeared on Baeldung.
       

Count Query In jOOQ

$
0
0

1. Overview

In this tutorial, we'll demonstrate how to perform a count query using jOOQ Object-Oriented Querying, also known as just jOOQ. jOOQ is a popular Java database library that helps you to write typesafe SQL queries in Java.

2. jOOQ

jOOQ is an ORM-alternative. Unlike most other ORMs, jOOQ is relational model-centric and not domain model-centric. Hibernate, for example, helps us to write Java code that is then automatically translated to SQL. However, jOOQ allows us to create relational objects in the database using SQL, and it then generates the Java code to map to those objects.

3. Maven Dependencies

We'll need the jooq module in this tutorial:

<dependency>
    <groupId>org.jooq</groupId>
    <artifactId>jooq</artifactId>
    <version>3.14.8</version>
</dependency>

4. Count Query

Let's say we have an author table in our database. The author table contains an id, first_name, and last_name.

Running a count query can be accomplished in a few different ways.

4.1. fetchCount

DSL.fetchCount has more than one way to count the number of records in the table.

First, let's look at the fetchCount​(Table<?> table) method to count the number of records:

int count = dsl.fetchCount(DSL.selectFrom(AUTHOR));
Assert.assertEquals(3, count);

Next, let's try the fetchCount​(Table<?> table) method with the selectFrom method and where clause to count the number of records:

int count = dsl.fetchCount(DSL.selectFrom(AUTHOR)
  .where(AUTHOR.FIRST_NAME.equalIgnoreCase("Bryan")));
Assert.assertEquals(1, count);

Now, let's try the fetchCount​(Table<?> table, Condition condition) method to count the number of records:

int count = dsl.fetchCount(AUTHOR, AUTHOR.FIRST_NAME.equalIgnoreCase("Bryan"));
Assert.assertEquals(1, count);

We can also use the fetchCount​(Table<?> table, Collection<? extends Condition> conditions) method for multiple conditions:

Condition firstCond = AUTHOR.FIRST_NAME.equalIgnoreCase("Bryan");
Condition secondCond = AUTHOR.ID.notEqual(1);
List<Condition> conditions = new ArrayList<>();
conditions.add(firstCond);
conditions.add(secondCond);
int count = dsl.fetchCount(AUTHOR, conditions);
Assert.assertEquals(1, count);

In this case, we're adding filter conditions to a list and providing it to the fetchCount method.

The fetchCount method also allows varargs for multiple conditions:

Condition firstCond = AUTHOR.FIRST_NAME.equalIgnoreCase("Bryan");
Condition secondCond = AUTHOR.ID.notEqual(1);
int count = dsl.fetchCount(AUTHOR, firstCond, secondCond);
Assert.assertEquals(1, count);

4.2. count

Let's try the count method to get the number of available records:

int count = dsl.select(DSL.count()).from(AUTHOR)
  .fetchOne(0, int.class);
Assert.assertEquals(3, count);

4.3. selectCount

Now, let's try to use the selectCount method to get the count of the available records:

int count = dsl.selectCount().from(AUTHOR)
  .where(AUTHOR.FIRST_NAME.equalIgnoreCase("Bryan"))
  .fetchOne(0, int.class);
Assert.assertEquals(1, count);

4.4. Simple select

We can also use a simple select method to get the count of the available records:

int count = dsl.select().from(AUTHOR).execute();
Assert.assertEquals(3, count);

4.5. Count With groupBy

Let's try to use the select and count methods to find the count of records grouped by a field:

Result<Record2<String, Integer>> result = dsl.select(AUTHOR.FIRST_NAME, DSL.count())
  .from(AUTHOR).groupBy(AUTHOR.FIRST_NAME).fetch();
Assert.assertEquals(3, result.size());
Assert.assertEquals(result.get(0).get(0), "Bert");
Assert.assertEquals(result.get(0).get(1), 1);

5. Conclusion

In this article, we've looked at how to perform a count query in jOOQ.

We've looked at using the selectCount, count, fetchCount, select, and count with groupBy methods to count the number of records.

As usual, all code samples used in this tutorial are available over on GitHub.

The post Count Query In jOOQ first appeared on Baeldung.
       

Java Class File Naming Conventions

$
0
0

 1. Overview

When a Java class is compiled, a class file with the same name is created. However, in the case of nested classes or nested interfaces, it creates a class file with a name combining the inner and outer class names, including a dollar sign.

In this article, we'll see all those scenarios.

2. Details

In Java, we can write a class within a class. The class written within is called the nested class, and the class that holds the nested class is called the outer class. The scope of a nested class is bounded by the scope of its enclosing class.

Similarly, we can declare an interface within another interface or class. Such an interface is called a nested interface.

We can use nested classes and interfaces to logically group entities that are only used in one place. This not only makes our code more readable and maintainable, but it also increases encapsulation.

In the next sections, we're going to discuss each of these in detail. We'll also take a look at enums.

3. Nested Classes

A nested class is a class that is declared inside another class or interface. Any time we need a separate class but still want that class to behave as part of another class, the nested class is the best way to achieve it.

When we compile a Java file, it creates a .class file for the enclosing class and separate class files for all the nested classes. The generated class file for the enclosing class will have the same name as the Java class.

For nested classes, the compiler uses a different naming convention – OuterClassName$NestedClassName.class

First of all, let's create a simple Java class:

public class Outer {
// variables and methods...
}
When we compile the Outer class, the compiler will create an Outer.class file.
In the next subsections, we'll add nested classes in the Outer class and see how class files are named.

3.1. Static Nested Classes

As the name suggests, nested classes that are declared as static are called static nested classes. In Java, only nested classes are allowed to be static.

Static nested classes can have both static and non-static fields and methods. They are tied to the outer class and not with a particular instance. Hence, we don’t need an instance of the outer class to access them.

Let's declare a static nested class within our Outer class:

public class Outer {
    static class StaticNested {
        public String message() {
            return "This is a static Nested Class";
        }
    }
}

When we compile our Outer class, the compiler creates two class files, one for Outer and another for StaticNested:

3.2. Non-Static Nested Classes

Non-static nested classes – also called inner classes – are associated with an instance of the enclosing class, and they can access all the variables and methods of the outer class.

An outer class can have only public or default access, whereas an inner class can be private, public, protected, or with default access. However, they can't contain any static members. Also, we need to create an instance of the outer class to access the inner class.

Let's add one more nested class to our Outer class:

public class Outer {
    class Nested {
        public String message() {
            return "This is a non-static Nested Class";
        }
    }
}

It generates one more class file:

3.3. Local Classes

Local classes, also called inner classes, are defined in a block — a group of statements between balanced braces. For example, they can be in a method body, a for loop, or an if clause. The scope of the local class is restricted within the block just like the local variables. Local classes, when compiled, appear as a dollar sign with an auto-generated number.

The class file generated for the local class uses a naming convention – OuterClassName$1LocalClassName.class

Let's declare a local class within a method:

public String message() {
    class Local {
        private String message() {
            return "This is a Local Class within a method";
        }
    }
    Local local = new Local();
    return local.message();
}

The compiler creates a separate class file for our Local class:

Similarly, we can declare a local class within an if clause:

public String message(String name) {
    if (StringUtils.isEmpty(name)) {
        class Local {
            private String message() {
                return "This is a Local class within if clause";
            }
        }
        Local local = new Local();
        return local.message();
    } else
        return "Welcome to " + name;
}

Although we're creating another local class with the same name, the compiler doesn't complain. It creates one more class file and names it with the number increased:

3.4. Anonymous Inner Classes

As the name suggests, anonymous classes are the inner classes with no name. The compiler uses an auto-generated number after a dollar sign to name the class file.

We need to declare and instantiate anonymous classes in a single expression at the same time. They usually extend an existing class or implement an interface.

Let's see a quick example:

public String greet() {
    Outer anonymous = new Outer() {
        @Override
        public String greet() {
            return "Running Anonymous Class...";
        }
    };
    return anonymous.greet();
}

Here, we've created an anonymous class by extending the Outer class, and the compiler added one more class file:

Similarly, we can implement an interface with an anonymous class.

Here, we're creating an interface:

interface HelloWorld {
    public String greet(String name);
}

Now, let's create an anonymous class:

public String greet(String name) {
    HelloWorld helloWorld = new HelloWorld() {
        @Override
        public String greet(String name) {
            return "Welcome to "+name;
        }
    };
    return helloWorld.greet(name);
}

Let's observe the revised list of class files:

As we see, a class file is generated for the interface HelloWorld and another one for the anonymous class with the name Outer$2.

3.5. Inner Class Within Interface

We have seen class inside another class, further, we can declare a class within an interface. If the functionality of class is closely associated with interface functionality, we can declare it inside the interface. We can go for this inner class when we want to write the default implementation for interface methods.

Let's declare an inner class inside our HelloWorld interface:

interface HelloWorld {
    public String greet(String name);
    class InnerClass implements HelloWorld {
        @Override
        public String message(String name) {
            return "Inner class within an interface";
        }
    }
}

And the compiler generates one more class file:

4. Nested Interfaces

Nested interfaces, also known as inner interfaces, are declared inside a class or another interface. The main purpose of using nested interfaces is to resolve the namespace by grouping related interfaces.

We can't directly access nested interfaces. They can only be accessed using the outer class or outer interface. For example, the Entry interface inside the Map interface is nested and can be accessed as Map.Entry.

Let's see how to create nested interfaces.

4.1. Interface Inside an Interface

An interface declared inside the interface is implicitly public.

Let's declare our interface inside the HelloWorld interface:

interface HelloWorld {
    public String greet(String name);
    
    interface HelloSomeone{
        public String greet(String name);
    }
}

This will create a new class file named HelloWorld$HelloSomeone for the nested interface.

4.2. Interface Inside a Class

Interfaces declared inside the class can take any access modifier.

Let's declare an interface inside our Outer class:

public class Outer {
     interface HelloOuter {
        public String hello(String name);
    }
}

It will generate a new class file with the name: OuterClass$StaticNestedClass

5. Enums

The enum was introduced in Java 5. It's a data type that contains a fixed set of constants, and those constants are the instances of that enum.

The enum declaration defines a class called an enum type (also known as enumerated data type). We can add many things to the enum like a constructor, methods, variables, and something called a constant-specific class body.

When we create an enum, we're creating a new class, and we’re implicitly extending the Enum class. Enum cannot inherit any other class or can't be extended. However, it can implement an interface.

We can declare an enum as a standalone class, in its own source file, or another class member. Let's see all the ways to create an enum.

5.1. Enum as a Class

First, let's create a simple enum:

enum Level {
    LOW, MEDIUM, HIGH;
}

When it is compiled, the compiler will create a class file with the name Level for our enum.

5.2. Enum Within a Class

Now, let's declare a nested enum in our Outer class:

public class Outer {
    enum Color{ 
        RED, GREEN, BLUE; 
    }
}

The compiler will create a separate class file named Outer$Color for our nested enum.

5.3. Enum Within an Interface

Similarly, we can declare an enum within an interface:

interface HelloWorld {
    enum DIRECTIONS {
        NORTH, SOUTH, EAST, WEST;
    }
}

When the HelloWorld interface is compiled, the compiler will add one more class file named HelloWorld$Directon.

5.4. Enum Within an Enum

We can declare an enum inside another enum:

enum Foods {
    DRINKS, EATS;
    enum DRINKS {
        APPLE_JUICE, COLA;
    }
    enum EATS {
        POTATO, RICE;
    }
}

Finally, let's take a look at the generated class files:

The compiler creates a separate class file for each of the enum types.

6. Conclusion

In this article, we saw different naming conventions used for Java class files. We added classes, interfaces, and enums inside a single Java file and observed how the compiler creates a separate class file for each of them.

As always, the code examples for this article are available over on GitHub.

The post Java Class File Naming Conventions first appeared on Baeldung.
       

Solving Spring’s “not eligible for auto-proxying” Warning

$
0
0

1. Overview

In this short tutorial, we'll see how to track down the cause of Spring's “not eligible for auto-proxying” message and how to fix it. 

First, we'll create a simple real-life code example that causes the message to appear during an application startup. Then, we'll explain the reason why this happens.

Finally, we'll present a solution to the problem by showing a working code example.

2. Cause of the “not eligible for auto proxying” Message

2.1. Example Configuration

Before we explain the cause of the message, let's build an example that causes the message to appear during the application startup.

First, we'll create a custom RandomInt annotation. We'll use it to annotate fields that should have a random integer from a specified range inserted into them:

@Retention(RetentionPolicy.RUNTIME)
public @interface RandomInt {
    int min();
    int max();
}

Second, let's create a DataCache class that is a simple Spring component. We want to assign to cache a random group that might be used, for example, to support sharding. To do that, we'll annotate that field with our custom annotation:

@Component
public class DataCache {
    @RandomInt(min = 2, max = 10)
    private int group;
    private String name;
}

Now, let's look at the RandomIntGenerator class. It's a Spring component that we'll use to insert random int values into fields annotated by the RandomInt annotation:

@Component
public class RandomIntGenerator {
    private Random random = new Random();
    private DataCache dataCache;
    public RandomIntGenerator(DataCache dataCache) {
        this.dataCache = dataCache;
    }
    public int generate(int min, int max) {
        return random.nextInt(max - min) + min;
    }
}

It's important to notice that we're autowiring the DataCache class into the RandomIntGenerator via constructor injection.

Finally, let's create a RandomIntProcessor class that will be responsible for finding fields annotated with the RandomInt annotation and inserting random values into them:

public class RandomIntProcessor implements BeanPostProcessor {
    private final RandomIntGenerator randomIntGenerator;
    public RandomIntProcessor(RandomIntGenerator randomIntGenerator) {
        this.randomIntGenerator = randomIntGenerator;
    }
    @Override
    public Object postProcessBeforeInitialization(Object bean, String beanName) throws BeansException {
        Field[] fields = bean.getClass().getDeclaredFields();
        for (Field field : fields) {
            RandomInt injectRandomInt = field.getAnnotation(RandomInt.class);
            if (injectRandomInt != null) {
                int min = injectRandomInt.min();
                int max = injectRandomInt.max();
                int randomValue = randomIntGenerator.generate(min, max);
                field.setAccessible(true);
                ReflectionUtils.setField(field, bean, randomValue);
            }
        }
        return bean;
    }
}

It uses an implementation of the org.springframework.beans.factory.config.BeanPostProcessor interface to access annotated fields right before class initialization.

2.2. Testing Our Example

Even though everything compiles correctly, when we run our Spring application and watch its logs, we'll see a “not eligible for auto proxying” message generated by Spring's BeanPostProcessorChecker class:

INFO org.springframework.context.support.PostProcessorRegistrationDelegate$BeanPostProcessorChecker - Bean 'randomIntGenerator' of type [com.baeldung.autoproxying.RandomIntGenerator] is not eligible for getting processed by all BeanPostProcessors (for example: not eligible for auto-proxying)

What's more, we see that our DataCache bean that depends on this mechanism has not been initialized as we intended:

@RunWith(SpringJUnit4ClassRunner.class)
@ContextConfiguration(classes = {RandomIntProcessor.class, DataCache.class, RandomIntGenerator.class})
public class NotEligibleForAutoProxyingIntegrationTest {
    private RandomIntProcessor randomIntProcessor;
    @Autowired
    private DataCache dataCache;
    @Test
    public void givenAutowireInBeanPostProcessor_whenSpringContextInitialize_thenNotEligibleLogShouldShow() {
        assertEquals(0, dataCache.getGroup());
    }
}

However, it's worth mentioning that even though the message shows up, the application does not crash.

2.3. Analyzing the Cause

The warning is caused by the RandomIntProcessor class and its autowired dependencies. Classes that implement the BeanPostProcessor interface are instantiated on startup, as part of the special startup phase of the ApplicationContext, before any other beans.

Moreover, the AOP auto-proxying mechanism is also the implementation of a BeanPostProcessor interface. As a result, neither BeanPostProcessor implementations nor the beans they reference directly are eligible for auto-proxying. What that means is that Spring's features that use AOP, such as autowiring, security, or transactional annotations, won't work as expected in those classes.

In our case, we were able to autowire the DataCache instance into the RandomIntGenerator class without any problems. However, the group field was not populated with a random integer.

3. How to Fix the Error

In order to get rid of the “not eligible for auto proxying” message, we need to break the cycle between the BeanPostProcessor implementation and its bean dependencies. In our case, we need to tell the IoC container to initialize the RandomIntGenerator bean lazily. We can use Spring's Lazy annotation:

public class RandomIntProcessor implements BeanPostProcessor {
    private final RandomIntGenerator randomIntGenerator;
    @Lazy
    public RandomIntProcessor(RandomIntGenerator randomIntGenerator) {
        this.randomIntGenerator = randomIntGenerator;
    }
    @Override
    public Object postProcessBeforeInitialization(Object bean, String beanName) throws BeansException {
        //...
    }
}

Spring initializes the RandomIntGenerator bean when the RandomIntProcessor requests it in the postProcessBeforeInitialization method. At that moment, Spring's IoC container instantiates all existing beans that are also eligible for auto-proxying.

In fact, if we run our application, we won't see a “not eligible for auto proxying” message in the logs. What's more, the DataCache bean will have a group field populated with a random integer:

@RunWith(SpringJUnit4ClassRunner.class)
@ContextConfiguration(classes = {RandomIntProcessor.class, DataCache.class, RandomIntGenerator.class})
public class NotEligibleForAutoProxyingIntegrationTest {
    private RandomIntProcessor randomIntProcessor;
    @Autowired
    private DataCache dataCache;
    @Test
    public void givenAutowireInBeanPostProcessor_whenSpringContextInitialize_thenGroupFieldShouldBePopulated() {
        assertNotEquals(0, dataCache.getGroup());
    }
}

4. Conclusion

In this article, we learned how to track down and fix the cause of Spring's “not eligible for auto-proxying” message. Lazy initialization breaks the cycle of dependencies during bean construction.

As always, the example code is available over on GitHub.

The post Solving Spring’s “not eligible for auto-proxying” Warning first appeared on Baeldung.
       
Viewing all 4464 articles
Browse latest View live


<script src="https://jsc.adskeeper.com/r/s/rssing.com.1596347.js" async> </script>