Quantcast
Channel: Baeldung
Viewing all 4464 articles
Browse latest View live

Open API Server Implementation Using OpenAPI Generator

$
0
0

1. Overview

As the name suggests, the OpenAPI Generator generates code from an OpenAPI specification. It can create code for client libraries, server stubs, documentation and configuration.

It supports various languages and frameworks. Notably, there's support for C++, C#, Java, PHP, Python, Ruby, Scala – almost all the widely used ones.

In this tutorial, we'll learn how to implement a Spring-based server stub using OpenAPI Generator via its maven plugin. Other ways of using the generator are through its CLI or online tools.

2. YAML File

To begin with, we'll need a YAML file specifying the API. We'll give it as input to our generator to produce a server stub.

Here's a snippet of our petstore.yml:

openapi: "3.0.0"
paths:
  /pets:
    get:
      summary: List all pets
      operationId: listPets
      tags:
        - pets
      parameters:
        - name: limit
          in: query
          ...
      responses:
        ...
    post:
      summary: Create a pet
      operationId: createPets
      ...
  /pets/{petId}:
    get:
      summary: Info for a specific pet
      operationId: showPetById
      ...
components:
  schemas:
    Pet:
      type: object
      required:
        - id
        - name
      properties:
        id:
          type: integer
          format: int64
        name:
          type: string
        tag:
          type: string
    Error:
      type: object
      required:
        - code
        - message
      properties:
        code:
          type: integer
          format: int32
        message:
          type: string

3. Maven Dependencies

3.1. Plugin for OpenAPI Generator

Next, let's add the Maven dependency for the generator plugin:

<plugin>
    <groupId>org.openapitools</groupId>
    <artifactId>openapi-generator-maven-plugin</artifactId>
    <version>5.1.0</version>
    <executions>
        <execution>
            <goals>
                <goal>generate</goal>
            </goals>
            <configuration>
                <inputSpec>
                    ${project.basedir}/src/main/resources/petstore.yml
                </inputSpec>
                <generatorName>spring</generatorName>
                <apiPackage>com.baeldung.openapi.api</apiPackage>
                <modelPackage>com.baeldung.openapi.model</modelPackage>
                <supportingFilesToGenerate>
                    ApiUtil.java
                </supportingFilesToGenerate>
                <configOptions>
                    <delegatePattern>true</delegatePattern>
                </configOptions>
            </configuration>
        </execution>
    </executions>
</plugin>

As we can see, we passed in the YAML file as inputSpec. After that, since we need a Spring-based server, we used the generatorName as spring.

Then apiPackage specifies the package name where the API will be generated into. Next, we have the modelPackage where the generator places the data models. With delegatePattern set to true, we're asking to create an interface that can be implemented as a customized @Service class.

Importantly, options for OpenAPI Generator are the same whether you're using the CLI, Maven/Gradle Plugins, or online generation options.

3.2. Spring Dependencies

As we'll be generating a Spring server, we also need its dependencies (Spring Boot Starter Web and Spring Data JPA) so that generated code compiles and runs as expected:

<dependencies>
    <dependency>
        <groupId>org.springframework.boot</groupId>
        <artifactId>spring-boot-starter-web</artifactId>
        <version>2.4.4</version>
    </dependency>
    <dependency>
        <groupId>org.springframework.data</groupId>
        <artifactId>spring-data-jpa</artifactId>
        <version>2.4.6</version>
    </dependency>
</dependencies>

4. Code Generation

To generate the server stub, we simply need to run:

mvn clean install

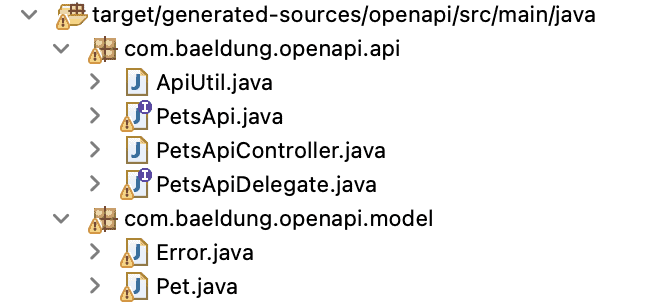
As a result, we get:

Now let's take a look at the code, starting with the contents of apiPackage.

First, we get an API interface called PetsApi, that contains all the requests mappings as defined in the YAML specification. Here's the snippet:

@javax.annotation.Generated(value = "org.openapitools.codegen.languages.SpringCodegen", 
  date = "2021-03-22T23:26:32.308871+05:30[Asia/Kolkata]")
@Validated
@Api(value = "pets", description = "the pets API")
public interface PetsApi {
    /**
     * GET /pets : List all pets
     *
     * @param limit How many items to return at one time (max 100) (optional)
     * @return A paged array of pets (status code 200)
     *         or unexpected error (status code 200)
     */
    @ApiOperation(value = "List all pets", nickname = "listPets", notes = "", 
      response = Pet.class, responseContainer = "List", tags={ "pets", })
    @ApiResponses(value = { @ApiResponse(code = 200, message = "A paged array of pets", 
      response = Pet.class, responseContainer = "List"),
      @ApiResponse(code = 200, message = "unexpected error", response = Error.class) })
    @GetMapping(value = "/pets", produces = { "application/json" })
    default ResponseEntity<List> listPets(@ApiParam(
      value = "How many items to return at one time (max 100)") 
      @Valid @RequestParam(value = "limit", required = false) Integer limit) {
        return getDelegate().listPets(limit);
    }
    // other generated methods
}

Second, since we're using the delegate pattern, OpenAPI also generates a delegator interface called PetsApiDelegate for us. In particular, methods declared in this interface return an HTTP status of 501 Not Implemented by default:

@javax.annotation.Generated(value = "org.openapitools.codegen.languages.SpringCodegen", 
  date = "2021-03-22T23:26:32.308871+05:30[Asia/Kolkata]")
public interface PetsApiDelegate {
    /**
     * GET /pets : List all pets
     *
     * @param limit How many items to return at one time (max 100) (optional)
     * @return A paged array of pets (status code 200)
     *         or unexpected error (status code 200)
     * @see PetsApi#listPets
     */
    default ResponseEntity<List<Pet>> listPets(Integer limit) {
        getRequest().ifPresent(request -> {
            for (MediaType mediaType: MediaType.parseMediaTypes(request.getHeader("Accept"))) {
                if (mediaType.isCompatibleWith(MediaType.valueOf("application/json"))) {
                    String exampleString = "{ \"name\" : \"name\", \"id\" : 0, \"tag\" : \"tag\" }";
                    ApiUtil.setExampleResponse(request, "application/json", exampleString);
                    break;
                }
            }
        });
        return new ResponseEntity<>(HttpStatus.NOT_IMPLEMENTED);
    }
    // other generated method declarations
}

After that, we see there's a PetsApiController class, that simply wires in the delegator:

@javax.annotation.Generated(value = "org.openapitools.codegen.languages.SpringCodegen", 
  date = "2021-03-22T23:26:32.308871+05:30[Asia/Kolkata]")
@Controller
@RequestMapping("${openapi.swaggerPetstore.base-path:}")
public class PetsApiController implements PetsApi {
    private final PetsApiDelegate delegate;
    public PetsApiController(
      @org.springframework.beans.factory.annotation.Autowired(required = false) PetsApiDelegate delegate) {
        this.delegate = Optional.ofNullable(delegate).orElse(new PetsApiDelegate() {});
    }
    @Override
    public PetsApiDelegate getDelegate() {
        return delegate;
    }
}

In the modelPackage, a couple of data model POJOs called Error and Pet are generated, based on the schemas defined in our YAML input.

Let's look at one of them – Pet:

@javax.annotation.Generated(value = "org.openapitools.codegen.languages.SpringCodegen", 
  date = "2021-03-22T23:26:32.308871+05:30[Asia/Kolkata]")
public class Pet {
  @JsonProperty("id")
  private Long id;
  @JsonProperty("name")
  private String name;
  @JsonProperty("tag")
  private String tag;
  // constructor
  @ApiModelProperty(required = true, value = "")
  @NotNull
  public Long getId() {
    return id;
  }
  // other getters and setters
  // equals, hashcode, and toString methods
}

5. Testing the Server

Now all that is required for the server stub to be functional as a server, is to add an implementation of the delegator interface.

To keep things simple, here we won't do that and only test the stub. Moreover, before doing that we'll need a Spring Application:

@SpringBootApplication
public class Application {
    public static void main(String[] args) {
        SpringApplication.run(Application.class, args);
    }
}

5.1. Test Using curl

After starting up the application, we'll simply run the command:

curl -I http://localhost:8080/pets/

And here's the expected result:

HTTP/1.1 501 
Content-Length: 0
Date: Fri, 26 Mar 2021 17:29:25 GMT
Connection: close

5.2. Integration Tests

Alternatively, we can write a simple integration test for the same:

@RunWith(SpringRunner.class)
@SpringBootTest
@AutoConfigureMockMvc
public class OpenApiPetsIntegrationTest {
    private static final String PETS_PATH = "/pets/";
    @Autowired
    private MockMvc mockMvc;
    @Test
    public void whenReadAll_thenStatusIsNotImplemented() throws Exception {
        this.mockMvc.perform(get(PETS_PATH)).andExpect(status().isNotImplemented());
    }
    @Test
    public void whenReadOne_thenStatusIsNotImplemented() throws Exception {
        this.mockMvc.perform(get(PETS_PATH + 1)).andExpect(status().isNotImplemented());
    }
}

6. Conclusion

In this tutorial, we saw how to generate a Spring-based server stub from a YAML specification using the OpenAPI generator's maven plugin.

As a next step, we can also use it to generate a client.

As always, source code is available over on GitHub.

The post Open API Server Implementation Using OpenAPI Generator first appeared on Baeldung.
       

Java Weekly, Issue 379

$
0
0

1. Spring and Java

>> JEP 406: Pattern Matching for switch (Preview) [openjdk.java.net]

Patterns meet switch expressions – the proposal to use pattern matching on switching cases!

>> A (definitive?) guide on LazyInitializationException [blog.frankel.ch]

Taming lazy entity associations – introducing solutions such as eager relationships, OSIV, DTOs, Hibernate Hydrate, fetch join, and entity graphs.

>> Performance of running Spring Boot as AWS Lambda functions [arnoldgalovics.com]

Productivity vs performance: comparing Spring Boot with vanilla Java in a serverless configuration. Good stuff.

Also worth reading:

Webinars and presentations:

Time to upgrade:

2. Technical

>> SQL Server deadlock trace flags [vladmihalcea.com]

Hunting down deadlock causes in SQL server – taking advantage of trace flags and error logs for root cause analysis!

Also worth reading:

3. Musings

>> Disconnecting From Work is a Skill We Need to Rebuild [morethancoding.com]

Tips for improving productivity and creativity by getting disconnected from work!

Also worth reading:

4. Comics

And my favorite Dilberts of the week:

>> Dogbert Crisis Consultant [dilbert.com]

>> Cut Pay For No Commute [dilbert.com]

>> Reschedule The Zoom Call [dilbert.com]

5. Pick of the Week

>> Why Most Programmers End Up Being (or Are) Underperforming Technical Leads [betterprogramming.pub]

The post Java Weekly, Issue 379 first appeared on Baeldung.
       

How to Enable All Endpoints in Spring Boot Actuator

$
0
0

1. Overview

In this tutorial, we're going to learn how to enable all the endpoints in the Spring Boot Actuator. We'll start with the necessary Maven dependencies. From there, we'll look at how to control our endpoints via our properties files. We'll finish up with an overview of how to secure our endpoints.

There have been several changes between Spring Boot 1.x and Spring Boot 2.x in terms of how actuator endpoints are configured. We'll note these as they come up.

2. Setup

In order to use the actuator, we need to include the spring-boot-starter-actuator in our Maven configuration:

<dependency>
    <groupId>org.springframework.boot</groupId>
    <artifactId>spring-boot-starter-actuator</artifactId>
    <version>2.4.3</version>
</dependency>

Additionally, starting with Spring Boot 2.0, we need to include the web starter if we want our endpoints exposed via HTTP:

<dependency>
    <groupId>org.springframework.boot</groupId>
    <artifactId>spring-boot-starter-web</artifactId>
    <version>2.4.3</version>
</dependency>

3. Enabling and Exposing Endpoints

Starting with Spring Boot 2, we have to enable and expose our endpoints. By default, all endpoints but /shutdown are enabled and only /health and /info are exposed. All endpoints are found at /actuator even if we've configured a different root context for our application.

That means that once we've added the appropriate starters to our Maven configuration, we can access the /health and /info endpoints at http://localhost:8080/actuator/health and http://localhost:8080/actuator/info.

Let's go to http://localhost:8080/actuator and view a list of available endpoints because the actuator endpoints are HATEOS enabled. We should see /health and /info.

{"_links":{"self":{"href":"http://localhost:8080/actuator","templated":false},
"health":{"href":"http://localhost:8080/actuator/health","templated":false},
"info":{"href":"http://localhost:8080/actuator/info","templated":false}}}

3.1. Exposing All Endpoints

Now, let's expose all endpoints except /shutdown by modifying our application.properties file:

management.endpoints.web.exposure.include=*

Once we've restarted our server and accessed the /actuator endpoint again we should see the other endpoints available with the exception of /shutdown:

{"_links":{"self":{"href":"http://localhost:8080/actuator","templated":false},
"beans":{"href":"http://localhost:8080/actuator/beans","templated":false},
"caches":{"href":"http://localhost:8080/actuator/caches","templated":false},
"health":{"href":"http://localhost:8080/actuator/health","templated":false},
"info":{"href":"http://localhost:8080/actuator/info","templated":false},
"conditions":{"href":"http://localhost:8080/actuator/conditions","templated":false},
"configprops":{"href":"http://localhost:8080/actuator/configprops","templated":false},
"env":{"href":"http://localhost:8080/actuator/env","templated":false},
"loggers":{"href":"http://localhost:8080/actuator/loggers","templated":false},
"heapdump":{"href":"http://localhost:8080/actuator/heapdump","templated":false},
"threaddump":{"href":"http://localhost:8080/actuator/threaddump","templated":false},
"metrics":{"href":"http://localhost:8080/actuator/metrics","templated":false},
"scheduledtasks":{"href":"http://localhost:8080/actuator/scheduledtasks","templated":false},
"mappings":{"href":"http://localhost:8080/actuator/mappings","templated":false}}}

3.2. Exposing Specific Endpoints

Some endpoints can expose sensitive data, so let's learn how to be more find-grained about which endpoints we expose.

The management.endpoints.web.exposure.include property can also take a comma-separated list of endpoints. So, let's only expose /beans and /loggers:

management.endpoints.web.exposure.include=beans, loggers

In addition to including certain endpoints with a property, we can also exclude endpoints. Let's expose all the endpoints except /threaddump:

management.endpoints.web.exposure.include=*
management.endpoints.web.exposure.exclude=threaddump

Both the include and exclude properties take a list of endpoints. The exclude property takes precedence over include.

3.3. Enabling Specific Endpoints

Next, let's learn how we can get more fine-grained about which endpoints we have enabled.

First, we need to turn off the default that enables all the endpoints:

management.endpoints.enabled-by-default=false

Next, let's enable and expose only the /health endpoint:

management.endpoint.health.enabled=true
management.endpoints.web.exposure.include=health

With this configuration, we can access only the /health endpoint.

3.4. Enabling Shutdown

Because of its sensitive nature, the /shutdown endpoint is disabled by default.

Let's enable it now by adding a line to our application.properties file:

management.endpoint.shutdown.enabled=true

Now when we query the /actuator endpoint, we should see it listed. The /shutdown endpoint only accepts POST requests, so let's shut down our application gracefully:

curl -X POST http://localhost:8080/actuator/shutdown

4. Securing Endpoints

In a real-world application, we're most likely going to have security on our application. With that in mind, let's secure our actuator endpoints.

First, let's add security to our application by adding the security starter Maven dependency:

<dependency>
    <groupId>org.springframework.boot</groupId>
    <artifactId>spring-boot-starter-security</artifactId>
    <version>2.4.4</version>
</dependency>

For the most basic security, that's all we have to do. Just by adding the security starter, we've automatically applied basic authentication to all exposed endpoints except /info and /health.

Now, let's customize our security to restrict the /actuator endpoints to an ADMIN role.

Let's start by excluding the default security configuration:

@SpringBootApplication(exclude = { 
    SecurityAutoConfiguration.class, 
    ManagementWebSecurityAutoConfiguration.class 
})

Let's note the ManagementWebSecurityAutoConfiguration.class because this will let us apply our own security configuration to the /actuator.

Over in our configuration class, let's configure a couple of users and roles, so we have an ADMIN role to work with:

@Override
protected void configure(AuthenticationManagerBuilder auth) throws Exception {
    PasswordEncoder encoder = PasswordEncoderFactories.createDelegatingPasswordEncoder();
    auth
      .inMemoryAuthentication()
      .withUser("user")
      .password(encoder.encode("password"))
      .roles("USER")
      .and()
      .withUser("admin")
      .password(encoder.encode("admin"))
      .roles("USER", "ADMIN");
}

SpringBoot provides us with a convenient request matcher to use for our actuator endpoints.

Let's use it to lockdown our /actuator to only the ADMIN role:

http.requestMatcher(EndpointRequest.toAnyEndpoint())
  .authorizeRequests((requests) -> requests.anyRequest().hasRole("ADMIN"));

5. Conclusion

In this tutorial, we learned how Spring Boot configures the actuator by default. After that, we customized which endpoints were enabled, disabled, and exposed in our application.properties file. Because Spring Boot configures the /shutdown endpoint differently by default, we learned how to enable it separately.

After learning the basics, we then learned how to configure actuator security.

As always, the example code is available over on GitHub.

The post How to Enable All Endpoints in Spring Boot Actuator first appeared on Baeldung.
       

Common Shortcuts in IntelliJ IDEA

$
0
0

1. Overview

This article looks at the keyboard shortcuts that we need to edit, build, and run Java applications in JetBrains' Java IDE, IntelliJ IDEA. Keyboard shortcuts save us time because we can keep our hands on the keyboard and get things done faster.

We looked at refactoring with IntelliJ IDEA in a previous article, so we don't cover these shortcuts here.

2. The One Shortcut

If we remember just one IntelliJ IDEA shortcut, then it must be Help – Find Action, which is Ctrl + Shift + A in Windows and Shift + Cmd + A in macOS. This shortcut opens a search window with all menu items and other IDE actions, whether they have a keyboard shortcut or not. We can immediately type to narrow our search, use the cursor keys to select a function, and use Enter to execute it.

From now on, we'll list the keyboard shortcuts in parentheses directly behind the menu item name. If the shortcuts differ between Windows and macOS, as they usually do, then we put the Windows shortcut first and the macOS one second.

On macOS computers, the Alt key is typically called Option. We'll still call it Alt in this article to keep our shortcuts brief.

3. Settings

Let's start with configuring IntelliJ IDEA and our project.

We reach the settings of IntelliJ in Windows with File – Settings (Ctrl + Alt + S) and in macOS with IntelliJ IDEA – Preferences (Cmd + ,). To configure our current project, we select the top-level element in the Project view. It has the project name. Then we can open its configuration with File – Project Structure (Ctrl + Alt + Shift + S / Cmd + ;).

4. Navigating to Files

After the configuration, we can start coding. First, we need to get to the file we want to work on.

We pick files by exploring the Project view on the left. We can also create new files in the currently selected location with File – New (Alt + Insert / Cmd + N). To delete the currently selected file/folder, we trigger Edit – Delete (Delete / ). We can switch back from the Project view to the editor with Esc on Windows and on macOS. There is no menu item for this.

To open a class directly, we use Navigate – Class (Ctrl + N / Cmd + O). This applies to Java classes and classes in other languages, such as TypeScript or Dart. If we want to open any file instead, such as HTML or text files, we use Navigate – File (Ctrl + Shift + N / Shift + Cmd + O).

The so-called switcher is the list of currently open files. We can only see the switcher through its shortcut Ctrl + Tab as it has no menu entry. The list of recently opened files is available with View – Recent (Ctrl + E / Cmd + E). If we press that shortcut again, then we see only the recently changed files.

We go to the place of our last code changes with Navigate – Last Edit Location (Ctrl + Shift + Backspace / Shift + Cmd + ⌫). IntelliJ also tracks our editor file locations. We can navigate that history with Navigate – Back (Ctrl + Alt + Left / Cmd + [) and Navigate – Forward (Ctrl + Alt + Right / Cmd + ]).

5. Navigating Within Files

We arrived at the file we want to work on. Now we need to navigate to the right place there.

We jump to a field or method of a class directly with Navigate – File Structure (Ctrl + F12 / Cmd + F12). As with Help – Find Action, we can immediately type to narrow down the members shown, use the cursor keys to select a member, and use Enter to jump to that member. If we want to highlight a member's usages in the current file, we use Edit – Find Usages – Find Usages in File (Ctrl + F7 / Cmd + F7).

We reach the definition of a base class or method with Navigate – Declaration or Usages (Ctrl + B / Cmd + B). As the name suggests, invoking functionality on a base class or method itself shows its usages instead. Since this is such a commonly used functionality, it has a mouse shortcut: Ctrl + Click on Windows and Cmd + Click on macOS. If we need to see all uses of a class or method in our project, we invoke Edit – Find Usages – Find Usages (Alt + F7).

Our code often calls other methods. If we put the cursor inside the method call parentheses, then View – Parameter Info (Ctrl + P / Cmd + P) reveals information on method parameters. In the default IntelliJ IDEA configuration, this parameter information automatically appears after a short delay.

To see the quick documentation window for a type or method, we need View – Quick Documentation (Ctrl + Q / F1). In the default IntelliJ IDEA configuration, the quick documentation automatically appears if we move the mouse cursor over the type or method and wait a bit.

6. Editing Files

6.1. Changing the Code

Once we arrive at the right file and the right place, we can start editing our code.

When we start to type the name of variables, methods, or types, IntelliJ IDEA helps us finish those names with Code – Code Completion – Basic (Ctrl + Space). This function also automatically launches after a brief delay in the default IntelliJ IDEA configuration. We may need to type a closing parenthesis and have to put a semicolon at the end. Code – Code Completion – Complete Current Statement (Ctrl + Shift + Enter / Shift + Cmd + Enter) finishes our current line.

Code – Override Methods (Ctrl + O) lets us pick inherited methods to overwrite. And with Code – Generate (Alt + Insert / Cmd + N), we can create common methods like getters, setters, or toString().

We can use Code – Surround with (Ctrl + Alt + T / Alt + Cmd +T) to put control structures around our code, such as an if statement. We can even comment out a whole block of code with Code – Comment with Block Comment. That is Ctrl + Shift + / in Windows and Alt + Cmd + / in macOS.

IntelliJ IDEA automatically saves our code, for instance, before running it. We can still save all files manually with File – Save all (Ctrl + S / Cmd + S).

6.2. Navigating the Code

Sometimes, we need to move code around in our file. Code – Move Statement Up (Ctrl + Shift + Up / Alt + Shift +Up) and Code – Move Statement Down (Ctrl + Shift + Down / Alt + Shift +Down) do that for the currently selected code. If we have nothing selected, then the current line is moved. Similarly, Edit – Duplicate Line or Selection (Ctrl + D / Cmd + D) duplicates either the selected code or the current line.

We can cycle through errors in the current file with Navigate – Next Highlighted Error (F2) and Navigate – Previous Highlighted Error (Shift + F2). If we put the cursor on incorrect code and hit Alt + Enter, IntelliJ IDEA will suggest fixes. There is no menu item for this shortcut. That shortcut may also suggest changes to our code if it doesn't have errors.

7. Find and Replace

We often need to find and replace code. Here's how we can do this in the current file or all files.

To find text in our current file, we use Edit – Find – Find (Ctrl + F / Cmd + F). To replace text in our current file, we use Edit – Find – Replace (Ctrl + R / Cmd + R). In both cases, we move through the search results with Edit – Find – Find Next Occurrence (F3 / Cmd + G) and Edit – Find – Find Previous Occurrence (Shift + F3 / Shift + Cmd + G).

We can also find text in all our files with Edit – Find – Find in Files (Ctrl + Shift + F / Shift + Cmd + F). Likewise, Edit – Find – Replace in Files (Ctrl + Shift + R / Shift + Cmd +R) replaces text in all our files. We can still use F3 / Cmd + G and Shift + F3 / Shift + Cmd + G to move through our search result.

8. Build and Run

We want to run our project when we finish coding.

When we run our project, IntelliJ IDEA typically builds our projects automatically. With Build – Build Project (Ctrl + F9 / Cmd + F9), we validate manually if our recent code changes still compile. And we can rebuild our entire project from scratch with Build – Rebuild Project (Ctrl + Shift + F9 / Shift + Cmd + F9).

To run our project with the current run configuration, we use Run – Run ‘(configuration name)' (Shift + F10 / Ctrl + R). We execute a particular run configuration with Run – Run… (Alt + Shift + F10 / Ctrl + Alt + R). In the same vein, we can debug the current run configuration with Run – Debug ‘(configuration name)' (Shift + F9 / Ctrl + D) and any other run configuration with Run – Debug (Alt + Shift + F9 / Ctrl + Alt + D).

9. Debugging

Our project will have bugs. Debugging helps us find and fix these bugs.

The debugger stops at breakpoints. We view the current breakpoints with Run – View Breakpoints (Ctrl + Shift + F8 / Shift + Cmd + F8). We can toggle a breakpoint at the current line with Run – Toggle Breakpoint – Line Breakpoint (Ctrl + F8 / Cmd + F8).

When our code hits a breakpoint during debugging, we can step over the current line with Run – Debugging Actions – Step Over (F8). So if that line is a method, we'll execute that entire method in one fell swoop. Alternatively, we can dive into the method at the current line with Run – Debugging Actions – Step Into (F7).

When debugging, we may want to run our code until the current method is finished. That's what Run – Debugging Actions – Step Out (Shift + F8) does. If we want our program to run to the line where our cursor is, then Run – Debugging Actions – Run to Cursor (Alt + F9) accomplishes this. And if we want our program just to run until it encounters the next breakpoint, then Run – Debugging Actions – Resume Program (F9) does just that.

10. Git

Our programs typically reside in a Git repository. IntelliJ IDEA has excellent support for Git.

We have one keyboard shortcut to give us all possible Git operations: Git – VCS Operations (Alt + ` / Ctrl + V). As expected, we can select items with the cursor and hit Enter to execute them. This is also a good way to reach commonly used functionality that doesn't have keyboard shortcuts by default, such as Show History or Show Diff.

If we want to update our project from a remote Git repository, then we go for Git – Update Project (Ctrl + T / Cmd + T). When we need to commit our changes in Git, then Git – Commit (Ctrl + K / Cmd + K) is available. To revert our changes to what's in Git, we use Git – Uncommitted Changes – Rollback (Ctrl + Alt + Z / Alt + Cmd + Z). And Git – Push (Ctrl + Shift + K / Shift + Cmd + K) pushes our changes to a remote Git repository.

11. Conclusion

Keyboard shortcuts save us time because we can keep our hands on the keyboard and get things done faster. This article looked at shortcuts for configuring, navigating, editing, finding and replacing, running, and debugging our programs in IntelliJ IDEA.

We also looked at the shortcuts for working with Git.

The post Common Shortcuts in IntelliJ IDEA first appeared on Baeldung.
       

Spring Boot With JavaServer Pages (JSP)

$
0
0

1. Introduction

When building Web Applications, JavaServer Pages (JSP) is one option we can use as a templating mechanism for our HTML pages. On the other hand, Spring Boot is a popular framework we can use to bootstrap our Web Application.

In this tutorial, we are going to see how we can use JSP together with Spring Boot to build a web application. First, we'll see how to set up our application to work in different deployment scenarios. Then, we'll go on to see some common usages of JSP. Finally, we'll explore the various options we have when packaging our application.

A quick side note here is that JSP has limitations on its own and even more so when combined with Spring Boot. Hence, we should consider Thymeleaf or FreeMarker as better alternatives to JSP.

2. Maven Dependencies

Let's see what dependencies we need to support Spring Boot with JSP.

We'll also note the subtleties between running our application as a standalone application and running in a web container.

2.1. Running as a Standalone Application

First of all, let's include the spring-boot-starter-web dependency. This dependency provides all the core requirements to get a web application running with Spring Boot along with a default Embedded Tomcat Servlet Container:

<dependency>
    <groupId>org.springframework.boot</groupId>
    <artifactId>spring-boot-starter-web</artifactId>
    <version>2.4.4</version>
</dependency>

Check out our article on Comparing Embedded Servlet Containers in Spring Boot for more information on how to configure an Embedded Servlet Container other than Tomcat.

We should take special note that Undertow does not support JSP when used as an Embedded Servlet Container.

Next, we need to include the tomcat-embed-jasper dependency to allow our application to compile and render JSP pages:

<dependency>
    <groupId>org.apache.tomcat.embed</groupId>
    <artifactId>tomcat-embed-jasper</artifactId>
    <version>9.0.44</version>
</dependency>

While the above two dependencies can be provided manually, it's usually better to let Spring Boot manage these dependency versions while we simply manage the Spring Boot version.

This version management can be done either by using the Spring Boot parent POM, as shown in our article Spring Boot Tutorial – Bootstrap a Simple Application, or by using dependency management as shown in our article Spring Boot Dependency Management with a Custom Parent.

Finally, we need to include the jstl library, which will provide the JSTL tags support required in our JSP pages:

<dependency>
    <groupId>javax.servlet</groupId>
    <artifactId>jstl</artifactId>
    <version>1.2</version>
</dependency>

2.2. Running in a Web Container (Tomcat)

We still need the above dependencies when running in a Tomcat web container.

However, to avoid dependencies provided by our application clashing with the ones provided by the Tomcat runtime, we need to set two dependencies with provided scope:

<dependency>
    <groupId>org.apache.tomcat.embed</groupId>
    <artifactId>tomcat-embed-jasper</artifactId>
    <version>9.0.44</version>
    <scope>provided</scope>
</dependency>
<dependency>
    <groupId>org.springframework.boot</groupId>
    <artifactId>spring-boot-starter-tomcat</artifactId>
    <version>2.4.4</version>
    <scope>provided</scope>
</dependency>

Note that we had to explicitly define spring-boot-starter-tomcat and mark it with the provided scope. This is because it was already a transitive dependency provided by spring-boot-starter-web.

3. View Resolver Configuration

As per convention, we place our JSP files in the ${project.basedir}/main/webapp/WEB-INF/jsp/ directory. We need to let Spring know where to locate these JSP files by configuring two properties in the application.properties file:

spring.mvc.view.prefix: /WEB-INF/jsp/
spring.mvc.view.suffix: .jsp

When compiled, Maven will ensure that the resulting WAR file will have the above jsp directory placed inside the WEB-INF directory, which will then be served by our application.

4. Bootstrapping Our Application

Our main application class will be affected by whether we are planning to run as a standalone application or in a web container.

When running as a standalone application, our application class will be a simple @SpringBootApplication annotated class along with the main method:

@SpringBootApplication(scanBasePackages = "com.baeldung.boot.jsp")
public class SpringBootJspApplication {
    public static void main(String[] args) {
        SpringApplication.run(SpringBootJspApplication.class);
    }
}

However, if we need to deploy in a web container, we need to extend SpringBootServletInitializer. This binds our application's Servlet, Filter, and ServletContextInitializer to the runtime server, which is necessary for our application to run:

@SpringBootApplication(scanBasePackages = "com.baeldung.boot.jsp")
public class SpringBootJspApplication extends SpringBootServletInitializer {
    @Override
    protected SpringApplicationBuilder configure(SpringApplicationBuilder builder) {
        return builder.sources(SpringBootJspApplication.class);
    }
    public static void main(String[] args) {
        SpringApplication.run(SpringBootJspApplication.class);
    }
}

5. Serving a Simple Web Page

JSP pages rely on the JavaServer Pages Standard Tag Library (JSTL) to provide common templating features like branching, iterating, and formatting, and it even provides a set of predefined functions.

Let's create a simple web page that shows a list of books saved in our application.

Say we have a BookService that helps us lookup all Book objects:

public class Book {
    private String isbn;
    private String name;
    private String author;
    //getters, setters, constructors and toString
}
public interface BookService {
    Collection<Book> getBooks();
    Book addBook(Book book);
}

We can write a Spring MVC Controller to expose this as a web page:

@Controller
@RequestMapping("/book")
public class BookController {
    private final BookService bookService;
    public BookController(BookService bookService) {
        this.bookService = bookService;
    }
    @GetMapping("/viewBooks")
    public String viewBooks(Model model) {
        model.addAttribute("books", bookService.getBooks());
        return "view-books";
    }
}

Notice above that the BookController will return a view template called view-books. According to our previous configuration in application.properties, Spring MVC will look for view-books.jsp inside the /WEB-INF/jsp/ directory.

We'll need to create this file in that location:

<%@ page contentType="text/html;charset=UTF-8" language="java" %>
<%@taglib prefix="c" uri="http://java.sun.com/jsp/jstl/core"%>
<html>
    <head>
        <title>View Books</title>
        <link href="https://feeds.feedblitz.com/~/t/0/_/baeldung/~<c:url value="/css/common.css"/>" rel="stylesheet" type="text/css">
    </head>
    <body>
        <table>
            <thead>
                <tr>
                    <th>ISBN</th>
                    <th>Name</th>
                    <th>Author</th>
                </tr>
            </thead>
            <tbody>
                <c:forEach items="${books}" var="book">
                    <tr>
                        <td>${book.isbn}</td>
                        <td>${book.name}</td>
                        <td>${book.author}</td>
                    </tr>
                </c:forEach>
            </tbody>
        </table>
    </body>
</html>

The above example shows us how to use the JSTL <c:url> tag to link to external resources like JavaScript and CSS. We normally place these under the ${project.basedir}/main/resources/static/ directory.

We can also see how the JSTL <c:forEach> tag can be used to iterate over the books model attribute provided by our BookController.

6. Handling Form Submissions

Let's now see how we can handle form submissions with JSP. Our BookController will need to provide MVC endpoints to serve the form to add books and to handle the form submission:

public class BookController {
    //already existing code
    @GetMapping("/addBook")
    public String addBookView(Model model) {
        model.addAttribute("book", new Book());
        return "add-book";
    }
    @PostMapping("/addBook")
    public RedirectView addBook(@ModelAttribute("book") Book book, RedirectAttributes redirectAttributes) {
        final RedirectView redirectView = new RedirectView("/book/addBook", true);
        Book savedBook = bookService.addBook(book);
        redirectAttributes.addFlashAttribute("savedBook", savedBook);
        redirectAttributes.addFlashAttribute("addBookSuccess", true);
        return redirectView;
    } 
}

We'll create the following add-book.jsp file (remember to place it in the proper directory):

<%@ taglib prefix="c" uri="http://java.sun.com/jsp/jstl/core" %>
<%@ taglib prefix="form" uri="http://www.springframework.org/tags/form" %>
<%@ page contentType="text/html;charset=UTF-8" language="java" %>
<html>
    <head>
        <title>Add Book</title>
    </head>
    <body>
        <c:if test="${addBookSuccess}">
            <div>Successfully added Book with ISBN: ${savedBook.isbn}</div>
        </c:if>
    
        <c:url var="add_book_url" value="/book/addBook"/>
        <form:form action="${add_book_url}" method="post" modelAttribute="book">
            <form:label path="isbn">ISBN: </form:label> <form:input type="text" path="isbn"/>
            <form:label path="name">Book Name: </form:label> <form:input type="text" path="name"/>
            <form:label path="author">Author Name: </form:label> <form:input path="author"/>
            <input type="submit" value="submit"/>
        </form:form>
    </body>
</html>

We use the modelAttribute parameter provided by the <form:form> tag to bind the book attribute added in the addBookView() method in BookController to the form, which in turn, will be filled when submitting the form.

As a result of using this tag, we need to define the form action URL separately (since we can't put tags inside tags). We also use the path attribute found in the <form:input> tag to bind each input field to an attribute in the Book object.

Please see our article on Getting Started with Forms in Spring MVC for more details on how to handle form submissions.

7. Handling Errors

Due to the existing limitations on using Spring Boot with JSP, we can't provide a custom error.html to customize the default /error mapping. Instead, we need to create custom error pages to handle different errors.

7.1. Static Error Pages

We can provide a static error page if we want to display a custom error page for different HTTP errors.

Let's say we need to provide an error page for all 4xx errors thrown by our application. We can simply place a file called 4xx.html under the ${project.basedir}/main/resources/static/error/ directory.

If our application throws a 4xx HTTP error, then Spring will resolve this error and return the provided 4xx.html page.

7.2. Dynamic Error Pages

There are multiple ways in which we can handle exceptions to provide a customized error page along with contextualized information. Let's see how Spring MVC provides this support for us using the @ControllerAdvice and @ExceptionHandler annotations.

Let's say our application defines a DuplicateBookException:

public class DuplicateBookException extends RuntimeException {
    private final Book book;
    public DuplicateBookException(Book book) {
        this.book = book;
    }
    // getter methods
}

Also, let's say our BookServiceImpl class will throw the above DuplicateBookException if we attempt to add two books with the same ISBN:

@Service
public class BookServiceImpl implements BookService {
    private final BookRepository bookRepository;
    // constructors, other override methods
    @Override
    public Book addBook(Book book) {
        final Optional<BookData> existingBook = bookRepository.findById(book.getIsbn());
        if (existingBook.isPresent()) {
            throw new DuplicateBookException(book);
        }
        final BookData savedBook = bookRepository.add(convertBook(book));
        return convertBookData(savedBook);
    }
    // conversion logic
}

Our LibraryControllerAdvice class will then define what errors we want to handle, along with how we're going to handle each error:

@ControllerAdvice
public class LibraryControllerAdvice {
    @ExceptionHandler(value = DuplicateBookException.class)
    public ModelAndView duplicateBookException(DuplicateBookException e) {
        final ModelAndView modelAndView = new ModelAndView();
        modelAndView.addObject("ref", e.getBook().getIsbn());
        modelAndView.addObject("object", e.getBook());
        modelAndView.addObject("message", "Cannot add an already existing book");
        modelAndView.setViewName("error-book");
        return modelAndView;
    }
}

We need to define the error-book.jsp file so that the above error will be resolved here. Make sure to place this under the ${project.basedir}/main/webapp/WEB-INF/jsp/ directory since this is no longer a static HTML, but a JSP template that needs to be compiled.

8. Creating an Executable

If we're planning to deploy our application in a Web Container such as Tomcat, then the choice is straightforward, and we'll use war packaging to achieve this.

However, we should be mindful that we can't use jar packaging if we are using JSP and Spring Boot with an Embedded Servlet Container. Hence, our only option is war packaging if running as a Standalone Application.

Our pom.xml will then, in either case, need to have its packaging directive set to war:

<packaging>war</packaging>

In case we didn't use the Spring Boot parent POM for managing dependencies, we'll need to include the spring-boot-maven-plugin to ensure that the resulting war file is capable of running as a Standalone Application.

We can now run our standalone application with an Embedded Servlet Container or simply drop the resulting war file into Tomcat and let it serve our application.

9. Conclusion

We've touched upon various topics in this tutorial. Let's recap on some key considerations:

  • JSP contains some inherent limitations. Consider Thymeleaf or FreeMarker instead
  • Remember to mark necessary dependencies as provided if deploying on a Web Container
  • Undertow will not support JSP if used as an Embedded Servlet Container
  • If deploying in a web container, our @SpringBootApplication annotated class should extend SpringBootServletInitializer and provide necessary configuration options
  • We can't override the default /error page with JSP. Instead, we need to provide custom error pages
  • JAR packaging is not an option for us if we are using JSP with Spring Boot

As always, the full source code with our examples is available over on GitHub.

The post Spring Boot With JavaServer Pages (JSP) first appeared on Baeldung.
       

Backpressure Mechanism in Spring WebFlux

$
0
0

1. Introduction

Spring WebFlux provides Reactive Programming to web applications. The asynchronous and non-blocking nature of Reactive design improves performance and memory usage. Project Reactor provides those capabilities to efficiently manage data streams.

However, backpressure is a common problem in these kinds of applications. In this tutorial, we'll explain what it is and how to apply backpressure mechanism in Spring WebFlux to mitigate it.

2. Backpressure in Reactive Streams

Due to the non-blocking nature of Reactive Programming, the server doesn't send the complete stream at once. It can push the data concurrently as soon as it is available. Thus, the client waits less time to receive and process the events. But, there are issues to overcome.

Backpressure in software systems is the capability to overload the traffic communication. In other words, emitters of information overwhelm consumers with data they are not able to process.

Eventually, people also apply this term as the mechanism to control and handle it. It is the protective actions taken by systems to control downstream forces.

2.1. What Is Backpressure?

In Reactive Streams, backpressure also defines how to regulate the transmission of stream elements. In other words, control how many elements the recipient can consume.

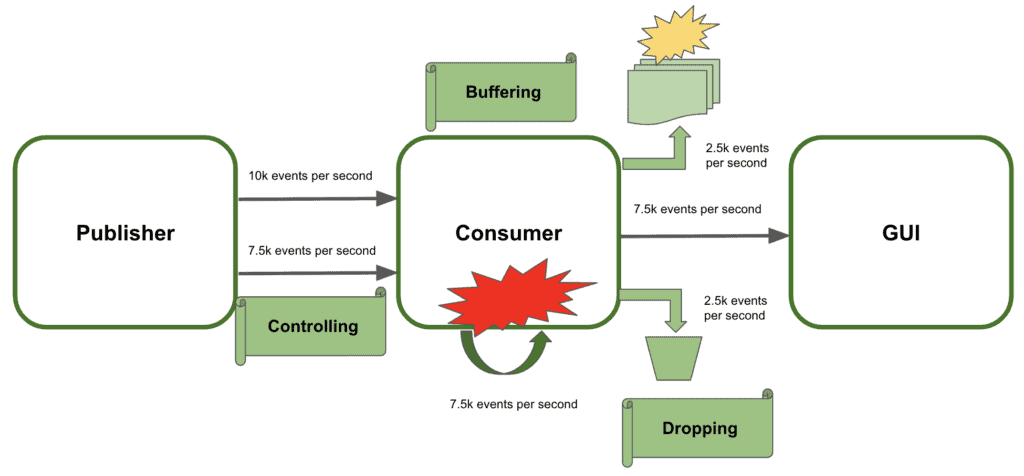
Let's use an example to clearly describe what it is:

  • The system contains three services: the Publisher, the Consumer, and the Graphical User Interface (GUI)
  • The Publisher sends 10000 events per second to the Consumer
  • The Consumer processes them and sends the result to the GUI
  • The GUI displays the results to the users
  • The Consumer can only handle 7500 events per second

At this speed rate, the consumer cannot manage the events (backpressure). Consequently, the system would collapse and the users would not see the results.

2.2. Using Backpressure to Prevent Systemic Failures

The recommendation here would be to apply some sort of backpressure strategy to prevent systemic failures. The objective is to efficiently manage the extra events received:

  • Controlling the data stream sent would be the first option. Basically, the publisher needs to slow down the pace of the events. Therefore, the consumer is not overloaded. Unfortunately, this is not always possible and we would need to find other available options
  • Buffering the extra amount of data is the second choice. With this approach, the consumer stores temporarily the remaining events until it can process them. The main drawback here is to unbind the buffer causing memory crashing
  • Dropping the extra events losing track of them. Even this solution is far from ideal, with this technique the system would not collapse


2.3. Controlling Backpressure

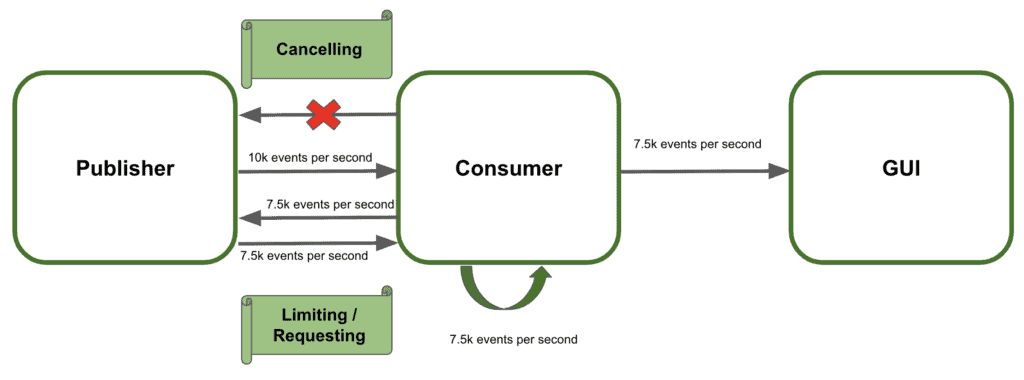
We'll focus on controlling the events emitted by the publisher. Basically, there are three strategies to follow:

  • Send new events only when the subscriber requests them. This is a pull strategy to gather elements at the emitter request
  • Limiting the number of events to receive at the client-side. Working as a limited push strategy the publisher only can send a maximum amount of items to the client at once
  • Canceling the data streaming when the consumer cannot process more events. In this case, the receiver can abort the transmission at any given time and subscribe to the stream later again


3. Handling Backpressure in Spring WebFlux

Spring WebFlux provides an asynchronous non-blocking flow of reactive streams. The responsible for backpressure within Spring WebFlux is the Project Reactor. It internally uses Flux functionalities to apply the mechanisms to control the events produced by the emitter.

WebFlux uses TCP flow control to regulate the backpressure in bytes. But it does not handle the logical elements the consumer can receive. Let's see the interaction flow happening under the hood:

  • WebFlux framework is responsible for the conversion of events to bytes in order to transfer/receive them through TCP
  • It may happen that the consumer starts and long-running job before requesting the next logical element
  • While the receiver is processing the events, WebFlux enqueue bytes without acknowledgment because there is no demand for new events
  • Due to the nature of the TCP protocol, if there are new events the publisher will continue sending them to the network


In conclusion, the diagram above shows that the demand in logical elements could be different for the consumer and the publisher. Spring WebFlux does not ideally manage backpressure between the services interacting as a whole system. It handles it with the consumer independently and then with the publisher in the same way. But it is not taking into account the logical demand between the two services.

So, Spring WebFlux does not handle backpressure as we can expect. Let's see in the next section how to implement backpressure mechanism in Spring WebFlux!

4. Implementing Backpressure Mechanism with Spring WebFlux

We'll use the Flux implementation to handle the control of the events received. Therefore, we'll expose the request and response body with backpressure support on the read and the write side. Then, the producer would slow down or stop until the consumer's capacity frees up. Let's see how to do it!

4.1. Dependencies

To implement the examples, we'll simply add the Spring WebFlux starter and Reactor test dependencies to our pom.xml:

<dependency>
    <groupId>org.springframework.boot</groupId>
    <artifactId>spring-boot-starter-webflux</artifactId>
</dependency>
<dependency>
    <groupId>io.projectreactor</groupId>
    <artifactId>reactor-test</artifactId>
    <scope>test</scope>
</dependency>

4.2. Request

The first option is to give the consumer control over the events it can process. Thus, the publisher waits until the receiver requests new events. In summary, the client subscribes to the Flux and then process the events based on its demand:

@Test
public void whenRequestingChunks10_thenMessagesAreReceived() {
    Flux request = Flux.range(1, 50);
    request.subscribe(
      System.out::println,
      err -> err.printStackTrace(),
      () -> System.out.println("All 50 items have been successfully processed!!!"),
      subscription -> {
          for (int i = 0; i < 5; i++) {
              System.out.println("Requesting the next 10 elements!!!");
              subscription.request(10);
          }
      }
    );
    StepVerifier.create(request)
      .expectSubscription()
      .thenRequest(10)
      .expectNext(1, 2, 3, 4, 5, 6, 7, 8, 9, 10)
      .thenRequest(10)
      .expectNext(11, 12, 13, 14, 15, 16, 17, 18, 19, 20)
      .thenRequest(10)
      .expectNext(21, 22, 23, 24, 25, 26, 27 , 28, 29 ,30)
      .thenRequest(10)
      .expectNext(31, 32, 33, 34, 35, 36, 37 , 38, 39 ,40)
      .thenRequest(10)
      .expectNext(41, 42, 43, 44, 45, 46, 47 , 48, 49 ,50)
      .verifyComplete();

With this approach, the emitter never overwhelms the receiver. In other words, the client is under control to process the events it needs.

We'll test the producer behavior with respect to backpressure with StepVerifier. We'll expect the next n items only when the thenRequest(n) is called.

4.3. Limit

The second option is to use the limitRange() operator from Project Reactor. It allows setting the number of items to prefetch at once. One interesting feature is that the limit applies even when the subscriber requests more events to process. The emitter splits the events into chunks avoiding consuming more than the limit on each request:

@Test
public void whenLimitRateSet_thenSplitIntoChunks() throws InterruptedException {
    Flux<Integer> limit = Flux.range(1, 25);
    limit.limitRate(10);
    limit.subscribe(
      value -> System.out.println(value),
      err -> err.printStackTrace(),
      () -> System.out.println("Finished!!"),
      subscription -> subscription.request(15)
    );
    StepVerifier.create(limit)
      .expectSubscription()
      .thenRequest(15)
      .expectNext(1, 2, 3, 4, 5, 6, 7, 8, 9, 10)
      .expectNext(11, 12, 13, 14, 15)
      .thenRequest(10)
      .expectNext(16, 17, 18, 19, 20, 21, 22, 23, 24, 25)
      .verifyComplete();
}

4.4. Cancel

Finally, the consumer can cancel the events to receive at any moment. For this example, we'll use another approach. Project Reactor allows implementing our own Subscriber or extend the BaseSubscriber. So let's see how the receiver can abort the reception of new events at any time overriding the mentioned class:

@Test
public void whenCancel_thenSubscriptionFinished() {
    Flux<Integer> cancel = Flux.range(1, 10).log();
    cancel.subscribe(new BaseSubscriber<Integer>() {
        @Override
        protected void hookOnNext(Integer value) {
            request(3);
            System.out.println(value);
            cancel();
        }
    });
    StepVerifier.create(cancel)
      .expectNext(1, 2, 3)
      .thenCancel()
      .verify();
}

5. Conclusion

In this tutorial, we showed what backpressure is in Reactive Programming and how to avoid it. Spring WebFlux supports backpressure through Project Reactor. Therefore, it can provide availability, robustness, and stability when the publisher overwhelms the consumer with too many events. In summary, it can prevent systemic failures due to high demand.

As always, the code is available over on GitHub.

The post Backpressure Mechanism in Spring WebFlux first appeared on Baeldung.
       

TLS Setup in Spring

$
0
0

1. Overview

Secure communication plays an important role in modern applications. Communication between client and server over plain HTTP is not secure. For a production-ready application, we should enable HTTPS via the TLS (Transport Layer Security) protocol in our application. In this tutorial, we'll discuss how to enable TLS technology in a Spring Boot application.

2. TLS Protocol

TLS provides protection for data in transit between client and server and is a key component of the HTTPS protocol. The Secure Sockets Layer (SSL) and TLS are often used interchangeably, but they aren’t the same. In fact, TLS is the successor of SSL. TLS can be implemented either one-way or two-way.

2.1. One-Way TLS

In one-way TLS, only the client verifies the server to ensure that it receives data from the trusted server. For implementing one-way TLS, the server shares its public certificate with the clients.

2.2. Two-Way TLS

In two-way TLS or Mutual TLS (mTLS), both the client and server authenticate each other to ensure that both parties involved in the communication are trusted. For implementing mTLS, both parties share their public certificates with each other.

3. Configuring TLS in Spring Boot

3.1. Generating a Key Pair

To enable TLS, we need to create a public/private key pair. For this, we use keytool. The keytool command comes with the default Java distribution. Let's use keytool to generate a key pair and store it in the keystore.p12 file:

keytool -genkeypair -alias baeldung -keyalg RSA -keysize 4096 \
  -validity 3650 -dname "CN=localhost" -keypass changeit -keystore keystore.p12 \
  -storeType PKCS12 -storepass changeit

The keystore file can be in different formats. The two most popular formats are Java KeyStore (JKS) and PKCS#12. JKS is specific to Java, while PKCS#12 is an industry-standard format belonging to the family of standards defined under Public Key Cryptography Standards (PKCS).

3.2. Configuring TLS in Spring

Let's start by configuring one-way TLS. We configure the TLS related properties in the application.properties file:

# enable/disable https
server.ssl.enabled=true
# keystore format
server.ssl.key-store-type=PKCS12
# keystore location
server.ssl.key-store=classpath:keystore/keystore.p12
# keystore password
server.ssl.key-store-password=changeit

When configuring the SSL protocol, we'll use TLS and tell the server to use TLS 1.2:

# SSL protocol to use
server.ssl.protocol=TLS
# Enabled SSL protocols
server.ssl.enabled-protocols=TLSv1.2

To validate that everything works fine, we just need to run the Spring Boot application:

3.3. Configuring mTLS in Spring

For enabling mTLS, we use the client-auth attribute with the need value:

server.ssl.client-auth=need

When we use the need value, client authentication is needed and mandatory. This means that both the client and server must share their public certificate. For storing the client's certificate in the Spring Boot application, we use the truststore file and configure it in the application.properties file:

#trust store location
server.ssl.trust-store=classpath:keystore/truststore.p12
#trust store password
server.ssl.trust-store-password=changeit

The path for the location to the truststore is the file that contains the list of certificate authorities that are trusted by the machine for SSL server authentication. The truststore password is the password to gain access to the truststore file.

4. Configuring TLS in Tomcat

By default, the HTTP protocol without any TLS capabilities is used when Tomcat is started. For enabling TLS in Tomcat, we config the server.xml file:

<Connector
  protocol="org.apache.coyote.http11.Http11NioProtocol"
  port="8443" maxThreads="200"
  scheme="https" secure="true" SSLEnabled="true"
  keystoreFile="${user.home}/.keystore" keystorePass="changeit"
  clientAuth="false" sslProtocol="TLS" sslEnabledProtocols="TLSv1.2"/>

For enabling mTLS, we'll set clientAuth=”true”.

5. Invoking an HTTPS API

For invoking the REST API, we'll use the curl tool:

curl -v http://localhost:8443/baeldung

Since we didn't specify https, it will output an error:

Bad Request
This combination of host and port requires TLS.

This issue is solved by using the https protocol:

curl -v https://localhost:8443/baeldung

However, this gives us another error:

SSL certificate problem: self signed certificate

This happens when we're using a self-signed certificate. To fix this, we must use the server certificate in the client request. First, we'll copy the server certificate baeldung.cer from the server keystore file. Then we'll use the server certificate in the curl request along with the –cacert option:

curl --cacert baeldung.cer https://localhost:8443/baeldung

6. Conclusion

For ensuring the security of the data being transferred between a client and server, TLS can be implemented either one-way or two-way. In this article, we describe how to configure TLS in a Spring Boot application in the application.properties file and in the Tomcat configuration file. As usual, all code samples used in this tutorial are available over on GitHub.

The post TLS Setup in Spring first appeared on Baeldung.
       

RSA in Java

$
0
0

1. Introduction

RSA, or in other words Rivest–Shamir–Adleman, is an asymmetric cryptographic algorithm. It differs from symmetric algorithms like DES or AES by having two keys. A public key that we can share with anyone is used to encrypt data. And a private one that we keep only for ourselves and it's used for decrypting the data

In this tutorial, we'll learn how to generate, store and use the RSA keys in Java.

2. Generate RSA Key Pair

Before we start the actual encryption, we need to generate our RSA key pair. We can easily do it by using the KeyPairGenerator from java.security package:

KeyPairGenerator generator = KeyPairGenerator.getInstance("RSA");
generator.initialize(2048);
KeyPair pair = generator.generateKeyPair();

The generated key will have a size of 2048 bits.

Next, we can extract the private and public key:

PrivateKey privateKey = pair.getPrivate();
PublicKey publicKey = pair.getPublic();

We'll use the public key to encrypt the data and the private one for decrypting it.

3. Storing Keys in Files

Storing the key pair in memory is not always a good option. Mostly, the keys will stay unchanged for a long time. In such cases, it's more convenient to store them in files.

To save a key in a file, we can use the getEncoded method, which returns the key content in its primary encoding format:

try (FileOutputStream fos = new FileOutputStream("public.key")) {
    fos.write(publicKey.getEncoded());
}

To read the key from a file, we'll first need to load the content as a byte array:

File publicKeyFile = new File("public.key");
byte[] publicKeyBytes = Files.readAllBytes(publicKeyFile.toPath());

and then use the KeyFactory to recreate the actual instance:

KeyFactory keyFactory = KeyFactory.getInstance("RSA");
EncodedKeySpec publicKeySpec = new X509EncodedKeySpec(publicKeyBytes);
keyFactory.generatePublic(publicKeySpec);

The key byte content needs to be wrapped with an EncodedKeySpec class. Here, we're using the X509EncodedKeySpec, which represents the default algorithm for Key::getEncoded method we used for saving the file.

In this example, we saved and read only the public key file. The same steps can be used for handling the private key.

Remember, keep the file with a private key as safe as possible with access as limited as possible. Unauthorized access might bring security issues.

4. Working With Strings

Now, let's take a look at how we can encrypt and decrypt simple strings. Firstly, we'll need some data to work with:

String secretMessage = "Baeldung secret message";

Secondly, we'll need a Cipher object initialized for encryption with the public key that we generated previously:

Cipher encryptCipher = Cipher.getInstance("RSA");
encryptCipher.init(Cipher.ENCRYPT_MODE, publicKey);

Having that ready, we can invoke the doFinal method to encrypt our message. Note that it accepts only byte array arguments, so we need to transform our string before:

byte[] secretMessageBytes = secretMessage.getBytes(StandardCharsets.UTF_8);)
byte[] encryptedMessageBytes = encryptCipher.doFinal(secretMessageBytes);

Now, our message is successfully encoded. If we'd like to store it in a database or send it via REST API, it would be more convenient to encode it with the Base64 Alphabet:

String encodedMessage = Base64.getEncoder().encodeToString(encryptedMessageBytes);

This way, the message will be more readable and easier to work with.

Now, let's see how we can decrypt the message to its original form. For this, we'll need another Cipher instance. This time we'll initialize it with a decryption mode and a private key:

Cipher decryptCipher = Cipher.getInstance("RSA");
decryptCipher.init(Cipher.DECRYPT_MODE, privateKey);

We'll invoke the cipher as previously with the doFinal method:

byte[] decryptedMessageBytes = decryptCipher.doFinal(encryptedMessageBytes);
String decryptedMessage = new String(decryptedMessageBytes, StandardCharsets.UTF_8);

Finally, let's verify if the encryption-decryption process went correctly:

assertEquals(secretMessage, decryptedMessage);

5. Working With Files

It is also possible to encrypt whole files. As an example, let's create a temp file with some text content:

Path tempFile = Files.createTempFile("temp", "txt");
Files.writeString(tempFile, "some secret message");

Before we start the encryption, we need to transform its content into a byte array:

byte[] fileBytes = Files.readAllBytes(tempFile);

Now, we can use the encryption cipher:

Cipher encryptCipher = Cipher.getInstance("RSA");
encryptCipher.init(Cipher.ENCRYPT_MODE, publicKey);
byte[] encryptedFileBytes = encryptCipher.doFinal(fileBytes);

And finally, we can overwrite it with new, encrypted content:

try (FileOutputStream stream = new FileOutputStream(tempFile.toFile())) {
    stream.write(encryptedFileBytes);
}

The decryption process looks very similar. The only difference is a cipher initialized in decryption mode with a private key:

byte[] encryptedFileBytes = Files.readAllBytes(tempFile);
Cipher decryptCipher = Cipher.getInstance("RSA");
decryptCipher.init(Cipher.DECRYPT_MODE, privateKey);
byte[] decryptedFileBytes = decryptCipher.doFinal(encryptedFileBytes);
try (FileOutputStream stream = new FileOutputStream(tempFile.toFile())) {
    stream.write(decryptedFileBytes);
}

As the last step, we can verify if the file content matches the original value:

String fileContent = Files.readString(tempFile);
Assertions.assertEquals("some secret message", fileContent);

6. Summary

In this article, we've learned how to create RSA keys in Java and how to use them to encrypt and decrypt messages and files. As always, all source code is available over on GitHub.

The post RSA in Java first appeared on Baeldung.
       

Introduction to Alibaba Sentinel

$
0
0

1. Overview

As the name suggests, Sentinel is a powerful guard for microservices. It offers features like flow control, concurrency limiting, circuit breaking, and adaptive system protection to guarantee their reliability. It's an open-source component actively maintained by Alibaba Group. In addition, it's officially a part of the Spring Cloud Circuit Breaker.

In this tutorial, we'll have a look at some of Sentinel's main features. Further, we'll see an example of how to use it, its annotation support, and its monitoring dashboard.

2. Features

2.1. Flow Control

Sentinel controls the speed of random incoming requests to avoid the overloading of microservices. This ensures that our service isn't killed by a surge in traffic. It supports a variety of traffic shaping strategies. These strategies automatically adjust traffic to appropriate shapes when Queries per Second (QPS) is too high.

Some of these traffic shaping strategies are:

  • Direct Rejection Mode – When the number of requests per second exceeds the set threshold, it'll automatically reject further requests
  • Slow Start Warm-Up Mode – If there's a sudden surge in traffic, this mode ensures that the request count goes on increasing gradually, until reaching the upper limit

2.2. Circuit Breaking and Downgrade

When one service synchronously calls another, there's a possibility that another service can be down for some reason. In such a case, threads are blocked as they keep on waiting for the other service to respond. This can lead to resource exhaustion and the caller service will also be unable to handle further requests. This is called a cascading effect and can take down our entire microservices architecture.

To prevent such scenarios, a circuit breaker comes into the picture. It will block all subsequent calls to the other service immediately. After the timeout period, some requests are passed through. If they succeed, then the circuit breaker resumes normal flow. Otherwise, the timeout period starts again.

Sentinel uses the principle of max concurrency limiting to implement circuit breaking. It reduces the impact of unstable resources by restricting the number of concurrent threads.

Sentinel also downgrades unstable resources. All calls to the resource will be rejected in the specified time window when the response time of a resource is too high. This prevents situations where calls become very slow, leading to the cascading effect.

2.3. Adaptive System Protection

Sentinel protects our server in case the system load goes too high. It uses load1 (system load) as the metric to initiate traffic control. The request will be blocked under the following conditions:

  • Current system load (load1) > threshold (highestSystemLoad);
  • Current concurrent requests (thread count) > estimated capacity (min response time * max QPS)

3. How to Use

3.1. Add Maven Dependency

In our Maven project, we need to add the sentinel-core dependency in the pom.xml:

<dependency>
    <groupId>com.alibaba.csp</groupId>
    <artifactId>sentinel-core</artifactId>
    <version>1.8.0</version>
</dependency>

3.2. Define Resource

Let's define our resource with the corresponding business logic inside a try-catch block using the Sentinel API:

try (Entry entry = SphU.entry("HelloWorld")) {
    // Our business logic here.
    System.out.println("hello world");
} catch (BlockException e) {
    // Handle rejected request.
}

This try-catch block with the resource name “HelloWorld”, serves as the entry point to our business logic, guarded by Sentinel.

3.3. Define Flow Control Rules

These rules control the flow to our resource, like threshold count or control behavior — for example, reject directly or slow startup. Let's use FlowRuleManager.loadRules() to configure the flow rules:

List<FlowRule> flowRules = new ArrayList<>();
FlowRule flowRule = new FlowRule();
flowRule.setResource(RESOURCE_NAME);
flowRule.setGrade(RuleConstant.FLOW_GRADE_QPS);
flowRule.setCount(1);
flowRules.add(flowRule);
FlowRuleManager.loadRules(flowRules);

This rule defines that our resource “RESOURCE_NAME” can respond to a maximum of one request per second.

3.4. Defining Degrade Rules

Using degrade rules, we can configure the circuit breaker's threshold request count, recovery timeout, and other settings.
Let's configure the degrade rules using DegradeRuleManager.loadRules():

List<DegradeRule> rules = new ArrayList<DegradeRule>();
DegradeRule rule = new DegradeRule();
rule.setResource(RESOURCE_NAME);
rule.setCount(10);
rule.setTimeWindow(10);
rules.add(rule);
DegradeRuleManager.loadRules(rules);

This rule specifies that when our resource RESOURCE_NAME fails to serve 10 requests (threshold count), the circuit will break. All subsequent requests to the resource will be blocked by Sentinel for 10 seconds (time window).

3.5. Defining System Protection Rules

Using system protection rules, we can configure and ensure adaptive system protection (threshold of load1, average response time, concurrent thread count). Let's configure the system rules using the SystemRuleManager.loadRules() method:

List<SystemRule> rules = new ArrayList<>();
SystemRule rule = new SystemRule();
rule.setHighestSystemLoad(10);
rules.add(rule);
SystemRuleManager.loadRules(rules);

This rule specifies that, for our system, the highest system load is 10 requests per second. All further requests will be blocked if the current load goes beyond this threshold.

4. Annotation Support

Sentinel also provides aspect-oriented annotation support for defining the resource.

First, we'll add the Maven dependency for sentinel-annotation-aspectj:

<dependency>
    <groupId>com.alibaba.csp</groupId>
    <artifactId>sentinel-annotation-aspectj</artifactId>
    <version>1.8.0</version>
</dependency>

Then, we add @Configuration to our configuration class to register the sentinel aspect as a Spring bean:

@Configuration
public class SentinelAspectConfiguration {
    @Bean
    public SentinelResourceAspect sentinelResourceAspect() {
        return new SentinelResourceAspect();
    }
}

@SentinelResource indicates the resource definition. It has attributes like value, which defines the resource name. Attribute fallback is the fallback method name. When the circuit is broken, this fallback method defines the alternate flow of our program. Let's define the resource using the @SentinelResource annotation:

@SentinelResource(value = "resource_name", fallback = "doFallback")
public String doSomething(long i) {
    return "Hello " + i;
}
public String doFallback(long i, Throwable t) {
    // Return fallback value.
    return "fallback";
}

This defines the resource with the name resource_name, as well as the fallback method.

5. Monitoring Dashboard

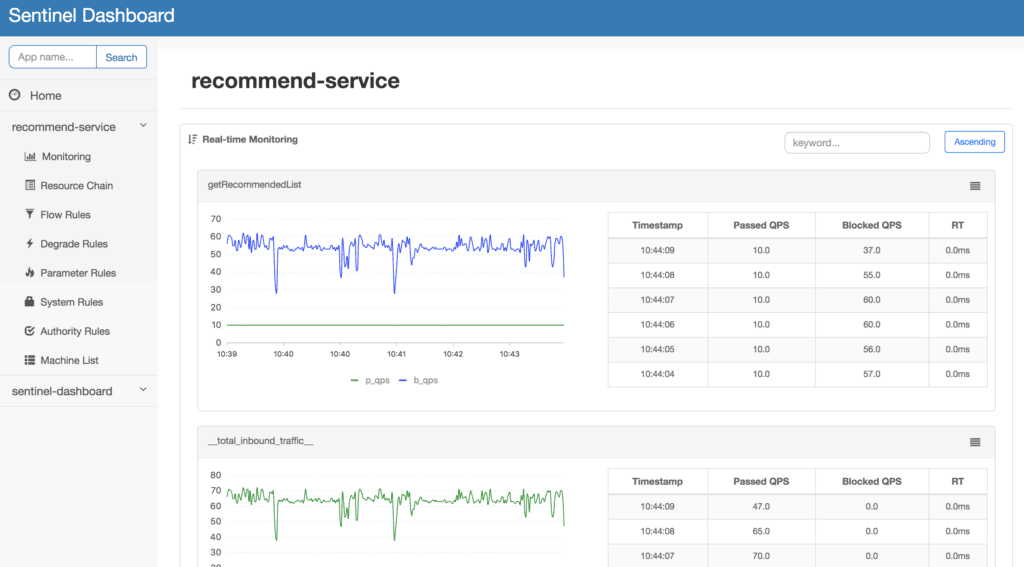
Sentinel also provides a monitoring dashboard. With this, we can monitor the clients and configure the rules dynamically. We can see the amount of incoming traffic to our defined resources in real-time.

5.1. Starting the Dashboard

First, we need to download the Sentinel Dashboard jar. And then, we can start the dashboard using the command:

java -Dserver.port=8080 -Dcsp.sentinel.dashboard.server=localhost:8080 -Dproject.name=sentinel-dashboard -jar sentinel-dashboard.jar

Once the dashboard application starts up, we can connect our application following the steps in the next sections.

5.2. Preparing Our Application

Let's add the sentinel-transport-simple-http dependency to our pom.xml:

<dependency>
    <groupId>com.alibaba.csp</groupId>
    <artifactId>sentinel-transport-simple-http</artifactId>
    <version>1.8.0</version>
</dependency>

5.3. Connecting Our Application to the Dashboard

When starting the application, we need to add the dashboard IP address:

-Dcsp.sentinel.dashboard.server=consoleIp:port

Now, whenever a resource is called, the dashboard will receive the heartbeat from our application:

We can also manipulate the flow, degrade, and system rules dynamically using the dashboard.

6. Conclusion

In this article, we saw the main features of Alibaba Sentinel flow control, circuit breaker, and adaptive system protection.

Corresponding examples can be found over on GitHub.

The post Introduction to Alibaba Sentinel first appeared on Baeldung.
       

Usage of the Hibernate @LazyCollection Annotation

$
0
0

1. Overview

Managing the SQL statements from our applications is one of the most important things we need to take care of because of its huge impact on performance. When working with relations between objects, there are two main design patterns for fetching. The first one is the lazy approach, while the other one is the eager approach.

In this article, we'll take an overview of both of them. In addition, we'll discuss the @LazyCollection annotation in Hibernate.

2. Lazy Fetching

We use lazy fetching when we want to postpone the data initialization until we need it. Let's look at an example to better understand the idea.

Suppose we have a company that has multiple branches in the city. Every branch has its own employees. From the database perspective, it means we have a one-to-many relation between the branch and its employees.

In the lazy fetching approach, we won't fetch the employees once we fetch the branch object. We only fetch the data of the branch object, and we postpone loading the list of employees until we call the getEmployees() method. At that point, another database query will be executed to get the employees.

The benefit of this approach is that we reduce the amount of data loaded initially. The reason is that we might not need the employees of the branch, and there's no point in loading them since we aren't planning to use them right away.

3. Eager Fetching

We use eager fetching when the data needs to be loaded instantly. Let's take the same example of the company, branches, and the employees to explain this idea as well. Once we load some branch object from the database, we'll immediately load the list of its employees as well using the same database query.

The main concern when using the eager fetching is that we load a huge amount of data that might not be needed. Hence, we should only use it when we're sure that the eagerly fetched data will always be used once we load its object.

4. The @LazyCollection Annotation

We use the @LazyCollection annotation when we need to take care of the performance in our application. Starting from Hibernate 3.0, @LazyCollection is enabled by default. The main idea of using the @LazyCollection is to control whether the fetching of data should be using the lazy approach or the eager one.

When using @LazyCollection, we have three configuration options for the LazyCollectionOption setting: TRUE, FALSE, and EXTRA. Let's discuss each of them independently.

4.1. Using LazyCollectionOption.TRUE

This option enables the lazy fetching approach for the specified field and is the default starting from Hibernate version 3.0. Therefore, we don't need to explicitly set this option. However, to explain the idea in a better way, we'll take an example where we set this option.

In this example, we have a Branch entity that consists of an id, name, and a @OneToMany relation to the Employee entity. We can notice that we set the @LazyCollection option explicitly to true in this example:

@Entity
public class Branch {
    @Id
    private Long id;
    private String name;
    @OneToMany(mappedBy = "branch")
    @LazyCollection(LazyCollectionOption.TRUE)
    private List<Employee> employees;
    
    // getters and setters
}

Now, let's take a look at the Employee entity that consists of an id, name, address, as well as a @ManyToOne relation with the Branch entity:

@Entity
public class Employee {
    @Id
    private Long id;
    private String name;
    private String address;
    
    @ManyToOne
    @JoinColumn(name = "BRANCH_ID") 
    private Branch branch; 
    // getters and setters 
}

In the above example, when we get a branch object, we won't load the list of employees immediately. Instead, this operation will be postponed until we call the getEmployees() method.

4.2. Using LazyCollectionOption.FALSE

When we set this option to FALSE, we enable the eager fetching approach. In this case, we need to explicitly specify this option because we'll be overriding Hibernate's default value. Let's look at another example.

In this case, we have the Branch entity, which contains id, name, and a @OneToMany relation with the Employee entity. Note that we set the option of @LazyCollection to FALSE:

@Entity
public class Branch {
    @Id
    private Long id;
    private String name;
    @OneToMany(mappedBy = "branch")
    @LazyCollection(LazyCollectionOption.FALSE)
    private List<Employee> employees;
    
    // getters and setters
}

In the above example, when we get a branch object, we'll load the branch with the list of employees instantly.

4.3. Using LazyCollectionOption.EXTRA

Sometimes, we're only concerned with the properties of the collection, and we don't need the objects inside it right away.

For example, going back to the Branch and the Employees example, we could just need the number of employees in the branch while not caring about the actual employees' entities. In this case, we consider using the EXTRA option. Let's update our example to handle this case.

Similar to the case before, the Branch entity has an id, name, and an @OneToMany relation with the Employee entity. However, we set the option for @LazyCollection to be EXTRA:

@Entity
public class Branch {
    @Id
    private Long id;
    private String name;
    @OneToMany(mappedBy = "branch")
    @LazyCollection(LazyCollectionOption.EXTRA)
    @OrderColumn(name = "order_id")
    private List<Employee> employees;
    // getters and setters
    
    public Branch addEmployee(Employee employee) {
        employees.add(employee);
        employee.setBranch(this);
        return this;
    }
}

We notice that we used the @OrderColumn annotation in this case. The reason is that the EXTRA option is taken into consideration only for indexed list collections. That's means if we didn't annotate the field with @OrderColumn, the EXTRA option will give us the same behavior as lazy and the collection will be fetched when accessed for the first time.

In addition, we define the addEmployee() method as well, because we need the Branch and the Employee to be synchronized from both sides. If we add a new Employee and set a branch for him, we need the list of employees inside the Branch entity to be updated as well.

Now, when persisting one Branch entity that has three associated employees, we'll need to write the code as:

entityManager.persist(
  new Branch().setId(1L).setName("Branch-1")
    .addEmployee(
      new Employee()
        .setId(1L)
        .setName("Employee-1")
        .setAddress("Employee-1 address"))
  
    .addEmployee(
      new Employee()
        .setId(2L)
        .setName("Employee-2")
        .setAddress("Employee-2 address"))
  
    .addEmployee(
      new Employee()
        .setId(3L)
        .setName("Employee-3")
        .setAddress("Employee-3 address"))
);

If we take a look at the executed queries, we'll notice that Hibernate will insert a new Branch for Branch-1 first. Then it will insert Employee-1, Employee-2, then Employee-3.

We can see that this is a natural behavior. However, the bad behavior in the EXTRA option is that after flushing the above queries, it'll execute three additional ones – one for every Employee we add:

UPDATE EMPLOYEES
SET
    order_id = 0
WHERE
    id = 1
     
UPDATE EMPLOYEES
SET
    order_id = 1
WHERE
    id = 2
 
UPDATE EMPLOYEES
SET
    order_id = 2
WHERE
    id = 3

The UPDATE statements are executed to set the List entry index. This is an example of what's known as the N+1 query issue, which means that we execute N additional SQL statements to update the same data we created.

As we noticed from our example, we might have the N+1 query issue when using the EXTRA option.

On the other hand, the advantage of using this option is when we need to get the size of the list of employees for every branch:

int employeesCount = branch.getEmployees().size();

When we call this statement, it'll only execute this SQL statement:

SELECT
    COUNT(ID)
FROM
    EMPLOYEES
WHERE
    BRANCH_ID = :ID

As we can see, we didn't need to store the employees' list in memory to get its size. Nevertheless, we advise avoiding the EXTRA option because it'll execute additional queries.

It's also worth noting here that it's possible to encounter the N+1 query issue with other data access technologies, as it isn't only restricted to JPA and Hibernate.

5. Conclusion

In this article, we discussed the different approaches to fetching an object's properties from the database using Hibernate.

First, we discussed lazy fetching with an example. Then, we updated the example to use eager fetching and discussed the differences.

Finally, we showed an extra approach to fetching the data and explained its advantages and disadvantages.

As always, the code presented in this article is available over on GitHub.

The post Usage of the Hibernate @LazyCollection Annotation first appeared on Baeldung.
       

Java Weekly, Issue 380

$
0
0

1. Spring and Java

>> MergingSortedSpliterator [javaspecialists.eu]

Writing our very own Spliterator to convert List<Stream<T>> to a Stream<T> with sorted elements. Cool stuff!

>> Record Serialization in Practice [inside.java]

Java records in serialization frameworks – an overview of framework support and common recipes on working with records.

>> Announcing Preview of Microsoft Build of OpenJDK [microsoft.com]

Microsoft introduces its own OpenJDK distribution – a no-cost and LTS distribution based on OpenJDK 11.

Also worth reading:

Webinars and presentations:

Time to upgrade:

2. Technical & Musings

>> PodSecurityPolicy Deprecation: Past, Present, and Future [kubernetes.io]

K8S is deprecating its admission controller in 1.21 – what it is, what it does, why deprecation, and alternatives!

>> Bitemporal History [martinfowler.com]

Capturing two dimensions of time – maintaining the history of events while being able to modify them individually. An interesting read for the weekend.

Also worth reading:

3. Comics

And my favorite Dilberts of the week:

>> Wally Not Remotely Working [dilbert.com]

>> Title Promotion [dilbert.com]

>> Dibert Prefers The Pandemic [dilbert.com]

4. Pick of the Week

A whole lot (400+) of new, open-source vulnerabilities were discovered in Maven packages last year.

Have a look at the Snyk cheat sheet and go over some core pieces of advice and how to avoid Java serialization, configure your XML parsers to prevent XXE injection, and quite a bit more:

>> 10 Java security best practices [snyk.io]

The article was written by two Java Champions, Brian Vermeer and Jim Manico, it's a quick, to-the-point read and requires no email.

The post Java Weekly, Issue 380 first appeared on Baeldung.
       

Java NIO DatagramChannel

$
0
0

1. Overview

In this tutorial, we'll explore the DatagramChannel class that allows us to send and receive UDP packets.

2. DatagramChannel

Among various protocols supported on the internet, TCP and UDP are the most common.

While TCP is a connection-oriented protocol, UDP is a datagram-oriented protocol that is highly performant and less reliable. UDP is often used in sending broadcast or multicast data transmissions due to its unreliable nature.

The DatagramChannel class of Java's NIO module provides a selectable channel for the datagram-oriented sockets. In other words, it allows creating a datagram channel to send and receive the datagrams (UDP packets).

Let's use the DatagramChannel class to create a client that sends the datagrams over the local IP address and a server that receives the datagram.

3. Open and Bind

First, let's create the DatagramChannelBuilder class with the openChannel method that provides an opened but unconnected datagram channel:

public class DatagramChannelBuilder {
    public static DatagramChannel openChannel() throws IOException {
        DatagramChannel datagramChannel = DatagramChannel.open();
        return datagramChannel;
    }
}

Then, we'll require to bind an opened channel to the local address for listening to the inbound UDP packets.

So, we'll add the bindChannel method that binds the DatagramChannel to the provided local address:

public static DatagramChannel bindChannel(SocketAddress local) throws IOException {
    return openChannel().bind(local); 
}

Now, we can use the DatagramChannelBuilder class to create the client/server that sends/receives the UDP packets on the configured socket address.

4. Client

First, let's create the DatagramClient class with the startClient method that uses the already discussed bindChannel method of the DatagramChannelBuilder class:

public class DatagramClient {
    public static DatagramChannel startClient() throws IOException {
        DatagramChannel client = DatagramChannelBuilder.bindChannel(null);
        return client;
    }
}

As the client doesn't require listening to the inbound UDP packets, we've provided a null value for the address while binding the channel.

Then, let's add the sendMessage method to send a datagram on the server address:

public static void sendMessage(DatagramChannel client, String msg, SocketAddress serverAddress) throws IOException {
    ByteBuffer buffer = ByteBuffer.wrap(msg.getBytes());
    client.send(buffer, serverAddress);
}

That's it! Now we're ready to send our message using the client:

DatagramChannel client = startClient();
String msg = "Hello, this is a Baeldung's DatagramChannel based UDP client!";
InetSocketAddress serverAddress = new InetSocketAddress("localhost", 7001);
sendMessage(client, msg, serverAddress);

Note: As we've sent our message to the localhost:7001 address, we must start our server using the same address.

5. Server

Similarly, let's create the DatagramServer class with the startServer method to start a server on the localhost:7001 address:

public class DatagramServer {
    public static DatagramChannel startServer() throws IOException {
        InetSocketAddress address = new InetSocketAddress("localhost", 7001);
        DatagramChannel server = DatagramChannelBuilder.bindChannel(address);
        System.out.println("Server started at #" + address);
        return server;
    }
}

Then, let's add the receiveMessage method that receives the datagrams from the client, extracts the message, and prints it:

public static void receiveMessage(DatagramChannel server) throws IOException {
    ByteBuffer buffer = ByteBuffer.allocate(1024);
    SocketAddress remoteAdd = server.receive(buffer);
    String message = extractMessage(buffer);
    System.out.println("Client at #" + remoteAdd + "  sent: " + message);
}

Also, to extract the client's message from the received buffer, we'll require to add the extractMessage method:

private static String extractMessage(ByteBuffer buffer) {
    buffer.flip();
    byte[] bytes = new byte[buffer.remaining()];
    buffer.get(bytes);
    String msg = new String(bytes);
    
    return msg;
}

Here, we've used the flip method on the ByteBuffer instance to flip it from reading from I/O to writing to I/O. Additionally, the flip method sets the limit to the current position and the position to zero to let us read from the beginning.

Now, we can start our server and receive a message from the client:

DatagramChannel server = startServer();
receiveMessage(server);

Therefore, the print output when the server receives our message will be:

Server started at #localhost/127.0.0.1:7001
Client at #/127.0.0.1:52580  sent: Hello, this is a Baeldung's DatagramChannel based UDP client!

6. DatagramChannelUnitTest

Now that we have both client and server ready, we can write a unit test to verify the end-to-end datagram (UDP packet) delivery:

@Test
public void whenClientSendsAndServerReceivesUDPPacket_thenCorrect() throws IOException {
    DatagramChannel server = DatagramServer.startServer();
    DatagramChannel client = DatagramClient.startClient();
    String msg1 = "Hello, this is a Baeldung's DatagramChannel based UDP client!";
    String msg2 = "Hi again!, Are you there!";
    InetSocketAddress serverAddress = new InetSocketAddress("localhost", 7001);
    
    DatagramClient.sendMessage(client, msg1, serverAddress);
    DatagramClient.sendMessage(client, msg2, serverAddress);
    
    assertEquals("Hello, this is a Baeldung's DatagramChannel based UDP client!", DatagramServer.receiveMessage(server));
    assertEquals("Hi again!, Are you there!", DatagramServer.receiveMessage(server));
}

First, we've started the server that binds the datagram channel to listen to the inbound message on localhost:7001. Then, we started the client and sent two messages.

Last, we received the inbound messages on the server and compared them with the messages we sent through the client.

7. Additional Methods

So far, we've used methods like open, bind, send, and receive provided by the DatagramChannel class. Now, let's quickly go through its other handy methods.

7.1. configureBlocking

By default, the datagram channel is blocking. We can use the configureBlocking method to make the channel non-blocking when passing the false value:

client.configureBlocking(false);

7.2. isConnected

The isConnected method returns the status of the datagram channel — that is, whether it's connected or disconnected.

7.3. socket

The socket method returns the object of the DatagramSocket class associated with the datagram channel.

7.4. close

Additionally, we can close the channel by calling the close method of the DatagramChannel class.

8. Conclusion

In this quick tutorial, we explored Java NIO's DatagramChannel class that allows the creation of a datagram channel to send/receive UDP packets.

First, we examined a few methods like open and bind that simultaneously allow the datagram channel to listen to the inbound UDP packets.

Then, we created a client and a server to explore the end-to-end UDP packet delivery using the DatagramChannel class.

As usual, the source code is available over on GitHub.

The post Java NIO DatagramChannel first appeared on Baeldung.
       

Service Mesh Architecture with Istio

$
0
0

1. Introduction

In this tutorial, we'll go through the basics of service mesh architecture and understand how it complements a distributed system architecture.

We'll primarily focus on Istio, which is an implementation of service mesh. In the process, we'll cover the core architecture of Istio and understand how to benefit from it on Kubernetes.

2. What Is a Service Mesh?

Over the past couple of decades, we've seen how monolithic applications have started to decompose into smaller applications. It has found unprecedented popularity with cloud-native computing and microservices architecture. Further, containerization technology like Docker and orchestration system like Kubernetes have only helped in this regard.

While there are a number of advantages for adopting microservices architecture on a distributed system like Kubernetes, it has its fair share of complexities. Since distributed services have to communicate with each other, we have to think about discovery, routing, retries, and fail-over.

There are several other concerns like security and observability that we also have to take care of:

Now, building these communication capabilities within each service can be quite tedious — even more so when the service landscape grows and communication becomes complex. This is precisely where a service mesh can help us. Basically, a service mesh takes away the responsibility of managing all service-to-service communication within a distributed software system.

The way service mesh is able to do that is through an array of network proxies. Essentially, requests between services are routed through proxies that run alongside the services but sit outside in the infrastructure layer:

These proxies basically create a mesh network for the services — hence the name, service mesh! Through these proxies, a service mesh is able to control every aspect of service-to-service communication. As such, we can use it to address the eight fallacies of distributed computing, a set of assertions that describe false assumptions we often make about a distributed application.

3. Features of a Service Mesh

Let's now understand some of the features that a service mesh can provide us. Please note that the list of actual features depends upon the implementation of service mesh. But, in general, we should expect most of these features in all implementations.

We can broadly divide these features into three categories: traffic management, security, and observability.

3.1. Traffic Management

One of the fundamental features of a service mesh is traffic management. This includes dynamic service discovery and routing. It also enables some interesting use-cases like traffic shadowing and traffic splitting. These are very useful for performing canary releases and A/B testing.

As all service-to-service communication is handled by the service mesh, it also enables some reliability features. For instance, a service mesh can provide retries, timeouts, rate-limiting, and circuit breakers. These out-of-the-box failure recovery features make the communication more reliable.

3.2. Security

A service mesh typically also handles the security aspects of the service-to-service communication. This includes enforcing traffic encryption through mutual TLS (MTLS), providing authentication through certificate validation, and ensuring authorization through access policies.

There can also be some interesting use cases of security in a service mesh. For instance, we can achieve network segmentation allowing some services to communicate while prohibiting others. Moreover, a service mesh can provide precise historical information for auditing requirements.

3.3. Observability

Robust observability is the underpinning requirement for handling the complexity of a distributed system. Because a service mesh handles all communication, it's rightly placed to provide observability features. For instance, it can provide information about distributed tracing.

A service mesh can generate a lot of metrics like latency, traffic, errors, and saturation. Moreover, a service mesh can also generate access logs, providing a full record for each request. These are quite useful in understanding the behavior of individual services as well as the whole system.

4. Introduction to Istio

Istio is an open-source implementation of the service mesh originally developed by IBM, Google, and Lyft. It can layer transparently onto a distributed application and provide all the benefits of a service mesh like traffic management, security, and observability.

It's designed to work with a variety of deployments, like on-premise, cloud-hosted, in Kubernetes containers, and in servicers running on virtual machines. Although Istio is platform-neutral, it's quite often used together with microservices deployed on the Kubernetes platform.

Fundamentally, Istio works by deploying an extended version of Envoy as proxies to every microservice as a sidecar:

This network of proxies constitutes the data plane of the Istio architecture. The configuration and management of these proxies are done from the control plane:

The control plane is basically the brain of the service mesh. It provides discovery, configuration, and certificate management to Envoy proxies in the data plane at runtime.

Of course, we can only realize the benefit of Istio when we have a large number of microservices that communicate with each other. Here, the sidecar proxies form a complex service mesh in a dedicated infrastructure layer:

Istio is quite flexible in terms of integrating with external libraries and platforms. For instance, we can integrate Istio with an external logging platform, telemetry, or policy system.

5. Understanding Istio Components

We have seen that the Istio architecture consists of the data plane and the control plane. Further, there are several core components that enable Istio to function.

In this section, we'll go through the details of these core components.

5.1. Data Plane

The data plane of Istio primarily comprises an extended version of the Envoy proxy. Envoy is an open-source edge and service proxy that helps decouple network concerns from underlying applications. Applications simply send and receive messages to and from localhost, without any knowledge of the network topology.

At the core, Envoy is a network proxy operating at the L3 and L4 layers of the OSI model. It works by using a chain of pluggable network filters to perform connection handling. Additionally, Envoy supports an additional L7 layer filter for HTTP-based traffic. Moreover, Envoy has first-class support for HTTP/2 and gRPC transports.

Many of the features that Istio provides as a service mesh are actually enabled by the underlying built-in features of the Envoy proxies:

  • Traffic Control: Envoy enables the application of fine-grained traffic control with rich routing rules for HTTP, gRPC, WebSocket, and TCP traffic
  • Network Resiliency: Envoy includes out-of-the-box support for automatic retries, circuit breaking, and fault injection
  • Security: Envoy can also enforce security policies and apply access control and rate-limiting on communication between underlying services

One of the other reasons Envoy works so well with Istio is its extensibility. Envoy provides a pluggable extension model based on WebAssembly. This is quite useful in custom policy enforcement and telemetry generation. Further, we can also extend the Envoy proxy in Istio using the Istio extensions based on the Proxy-Wasm sandbox API.

5.2. Control Plane

As we've seen earlier, the control plane is responsible for managing and configuring the Envoy proxies in the data plane. The component that is responsible for this in the control plane is istiod. Here, istiod is responsible for converting high-level routing rules and traffic control behavior into Envoy-specific configurations and propagating them to sidecars at runtime.

If we recall the architecture of the Istio control plane from some time back, we'll notice that it used to be a set of independent components working together. It comprised components like Pilot for service discovery, Galley for configuration, Citadel for certificate generation, and Mixer for extensibility. Due to complexity, these individual components were merged into a single component called istiod.

At the core, istiod still uses the same code and APIs as the individual components earlier. For instance, Pilot is responsible for abstracting platform-specific service discovery mechanisms and synthesizing them into a standard format that sidecars can consume. Hence, Istio can support discovery for multiple environments like Kubernetes or Virtual Machines.

In addition, istiod also provides security, enabling strong service-to-service and end-user authentication with built-in identity and credential management. Moreover, with istiod, we can enforce security policies based on service identity. The process istiod also acts as a Certificate Authority (CA) and generates certificates to facilitate mutual TLS (MTLS) communication in the data plane.

6. How Istio Works

We've learned what the typical features of a service mesh are. Further, we've gone through the basics of Istio architecture and its core components. Now, it's time to understand how Istio provides these features through the core components in its architecture.

We'll focus on the same categories of features that we went through earlier.

6.1. Traffic Management

We can exercise granular control over the traffic in the service mesh by using Istio traffic management API. We can use these APIs to add our own traffic configurations to Istio. Further, we can define the API resources using Kubernetes custom resource definitions (CRDs). The key API resources that help us control the traffic routing are virtual services and destination rules:

Basically, a virtual service lets us configure how requests are routed to a service within the Istio service mesh. Hence, a virtual service consists of one or more routing rules that are evaluated in order. After the routing rules of a virtual service are evaluated, the destination rules are applied. The destination rules help us to control the traffic to a destination — for instance, grouping service instances by version.

6.2. Security

Security in Istio begins with the provisioning of strong identities to every service. The Istio agents running alongside every Envoy proxy work with istiod to automate key and certificate rotation:

Istio provides two types of authentication — peer authentication and request authentication. Peer authentication is used for service-to-service authentication where Istio offers mutual TLS as a full-stack solution. Request authentication is used for end-user authentication where Istio offers JSON Web Token (JWT) validation using a custom authentication provider or an OpenID Connect (OIDC) provider.

Istio also allows us to enforce access control to services by simply applying an authorization policy to the services. The authorization policy enforces access control to the inbound traffic in the Envoy proxy. With this, we can apply access control at various levels: mesh, namespace, and service-wide.

6.3. Observability

Istio generates detailed telemetry like metrics, distributed traces, and access logs for all service communication within the mesh. Istio generates a rich set of proxy-level metrics, service-oriented metrics, and control plane metrics.

Earlier, the Istio telemetry architecture included Mixer as a central component. But starting with Telemetry v2, features provided by Mixer were replaced with the Envoy proxy plugins:

Moreover, Istio generates distributed traces through the Envoy proxies. Istio supports a number of tracing backends like Zipkin, Jaeger, Lightstep, and Datadog. We can also control the sampling rate for trace generation. Further, Istio also generates access logs for service traffic in a configurable set of formats.

7. Hands-on With Istio

Now that we've gone through enough background, we're ready to see Istio in action. To begin with, we'll install Istio within a Kubernetes cluster. Further, we'll use a simple microservices-based application to demonstrate the capabilities of Istio on Kubernetes.

7.1. Installation

There are several ways to install Istio, but the simplest of them is to download and extract the latest release for a specific OS like Windows. The extracted package contains the istioctl client binary in the bin directory. We can use istioctl to install Istio on the target Kubernetes cluster:

istioctl install --set profile=demo -y

This installs Istio components on the default Kubernetes cluster with the demo profile. We can also use any other vendor-specific profile instead of the demo.

Finally, we need to instruct Istio to automatically inject Envoy sidecar proxies when we deploy any application on this Kubernetes cluster:

kubectl label namespace default istio-injection=enabled

We're using kubectl here with an assumption that a Kubernetes cluster like Minikube and the Kubernetes CLI kubectl are already available on our machine.

7.2. Sample Application

For the purpose of demonstration, we'll imagine a very simple application for placing online orders. This application comprises three microservices that interact with each other to fulfill an end user's request for order:

We're not going into the details of these microservices, but they can be fairly simple to create using Spring Boot and REST APIs. Most importantly, we create a Docker image for these microservices so that we can deploy them on Kubernetes.

7.3. Deployment

Deploying a containerized workload on the Kubernetes cluster like Minikube is fairly straightforward. We'll be using the Deployment and Service resource types to declare and access the workload. Typically, we define them in a YAML file:

apiVersion: apps/v1beta1
kind: Deployment
metadata:
  name: order-service
  namespace: default
spec:
  replicas: 1
  template:
    metadata:
      labels:
        app: order-service
        version: v1
    spec:
      containers:
      - name: order-service
        image: kchandrakant/order-service:v1
        resources:
          requests:
            cpu: 0.1
            memory: 200
---
apiVersion: v1
kind: Service
metadata:
  name: order-service
spec:
  ports:
  - port: 80
    targetPort: 80
    protocol: TCP
    name: http
  selector:
    app: order-service

This is a very simple definition for the Deployment and Service for the order-service. Similarly, we can define the YAML file for the inventory-service and the shipping-service.

Deploying these resources using kubectl is fairly straightforward as well:

kubectl apply -f booking-service.yaml -f inventory-service.yaml -f shipping-service.yaml

Since we've enabled auto-injection of Envoy sidecar proxies for the default namespace, everything will be taken care of for us. Alternatively, we can use the kube-inject command of istioctl to manually inject the Envoy sidecar proxies.

7.4. Accessing the Application

Now, Istio is primarily responsible for handling all the mesh traffic. Hence, any traffic to or from outside of the mesh is not permitted by default. Istio uses gateways to manage inbound and outbound traffic from the mesh. This way, we can precisely control the traffic that enters or leaves the mesh. Istio provides some preconfigured gateway proxy deployments: istio-ingressgateway and istio-egressgateway.

We'll create a Gateway and a Virtual Service for our application to make this happen:

apiVersion: networking.istio.io/v1alpha3
kind: Gateway
metadata:
  name: booking-gateway
spec:
  selector:
    istio: ingressgateway
  servers:
  - port:
      number: 80
      name: http
      protocol: HTTP
    hosts:
    - "*"
---
apiVersion: networking.istio.io/v1alpha3
kind: VirtualService
metadata:
  name: booking
spec:
  hosts:
  - "*"
  gateways:
  - booking-gateway
  http:
  - match:
    - uri:
        prefix: /api/v1/booking
    route:
    - destination:
        host: booking-service
        port:
          number: 8080

Here, we're making use of the default ingress controller provided by Istio. Moreover, we've defined a virtual service to route our requests to the booking-service.

Similarly, we can also define an egress gateway for the outbound traffic from the mesh as well.

8. Common Use Cases With Istio

Now, we've seen how to deploy a simple application on Kubernetes with Istio. But, we are still not making use of any interesting feature that Istio enables for us. In this section, we'll go through some common use-cases of a service mesh and understand how to use Istio to achieve them for our simple application.

8.1. Request Routing

There are several reasons why we may want to handle request routing in a specific manner. For instance, we may deploy multiple versions of a microservice like shipping-service and wish to route only a small percentage of requests to the new version.

We can use the routing rules of the virtual service to achieve this:

apiVersion: networking.istio.io/v1alpha3
kind: VirtualService
metadata:
  name: shipping-service
spec:
  hosts:
    - shipping-service
  http:
  - route:
    - destination:
        host: shipping-service
        subset: v1
      weight: 90
    - destination:
        host: shipping-service
        subset: v2
      weight: 10
---
apiVersion: networking.istio.io/v1alpha3
kind: DestinationRule
metadata:
  name: shipping-service
spec:
  host: shipping-service
  subsets:
  - name: v1
    labels:
      version: v1
  - name: v2
    labels:
      version: v2

The routing rules also allow us to define match conditions based on attributes like a header parameter. Further, the destination field specifies the actual destination for traffic that matches the condition.

8.2. Circuit Breaking

A circuit breaker is basically a software design pattern to detect failures and encapsulate the logic of preventing a failure from cascading further. This helps in creating resilient microservice applications that limit the impact of failures and latency spikes.

In Istio, we can use the trafficPolicy configuration in DestinationRule to apply circuit breaking when calling a service like inventory-service:

apiVersion: networking.istio.io/v1alpha3
kind: DestinationRule
metadata:
  name: inventory-service
spec:
  host: inventory-service
  trafficPolicy:
    connectionPool:
      tcp:
        maxConnections: 1
      http:
        http1MaxPendingRequests: 1
        maxRequestsPerConnection: 1
    outlierDetection:
      consecutive5xxErrors: 1
      interval: 1s
      baseEjectionTime: 3m
      maxEjectionPercent: 100

Here, we've configured the DestinationRule with maxConnections as 1, httpMaxPendingRequests as 1, and maxRequestsPerConnection as 1. This effectively means that if we exceed the number of concurrent requests by more than 1, the circuit breaker will start to trap some of the requests.

8.3. Enabling Mutual TLS

Mutual authentication refers to a situation where two parties authenticate each other at the same time in an authentication protocol like TLS. By default, all traffic between services with proxies uses mutual TLS in Istio. However, services without proxies still continue to receive traffic in plain text.

While Istio automatically upgrades all traffic between services with proxies to mutual TLS, these services can still receive plain-text traffic. We have an option to enforce mutual TLS mesh-wide with a PeerAuthentication policy:

apiVersion: "security.istio.io/v1beta1"
kind: "PeerAuthentication"
metadata:
  name: "default"
  namespace: "istio-system"
spec:
  mtls:
    mode: STRICT

We also have options to enforce mutual TLS per namespace or service instead of mesh-wide. However, a service-specific PeerAuthentication policy takes precedence over the namespace-wide policy.

8.4. Access Control With JWT

JSON Web Token (JWT) is a standard for creating data whose payload holds JSON that asserts a number of claims. This has come to be widely accepted for passing the identity and standard or custom claims of authenticated users between an identity provider and a service provider.

We can enable authorization policy in Istio to allow access to a service like booking-service based on JWT:

apiVersion: security.istio.io/v1beta1
kind: AuthorizationPolicy
metadata:
  name: require-jwt
  namespace: default
spec:
  selector:
    matchLabels:
      app: booking-service
  action: ALLOW
  rules:
  - from:
    - source:
       requestPrincipals: ["testing@baeldung.com/testing@baeldung.io"]

Here, the AuthorizationPolicy enforces all requests to have a valid JWT with requestPrincipal set to a specific value. Istio creates the requestPrincipal attribute by combining the claims iss and sub of JWT.

9. Afterthoughts

So, we've seen by now how a service mesh like Istio makes our life easier to handle a number of common concerns in a distributed architecture like microservices. But in spite of everything, Istio is a complex system that increases the complexity of the resulting deployment. Like every other technology, Istio is not a silver bullet and must be used with due considerations.

9.1. Should We Always Use a Service Mesh?

While we've seen enough reasons to use a service mesh, let's cite some reasons which may prompt us against using it:

  • Service mesh handles all service-to-service communication at the additional cost of deploying and operating the service mesh. For simpler applications, this may not be justifiable
  • Since we're quite used to handling some of these concerns like circuit breaking in application code, it may lead to duplicate handling in the service mesh
  • Increasing dependency on an external system like service mesh may prove to be detrimental to application portability, especially as there are no industry standards for service mesh
  • Since a service mesh typically works by intercepting the mesh traffic through a proxy, it can potentially add undesirable latency to requests
  • Service mesh adds a lot of additional components and configurations that require precise handling; this requires expertise and adds to the learning curve
  • Finally, we may end up mixing operational logic – which should be there in the service mesh – with business logic, which should not be in the service mesh

Hence, as we can see, the story of a service mesh is not all about benefits, but that doesn't mean they aren't true. The important thing for us is to carefully evaluate our requirements and the complexity of our application, and then weigh the benefits of a service mesh against their added complexity.

9.2. What Are the Alternatives to Istio?

While Istio is quite popular and backed by some of the leaders in the industry, it's certainly not the only option available. While we can't do a thorough comparison here, let's go through a couple of these options, Linkerd and Consul.

Linkerd is an open-source service mesh that has been created for the Kubernetes platform. It's also quite popular and has the status of an incubating project in CNCF at present. Its working principles are similar to any other service mesh like Istio. It also makes use of TCP proxies to handle the mesh traffic. Linkerd uses a micro-proxy that is written in Rust and known as the Linkerd-proxy.

Overall, Linkerd is less complex than Istio, considering that it only supports Kubernetes. But, apart from that, the list of features that are available in Linkerd is very similar to those available in Istio. The core architecture of Linkerd also closely resembles that of Istio. Basically, Linkerd comprises three primary components: a user interface, a data plane, and a control plane.

Consul is an open-source implementation of service mesh from HashiCorp. It has the benefit of integrating well with the suite of other infrastructure management products from HashiCorp to provide wider capabilities. The data plane in Consul has the flexibility to support a proxy as well as a native integration model. It comes with a built-in proxy but can work well with Envoy as well.

Apart from Kubernetes, Consul is designed to work with other platforms like Nomad. Consul works by running the Consul agent on every node to perform health checks. These agents talk to one or more Consul servers that store and replicate data. While it provides all the standard features of a service mesh like Istio, it's a more complex system to deploy and manage.

10. Conclusion

To sum up, in this tutorial, we went through the basic concepts of the service mesh pattern and the features that it provides us. In particular, we went through the details of Istio. This covered the core architecture of Istio and its basic components. Further, we went through the details of installing and using Istio for some of the common use-cases.

The post Service Mesh Architecture with Istio first appeared on Baeldung.
       

Difference Between “expose” and “publish” in Docker

$
0
0

1. Overview

In Docker, it's important to know which ports a containerized application is listening on. We also need a way to access the application from outside the container.

To address those concerns, Docker enables us to expose and publish the ports.

In this article, we'll learn about both exposing and publishing ports. We'll use a simple Nginx web server container as an example.

2. Exposing Ports

An exposed port is a piece of metadata about the containerized application. In most cases, this shows which ports the application is listening to. Docker itself does not do anything with an exposed port. However, when we launch a container, we can use this metadata when publishing the port.

2.1. Expose With Nginx

Let's use the Nginx web server to try this out.

If we take a look at the Nginx official Dockerfile, we'll see that port 80 is exposed with the following command:

EXPOSE 80

Port 80 is exposed here because it's the default port for the http protocol. Let's run the Nginx container on our local machine and see if we can access it through port 80:

$ docker run -d nginx

The above command will use Nginx's latest image and run the container. We can double-check that the Nginx container is running with the command:

$ docker container ls

This command will output some information about all running containers, including Nginx:

CONTAINER ID        IMAGE               COMMAND                  CREATED             STATUS              PORTS               NAMES
cbc2f10f787f        nginx               "/docker-entrypoint..."   15 seconds ago      Up 15 seconds       80/tcp              dazzling_mclean

Here we see 80 under the port section. Since port 80 is exposed, we might think that accessing localhost:80 (or just localhost) will display the Nginx default page, but that's not the case:

$ curl http://localhost:8080
... no web page appears

Though the port is exposed, Docker has not opened it to the host.

2.2. Ways to Expose Ports

There are two main ways to expose ports in Docker. We can do it in the Dockerfile with the EXPOSE command:

EXPOSE 8765

Alternatively, we can also expose the port with the –expose option when running a container:

$ docker run --expose 8765 nginx

3. Publishing Ports

For a container port to be accessible through the docker host, we need to publish it.

3.1. Publish With Nginx

Let's run Nginx with a mapped port:

$ docker run -d -p 8080:80 nginx

The above command will map port 8080 of the host to port 80 of the container. The general syntax for the option is:

-p <hostport>:<container port>

If we go to localhost:8080, we should get Nginx's default welcome page:

$ curl http://localhost:8080
StatusCode : 200
StatusDescription : OK
Content : <!DOCTYPE html>
<html>
<head>
<title>Welcome to nginx!</title>
... more HTML

Let's list all running containers:

$ docker container ls

Now we should see that the container has a port mapping:

CONTAINER ID        IMAGE               COMMAND                  CREATED             STATUS              PORTS                  NAMES
38cfed3c61ea        nginx               "/docker-entrypoint..."   31 seconds ago      Up 30 seconds       0.0.0.0:8080->80/tcp   dazzling_kowalevski

Under the ports section, we have the 0.0.0.0:8080->80/tcp mapping.

Docker, by default, added 0.0.0.0 non-routable meta-address for the host. It means that the mapping is valid for all addresses/interfaces of the host.

3.2. Restricting Container Access

We can restrict access to the container, based on the host IP address. Rather than allowing access to the container from all the interfaces (which 0.0.0.0 does), we can specify the host IP address within the mapping.

Let's limit access to the container to traffic from just the 127.0.0.1 loopback address:

$ docker run -d -p 127.0.0.1:8081:80 nginx

In this case, the container is only accessible from the host itself. This uses the extended syntax for publishing, which includes an address binding:

-p <binding address>:<hostport>:<container port>

4. Publish All Exposed Ports

The exposed port metadata can be useful for launching a container as Docker gives us the ability to publish all exposed ports:

$ docker run -d --publish-all nginx

Here, Docker binds all exposed ports in the container to free random ports on the host.

Let's look at the containers this command launches:

$ docker container ls
CONTAINER ID        IMAGE               COMMAND                  CREATED             STATUS              PORTS                   NAMES
0a23e78732ce        nginx               "/docker-entrypoint..."   6 minutes ago       Up 6 minutes        0.0.0.0:32768->80/tcp   pedantic_curran

As we expected, Docker chose a random port (32768 in this case) from the host and mapped it to the exposed port.

5. Conclusion

In this article, we learned about exposing and publishing the ports in Docker.

We also discussed that the exposed port is metadata about the containerized application, whereas publishing a port is a way to access the application from the host.

The post Difference Between “expose” and “publish” in Docker first appeared on Baeldung.

Looking for a Java Developer with Spring Experience (Remote) (Part Time)

$
0
0

Who?

I'm looking for a Java developer with extensive Spring experience.

On the non-technical side – a good level of command over the English language is also important.

The Work

You're going to be working with me and the team on developing projects and written guides for teaching purposes, with a focus on different Spring modules (security, persistence, web, etc).

This includes creating new material based on our internal guidelines, as well as maintaining/upgrading the existing projects.

The Admin Details

Type of Engagement: Fully Remote

Time: 8-10 Hours / Week

Systems we use: JIRA, Slack, GitHub, Email

Budget: 20$ / hour

Apply

You can apply with a quick message (and a link to your LinkedIn profile), here or at the email hiring@baeldung.com.

Best of luck,

Eugen.

The post Looking for a Java Developer with Spring Experience (Remote) (Part Time) first appeared on Baeldung.
       

Convert a Java Enumeration Into a Stream

$
0
0

1. Overview

Enumeration is an interface from the first version of Java (JDK 1.0). This interface is generic and provides lazy access to a sequence of elements. Although there are better alternatives in newer versions of Java, legacy implementations may still return results using the Enumeration interface.  Therefore, for modernizing a legacy implementation, a developer may have to convert an Enumeration object to the Java Stream API.

In this short tutorial, we're going to implement a utility method for converting Enumeration objects to the Java Stream API. As a result, we'll be able to use stream methods such as filter and map.

2. Java's Enumeration Interface

Let's start with an example to illustrate the use of an Enumeration object:

public static <T> void print(Enumeration<T> enumeration) {
    while (enumeration.hasMoreElements()) {
        System.out.println(enumeration.nextElement());
    }
}

Enumeration has two main methods: hasMoreElements and nextElement. We should use both methods together to iterate over the collection of elements.

3. Creating a Spliterator

As a first step, we'll create a concrete class for the AbstractSpliterator abstract class. This class is necessary for adapting the Enumeration objects to the Spliterator interface:

public class EnumerationSpliterator<T> extends AbstractSpliterator<T> {
    private final Enumeration<T> enumeration;
    public EnumerationSpliterator(long est, int additionalCharacteristics, Enumeration<T> enumeration) {
        super(est, additionalCharacteristics);
        this.enumeration = enumeration;
    }
}

Besides creating the class, we also need to create a constructor. We should pass the first two parameters to the super constructor. The first parameter is the estimated size of the Spliterator. The second one is for defining additional characteristics. Finally, we'll use the last parameter to receive the Enumeration object.

We also need to override the tryAdvance and forEachRemaining methods. They'll be used by the Stream API for performing actions on the Enumeration‘s elements:

@Override
public boolean tryAdvance(Consumer<? super T> action) {
    if (enumeration.hasMoreElements()) {
        action.accept(enumeration.nextElement());
        return true;
    }
    return false;
}
@Override
public void forEachRemaining(Consumer<? super T> action) {
    while (enumeration.hasMoreElements())
        action.accept(enumeration.nextElement());
}

4. Converting Enumeration to Stream

Now, using the EnumerationSpliterator class, we're able to use the StreamSupport API for performing the conversion:

public static <T> Stream<T> convert(Enumeration<T> enumeration) {
    EnumerationSpliterator<T> spliterator 
      = new EnumerationSpliterator<T>(Long.MAX_VALUE, Spliterator.ORDERED, enumeration);
    Stream<T> stream = StreamSupport.stream(spliterator, false);
    return stream;
}

In this implementation, we need to create an instance of the EnumerationSpliterator class. Long.MAX_VALUE is the default value for the estimated size. Spliterator.ORDERED defines that the stream will iterate the elements in the order provided by the enumeration.

Next, we should call the stream method from the StreamSupport class. We need to pass the EnumerationSpliterator instance as the first parameter. The last parameter is to define whether the stream will be parallel or sequential.

5. Testing Our Implementation

By testing our convert method, we can observe that now we're able to create a valid Stream object based on an Enumeration:

@Test
public void givenEnumeration_whenConvertedToStream_thenNotNull() {
    Vector<Integer> input = new Vector<>(Arrays.asList(1, 2, 3, 4, 5));
    Stream<Integer> resultingStream = convert(input.elements());
    Assert.assertNotNull(resultingStream);
}

6. Conclusion

In this tutorial, we showed how to convert an Enumeration into a Stream object. The source code, as always, can be found over on GitHub.

The post Convert a Java Enumeration Into a Stream first appeared on Baeldung.
       

Spring Bean Names

$
0
0

1. Overview

Naming a Spring bean is quite helpful when we have multiple implementations of the same type. This is because it'll be ambiguous to Spring to inject a bean if our beans don't have unique names.

By having control over naming the beans, we can tell Spring which bean we want to inject into the targeted object.

In this article, we'll discuss Spring bean naming strategies and also explore how we can give multiple names to a single type of bean.

2. Default Bean Naming Strategy

Spring provides multiple annotations for creating beans. We can use these annotations at different levels. For example, we can place some annotations on a bean class and others on a method that creates a bean.

First, let's see the default naming strategy of Spring in action. How does Spring name our bean when we just specify the annotation without any value?

2.1. Class-Level Annotations

Let's start with the default naming strategy for an annotation used at the class level. To name a bean, Spring uses the class name and converts the first letter to lowercase.

Let's take a look at an example:

@Service
public class LoggingService {
}

Here, Spring creates a bean for the class LoggingService and registers it using the name “loggingService“.

This same default naming strategy is applicable for all class-level annotations that are used to create a Spring bean, such as @Component, @Service, and @Controller.

2.2. Method-Level Annotation

Spring provides annotations like @Bean and @Qualifier to be used on methods for bean creation.

Let's see an example to understand the default naming strategy for the @Bean annotation:

@Configuration
public class AuditConfiguration {
    @Bean
    public AuditService audit() {
          return new AuditService();
    }
}

In this configuration class, Spring registers a bean of type AuditService under name “audit” because when we use the @Bean annotation on a method, Spring uses the method name as a bean name.

We can also use the @Qualifier annotation on the method, and we'll see an example of it below.

3. Custom Naming of Beans

When we need to create multiple beans of the same type in the same Spring context, we can give custom names to the beans and refer to them using those names.

So, let's see how can we give a custom name to our Spring bean:

@Component("myBean")
public class MyCustomComponent {
}

This time, Spring will create the bean of type MyCustomComponent with the name “myBean“.

As we're explicitly giving the name to the bean, Spring will use this name, which can then be used to refer to or access the bean.

Similar to @Component(“myBean”), we can specify the name using other annotations such as @Service(“myService”), @Controller(“myController”), and @Bean(“myCustomBean”), and then Spring will register that bean with the given name.

4. Naming Bean With @Bean and @Qualifier

4.1. @Bean With Value

As we saw earlier, the @Bean annotation is applied at the method level, and by default, Spring uses the method name as a bean name.

This default bean name can be overwritten — we can specify the value using the @Bean annotation:

@Configuration
public class MyConfiguration {
    @Bean("beanComponent")
    public MyCustomComponent myComponent() {
        return new MyCustomComponent();
    }
}

In this case, when we want to get a bean of type MyCustomComponent, we can refer to this bean by using the name “beanComponent“.

The Spring @Bean annotation is usually declared in configuration class methods. It may reference other @Bean methods in the same class by calling them directly.

4.2. @Qualifier With Value

We can also use the @Qualifier annotation to name the bean.

First, let's create an interface Animal that will be implemented by multiple classes:

public interface Animal {
    String name();
}

Now, let's define an implementation class Cat and add the @Qualifier annotation to it with value “cat“:

@Component 
@Qualifier("cat") 
public class Cat implements Animal { 
    @Override 
     public String name() { 
        return "Cat"; 
     } 
}

Let's add another implementation of Animal and annotate it with @Qualifier and the value “dog“:

@Component
@Qualifier("dog")
public class Dog implements Animal {
    @Override
    public String name() {
        return "Dog";
    }
}

Now, let's write a class PetShow where we can inject the two different instances of Animal:

@Service 
public class PetShow { 
    private final Animal dog; 
    private final Animal cat; 
    public PetShow (@Qualifier("dog")Animal dog, @Qualifier("cat")Animal cat) { 
      this.dog = dog; 
      this.cat = cat; 
    }
    public Animal getDog() { 
      return dog; 
    }
    public Animal getCat() { 
      return cat; 
    }
}

In the class PetShow, we've injected both the implementations of type Animal by using the @Qualifier annotation on the constructor parameters, with the qualified bean names in value attributes of each annotation. Whenever we use this qualified name, Spring will inject the bean with that qualified name into the targeted bean.

5. Verifying Bean Names

So far, we've seen different examples to demonstrate giving names to Spring beans. Now the question is, how we can verify or test this?

Let's look at a unit test to verify the behavior:

@ExtendWith(SpringExtension.class)
public class SpringBeanNamingUnitTest {
    private AnnotationConfigApplicationContext context;
    
    @BeforeEach
    void setUp() {
        context = new AnnotationConfigApplicationContext();
        context.scan("com.baeldung.springbean.naming");
        context.refresh();
    }
    
    @Test
    void givenMultipleImplementationsOfAnimal_whenFieldIsInjectedWithQualifiedName_thenTheSpecificBeanShouldGetInjected() {
        PetShow petShow = (PetShow) context.getBean("petShow");
        assertThat(petShow.getCat().getClass()).isEqualTo(Cat.class);
        assertThat(petShow.getDog().getClass()).isEqualTo(Dog.class);
    }

In this JUnit test, we're initializing the AnnotationConfigApplicationContext in the setUp method, which is used to get the bean.

Then we simply verify the class of our Spring beans using standard assertions.

6. Conclusion

In this quick article, we've examined the default and custom Spring bean naming strategies.

We've also learned about how custom Spring bean naming is useful in use cases where we need to manage multiple beans of the same type.

As usual, the complete code for this article is available over on GitHub.

The post Spring Bean Names first appeared on Baeldung.
       

Java Weekly, Issue 381

$
0
0

1. Spring and Java

>> JDK Mission Control 8 Released [infoq.com]

The new version of JMC gives us even more insights from running JVM applications.

>> Microsoft Introduces Microsoft Build of OpenJDK [infoq.com]

Yeah, Microsoft and OpenJDK – an interesting interview about the different aspects of this significant release.

>> Looking into the JDK 16 vector API [mscharhag.com]

More computations in a single CPU cycle – an overview of the new incubating Vector API in Java language.

Also worth reading:

Webinars and presentations:

Time to upgrade:

2. Technical & Musings

>> Kubernetes 1.21: CronJob Reaches GA [kubernetes.io]

Scheduling jobs on K8S clusters – the CronJob resource goes GA with improved performance.

>> Don’t hire top talent; hire for weaknesses. [benjiweber.co.uk]

Weakness-oriented hiring – instead of hiring top-talent, let's find someone to strengthen our weaknesses. Very interesting, I need to read this one again.

Also worth reading:

3. Comics

And my favorite Dilberts of the week:

>> Pretending To Listen [dilbert.com]

>> Zoom Team Building [dilbert.com]

>> Boss Needs To Be Dumber [dilbert.com]

4. Pick of the Week

Always having security in mind while coding is, well, both critical and definitely not easy.

If you're using IntelliJ, Snyk’s security-focused plugin analyzes your code for vulnerabilities and provides fix advice:

>> Secure as you develop in IntelliJ IDEA [snyk.io]

Oh, and yeah, it's free.

The post Java Weekly, Issue 381 first appeared on Baeldung.
       

Displaying Error Messages with Thymeleaf in Spring

$
0
0

1. Overview

In this tutorial, we'll see how to display error messages originating from a Spring based back-end application in Thymeleaf templates.

For our demonstration purposes, we'll create a simple Spring Boot User Registration app and validate the individual input fields. Additionally, we'll see an example of how to handle global level errors.

First, we'll quickly set up the back-end app and then come to the UI part.

2. Sample Spring Boot Application

To create a simple Spring Boot app for User Registration, we'll need a controller, a repository, and an entity.

However, even before that we should add the Maven dependencies.

2.1. Maven Dependency

Let's add all the Spring Boot starters we'll need – Web for the MVC bit, Validation for hibernate entity validation, Thymeleaf for the UI and JPA for the repository. Furthermore, we'll need an H2 dependency to have an in-memory database:

<dependency>
    <groupId>org.springframework.boot</groupId>
    <artifactId>spring-boot-starter-web</artifactId>
    <version>2.4.3</version>
</dependency>
<dependency>
    <groupId>org.springframework.boot</groupId>
    <artifactId>spring-boot-starter-validation</artifactId>
    <version>2.4.3</version>
</dependency>
<dependency>
    <groupId>org.springframework.boot</groupId>
    <artifactId>spring-boot-starter-thymeleaf</artifactId>
    <version>2.4.3</version>
</dependency>
<dependency>
    <groupId>org.springframework.boot</groupId>
    <artifactId>spring-boot-starter-data-jpa</artifactId>
    <version>2.4.3</version>
</dependency>
<dependency>
    <groupId>com.h2database</groupId>
    <artifactId>h2</artifactId>
    <scope>runtime</scope>
    <version>1.4.200</version>
</dependency>

2.2. The Entity

Here's our User entity:

@Entity
public class User {
    @Id
    @GeneratedValue(strategy = GenerationType.AUTO)
    private Long id;
    @NotEmpty(message = "User's name cannot be empty.")
    @Size(min = 5, max = 250)
    private String fullName;
    @NotEmpty(message = "User's email cannot be empty.")
    private String email;
    @NotNull(message = "User's age cannot be null.")
    @Min(value = 18)
    private Integer age;
    private String country;
    private String phoneNumber;
    // getters and setters
}

As we can see, we've added a number of validation constraints for the user input. Such as, fields should not be null or empty and have a specific size or value.

Notably, we haven't added any constraint on the country or phoneNumber field. That's because we'll use them as an example for generating a global error, or an error not tied to a particular field.

2.3. The Repository

We'll use a simple JPA repository for our basic use case:

@Repository
public interface UserRepository extends JpaRepository<User, Long> {}

2.4. The Controller

Finally, to wire everything together at the back-end, let's put together a UserController:

@Controller
public class UserController {
    @Autowired
    private UserRepository repository;
    @GetMapping("/add")
    public String showAddUserForm(User user) {
        return "errors/addUser";
    }
    @PostMapping("/add")
    public String addUser(@Valid User user, BindingResult result, Model model) {
        if (result.hasErrors()) {
            return "errors/addUser";
        }
        repository.save(user);
        model.addAttribute("users", repository.findAll());
        return "errors/home";
    }
}

Here we're defining a GetMapping at the path /add to display the registration form. Our PostMapping at the same path deals with validation when the form is submitted, with subsequent save to the repository if all goes well.

3. Thymeleaf Templates With Error Messages

Now that the basics are covered, we've come to the crux of the matter, that is, creating the UI templates and displaying error messages, if any.

Let's construct the templates piecemeal based on what type of errors we can display.

3.1. Displaying Field Errors

Thymeleaf offers an inbuilt field.hasErrors method that returns a boolean depending on whether any errors exist for a given field. Combining it with a th:if we can choose to display the error if it exists:

<p th:if="${#fields.hasErrors('age')}">Invalid Age</p>

Next, if we want to add any styling, we can use th:class conditionally:

<p  th:if="${#fields.hasErrors('age')}" th:class="${#fields.hasErrors('age')}? error">
  Invalid Age</p>

Our simple embedded CSS class error turns the element red in color:

<style>
    .error {
        color: red;
    }
</style>

Another Thymeleaf attribute th:errors gives us the ability to display all errors on the specified selector, say email:

<div>
    <label for="email">Email</label> <input type="text" th:field="*{email}" />
    <p th:if="${#fields.hasErrors('email')}" th:errorclass="error" th:errors="*{email}" />
</div>

In the above snippet, we can also see a variation in using the CSS style. Here we're using th:errorclass, which eliminates the need for us to use any conditional attribute for applying the CSS.

Alternatively, we may choose to iterate over all validation messages on a given field using th:each:

<div>
    <label for="fullName">Name</label> <input type="text" th:field="*{fullName}" 
      id="fullName" placeholder="Full Name">
    <ul>
        <li th:each="err : ${#fields.errors('fullName')}" th:text="${err}" class="error" />
    </ul>
</div>

Notably, we used another Thymeleaf method fields.errors() here to collect all validation messages returned by our back-end app for the fullName field.

Now, to test this, let's fire up our Boot app and hit the endpoint http://localhost:8080/add.

This is how our page looks when we don't supply any input at all:

3.2. Displaying All Errors At Once

Next, let's see how instead of showing every error message one by one, we can show it all in one place.

For that, we'll use Thymeleaf's  fields.hasAnyErrors() method:

<div th:if="${#fields.hasAnyErrors()}">
    <ul>
        <li th:each="err : ${#fields.allErrors()}" th:text="${err}" />
    </ul>
</div>

As we can see, we used another variant fields.allErrors() here to iterate over all the errors on all the fields on the HTML form.

Instead of fields.hasAnyErrors(), we could have used #fields.hasErrors(‘*'). Similarly, #fields.errors(‘*') is an alternate to #fields.allErrors() that was used above.

Here's the effect:

3.3. Displaying Errors Outside Forms

Next. let's consider a scenario wherein we want to display validation messages outside an HTML form.

In that case, instead of using selections or (*{….}), we simply need to use the fully-qualified variable name in the format (${….}) :

<h4>Errors on a single field:</h4>
<div th:if="${#fields.hasErrors('${user.email}')}"
 th:errors="*{user.email}"></div>
<ul>
    <li th:each="err : ${#fields.errors('user.*')}" th:text="${err}" />
</ul>

This would display all error messages on the email field.

Now, let's see how we can display all the messages at once:

<h4>All errors:</h4>
<ul>
<li th:each="err : ${#fields.errors('user.*')}" th:text="${err}" />
</ul>

And here's what we see on the page:

3.4. Displaying Global Errors

In a real-life scenario, there might be errors not specifically associated with a particular field. We might have a use case where we need to consider multiple inputs in order to validate a business condition. These are called global errors.

Let's consider a simple example to demonstrate this. For our country and phoneNumber fields, we might add a check that for a given country, the phone numbers should start with a particular prefix.

We'll need to make a few changes on the back-end to add this validation.

First, we'll add a Service to perform this validation:

@Service
public class UserValidationService {
    public String validateUser(User user) {
        String message = "";
        if (user.getCountry() != null && user.getPhoneNumber() != null) {
            if (user.getCountry().equalsIgnoreCase("India") 
              && !user.getPhoneNumber().startsWith("91")) {
                message = "Phone number is invalid for " + user.getCountry();
            }
        }
        return message;
    }
}

As we can see, we added a trivial case. For the country India, the phone number should start with the prefix 91.

Second, we'll need a tweak to our controller's PostMapping:

@PostMapping("/add")
public String addUser(@Valid User user, BindingResult result, Model model) {
    String err = validationService.validateUser(user);
    if (!err.isEmpty()) {
        ObjectError error = new ObjectError("globalError", err);
        result.addError(error);
    }
    if (result.hasErrors()) {
        return "errors/addUser";
    }
    repository.save(user);
    model.addAttribute("users", repository.findAll());
    return "errors/home";
}

Finally, in the Thymeleaf template, we'll add the constant global to display such type of error:

<div th:if="${#fields.hasErrors('global')}">
    <h3>Global errors:</h3>
    <p th:each="err : ${#fields.errors('global')}" th:text="${err}" class="error" />
</div>

Alternatively, instead of the constant, we can use methods #fields.hasGlobalErrors() and #fields.globalErrors() to achieve the same.

This is what we see on entering an invalid input:

4. Conclusion

In this tutorial, we built a simple Spring Boot Application to demonstrate how to display various types of errors in Thymeleaf.

We looked at displaying field errors one by one and then all at one go, errors outside HTML forms, and global errors.

As always, source code is available over on GitHub.

The post Displaying Error Messages with Thymeleaf in Spring first appeared on Baeldung.
       

The package-info.java File

$
0
0

1. Overview

In this tutorial, we're going to understand the purpose of package-info.java and how it is useful. Simply put, package-info is a Java file that can be added to any Java package.

2. Purposes of package-info

The package-info.java file currently serves two purposes:

  • A place for package-level documentation
  • Home for package-level annotations

Other than the aforementioned, the use-cases can be extended as required. In the future, if it's required to add any package-level feature, this file will be a perfect place.

Let's examine the current use cases in detail.

3. Package Documentation

Prior to Java version 5, the documentation related to a package was placed in an HTML file, package.html. This is just a normal HTML file with Javadoc comments placed inside the body tag.

As JDK 5 arrived on the scene, package.html gave way to a new option, package-info.java, which is now preferred over package.html.

Let's see an example of the package documentation in a package-info.java file:

/**
 * This module is about impact of the final keyword on performance
 * <p>
 * This module explores  if there are any performance benefits from
 * using the final keyword in our code. This module examines the performance
 * implications of using final on a variable, method, and class level.
 * </p>
 *
 * @since 1.0
 * @author baeldung
 * @version 1.1
 */
package com.baeldung.finalkeyword;

The above package-info.java will generate the Javadoc:

So, just as we write a Javadoc in other places, we can place the package Javadoc in a Java source file.

4. Package Annotations

Suppose we have to apply an annotation to the entire package. In this case, package-info.java can come to our aid.

Consider a situation where we need to declare fields, parameters, and return values as non-null by default. We can achieve this goal by simply including the @NonNullApi annotation for non-null parameters and return values, and the @NonNullFields annotation for non-null fields, in our package-info.java file.

@NonNullFields and @NonNullApi will mark fields, parameters, and return values as non-null unless they are explicitly marked as @Nullable:

@NonNullApi
@NonNullFields
package com.baeldung.nullibility;
import org.springframework.lang.NonNullApi;
import org.springframework.lang.NonNullFields;

There are various annotations available to be used at the package level. For example, in the Hibernate project, we have a category of annotations, and the JAXB project also has package-level annotations.

5. How to Create a package-info File

Creating a package-info file is fairly simple: we can create it manually or seek IDE help for generating the same.

In IntelliJ IDEA, we can right-click on the package and select New-> package-info.java:

Eclipse's New Java Package option allows us to generate a package-info.java:

The above method works for existing packages also. Select the existing package, New-> Package option, and tick the Create package-info.java option.

It's always a good practice to make the mandatory inclusion of package-info.java in our project coding guidelines. Tools like Sonar or Checkstyle can be of help in achieving this.

6. Conclusion

The main difference between the HTML and Java file usage is that, with a Java file, we have an additional possibility of using Java annotations. So the package-info java file isn't just a home for package Javadocs but also package-wide annotations. Also, this list of use-cases can be extended in the future.

As always, the code is available over on GitHub.

The post The package-info.java File first appeared on Baeldung.
       
Viewing all 4464 articles
Browse latest View live


<script src="https://jsc.adskeeper.com/r/s/rssing.com.1596347.js" async> </script>