Quantcast
Channel: Baeldung
Viewing all 4464 articles
Browse latest View live

Guide to Setting Up Apache Kafka Using Docker

$
0
0

1. Overview

Docker is one of the most popular container engines used in the software industry to create, package, and deploy applications. In this tutorial, we'll learn how to do an Apache Kafka setup using Docker.

2. Single Node Setup

A single-node Kafka broker setup would meet most of the local development needs. So, let's start by learning this simple setup.

2.1. docker-compose.yml Configuration

To start an Apache Kafka server, first, we'd need to start a Zookeeper server. We can configure this dependency in a docker-compose.yml file, which will ensure that the Zookeeper server always starts before the Kafka server and stops after it.

Let's create a simple docker-compose.yml file with two services — namely, zookeeper and kafka:

version: '2'
services:
  zookeeper:
    image: confluentinc/cp-zookeeper:latest
    environment:
      ZOOKEEPER_CLIENT_PORT: 2181
      ZOOKEEPER_TICK_TIME: 2000
    ports:
      - 22181:2181
  
  kafka:
    image: confluentinc/cp-kafka:latest
    depends_on:
      - zookeeper
    ports:
      - 29092:29092
    environment:
      KAFKA_BROKER_ID: 1
      KAFKA_ZOOKEEPER_CONNECT: zookeeper:2181
      KAFKA_ADVERTISED_LISTENERS: PLAINTEXT://kafka:9092,PLAINTEXT_HOST://localhost:29092
      KAFKA_LISTENER_SECURITY_PROTOCOL_MAP: PLAINTEXT:PLAINTEXT,PLAINTEXT_HOST:PLAINTEXT
      KAFKA_INTER_BROKER_LISTENER_NAME: PLAINTEXT
      KAFKA_OFFSETS_TOPIC_REPLICATION_FACTOR: 1

In this setup, our Zookeeper server is listening on port=2181 for the kafka service, which is defined within the same container setup. However, for any client running on the host, it'll be exposed on port 22181.

Similarly, the kafka service is exposed to the host applications through port 29092, but it is actually advertised on port 9092 within the container environment configured by the KAFKA_ADVERTISED_LISTENERS property.

2.2. Start Kafka Server

Let's start the Kafka server by spinning up the containers using the docker-compose command:

$ docker-compose up -d
Creating network "kafka_default" with the default driver
Creating kafka_zookeeper_1 ... done
Creating kafka_kafka_1     ... done

Now, let's use the nc command to verify that both the servers are listening on the respective ports:

$ nc -z localhost 22181
Connection to localhost port 22181 [tcp/*] succeeded!
$ nc -z localhost 29092
Connection to localhost port 29092 [tcp/*] succeeded!

Additionally, we can also check the verbose logs while the containers are starting up and verify that the Kafka server is up:

$ docker-compose logs kafka | grep -i started
kafka_1      | [2021-04-10 22:57:40,413] DEBUG [ReplicaStateMachine controllerId=1] Started replica state machine with initial state -> HashMap() (kafka.controller.ZkReplicaStateMachine)
kafka_1      | [2021-04-10 22:57:40,418] DEBUG [PartitionStateMachine controllerId=1] Started partition state machine with initial state -> HashMap() (kafka.controller.ZkPartitionStateMachine)
kafka_1      | [2021-04-10 22:57:40,447] INFO [SocketServer brokerId=1] Started data-plane acceptor and processor(s) for endpoint : ListenerName(PLAINTEXT) (kafka.network.SocketServer)
kafka_1      | [2021-04-10 22:57:40,448] INFO [SocketServer brokerId=1] Started socket server acceptors and processors (kafka.network.SocketServer)
kafka_1      | [2021-04-10 22:57:40,458] INFO [KafkaServer id=1] started (kafka.server.KafkaServer)

With that, our Kafka setup is ready for use.

2.3. Connection Using Kafka Tool

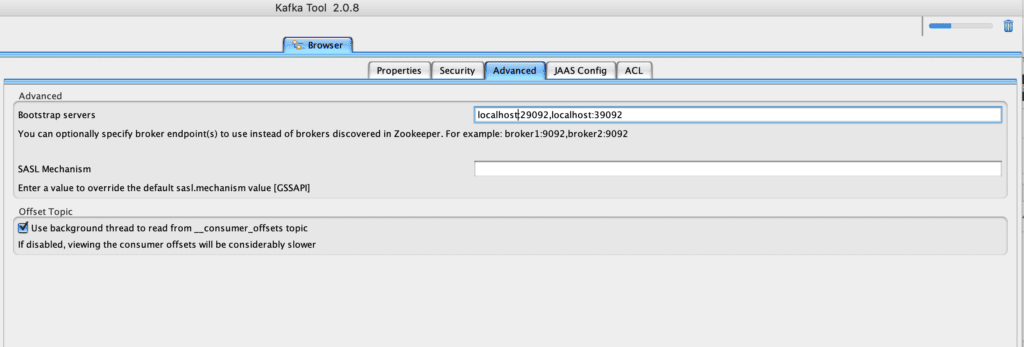
Finally, let's use the Kafka Tool GUI utility to establish a connection with our newly created Kafka server, and later, we'll visualize this setup:

We must note that we need to use the Bootstrap servers property to connect to the Kafka server listening at port 29092 for the host machine.

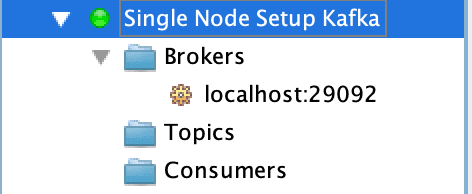
Finally, we should be able to visualize the connection on the left side-bar:

As such, the entries for Topics and Consumers are empty because it's a new setup. Once the topics are created, we should be able to visualize data across partitions. Moreover, if there are active consumers connected to our Kafka server, then we can view their details, too.

3. Kafka Cluster Setup

For more stable environments, we'll need a resilient setup. So, let's extend our docker-compose.yml file to create a multi-node Kafka cluster setup.

3.1. docker-compose.yml Configuration

A cluster setup for Apache Kafka needs to have redundancy for both Zookeeper servers and the Kafka servers. So, let's add configuration for one more node each for Zookeeper and Kafka services:

---
version: '2'
services:
  zookeeper-1:
    image: confluentinc/cp-zookeeper:latest
    environment:
      ZOOKEEPER_CLIENT_PORT: 2181
      ZOOKEEPER_TICK_TIME: 2000
    ports:
      - 22181:2181
  zookeeper-2:
    image: confluentinc/cp-zookeeper:latest
    environment:
      ZOOKEEPER_CLIENT_PORT: 2181
      ZOOKEEPER_TICK_TIME: 2000
    ports:
      - 32181:2181
  
  kafka-1:
    image: confluentinc/cp-kafka:latest
    depends_on:
      - zookeeper-1
      - zookeeper-2
    ports:
      - 29092:29092
    environment:
      KAFKA_BROKER_ID: 1
      KAFKA_ZOOKEEPER_CONNECT: zookeeper-1:2181,zookeeper-2:2181
      KAFKA_ADVERTISED_LISTENERS: PLAINTEXT://kafka-1:9092,PLAINTEXT_HOST://localhost:29092
      KAFKA_LISTENER_SECURITY_PROTOCOL_MAP: PLAINTEXT:PLAINTEXT,PLAINTEXT_HOST:PLAINTEXT
      KAFKA_INTER_BROKER_LISTENER_NAME: PLAINTEXT
      KAFKA_OFFSETS_TOPIC_REPLICATION_FACTOR: 1
  kafka-2:
    image: confluentinc/cp-kafka:latest
    depends_on:
      - zookeeper-1
      - zookeeper-2
    ports:
      - 39092:39092
    environment:
      KAFKA_BROKER_ID: 2
      KAFKA_ZOOKEEPER_CONNECT: zookeeper-1:2181,zookeeper-2:2181
      KAFKA_ADVERTISED_LISTENERS: PLAINTEXT://kafka-2:9092,PLAINTEXT_HOST://localhost:39092
      KAFKA_LISTENER_SECURITY_PROTOCOL_MAP: PLAINTEXT:PLAINTEXT,PLAINTEXT_HOST:PLAINTEXT
      KAFKA_INTER_BROKER_LISTENER_NAME: PLAINTEXT
      KAFKA_OFFSETS_TOPIC_REPLICATION_FACTOR: 1

We must ensure that the service names and KAFKA_BROKER_ID are unique across the services.

Moreover, each service must expose a unique port to the host machine. So, although zookeeper-1 and zookeeper-2 are listening on port 2181, they're exposing it to the host via ports 22181 and 32181, respectively. The same logic applies for the kafka-1 and kafka-2 services, where they'll be listening on ports 29092 and 39092, respectively.

3.2. Start the Kafka Cluster

Let's spin up the cluster by using the docker-compose command:

$ docker-compose up -d
Creating network "kafka_default" with the default driver
Creating kafka_zookeeper-1_1 ... done
Creating kafka_zookeeper-2_1 ... done
Creating kafka_kafka-2_1     ... done
Creating kafka_kafka-1_1     ... done

Once the cluster is up, let's use the Kafka Tool to connect to the cluster by specifying comma-separated values for the Kafka servers and respective ports:

Finally, let's take a look at the multiple broker nodes available in the cluster:

4. Conclusion

In this tutorial, we used the Docker technology to create single-node and multi-node setups of Apache Kafka. Additionally, we also used the Kafka Tool to connect and visualize the configured broker server details.

The post Guide to Setting Up Apache Kafka Using Docker first appeared on Baeldung.

Using Watch with the Kubernetes API

$
0
0

1. Introduction

In this tutorial, we'll continue to explore the Java Kubernetes API. This time, we'll show how to use Watches to efficiently monitor cluster events.

2. What are Kubernetes Watches?

In our previous articles covering the Kubernetes API, we've shown how to recover information about a given resource or a collection of them. This is fine if all we wanted was to get the state of those resources at a given point on time. However, given that Kubernetes clusters are highly dynamic in nature, this is usually not enough.

Most often, we also want to monitor those resources and track events as they happen. For instance, we might be interested in tracking pod life cycle events or deployment status changes. While we could use polling, this approach would suffer from a few limitations. Firstly, it would not scale well as the number of resources to monitor increases. Secondly, we risk losing events that happen to occur between polling cycles.

To address those issues, Kubernetes has the concept of Watches, which is available for all resource collection API calls through the watch query parameter. When its value is false or omitted, the GET operation behaves as usual: the server processes the request and returns a list of resource instances that match the given criteria. However, passing watch=true changes its behavior dramatically:

  • The response now consists of a series of modification events, containing the type of modification and the affected object
  • The connection will be kept open after sending the initial batch of events, using a technique called long polling

3. Creating a Watch

The Java Kubernetes API support Watches through the Watch class, which has a single static method: createWatch. This method takes three arguments:

  • An ApiClient, which handles handles actual REST calls to the Kubernetes API server
  • Call instance describing the resource collection to watch
  • TypeToken with the expected resource type

We create a Call instance from any of the xxxApi classes available in the library using one of their listXXXCall() methods. For instance, to create a Watch that detects Pod events, we'd use listPodForAllNamespacesCall():

CoreV1Api api = new CoreV1Api(client);
Call call = api.listPodForAllNamespacesCall(null, null, null, null, null, null, null, null, 10, true, null);
Watch<V1Pod> watch = Watch.createWatch(
  client, 
  call, 
  new TypeToken<Response<V1Pod>>(){}.getType()));

Here, we use null for most parameters, meaning “use the default value”, with just two exceptions: timeout and watch. The latter must be set to true for a watch call. Otherwise, this would be a regular rest call. The timeout, in this case, works as the watch “time-to-live”, meaning that the server will stop sending events and terminate the connection once it expires.

Finding a good value for the timeout parameter, which is expressed in seconds, requires some trial-and-error, as it depends on the exact requirements of the client application. Also, it is important to check your Kubernetes cluster configuration. Usually, there's a hard limit of 5 minutes for watches, so passing anything beyond that will not have the desired effect.

4. Receiving Events

Taking a closer look at the Watch class, we can see that it implements both Iterator and Iterable from the standard JRE, so we can use the value returned from createWatch() in for-each or hasNext()-next() loops:

for (Response<V1Pod> event : watch) {
    V1Pod pod = event.object;
    V1ObjectMeta meta = pod.getMetadata();
    switch (event.type) {
    case "ADDED":
    case "MODIFIED":
    case "DELETED":
        // ... process pod data
        break;
    default:
        log.warn("Unknown event type: {}", event.type);
    }
}

The type field of each event tells us what kind of event happened to the object – a Pod in our case. Once we consume all events, we must do a new call to Watch.createWatch() to start receiving events again. In the example code, we surround the Watch creation and result processing in a while loop. Other approaches are also possible, such as using an ExecutorService or similar to receive updates in the background.

5. Using Resource Versions and Bookmarks

A problem with the code above is the fact that every time we create a new Watch, there's an initial event stream with all existing resource instances of the given kind. This happens because the server assumes that we don't have any previous information about them, so it just sends them all.

However, doing so defeats the purpose of processing events efficiently, as we only need new events after the initial load. To prevent receiving all data again, the watch mechanism supports two additional concepts: resource versions and bookmarks.

5.1. Resource Versions

Every resource in Kubernetes contains a resourceVersion field in its metadata, which is just an opaque string set by the server every time something changes. Moreover, since a resource collection is also a resource, there's a resourceVersion associated with it. As new resources are added, removed, and/or modified from a collection, this field will change accordingly.

When we make an API call that returns a collection and includes the resourceVersion parameter, the server will use its value as a “starting point” for the query. For Watch API calls, this means that only events that happened after the time where the informed version was created will be included.

But, how do we get a resourceVersion to include in our calls? Simple: we just do an initial synchronization call to retrieve the initial list of resources, which includes the collection's resourceVersion, and then use it in subsequent Watch calls:

String resourceVersion = null;
while (true) {
    if (resourceVersion == null) {
        V1PodList podList = api.listPodForAllNamespaces(null, null, null, null, null, "false",
          resourceVersion, null, 10, null);
        resourceVersion = podList.getMetadata().getResourceVersion();
    }
    try (Watch<V1Pod> watch = Watch.createWatch(
      client,
      api.listPodForAllNamespacesCall(null, null, null, null, null, "false",
        resourceVersion, null, 10, true, null),
      new TypeToken<Response<V1Pod>>(){}.getType())) {
        
        for (Response<V1Pod> event : watch) {
            // ... process events
        }
    } catch (ApiException ex) {
        if (ex.getCode() == 504 || ex.getCode() == 410) {
            resourceVersion = extractResourceVersionFromException(ex);
        }
        else {
            resourceVersion = null;
        }
    }
}

The exception handling code, in this case, is rather important. Kubernetes servers will return a 504 or 410 error code when, for some reason, the requested resourceVersion doesn't exist. In this case, the returned message usually contains the current version. Unfortunately, this information doesn't come in any structured way but rather as part of the error message itself.

The extraction code (a.k.a. ugly hack) uses a regular expression for this intent, but since error messages tend to be implementation-dependent, the code falls back to a null value. By doing so, the main loop goes back to its starting point, recovering a fresh list with a new resourceVersion and resuming watch operations.

Anyhow, even with this caveat, the key point is that now the event list will not start from scratch on every watch.

5.2. Bookmarks

Bookmarks are an optional feature that enables a special BOOKMARK event on events streams returned from a Watch call. This event contains in its metadata a resourceVersion value that we can use in subsequent Watch calls as a new starting point.

As this is an opt-in feature, we must explicitly enable it by passing true to allowWatchBookmarks on API calls. This option is valid only when creating a Watch and ignored otherwise. Also, a server may ignore it completely, so clients should not rely on receiving those events at all.

When comparing with the previous approach using resourceVersion alone, bookmarks allow us to mostly get away with a costly synchronization call:

String resourceVersion = null;
while (true) {
    // Get a fresh list whenever we need to resync
    if (resourceVersion == null) {
        V1PodList podList = api.listPodForAllNamespaces(true, null, null, null, null,
          "false", resourceVersion, null, null, null);
        resourceVersion = podList.getMetadata().getResourceVersion();
    }
    while (true) {
        try (Watch<V1Pod> watch = Watch.createWatch(
          client,
          api.listPodForAllNamespacesCall(true, null, null, null, null, 
            "false", resourceVersion, null, 10, true, null),
          new TypeToken<Response<V1Pod>>(){}.getType())) {
              for (Response<V1Pod> event : watch) {
                  V1Pod pod = event.object;
                  V1ObjectMeta meta = pod.getMetadata();
                  switch (event.type) {
                      case "BOOKMARK":
                          resourceVersion = meta.getResourceVersion();
                          break;
                      case "ADDED":
                      case "MODIFIED":
                      case "DELETED":
                          // ... event processing omitted
                          break;
                      default:
                          log.warn("Unknown event type: {}", event.type);
                  }
              }
          }
        } catch (ApiException ex) {
            resourceVersion = null;
            break;
        }
    }
}

Here, we only need to get the full list on the first pass and whenever we get an ApiException in the inner loop. Notice that BOOKMARK events have the same object type as other events, so we don't need any special casting here. However, the only field we care about is the resourceVersion, which we save for the next Watch call.

6. Conclusion

In this article, we've covered different ways to create Kubernetes Watches using the Java API client. As usual, the full source code of the examples can be found over on GitHub.

The post Using Watch with the Kubernetes API first appeared on Baeldung.
       

Split Java String by Newline

$
0
0

1. Overview

In this tutorial, we'll look at different ways to split a Java String by newline characters. Since the newline character is different in various operating systems, we'll look at the method to cover Unix, Linux, Mac OS 9 and earlier, macOS, and Windows OS.

2. Split String by Newline

2.1. Split String by Newline Using the System#lineSeparator Method

Given that the newline character is different in various operating systems, we can use system-defined constants or methods when we want our code to be platform-independent.

The System#lineSeparator method returns the line separator string for the underlying operating system. It returns the value of the system property line.separator.

Therefore, we can use the line separator string returned by the System#lineSeparator method along with String#split method to split the Java String by newline:

String[] lines = "Line1\r\nLine2\r\nLine3".split(System.lineSeparator());

The resulting lines will be:

["Line1", "Line2", "Line3"]

2.2. Split String by Newline Using Regular Expressions

Next, let's start by looking at the different characters used to separate lines in different operating systems.

The “\n” character separates lines in Unix, Linux, and macOS. On the other hand, the “\r\n” character separates lines in Windows Environment. Finally, the “\r” character separates lines in Mac OS 9 and earlier.

Therefore, we need to take care of all the possible newline characters while splitting a string by newlines using regular expressions.

Finally, let's look at the regular expression pattern that will cover all the different operating systems' newline characters. That is to say, we need to look for “\n”, “\r\n” and “\r” patterns. This can be easily done by using regular expressions in Java.

The regular expression pattern to cover all the different newline characters will be:

"\\r?\\n|\\r"

Breaking it down, we see that:

  • \\n = Unix, Linux and macOS pattern
  • \\r\\n = Windows Environment pattern
  • \\r = MacOS 9 and earlier pattern

Next, let's use the String#split method to split the Java String. Let's look at a few examples:

String[] lines = "Line1\nLine2\nLine3".split("\\r?\\n|\\r");
String[] lines = "Line1\rLine2\rLine3".split("\\r?\\n|\\r");
String[] lines = "Line1\r\nLine2\r\nLine3".split("\\r?\\n|\\r");

The resulting lines for all the examples will be:

["Line1", "Line2", "Line3"]

2.3. Split String by Newline in Java 8

Java 8 provides an “\R” pattern that matches any Unicode line-break sequence and covers all the newline characters for different operating systems. Therefore, we can use the “\R” pattern instead of “\\r?\\n|\\r” in Java 8 or higher.

Let's look at a few examples:

String[] lines = "Line1\nLine2\nLine3".split("\\R");
String[] lines = "Line1\rLine2\rLine3".split("\\R");
String[] lines = "Line1\r\nLine2\r\nLine3".split("\\R");

Again, the resulting output lines for all examples will be:

["Line1", "Line2", "Line3"]

3. Conclusion

In this quick article, we looked at the different newline characters we're likely to encounter in different operating systems. Furthermore, we saw how to split a Java String by newlines using our own regular expression pattern, as well as using the “\R” pattern available starting in Java 8.

As always, all these code samples are available over on GitHub.

The post Split Java String by Newline first appeared on Baeldung.
       

Long Polling in Spring MVC

$
0
0

1. Overview

Long polling is a method that server applications use to hold a client connection until information becomes available. This is often used when a server must call a downstream service to get information and await a result.

In this tutorial, we'll explore the concept of long polling in Spring MVC by using DeferredResult. We'll start by looking at a basic implementation using DeferredResult and then discuss how we can handle errors and timeouts. Finally, we'll look at how all this can be tested.

2. Long Polling Using DeferredResult

We can use DeferredResult in Spring MVC as a way to handle inbound HTTP requests asynchronously. It allows the HTTP worker thread to be freed up to handle other incoming requests and offloads the work to another worker thread. As such, it helps with service availability for requests that require long computations or arbitrary wait times.

Our previous article on Spring's DeferredResult class covers its capabilities and use cases in greater depth.

2.1. Publisher

Let's start our long polling example by creating a publishing application that uses DeferredResult. 

Initially, let's define a Spring @RestController that makes use of DeferredResult but does not offload its work to another worker thread:

@RestController
@RequestMapping("/api")
public class BakeryController { 
    @GetMapping("/bake/{bakedGood}")
    public DeferredResult<String> publisher(@PathVariable String bakedGood, @RequestParam Integer bakeTime) {
        DeferredResult<String> output = new DeferredResult<>();
        try {
            Thread.sleep(bakeTime);
            output.setResult(format("Bake for %s complete and order dispatched. Enjoy!", bakedGood));
        } catch (Exception e) {
            // ...
        }
        return output;
    }
}

This controller works synchronously in the same way that a regular blocking controller works. As such, our HTTP thread is completely blocked until bakeTime has passed. This is not ideal if our service has a lot of inbound traffic.

Let's now set the output asynchronously by offloading the work to a worker thread:

private ExecutorService bakers = Executors.newFixedThreadPool(5);
@GetMapping("/bake/{bakedGood}")
public DeferredResult<String> publisher(@PathVariable String bakedGood, @RequestParam Integer bakeTime) {
    DeferredResult<String> output = new DeferredResult<>();
    bakers.execute(() -> {
        try {
            Thread.sleep(bakeTime);
            output.setResult(format("Bake for %s complete and order dispatched. Enjoy!", bakedGood));
        } catch (Exception e) {
            // ...
        }
    });
    return output;
}

In this example, we're now able to free up the HTTP worker thread to handle other requests. A worker thread from our bakers pool is doing the work and will set the result upon completion. When the worker calls setResult, it will allow the container thread to respond to the calling client.

Our code is now a good candidate for long polling and will allow our service to be more available to inbound HTTP requests than with a traditional blocking controller. However, we also need to take care of edge cases such as error handling and timeout handling.

To handle checked errors thrown by our worker, we'll use the setErrorResult method provided by DeferredResult:

bakers.execute(() -> {
    try {
        Thread.sleep(bakeTime);
        output.setResult(format("Bake for %s complete and order dispatched. Enjoy!", bakedGood));
     } catch (Exception e) {
        output.setErrorResult("Something went wrong with your order!");
     }
});

The worker thread is now able to gracefully handle any exception thrown.

Since long polling is often implemented to handle responses from downstream systems both asynchronously and synchronously, we should add a mechanism to enforce a timeout in the case that we never receive a response from the downstream system. The DeferredResult API provides a mechanism for doing this. First, we pass in a timeout parameter in the constructor of our DeferredResult object:

DeferredResult<String> output = new DeferredResult<>(5000L);

Next, let's implement the timeout scenario. For this, we'll use onTimeout:

output.onTimeout(() -> output.setErrorResult("the bakery is not responding in allowed time"));

This takes in a Runnable as input — it's invoked by the container thread when the timeout threshold is reached. If the timeout is reached, then we handle this as an error and use setErrorResult accordingly.

2.2. Subscriber

Now that we have our publishing application set up, let's write a subscribing client application.

Writing a service that calls this long polling API is fairly straightforward, as it's essentially the same as writing a client for standard blocking REST calls. The only real difference is that we want to ensure we have a timeout mechanism in place due to the wait time of long polling. In Spring MVC, we can use RestTemplate or WebClient to achieve this, as both have built-in timeout handling.

First, let's start with an example using RestTemplate. Let's create an instance of RestTemplate using RestTemplateBuilder so that we can set the timeout duration:

public String callBakeWithRestTemplate(RestTemplateBuilder restTemplateBuilder) {
    RestTemplate restTemplate = restTemplateBuilder
      .setConnectTimeout(Duration.ofSeconds(10))
      .setReadTimeout(Duration.ofSeconds(10))
      .build();
    try {
        return restTemplate.getForObject("/api/bake/cookie?bakeTime=1000", String.class);
    } catch (ResourceAccessException e) {
        // handle timeout
    }
}

In this code, by catching the ResourceAccessException from our long polling call, we're able to handle the error upon timeout.

Next, let's create an example using WebClient to achieve the same result:

public String callBakeWithWebClient() {
    WebClient webClient = WebClient.create();
    try {
        return webClient.get()
          .uri("/api/bake/cookie?bakeTime=1000")
          .retrieve()
          .bodyToFlux(String.class)
          .timeout(Duration.ofSeconds(10))
          .blockFirst();
    } catch (ReadTimeoutException e) {
        // handle timeout
    }
}

Our previous article on setting Spring REST timeouts covers this topic in greater depth.

3. Testing Long Polling

Now that we have our application up and running, let's discuss how we can test it. We can start by using MockMvc to test calls to our controller class:

MvcResult asyncListener = mockMvc
  .perform(MockMvcRequestBuilders.get("/api/bake/cookie?bakeTime=1000"))
  .andExpect(request().asyncStarted())
  .andReturn();

Here, we're calling our DeferredResult endpoint and asserting that the request has started an asynchronous call. From here, the test will await the completion of the asynchronous result, meaning that we do not need to add any waiting logic in our test.

Next, we want to assert when the asynchronous call has returned and that it matches the value that we're expecting:

String response = mockMvc
  .perform(asyncDispatch(asyncListener))
  .andReturn()
  .getResponse()
  .getContentAsString();
assertThat(response)
  .isEqualTo("Bake for cookie complete and order dispatched. Enjoy!");

By using asyncDispatch(), we can get the response of the asynchronous call and assert its value.

To test the timeout mechanism of our DeferredResult, we need to alter the test code slightly by adding a timeout enabler between the asyncListener and the response calls:

((MockAsyncContext) asyncListener
  .getRequest()
  .getAsyncContext())
  .getListeners()
  .get(0)
  .onTimeout(null);

This code might look strange, but there's a specific reason we call onTimeout in this way. We do this to let the AsyncListener know that an operation has timed out. This will ensure that the Runnable class that we've implemented for our onTimeout method in our controller is called correctly.

4. Conclusion

In this article, we covered how to use DeferredResult in the context of long polling. We also discussed how we can write subscribing clients for long polling, and how it can be tested. The source code is available over on GitHub.

The post Long Polling in Spring MVC first appeared on Baeldung.
       

Multi-Entity Aggregates in Axon

$
0
0

1. Overview

In this article, we'll be looking into how Axon supports Aggregates with multiple entities.

We consider this article to be an expansion of our main guide on Axon. As such, we'll utilize both Axon Framework and Axon Server again. We'll use the former in the code of this article, and the latter is the Event Store and Message Router.

As this is an expansion, let's elaborate a bit on the Order domain that we presented in the base article.

2. Aggregates and Entities

The Aggregates and Entities that Axon supports stem from Domain-Driven Design. Prior to diving into code, let's first establish what an entity is within this context:

  • An object that is not fundamentally defined by its attributes, but rather by a thread of continuity and identity

An entity is thus identifiable, but not through the attributes it contains. Furthermore, changes occur on the entity, as it maintains a thread of continuity.

Knowing this, we can take the following step, by sharing what an Aggregate means in this context (distilled from Domain-Driven Design: Tackling Complexity in the Heart of Software):

  • An Aggregate is a group of associated objects acting as a single unit to data changes
  • References regarding the Aggregate are restricted towards a single member, the Aggregate Root
  • A set of consistency rules apply within the Aggregate boundary

As the first point dictates, an Aggregate is not a single thing, but a group of objects. Objects can be value objects but, more importantly, they can also be entities. Axon supports modeling the aggregate as a group of associated objects rather than a single object, as we'll see later on.

3. Order Service API: Commands and Events

As we're dealing with a message-driven application, we start with defining new commands when expanding the Aggregate to contain multiple entities.

Our Order domain currently contains an OrderAggregate. A logical concept to include in this Aggregate is the OrderLine entity. An order line refers to a specific product that is being ordered, including the total number of product entries.

Knowing this, we can expand the command API – which consisted of a PlaceOrderCommand, ConfirmOrderCommand, and ShipOrderCommand – with three additional operations:

  • Adding a product
  • Incrementing the number of products for an order line
  • Decrementing the number of products for an order line

These operations translate to the classes AddProductCommand, IncrementProductCountCommand, and DecrementProductCountCommand:

public class AddProductCommand {
    @TargetAggregateIdentifier
    private final String orderId;
    private final String productId;
    // default constructor, getters, equals/hashCode and toString
}
 
public class IncrementProductCountCommand {
    @TargetAggregateIdentifier
    private final String orderId;
    private final String productId;
    // default constructor, getters, equals/hashCode and toString
}
 
public class DecrementProductCountCommand {
    @TargetAggregateIdentifier
    private final String orderId;
    private final String productId;
    // default constructor, getters, equals/hashCode and toString
}

The TargetAggregateIdentifier is still present on the orderId, since the OrderAggregate remains the Aggregate within the system.

Remember from the definition, the entity also has an identity. This is why the productId is part of the command. Later in this article, we'll show how these fields refer to an exact entity.

Events will be published as a result of command handling, notifying that something relevant has happened. So, the event API should also be expanded as a result of the new command API.

Let's looks at the POJOs that reflect the enhanced thread of continuity — ProductAddedEvent, ProductCountIncrementedEvent, ProductCountDecrementedEvent, and ProductRemovedEvent:

public class ProductAddedEvent {
    private final String orderId;
    private final String productId;
    // default constructor, getters, equals/hashCode and toString
}
 
public class ProductCountIncrementedEvent {
    private final String orderId;
    private final String productId;
    // default constructor, getters, equals/hashCode and toString
}
 
public class ProductCountDecrementedEvent {
    private final String orderId;
    private final String productId;
    // default constructor, getters, equals/hashCode and toString
}
 
public class ProductRemovedEvent {
    private final String orderId;
    private final String productId;
    // default constructor, getters, equals/hashCode and toString
}

4. Aggregates and Entities: Implementation

The new API dictates that we can add a product and increment or decrement its count. As this occurs per product added to the Order, we need to define distinct order lines allowing these operations. This signals the requirement to add an OrderLine entity that is part of the OrderAggregate

Axon doesn't know, without guidance, if an object is an entity in an Aggregate. We should place the AggregateMember annotation on a field or method exposing the entity to mark it as such.

We can use this annotation for single objects, collections of objects, and maps. In the Order domain, we're better off using a map of the OrderLine entity on the OrderAggregate. 

4.1. Aggregate Adjustments

Knowing this, let's enhance the OrderAggregate:

@Aggregate
public class OrderAggregate {
    @AggregateIdentifier
    private String orderId;
    private boolean orderConfirmed;
    @AggregateMember
    private Map<String, OrderLine> orderLines;
    @CommandHandler
    public void handle(AddProductCommand command) {
        if (orderConfirmed) {
            throw new OrderAlreadyConfirmedException(orderId);
        }
        
        String productId = command.getProductId();
        if (orderLines.containsKey(productId)) {
            throw new DuplicateOrderLineException(productId);
        }
        
        AggregateLifecycle.apply(new ProductAddedEvent(orderId, productId));
    }
    // previous command- and event sourcing handlers left out for conciseness
    @EventSourcingHandler
    public void on(OrderPlacedEvent event) {
        this.orderId = event.getOrderId();
        this.orderConfirmed = false;
        this.orderLines = new HashMap<>();
    }
    @EventSourcingHandler
    public void on(ProductAddedEvent event) {
        String productId = event.getProductId();
        this.orderLines.put(productId, new OrderLine(productId));
    }
    @EventSourcingHandler
    public void on(ProductRemovedEvent event) {
        this.orderLines.remove(event.getProductId());
    }
}

Marking the orderLines field with the AggregateMember annotation tells Axon it's part of the domain model. Doing this allows us to add CommandHandler and EventSourcingHandler annotated methods in the OrderLine object, just as in the Aggregate.

As the OrderAggregate holds the OrderLine entities, it's in charge of adding and removing the products and, thus, the respective OrderLines. The application uses Event Sourcing, so there's a ProductAddedEvent and ProductRemovedEvent EventSourcingHandler that respectively add and remove an OrderLine.

The OrderAggregate decides when to add a product or decline the addition since it holds the OrderLines. This ownership dictates that the AddProductCommand command handler lies within the OrderAggregate.

A successful addition is notified through publishing the ProductAddedEvent. Unsuccessful addition follows from throwing the DuplicateOrderLineException, if the product is already present, and an OrderAlreadyConfirmedException if the OrderAggregate has already been confirmed.

Lastly, we set the orderLines map in the OrderPlacedEvent handler because it's the first event in the OrderAggregate‘s event stream. We can set the field globally in the OrderAggregate or in a private constructor, but this would mean state changes are no longer the sole domain of the event sourcing handlers.

4.2. Entity Introduction

With our updated OrderAggregate, we can start taking a look at the OrderLine:

public class OrderLine {
    @EntityId
    private final String productId;
    private Integer count;
    private boolean orderConfirmed;
    public OrderLine(String productId) {
        this.productId = productId;
        this.count = 1;
    }
    @CommandHandler
    public void handle(IncrementProductCountCommand command) {
        if (orderConfirmed) {
            throw new OrderAlreadyConfirmedException(orderId);
        }
        
        apply(new ProductCountIncrementedEvent(command.getOrderId(), productId));
    }
    @CommandHandler
    public void handle(DecrementProductCountCommand command) {
        if (orderConfirmed) {
            throw new OrderAlreadyConfirmedException(orderId);
        }
        
        if (count <= 1) {
            apply(new ProductRemovedEvent(command.getOrderId(), productId));
        } else {
            apply(new ProductCountDecrementedEvent(command.getOrderId(), productId));
        }
    }
    @EventSourcingHandler
    public void on(ProductCountIncrementedEvent event) {
        this.count++;
    }
    @EventSourcingHandler
    public void on(ProductCountDecrementedEvent event) {
        this.count--;
    }
    @EventSourcingHandler
    public void on(OrderConfirmedEvent event) {
        this.orderConfirmed = true;
    }
}

The OrderLine should be identifiable, as is defined in section 2. The entity is identifiable through the productId field, which we marked with the EntityId annotation.

Marking a field with the EntityId annotation tells Axon which field identifies the entity instance inside an aggregate.

Since the OrderLine reflects a product that is being ordered, it's in charge of handling the IncrementProductCountCommand and DecrementProductCountCommand. We can use the CommandHandler annotation inside an entity to directly route these commands to the appropriate entity.

As Event Sourcing is used, the state of the OrderLine needs to be set based on events. The OrderLine can simply include the EventSourcingHandler annotation for the events it requires to set the state, similar to the OrderAggregate.

Routing a command to the correct OrderLine instance is done by using the EntityId annotated field. To be routed correctly, the name of the annotated field should be identical to one of the fields contained in the command. In this sample, that's reflected by the productId field present in the commands and in the entity.

Correct command routing makes the EntityId a hard requirement whenever the entity is stored in a collection or map. This requirement is loosened to a recommendation if only a single instance of an aggregate member is defined.

We should adjust the routingKey value of the EntityId annotation whenever the name in the command differs from the annotated field. The routingKey value should reflect an existing field on the command to allow command routing to be successful.

Let's explain it through an example:

public class IncrementProductCountCommand {
    @TargetAggregateIdentifier
    private final String orderId;
    private final String productId;
    // default constructor, getters, equals/hashCode and toString
}
...
public class OrderLine {
    @EntityId(routingKey = "productId")
    private final String orderLineId;
    private Integer count;
    private boolean orderConfirmed;
    // constructor, command and event sourcing handlers
}

The IncrementProductCountCommand has stayed the same, containing the orderId aggregate identifier and productId entity identifier. In the OrderLine entity, the identifier is now called orderLineId.

Since there's no field called orderLineId in the IncrementProductCountCommand, this would break the automatic command routing based on the field name.

Hence, the routingKey field on the EntityId annotation should reflect the name of a field in the command to maintain this routing ability. 

5. Conclusion

In this article, we've looked at what it means for an aggregate to contain multiple entities and how Axon Framework supports this concept.

We've enhanced the Order application to allow Order Lines as separate entities to belong to the OrderAggregate.

Axon's aggregate modeling support provides the AggregateMember annotation, enabling users to mark objects to be entities of a given aggregate. Doing so allows command routing towards an entity directly, as well as keeping event sourcing support in place.

The implementation of all these examples and the code snippets can be found over on GitHub.

For any additional questions on this topic, also check out Discuss AxonIQ.

The post Multi-Entity Aggregates in Axon first appeared on Baeldung.
       

How to Handle InterruptedException in Java

$
0
0

1. Introduction

In this tutorial, we'll explore Java's InterruptedException. First, we'll quickly go through the life cycle of a thread with an illustration. Next, we'll see how working in multithreaded applications can potentially cause an InterruptedException. Finally, we will see how to handle this exception.

2. Multithreading Basics

Before discussing interrupts, let's review multithreading. Multithreading is a process of executing two or more threads simultaneously. A Java application starts with a single thread – called the main thread – associated with the main() method. This main thread can then start other threads.

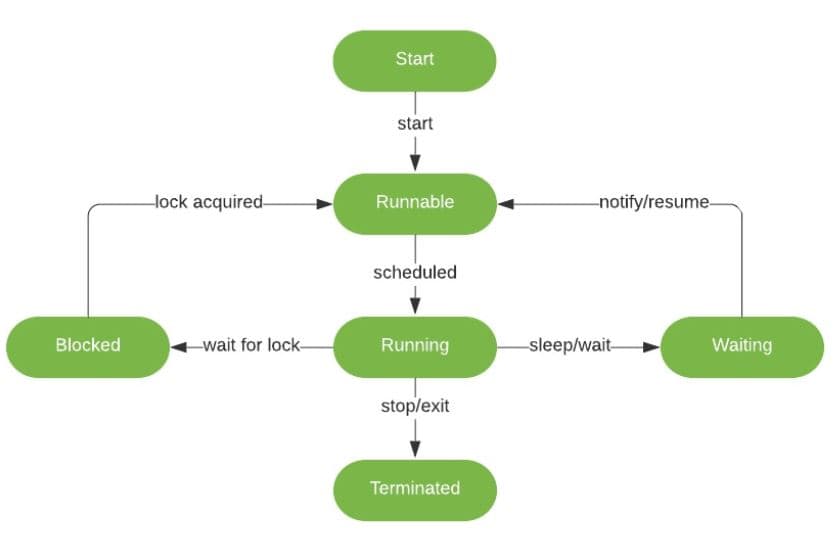
Threads are lightweight, which means that they run in the same memory space. Hence, they can easily communicate among themselves. Let's take a look at the life cycle of a thread:

As soon as we create a new thread, it’s in the NEW state. It remains in this state until the program starts the thread using the start() method.

Calling the start() method on a thread puts it in the RUNNABLE state. Threads in this state are either running or ready to run.

When a thread is waiting for a monitor lock and is trying to access code that is locked by some other thread, it enters the BLOCKED state.

A thread can be put in the WAITING state by various events, such as a call to the wait() method. In this state, a thread is waiting for a signal from another thread.

When a thread either finishes execution or terminates abnormally, it'll wind up in the TERMINATED state. Threads can be interrupted, and when a thread is interrupted, it will throw InterruptedException.

In the next sections, we'll see InterruptedException in detail and learn how to respond to it.

3. What Is An InterruptedException?

An InterruptedException is thrown when a thread is interrupted while it's waiting, sleeping, or otherwise occupied. In other words, some code has called the interrupt() method on our thread. It's a checked exception, and many blocking operations in Java can throw it.

3.1. Interrupts

The purpose of the interrupt system is to provide a well-defined framework for allowing threads to interrupt tasks (potentially time-consuming ones) in other threads.  A good way to think about interruption is that it doesn't actually interrupt a running thread — it just requests that the thread interrupt itself at the next convenient opportunity.

3.2. Blocking and Interruptible Methods

Threads may block for several reasons: waiting to wake up from a Thread.sleep(), waiting to acquire a lock, waiting for I/O completion, or waiting for the result of a computation in another thread, among others.

The InterruptedException is usually thrown by all blocking methods so that it can be handled and the corrective action can be performed. There are several methods in Java that throw InterruptedException. These include Thread.sleep(), Thread.join(), the wait() method of the Object class, and put() and take() methods of BlockingQueue, to name a few.

3.3. Interruption Methods in Threads

Let's have a quick look at some key methods of the Thread class for dealing with interrupts:

public void interrupt() { ... }
public boolean isInterrupted() { ... }
public static boolean interrupted() { ... }

Thread provides the interrupt() method for interrupting a thread, and to query whether a thread has been interrupted, we can use the isInterrupted() method. Occasionally, we may wish to test whether the current thread has been interrupted and if so, to immediately throw this exception. Here, we can use the interrupted() method:

if (Thread.interrupted()) {
    throw new InterruptedException();
}

3.4. The Interrupt Status Flag

The interrupt mechanism is implemented using a flag known as the interrupt status. Each thread has a boolean property that represents its interrupted status. Invoking Thread.interrupt() sets this flag. When a thread checks for an interrupt by invoking the static method Thread.interrupted(), the interrupt status is cleared.

To respond to interrupt requests, we must handle InterruptedException. We'll see how to do just that in the next section.

4. How to Handle an InterruptedException

It's important to note that thread scheduling is JVM-dependent. This is natural, as JVM is a virtual machine and requires the native operating system resources to support multithreading. Hence, we can't guarantee that our thread will never be interrupted.

An interrupt is an indication to a thread that it should stop what it's doing and do something else. More specifically, if we're writing some code that will be executed by an Executor or some other thread management mechanism, we need to make sure that our code responds promptly to interrupts. Otherwise, our application may lead to a deadlock.

There are few practical strategies for handling InterruptedException. Let's take a look at them.

4.1. Propagate the InterruptedException

We can allow the InterruptedException to propagate up the call stack, for example, by adding a throws clause to each method in turn and letting the caller determine how to handle the interrupt. This can involve our not catching the exception or catching and rethrowing it. Let's try to achieve this in an example:

public static void propagateException() throws InterruptedException {
    Thread.sleep(1000);
    Thread.currentThread().interrupt();
    if (Thread.interrupted()) {
        throw new InterruptedException();
    }
}

Here, we are checking whether the thread is interrupted and if so, we throw an InterruptedException. Now, let's call the propagateException() method:

public static void main(String... args) throws InterruptedException {
    propagateException();
}

When we try to run this piece of code, we'll receive an InterruptedException with the stack trace:

Exception in thread "main" java.lang.InterruptedException
    at com.baeldung.concurrent.interrupt.InterruptExample.propagateException(InterruptExample.java:16)
    at com.baeldung.concurrent.interrupt.InterruptExample.main(InterruptExample.java:7)

Although this is the most sensible way to respond to the exception, sometimes we can't throw it — for instance, when our code is a part of a Runnable. In this situation, we must catch it and restore the status. We'll see how to handle this scenario in the next section.

4.2. Restore the Interrupt

There are some cases where we can't propagate InterruptedException. For example, suppose our task is defined by a Runnable or overriding a method that doesn't throw any checked exceptions. In such cases, we can preserve the interruption. The standard way to do this is to restore the interrupted status.

We can call the interrupt() method again (it will set the flag back to true) so that the code higher up the call stack can see that an interrupt was issued. For example, let's interrupt a thread and try to access its interrupted status:

public class InterruptExample extends Thread {
    public static Boolean restoreTheState() {
        InterruptExample thread1 = new InterruptExample();
        thread1.start();
        thread1.interrupt();
        return thread1.isInterrupted();
    }
}

And here's the run() method that handles this interrupt and restores the interrupted status:

public void run() {
    try {
        Thread.sleep(1000);
    } catch (InterruptedException e) {
        Thread.currentThread().interrupt();  //set the flag back to true
 } }

Finally, let's test the status:

assertTrue(InterruptExample.restoreTheState());

Although Java exceptions cover all the exceptional cases and conditions, we might want to throw a specific custom exception unique to the code and business logic. Here, we can create our custom exception to handle the interrupt. We'll see it in the next section.

4.3. Custom Exception Handling

Custom exceptions provide the flexibility to add attributes and methods that are not part of a standard Java exception. Hence, it's perfectly valid to handle the interrupt in a custom way, depending on the circumstances.

We can complete additional work to allow the application to handle the interrupt request gracefully. For instance, when a thread is sleeping or waiting on an I/O operation, and it receives the interrupt, we can close any resources before terminating the thread.

Let’s create a custom checked exception called CustomInterruptedException:

public class CustomInterruptedException extends Exception {
    CustomInterruptedException(String message) {
        super(message);
    }
}

We can throw our CustomInterruptedException when the thread is interrupted:

public static void throwCustomException() throws Exception {
    Thread.sleep(1000);
    Thread.currentThread().interrupt();
    if (Thread.interrupted()) {
        throw new CustomInterruptedException("This thread was interrupted");
    }
}

Let's also see how we can check whether the exception is thrown with the correct message:

@Test
 public void whenThrowCustomException_thenContainsExpectedMessage() {
    Exception exception = assertThrows(CustomInterruptedException.class, () -> InterruptExample.throwCustomException());
    String expectedMessage = "This thread was interrupted";
    String actualMessage = exception.getMessage();
    assertTrue(actualMessage.contains(expectedMessage));
}

Similarly, we can handle the exception and restore the interrupted status:

public static Boolean handleWithCustomException() throws CustomInterruptedException{
    try {
        Thread.sleep(1000);
        Thread.currentThread().interrupt();
    } catch (InterruptedException e) {
        Thread.currentThread().interrupt();
        throw new CustomInterruptedException("This thread was interrupted...");
    }
    return Thread.currentThread().isInterrupted();
}

We can test the code by checking the interrupted status to make sure it returns true:

assertTrue(InterruptExample.handleWithCustomException());

5. Conclusion

In this tutorial, we saw different ways to handle the InterruptedException. If we handle it correctly, we can balance the responsiveness and robustness of the application. And, as always, the code snippets used here are available over on GitHub.

The post How to Handle InterruptedException in Java first appeared on Baeldung.
       

Java Weekly, Issue 382

$
0
0

1. Spring and Java

>> What's new in Spring Data 2021.0? [spring.io]

JFR metrics, R2DBC by example, more type-safe queries for Kotlin, and supporting jMolecules – all in a new Spring Data version!

>> A look at Kotlin's delegation [blog.frankel.ch]

Empowering composition – different approaches to achieve delegation both at class and property level in Kotlin.

>> Foreign Memory Access and NIO channels – Going Further [inside.java]

Meet resource scope – how a well-defined resource scope can affect the NIO channel limitations!

Also worth reading:

Webinars and presentations:

Time to upgrade:

2. Technical & Musings

>> Introducing Indexed Jobs [kubernetes.io]

Parallelize and partition work between job instances in K8S 1.21 using indexed jobs!

Also worth reading:

3. Comics

And my favorite Dilberts of the week:

>> Too Technical For Boss [dilbert.com]

>> Zooming Right [dilbert.com]

>> Keyboard Conscience [dilbert.com]

4. Pick of the Week

>> Solutions Architect Tips — The 5 Types of Architecture Diagrams [betterprogramming.pub]

The post Java Weekly, Issue 382 first appeared on Baeldung.
       

Set a Timeout in Spring 5 Webflux WebClient

$
0
0

1. Overview

Spring 5 added a completely new framework – Spring WebFlux, which supports reactive programming in our web applications. To perform HTTP requests, we can use the WebClient interface, which provides a functional API based on the Reactor Project.

In this tutorial, we'll focus on timeout settings for our WebClient. We'll discuss different methods, how to set the different timeouts properly, both globally in the whole application and specific to a request.

2. WebClient and HTTP Clients

Before we move on, let's make a quick recap. Spring WebFlux includes its own client, the WebClient class, to perform HTTP requests in a reactive way. The WebClient also requires an HTTP client library to work properly. Spring delivers built-in support for some of them, but the Reactor Netty is used by default.

Most of the configurations, including timeouts, can be done using those clients.

3. Configuring Timeouts via HTTP Client

As we mentioned previously, the easiest way to set different WebClient timeouts in our application is to set them globally using an underlying HTTP client. It's also the most efficient way to do this.

As Netty is a default client library for the Spring WebFlux, we'll cover our examples using the Reactor Netty HttpClient class.

3.1. Response Timeout

The response timeout is the time we wait to receive a response after sending a request. We can use the responseTimeout() method to configure it for the client:

HttpClient client = HttpClient.create()
  .responseTimeout(Duration.ofSeconds(1)); 

In this example, we configure the timeout for 1 second. Netty doesn't set the response timeout by default.

After that, we can supply the HttpClient to the Spring WebClient:

WebClient webClient = WebClient.builder()
  .clientConnector(new ReactorClientHttpConnector(httpClient))
  .build();

After doing that, the WebClient inherits all the configurations provided by the underlying HttpClient for all requests sent.

3.2. Connection Timeout

The connection timeout is a period within which a connection between a client and a server must be establishedWe can use different channel options keys and the option() method to perform the configuration:

HttpClient client = HttpClient.create()
  .option(ChannelOption.CONNECT_TIMEOUT_MILLIS, 10000);
// create WebClient...

The value provided is in milliseconds, so we configured the timeout for 10 seconds. Netty sets that value to 30 seconds by default.

Moreover, we can configure the keep-alive option, which will send TCP check probes when the connection is idle:

HttpClient client = HttpClient.create()
  .option(ChannelOption.SO_KEEPALIVE, true)
  .option(EpollChannelOption.TCP_KEEPIDLE, 300)
  .option(EpollChannelOption.TCP_KEEPINTVL, 60)
  .option(EpollChannelOption.TCP_KEEPCNT, 8);
// create WebClient...

So, we've enabled keep-alive checks to probe after 5 minutes of being idle, at 60 seconds intervals. We also set the maximum number of probes before the connection dropping to 8.

When the connection is not established in a given time or dropped, a ConnectTimeoutException is thrown.

3.3. Read and Write Timeout

A read timeout occurs when no data was read within a certain period of time, while the write timeout when a write operation cannot finish at a specific time. The HttpClient allows to configure additional handlers to configure those timeouts:

HttpClient client = HttpClient.create()
  .doOnConnected(conn -> conn
    .addHandler(new ReadTimeoutHandler(10, TimeUnit.SECONDS))
    .addHandler(new WriteTimeoutHandler(10)));
// create WebClient...

In this situation, we configured a connected callback via the doOnConnected() method, where we created additional handlers. To configure timeouts we added ReadTimeOutHandler and WriteTimeOutHandler instances. We set both of them to 10 seconds.

The constructors for these handlers accept two variants of parameters. For the first one, we provided a number with the TimeUnit specification, while the second converts the given number to seconds.

The underlying Netty library delivers ReadTimeoutException and WriteTimeoutException classes accordingly to handle errors.

3.4. SSL/TLS Timeout

The handshake timeout is the duration in time that the system tries to establish an SSL connection before halting the operation. We can set the SSL configuration via the secure() method:

HttpClient.create()
  .secure(spec -> spec.sslContext(SslContextBuilder.forClient())
    .defaultConfiguration(SslProvider.DefaultConfigurationType.TCP)
    .handshakeTimeout(Duration.ofSeconds(30))
    .closeNotifyFlushTimeout(Duration.ofSeconds(10))
    .closeNotifyReadTimeout(Duration.ofSeconds(10)));
// create WebClient...

As above, we set a handshake timeout to 30 seconds (default: 10s), while close_notify flush (default: 3s) and read (default: 0s) timeouts to 10 seconds. All methods are delivered by the SslProvider.Builder interface.

The SslHandshakeTimeoutException is used when a handshake failed due to a configured timeout.

3.5. Proxy Timeout

HttpClient also supports proxy functionality. If the connection establishment attempt to the peer does not finish within the proxy timeout, the connection attempt fails. We set this timeout during the proxy() configuration:

HttpClient.create()
  .proxy(spec -> spec.type(ProxyProvider.Proxy.HTTP)
    .host("proxy")
    .port(8080)
    .connectTimeoutMillis(30000));
// create WebClient...

We used connectTimeoutMillis() to set the timeout to 30 seconds when the default value is 10.

The Netty library also implements its own ProxyConnectException in case of any fails.

4. Request-Level Timeouts

In the previous section, we configured different timeouts globally using HttpClient. However, we can also set the response request-specific timeouts independently of the global settings.

4.1. Response Timeout – Using HttpClientRequest

As previously, we can configure the response timeout also at the request level:

webClient.get()
  .uri("https://baeldung.com/path")
  .httpRequest(httpRequest -> {
    HttpClientRequest reactorRequest = httpRequest.getNativeRequest();
    reactorRequest.responseTimeout(Duration.ofSeconds(2));
  });

In the case above, we used the WebClient's httpRequest() method to get access to the native HttpClientRequest from the underlying Netty library. Next, we used it to set the timeout value to 2 seconds.

This kind of response timeout setting overrides any response timeout on the HttpClient level. We can also set this value to null to remove any previously configured value.

4.2. Reactive Timeout – Using Reactor Core

Reactor Netty uses Reactor Core as its Reactive Streams implementation. To configure another timeout, we can use the timeout() operator provided by Mono and Flux publishers:

webClient.get()
  .uri("https://baeldung.com/path")
  .retrieve()
  .bodyToFlux(JsonNode.class)
  .timeout(Duration.ofSeconds(5));

In that situation, the TimeoutException will appear in case no item arrives within the given 5 seconds.

Keep in mind that it's better to use the more specific timeout configuration options available in Reactor Netty since they provide more control for a specific purpose and use case.

The timeout() method applies to the whole operation, from establishing the connection to the remote peer to receiving the response. It doesn't override any HttpClient related settings.

5. Exception Handling

We've just learned about different timeout configurations. Now it's time to quickly talk about exception handling. Each type of timeout delivers a dedicated exception, so we can easily handle them using Ractive Streams and onError blocks:

webClient.get()
  .uri("https://baeldung.com/path")
  .retrieve()
  .bodyToFlux(JsonNode.class)
  .timeout(Duration.ofSeconds(5))
  .onErrorMap(ReadTimeoutException.class, ex -> new HttpTimeoutException("ReadTimeout"))
  .onErrorReturn(SslHandshakeTimeoutException.class, new TextNode("SslHandshakeTimeout"))
  .doOnError(WriteTimeoutException.class, ex -> log.error("WriteTimeout"))
  ...

We can reuse any previously described exceptions and write our own handling methods using Reactor.

Moreover, we can also add some logic according to the HTTP status:

webClient.get()
  .uri("https://baeldung.com/path")
  .onStatus(HttpStatus::is4xxClientError, resp -> {
    log.error("ClientError {}", resp.statusCode());
    return Mono.error(new RuntimeException("ClientError"));
  })
  .retrieve()
  .bodyToFlux(JsonNode.class)
  ...

6. Conclusion

In this tutorial, we learned how to configure timeouts in Spring WebFlux on our WebClient using Netty examples.

We quickly talked about different timeouts and the ways to set them correctly at the HttpClient level and also how to apply them to our global settings. Then, we worked with a single request to configure the response timeout at a request-specific level. Finally, we showed different methods to handle occurring exceptions.

All of the code snippets mentioned in the article can be found over on GitHub.

The post Set a Timeout in Spring 5 Webflux WebClient first appeared on Baeldung.
       

Advise Methods on Annotated Classes With AspectJ

$
0
0

1. Overview

In this tutorial, we'll use AspectJ to write trace logging output when calling methods of configured classes. By using an AOP advice to write trace logging output, we encapsulate the logic into a single compilation unit.

Our example expands upon the information presented in Intro to AspectJ.

2. Trace Logging Annotation

We'll use an annotation to configure classes so their method calls can be traced. Using an annotation gives us an easy mechanism for adding the trace logging output to new code without having to add logging statements directly.

Let's create the annotation:

@Retention(RetentionPolicy.RUNTIME)
@Target(ElementType.TYPE)
public @interface Trace {
}

3. Creating Our Aspect

We'll create an aspect to define our pointcut to match the join points we care about and the around advice containing the logic to execute.

Our aspect will look similar to this:

public aspect TracingAspect {
    private static final Log LOG = LogFactory.getLog(TracingAspect.class);
    pointcut traceAnnotatedClasses(): within(@Trace *) && execution(* *(..));
    Object around() : traceAnnotatedClasses() {
        String signature = thisJoinPoint.getSignature().toShortString();
        LOG.trace("Entering " + signature);
        try {
            return proceed();
        } finally {
            LOG.trace("Exiting " + signature);
        }
    }
}

In our aspect, we define a pointcut named traceAnnotatedClasses to match the execution of methods within classes annotated with our Trace annotation. By defining and naming a pointcut, we can reuse it as we would a method in a class. We'll use this named pointcut to configure our around advice.

Our around advice will execute in place of any join point matched by our pointcut and will return an Object. By having an Object return type, we can account for advised methods having any return type, even void.

We retrieve the signature of the matched join point to create a short String representation of the signature to add context to our tracing messages. As a result, our logging output will have the name of the class and the method executed, which gives us some needed context.

In between our trace output calls, we've called a method named proceed. This method is available for around advice in order to continue the execution of the matched join point. The return type will be Object since we have no way to know the return type at compile time. We will send this value back to the caller after sending the final trace output to the log.

We wrap the proceed() call in a try/finally block to ensure the exit message is written. If we wanted to trace the thrown exception, we could add after() advice to write a log message when an exception is thrown:

after() throwing (Exception e) : traceAnnotatedClasses() {
    LOG.trace("Exception thrown from " + thisJoinPoint.getSignature().toShortString(), e);
}

4. Annotating Our Code

Now we need to enable our trace. Let's create a simple class and activate the trace logging with our custom annotation:

@Trace
@Component
public class MyTracedService {
    public void performSomeLogic() {
        ...
    }
    public void performSomeAdditionalLogic() {
        ...
    }
}

With the Trace annotation in place, the methods in our class will match the pointcut we've defined. When these methods execute, the tracing messages will be written to the log.

After running our code calling these methods, our log output should include content similar to:

22:37:58.867 [main] TRACE c.b.a.c.TracingAspect - Entering MyTracedService.performSomeAdditionalLogic()
22:37:58.868 [main] INFO  c.b.a.c.MyTracedService - Inside performSomeAdditionalLogic...
22:37:58.868 [main] TRACE c.b.a.c.TracingAspect - Exiting MyTracedService.performSomeAdditionalLogic()
22:37:58.869 [main] TRACE c.b.a.c.TracingAspect - Entering MyTracedService.performSomeLogic()
22:37:58.869 [main] INFO  c.b.a.c.MyTracedService - Inside performSomeLogic...
22:37:58.869 [main] TRACE c.b.a.c.TracingAspect - Exiting MyTracedService.performSomeLogic()

5. Conclusion

In this article, we used AspectJ to intercept all of a class's methods with a single annotation on the class. Doing so allows us to quickly add our trace logging functionality to new code.

We also consolidated our trace logging output logic to a single compilation unit to improve our ability to modify our trace logging output as our application evolves.

As always, the full source code of the article is available over on GitHub.

The post Advise Methods on Annotated Classes With AspectJ first appeared on Baeldung.
       

Using Cucumber Tags with JUnit 5

$
0
0

1. Overview

In this tutorial, we'll illustrate how we can use Cucumber tag expressions to manipulate the execution of tests and their relevant setups.

We're going to look at how we can separate our API and UI tests and control what configuration steps we run for each.

2. Application with UI and API Components

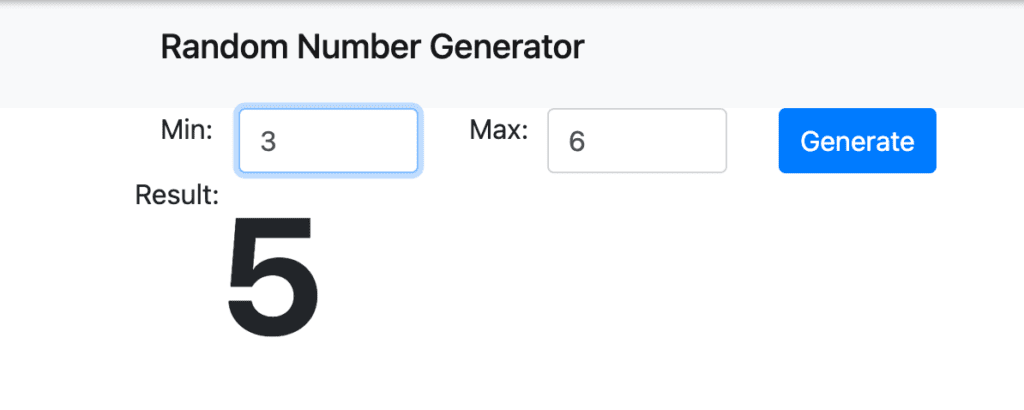
Our sample application has a simple UI for generating a random number between a range of values:

We also have a /status Rest endpoint returning an HTTP status code. We'll cover both of these functionalities with acceptance tests, using Cucumber and Junit 5

For cucumber to work with Junit 5, we must declare cucumberjunit-platform-engine as its dependency in our pom:

<dependency>
    <groupId>io.cucumber</groupId>
    <artifactId>cucumber-junit-platform-engine</artifactId>
    <version>6.10.3</version>
</dependency>

3. Cucumber Tags and Conditional Hooks

Cucumber tags can help us with grouping our scenarios together. Let's say that we have different requirements for testing the UI and the API. For example, we need to start a browser to test the UI components, but that's not necessary for calling the /status endpoint. What we need is a way to figure out which steps to run and when. Cucumber tags can help us with this.

4. UI Tests

First, let's group our Features or Scenarios together by a tag. Here we mark our UI feature with a @ui tag:

@ui
Feature: UI - Random Number Generator
  Scenario: Successfully generate a random number
    Given we are expecting a random number between min and max
    And I am on random-number-generator page
    When I enter min 1
    And I enter max 10
    And I press Generate button
    Then I should receive a random number between 1 and 10

Then, based on these tags, we can manipulate what we run for this group of features by using conditional hooks.  We do this with separate @Before and @After methods annotated with the relevant tags in our ScenarioHooks:

@Before("@ui")
public void setupForUI() {
    uiContext.getWebDriver();
}
@After("@ui")
public void tearDownForUi(Scenario scenario) throws IOException {
    uiContext.getReport().write(scenario);
    uiContext.getReport().captureScreenShot(scenario, uiContext.getWebDriver());
    uiContext.getWebDriver().quit();
}

5. API Tests

Similarly to our UI tests, we can mark our API feature with the @api tag:

@api
Feature: Health check
  Scenario: Should have a working health check
    When I make a GET call on /status
    Then I should receive 200 response status code
    And should receive a non-empty body

We also have our @Before and @After methods with @api tag:

@Before("@api")
public void setupForApi() {
    RestAssuredMockMvc.mockMvc(mvc);
    RestAssuredMockMvc.config = RestAssuredMockMvc.config()
      .logConfig(new LogConfig(apiContext.getReport().getRestLogPrintStream(), true));
}
@After("@api")
public void tearDownForApi(Scenario scenario) throws IOException {
    apiContext.getReport().write(scenario);
}

When we run our AcceptanceTestRunnerIT, we can see that our appropriate setup and teardown steps are being executed for the relevant tests.

6. Conclusion

In this article, we have shown how we can control the execution of different sets of tests and their setup/teardown instructions by using Cucumber Tags and Conditional Hooks.

As always, the code for this article is available over on GitHub.

The post Using Cucumber Tags with JUnit 5 first appeared on Baeldung.
       

Convert an Array of Primitives to an Array of Objects

$
0
0

1. Introduction

In this short tutorial, we'll show how to convert an array of primitives to an array of objects, and vice versa.

2. Problem

Let's say we have an array of primitives, such as int[], and we would like to convert it to an array of objects, Integer[]. We might intuitively try casting:

Integer[] integers = (Integer[])(new int[]{0,1,2,3,4});

However, this will result in a compilation error because of inconvertible types. That's because autoboxing only applies to individual elements and not to arrays or collections.

Therefore, we need to convert the elements one by one. Let's take a look at a couple of options to do that.

3. Iteration

Let's see how we can use autoboxing in an iteration.

First, let's convert from a primitive array to an object array:

int[] input = new int[] { 0, 1, 2, 3, 4 };
Integer[] expected = new Integer[] { 0, 1, 2, 3, 4 };
Integer[] output = new Integer[input.length];
for (int i = 0; i < input.length; i++) {
    output[i] = input[i];
}
assertArrayEquals(expected, output);

Now, let's convert from an array of objects to an array of primitives:

Integer[] input = new Integer[] { 0, 1, 2, 3, 4 };
int[] expected = new int[] { 0, 1, 2, 3, 4 };
int[] output = new int[input.length];
for (int i = 0; i < input.length; i++) {
    output[i] = input[i];
}
assertArrayEquals(expected, output);

As we can see, this is not complicated at all, but a more readable solution, like the Stream API, might suit our needs better.

4. Streams

Since Java 8, we can use the Stream API to write fluent code.

First, let's see how to box the elements of a primitive array:

int[] input = new int[] { 0, 1, 2, 3, 4 };
Integer[] expected = new Integer[] { 0, 1, 2, 3, 4 };
Integer[] output = Arrays.stream(input)
  .boxed()
  .toArray(Integer[]::new);
assertArrayEquals(expected, output);

Notice the Integer[]::new parameter in the toArray method. Without this parameter, the stream would return an Object[] instead of the Integer[].

Next, to convert them back, we'll use the mapToInt method together with the unboxing method of Integer:

Integer[] input = new Integer[] { 0, 1, 2, 3, 4 };
int[] expected = new int[] { 0, 1, 2, 3, 4 };
int[] output = Arrays.stream(input)
  .mapToInt(Integer::intValue)
  .toArray();
assertArrayEquals(expected, output);

With the Stream API, we created a more readable solution, but if we still wish it were more concise, we could try a library, like Apache Commons.

5. Apache Commons

First, let's add the Apache Commons Lang library as a dependency:

<dependency>
    <groupId>org.apache.commons</groupId>
    <artifactId>commons-lang3</artifactId>
    <version>3.12.0</version>
</dependency>

Then, to convert a primitives array to its boxed counterpart, let's use the ArrayUtils.toObject method:

int[] input = new int[] { 0, 1, 2, 3, 4 };
Integer[] expected = new Integer[] { 0, 1, 2, 3, 4 };
Integer[] output = ArrayUtils.toObject(input);
assertArrayEquals(expected, output);

Lastly, to convert back the boxed elements to primitives, let's use the ArrayUtils.toPrimitives method:

Integer[] input = new Integer[] { 0, 1, 2, 3, 4 };
int[] expected = new int[] { 0, 1, 2, 3, 4 };
int[] output = ArrayUtils.toPrimitive(input);
assertArrayEquals(expected, output);

The Apache Commons Lang library provides a concise, easy-to-use solution to our problem, with the cost of having to add a dependency.

6. Conclusion

In this article, we've looked at a couple of ways to convert an array of primitives to an array of their boxed counterparts, and then, convert the boxed elements back to their primitive counterparts.

As always, the code examples of this article are available over on GitHub.

The post Convert an Array of Primitives to an Array of Objects first appeared on Baeldung.
       

JVM Storage for Static Members

$
0
0

1. Overview

In our day-to-day work, we often don't care about JVM's internal memory allocation.

However, knowing the basics of the JVM memory model comes in handy for performance optimization and improving code quality.

In this article, we'll explore JVM storage for the static methods and members.

2. JVM's Memory Classification

Before deep-diving into memory allocation for the static members, we must refresh our understanding of JVM's memory structure.

2.1. Heap Memory

Heap memory is the runtime data area shared among all JVM threads to allocate memory for all class instances and arrays.

Java classifies heap memory into two categories – Young Generation and Old Generation.

The JVM internally separates the Young Generation into Eden and Survivor Space. Similarly, Tenured Space is the official name of the Old Generation.

The lifecycle of an object in the heap memory is managed by an automatic memory management system known as a garbage collector.

Therefore, the garbage collector can automatically either deallocate an object or move it in the various sections of the heap memory (young to old generation).

2.2. Non-Heap Memory

Non-heap memory consists primarily of a method area that stores class structures, fields, method data, and the code for methods/constructors.

Similar to the Heap memory, all JVM threads have access to the method area.

The method area, also known as Permanent Generation (PermGen), is considered a part of Heap memory, logically, although the simpler implementations of JVM may choose not to garbage-collect it.

However, Java 8 removes the PermGen space and introduces a new native memory space named Metaspace.

2.3. Cache Memory

The JVM reserves the cache memory area for the compilation and storage of native code, such as JVM internal structures and native code produced by the JIT compiler.

3. Static Members Storage Before Java 8

Before Java 8, PermGen stores static members like static methods and static variables. Additionally, PermGen also stores interned strings.

In other words, PermGen space stores the variables and their technical values, which can be primitives or references.

4. Static Members Storage From Java 8 and Beyond

As we've already discussed, PermGen space is replaced with Metaspace in Java 8, resulting in a change for memory allocation of the static members.

Since Java 8, Metaspace only stores the class metadata, and heap memory keeps the static members. Furthermore, the heap memory also provides storage for interned strings.

5. Conclusion

In this short article, we explored JVM storage for static members.

First, we took a quick look at the JVM's memory model. Then, we discussed JVM storage for static members before and after Java 8.

Simply put, we know that the static members were a part of PermGen before Java 8. However, since Java 8, they're a part of heap memory.

The post JVM Storage for Static Members first appeared on Baeldung.
       

Introduction to Debezium

$
0
0

1. Introduction

Today's applications sometimes need a replica database, a search index to perform a search operation, a cache store to speed up data read, and a data warehouse for complex analytics on data.

The need to support different data models and data access patterns presents a common problem that most software web developers need to solve, and that's when Change Data Capture (CDC) comes to the rescue!

In this article, we'll start with a brief overview of CDC, and we'll focus on Debezium, a platform commonly used for CDC.

2. What Is a CDC?

In this section, we'll see what a CDC is, the key benefits of using it, and some common use cases.

2.1. Change Data Capture

Change Data Capture (CDC) is a technique and a design pattern. We often use it to replicate data between databases in real-time.

We can also track data changes written to a source database and automatically sync target databases. CDC enables incremental loading and eliminates the need for bulk load updating.

2.2. Advantages of CDC

Most companies today still use batch processing to sync data between their systems. Using batch processing:

  • Data is not synced immediately
  • More allocated resources are used for syncing databases
  • Data replication only happens during specified batch periods

However, change data capture offers some advantages:

  • Constantly tracks changes in the source database
  • Instantly updates the target database
  • Uses stream processing to guarantee instant changes

With CDC, the different databases are continuously synced, and bulk selecting is a thing of the past. Moreover, the cost of transferring data is reduced because CDC transfers only incremental changes.

2.3. Common CDC Use Cases

There are various use cases that CDC can help us solve, such as data replication by keeping different data sources in sync, updating or invalidating a cache, updating search indexes, data synchronization in microservices, and much more.

Now that we know a little bit about what a CDC can do, let's see how it's implemented in one of the well-known open-source tools.

3. Debezium Platform

In this section, we’ll introduce Debezium, discover its architecture in detail, and see the different ways of deploying it.

3.1. What Is Debezium?

Debezium is an open-source platform for CDC built on top of Apache Kafka. Its primary use is to record all row-level changes committed to each source database table in a transaction log. Each application listening to these events can perform needed actions based on incremental data changes.

Debezium provides a library of connectors, supporting multiple databases like MySQL, MongoDB, PostgreSQL, and others.

These connectors can monitor and record the database changes and publish them to a streaming service like Kafka.

Moreover, Debezium monitors even if our applications are down. Upon restart, it will start consuming the events where it left off, so it misses nothing.

3.2. Debezium Architecture

Deploying Debezium depends on the infrastructure we have, but more commonly, we often use Apache Kafka Connect.

Kafka Connect is a framework that operates as a separate service alongside the Kafka broker. We used it for streaming data between Apache Kafka and other systems.

We can also define connectors to transfer data into and out of Kafka.

The diagram shown below shows the different parts of a change data capture pipeline based on Debezium:

Debezium Platform Architecture

First, on the left, we have a MySQL source database whose data we want to copy and use in a target database like PostgreSQL or any analytics database.

Second, the Kafka Connect connector parses and interprets the transaction log and writes it to a Kafka topic.

Next, Kafka acts as a message broker to reliably transfer the changeset to the target systems.

Then, on the right, we have Kafka connectors polling Kafka and pushing the changes to the target databases.

Debezium utilizes Kafka in its architecture, but it also offers other deployment methods to satisfy our infrastructure needs.

We can use it as a standalone server with the Debezium server, or we can embed it into our application code as a library.

We'll see those methods in the following sections.

3.3. Debezium Server

Debezium provides a standalone server to capture the source database changes. It's configured to use one of the Debezium source connectors.

Moreover, these connectors send change events to various messaging infrastructures like Amazon Kinesis or Google Cloud Pub/Sub.

3.4. Embedded Debezium

Kafka Connect offers fault tolerance and scalability when used to deploy Debezium. However, sometimes our applications don't need that level of reliability, and we want to minimize the cost of our infrastructure.

Thankfully, we can do this by embedding the Debezium engine within our application. After doing this, we must configure the connectors.

4. Setup

In this section, we’ll start first with the architecture of our application. Then, we’ll see how to set up our environment and follow some basic steps to integrate Debezium.

Let’s start by introducing our application.

4.1. Sample Application’s Architecture

To keep our application simple, we'll create a Spring Boot application for customer management.

Our customer model has ID, fullname, and email fields. For the data access layer, we'll use Spring Data JPA.

Above all, our application will run the embedded version of Debezium. Let's visualize this application architecture:

Springboot Debezium Embedded Integration

First, the Debezium Engine will track a customer table's transaction logs on a source MySQL database (from another system or application).

Second, whenever we perform a database operation like Insert/Update/Delete on the customer table, the Debezium connector will call a service method.

Finally, based on these events, that method will sync the customer table's data to a target MySQL database (our application’s primary database).

4.2. Maven Dependencies

Let's get started by first adding the required dependencies to our pom.xml:

<dependency>
    <groupId>io.debezium</groupId>
    <artifactId>debezium-api</artifactId>
    <version>1.4.2.Final</version>
</dependency>
<dependency>
    <groupId>io.debezium</groupId>
    <artifactId>debezium-embedded</artifactId>
    <version>1.4.2.Final</version>
</dependency>

Likewise, we add dependencies for each of the Debezium connectors that our application will use.

In our case, we’ll use the MySQL connector:

<dependency>
    <groupId>io.debezium</groupId>
    <artifactId>debezium-connector-mysql</artifactId>
    <version>1.4.2.Final</version>
</dependency>

4.3. Installing Databases

We can install and configure our databases manually. However, to speed things up, we’ll use a docker-compose file:

version: "3.9"
services:
  # Install Source MySQL DB and setup the Customer database
  mysql-1:
    container_name: source-database
    image: mysql
    ports:
      - 3305:3306
    environment:
      MYSQL_ROOT_PASSWORD: root
      MYSQL_USER: user
      MYSQL_PASSWORD: password
      MYSQL_DATABASE: customerdb
  # Install Target MySQL DB and setup the Customer database
  mysql-2:
    container_name: target-database
    image: mysql
    ports:
      - 3306:3306
    environment:
      MYSQL_ROOT_PASSWORD: root
      MYSQL_USER: user
      MYSQL_PASSWORD: password
      MYSQL_DATABASE: customerdb

This file will run two database instances on different ports.

We can run this file using the command docker-compose up -d.

Now, let’s create the customer table by running a SQL script:

CREATE TABLE customer
(
    id integer NOT NULL,
    fullname character varying(255),
    email character varying(255),
    CONSTRAINT customer_pkey PRIMARY KEY (id)
);

5. Configuration

In this section, we'll configure the Debezium MySQL Connector and see how to run the Embedded Debezium Engine.

5.1. Configuring the Debezium Connector

To configure our Debezium MySQL Connector, we’ll create a Debezium configuration bean:

@Bean
public io.debezium.config.Configuration customerConnector() {
    return io.debezium.config.Configuration.create()
        .with("name", "customer-mysql-connector")
        .with("connector.class", "io.debezium.connector.mysql.MySqlConnector")
        .with("offset.storage", "org.apache.kafka.connect.storage.FileOffsetBackingStore")
        .with("offset.storage.file.filename", "/tmp/offsets.dat")
        .with("offset.flush.interval.ms", "60000")
        .with("database.hostname", customerDbHost)
        .with("database.port", customerDbPort)
        .with("database.user", customerDbUsername)
        .with("database.password", customerDbPassword)
        .with("database.dbname", customerDbName)
        .with("database.include.list", customerDbName)
        .with("include.schema.changes", "false")
        .with("database.server.id", "10181")
        .with("database.server.name", "customer-mysql-db-server")
        .with("database.history", "io.debezium.relational.history.FileDatabaseHistory")
        .with("database.history.file.filename", "/tmp/dbhistory.dat")
        .build();
}

Let's examine this configuration in more detail.

The create method within this bean uses a builder to create a Properties object.

This builder sets several properties required by the engine regardless of the preferred connector. To track the source MySQL database, we use the class MySqlConnector.

When this connector runs, it starts tracking changes from the source and records “offsets” to determine how much data it has processed from the transaction log.

There are several ways to save these offsets, but in this example, we'll use the class FileOffsetBackingStore to store offsets on our local filesystem.

The last few parameters of the connector are the MySQL database properties.

Now that we have a configuration, we can create our engine.

5.2. Running the Debezium Engine

The DebeziumEngine serves as a wrapper around our MySQL connector. Let’s create the engine using the connector configuration:

private DebeziumEngine<RecordChangeEvent<SourceRecord>> debeziumEngine;
public DebeziumListener(Configuration customerConnectorConfiguration, CustomerService customerService) {
    this.debeziumEngine = DebeziumEngine.create(ChangeEventFormat.of(Connect.class))
      .using(customerConnectorConfiguration.asProperties())
      .notifying(this::handleEvent)
      .build();
    this.customerService = customerService;
}

More to this, the engine will call a method for every data change – in our example, the handleChangeEvent.

In this method, first, we’ll parse every event based on the format specified when calling create().

Then, we find which operation we had and invoke the CustomerService to perform Create/Update/Delete functions on our target database:

private void handleChangeEvent(RecordChangeEvent<SourceRecord> sourceRecordRecordChangeEvent) {
    SourceRecord sourceRecord = sourceRecordRecordChangeEvent.record();
    Struct sourceRecordChangeValue= (Struct) sourceRecord.value();
    if (sourceRecordChangeValue != null) {
        Operation operation = Operation.forCode((String) sourceRecordChangeValue.get(OPERATION));
        if(operation != Operation.READ) {
            String record = operation == Operation.DELETE ? BEFORE : AFTER;
            Struct struct = (Struct) sourceRecordChangeValue.get(record);
            Map<String, Object> payload = struct.schema().fields().stream()
              .map(Field::name)
              .filter(fieldName -> struct.get(fieldName) != null)
              .map(fieldName -> Pair.of(fieldName, struct.get(fieldName)))
              .collect(toMap(Pair::getKey, Pair::getValue));
            this.customerService.replicateData(payload, operation);
        }
    }
}

Now that we have configured a DebeziumEngine object, let’s start it asynchronously using the service executor:

private final Executor executor = Executors.newSingleThreadExecutor();
@PostConstruct
private void start() {
    this.executor.execute(debeziumEngine);
}
@PreDestroy
private void stop() throws IOException {
    if (this.debeziumEngine != null) {
        this.debeziumEngine.close();
    }
}

6. Debezium in Action

To see our code in action, let's make some data changes on the source database's customer table.

6.1. Inserting a Record

To add a new record to the customer table, we'll go to MySQL shell and run:

INSERT INTO customerdb.customer (id, fullname, email) VALUES (1, 'John Doe', 'jd@example.com')

After running this query, we’ll see the corresponding output from our application:

23:57:57.897 [pool-1-thread-1] INFO  c.b.l.d.listener.DebeziumListener - Key = 'Struct{id=1}' value = 'Struct{after=Struct{id=1,fullname=John Doe,email=jd@example.com},source=Struct{version=1.4.2.Final,connector=mysql,name=customer-mysql-db-server,ts_ms=1617746277000,db=customerdb,table=customer,server_id=1,file=binlog.000007,pos=703,row=0,thread=19},op=c,ts_ms=1617746277422}'
Hibernate: insert into customer (email, fullname, id) values (?, ?, ?)
23:57:58.095 [pool-1-thread-1] INFO  c.b.l.d.listener.DebeziumListener - Updated Data: {fullname=John Doe, id=1, email=jd@example.com} with Operation: CREATE

Finally, we check that a new record was inserted into our target database:

id  fullname   email
1  John Doe   jd@example.com

6.2. Updating a Record

Now, let's try to update our last inserted customer and check what happens:

UPDATE customerdb.customer t SET t.email = 'john.doe@example.com' WHERE t.id = 1

After that, we'll get the same output as we got with insert, except the operation type changes to ‘UPDATE', and of course, the query that Hibernate uses is an ‘update' query:

00:08:57.893 [pool-1-thread-1] INFO  c.b.l.d.listener.DebeziumListener - Key = 'Struct{id=1}' value = 'Struct{before=Struct{id=1,fullname=John Doe,email=jd@example.com},after=Struct{id=1,fullname=John Doe,email=john.doe@example.com},source=Struct{version=1.4.2.Final,connector=mysql,name=customer-mysql-db-server,ts_ms=1617746937000,db=customerdb,table=customer,server_id=1,file=binlog.000007,pos=1040,row=0,thread=19},op=u,ts_ms=1617746937703}'
Hibernate: update customer set email=?, fullname=? where id=?
00:08:57.938 [pool-1-thread-1] INFO  c.b.l.d.listener.DebeziumListener - Updated Data: {fullname=John Doe, id=1, email=john.doe@example.com} with Operation: UPDATE

We can verify that John's email has been changed in our target database:

id  fullname   email
1  John Doe   john.doe@example.com

6.3. Deleting a Record

Now, we can delete an entry in the customer table by executing:

DELETE FROM customerdb.customer WHERE id = 1

Likewise, here we have a change in operation and query again:

00:12:16.892 [pool-1-thread-1] INFO  c.b.l.d.listener.DebeziumListener - Key = 'Struct{id=1}' value = 'Struct{before=Struct{id=1,fullname=John Doe,email=john.doe@example.com},source=Struct{version=1.4.2.Final,connector=mysql,name=customer-mysql-db-server,ts_ms=1617747136000,db=customerdb,table=customer,server_id=1,file=binlog.000007,pos=1406,row=0,thread=19},op=d,ts_ms=1617747136640}'
Hibernate: delete from customer where id=?
00:12:16.951 [pool-1-thread-1] INFO  c.b.l.d.listener.DebeziumListener - Updated Data: {fullname=John Doe, id=1, email=john.doe@example.com} with Operation: DELETE

We can verify that the data has been deleted on our target database:

select * from customerdb.customer where id= 1
0 rows retrieved

7. Conclusion

In this article, we saw the benefits of CDC and what problems it can solve. We also learned that, without it, we're left with bulk loading of the data, which is both time-consuming and costly.

We also saw Debezium, an excellent open-source platform that can help us solve CDC use cases with ease.

As always, the full source code of the article is available over on GitHub.

The post Introduction to Debezium first appeared on Baeldung.
       

CRUD Application With React and Spring Boot

$
0
0

1. Introduction

In this tutorial, we'll look at creating an application capable of creating, updating, retrieving, and deleting (CRUD) client data. The application will consist of a simple Spring Boot RESTful API and a user interface (UI) implemented with the React JavaScript library.

2. Spring Boot

2.1. Maven Dependencies

Let's start by adding a few dependencies to our pom.xml file:

<dependencies>
    <dependency>
        <groupId>org.springframework.boot</groupId>
        <artifactId>spring-boot-starter-web</artifactId>
        <version>2.4.4</version>
    </dependency>
    <dependency>
        <groupId>org.springframework.boot</groupId>
        <artifactId>spring-boot-starter-data-jpa</artifactId>
        <version>2.4.4</version>
    </dependency>
    <dependency>
        <groupId>org.springframework.boot</groupId>
        <artifactId>spring-boot-starter-test</artifactId>
        <version>2.4.4</version>
        <scope>test</scope>
    </dependency>
</dependencies>

2.2. Creating the Model

Next, let's create our Client entity class, with name and email properties, to represent our data model:

@Entity
@Table(name = "client")
public class Client {
    @Id
    @GeneratedValue
    private Long id;
    private String name;
    private String email;
    // getter, setters, contructors
}

2.3. Creating the Repository

Then we'll create our ClientRepository class extending from JpaRepository to provide JPA CRUD capabilities:

public interface ClientRepository extends JpaRepository<Client, Long> {
}

2.4. Creating the REST Controler

Next, let's expose a REST API by creating a controller to interact with the ClientRepository:

@RestController
@RequestMapping("/clients")
public class ClientsController {
    private final ClientRepository clientRepository;
    public ClientsController(ClientRepository clientRepository) {
        this.clientRepository = clientRepository;
    }
    @GetMapping
    public List<Client> getClients() {
        return clientRepository.findAll();
    }
    @GetMapping("/{id}")
    public Client getClient(@PathVariable Long id) {
        return clientRepository.findById(id).orElseThrow(RuntimeException::new);
    }
    @PostMapping
    public ResponseEntity createClient(@RequestBody Client client) throws URISyntaxException {
        Client savedClient = clientRepository.save(client);
        return ResponseEntity.created(new URI("/clients/" + savedClient.getId())).body(savedClient);
    }
    @PutMapping("/{id}")
    public ResponseEntity updateClient(@PathVariable Long id, @RequestBody Client client) {
        Client currentClient = clientRepository.findById(id).orElseThrow(RuntimeException::new);
        currentClient.setName(client.getName());
        currentClient.setEmail(client.getEmail());
        currentClient = clientRepository.save(client);
        return ResponseEntity.ok(currentClient);
    }
    @DeleteMapping("/{id}")
    public ResponseEntity deleteClient(@PathVariable Long id) {
        clientRepository.deleteById(id);
        return ResponseEntity.ok().build();
    }
}

2.5. Starting Our API

With that, we're now ready to start our Spring Boot API. We can do this using the spring-boot-maven-plugin:

mvn spring-boot:run

Then, we'll be able to get our clients list by going to http://localhost:8080/clients.

2.6. Creating Clients

Additionally, we can create a few clients using Postman:

curl -X POST http://localhost:8080/clients -d '{"name": "John Doe", "email": "john.doe@baeldgung.com"}'

3. React

React is a JavaScript library for creating user interfaces. Working with React does require that Node.js is installed. You can find the installation instructions on the Node.js download page.

3.1. Creating a React UI

Create React App is a command utility that generates React projects for us. Let's create our frontend app in our Spring Boot application base directory by running:

npx create-react-app frontend

After the app creation process completes, we'll install Bootstrap, React Router, and reactstrap in the frontend directory:

npm install --save bootstrap@4.1.3 react-cookie@3.0.4 react-router-dom@4.3.1 reactstrap@6.5.0

We'll be using Bootstrap's CSS and reacstrap's components to create a better-looking UI and React Router components to handle navigability around the application.

Let's add Bootstrap's CSS file as an import in app/src/index.js:

import 'bootstrap/dist/css/bootstrap.min.css';

3.2. Starting Our React UI

Now, we're ready to start our frontend application:

npm start

When accessing http://localhost:3000 in our browser, we should see the React sample page:


3.3. Calling Our Spring Boot API

Calling our Spring Boot API requires setting up our React application's package.json file to configure a proxy when calling the API.

For that, we'll include the URL for our API in package.json:

...
"proxy": "http://localhost:8080",
...

Next, let's edit frontend/src/App.js so that it calls our API to show the list of clients with the name and email properties:

class App extends Component {
  state = {
    clients: []
  };
  async componentDidMount() {
    const response = await fetch('/clients');
    const body = await response.json();
    this.setState({clients: body});
  }
  render() {
    const {clients} = this.state;
    return (
        <div className="App">
          <header className="App-header">
            <img src={logo} className="App-logo" alt="logo" />
            <div className="App-intro">
              <h2>Clients</h2>
              {clients.map(client =>
                  <div key={client.id}>
                    {client.name} ({client.email})
                  </div>
              )}
            </div>
          </header>
        </div>
    );
  }
}
export default App;

In the componentDidMount function, we fetch our client API and set the response body in the clients variable, and in our render function, we return the HTML with the list of clients found in the API.

We'll see our client's page, which will look like:

Note: Make sure the Spring Boot application is running so that the UI will be able to call the API.

3.4. Creating a ClientList Component

We can now improve our UI to display a more sophisticated component to list, edit, delete, and create clients using our API. Later, we'll see how to use this component and remove the client list from the App component.

Let's create a file in frontend/src/ClientList.js:

import React, { Component } from 'react';
import { Button, ButtonGroup, Container, Table } from 'reactstrap';
import AppNavbar from './AppNavbar';
import { Link } from 'react-router-dom';
class ClientList extends Component {
    constructor(props) {
        super(props);
        this.state = {clients: []};
        this.remove = this.remove.bind(this);
    }
    componentDidMount() {
        fetch('/clients')
            .then(response => response.json())
            .then(data => this.setState({clients: data}));
    }
}
export default ClientList;

As we had in App.js, the componentDidMount function is calling our API to load our client list.

Moreover, let's include the remove function to handle the DELETE call to the API when we want to delete a client. In addition, we'll create the render function, which will render the HTML with Edit, Delete, and Add Client actions:

async remove(id) {
    await fetch(`/clients/${id}`, {
        method: 'DELETE',
        headers: {
            'Accept': 'application/json',
            'Content-Type': 'application/json'
        }
    }).then(() => {
        let updatedClients = [...this.state.clients].filter(i => i.id !== id);
        this.setState({clients: updatedClients});
    });
}
render() {
    const {clients, isLoading} = this.state;
    if (isLoading) {
        return <p>Loading...</p>;
    }
    const clientList = clients.map(client => {
        return <tr key={client.id}>
            <td style={{whiteSpace: 'nowrap'}}>{client.name}</td>
            <td>{client.email}</td>
            <td>
                <ButtonGroup>
                    <Button size="sm" color="primary" tag={Link} to={"/clients/" + client.id}>Edit</Button>
                    <Button size="sm" color="danger" onClick={() => this.remove(client.id)}>Delete</Button>
                </ButtonGroup>
            </td>
        </tr>
    });
    return (
        <div>
            <AppNavbar/>
            <Container fluid>
                <div className="float-right">
                    <Button color="success" tag={Link} to="/clients/new">Add Client</Button>
                </div>
                <h3>Clients</h3>
                <Table className="mt-4">
                    <thead>
                    <tr>
                        <th width="30%">Name</th>
                        <th width="30%">Email</th>
                        <th width="40%">Actions</th>
                    </tr>
                    </thead>
                    <tbody>
                    {clientList}
                    </tbody>
                </Table>
            </Container>
        </div>
    );
}

3.5. Creating a ClientEdit Component

The ClientEdit component will be responsible for creating and editing our client.

Let's create a file in frontend/src/ClientEdit.js:

import React, { Component } from 'react';
import { Link, withRouter } from 'react-router-dom';
import { Button, Container, Form, FormGroup, Input, Label } from 'reactstrap';
import AppNavbar from './AppNavbar';
class ClientEdit extends Component {
    emptyItem = {
        name: '',
        email: ''
    };
    constructor(props) {
        super(props);
        this.state = {
            item: this.emptyItem
        };
        this.handleChange = this.handleChange.bind(this);
        this.handleSubmit = this.handleSubmit.bind(this);
    }
}
export default withRouter(ClientEdit);

Let's add the componentDidMount function to check whether we're dealing with the create or edit feature, and in case of editing, it'll fetch our client from the API:

async componentDidMount() {
    if (this.props.match.params.id !== 'new') {
        const client = await (await fetch(`/clients/${this.props.match.params.id}`)).json();
        this.setState({item: client});
    }
}

Then in the handleChange function, we'll update our component state item property that will be used when submitting our form:

handleChange(event) {
    const target = event.target;
    const value = target.value;
    const name = target.name;
    let item = {...this.state.item};
    item[name] = value;
    this.setState({item});
}

In handeSubmit, we'll call our API, sending the request to a PUT or POST method, depending on the feature we're invoking. For that, we can check if the id property is filled:

async handleSubmit(event) {
    event.preventDefault();
    const {item} = this.state;
    await fetch('/clients' + (item.id ? '/' + item.id : ''), {
        method: (item.id) ? 'PUT' : 'POST',
        headers: {
            'Accept': 'application/json',
            'Content-Type': 'application/json'
        },
        body: JSON.stringify(item),
    });
    this.props.history.push('/clients');
}

Last, but not least, our render function will be handling our form:

render() {
    const {item} = this.state;
    const title = <h2>{item.id ? 'Edit Client' : 'Add Client'}</h2>;
    return <div>
        <AppNavbar/>
        <Container>
            {title}
            <Form onSubmit={this.handleSubmit}>
                <FormGroup>
                    <Label for="name">Name</Label>
                    <Input type="text" name="name" id="name" value={item.name || ''}
                           onChange={this.handleChange} autoComplete="name"/>
                </FormGroup>
                <FormGroup>
                    <Label for="email">Email</Label>
                    <Input type="text" name="email" id="email" value={item.email || ''}
                           onChange={this.handleChange} autoComplete="email"/>
                </FormGroup>
                <FormGroup>
                    <Button color="primary" type="submit">Save</Button>{' '}
                    <Button color="secondary" tag={Link} to="/clients">Cancel</Button>
                </FormGroup>
            </Form>
        </Container>
    </div>
}

Note: We also have a Link with a route configured to go back to /clients when clicking on the Cancel Button.

3.6. Creating an AppNavBar Component

To give our application better navigability, let's create a file in frontend/src/AppNavBar.js:

import React, {Component} from 'react';
import {Navbar, NavbarBrand} from 'reactstrap';
import {Link} from 'react-router-dom';
export default class AppNavbar extends Component {
    constructor(props) {
        super(props);
        this.state = {isOpen: false};
        this.toggle = this.toggle.bind(this);
    }
    toggle() {
        this.setState({
            isOpen: !this.state.isOpen
        });
    }
    render() {
        return <Navbar color="dark" dark expand="md">
            <NavbarBrand tag={Link} to="/">Home</NavbarBrand>
        </Navbar>;
    }
}

In the render function, we're using the react-router-dom capabilities to create a Link to route to our application Home page.

 3.7. Creating Our Home Component

This component will be our application Home page and will have a button to our previously created ClientList component.

Let's create a file in frontend/src/Home.js:

import React, { Component } from 'react';
import './App.css';
import AppNavbar from './AppNavbar';
import { Link } from 'react-router-dom';
import { Button, Container } from 'reactstrap';
class Home extends Component {
    render() {
        return (
            <div>
                <AppNavbar/>
                <Container fluid>
                    <Button color="link"><Link to="/clients">Clients</Link></Button>
                </Container>
            </div>
        );
    }
}
export default Home;

Note: In this component, we also have a Link from react-router-dom that leads us to /clients. This route will be configured in the next step.

3.8. Using React Router

We'll now be using React Router to navigate between our components.

Let's change our App.js:

import React, { Component } from 'react';
import './App.css';
import Home from './Home';
import { BrowserRouter as Router, Route, Switch } from 'react-router-dom';
import ClientList from './ClientList';
import ClientEdit from "./ClientEdit";
class App extends Component {
  render() {
    return (
        <Router>
          <Switch>
            <Route path='/' exact={true} component={Home}/>
            <Route path='/clients' exact={true} component={ClientList}/>
            <Route path='/clients/:id' component={ClientEdit}/>
          </Switch>
        </Router>
    )
  }
}
export default App;

As we can see, we have our application routes defined for each of the components we've created.

When accessing localhost:3000, we now have our Home page with a Clients link:

Clicking on the Clients link, we now have our list of clients and the Edit, Remove, and Add Client features:

4. Building and Packaging

To build and package our React application with Maven, we'll use the frontend-maven-plugin.

This plugin will be responsible for packaging and copying our frontend application into our Spring Boot API build folder:

<properties>
    ...
    <frontend-maven-plugin.version>1.6</frontend-maven-plugin.version>
    <node.version>v10.14.2</node.version>
    <yarn.version>v1.12.1</yarn.version>
    ...
</properties>
...
<build>
    <plugins>
        <plugin>
            <groupId>org.apache.maven.plugins</groupId>
            <artifactId>maven-resources-plugin</artifactId>
            <version>3.1.0</version>
            <executions>
                ...
            </executions>
        </plugin>
        <plugin>
            <groupId>com.github.eirslett</groupId>
            <artifactId>frontend-maven-plugin</artifactId>
            <version>${frontend-maven-plugin.version}</version>
            <configuration>
                ...
            </configuration>
            <executions>
                ...
            </executions>
        </plugin>
        ...
    </plugins>
</build>

Let´s take a closer look at our maven-resources-plugin, which is responsible for copying our frontend sources to the application target folder:

...
<plugin>
    <groupId>org.apache.maven.plugins</groupId>
    <artifactId>maven-resources-plugin</artifactId>
    <version>3.1.0</version>
    <executions>
        <execution>
            <id>copy-resources</id>
            <phase>process-classes</phase>
            <goals>
                <goal>copy-resources</goal>
            </goals>
            <configuration>
                <outputDirectory>${basedir}/target/classes/static</outputDirectory>
                <resources>
                    <resource>
                        <directory>frontend/build</directory>
                    </resource>
                </resources>
            </configuration>
        </execution>
    </executions>
</plugin>
...

Then, our front-end-maven-plugin will be responsible for installing Node.js and Yarn and then building and testing our frontend application:

...
<plugin>
    <groupId>com.github.eirslett</groupId>
    <artifactId>frontend-maven-plugin</artifactId>
    <version>${frontend-maven-plugin.version}</version>
    <configuration>
        <workingDirectory>frontend</workingDirectory>
    </configuration>
    <executions>
        <execution>
            <id>install node</id>
            <goals>
                <goal>install-node-and-yarn</goal>
            </goals>
            <configuration>
                <nodeVersion>${node.version}</nodeVersion>
                <yarnVersion>${yarn.version}</yarnVersion>
            </configuration>
        </execution>
        <execution>
            <id>yarn install</id>
            <goals>
                <goal>yarn</goal>
            </goals>
            <phase>generate-resources</phase>
        </execution>
        <execution>
            <id>yarn test</id>
            <goals>
                <goal>yarn</goal>
            </goals>
            <phase>test</phase>
            <configuration>
                <arguments>test</arguments>
                <environmentVariables>
                    <CI>true</CI>
                </environmentVariables>
            </configuration>
        </execution>
        <execution>
            <id>yarn build</id>
            <goals>
                <goal>yarn</goal>
            </goals>
            <phase>compile</phase>
            <configuration>
                <arguments>build</arguments>
            </configuration>
        </execution>
    </executions>
</plugin>
...

Note: to specify a different Node.js version, we can simply edit the node.version property in our pom.xml.

5. Running Our Spring Boot React CRUD Application

Finally, by adding the plugin, we can access our application by running:

mvn spring-boot:run

Our React application will be fully integrated into our API at the http://localhost:8080/ URL.

6. Conclusion

In this article, we saw how to create a CRUD application using Spring Boot and React. For that, we first created some REST API endpoints to interact with our database. Then, we created some React components to fetch and write data using our API. We also learned how to package our Spring Boot Application with our React UI into a single application package.

The source code for our application is available over on GitHub.

The post CRUD Application With React and Spring Boot first appeared on Baeldung.
       

What are Compile-time Constants in Java?

$
0
0

1. Overview

The Java language specification does not define or even use the term compile-time constants. However, developers often use this term for describing a value that is not changed after compilation.

In this tutorial, we'll explore the differences between a class constant and a compile-time constant. We'll look at constant expressions and see which data types and operators may be used for defining compile-time constants. Finally, we'll look at a few examples where compile-time constants are commonly used.

2. Class Constants

When we use the term constant in Java, most of we the time, we are referring to static and final class variables. We cannot change the value of a class constant after compilation. Thus, all class constants of a primitive type or String are also compile-time constants:

public static final int MAXIMUM_NUMBER_OF_USERS = 10;
public static final String DEFAULT_USERNAME = "unknown";

It's possible to create constants that are not static. However, Java will allocate memory for that constant in every object of the class. Therefore, if the constant really has only one value, it should be declared static.

Oracle has defined a naming convention for class constants. We name them uppercase with words separated by underscores. However, not all static and final variables are constants. If a state of an object can change, it is not a constant:

public static final Logger log = LoggerFactory.getLogger(ClassConstants.class);
public static final List<String> contributorGroups = Arrays.asList("contributor", "author");

Though these are constant references, they refer to mutable objects.

3. Constant Expressions

The Java compiler is able to calculate expressions that contain constant variables and certain operators during code compilation:

public static final int MAXIMUM_NUMBER_OF_GUESTS = MAXIMUM_NUMBER_OF_USERS * 10;
public String errorMessage = ClassConstants.DEFAULT_USERNAME + " not allowed here.";

Expressions like these are called constant expressions, as the compiler will calculate them and produce a single compile-time constant. As defined in the Java language specification, the following operators and expressions may be used for constant expressions:

  • Unary operators: +, -, ~, !
  • Multiplicative operators: *, /, %
  • Additive operators: +, –
  • Shift operators: <<, >>,  >>>
  • Relational operators: <, <=, >, >=
  • Equality operators: ==, !=
  • Bitwise and logical operators: &, ^, |
  • Conditional-and and the conditional-or operator: &&, ||
  • Ternary conditional operator: ?:
  • Parenthesized expressions whose contained expression is a constant expression
  • Simple names that refer to constant variables

4. Compile vs. Runtime Constants

A variable is a compile-time constant if its value is computed at compile-time. On the other hand, a runtime constant value will be computed during execution.

4.1. Compile-Time Constants

A Java variable is a compile-time constant if it's of a primitive type or String, declared final, initialized within its declaration, and with a constant expression.

Strings are a special case on top of the primitive types because they are immutable and live in a String pool. Therefore, all classes running in an application can share String values.

The term compile-time constants include class constants, but also instance and local variables defined using constant expressions:

public final int maximumLoginAttempts = 5;
public static void main(String[] args) {
    PrintWriter printWriter = System.console().writer();
    printWriter.println(ClassConstants.DEFAULT_USERNAME);
    CompileTimeVariables instance = new CompileTimeVariables();
    printWriter.println(instance.maximumLoginAttempts);
    final String username = "baeldung" + "-" + "user";
    printWriter.println(username);
}

Only the first printed variable is a class constant. However, all three printed variables are compile-time constants.

4.2. Run-Time Constants

A runtime constant value cannot change while the program is running. However, each time when we run the application, it can have a different value:

public static void main(String[] args) {
    Console console = System.console();
    final String input = console.readLine();
    console.writer().println(input);
    final double random = Math.random();
    console.writer().println("Number: " + random);
}

Two run-time constants are printed in our example, a user-defined value and a randomly generated value.

5. Static Code Optimization

The Java compiler statically optimizes all compile-time constants during the compilation process. Therefore, the compiler replaces all compile-time constant references with their actual values. The compiler performs this optimization for any classes where compile-time constants are used.

Let's take a look at an example where a constant from another class is referenced:

PrintWriter printWriter = System.console().writer();
printWriter.write(ClassConstants.DEFAULT_USERNAME);

Next, we'll compile the class and observe the generated bytecode for the above two lines for code:

LINENUMBER 11 L1
ALOAD 1
LDC "unknown"
INVOKEVIRTUAL java/io/PrintWriter.write (Ljava/lang/String;)V

Note that the compiler replaced the variable reference with its actual value. Consequently, in order to change a compile-time constant, we need to recompile all classes which are using it. Otherwise, the old value would continue to be used.

6. Use Cases

Let's take a look at two common use cases for compile-time constants in Java.

6.1. Switch Statement

When defining the cases for a switch statement, we need to adhere to the rules defined in the Java language specification:

  • The case labels of the switch statement require values that are either constant expressions or enum constants
  • No two of the case constant expressions associated with a switch statement may have the same value

The reason behind this is that the compiler compiles switch statements into bytecode tableswitch or lookupswitch. They require the values used in the case statement to be both compile-time constants and unique:

private static final String VALUE_ONE = "value-one"
public static void main(String[] args) {
    final String valueTwo = "value" + "-" + "two";
    switch (args[0]) {
        case VALUE_ONE:
            break;
        case valueTwo:
            break;
        }
}

The compiler will throw an error if we do not use constant values in our switch statement. However, it will accept a final String or any other compile-time constant.

6.2. Annotations

Annotation processing in Java takes place at compile time. In effect, that means that annotation parameters can only be defined using compile-time constants:

private final String deprecatedDate = "20-02-14";
private final String deprecatedTime = "22:00";
@Deprecated(since = deprecatedDate + " " + deprecatedTime)
public void deprecatedMethod() {}

Though it's more common to use class constants in this situation, the compiler allows this implements, as it recognizes the values as immutable constants.

7. Conclusion

In this article, we explored the term compile-time constants in Java. We saw that the term includes class, instance, and local variables of a primitive type or String, declared final, initialized within its declaration, and defined with a constant expression.

In the examples, we saw the difference between compile-time and run-time constants. We also saw that the compiler uses compile-time constants to perform static code optimization.

Finally, we looked at the usage of compile-time constants in switch statements and Java annotations.

As always, the source code is available over on GitHub.

The post What are Compile-time Constants in Java? first appeared on Baeldung.
       

Java Weekly, Issue 383

$
0
0

1. Spring and Java

>> The Anatomy of ct.sym — How javac Ensures Backwards Compatibility [morling.dev]

In pursuit of backward compatibility – how the release flag and ct.sym file helps us to ensure backward compatibility more effectively. Interesting stuff

>> Greetings, Micronaut Hipster! [github.com]

Say hello to a Micronaut-based JHispter application – using Micronaut instead of Spring Boot with JHispter

>> Faster warmup, smaller downloads, JDK 16 — GraalVM 21.1 is here! [medium.com]

Supporting Java 16, removing unnecessary barriers, performance improvements, and small other features in a new GraalVM version

Also worth reading:

Webinars and presentations:

Time to upgrade:

2. Technical

>> Evolving Kubernetes networking with the Gateway API [kubernetes.io]

The Gateway API in K8S – routing, request manipulation, traffic management, and many more cool networking features

Also worth reading:

3. Musings

>> Is Bitcoin Really Throwing Energy Away? [diegobasch.com]

Bitcoin from a “first-prototype” perspective: it's surely inefficient but on its path to becoming ENIAC of cryptocurrencies

Also worth reading:

4. Comics

And my favorite Dilberts of the week:

>> Bookshelves On Zoom [dilbet.com]

>> Instead Of Handshakes [dilbet.com]

>> Workplace Injuries [dilbet.com]

5. Pick of the Week

>> Never say “no,” but rarely say “yes.” [asmartbear.com]

The post Java Weekly, Issue 383 first appeared on Baeldung.
       

Guide to Retry in Spring WebFlux

$
0
0

1. Overview

When we're building applications in a distributed cloud environment, we need to design for failure. This often involves retries.

Spring WebFlux offers us a few tools for retrying failed operations.

In this tutorial, we'll look at how to add and configure retries to our Spring WebFlux applications.

2. Use Case

For our example, we'll use MockWebServer and simulate an external system being temporarily unavailable and then becoming available.

Let's create a simple test for a component connecting to this REST service:

@Test
void givenExternalServiceReturnsError_whenGettingData_thenRetryAndReturnResponse() {
    mockExternalService.enqueue(new MockResponse()
      .setResponseCode(SERVICE_UNAVAILABLE.code()));
    mockExternalService.enqueue(new MockResponse()
      .setResponseCode(SERVICE_UNAVAILABLE.code()));
    mockExternalService.enqueue(new MockResponse()
      .setResponseCode(SERVICE_UNAVAILABLE.code()));
    mockExternalService.enqueue(new MockResponse()
      .setBody("stock data"));
    StepVerifier.create(externalConnector.getData("ABC"))
      .expectNextMatches(response -> response.equals("stock data"))
      .verifyComplete();
    verifyNumberOfGetRequests(4);
}

3. Adding Retries

There are two key retry operators built into the Mono and Flux APIs.

3.1. Using retry

First, let's use the retry method, which prevents the application from immediately returning an error and re-subscribes a specified number of times:

public Mono<String> getData(String stockId) {
    return webClient.get()
        .uri(PATH_BY_ID, stockId)
        .retrieve()
        .bodyToMono(String.class)
        .retry(3);
}

This will retry up to three times, no matter what error comes back from the web client.

3.2. Using retryWhen

Next, let's try a configurable strategy using the retryWhen method:

public Mono<String> getData(String stockId) {
    return webClient.get()
        .uri(PATH_BY_ID, stockId)
        .retrieve()
        .bodyToMono(String.class)
        .retryWhen(Retry.max(3));
}

This allows us to configure a Retry object to describe the desired logic.

Here, we've used the max strategy to retry up to a maximum number of attempts. This is equivalent to our first example but allows us more configuration options. In particular, we should note that in this case, each retry happens as quickly as possible.

4. Adding Delay

The main disadvantage of retrying without any delay is that this does not give the failing service time to recover. It may overwhelm it, making the problem worse and reducing the chance of recovery.

4.1. Retrying with fixedDelay

We can use the fixedDelay strategy to add a delay between each attempt:

public Mono<String> getData(String stockId) {
    return webClient.get()
      .uri(PATH_BY_ID, stockId)
      .retrieve()
      .bodyToMono(String.class)
      .retryWhen(Retry.fixedDelay(3, Duration.ofSeconds(2)));
}

This configuration allows a two-second delay between attempts, which may increase the chances of success. However, if the server is experiencing a longer outage, then we should wait longer. But, if we configure all delays to be a long time, short blips will slow our service down even more.

4.2. Retrying with backoff

Instead of retrying at fixed intervals, we can use the backoff strategy:

public Mono<String> getData(String stockId) {
    return webClient.get()
      .uri(PATH_BY_ID, stockId)
      .retrieve()
      .bodyToMono(String.class)
      .retryWhen(Retry.backoff(3, Duration.ofSeconds(2)));
}

In effect, this adds a progressively increasing delay between attempts — roughly at 2, 4, and then 8-second intervals in our example. This gives the external system a better chance to recover from commonplace connectivity issues or handle the backlog of work.

4.3. Retrying with jitter

An additional benefit of the backoff strategy is that it adds randomness or jitter to the computed delay interval. Consequently, jitter can help to reduce retry-storms where multiple clients retry in lockstep.

By default, this value is set to 0.5, which corresponds to a jitter of at most 50% of the computed delay.

Let's use the jitter method to configure a different value of 0.75 to represent jitter of at most 75% of the computed delay:

public Mono<String> getData(String stockId) {
    return webClient.get()
      .uri(PATH_BY_ID, stockId)
      .accept(MediaType.APPLICATION_JSON)
      .retrieve()
      .bodyToMono(String.class)
      .retryWhen(Retry.backoff(3, Duration.ofSeconds(2)).jitter(0.75));
}

We should note that the possible range of values is between 0 (no jitter) and 1 (jitter of at most 100% of the computed delay).

5. Filtering Errors

At this point, any errors from the service will lead to a retry attempt, including 4xx errors such as 400:Bad Request or 401:Unauthorized.

Clearly, we should not retry on such client errors, as server response is not going to be any different. Therefore, let's see how we can apply the retry strategy only in the case of specific errors.

First, let's create an exception to represent the server error:

public class ServiceException extends RuntimeException {
    
    public ServiceException(String message, int statusCode) {
        super(message);
        this.statusCode = statusCode;
    }
}

Next, we'll create an error Mono with our exception for the 5xx errors and use the filter method to configure our strategy:

public Mono<String> getData(String stockId) {
    return webClient.get()
      .uri(PATH_BY_ID, stockId)
      .retrieve()
      .onStatus(HttpStatus::is5xxServerError, 
          response -> Mono.error(new ServiceException("Server error", response.rawStatusCode())))
      .bodyToMono(String.class)
      .retryWhen(Retry.backoff(3, Duration.ofSeconds(5))
          .filter(throwable -> throwable instanceof ServiceException));
}

Now we only retry when a ServiceException is thrown in the WebClient pipeline.

6. Handling Exhausted Retries

Finally, we can account for the possibility that all our retry attempts were unsuccessful. In this case, the default behavior by the strategy is to propagate a RetryExhaustedException, wrapping the last error.

Instead, let's override this behavior by using the onRetryExhaustedThrow method and provide a generator for our ServiceException:

public Mono<String> getData(String stockId) {
    return webClient.get()
      .uri(PATH_BY_ID, stockId)
      .retrieve()
      .onStatus(HttpStatus::is5xxServerError, response -> Mono.error(new ServiceException("Server error", response.rawStatusCode())))
      .bodyToMono(String.class)
      .retryWhen(Retry.backoff(3, Duration.ofSeconds(5))
          .filter(throwable -> throwable instanceof ServiceException)
          .onRetryExhaustedThrow((retryBackoffSpec, retrySignal) -> {
              throw new ServiceException("External Service failed to process after max retries", HttpStatus.SERVICE_UNAVAILABLE.value());
          }));
}

Now the request will fail with our ServiceException at the end of a failed series of retries.

7. Conclusion

In this article, we looked at how to add retries in a Spring WebFlux application using retry and retryWhen methods.

Initially, we added a maximum number of retries for failed operations. Then we introduced delay between attempts by using and configuring various strategies.

Finally, we looked at retrying for certain errors and customizing the behavior when all attempts have been exhausted.

As always, the full source code is available over on GitHub.

The post Guide to Retry in Spring WebFlux first appeared on Baeldung.
       

Concatenate Two Arrays in Java

$
0
0

1. Overview

In this tutorial, we're going to discuss how to concatenate two arrays in Java.

First, we'll implement our own methods with the standard Java API.

Then, we'll have a look at how to solve the problem using commonly used libraries.

2. Introduction to the Problem

Quick examples may explain the problem clearly.

Let's say, we have two arrays:

String[] strArray1 = {"element 1", "element 2", "element 3"};
String[] strArray2 = {"element 4", "element 5"};

Now, we want to join them and get a new array:

String[] expectedStringArray = {"element 1", "element 2", "element 3", "element 4", "element 5"}

Also, we don't want our method only to work with String arrays, so we'll look for a generic solution.

Moreover, we shouldn't forget the primitive array cases. It would be good if our solution works for primitive arrays, too:

int[] intArray1 = { 0, 1, 2, 3 };
int[] intArray2 = { 4, 5, 6, 7 };
int[] expectedIntArray = { 0, 1, 2, 3, 4, 5, 6, 7 };

In this tutorial, we'll address different approaches to solve the problem.

3. Using Java Collections

When we look at this problem, a quick solution may come up.

Well, Java doesn't provide a helper method to concatenate arrays. However, since Java 5, the Collections utility class has introduced an addAll(Collection<? super T> c, T… elements) method.

We can create a List object, then call this method twice to add the two arrays to the list. Finally, we convert the resulting List back to an array:

static <T> T[] concatWithCollection(T[] array1, T[] array2) {
    List<T> resultList = new ArrayList<>(array1.length + array2.length);
    Collections.addAll(resultList, array1);
    Collections.addAll(resultList, array2);
    @SuppressWarnings("unchecked")
    //the type cast is safe as the array1 has the type T[]
    T[] resultArray = (T[]) Array.newInstance(array1.getClass().getComponentType(), 0);
    return resultList.toArray(resultArray);
}

In the method above, we use Java reflection API to create a generic array instance: resultArray.

Let's write a test to verify if our method works:

@Test
public void givenTwoStringArrays_whenConcatWithList_thenGetExpectedResult() {
    String[] result = ArrayConcatUtil.concatWithCollection(strArray1, strArray2);
    assertThat(result).isEqualTo(expectedStringArray);
}

If we execute the test, it'll pass.

This approach is pretty straightforward. However, since the method accepts T[] arrays, it doesn't support concatenating primitive arrays.

Apart from that, it's inefficient as it creates an ArrayList object, and later we call the toArray() method to convert it back to an array. In this procedure, the Java List object adds unnecessary overhead.

Next, let's see if we can find a more efficient way to solve the problem.

4. Using the Array Copy Technique

Java doesn't offer an array concatenation method, but it provides two array copy methods: System.arraycopy() and Arrays.copyOf().

We can solve the problem using Java's array copy methods.

The idea is, we create a new array, say result, which has result.length = array1.length + array2.length, and copy each array's elements to the result array.

4.1. Non-Primitive Arrays

First, let's have a look at the method implementation:

static <T> T[] concatWithArrayCopy(T[] array1, T[] array2) {
    T[] result = Arrays.copyOf(array1, array1.length + array2.length);
    System.arraycopy(array2, 0, result, array1.length, array2.length);
    return result;
}

The method looks compact. Further, the whole method has created only one new array object: result.

Now, let's write a test method to check if it works as we expect:

@Test
public void givenTwoStringArrays_whenConcatWithCopy_thenGetExpectedResult() {
    String[] result = ArrayConcatUtil.concatWithArrayCopy(strArray1, strArray2);
    assertThat(result).isEqualTo(expectedStringArray);
}

The test will pass if we give it a run.

There is no unnecessary object creation. Thus, this method is more performant than the approach using Java Collections.

On the other hand, this generic method only accepts parameters with the T[] type. Therefore, we cannot pass primitive arrays to the method.

However, we can modify the method to make it support primitive arrays.

Next, let's take a closer look at how to add primitive array support.

4.2. Add Primitive Array Support

To make the method support primitive arrays, we need to change the parameters' type from T[] to T and do some type-safe checks.

First, let's take a look at the modified method:

static <T> T concatWithCopy2(T array1, T array2) {
    if (!array1.getClass().isArray() || !array2.getClass().isArray()) {
        throw new IllegalArgumentException("Only arrays are accepted.");
    }
    Class<?> compType1 = array1.getClass().getComponentType();
    Class<?> compType2 = array2.getClass().getComponentType();
    if (!compType1.equals(compType2)) {
        throw new IllegalArgumentException("Two arrays have different types.");
    }
    int len1 = Array.getLength(array1);
    int len2 = Array.getLength(array2);
    @SuppressWarnings("unchecked")
    //the cast is safe due to the previous checks
    T result = (T) Array.newInstance(compType1, len1 + len2);
    System.arraycopy(array1, 0, result, 0, len1);
    System.arraycopy(array2, 0, result, len1, len2);
    return result;
}

Obviously, the concatWithCopy2() method is longer than the original version. But it's not hard to understand. Now, let's quickly walk through it to understand how it works.

Since the method now allows parameters with the type T, we need to make sure both parameters are arrays:

if (!array1.getClass().isArray() || !array2.getClass().isArray()) {
    throw new IllegalArgumentException("Only arrays are accepted.");
}

It's still not safe enough if two parameters are arrays. For example, we don't want to concatenate an Integer[] array and a String[] array. So, we need to make sure the ComponentType of the two arrays are identical:

if (!compType1.equals(compType2)) {
    throw new IllegalArgumentException("Two arrays have different types.");
}

After the type-safe checks, we can create a generic array instance using the ConponentType object and copy parameter arrays to the result array. It's quite similar to the previous concatWithCopy() method.

4.3. Testing the concatWithCopy2() Method

Next, let's test if our new method works as we expected. First, we pass two non-array objects and see if the method raises the expected exception:

@Test
public void givenTwoStrings_whenConcatWithCopy2_thenGetException() {
    String exMsg = "Only arrays are accepted.";
    try {
        ArrayConcatUtil.concatWithCopy2("String Nr. 1", "String Nr. 2");
        fail(String.format("IllegalArgumentException with message:'%s' should be thrown. But it didn't", exMsg));
    } catch (IllegalArgumentException e) {
        assertThat(e).hasMessage(exMsg);
    }
}

In the test above, we pass two String objects to the method. If we execute the test, it passes. This means we've got the expected exception.

Finally, let's build a test to check if the new method can concatenate primitive arrays:

@Test
public void givenTwoArrays_whenConcatWithCopy2_thenGetExpectedResult() {
    String[] result = ArrayConcatUtil.concatWithCopy2(strArray1, strArray2);
    assertThat(result).isEqualTo(expectedStringArray);
    int[] intResult = ArrayConcatUtil.concatWithCopy2(intArray1, intArray2);
    assertThat(intResult).isEqualTo(expectedIntArray);
}

This time, we called the concatWithCopy2() method twice. First, we pass two String[] arrays. Then, we pass two int[] primitive arrays.

The test will pass if we run it. Now, we can say, the concatWithCopy2() method works as we expected.

5. Using Java Stream API

If the Java version we're working with is 8 or newer, the Stream API is available. We can also resolve the problem using the Stream API.

First, we can get a Stream from an array by the Arrays.stream() method. Also, the Stream class provides a static concat() method to concatenate two Stream objects.

Now, let's see how to concatenate two arrays with Stream.

5.1. Concatenating Non-Primitive Arrays

Building a generic solution using Java Streams is pretty simple:

static <T> T[] concatWithStream(T[] array1, T[] array2) {
    return Stream.concat(Arrays.stream(array1), Arrays.stream(array2))
      .toArray(size -> (T[]) Array.newInstance(array1.getClass().getComponentType(), size));
}

First, we convert two input arrays to Stream objects. Second, we concatenate the two Stream objects using the Stream.concat() method.

Finally, we return an array containing all elements in the concatenated Stream.

Next, let's build a simple test method to check if the solution works:

@Test
public void givenTwoStringArrays_whenConcatWithStream_thenGetExpectedResult() {
    String[] result = ArrayConcatUtil.concatWithStream(strArray1, strArray2);
    assertThat(result).isEqualTo(expectedStringArray);
}

The test will pass if we pass two String[] arrays.

Probably, we've noticed that our generic method accepts parameters in the T[] type. Therefore, it won't work for primitive arrays.

Next, let's see how to concatenate two primitive arrays using Java Streams.

5.2. Concatenating Primitive Arrays

The Stream API ships different Stream classes that can convert the Stream object to the corresponding primitive array, such as IntStream, LongStream, and DoubleStream.

However, only int, long, and double have their Stream types. That is to say, if the primitive arrays we want to concatenate have type int[], long[], or double[], we can pick the right Stream class and invoke the concat() method.

Let's see an example to concatenate two int[] arrays using IntStream:

static int[] concatIntArraysWithIntStream(int[] array1, int[] array2) {
    return IntStream.concat(Arrays.stream(array1), Arrays.stream(array2)).toArray();
}

As the method above shows, the Arrays.stream(int[]) method will return an IntStream object.

Also, the IntStream.toArray() method returns int[]. Therefore, we don't need to take care of the type conversions.

As usual, let's create a test to see if it works with our int[] input data:

@Test
public void givenTwoIntArrays_whenConcatWithIntStream_thenGetExpectedResult() {
    int[] intResult = ArrayConcatUtil.concatIntArraysWithIntStream(intArray1, intArray2);
    assertThat(intResult).isEqualTo(expectedIntArray);
}

If we run the test, it'll pass.

6. Using the Apache Commons Lang Library

The Apache Commons Lang library is widely used in Java applications in the real world.

It ships with an ArrayUtils class, which contains many handy array helper methods.

The ArrayUtils class provides a series of addAll() methods, which support concatenating both non-primitive and primitive arrays.

Let's verify it by a test method:

@Test
public void givenTwoArrays_whenConcatWithCommonsLang_thenGetExpectedResult() {
    String[] result = ArrayUtils.addAll(strArray1, strArray2);
    assertThat(result).isEqualTo(expectedStringArray);
    int[] intResult = ArrayUtils.addAll(intArray1, intArray2);
    assertThat(intResult).isEqualTo(expectedIntArray);
}

Internally, the ArrayUtils.addAll() methods use the performant System.arraycopy() method to do the array concatenation.

7. Using the Guava Library

Similar to the Apache Commons library, Guava is another library loved by many developers.

Guava provides convenient helper classes to do array concatenation as well.

If we want to concatenate non-primitive arrays, the ObjectArrays.concat() method is a good choice:

@Test
public void givenTwoStringArrays_whenConcatWithGuava_thenGetExpectedResult() {
    String[] result = ObjectArrays.concat(strArray1, strArray2, String.class);
    assertThat(result).isEqualTo(expectedStringArray);
}

Guava has offered primitive utilities for each primitive. All primitive utilities provide concat() method to concatenate the arrays with the corresponding types, for example:

  • int[] – Guava: Ints.concat(int[] … arrays)
  • long[] – Guava: Longs.concat(long[] … arrays)
  • byte[] – Guava: Bytes.concat(byte[] … arrays)
  • double[] – Guava: Doubles.concat(double[] … arrays)

We can just pick the right primitive utility class to concatenate primitive arrays.

Next, let's concatenate our two int[] arrays using the Ints.concat() method:

@Test
public void givenTwoIntArrays_whenConcatWithGuava_thenGetExpectedResult() {
    int[] intResult = Ints.concat(intArray1, intArray2);
    assertThat(intResult).isEqualTo(expectedIntArray);
}

Similarly, Guava internally uses System.arraycopy() in the above-mentioned methods to do the array concatenation to gain good performance.

8. Conclusion

In this article, we've addressed different approaches to concatenate two arrays in Java through examples.

As usual, the complete code samples that accompany this article are available over on GitHub.

The post Concatenate Two Arrays in Java first appeared on Baeldung.
       

How to Deal With Databases in Docker?

$
0
0

1. Overview

In this article, we'll review how to work with Docker to manage databases.

In the first chapter, we'll cover the installation of a database on our local machine. Then we'll discover how data persistence is working across containers.

To conclude, we'll discuss the reliability of implementing databases in Docker production environments.

2. Running a Docker Image Locally

2.1. Starting With a Standard Docker Image

First, we have to install Docker Desktop. Then, we should find an existing image of our database from the Docker Hub. Once we find it, we'll pick the docker pull command from the top right corner of the page.

In this tutorial, we'll work with PostgreSQL, so the command is:

$docker pull postgres

When the download is complete, the docker run command will create a running database within a Docker container. For PostgreSQL, the POSTGRES_PASSWORD environment variable must be specified with the -e option:

$docker run -e POSTGRES_PASSWORD=password postgres

Next, we'll test our database container connection.

2.2. Connecting a Java Project to the Database

Let's try a simple test. We'll connect a local Java project to the database using a JDBC datasource. The connection string should use the default PostgreSQL port 5432 on localhost:

jdbc:postgresql://localhost:5432/postgres?user=postgres&password=password

An error should inform us that the port is not opened. Indeed, the database is listening for connections from inside the container network, and our Java project is running outside of it.

To fix it, we need to map the container port to our localhost port. We'll use the default port 5432 for PostgreSQL:

$docker run -p 5432:5432 -e POSTGRES_PASSWORD=password postgres

The connection is working now, and we should be able to use our JDBC data source.

2.3. Running SQL Scripts

Now, we can connect to our database from a shell, for example, to run an initialization script.

First, let's find our running container id:

$docker ps
CONTAINER ID   IMAGE      COMMAND                  CREATED          STATUS          PORTS                    NAMES
65d9163eece2   postgres   "docker-entrypoint.s…"   27 minutes ago   Up 27 minutes   0.0.0.0:5432->5432/tcp   optimistic_hellman

Then, we'll run the docker exec command with the interactive -it option to run a shell inside the container:

$docker exec -it 65d9163eece2 bash

Finally, we can connect to the database instance with the command-line client and paste our SQL script:

root@65d9163eece2:/# psql -U postgres
postgres=#CREATE DATABASE TEST;
CREATE TABLE PERSON(
  ID INTEGER PRIMARY KEY,
  FIRST_NAME VARCHAR(1000),
  LAST_NAME VARCHAR(1000)
);
...

For example, if we have a large dump file to load, we must avoid copy-pasting. We can run the import command directly from the host instead with the docker exec command:

$docker exec 65d9163eece2 psql -U postgres < dump.sql

3. Persist Data With a Docker Volume

3.1. Why Do We Need Volumes?

Our basic setup will work as long as we use the same container, with docker container stop/start each time we need to reboot. If we use docker run again, a new empty container will be created, and we'll lose our data. Indeed, Docker persists data inside a temporary directory by default.

Now, we'll learn how to modify this volume mapping.

3.2. Docker Volumes Setup

The first task is to inspect our container to see which volume is used by our database:

$docker inspect -f "{{ .Mounts }}" 65d9163eece2
[{volume f1033d3 /var/lib/docker/volumes/f1033d3/_data /var/lib/postgresql/data local true }] 

We can see that the volume f1033d3 has mapped the container directory /var/lib/postgresql/data to a temporary directory /var/lib/docker/volumes/f1033d3/_data created in the host filesystem.

We have to modify this mapping by adding the -v option to the docker run command we used in chapter 2.1:

$docker run -v C:\docker-db-volume:/var/lib/postgresql/data -e POSTGRES_PASSWORD=password postgres

Now, we can see the database files created in the C:\docker-db-volume directory. We can find advanced volume configuration in this dedicated article.

As a result, each time we're using the docker run command, the data will be persisted along with the different container executions.

Also, we may want to share the configuration between team members or across different environments. We can use a Docker Compose file, which will create new containers each time. In this case, volumes are mandatory.

The following chapter will cover the specific use of a Docker database in a production environment.

4. Working With Docker in Production

Docker Compose is great for sharing configuration and managing containers as stateless services. If a service fails or can't handle the workload, we can configure Docker Compose to create new containers automatically. This is very useful for building a production cluster for REST back-ends, which are stateless by design.

However, databases are stateful, and their management is more complex: let's review the different contexts.

4.1. Single Instance Database

Let's suppose we're building a non-critical environment, for testing or for production, that tolerates periods of downtime (during deployments, backups, or failure).

In this case, we don't need a high-availability cluster, and we can simply use Docker Compose for a single-instance database:

  • We can use a simple volume for the data storage because the containers will be executed on the same machine
  • We can limit it to run one container at a time using the global mode

Let's see a minimalist working example:

version: '3'
services:       
  database:
    image: 'postgres'
    deploy:
      mode: global
    environment:
      - POSTGRES_PASSWORD=password
    ports:
      - "5432:5432"
    volumes:
      - "C:/docker-db-volume:/var/lib/postgresql/data"

Using this configuration, our production will create only one container at a time and reuse the data files from our C:\docker-db-volume directory.

However, it's even more important in this configuration to make regular backups. In case of a configuration error, this directory could be erased or corrupted by the container.

4.2. Replicated Databases

Let's assume now that our production environment is critical.

In this case, orchestration tools like Docker Swarm and Kubernetes are beneficial with stateless containers: They offer vertical and horizontal clustering, with load-balancing, fail-over, and auto-scaling capabilities.

Unfortunately, as our database containers are stateful, these solutions don't provide a volume replication mechanism.

On the other hand, it's dangerous to build homemade configurations because it can lead to severe data loss. For example:

  • Using shared storage like NFS or NAS for volumes can't guarantee that there will be no data loss when the database is restarted in another instance
  • On master-slave clusters, it's a common error to let a Docker orchestration elect more than one master node, which will lead to data corruption

So far, our different options are:

  • Don't use Docker for the database, and implement a database-specific or hardware replication mechanism
  • Don't use Docker for the database, and subscribe to Platform-as-a-Service solutions like OpenShift, Amazon AWS, or Azure
  • Use a Docker-specific replication mechanism like KubeDB and Portworx

5. Conclusion

In this article, we've reviewed the basic configuration that was suitable for development, testing, and non-critical production.

Finally, we concluded that Docker has drawbacks when used in high-availability environments. Therefore, it should be avoided or coupled with solutions specialized in database clusters.

The post How to Deal With Databases in Docker? first appeared on Baeldung.

Converting a Java Keystore Into PEM Format

$
0
0

1. Introduction

A Java KeyStore is a container of security certificates that we can use when writing Java code. Java KeyStores hold one or more certificates with their matching private keys and are created using keytool which comes with the JDK.

In this tutorial, we'll convert a Java KeyStore into PEM (Privacy-Enhanced Mail) format using a combination of keytool and openssl. The steps will include using keytool to convert the JKS into a PKCS#12 KeyStore, and then openssl to transform the PKCS#12 KeyStore into a PEM file.

keytool is available with the JDK, and we can download openssl from the OpenSSL website.

2. File Formats

Java KeyStores are stored in the JKS file format. It's a proprietary format that is specifically for use in Java programs. PKCS#12 KeyStores are non-proprietary and are increasing in popularity — from Java 9 onward, PKCS#12 is used as the default KeyStore format over JKS.

PEM files are also certificate containers — they encode binary data using Base64, which allows the content to be transmitted more easily through different systems. A PEM file may contain multiple instances, with each instance adhering to two rules:

  • A one-line header of -----BEGIN <label>-----
  • A one-line footer of -----END <label>-----

<label> specifies the type of the encoded message, common values being CERTIFICATE and PRIVATE KEY.

3. Converting an Entire JKS Into PEM Format

Let's now go through the steps for converting all the certificates and private keys from a JKS into PEM format.

3.1. Creating the Java KeyStore

We'll start by creating a JKS with a single RSA key pair:

keytool -genkey -keyalg RSA -v -keystore keystore.jks -alias first-key-pair

We'll enter a KeyStore password at the prompt and enter information about the key pair.

For this example, we'll create a second key pair as well:

keytool -genkey -keyalg RSA -v -keystore keystore.jks -alias second-key-pair

3.2. JKS to PKCS#12

The first step in the conversion process is to convert the JKS into PKCS#12 using keytool:

keytool -importkeystore -srckeystore keystore.jks \
   -destkeystore keystore.p12 \
   -srcstoretype jks \
   -deststoretype pkcs12

Again, we'll answer the password prompts — one will ask for the password of the original JKS, and the other will ask us to create a password for the resulting PKCS#12 KeyStore.

Let's check the output of running that command:

Entry for alias first-key-pair successfully imported.
Entry for alias second-key-pair successfully imported.
Import command completed:  2 entries successfully imported, 0 entries failed or cancelled

The result is a keystore.p12 KeyStore stored in PKCS#12 format.

3.3. PKCS#12 to PEM

From here, we'll use openssl to encode keystore.p12 into a PEM file:

openssl pkcs12 -in keystore.p12 -out keystore.pem

The tool will prompt us for the PKCS#12 KeyStore password and a PEM passphrase for each alias. The PEM passphrase is used to encrypt the resulting private key.

If we don't want to encrypt the resulting private key, we should instead use:

openssl pkcs12 -nodes -in keystore.p12 -out keystore.pem

keystore.pem will contain all of the keys and certificates from the KeyStore. For this example, it contains a private key and a certificate for both the first-key-pair and second-key-pair aliases.

4. Converting a Single Certificate From a JKS Into PEM

We can export a single public key certificate out of a JKS and into PEM format using keytool alone:

keytool -exportcert -alias first-key-pair -keystore keystore.jks -rfc -file first-key-pair-cert.pem

After entering the JKS password at the prompt, we'll see the output of that command:

Certificate stored in file <first-key-pair-cert.pem>

5. Conclusion

We've successfully converted an entire JKS into PEM format using keytool, openssl, and the intermediary stage of the PKCS#12 format. We've also covered converting a single public key certificate using keytool alone.

The post Converting a Java Keystore Into PEM Format first appeared on Baeldung.
       
Viewing all 4464 articles
Browse latest View live


<script src="https://jsc.adskeeper.com/r/s/rssing.com.1596347.js" async> </script>