Quantcast
Channel: Baeldung
Viewing all 4717 articles
Browse latest View live

Introduction to GeoTools

$
0
0

1. Overview

In this article, we’ll go through the basics of the GeoTools open source Java library – for working with geospatial data. This library provides compliant methods for implementing Geographic Information Systems (GIS) and implements and supports many Open Geospatial Consortium (OGC) standards.

As the OGC develops new standards, they’re implemented by the GeoTools, which makes it quite handy for geospatial work.

2. Dependencies

We’ll need to add the GeoTools dependencies to our pom.xml file. Since these dependencies are not hosted on Maven Central, we also need to declare their repositories so that Maven can download them:

<repositories>
    <repository>
        <id>osgeo</id>
        <name>Open Source Geospatial Foundation Repository</name>
        <url>http://download.osgeo.org/webdav/geotools/</url>
    </repository>
    <repository>
        <id>opengeo</id>
        <name>OpenGeo Maven Repository</name>
        <url>http://repo.opengeo.org</url>
    </repository>
</repositories>

After that, we can add our dependencies:

<dependency>
    <groupId>org.geotools</groupId>
    <artifactId>gt-shapefile</artifactId>
    <version>15.2</version>
</dependency>
<dependency>
    <groupId>org.geotools</groupId>
    <artifactId>gt-epsg-hsql</artifactId>
    <version>15.2</version>
</dependency>

3. GIS And Shapefiles

To have any practical use of the GeoTools library, we’ll need to know a few things about geographic information systems and shapefiles.

3.1. GIS

If we want to work with geographical data, we’ll need a geographic information system (GIS). This system can be used to present, capture, store, manipulate, analyze, or manage geographical data.

Some portion of the geographical data is spatial – it references concrete locations on earth. The spatial data is usually accompanied by the attribute data. Attribute data can be any additional information about each of the spatial features.

An example of geographical data would be cities. The actual location of the cities is the spatial data. Additional data such as the city name and population would make up the attribute data.

3.2. Shapefiles

Different formats are available for working with geospatial data. Raster and vector are the two primary data types.

In this article, we’re going to see how to work with the vector data type. This data type can be represented as points, lines, or polygons.

To store vector data in a file, we will use a shapefile. This file format is used when working with the geospatial vector data type. Also, it is compatible with a wide range of GIS software.

We can use GeoTools to add features like cities, schools, and landmarks to shapefiles.

4. Creating Features

The GeoTools documentation specifies that a feature is anything that can be drawn on a map, like a city or some landmark.  And, as we mentioned, once created, features can then be saved into files called shapefiles.

4.1. Keeping Geospatial Data

Before creating a feature, we need to know its geospatial data or the longitude and latitude coordinates of its location on earth. As for attribute data, we need to know the name of the feature we want to create.

This information can be found on the web. Some sites like simplemaps.com or maxmind.com offer free databases with geospatial data.

When we know the longitude and latitude of a city, we can easily store them in some object. We can use a Map object that will hold the city name and a list of its coordinates.

Let’s create a helper method to ease the storing of data inside our Map object:

private static void addToLocationMap(
  String name,
  double lat,
  double lng,
  Map<String, List<Double>> locations) {
    List<Double> coordinates = new ArrayList<>();

    coordinates.add(lat);
    coordinates.add(lng);
    locations.put(name, coordinates);
}

Now let’s fill in our Map object:

Map<String, List<Double>> locations = new HashMap<>();

addToLocationMap("Bangkok", 13.752222, 100.493889, locations);
addToLocationMap("New York", 53.083333, -0.15, locations);
addToLocationMap("Cape Town", -33.925278, 18.423889, locations);
addToLocationMap("Sydney", -33.859972, 151.211111, locations);
addToLocationMap("Ottawa", 45.420833, -75.69, locations);
addToLocationMap("Cairo", 30.07708, 31.285909, locations);

If we download some CSV database that contains this data, we can easily create a reader to retrieve the data instead of keeping it in an object like here.

4.2. Defining Feature Types

So, now we have a map of cities. To be able to create features with this data, we’ll need to define their type first. GeoTools offers two ways of defining feature types.

One way is to use the createType method of the DataUtilites class:

SimpleFeatureType TYPE = DataUtilities.createType(
  "Location", "location:Point:srid=4326," + "name:String");

Another way is to use a SimpleFeatureTypeBuilder, which provides more flexibility. For example, we can set the Coordinate Reference System for the type, and we can set a maximum length for the name field:

SimpleFeatureTypeBuilder builder = new SimpleFeatureTypeBuilder();
builder.setName("Location");
builder.setCRS(DefaultGeographicCRS.WGS84);

builder
  .add("Location", Point.class);
  .length(15)
  .add("Name", String.class);

SimpleFeatureType CITY = builder.buildFeatureType();

Both types store the same information. The location of the city is stored as a Point, and the name of the city is stored as a String.

You probably noticed that the type variables TYPE and CITY  are named with all capital letters, like constants. Type variables should be treated as final variables and should not be changed after they are created, so this way of naming can be used to indicate just that.

4.3. Feature Creation and Feature Collections

Once we have the feature type defined and we have an object that has the data needed to create features, we can start creating them with their builder.

Let’s instantiate a SimpleFeatureBuilder providing our feature type:

SimpleFeatureBuilder featureBuilder = new SimpleFeatureBuilder(CITY);

We’ll also need a collection to store all the created feature objects:

DefaultFeatureCollection collection = new DefaultFeatureCollection();

Since we declared in our feature type to hold a Point for the location, we’ll need to create points for our cities based on their coordinates. We can do this with the GeoTools’s JTSGeometryFactoryFinder:

GeometryFactory geometryFactory
  = JTSFactoryFinder.getGeometryFactory(null);

Note that we can also use other Geometry classes like Line and Polygon.

We can create a function that will help us put features in the collection:

private static Function<Map.Entry<String, List<Double>>, SimpleFeature>
  toFeature(SimpleFeatureType CITY, GeometryFactory geometryFactory) {
    return location -> {
        Point point = geometryFactory.createPoint(
           new Coordinate(location.getValue()
             .get(0), location.getValue().get(1)));

        SimpleFeatureBuilder featureBuilder
          = new SimpleFeatureBuilder(CITY);
        featureBuilder.add(point);
        featureBuilder.add(location.getKey());
        return featureBuilder.buildFeature(null);
    };
}

Once we have the builder and the collection, by using the previously created function, we can create features and store them in our collection:

locations.entrySet().stream()
  .map(toFeature(CITY, geometryFactory))
  .forEach(collection::add);

The collection now contains all the features created based on our Map object that held the geospatial data.

5. Creating a DataStore

GeoTools contains a DataStore API that is used to represent a source of geospatial data. This source can be a file, a database, or some service that returns data. We can use a DataStoreFactory to create our DataStore, which will contain our features.

Let’s set the file that will contain the features:

File shapeFile = new File(
  new File(".").getAbsolutePath() + "shapefile.shp");

Now, let’s set the parameters that we are going to use to tell the DataStoreFactory which file to use and indicate that we need to store a spatial index when we create our DataStore:

Map<String, Serializable> params = new HashMap<>();
params.put("url", shapeFile.toURI().toURL());
params.put("create spatial index", Boolean.TRUE);

Let’s create the DataStoreFactory using the parameters we just created, and use that factory to create the DataStore:

ShapefileDataStoreFactory dataStoreFactory
  = new ShapefileDataStoreFactory();

ShapefileDataStore dataStore 
  = (ShapefileDataStore) dataStoreFactory.createNewDataStore(params);
dataStore.createSchema(CITY);

6. Writing to a Shapefile

The last step that we need to do is to write our data to a shapefile. To do this safely, we are going to use the Transaction interface that is a part of the GeoTools API.

This interface gives us the possibility to easily commit our the changes to the file. It also provides a way to perform a rollback of the unsuccessful changes if some problem occurs while writing to the file:

Transaction transaction = new DefaultTransaction("create");

String typeName = dataStore.getTypeNames()[0];
SimpleFeatureSource featureSource
  = dataStore.getFeatureSource(typeName);

if (featureSource instanceof SimpleFeatureStore) {
    SimpleFeatureStore featureStore
      = (SimpleFeatureStore) featureSource;

    featureStore.setTransaction(transaction);
    try {
        featureStore.addFeatures(collection);
        transaction.commit();

    } catch (Exception problem) {
        transaction.rollback();
    } finally {
        transaction.close();
    }
}

The SimpleFeatureSource is used to read features, and the SimpleFeatureStore is used for read/write access. It is specified in the GeoTools documentation that using the instanceof method for checking if we can write to the file is the right way to do so.

This shapefile can later be opened with any GIS viewer that has shapefile support.

7. Conclusion

In this article, we saw how we can make use of the GeoTools library to do some very interesting geo-spatial work.

Although the example was simple, it can be extended and used for creating rich shapefiles for various purposes.

We should have in mind that GeoTools is a vibrant library, and this article just serves as a basic introduction to the library. Also, GeoTools is not limited to creating vector data types only – it can also be used to create or to work with raster data types.

You can find the full example code used in this article in our GitHub project. This is a Maven project, so you should be able to import it and run it as it is.


Introduction to EthereumJ

$
0
0

1. Introduction

In this article, we take a look at the EthereumJ library that allows us to interact with the Ethereum blockchain, using Java.

First, let’s just briefly dive into what this technology is all about.

2. About Ethereum

Ethereum is a cryptocurrency leveraging a distributed, peer-to-peer, database in the form of a programmable blockchain, the Ethereum Virtual Machine (EVM). It’s synchronized and operated through disparate but connected nodes.

As of 2017, Nodes synchronize the blockchain through consensus, create coins through mining (proof of work), verify transactions, execute smart contracts written in Solidity, and run the EVM.

The blockchain is divided into blocks which contain account states (including transactions between accounts) and proof of work.

3. The Ethereum Facade

The org.ethereum.facade.Ethereum class abstracts and unites many packages of EthereumJ into one easy to use interface.

It’s possible to connect to a node to sync with the overall network and, once connected, we can work with the blockchain.

Creating a facade object is as easy as:

Ethereum ethereum = EthereumFactory.createEthereum();

4. Connecting to the Ethereum Network

To connect to the network, we must first connect to a node, i.e. a server running the official client. Nodes are represented by the org.ethereum.net.rlpx.Node class.

The org.ethereum.listener.EthereumListenerAdapter handles blockchain events detected by our client after connection to a node has been established successfully.

4.1. Connecting to the Ethereum Network

Let’s connect to a node on the network. This can be done manually:

String ip = "http://localhost";
int port = 8345;
String nodeId = "a4de274d3a159e10c2c9a68c326511236381b84c9ec...";

ethereum.connect(ip, port, nodeId);

Connecting to the network can also be done automatically using a bean:

public class EthBean {
    private Ethereum ethereum;

    public void start() {
        ethereum = EthereumFactory.createEthereum();
        ethereum.addListener(new EthListener(ethereum));
    }

    public Block getBestBlock() {
        return ethereum.getBlockchain().getBestBlock();
    }

    public BigInteger getTotalDifficulty() {
        return ethereum.getBlockchain().getTotalDifficulty();
    }
}

We can then inject our EthBean into our application configuration. Then it automatically connects to the Ethereum network and starts downloading the blockchain.

In fact, the most connection processing is conveniently wrapped and abstracted by merely adding an org.ethereum.listener.EthereumListenerAdapter instance to our created org.ethereum.facade.Ethereum instance, as we did in our start() method above:

EthBean eBean = new EthBean();
Executors.newSingleThreadExecutor().submit(eBean::start);

4.2. Handling the Blockchain Using a Listener

We can also subclass the EthereumListenerAdapter to handle blockchain events detected by our client.

To accomplish this step, we’ll need to make our subclassed listener:

public class EthListener extends EthereumListenerAdapter {
    
    private void out(String t) {
        l.info(t);
    }

    //...

    @Override
    public void onBlock(Block block, List receipts) {
        if (syncDone) {
            out("Net hash rate: " + calcNetHashRate(block));
            out("Block difficulty: " + block.getDifficultyBI().toString());
            out("Block transactions: " + block.getTransactionsList().toString());
            out("Best block (last block): " + ethereum
              .getBlockchain()
              .getBestBlock().toString());
            out("Total difficulty: " + ethereum
              .getBlockchain()
              .getTotalDifficulty().toString());
        }
    }

    @Override
    public void onSyncDone(SyncState state) {
        out("onSyncDone " + state);
        if (!syncDone) {
            out(" ** SYNC DONE ** ");
            syncDone = true;
        }
    }
}

The onBlock() method is triggered on any new block received (whether old or current). EthereumJ represents and handles blocks using the org.ethereum.core.Block class.

The onSyncDone() method fires once syncing is complete, bringing our local Ethereum data up-to-date.

5. Working with the Blockchain

Now that we can connect to the Ethereum network and work directly with the blockchain, we’ll dive into several basic but nevertheless very important operations we’ll often use.

5.1. Submitting a Transaction

Now, that we’ve connected to the blockchain we can submit a transaction. Submitting a Transaction is relatively easy but creating an actual Transaction is a lengthy topic by itself:

ethereum.submitTransaction(new Transaction(new byte[]));

5.2. Access The Blockchain Object

The getBlockchain() method returns a Blockchain facade object with getters for fetching current network difficulties and specific Blocks.

Since we set up our EthereumListener in section 4.3,  we can access the blockchain using the above method:

ethereum.getBlockchain();

5.3. Returning an Ethereum Account Address

We can also return an Ethereum Address.

To get an Ethereum Account – we first need to authenticate a public and private key pair on the blockchain.

Let’s create a fresh key with a new random key pair:

org.ethereum.crypto.ECKey key = new ECKey();

And let’s create a key from a given private key:

org.ethereum.crypto.ECKey key = ECKey.fromPivate(privKey);

We can then use our key to initialize an Account. By calling .init() we set both an ECKey and the associated Address on the Account object:

org.ethereum.core.Account account = new Account();
account.init(key);

6. Other Functionality

There are two other major functionalities provided for by the framework that we won’t cover here but that are worth mentioning.

First, we have the ability to compile and execute Solidity smart contracts. However, creating contracts in Solidity, and subsequently compiling and executing them is an extensive topic in its own right.

Second, although the framework supports limited mining using a CPU, using a GPU miner is the recommended approach given the lack of profitability of the former.

More advanced topics regarding Ethereum itself can be found in the official docs.

7. Conclusion

In this quick tutorial, we showed how to connect to the Ethereum network and several important methods for working with the blockchain.

As always the code used in this example can be found over on GitHub.

Observable Utility Operators in RxJava

$
0
0

1. Overview

In this article, we’ll discover some utility operators for working with Observables in RxJava and how to implement custom ones.

An operator is a function that takes and alters the behavior of an upstream Observable<T> and returns a downstream Observable<R> or Subscriber, where types T and R might or might not be the same.

Operators wrap existing Observables and enhance them typically by intercepting subscription. This might sound complicated, but it is actually quite flexible and not that difficult to grasp.

2. Do

There are multiple actions that could alter the Observable lifecycle events.

The doOnNext operator modifies the Observable source so that it invokes an action when the onNext is called.

The doOnCompleted operator registers an action which is called if the resulting Observable terminates normally, calling observer‘s method onCompleted:

Observable.range(1, 10)
  .doOnNext(r -> receivedTotal += r)
  .doOnCompleted(() -> result = "Completed")
  .subscribe();
 
assertTrue(receivedTotal == 55);
assertTrue(result.equals("Completed"));

The doOnEach operator modifies the Observable source so that it notifies an Observer for each item and establishes a callback that will be called each time an item is emitted.

The doOnSubscribe operator registers an action which is called whenever an observer subscribes to the resulting Observable.

There’s also the doOnUnsubscribe operator which does the oppposite of doOnSubscribe:

Observable.range(1, 10)
  .doOnEach(new Observer<Integer>() {
      @Override
      public void onCompleted() {
          System.out.println("Complete");
      }
      @Override
      public void onError(Throwable e) {
          e.printStackTrace();
      }
      @Override
      public void onNext(Integer value) {
          receivedTotal += value;
      }
  })
  .doOnSubscribe(() -> result = "Subscribed")
  .subscribe();
assertTrue(receivedTotal == 55);
assertTrue(result.equals("Subscribed"));

When an Observable completes with an error, we can use the doOnError operator to perform an action.

DoOnTerminate operator registers an action that will be invoked when an Observable completes, either successfully or with an error:

thrown.expect(OnErrorNotImplementedException.class);
Observable.empty()
  .single()
  .doOnError(throwable -> { throw new RuntimeException("error");})
  .doOnTerminate(() -> result += "doOnTerminate")
  .doAfterTerminate(() -> result += "_doAfterTerminate")
  .subscribe();
assertTrue(result.equals("doOnTerminate_doAfterTerminate"));

There’s also a FinallyDo operator – which was deprecated in favor of doAfterTerminate. It registers an action when an Observable completes.

3. ObserveOn vs SubscribeOn

By default, an Observable along with the operator chain will operate on the same thread on which its Subscribe method is called.

The ObserveOn operator specifies a different Scheduler that the Observable will use for sending notifications to observers:

Observable.range(1, 5)
  .map(i -> i * 100)
  .doOnNext(i -> {
      emittedTotal += i;
      System.out.println("Emitting " + i
        + " on thread " + Thread.currentThread().getName());
  })
  .observeOn(Schedulers.computation())
  .map(i -> i * 10)
  .subscribe(i -> {
      receivedTotal += i;
      System.out.println("Received " + i + " on thread "
        + Thread.currentThread().getName());
  });

Thread.sleep(2000);
assertTrue(emittedTotal == 1500);
assertTrue(receivedTotal == 15000);

We see that elements were produced in the main thread and were pushed all the way to the first map call.

But after that, the observeOn redirected the processing to a computation thread, which which was used when processing map and the final Subscriber.

One problem that may arise with observeOn is the bottom stream can produce emissions faster than the top stream can process them. This can cause issues with backpressure that we may have to consider.

To specify on which Scheduler the Observable should operate, we can use the subscribeOn operator:

Observable.range(1, 5)
  .map(i -> i * 100)
  .doOnNext(i -> {
      emittedTotal += i;
      System.out.println("Emitting " + i
        + " on thread " + Thread.currentThread().getName());
  })
  .subscribeOn(Schedulers.computation())
  .map(i -> i * 10)
  .subscribe(i -> {
      receivedTotal += i;
      System.out.println("Received " + i + " on thread "
        + Thread.currentThread().getName());
  });

Thread.sleep(2000);
assertTrue(emittedTotal == 1500);
assertTrue(receivedTotal == 15000);

SubscribeOn instructs the source Observable which thread to use for emitting items – only this thread will push items to the Subscriber. It can be placed in any place in the stream because it affects the subscription only.

Effectively, we can only use one subscribeOn, but we can have any number of observeOn operators. We can switch emissions from one thread to another with ease by using observeOn.

4. Single and SingleOrDefault

The operator Single returns an Observable that emits the single item emitted by the source Observable:

Observable.range(1, 1)
  .single()
  .subscribe(i -> receivedTotal += i);
assertTrue(receivedTotal == 1);

If the source Observable produces zero or more than one element, an exception will be thrown:

Observable.empty()
  .single()
  .onErrorReturn(e -> receivedTotal += 10)
  .subscribe();
assertTrue(receivedTotal == 10);

On the other hand, the operator SingleOrDefault is very similar to Single, meaning that it also returns an Observable that emits the single item from the source, but additionally, we can specify a default value:

Observable.empty()
  .singleOrDefault("Default")
  .subscribe(i -> result +=i);
assertTrue(result.equals("Default"));

But if the Observable source emits more than one item, it still throws an IllegalArgumentExeption.

Observable.range(1, 3)
  .singleOrDefault(5)
  .onErrorReturn(e -> receivedTotal += 10)
  .subscribe();
assertTrue(receivedTotal == 10);

S simple conclusion:

  • If it is expected that the source Observable may have none or one element, then SingleOrDefault should be used
  • If we’re dealing with potentially more than one item emitted in our Observable and we only want to emit either the first or the last value, we can use other operators like first or last

5. Timestamp

The Timestamp operator attaches a timestamp to each item emitted by the source Observable before reemitting that item in its own sequence. The timestamp indicates at what time the item was emitted:

Observable.range(1, 10)
  .timestamp()
  .map(o -> result = o.getClass().toString() )
  .last()
  .subscribe();
 
assertTrue(result.equals("class rx.schedulers.Timestamped"));

6. Delay

This operator modifies its source Observable by pausing for a particular increment of time before emitting each of the source Observable’s items.

It offsets the entire sequence using the provided value:

Observable source = Observable.interval(1, TimeUnit.SECONDS)
  .take(5)
  .timestamp();

Observable delayedObservable
  = source.delay(2, TimeUnit.SECONDS);

source.subscribe(
  value -> System.out.println("source :" + value),
  t -> System.out.println("source error"),
  () -> System.out.println("source completed"));

delayedObservable.subscribe(
  value -> System.out.println("delay : " + value),
  t -> System.out.println("delay error"),
  () -> System.out.println("delay completed"));
Thread.sleep(8000);

There is an alternative operator, with which we can delay the subscription to the source Observable called delaySubscription.

The Delay operator runs on the computation Scheduler by default, but we can choose a different Scheduler by passing it in as an optional third parameter to delaySubscription.

7. Repeat

Repeat simply intercepts completion notification from upstream and rather than passing it downstream it resubscribes.

Therefore, it is not guaranteed that repeat will keep cycling through the same sequence of events, but it happens to be the case when upstream is a fixed stream:

Observable.range(1, 3)
  .repeat(3)
  .subscribe(i -> receivedTotal += i);
 
assertTrue(receivedTotal == 18);

8. Cache

The cache operator stands between the subscribe and our custom Observable.

When the first subscriber appears, cache delegates subscription to the underlying Observable and forwards all notifications (events, completions, or errors) downstream.

However, at the same time, it keeps a copy of all notifications internally. When a subsequent subscriber wants to receive pushed notifications, cache no longer delegates to the underlying Observable but instead feeds cached values:

Observable<Integer> source =
  Observable.<Integer>create(subscriber -> {
      System.out.println("Create");
      subscriber.onNext(receivedTotal += 5);
      subscriber.onCompleted();
  }).cache();
source.subscribe(i -> {
  System.out.println("element 1");
  receivedTotal += 1;
});
source.subscribe(i -> {
  System.out.println("element 2");
  receivedTotal += 2;
});
 
assertTrue(receivedTotal == 8);

9. Using

When an observer subscribes to the Observable returned from the using(), it will use the Observable factory function to create the Observable the observer will observe, while at the same time using the resource factory function to create whichever resource we have designed it to make.

When the observer unsubscribes from the Observable, or when the Observable terminates, using will call the third function to dispose of the created resource:

Observable<Character> values = Observable.using(
  () -> "resource",
  r -> {
      return Observable.create(o -> {
          for (Character c : r.toCharArray()) {
              o.onNext(c);
          }
          o.onCompleted();
      });
  },
  r -> System.out.println("Disposed: " + r)
);
values.subscribe(
  v -> result += v,
  e -> result += e
);
assertTrue(result.equals("resource"));

10. Conclusion

In this article, we talked how to use RxJava utility operators and also how to explore their most important features.

The true power of RxJava lies in its operators. Declarative transformations of streams of data are safe yet expressive and flexible.

With a strong foundation in functional programming, operators play deciding role in RxJava adoption. Mastering built-in operators is a key to success in this library.

The full source code for the project including all the code samples used here can be found over on Github.

Java Weekly, Issue 195

$
0
0

Today – Java 9 goes live (I’ve been waiting for some time to write this sentence).

Let’s jump right in…

1. Spring and Java

>> The Top 10 Jigsaw and Java 9 Misconceptions Debunked [blog.takipi.com]

There are a number of myths surrounding Java 9 – so this piece is doing some major myth-busting.

>> Synthetic [blog.frankel.ch]

Understanding the ACC_SYNTHETIC flag might not revolutionize your day-to-day work – but it’s an important part of the JVM.

>> How fast (or slow) mutation testing really is? [solidsoft.wordpress.com]

A case study focused on how much time mutation testing actually takes.

>> Security changes in Spring Boot 2.0 M4 [spring.io]

The new milestone introduces a few interesting updates.

Also worth reading:

Webinars and presentations:

Time to upgrade:

2. Technical

>> Given-When-Then in JUnit Tests [blog.codecentric.de]

This is a great way to structure your tests (and a personal favorite).

Also worth reading:

3. Musings

>> The Decline of the Enterprise Architect [daedtech.com]

With the evolution of Agile, the need for the separate role of Enterprise Architect is slowly decreasing.

Also worth reading:

4. Comics

And my favorite Dilberts of the week:

>> Too Dumb to Understand [dilbert.com]

>> Robots in Management [dilbert.com]

>> Robot Will Crush Employees [dilbert.com]

5. Pick of the Week

>> Long Awaited Java 9.0 Releasing This Week [infoq.com]

Guide to LinkRest

$
0
0

1. Overview

LinkRest is an open-source framework for building data-driven REST web services. It’s built on top of JAX-RS and Apache Cayenne ORM, and uses an HTTP/JSON-based message protocol.

Basically, this framework is meant to provide an easy way of exposing our data store on the web.

In the following sections, we’ll take a look at how we can build a REST web service to access a data model using LinkRest.

2. Maven Dependencies

To start working with the library, first we need to add the link-rest dependency:

<dependency>
    <groupId>com.nhl.link.rest</groupId>
    <artifactId>link-rest</artifactId>
    <version>2.9</version>
</dependency>

This also brings in the cayenne-server artifact.

Additionally, we’ll use Jersey as the JAX-RS implementation, so we need to add the jersey-container-servlet dependency, as well as jersey-media-moxy for serializing JSON responses:

<dependency>
    <groupId>org.glassfish.jersey.containers</groupId>
    <artifactId>jersey-container-servlet</artifactId>
    <version>2.25.1</version>
</dependency>
<dependency>
    <groupId>org.glassfish.jersey.media</groupId>
    <artifactId>jersey-media-moxy</artifactId>
    <version>2.25.1</version>
</dependency>

For our example, we’ll be working with an in-memory H2 database as it’s easier to set up; as a consequence, we’ll also add h2 :

<dependency>
    <groupId>com.h2database</groupId>
    <artifactId>h2</artifactId>
    <version>1.4.196</version>
</dependency>

3. Cayenne Data Model

The data model we’ll be working with contains a Department and an Employee entity that represents a one-to-many relationship:

As mentioned, LinkRest works with data objects generated using Apache Cayenne ORM. Working with Cayenne is not the main subject of this article, so for more information check out the Apache Cayenne documentation.

We’ll save the Cayenne project in a cayenne-linkrest-project.xml file.

After running the cayenne-maven-plugin, this will generate two _Department and _Employee abstract classes – which will extend the CayenneDataObject class, as well as two concrete classes derived from them, Department and Employee.

These latter classes are the ones that we can customize and use with LinkRest.

4. LinkRest Application Startup

In the next section, we’re going to be writing and testing REST endpoints, so to be able to run them we need to setup our runtime.

Since we’re using Jersey as the JAX-RS implementation, let’s add a class that extends ResourceConfig and specifies the package that will hold the classes in which we define the REST endpoints:

@ApplicationPath("/linkrest")
public class LinkRestApplication extends ResourceConfig {

    public LinkRestApplication() {
        packages("com.baeldung.linkrest.apis");
        
        // load linkrest runtime
    }
}

In the same constructor, we need to build and register the LinkRestRuntime to the Jersey container. This class is based on first loading the CayenneRuntime:

ServerRuntime cayenneRuntime = ServerRuntime.builder()
  .addConfig("cayenne-linkrest-project.xml")
  .build();
LinkRestRuntime lrRuntime = LinkRestBuilder.build(cayenneRuntime);
super.register(lrRuntime);

Finally, we need to add the class to the web.xml:

<servlet>
    <servlet-name>linkrest</servlet-name>
    <servlet-class>org.glassfish.jersey.servlet.ServletContainer</servlet-class>
        <init-param>
            <param-name>javax.ws.rs.Application</param-name>
            <param-value>com.baeldung.LinkRestApplication</param-value>
        </init-param>
    <load-on-startup>1</load-on-startup>
</servlet>
<servlet-mapping>
    <servlet-name>linkrest</servlet-name>
    <url-pattern>/*</url-pattern>
</servlet-mapping>

5. REST Resources

Now that we’ve got our model classes, we can start writing REST resources.

The REST endpoints are created using standard JAX-RS annotations, while the response is built using the LinkRest class.

Our example will consist of writing a series of CRUD endpoints that access the /department URL using different HTTP methods.

First, let’s create the DepartmentResource class, which is mapped to /department:

@Path("department")
@Produces(MediaType.APPLICATION_JSON)
public class DepartmentResource {

    @Context
    private Configuration config;
    
    // ...
}

The LinkRest class needs an instance of the JAX-RS Configuration class, which is injected using the Context annotation, also provided by JAX-RS.

Next, let’s continue writing each of the endpoints that access Department objects.

5.1. Creating Entities Using POST

To create an entity, the LinkRest class provides the create() method which returns an UpdateBuilder object:

@POST
public SimpleResponse create(String data) {
    return LinkRest.create(Department.class, config).sync(data);
}

The data parameter can be either a single JSON object representing a Department or an array of objects. This parameter is sent to the UpdateBuilder using the sync() method to create one or more objects and insert the records into the database, after which the method returns a SimpleResponse.

The library defines 3 additional formats for responses:

  • DataResponse<T> – a response that represents a collection of T
  • MetadataResponse<T> – contains metadata information about the type
  • SimpleResponse – an object that contains two success and message attributes

Next, let’s use curl to add a Department record to the database:

curl -i -X POST -H "Content-Type:application/json" 
  -d "{"name":"IT"}" http://localhost:8080/linkrest/department

As a result, the command returns the status 201 Created and a success attribute:

{"success":true}

We can also create multiple objects by sending a JSON array:

curl -i -X POST -H "Content-Type:application/json" 
  -d "[{"name":"HR"},{"name":"Marketing"}]" 
  http://localhost:8080/linkrest/department

5.2. Reading Entities Using GET

The main method for querying objects is the select() method from the LinkRest class. This returns a SelectBuilder object which we can use to chain additional querying or filtering methods.

Let’s create an endpoint in the DepartmentResource class that returns all the Department objects in the database:

@GET
public DataResponse<Department> getAll(@Context UriInfo uriInfo) {
    return LinkRest.select(Department.class, config).uri(uriInfo).get();
}

The uri() call sets the request information for the SelectBuilder, while get() returns a collection of Departments wrapped as a DataResponse<Department> object.

Let’s take a look at the departments we added before using this endpoint:

curl -i -X GET http://localhost:8080/linkrest/department

The response takes the form of a JSON object with a data array and a total property:

{"data":[
  {"id":200,"name":"IT"},
  {"id":201,"name":"Marketing"},
  {"id":202,"name":"HR"}
], 
"total":3}

Alternatively, to retrieve a collection of objects, we can also get back a single object by using the getOne() instead of get().

Let’s add an endpoint mapped to /department/{departmentId} that returns an object with a given id. For this purpose, we’ll filter the records using the byId() method:

@GET
@Path("{id}")
public DataResponse<Department> getOne(@PathParam("id") int id, 
  @Context UriInfo uriInfo) {
    return LinkRest.select(Department.class, config)
      .byId(id).uri(uriInfo).getOne();
}

Then, we can send a GET request to this URL:

curl -i -X GET http://localhost:8080/linkrest/department/200

The result is a data array with one element:

{"data":[{"id":200,"name":"IT"}],"total":1}

5.3. Updating Entities using PUT

To update records, we can use the update() or createOrUpdate() method. The latter will update records if they exist, or create them if they do not:

@PUT
public SimpleResponse createOrUpdate(String data) {
    return LinkRest.createOrUpdate(Department.class, config).sync(data);
}

Similarly to the previous sections, the data argument can be a single object or an array of objects.

Let’s update one of the previously added departments:

curl -i -X PUT -H "Content-Type:application/json" 
  -d "{"id":202,"name":"Human Resources"}" 
  http://localhost:8080/linkrest/department

This returns a JSON object with a success or error message. Afterwards, we can verify if the name of the department with ID 202 was changed:

curl -i -X GET http://localhost:8080/linkrest/department/202

Sure enough, this command returns the object with the new name:

{"data":[
  {"id":202,"name":"Human Resources"}
],
"total":1}

5.4. Removing Entities Using DELETE

And, to remove an object, we can call the delete() method which creates a DeleteBuilder, then specify the primary key of the object we want to delete by using the id() method:

@DELETE
@Path("{id}")
public SimpleResponse delete(@PathParam("id") int id) {
    return LinkRest.delete(Department.class, config).id(id).delete();
}

Then we can call this endpoint using curl:

curl -i -X DELETE http://localhost:8080/linkrest/department/202

5.5. Working with Relationships between Entities

LinkRest also contains methods that make working with relationships between objects easier.

Since Department has a one-to-many relationship to Employee, let’s add a /department/{departmentId}/employees endpoint that accesses an EmployeeSubResource class:

@Path("{id}/employees")
public EmployeeSubResource getEmployees(
  @PathParam("id") int id, @Context UriInfo uriInfo) {
    return new EmployeeSubResource(id);
}

The EmployeeSubResource class corresponds to a department so it’ll have a constructor that sets a department id, as well as the Configuration instance:

@Produces(MediaType.APPLICATION_JSON)
public class EmployeeSubResource {
    private Configuration config;

    private int departmentId;

    public EmployeeSubResource(int departmentId, Configuration configuration) {
        this.departmentId = departmentId;
        this.config = config;
    }

    public EmployeeSubResource() {
    }
}

Do note that a default constructor is necessary for the object to be serialized as a JSON object.

Next, let’s define an endpoint that retrieves all the employees from a department:

@GET
public DataResponse<Employee> getAll(@Context UriInfo uriInfo) {
    return LinkRest.select(Employee.class, config)
      .toManyParent(Department.class, departmentId, Department.EMPLOYEES)
      .uri(uriInfo).get();
}

In this example, we’ve used the toManyParent() method of the SelectBuilder to query only the objects with a given parent.

The endpoints for the POST, PUT, DELETE methods can be created in a similar manner.

To add employees to a department, we can call the departments/{departmentId}/employees endpoint with POST method:

curl -i -X POST -H "Content-Type:application/json" 
  -d "{"name":"John"}" http://localhost:8080/linkrest/department/200/employees

Then, let’s send a GET request to view the employees of the department:

curl -i -X GET "http://localhost:8080/linkrest/department/200/employees

This returns a JSON object with a data array::

{"data":[{"id":200,"name":"John"}],"total":1}

6. Customizing the Response with Request Parameters

LinkRest provides an easy way to customize the response by adding specific parameters to the request. These can be used to filter, sort, paginate or restrict the set of attributes of the result set.

6.1. Filtering

We can filter the results based on the values of attributes by using the cayenneExp parameter. As the name suggests, this follows the format of Cayenne expressions.

Let’s send a request that only returns departments with the name “IT”:

curl -i -X GET http://localhost:8080/linkrest/department?cayenneExp=name='IT'

6.2. Sorting

The parameters to add for sorting a set of results are sort and dir. The first of these specifies the attribute to sort by, and the second the direction of sorting.

Let’s see all the departments sorted by name:

curl -i -X GET "http://localhost:8080/linkrest/department?sort=name&dir=ASC"

6.3. Pagination

The library supports pagination by adding the start and limit parameters:

curl -i -X GET "http://localhost:8080/linkrest/department?start=0&limit=2

6.4. Selecting Attributes

Using the include and exclude parameters, we can control which attributes or relationships are returned in the result.

For example, let’s send a request that only displays the names of the departments:

curl -i -X GET "http://localhost:8080/linkrest/department?include=name

To show the names as well as the employees of a department with only their name we can use the include attribute twice:

curl -i -X GET "http://localhost:8080/linkrest/department?include=name&include=employees.name

7. Conclusion

In the article, we have shown how we can quickly expose a data model through REST endpoints by using the LinkRest framework.

The full source code of the examples can be found over on GitHub.

Introduction to Jukito

$
0
0

1. Overview

Jukito is the combined power of JUnit, Guice, and Mockito – used for simplifying testing of multiple implementations of the same interface.

In this article we’re going to see how authors managed to combine those three libraries to help us reduce a lot of boilerplate code, making our tests flexible and easy.

2. Setting Up

First, we’ll add the following dependency to our project:

<dependency>
    <groupId>org.jukito</groupId>
    <artifactId>jukito</artifactId>
    <version>1.5</version>
    <scope>test</scope>
</dependency>

We can find the latest version at Maven Central.

3. Different Implementations of an Interface

To start understanding the power of Jukito, we’re going to define a simple Calculator interface with an Add method:

public interface Calculator {
    public double add(double a, double b);
}

And we’re going to implement the following interface:

public class SimpleCalculator implements Calculator {

    @Override
    public double add(double a, double b) {
        return a + b;
    }
}

We also need another implementation:

public class ScientificCalculator extends SimpleCalculator {
}

Now, let’s use Jukito to test both our implementations:

@RunWith(JukitoRunner.class)
public class CalculatorTest {

    public static class Module extends JukitoModule {

        @Override
        protected void configureTest() {
            bindMany(Calculator.class, SimpleCalculator.class, 
              ScientificCalculator.class);
        }
    }

    @Test
    public void givenTwoNumbers_WhenAdd_ThenSumBoth(@All Calculator calc) {
        double result = calc.add(1, 1);
 
        assertEquals(2, result, .1);
    }
}

In this example, we can see a JukitoModule, that wires in all specified implementations.

The @All annotation takes all bindings of the same interface made by the JukitoModule and runs the test with all the different implementations injected at runtime.

If we run tests, we can see that indeed two tests are run instead of one:

Tests run: 2, Failures: 0, Errors: 0, Skipped: 0

4. The Cartesian Product

Let’s now add a simple nested class for different combinations of tests for our Add method:

public static class AdditionTest {
    int a;
    int b;
    int expected;

    // standard constructors/getters
}

This will expand the number of tests we can run, but first, we need to add additional bindings in our configureTest method:

bindManyInstances(AdditionTest.class, 
  new AdditionTest(1, 1, 2), 
  new AdditionTest(10, 10, 20), 
  new AdditionTest(18, 24, 42));

And finally we add another test to our suite:

@Test
public void givenTwoNumbers_WhenAdd_ThenSumBoth(
  @All Calculator calc, 
  @All AdditionTest addTest) {
 
    double result = calc.add(addTest.a, addTest.b);
 
    assertEquals(addTest.expected, result, .1);
}

Now the @All annotation is going to produce the Cartesian product of the different combinations between the different implementations of the Calculator interface and the AdditionTest instances.

We can have a look at the increased number of tests it now produces:

Tests run: 8, Failures: 0, Errors: 0, Skipped: 0

We need to remember that the number of test executions increases drastically for Cartesian products.

The execution time of all tests will grow linear with the number of executions. i:e.: a test method with three parameters with an @All annotation and four bindings per parameter will be executed 4 x 4 x 4 = 64 times.

Having five bindings for the same test method will lead to 5 x 5 x 5 = 125 executions.

5. Grouping by Names

The final feature we’ll discuss is the grouping by name:

bindManyNamedInstances(Integer.class, "even", 2, 4, 6);
bindManyNamedInstances(Integer.class, "odd", 1, 3, 5);

Here, we added some named instances of the integer class to our configureTest method, to showcase what can be done with these groups.

Now let’s add some more tests:

@Test
public void givenEvenNumbers_whenPrint_thenOutput(@All("even") Integer i) {
    System.out.println("even " + i);
}

@Test
public void givenOddNumbers_whenPrint_thenOutput(@All("odd") Integer i) {
    System.out.println("odd " + i);
}

The above example will print the six strings “even 2”, “even 4”, “even 6”, “odd 1”, “odd 3”, “odd 5”.

Keep in mind that the order of these is not guaranteed at runtime.

6. Conclusion

In this quick tutorial, we took a look at how Jukito allows the use of a whole test suite, by providing just enough combinations of test cases.

The complete example can be found over on GitHub.

Proxy, Decorator, Adapter and Bridge Patterns

$
0
0

1. Introduction

In this article, we’re going to focus on Structural Design Patterns in Java – and discuss what these are and some fundamental differences between some of them.

2. Structural Design Patterns

According to the Gang Of Four (GoF), design patterns can be classified into three types:

  1. Creational
  2. Structural
  3. Behavioural

Simply put, Structural Patterns deal with the composition of classes and objects. They provide different ways of using object composition and inheritance to create some abstraction.

3. Proxy Pattern

With this pattern, we create an intermediary that acts as an interface to another resource, e.g., a file, a connection. This secondary access provides a surrogate for the real component and protects it from the underlying complexity.

3.1. Proxy Pattern Example

Consider a heavy Java object (like a JDBC connection or a SessionFactory) that requires some initial configuration.

We only want such objects to be initialized on demand, and once they are, we’d want to reuse them for all calls:

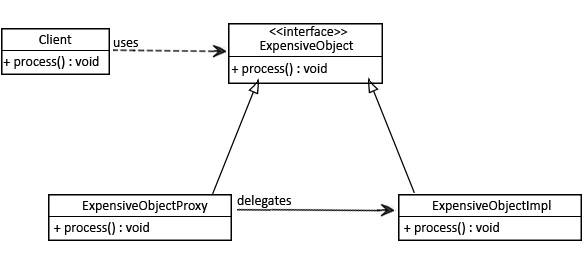
Let’s now create a simple interface and the configuration for this object:

public interface ExpensiveObject {
    void process();
}

And the implementation of this interface with a large initial configuration:

public class ExpensiveObjectImpl implements ExpensiveObject {

    public ExpensiveObjectImpl() {
        heavyInitialConfiguration();
    }
    
    @Override
    public void process() {
        LOG.info("processing complete.");
    }
    
    private void heavyInitialConfiguration() {
        LOG.info("Loading initial configuration...");
    }
    
}

We’ll now utilize the Proxy pattern and initialize our object on demand:

public class ExpensiveObjectProxy implements ExpensiveObject {
    private static ExpensiveObject object;

    @Override
    public void process() {
        if (object == null) {
            object = new ExpensiveObjectImpl();
        }
        object.process();
    }
}

Whenever our client calls the process() method, they’ll just get to see the processing and the initial configuration will always remain hidden:

public static void main(String[] args) {
    ExpensiveObject object = new ExpensiveObjectProxy();
    object.process();
    object.process();
}

Note that we’re calling the process() method twice. Behind the scenes, the settings part will occur only once – when the object is first initialized.

For every other subsequent call, this pattern will skip the initial configuration, and only processing will occur:

Loading initial configuration...
processing complete.

3.2. When to Use Proxy

Understanding how to use a pattern is important.

Understanding when to use it is critical.

Let’s talk about when to use the Proxy pattern:

  • When we want a simplified version of a complex or heavy object. In this case, we may represent it with a skeleton object which loads the original object on demand, also called as lazy initialization. This is known as the Virtual Proxy
  • When the original object is present in different address space, and we want to represent it locally. We can create a proxy which does all the necessary boilerplate stuff like creating and maintaining the connection, encoding, decoding, etc., while the client accesses it as it was present in their local address space. This is called the Remote Proxy
  • When we want to add a layer of security to the original underlying object to provide controlled access based on access rights of the client. This is called Protection Proxy

3.3. Key Points of Differentiation

  • The proxy provides the same interface as the object it’s holding the reference to, and it doesn’t modify the data in any manner; it’s in contrast to Adapter and Decorator patterns which alter and decorate the functionalities of pre-existing instances respectively
  • The Proxy usually has the information about the real subject at the compile time itself whereas Decorator and Adapter get injected at runtime, knowing only the actual object’s interface

4. Decorator Pattern

A Decorator pattern can be used to attach additional responsibilities to an object either statically or dynamically. A Decorator provides an enhanced interface to the original object.

In the implementation of this pattern, we prefer composition over an inheritance – so that we can reduce the overhead of subclassing again and again for each decorating element. The recursion involved with this design can be used to decorate our object as many times as we require.

4.1. Decorator Pattern Example

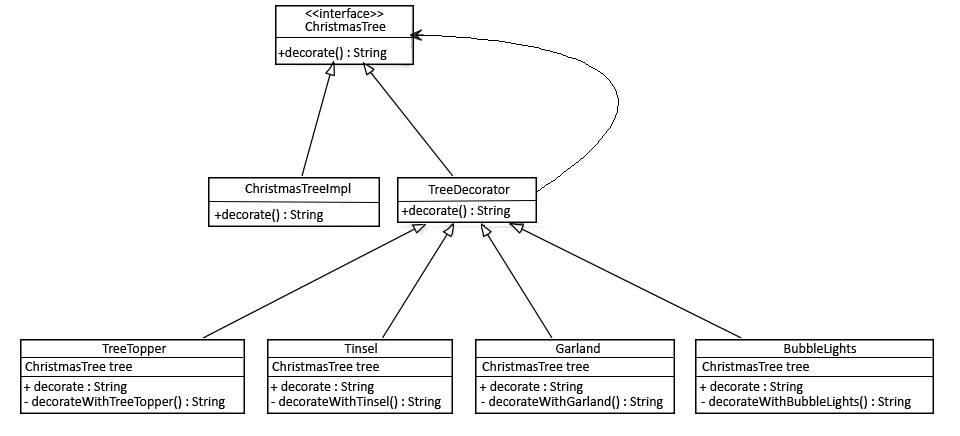
Suppose we have a Christmas tree object and we want to decorate it. The decoration does not change the object itself; it’s just that in addition to the Christmas tree, we’re adding some decoration items like garland, tinsel, tree-topper, bubble lights, etc.:

For this scenario, we’ll follow the original Gang of Four design and naming conventions. First, we’ll create a ChristmasTree interface and its implementation:

public interface ChristmasTree {
    String decorate();
}

The implementation of this interface will look like:

public class ChristmasTreeImpl implements ChristmasTree {

    @Override
    public String decorate() {
        return "Christmas tree";
    }
}

We’ll now create an abstract TreeDecorator class for this tree. This decorator will implement the ChristmasTree interface as well as hold the same object. The implemented method from the same interface will simply call the decorate() method from our interface:

public abstract class TreeDecorator implements ChristmasTree {
    private ChristmasTree tree;
    
    // standard constructors
    @Override
    public String decorate() {
        return tree.decorate();
    }
}

We’ll now create some decorating element. These decorators will extend our abstract TreeDecorator class and will modify its decorate() method according to our requirement:

public class BubbleLights extends TreeDecorator {

    public BubbleLights(ChristmasTree tree) {
        super(tree);
    }
    
    public String decorate() {
        return super.decorate() + decorateWithBubbleLights();
    }
    
    private String decorateWithBubbleLights() {
        return " with Bubble Lights";
    }
}

For this case, the following is true:

@Test
public void whenDecoratorsInjectedAtRuntime_thenConfigSuccess() {
    ChristmasTree tree1 = new Garland(new ChristmasTreeImpl());
    assertEquals(tree1.decorate(), 
      "Christmas tree with Garland");
     
    ChristmasTree tree2 = new BubbleLights(
      new Garland(new Garland(new ChristmasTreeImpl())));
    assertEquals(tree2.decorate(), 
      "Christmas tree with Garland with Garland with Bubble Lights");
}

Note that in the first tree1 object, we’re only decorating it with only one Garland, while the other tree2 object we’re decorating with one BubbleLights and two Garlands. This pattern gives us this flexibility to add as many decorators as we want at runtime.

4.2. When to Use Decorator Pattern

  • When we wish to add, enhance or even remove the behavior or state of objects
  • When we just want to modify the functionality of a single object of class and leave others unchanged

4.3. Key Points of Differentiation

  • Although Proxy and Decorator patterns have similar structures, they differ in intention; while Proxy’s prime purpose is to facilitate ease of use or controlled access, a Decorator attaches additional responsibilities
  • Both Proxy and Adapter patterns hold reference to the original object
  • All the decorators from this pattern can be used recursively, infinite number of times, which is neither possible with other models

5. Adapter Pattern

An Adapter pattern acts as a connector between two incompatible interfaces that otherwise cannot be connected directly. An Adapter wraps an existing class with a new interface so that it becomes compatible with client’s interface.

The main motive behind using this pattern is to convert an existing interface into another interface that client expects. It’s usually implemented once the application is designed.

5.1. Adapter Pattern Example

Consider a scenario in which there is an app that’s developed in the US which returns the top speed of luxury cars in miles per hour (MPH). Now we need to use the same app for our client in the UK that wants the same results but in kilometers per hour (km/h).

To deal with this problem, we’ll create an adapter which will convert the values and give us the desired results:

First, we’ll create the original interface Movable which is supposed to return the speed of some luxury cars in miles per hour:

public interface Movable {
    // returns speed in MPH 
    double getSpeed();
}

We’ll now create one concrete implementation of this interface:

public class BugattiVeyron implements Movable {
 
    @Override
    public double getSpeed() {
        return 268;
    }
}

Now we’ll create an adapter interface MovableAdapter that will be based on the same Movable class. It may be slightly modified to yield different results in different scenarios:

public interface MovableAdapter {
    // returns speed in KM/H 
    double getSpeed();
}

The implementation of this interface will consist of private method convertMPHtoKMPH() that will be used for the conversion:

public class MovableAdapterImpl implements MovableAdapter {
    private Movable luxuryCars;
    
    // standard constructors

    @Override
    public double getSpeed() {
        return convertMPHtoKMPH(luxuryCars.getSpeed());
    }
    
    private double convertMPHtoKMPH(double mph) {
        return mph * 1.60934;
    }
}

Now we’ll only use the methods defined in our Adapter, and we’ll get the converted speeds. In this case, the following assertion will be true:

@Test
public void whenConvertingMPHToKMPH_thenSuccessfullyConverted() {
    Movable bugattiVeyron = new BugattiVeyron();
    MovableAdapter bugattiVeyronAdapter = new MovableAdapterImpl(bugattiVeyron);
 
    assertEquals(bugattiVeyronAdapter.getSpeed(), 431.30312, 0.00001);
}

As we can notice here, our adapter converts 268 mph to 431 km/h for this particular case.

5.2. When to Use Adapter Pattern

  • When an outside component provides captivating functionality that we’d like to reuse, but it’s incompatible with our current application. A suitable Adapter can be developed to make them compatible with each other
  • When our application is not compatible with the interface that our client is expecting
  • When we want to reuse legacy code in our application without making any modification in the original code

5.3. Key Points of Differentiation

  • While proxy provides the same interface, Adapter provides a different interface that’s compatible with its client
  • Adapter pattern is used after the application components are designed so that we can use them without modifying the source code. This is in contrast to Bridge pattern, which is used before the components are designed.

6. Bridge Pattern

The official definition for Bridge design pattern introduced by Gang of Four (GoF) is to decouple an abstraction from its implementation so that the two can vary independently.

This means to create a bridge interface that uses OOP principles to separate out responsibilities into different abstract classes.

6.1. Bridge Pattern Example

For the Bridge pattern, we’ll consider two layers of abstraction; one is the geometric shape (like triangle and square) which is filled with different colors (our second abstraction layer):

First, we’ll define a color interface:

public interface Color {
    void fill();
}

Now we’ll create a concrete class for this interface:

public class Blue implements Color {
    @Override
    public String fill() {
        return "Color is Blue";
    }
}

Let’s now create an abstract Shape class which consists a reference (bridge) to the Color object:

public abstract class Shape {
    protected Color color;
    
    //standard constructors
    
    abstract public String draw();
}

We’ll now create a concrete class of Shape interface which will utilize method from Color interface as well:

public class Square extends Shape {

    public Square(Color color) {
        super(color);
    }

    @Override
    public String draw() {
        return "Square drawn. " + color.fill();
    }
}

For this pattern, the following assertion will be true:

@Test
public void whenBridgePatternInvoked_thenConfigSuccess() {
    //a square with red color
    Shape square = new Square(new Red());
 
    assertEquals(square.draw(), "Square drawn. Color is Red");
}

Here, we’re using Bridge pattern and passing the desired color object. As we can note in the output, the shape gets draws with the desired color:

Square drawn. Color: Red
Triangle drawn. Color: Blue

6.2. When to Use Bridge Design Pattern

  • When we want a parent abstract class to define the set of basic rules, and the concrete classes to add additional rules
  • When we have an abstract class that has a reference to the objects, and it has abstract methods that will be defined in each of the concrete classes

6.3. Key Points of Differentiation

  • A Bridge pattern can only be implemented before the application is designed.
  • Allows an abstraction and implementation to change independently whereas an Adapter pattern makes it possible for incompatible classes to work together

7. Conclusion

In this article, we focused on the Structural Design Pattern and differences between some of its types.

As always, the full implementation of this tutorial can be found over on Github.

Collection Factory Methods for Vavr

$
0
0

1. Overview

Vavr is a powerful library for Java 8+, built on top of Java lambda expressions. Inspired by the Scala language, Vavr adds functional programming constructs to the Java language, such as pattern-matching, control structures, data types, persistent and immutable collections, and more.

In this short article, we’ll show how to use some of the factory methods to create Vavr collections. If you are new to Vavr, you can start with this introductory tutorial which in turn has references to other useful articles.

2. Maven Dependency

To add the Vavr library to your Maven project, edit your pom.xml file to include the following dependency:

<dependency>
    <groupId>io.vavr</groupId>
    <artifactId>vavr</artifactId>
    <version>0.9.1</version>
</dependency>

You can find the latest version of the library on the Maven Central repository.

3. Static Factory Methods

Using the static import:

static import io.vavr.API.*;

we can create a list using the constructor List(…):

List numbers = List(1,2,3);

instead of using the static factory method of(…):

List numbers = List.of(1,2,3);

or also:

Tuple t = Tuple('a', 3);

instead of:

Tuple t = Tuple.of('a', 3);

This syntactic sugar is similar to the constructs in Scala/Kotlin. From now on, we’ll use these abbreviations in the article.

4. Creation of Option Elements

The Option elements are not collections but they can be very useful constructs of the Vavr library. It’s a type that allows us to hold either an object or a None element (the equivalent of a null object):

Option<Integer> none = None();
Option<Integer> some = Some(1);

5. Vavr Tuples

Similarly, Java doesn’t come with tuples, like ordered pairs, triples, etc. In Vavr we can define a Tuple that holds up to eight objects of different types. Here’s an example that holds a Character, a String and an Integer object:

Tuple3<Character, String, Integer> tuple
  = Tuple('a', "chain", 2);

6. The Try Type

The Try type can be used to model computations that may or may not raise an exception:

Try<Integer> integer
  = Success(55);
Try<Integer> failure
  = Failure(new Exception("Exception X encapsulated here"));

In this case, if we evaluate integer.get() we’ll obtain the integer object 55. If we evaluate failure.get(), an exception will be thrown.

7. Vavr Collections

We can create collections in many different ways. For Lists, we can use List.of(), List.fill(), List.tabulate(), etc. As mentioned before, the default factory method is List.of() that can be abbreviated using the Scala style constructor:

List<Integer> list = List(1, 2, 3, 4, 5);

We can also create an empty list (called a Nil object in Vavr):

List()

In an analogous way, we can create other kinds of Collections:

Array arr = Array(1, 2, 3, 4, 5);
Stream stm = Stream(1, 2, 3, 4, 5);
Vector vec = Vector(1, 2, 3, 4, 5);

8. Conclusion

We’ve seen the most common constructors for the Vavr types and collections. The syntactic sugar provided by the static imports mentioned in section 3 makes it easy to create all the types in the library.

You can find all the code samples used in this article in the GitHub project.


Granted Authority Versus Role in Spring Security

$
0
0

1. Overview

In this quick article, we’ll explain the subtle but significant difference between a Role and a GrantedAuthority in Spring Security. For more detailed information on roles and authorities, see the article here.

2. GrantedAuthority

In Spring Security, we can think of each GrantedAuthority as an individual privilege. Examples could include READ_AUTHORITY, WRITE_PRIVILEGE, or even CAN_EXECUTE_AS_ROOT. The important thing to understand is that the name is arbitrary.

When using a GrantedAuthority directly, such as through the use of an expression like hasAuthority(‘READ_AUTHORITY’), we are restricting access in a fine-grained manner.

As you can probably gather, we can refer to the concept of authority by using privilege as well.

3. Role as Authority

Similarly, in Spring Security, we can think of each Role as a coarse-grained GrantedAuthority that is represented as a String and prefixed with “ROLE. When using a Role directly, such as through an expression like hasRole(“ADMIN”), we are restricting access in a coarse-grained manner.

It is worth noting that the default “ROLE” prefix is configurable, but explaining how to do that is beyond the scope of this article.

The core difference between these two is the semantics we attach to how we use the feature. For the framework, the difference is minimal – and it basically deals with these in exactly the same way.

4. Role as Container

Now that we’ve seen how the framework uses the role concept, let’s also quickly discuss an alternative – and that is using roles as containers of authorities/privileges.

This is a higher level approach to roles – making them a more business-facing concept rather than an implementation-centric one.

The Spring Security framework doesn’t give any guidance in terms of how we should use the concept, so the choice is entirely implementation specific.

5. Spring Security Configuration

We can demonstrate a fine-grained authorization requirement by restricting access to /protectedbyauthority to users with READ_AUTHORITY.

We can demonstrate a coarse-grained authorization requirement by restricting access to /protectedbyrole to users with ROLE_USER.

Let’s configure such a scenario in our security configuration:

@Override
protected void configure(HttpSecurity http) throws Exception {
    // ...
    .antMatchers("/protectedbyrole").hasRole("USER")
    .antMatchers("/protectedbyauthority").hasAuthority("READ_PRIVILEGE")
    // ...
}

6. Simple Data Init

Now that we understand the core concepts better, let’s talk about creating some setup data when the application starts up.

This is, of course, a very simple way of doing that, to hit the ground running with some preliminary test users during development – not the way you should handle data in production.

We’re going to be listening for the context refresh event:

@Override
@Transactional
public void onApplicationEvent(ContextRefreshedEvent event) {
    MyPrivilege readPrivilege
      = createPrivilegeIfNotFound("READ_PRIVILEGE");
    MyPrivilege writePrivilege
      = createPrivilegeIfNotFound("WRITE_PRIVILEGE"); 
}

The actual implementation here doesn’t really matter – and generally, depends on the persistence solution you’re using. The main point is – we’re persisting the authorities we’re using in the code.

7. UserDetailsService

Our implementation of UserDetailsService is where the authority mapping takes place. Once the user has authenticated, our getAuthorities() method populates and returns a UserDetails object:

private Collection<? extends GrantedAuthority> getAuthorities(
  Collection<Role> roles) {
    List<GrantedAuthority> authorities
      = new ArrayList<>();
    for (Role role: roles) {
        authorities.add(new SimpleGrantedAuthority(role.getName()));
        role.getPrivileges().stream()
         .map(p -> new SimpleGrantedAuthority(p.getName()))
         .forEach(authorities::add);
    }
    
    return authorities;
}

8. Running and Testing the Example

We can execute the example RolesAuthoritiesApplication Java application, found in the GitHub project.

To see the role-based authorization in action, we need to:

  • Access http://localhost:8082/protectedbyrole
  • Authenticate as user@test.com (password is “user”)
  • Note successful authorization
  • Access http://localhost:8082/protectedbyauthority
  • Note unsuccessful authorization

To see authority-based authorization in action, we need to log out of the application and then:

  • Access http://localhost:8082/protectedbyauthority
  • Authenticate as admin@test.com / admin
  • Note successful authorization
  • Access http://localhsot:8082/protectedbyrole
  • Note unsuccessful authorization

9. Conclusion

In this quick tutorial, we looked at the subtle but significant difference between a Role and a GrantedAuthority in Spring Security.

Introduction to rxjava-jdbc

$
0
0

1. Overview

Simply put, rxjava-jdbc is an API for interacting with relational databases which allows fluent-style method calls. In this quick tutorial, we’re going to have a look at the library and how we can make use of some of its common features.

If you want to discover RxJava’s basics, check out this article.

2. Maven Dependency

Let’s start with the Maven dependency we need to add to our pom.xml:

<dependency>
    <groupId>com.github.davidmoten</groupId>
    <artifactId>rxjava-jdbc</artifactId>
    <version>0.7.11</version>
</dependency>

We can find the latest version of the API on Maven Central.

3. Main Components

The Database class is the main entry point for running all common types of database interactions. To create a Database object, we can pass an instance of an implementation of the ConnectionProvider interface to the from() static method:

public static ConnectionProvider connectionProvider
  = new ConnectionProviderFromUrl(
  DB_CONNECTION, DB_USER, DB_PASSWORD);
Database db = Database.from(connectionProvider);

ConnectionProvider has several implementations worth looking at – such as ConnectionProviderFromContext, ConnectionProviderFromDataSource, ConnectionProviderFromUrl and ConnectionProviderPooled.

In order to do basic operations, we can use the following APIs of Database:

  • select() – used for SQL select queries
  • update() – used for DDL statements such as create and drop, as well as insert, update and delete

4. Starting Up

In the next quick example, we’re going to show how we can do all the basic database operations:

public class BasicQueryTypesTest {
    
    Observable<Integer> create,
      insert1, 
      insert2, 
      insert3, 
      update, 
      delete = null;
    
    @Test
    public void whenCreateTableAndInsertRecords_thenCorrect() {
        create = db.update(
          "CREATE TABLE IF NOT EXISTS EMPLOYEE("
          + "id int primary key, name varchar(255))")
          .count();
        insert1 = db.update(
          "INSERT INTO EMPLOYEE(id, name) VALUES(1, 'John')")
          .dependsOn(create)
          .count();
        update = db.update(
          "UPDATE EMPLOYEE SET name = 'Alan' WHERE id = 1")
          .dependsOn(create)
          .count();
        insert2 = db.update(
          "INSERT INTO EMPLOYEE(id, name) VALUES(2, 'Sarah')")
          .dependsOn(create)
          .count();
        insert3 = db.update(
          "INSERT INTO EMPLOYEE(id, name) VALUES(3, 'Mike')")
          .dependsOn(create)
          .count();
        delete = db.update(
          "DELETE FROM EMPLOYEE WHERE id = 2")
          .dependsOn(create)
          .count();
        List<String> names = db.select(
          "select name from EMPLOYEE where id < ?")
          .parameter(3)
          .dependsOn(create)
          .dependsOn(insert1)
          .dependsOn(insert2)
          .dependsOn(insert3)
          .dependsOn(update)
          .dependsOn(delete)
          .getAs(String.class)
          .toList()
          .toBlocking()
          .single();
        
        assertEquals(Arrays.asList("Alan"), names);
    }
}

A quick note here – we’re calling dependsOn() to determine the order of running of queries.

Otherwise, the code will fail or produce unpredictable results, unless we specify in what sequence we want the queries to be executed.

5. Automap

The automap feature allows us to map selected database records to objects.

Let’s have a look at the two ways of automapping database records.

5.1. Automapping using an Interface

We can automap() database records to objects using annotated interfaces. To do this, we can create an annotated interface:

public interface Employee {

    @Column("id")
    int id();

    @Column("name")
    String name();
}

Then, we can run our test:

@Test
public void whenSelectFromTableAndAutomap_thenCorrect() {
    List<Employee> employees = db.select("select id, name from EMPLOYEE")
      .dependsOn(create)
      .dependsOn(insert1)
      .dependsOn(insert2)
      .autoMap(Employee.class)
      .toList()
      .toBlocking()
      .single();
    
    assertThat(
      employees.get(0).id()).isEqualTo(1);
    assertThat(
      employees.get(0).name()).isEqualTo("Alan");
    assertThat(
      employees.get(1).id()).isEqualTo(2);
    assertThat(
      employees.get(1).name()).isEqualTo("Sarah");
}

5.2. Automapping using a Class

We can also automap database records to objects using concrete classes. Let’s see what the class can look like:

public class Manager {

    private int id;
    private String name;

    // standard constructors, getters and setters
}

Now, we can run our test:

@Test
public void whenSelectManagersAndAutomap_thenCorrect() {
    List<Manager> managers = db.select("select id, name from MANAGER")
      .dependsOn(create)
      .dependsOn(insert1)
      .dependsOn(insert2)
      .autoMap(Manager.class)
      .toList()
      .toBlocking()
      .single();
    
    assertThat(
      managers.get(0).getId()).isEqualTo(1);
    assertThat(
     managers.get(0).getName()).isEqualTo("Alan");
    assertThat(
      managers.get(1).getId()).isEqualTo(2);
    assertThat(
      managers.get(1).getName()).isEqualTo("Sarah");
}

A few notes here:

  • create, insert1 and insert2 are references to Observables returned by creating the Manager table and inserting records into it
  • The number of the selected columns in our query must match the number of parameters in the Manager class constructor
  • The columns must be of types that can be automatically mapped to the types in the constructor

For more information on automapping, visit the rxjava-jdbc repository on GitHub

6. Working with Large Objects

The API supports working with Large Objects like CLOBs and BLOBS. In the next subsections, we’re going to see how we can make use of this functionality.

6.1. CLOBs

Let’s see how we can insert and select a CLOB:

@Before
public void setup() throws IOException {
    create = db.update(
      "CREATE TABLE IF NOT EXISTS " + 
      "SERVERLOG (id int primary key, document CLOB)")
        .count();
    
    InputStream actualInputStream
      = new FileInputStream("src/test/resources/actual_clob");
    actualDocument = getStringFromInputStream(actualInputStream);

    InputStream expectedInputStream = new FileInputStream(
      "src/test/resources/expected_clob");
 
    expectedDocument = getStringFromInputStream(expectedInputStream);
    insert = db.update(
      "insert into SERVERLOG(id,document) values(?,?)")
        .parameter(1)
        .parameter(Database.toSentinelIfNull(actualDocument))
      .dependsOn(create)
      .count();
}

@Test
public void whenSelectCLOB_thenCorrect() throws IOException {
    db.select("select document from SERVERLOG where id = 1")
      .dependsOn(create)
      .dependsOn(insert)
      .getAs(String.class)
      .toList()
      .toBlocking()
      .single();
    
    assertEquals(expectedDocument, actualDocument);
}

Note that getStringFromInputStream() is a method that converts the content of an InputStream to a String.

6.2. BLOBs

We can use the API to work with BLOBs in a very similar way. The only difference is, instead of passing a String to the toSentinelIfNull() method, we have to pass a byte array.

Here’s how we can do that:

@Before
public void setup() throws IOException {
    create = db.update(
      "CREATE TABLE IF NOT EXISTS " 
      + "SERVERLOG (id int primary key, document BLOB)")
        .count();
    
    InputStream actualInputStream
      = new FileInputStream("src/test/resources/actual_clob");
    actualDocument = getStringFromInputStream(actualInputStream);
    byte[] bytes = this.actualDocument.getBytes(StandardCharsets.UTF_8);
    
    InputStream expectedInputStream = new FileInputStream(
      "src/test/resources/expected_clob");
    expectedDocument = getStringFromInputStream(expectedInputStream);
    insert = db.update(
      "insert into SERVERLOG(id,document) values(?,?)")
      .parameter(1)
      .parameter(Database.toSentinelIfNull(bytes))
      .dependsOn(create)
      .count();
}

Then, we can reuse the same test in the previous example.

7. Transactions

Next, let’s have a look at the support for transactions.

Transaction management allows us to handle transactions which are used to group multiple database operations in a single transaction so that they can all be committed – permanently saved to the database, or rolled back altogether.

Let’s see a quick example:

@Test
public void whenCommitTransaction_thenRecordUpdated() {
    Observable<Boolean> begin = db.beginTransaction();
    Observable<Integer> createStatement = db.update(
      "CREATE TABLE IF NOT EXISTS EMPLOYEE(id int primary key, name varchar(255))")
      .dependsOn(begin)
      .count();
    Observable<Integer> insertStatement = db.update(
      "INSERT INTO EMPLOYEE(id, name) VALUES(1, 'John')")
      .dependsOn(createStatement)
      .count();
    Observable<Integer> updateStatement = db.update(
      "UPDATE EMPLOYEE SET name = 'Tom' WHERE id = 1")
      .dependsOn(insertStatement)
      .count();
    Observable<Boolean> commit = db.commit(updateStatement);
    String name = db.select("select name from EMPLOYEE WHERE id = 1")
      .dependsOn(commit)
      .getAs(String.class)
      .toBlocking()
      .single();
    
    assertEquals("Tom", name);
}

In order to start a transaction, we call the method beginTransaction(). After this method is called, every database operation is run in the same transaction until any of the methods commit() or rollback() is called.

We can use the rollback() method while catching an Exception to roll back the whole transaction in case the code fails for any reason. We can do so for all Exceptions or particular expected Exceptions.

8. Returning Generated Keys

If we set the auto_increment field in the table we’re working on, we might need to retrieve the generated value. We can do this by calling the returnGeneratedKeys() method.

Let’s see a quick example:

@Test
public void whenInsertAndReturnGeneratedKey_thenCorrect() {
    Integer key = db.update("INSERT INTO EMPLOYEE(name) VALUES('John')")
      .dependsOn(createStatement)
      .returnGeneratedKeys()
      .getAs(Integer.class)
      .count()
      .toBlocking()
      .single();
 
    assertThat(key).isEqualTo(1);
}

9. Conclusion

In this tutorial, we’ve seen how to make use of rxjavajdbc’s fluent-style methods. We’ve also walked through some of the features it provides such as automapping, working with Large Objects and transactions.

As always, the full version of the code is available over on GitHub.

RxJava Tutorial

$
0
0

RxJava is a Reactive Extensions implementation for Java environment.

The library utilizes a combination of functional and reactive techniques that can represent an elegant approach to event-driven programming – with values that change over time and where the consumer reacts to the data as it comes in.

>> Introduction to RxJava

Starting at the top – this is the high-level overview of the whole library and the Functional-Reactive concept.

>> RxJava and Backpressure

We start by looking at the RxJava’s signature functionality – throttling.

>> Implementing Custom Operators

Here, we discover how to manipulate Observables by using custom operators.

>> RxJava Error Handling

Here, we learn what is the idiomatic way of handling exceptions.

>> Testing RxJava

Finally, we see how to test RxJava pipelines.

>> RxJava with Retrofit

Additionally, we have a look at RxJava’s integration with Retrofit.

>> Vertx RxJava

… and with Vertx.

Kotlin Tutorial

$
0
0

Kotlin is a new statically-typed language in the JVM world with a developer-friendly syntax and strong Java interoperability.

It’s now also a first-class language on the Android platform.

>> Introduction to Kotlin

Starting at the top – this is the high-level overview of the language, highlighting its most interesting features.

>> Null-Safety in Kotlin

Kotlin features a new modern approach to compile-time null-safety. Here, we explore it in depth.

>> Visibility Modifiers in Kotlin

Kotlin has his own set of visibility modifiers – some are borrowed directly from Java, some are not.

>> Kotlin’s Collections API

In this one, we introduce the Kotlin’s Collections API and go through its features.

>> Generics in Kotlin

Generics are slightly more flexible than in Java. We see how to use the out and in keywords properly. We look at type projections and defining a generic method that uses generic constraints.

>> Kotlin’s when {…} Block

Even though it’s not possible to do pattern matching using when in Kotlin, as is the case with the corresponding structures in Scala and other JVM languages, the when block is versatile enough to make us totally forget about these features.

>> Kotlin’s Data Classes

There’s also an easy way for creating plain data holders without writing any excessive boilerplate.

>> Kotlin’s Sealed Classes

Sealed classes can be an invaluable tool for your API design toolbox. Allowing a well-known, structured class hierarchy that can only ever be one of an expected set of classes can help remove a whole set of potential error conditions from your code, whilst still making things easy to read and maintain.

>> Kotlin’s Collections vs Stream API

Collections API has methods similar to those found in the Java Stream API but they do not always behave the same.

>> Destructuring Declarations in Kotlin

Here, we can see how to use destructuring declarations in Kotlin.

>> Kotlin’s Equality Operators

The approach to equality operators is slightly different than in Java.

>> Kotlin-Java Interoperability

If we want to mix Kotlin and Java code, we can do that easily.

>> @Tailrec Annotation

We can also easily optimize tail-recursive methods.

>> Kotlin’s Delegated Properties

Class properties do not always need to be backed back a field in a particular class, we can also delegate them.

>> Coroutines

Coroutines are a new, lightweight approach to concurrency.

>> Lazy Initialization in Kotlin

We delve into Kotlin lazy keyword that is used for lazy initialization of properties. In the end, we see how to defer assigning variables using the lateinit keyword.

>> Kotlin and Mockito

Here, we have a look at how to set up our project to use Mockito and Kotlin together, and how we can leverage this combination to create mocks and write effective unit tests.

>> List to Map

And finally, we explore different ways of converting a List to a Map in Kotlin.

Guide to Kotlin @JvmField

$
0
0

1. Overview

In this tutorial, we’re going to explore the @JvmField annotation out of Kotlin.

Kotlin has its approach to classes and properties, which differs from the approach used in Java. The @JvmField annotation makes it possible to achieve compatibility between the two languages.

2. Field Declaration

By default, Kotlin classes do not expose fields, but properties instead.

The language automatically provides backing fields to properties which will store its value in the form of a field:

class CompanionSample {
    var quantity = 0
    set(value) {
        if(value >= 0) field = value
    }
}

This is a simple example, but by using Kotlin’s Decompiler in IntelliJ (Tools > Kotlin > Show Kotlin Decompiler) it will show us how it’d look in Java:

public class JvmSample {
   private int quantity;

   // custom getter

   public final void setQuantity(int value) {
      if (value >= 0) {
         this.quantity = value;
      }
   }
}

However, this doesn’t mean we can’t have fields at all, there are certain scenarios, where it’s necessary. In this case, we can leverage the @JvmField annotation, which instructs the compiler not to generate getters and setters for the property and expose it as a simple Java field.

Let’s have a look at the Kotlin example:

class KotlinJvmSample {
    @JvmField
    val example = "Hello!"
}

And its Java decompiled counterpart – which, indeed, proves that the field was exposed in the standard Java way:

public class KotlinJvmSample {
    @NotNull
    public final String example = "Hello!";
}

3. Static Variables

Another instance where the annotation comes in handy is whenever a property declared in a name object or companion object has a static backing field:

public class Sample {
    public static final int MAX_LIMIT = 20;
}
class Sample {
    companion object {
        @JvmField val MAX_LIMIT = 20
    }
}

4. Usage Exceptions

So far, we’ve discussed situations where we can use the annotation, but there are some restrictions.

Here are some situations where we cannot use the annotation:

  • Private properties
  • Properties with open, override, const modifiers
  • Delegated properties

5. Conclusion

In this quick article, we explored the different ways of using the Kotlin’s @JvmField annotation.

The implementation of all these examples and code snippets can be found in the GitHub project – this is a Maven project, so it should be easy to import and run as it is.

Querying Couchbase with N1QL

$
0
0

1. Overview

In this article, we’ll be looking at querying a Couchbase Server with N1QL. In a simplified way, this is SQL for NoSQL databases – with the goal of making the transition from SQL/Relational databases to a NoSQL database system easier.

There are a couple of ways of interacting with the Couchbase Server; here, we’ll be using the Java SDK to interact with the database – as it is typical for Java applications.

2. Maven Dependencies

We assume that a local Couchbase Server has been set up already; if that’s not the case, this guide can help you get started.

Let’s now add the dependency for Couchbase Java SDK to pom.xml:

<dependency>
    <groupId>com.couchbase.client</groupId>
    <artifactId>java-client</artifactId>
    <version>2.5.0</version>
</dependency>

The latest version of Couchbase Java SDK can be found on Maven Central.

We’ll also be using Jackson library to map results returned from queries; let’s add its dependency to pom.xml as well:

<dependency>
    <groupId>com.fasterxml.jackson.core</groupId>
    <artifactId>jackson-databind</artifactId>
    <version>2.9.1</version>
</dependency>

The latest version of Jackson library can be found on Maven Central.

3. Connecting to a Couchbase Server

Now, that the project is set up with the right dependencies, let’s connect to Couchbase Server from a Java application.

First, we need to start the Couchbase Server – if it’s not running already.

A guide to starting and stopping a Couchbase Server can be found here.

Let’s connect to a Couchbase Bucket:

Cluster cluster = CouchbaseCluster.create("localhost");
Bucket bucket = cluster.openBucket("test");

What we did was to connect to the Couchbase Cluster and then obtain the Bucket object.

The name of the bucket in the Couchbase cluster is test and can be created using the Couchbase Web Console. When we’re done with all the database operations, we can close the particular bucket we’ve opened.

On the other hand, we can disconnect from the cluster – which will eventually close all the buckets:

bucket.close();
cluster.disconnect();

4. Inserting Documents

Couchbase is a document-oriented database system. Let’s add a new document to the test bucket:

JsonObject personObj = JsonObject.create()
  .put("name", "John")
  .put("email", "john@doe.com")
  .put("interests", JsonArray.from("Java", "Nigerian Jollof"));

String id = UUID.randomUUID().toString();
JsonDocument doc = JsonDocument.create(id, personObj);
bucket.insert(doc);

First, we created a JSON personObj and provided some initial data. Keys can be seen as columns in a relational database system.

From the person object, we created a JSON document using JsonDocument.create(), which we’ll insert into the bucket. Note that we generate a random id using java.util.UUID class.

The inserted document can be seen in the Couchbase Web Console at http://localhost:8091 or by calling the bucket.get() with its id:

System.out.println(bucket.get(id));

5. Basic N1QL SELECT Query

N1QL is a superset of SQL, and its syntax, naturally, looks similar.

For instance, the N1QL for selecting all documents in the test bucket is:

SELECT * FROM test

Let’s execute this query in the application:

bucket.bucketManager().createN1qlPrimaryIndex(true, false);

N1qlQueryResult result
  = bucket.query(N1qlQuery.simple("SELECT * FROM test"));

First, we create a primary index using the createN1qlPrimaryIndex(), it’ll be ignored if it has been created before; creating it is compulsory before any query can be executed.

Then we use the bucket.query() to execute the N1QL query.

N1qlQueryResult is an Iterable<N1qlQueryRow> object, and thus we can print out every row using forEach():

result.forEach(System.out::println);

From the returned result, we can get N1qlMetrics object by calling result.info(). From the metrics object, we can get insights about the returned result – for example, the result and the error count:

System.out.println("result count: " + result.info().resultCount());
System.out.println("error count: " + result.info().errorCount());

On the returned result, we can use the result.parseSuccess() to check if the query is syntactically correct and parsed successfully. We can use the result.finalSuccess() to determine if the execution of the query was successful.

6. N1QL Query Statements

Let’s take a look at the different N1QL Query statements and different ways of executing them via the Java SDK.

6.1. SELECT Statement

The SELECT statement in NIQL is just like a standard SQL SELECT. It consists of three parts:

  • SELECT – defines the projection of the documents to be returned
  • FROM  describes the keyspace to fetch the documents from; keyspace is synonymous with table name in SQL database systems
  • WHERE  specifies the additional filtering criteria

The Couchbase Server comes with some sample buckets (databases). If they were not loaded during initial setup, the Settings section of the Web Console has a dedicated tab for setting them up.

We’ll be using the travel-sample bucket. The travel-sample bucket contains data for airlines, landmark, airports, hotels, and routes. The data model can be found here.

Let’s select 100 airline records from the travel-sample data:

String query = "SELECT name FROM `travel-sample` " +
  "WHERE type = 'airport' LIMIT 100";
N1qlQueryResult result1 = bucket.query(N1qlQuery.simple(query));

The N1QL query, as can be seen above, looks very similar to SQL. Note that the keyspace name has to be put in backtick (`) because it contains a hyphen.

N1qlQueryResult is just a wrapper around the raw JSON data returned from the database. It extends Iterable<N1qlQueryRow> and can be looped over.

Invoking result1.allRows() will return all the rows in a List<N1qlQueryRow> object. This is useful for processing results with the Stream API and/or accessing each result via index:

N1qlQueryRow row = result1.allRows().get(0);
JsonObject rowJson = row.value();
System.out.println("Name in First Row " + rowJson.get("name"));

We got the first row of the returned results, and we use row.value() to get a JsonObject – which maps the row to a key-value pair, and the key corresponds to the column name.

So we got the value of column, name, for the first row using the get(). It’s as easy as that.

So far we have been using simple N1QL query. Let’s look at the parameterized statement in N1QL.

In this query, we’re going to use the wildcard (*) symbol for selecting all the fields in the travel-sample records where type is an airport.

The type will be passed to the statement – as a parameter. Then we process the returned result:

JsonObject pVal = JsonObject.create().put("type", "airport");
String query = "SELECT * FROM `travel-sample` " +
  "WHERE type = $type LIMIT 100";
N1qlQueryResult r2 = bucket.query(N1qlQuery.parameterized(query, pVal));

We created a JsonObject to hold the parameters as a key-value pair. The value of the key ‘type’, in the pVal object, will be used to replace the $type placeholder in the query string.

N1qlQuery.parameterized() accepts a query string that contains one or more placeholders and a JsonObject as demonstrated above.

In the previous sample query above, we only select a column – name. This makes it easy to map the returned result into a JsonObject.

But now that we use the wildcard (*) in the select statement, it is not that simple. The returned result is a raw JSON string:

[  
  {  
    "travel-sample":{  
      "airportname":"Calais Dunkerque",
      "city":"Calais",
      "country":"France",
      "faa":"CQF",
      "geo":{  
        "alt":12,
        "lat":50.962097,
        "lon":1.954764
      },
      "icao":"LFAC",
      "id":1254,
      "type":"airport",
      "tz":"Europe/Paris"
    }
  },

So what we need is a way to map each row to a structure that allows us to access the data by specifying the column name.

Therefore, let’s create a method that will accept N1qlQueryResult and then map every row in the result to a JsonNode object.

We choose JsonNode because it can handle a broad range of JSON data structures and we can easily navigate it:

public static List<JsonNode> extractJsonResult(N1qlQueryResult result) {
  return result.allRows().stream()
    .map(row -> {
        try {
            return objectMapper.readTree(row.value().toString());
        } catch (IOException e) {
            logger.log(Level.WARNING, e.getLocalizedMessage());
            return null;
        }
    })
    .filter(Objects::nonNull)
    .collect(Collectors.toList());
}

We processed each row in the result using the Stream API. We mapped each row to a JsonNode object and then return the result as a List of JsonNodes. 

Now we can use the method to process the returned result from the last query:

List<JsonNode> list = extractJsonResult(r2);
System.out.println(
  list.get(0).get("travel-sample").get("airportname").asText());

From the example JSON output shown previously, every row has a key the correlates to the keyspace name specified in the SELECT query – which is travel-sample in this case.

So we got the first row in the result, which is a JsonNode. Then we traverse the node to get to the airportname key, that is then printed as a text.

The example raw JSON output shared earlier provides more clarity as per the structure of the returned result.

6.2. SELECT Statement Using N1QL DSL

Other than using raw string literals for building queries we can also use N1QL DSL which comes with the Java SDK we are using.

For example, the above string query can be formulated with the DSL thus:

Statement statement = select("*")
  .from(i("travel-sample"))
  .where(x("type").eq(s("airport")))
  .limit(100);
N1qlQueryResult r3 = bucket.query(N1qlQuery.simple(statement));

The DSL is fluent and can be interpreted easily. The data selection classes and methods are in com.couchbase.client.java.query.Select class.

Expression methods like i(), eq(), x(), s() are in com.couchbase.client.java.query.dsl.Expression class. Read more about the DSL here.

N1QL select statements can also have OFFSET, GROUP BY and ORDER BY clauses. The syntax is pretty much like that of standard SQL, and its reference can be found here.

The WHERE clause of N1QL can take Logical Operators AND, OR, and NOT in its definitions. In addition to this, N1QL has provision for comparison operators like >, ==, !=, IS NULL and others.

There are also other operators that make accessing stored documents easy – the string operators can be used to concatenate fields to form a single string, and the nested operators can be used to slice arrays and cherry pick fields or element.

Let’s see these in action.

This query selects the city column, concatenate the airportname and faa columns as portname_faa from the travel-sample bucket where the country column ends with ‘States’‘, and the latitude of the airport is greater than or equal to 70:

String query2 = "SELECT t.city, " +
  "t.airportname || \" (\" || t.faa || \")\" AS portname_faa " +
  "FROM `travel-sample` t " +
  "WHERE t.type=\"airport\"" +
  "AND t.country LIKE '%States'" +
  "AND t.geo.lat >= 70 " +
  "LIMIT 2";
N1qlQueryResult r4 = bucket.query(N1qlQuery.simple(query2));
List<JsonNode> list3 = extractJsonResult(r4);
System.out.println("First Doc : " + list3.get(0));

We can do the same thing using N1QL DSL:

Statement st2 = select(
  x("t.city, t.airportname")
  .concat(s(" (")).concat(x("t.faa")).concat(s(")")).as("portname_faa"))
  .from(i("travel-sample").as("t"))
  .where( x("t.type").eq(s("airport"))
  .and(x("t.country").like(s("%States")))
  .and(x("t.geo.lat").gte(70)))
  .limit(2);
N1qlQueryResult r5 = bucket.query(N1qlQuery.simple(st2));
//...

Let’s look at other statements in N1QL. We’ll be building on the knowledge we’ve acquired in this section.

6.3. INSERT Statement

The syntax for the insert statement in N1QL is:

INSERT INTO `travel-sample` ( KEY, VALUE )
VALUES("unique_key", { "id": "01", "type": "airline"})
RETURNING META().id as docid, *;

Where travel-sample is the keyspace name, unique_key is the required non-duplicate key for the value object that follows it.

The last segment is the RETURNING statement that specifies what gets returned.

In this case, the id of the inserted document is returned as docid. The wildcard (*) signifies that other attributes of the added document should be returned as well – separately from docid. See the sample result below.

Executing the following statement in the Query tab of Couchbase Web Console will insert a new record into the travel-sample bucket:

INSERT INTO `travel-sample` (KEY, VALUE)
VALUES('cust1293', {"id":"1293","name":"Sample Airline", "type":"airline"})
RETURNING META().id as docid, *

Let’s do the same thing from a Java app. First, we can use a raw query like this:

String query = "INSERT INTO `travel-sample` (KEY, VALUE) " +
  " VALUES(" +
  "\"cust1293\", " +
  "{\"id\":\"1293\",\"name\":\"Sample Airline\", \"type\":\"airline\"})" +
  " RETURNING META().id as docid, *";
N1qlQueryResult r1 = bucket.query(N1qlQuery.simple(query));
r1.forEach(System.out::println);

This will return the id  of the inserted document as docid separately and the complete document body separately:

{  
  "docid":"cust1293",
  "travel-sample":{  
    "id":"1293",
    "name":"Sample Airline",
    "type":"airline"
  }
}

However, since we’re using the Java SDK, we can do it the object way by creating a JsonDocument that is then inserted into the bucket via the Bucket API:

JsonObject ob = JsonObject.create()
  .put("id", "1293")
  .put("name", "Sample Airline")
  .put("type", "airline");
bucket.insert(JsonDocument.create("cust1295", ob));

Instead of using the insert() we can use upsert() which will update the document if there is an existing document with the same unique identifier cust1295.

As it is now, using insert() will throw an exception if that same unique id already exists.

The insert(), however, if successful, will return a JsonDocument that contains the unique id and entries of the inserted data.

The syntax for bulk insert using N1QL is:

INSERT INTO `travel-sample` ( KEY, VALUE )
VALUES("unique_key", { "id": "01", "type": "airline"}),
VALUES("unique_n", { "id": "01", "type": "airline"})
RETURNING META().id as docid, *;

We can perform bulk operations with the Java SDK using Reactive Java that underlines the SDK. Let’s add ten documents into a bucket using batch process:

List<JsonDocument> documents = IntStream.rangeClosed(0,10)
  .mapToObj( i -> {
      JsonObject content = JsonObject.create()
        .put("id", i)
        .put("type", "airline")
        .put("name", "Sample Airline "  + i);
      return JsonDocument.create("cust_" + i, content);
  }).collect(Collectors.toList());

List<JsonDocument> r5 = Observable
  .from(documents)
  .flatMap(doc -> bucket.async().insert(doc))
  .toList()
  .last()
  .toBlocking()
  .single();

r5.forEach(System.out::println);

First, we generate ten documents and put them into a List; then we used RxJava to perform the bulk operation.

Finally, we print out the result of each insert – which has been accumulated to form a List.

The reference for performing bulk operations in the Java SDK can be found here. Also, the reference for insert statement can be found here.

6.4. UPDATE Statement

N1QL also has UPDATE statement. It can update documents identified by their unique keys. We can use the update statement to either SET (update) values of an attribute or UNSET (remove) an attribute altogether.

Let’s update one of the documents we recently inserted into the travel-sample bucket:

String query2 = "UPDATE `travel-sample` USE KEYS \"cust_1\" " +
  "SET name=\"Sample Airline Updated\" RETURNING name";
N1qlQueryResult result = bucket.query(N1qlQuery.simple(query2));
result.forEach(System.out::println);

In the above query, we updated the name attribute of a cust_1 entry in the bucket to Sample Airline Updated, and we instruct the query to return the updated name.

As stated earlier, we can also achieve the same thing by constructing a JsonDocument with the same id and use the upsert() of Bucket API to update the document:

JsonObject o2 = JsonObject.create()
  .put("name", "Sample Airline Updated");
bucket.upsert(JsonDocument.create("cust_1", o2));

In this next query, let’s use the UNSET command to remove the name attribute and return the affected document:

String query3 = "UPDATE `travel-sample` USE KEYS \"cust_2\" " +
  "UNSET name RETURNING *";
N1qlQueryResult result1 = bucket.query(N1qlQuery.simple(query3));
result1.forEach(System.out::println);

The returned JSON string is:

{  
  "travel-sample":{  
    "id":2,
    "type":"airline"
  }
}

Take note of the missing name attribute – it has been removed from the document object. N1QL update syntax reference can be found here.

So we have a look at inserting new documents and updating documents. Now let’s look at the final piece of the CRUD acronym – DELETE.

6.5. DELETE Statement

Let’s use the DELETE query to delete some of the documents we have created earlier. We’ll use the unique id to identify the document with the USE KEYS keyword:

String query4 = "DELETE FROM `travel-sample` USE KEYS \"cust_50\"";
N1qlQueryResult result4 = bucket.query(N1qlQuery.simple(query4));

N1QL DELETE statement also takes a WHERE clause. So we can use conditions to select the records to be deleted:

String query5 = "DELETE FROM `travel-sample` WHERE id = 0 RETURNING *";
N1qlQueryResult result5 = bucket.query(N1qlQuery.simple(query5));

We can also use the remove() from the bucket API directly:

bucket.remove("cust_2");

Much simpler right? Yes, but now we also know how to do it using N1QL. The reference doc for DELETE syntax can be found here.

7. N1QL Functions and Sub-queries

N1QL did not just resemble SQL regarding syntax alone; it goes all the way to some functionalities. In SQL, we’ve some functions like COUNT() that can be used within the query string.

N1QL, in the same fashion, has its functions that can be used in the query string.

For example, this query will return the total number of landmark records that are in the travel-sample bucket:

SELECT COUNT(*) as landmark_count FROM `travel-sample` WHERE type = 'landmark'

In previous examples above, we’ve used the META function in UPDATE statement to return the id of updated document.

There are string method that can trim trailing white spaces, make lower and upper case letters and even check if a string contains a token. Let’s use some of these functions in a query:

Let’s use some of these functions in a query:

INSERT INTO `travel-sample` (KEY, VALUE) 
VALUES(LOWER(UUID()), 
  {"id":LOWER(UUID()), "name":"Sample Airport Rand", "created_at": NOW_MILLIS()})
RETURNING META().id as docid, *

The query above inserts a new entry into the travel-sample bucket. It uses the UUID() function to generate a unique random id which was converted to lower case using the LOWER() function. 

The NOW_MILLIS() method was used to set the current time, in milliseconds, as the value of the created_at attribute. The complete reference of N1QL functions can be found here.

Sub-queries come in handy at times, and N1QL has provision for them. Still using the travel-sample bucket, let’s select the destination airport of all routes for a particular airline – and get the country they are located in:

SELECT DISTINCT country FROM `travel-sample` WHERE type = "airport" AND faa WITHIN 
  (SELECT destinationairport 
  FROM `travel-sample` t WHERE t.type = "route" and t.airlineid = "airline_10")

The sub-query in the above query is enclosed within parentheses and returns the destinationairport attribute, of all routes associated with airline_10, as a collection.

The destinationairport attributes correlate to the faa attribute on airport documents in the travel-sample bucket. The WITHIN keyword is part of collection operators in N1QL.

Now, that we’ve got the country of destination airport of all routes for airline_10. Let’s do something interesting by looking for hotels within that country:

SELECT name, price, address, country FROM `travel-sample` h 
WHERE h.type = "hotel" AND h.country WITHIN
  (SELECT DISTINCT country FROM `travel-sample` 
  WHERE type = "airport" AND faa WITHIN 
  (SELECT destinationairport FROM `travel-sample` t 
  WHERE t.type = "route" and t.airlineid = "airline_10" )
  ) LIMIT 100

The previous query was used as a sub-query in the WHERE constraint of the outermost query. Take note of the DISTINCT keyword – it does the same thing as in SQL – returns non-duplicate data.

All the query examples here can be executed using the SDK as demonstrated earlier in this article.

8. Conclusion

N1QL takes the process of querying the document-based database like Couchbase to another whole level. It doesn’t only simplify this process, it also makes switching from a relational database system a lot easier as well.

We’ve looked at the N1QL query in this article; the main documentation can be found here. And you can learn about Spring Data Couchbase here.

As always, the complete source code is available over on Github.

Schedulers in RxJava

$
0
0

1. Overview

In this article, we’re going to focus on different types of Schedulers that we’re going to use in writing multithreading programs based on RxJava Observable’s subscribeOn and observeOn methods.

Schedulers give the opportunity to specify where and likely when to execute tasks related to the operation of an Observable chain.

We can obtain a Scheduler from the factory methods described in the class Schedulers.

2. Default Threading Behavior

By default, Rx is single-threaded which implies that an Observable and the chain of operators that we can apply to it will notify its observers on the same thread on which its subscribe() method is called.

The observeOn and subscribeOn methods take as an argument a Scheduler, that, as the name suggests, is a tool that we can use for scheduling individual actions.

We’ll create our implementation of a Scheduler by using the createWorker method, which returns a Scheduler.Worker. A worker accepts actions and executes them sequentially on a single thread.

In a way, a worker is a Scheduler itself, but we’ll not refer to it as a Scheduler to avoid confusion.

2.1. Scheduling an Action

We can schedule a job on any Scheduler by creating a new worker and scheduling some actions:

Scheduler scheduler = Schedulers.immediate();
Scheduler.Worker worker = scheduler.createWorker();
worker.schedule(() -> result += "action");
 
Assert.assertTrue(result.equals("action"));

The action is then queued on the thread that the worker is assigned to.

2.2. Canceling an Action

Scheduler.Worker extends Subscription. Calling the unsubscribe method on a worker will result in the queue being emptied and all pending tasks being canceled. We can see that by example:

Scheduler scheduler = Schedulers.newThread();
Scheduler.Worker worker = scheduler.createWorker();
worker.schedule(() -> {
    result += "First_Action";
    worker.unsubscribe();
});
worker.schedule(() -> result += "Second_Action");
 
Assert.assertTrue(result.equals("First_Action"));

The second task is never executed because the one before it canceled the whole operation. Actions that were in the process of being executed will be interrupted.

3. Schedulers.newThread

This scheduler simply starts a new thread every time it is requested via subscribeOn() or observeOn().

It’s hardly ever a good choice, not only because of the latency involved when starting a thread but also because this thread is not reused:

Observable.just("Hello")
  .observeOn(Schedulers.newThread())
  .doOnNext(s ->
    result2 += Thread.currentThread().getName()
  )
  .observeOn(Schedulers.newThread())
  .subscribe(s ->
    result1 += Thread.currentThread().getName()
  );
Thread.sleep(500);
Assert.assertTrue(result1.equals("RxNewThreadScheduler-1"));
Assert.assertTrue(result2.equals("RxNewThreadScheduler-2"));

When the Worker is done, the thread simply terminates. This Scheduler can be used only when tasks are coarse-grained: it takes a lot of time to complete, but there are very few of them so that threads are unlikely to be reused at all.

Scheduler scheduler = Schedulers.newThread();
Scheduler.Worker worker = scheduler.createWorker();
worker.schedule(() -> {
    result += Thread.currentThread().getName() + "_Start";
    worker.schedule(() -> result += "_worker_");
    result += "_End";
});
Thread.sleep(3000);
Assert.assertTrue(result.equals(
  "RxNewThreadScheduler-1_Start_End_worker_"));

When we scheduled the worker on a NewThreadScheduler, we saw that the worker was bound to a particular thread.

4. Schedulers.immediate

Schedulers.immediate is a special scheduler that invokes a task within the client thread in a blocking way, rather than asynchronously and returns when the action is completed:

Scheduler scheduler = Schedulers.immediate();
Scheduler.Worker worker = scheduler.createWorker();
worker.schedule(() -> {
    result += Thread.currentThread().getName() + "_Start";
    worker.schedule(() -> result += "_worker_");
    result += "_End";
});
Thread.sleep(500);
Assert.assertTrue(result.equals(
  "main_Start_worker__End"));

In fact, subscribing to an Observable via immediate Scheduler typically has the same effect as not subscribing with any particular Scheduler at all:

Observable.just("Hello")
  .subscribeOn(Schedulers.immediate())
  .subscribe(s ->
    result += Thread.currentThread().getName()
  );
Thread.sleep(500);
Assert.assertTrue(result.equals("main"));

5. Schedulers.trampoline

The trampoline Scheduler is very similar to immediate because it also schedules tasks in the same thread, effectively blocking.

However, the upcoming task is executed when all previously scheduled tasks complete:

Observable.just(2, 4, 6, 8)
  .subscribeOn(Schedulers.trampoline())
  .subscribe(i -> result += "" + i);
Observable.just(1, 3, 5, 7, 9)
  .subscribeOn(Schedulers.trampoline())
  .subscribe(i -> result += "" + i);
Thread.sleep(500);
Assert.assertTrue(result.equals("246813579"));

Immediate invokes a given task right away, whereas trampoline waits for the current task to finish.

The trampoline‘s worker executes every task on the thread that scheduled the first task. The first call to schedule is blocking until the queue is emptied:

Scheduler scheduler = Schedulers.trampoline();
Scheduler.Worker worker = scheduler.createWorker();
worker.schedule(() -> {
    result += Thread.currentThread().getName() + "Start";
    worker.schedule(() -> {
        result += "_middleStart";
        worker.schedule(() ->
            result += "_worker_"
        );
        result += "_middleEnd";
    });
    result += "_mainEnd";
});
Thread.sleep(500);
Assert.assertTrue(result
  .equals("mainStart_mainEnd_middleStart_middleEnd_worker_"));

6. Schedulers.from

Schedulers are internally more complex than Executors from java.util.concurrent – so a separate abstraction was needed.

But because they are conceptually quite similar, unsurprisingly there is a wrapper that can turn Executor into Scheduler using the from factory method:

private ThreadFactory threadFactory(String pattern) {
    return new ThreadFactoryBuilder()
      .setNameFormat(pattern)
      .build();
}

@Test
public void givenExecutors_whenSchedulerFrom_thenReturnElements() 
 throws InterruptedException {
 
    ExecutorService poolA = newFixedThreadPool(
      10, threadFactory("Sched-A-%d"));
    Scheduler schedulerA = Schedulers.from(poolA);
    ExecutorService poolB = newFixedThreadPool(
      10, threadFactory("Sched-B-%d"));
    Scheduler schedulerB = Schedulers.from(poolB);

    Observable<String> observable = Observable.create(subscriber -> {
      subscriber.onNext("Alfa");
      subscriber.onNext("Beta");
      subscriber.onCompleted();
    });;

    observable
      .subscribeOn(schedulerA)
      .subscribeOn(schedulerB)
      .subscribe(
        x -> result += Thread.currentThread().getName() + x + "_",
        Throwable::printStackTrace,
        () -> result += "_Completed"
      );
    Thread.sleep(2000);
    Assert.assertTrue(result.equals(
      "Sched-A-0Alfa_Sched-A-0Beta__Completed"));
}

SchedulerB is used for a short period of time, but it barely schedules a new action on schedulerA, which does all the work. Thus, multiple subscribeOn methods aren’t only ignored, but also introduce a small overhead.

7. Schedulers.io

This Scheduler is similar to the newThread except for the fact that already started threads are recycled and can possibly handle future requests.

This implementation works similarly to ThreadPoolExecutor from java.util.concurrent with an unbounded pool of threads. Every time a new worker is requested, either a new thread is started (and later kept idle for some time) or the idle one is reused:

Observable.just("io")
  .subscribeOn(Schedulers.io())
  .subscribe(i -> result += Thread.currentThread().getName());
 
Assert.assertTrue(result.equals("RxIoScheduler-2"));

We need to be careful with unbounded resources of any kind – in case of slow or unresponsive external dependencies like web services, io scheduler might start an enormous number of threads, leading to our very own application becoming unresponsive.

In practice, following Schedulers.io is almost always a better choice.

8. Schedulers.computation

Computation Scheduler by default limits the number of threads running in parallel to the value of availableProcessors(), as found in the Runtime.getRuntime() utility class.

So we should use a computation scheduler when tasks are entirely CPU-bound; that is, they require computational power and have no blocking code.

It uses an unbounded queue in front of every thread, so if the task is scheduled, but all cores are occupied, it will be queued. However, the queue just before each thread will keep growing:

Observable.just("computation")
  .subscribeOn(Schedulers.computation())
  .subscribe(i -> result += Thread.currentThread().getName());
Assert.assertTrue(result.equals("RxComputationScheduler-1"));

If for some reason, we need a different number of threads than the default, we can always use the rx.scheduler.max-computation-threads system property.

By taking fewer threads we can ensure that there is always one or more CPU cores idle, and even under heavy load, computation thread pool does not saturate the server. It’s simply not possible to have more computation threads than cores.

9. Schedulers.test

This Scheduler is used only for testing purposes, and we’ll never see it in production code. Its main advantage is the ability to advance the clock, simulating time passing by arbitrarily:

List<String> letters = Arrays.asList("A", "B", "C");
TestScheduler scheduler = Schedulers.test();
TestSubscriber<String> subscriber = new TestSubscriber<>();

Observable<Long> tick = Observable
  .interval(1, TimeUnit.SECONDS, scheduler);

Observable.from(letters)
  .zipWith(tick, (string, index) -> index + "-" + string)
  .subscribeOn(scheduler)
  .subscribe(subscriber);

subscriber.assertNoValues();
subscriber.assertNotCompleted();

scheduler.advanceTimeBy(1, TimeUnit.SECONDS);
subscriber.assertNoErrors();
subscriber.assertValueCount(1);
subscriber.assertValues("0-A");

scheduler.advanceTimeTo(3, TimeUnit.SECONDS);
subscriber.assertCompleted();
subscriber.assertNoErrors();
subscriber.assertValueCount(3);
assertThat(
  subscriber.getOnNextEvents(), 
  hasItems("0-A", "1-B", "2-C"));

10. Default Schedulers

Some Observable operators in RxJava have alternate forms that allow us to set which Scheduler the operator will use for its operation. Others don’t operate on any particular Scheduler or operate on a particular default Scheduler.

For example, the delay operator takes upstream events and pushes them downstream after a given time. Obviously, it cannot hold the original thread during that period, so it must use a different Scheduler:

ExecutorService poolA = newFixedThreadPool(
  10, threadFactory("Sched1-"));
Scheduler schedulerA = Schedulers.from(poolA);
Observable.just('A', 'B')
  .delay(1, TimeUnit.SECONDS, schedulerA)
  .subscribe(i -> result+= Thread.currentThread().getName() + i + " ");

Thread.sleep(2000);
Assert.assertTrue(result.equals("Sched1-A Sched1-B "));

Without supplying a custom schedulerA, all operators below delay would use the computation Scheduler.

Other important operators that support custom Schedulers are buffer, intervalrangetimer, skip, taketimeout, and several others. If we don’t provide a Scheduler to such operators, computation scheduler is utilized, which is a safe default in most cases.

11. Conclusion

In truly reactive applications, for which all long-running operations are asynchronous, very few threads and thus Schedulers are needed.

Mastering schedulers are essential to writing scalable and safe code using RxJava. The difference between subscribeOn and observeOn is especially important under high load where every task must be executed precisely when we expect.

Last but not least, we must be sure that Schedulers used downstream can keep up with the load generated by Schedulers upstream. For more information, there is this article about backpressure.

The implementation of all these examples and code snippets can be found in the GitHub project – this is a Maven project, so it should be easy to import and run as it is.


Java Weekly, Issue 196

$
0
0

Lots of interesting writeups on Java 9 this week.

Here we go…

1. Spring and Java

>> Java 9 and IntelliJ IDEA [blog.jetbrains.com]

It’s nice to see that tools are adapting to new releases super quickly 🙂

>> Sneakily Throwing Exceptions in Lambda Expressions in Java [4comprehension.com]

Java 8 brought also small amendments to Type Inference – which can be used for disguising checked exceptions as runtime exceptions. 

Definitely good to know about it but it’s worth being careful when using it.

>> The JVM on Fire – Using Flame Graphs to Analyse Performance [blog.codecentric.de]

Looks like Flame Graphs can be a much more readable alternative to standard profilers’ views.

>> Testing Microservices — Java & Spring Boot [hamvocke.com]

A comprehensive guide to Microservices testing with Spring Boot.

>> SecureLogin For Java Web Applications [techblog.bozho.net]

The SecureLogin protocol is a new promising option for securing web applications.

>> RebelLabs Developer Productivity Report 2017: Why do you use the Java tools you use? [zeroturnaround.com]

It’s always super interesting to get usage insights for tools we actually use.

Also worth reading:

Webinars and presentations:

Time to upgrade:

2. Technical

>> Polite HTTP API design – “Use the headers, Luke!” [blog.codecentric.de]

It’s always a good idea to use the right HTTP headers – as the spec intended 🙂

Also worth reading: 

3. Musings

>> Low-risk Monolith to Microservice Evolution Part I [blog.christianposta.com]

A cool write-up about minimizing risk when refactoring your monolith to microservice architecture.

>> Starting a Tech Firm in the Era of the Efficiencer [daedtech.com]

Quite a few interesting tips here 🙂

Also worth reading:

4. Comics

And my favorite Dilberts of the week:

>> Soul Killing Tasks [dilbert.com]

>> Estimate of Timeline [dilbert.com]

>> Ideal Customer [dilbert.com]

5. Pick of the Week

>> What ORMs have taught me: just learn SQL [woz.posthaven.com]

Apache Commons Collections Bag

$
0
0

1. Introduction

In this quick article, we’ll focus on how to use the Apache’s Bag collection.

2. Maven Dependency

Before we start, we need to import the latest dependencies from Maven Central:

<dependency>
    <groupId>org.apache.commons</groupId>
    <artifactId>commons-collections4</artifactId>
    <version>4.1</version>
</dependency>

3. Bags vs Collections

Simply put, Bag is a collection that allows storing multiple items along with their repetition count:

public void whenAdded_thenCountIsKept() {
    Bag<Integer> bag = new HashBag<>(
      Arrays.asList(1, 2, 3, 3, 3, 1, 4));
        
    assertThat(2, equalTo(bag.getCount(1)));
}

3.1. Violations of the Collection Contract

While reading Bag‘s API documentation, we may notice that some methods are marked as violating the standard Java’s Collection contract.

For example, when we use an add() API from a Java collection, we receive true even if the item is already in the collection:

Collection<Integer> collection = new ArrayList<>();
collection.add(1);
assertThat(collection.add(1), is(true));

The same API from a Bag implementation will return a false when we add an element which is already available in the collection:

Bag<Integer> bag = new HashBag<>();
bag.add(1);
 
assertThat(bag.add(1), is(not(true)));

To resolve these issues, Apache Collections’ library provides a decorator called the CollectionBag. We can use this to make our bag collections compliant with the Java Collection contract:

public void whenBagAddAPILikeCollectionAPI_thenTrue() {
    Bag<Integer> bag = CollectionBag.collectionBag(new HashBag<>());
    bag.add(1);

    assertThat(bag.add(1), is((true)));
}

4. Bag Implementations

Let’s now explore the various implementations of the Bag interface – within Apache’s collections library.

4.1. HashBag

We can add an element and instruct the API on the number of copies this element should have in our bag collection:

public void givenAdd_whenCountOfElementsDefined_thenCountAreAdded() {
    Bag<Integer> bag = new HashBag<>();
	
    bag.add(1, 5); // adding 1 five times
 
    assertThat(5, equalTo(bag.getCount(1)));
}

We can also delete a specific number of copies or every instance of an element from our bag:

public void givenMultipleCopies_whenRemove_allAreRemoved() {
    Bag<Integer> bag = new HashBag<>(
      Arrays.asList(1, 2, 3, 3, 3, 1, 4));

    bag.remove(3, 1); // remove one element, two still remain
    assertThat(2, equalTo(bag.getCount(3)));
	
    bag.remove(1); // remove all
    assertThat(0, equalTo(bag.getCount(1)));
}

4.2. TreeBag

The TreeBag implementation works like any other tree, additionally maintaining Bag semantics.

We can naturally sort an array of integers with a TreeBag and then query the number of instances each individual element has within the collection:

public void givenTree_whenDuplicateElementsAdded_thenSort() {
    TreeBag<Integer> bag = new TreeBag<>(Arrays.asList(7, 5,
      1, 7, 2, 3, 3, 3, 1, 4, 7));
    
    assertThat(bag.first(), equalTo(1));
    assertThat(bag.getCount(bag.first()), equalTo(2));
    assertThat(bag.last(), equalTo(7));
    assertThat(bag.getCount(bag.last()), equalTo(3));
}

The TreeBag implements a SortedBag interface, all implementations of this interface can use the decorator CollectionSortedBag to comply with the Java Collections contract:

public void whenTreeAddAPILikeCollectionAPI_thenTrue() {
    SortedBag<Integer> bag 
      = CollectionSortedBag.collectionSortedBag(new TreeBag<>());

    bag.add(1);
 
    assertThat(bag.add(1), is((true)));
}

4.3. SynchronizedSortedBag

Another widely used implementation of Bag is the SynchronizedSortedBag. Precisely, this is a synchronized decorator of a SortedBag implementation.

We can use this decorator with our TreeBag (an implementation of SortedBag) from the previous section to synchronize access to our bag:

public void givenSortedBag_whenDuplicateElementsAdded_thenSort() {
    SynchronizedSortedBag<Integer> bag = SynchronizedSortedBag
      .synchronizedSortedBag(new TreeBag<>(
        Arrays.asList(7, 5, 1, 7, 2, 3, 3, 3, 1, 4, 7)));
    
    assertThat(bag.first(), equalTo(1));
    assertThat(bag.getCount(bag.first()), equalTo(2));
    assertThat(bag.last(), equalTo(7));
    assertThat(bag.getCount(bag.last()), equalTo(3));
}

We can use a combination of APIs – Collections.synchronizedSortedMap() and TreeMap – to simulate what we did here with SynchronizedSortedBag.

5. Conclusion

In this short tutorial, we’ve learned about the Bag interface and its various implementations.

As always, the code for this article can be found over on GitHub.

Introduction to Animal Sniffer Maven Plugin

$
0
0

1. Introduction

While working in Java, there are times when we need to use multiple language versions at the same time.

It’s common to need our Java program to be compile-time compatible with one Java version (say – Java 6) but to need to use a different version (say – Java 8) in our development tools and a maybe different version to run the application.

In this quick article, we’ll demonstrate how easy it is to add Java version-based incompatibility safeguards and how the Animal Sniffer plugin can be used to flag these issues at build time by checking our project against previously generated signatures.

2. Setting -source and -target of the Java Compiler

Let’s start with a hello world Maven project – where we’re using Java 7 on our local machine but we’d like to deploy the project to the production environment which is still using Java 6.

In this case, we can configure the Maven compiler plugin with source and target fields pointing to Java 6.

The “source” field is used for specifying compatibility with Java language changes and “target” field is used to for specifying compatibility with JVM changes.

Let’s now look at Maven compiler configuration of pom.xml:

<plugins>
    <plugin>
        <groupId>org.apache.maven.plugins</groupId>
        <artifactId>maven-compiler-plugin</artifactId>
        <version>3.7.0</version>
	<configuration>
            <source>1.6</source>
            <target>1.6</target>
	</configuration>
    </plugin>
</plugins>

With Java 7 on our local machine and Java code printing “hello world” to the console, if we go ahead and build this project using Maven, it will build and work correctly on a production box running Java 6.

3. Introducing API Incompatibilities

Let’s now look at how easy it is to introduce API incompatibility by accident.

Let’s say we start working on some new requirement and we use some API features of Java 7 which were not present in Java 6.

Let’s look at the updated source code:

public static void main(String[] args) {
    System.out.println("Hello World!");
    System.out.println(StandardCharsets.UTF_8.name());
}

java.nio.charset.StandardCharsets was introduced in Java 7.

If we now go ahead and execute the Maven build, it will still compile successfully but fail at runtime with linkage error on a production box with Java 6 installed.

The Maven documentation mentions this pitfall and recommends to use Animal Sniffer plugin as one of the options.

4. Reporting API Compatibilities

Animal Sniffer plugin provides two core capabilities:

  1. Generating signatures of the Java runtime
  2. Checking a project against API signatures

Let’s now modify the pom.xml to include the plugin:

<plugin>
    <groupId>org.codehaus.mojo</groupId>
    <artifactId>animal-sniffer-maven-plugin</artifactId>
    <version>1.16</version>
    <configuration>
        <signature>
            <groupId>org.codehaus.mojo.signature</groupId>
            <artifactId>java16</artifactId>
            <version>1.0</version>
        </signature>
    </configuration>
    <executions>
        <execution>
            <id>animal-sniffer</id>
            <phase>verify</phase>
            <goals>
                <goal>check</goal>
            </goals>
        </execution>
    </executions>
</plugin>

Here, the configuration section of Animal Sniffer refers to an existing Java 6 runtime signature. Also, execution section checks and verifies the project source code against the given signature and flags if any issues are found.

If we go ahead and build the Maven project, the build will fail with the plugin reporting signature verification error as expected:

[INFO] ------------------------------------------------------------------------
[INFO] BUILD FAILURE
[INFO] ------------------------------------------------------------------------
[ERROR] Failed to execute goal org.codehaus.mojo:animal-sniffer-maven-plugin:1.16:check 
(animal-sniffer) on project example-animal-sniffer-mvn-plugin: Signature errors found.
Verify them and ignore them with the proper annotation if needed.

5. Conclusion

In this tutorial, we explored the Maven Animal Sniffer plugin and how it can be used to report API related incompatibilities if any at build time.

As always, the full source code is available over on GitHub.

Introduction to JGraphT

$
0
0

 1. Overview

Most of the time, when we’re implementing graph-based algorithms, we also need to implement some utility functions.

JGraphT is an open-source Java class library which not only provides us with various types of graphs but also many useful algorithms for solving most frequently encountered graph problems.

In this article, we’ll see how to create different types of graphs and how convenient it is to use the provided utilities.

2. Maven Dependency

Let’s start by adding the dependency to our Maven project:

<dependency>
    <groupId>org.jgrapht</groupId>
    <artifactId>jgrapht-core</artifactId>
    <version>1.0.1</version>
</dependency>

The latest version can be found at the Maven Central.

3. Creating Graphs

JGraphT supports various types of graphs.

3.1. Simple Graphs

For starters, let’s create a simple graph with a vertex of type String:

Graph<String, DefaultEdge> g 
  = new SimpleGraph<>(DefaultEdge.class);
g.addVertex(“v1”);
g.addVertex(“v2”);
g.addEdge(v1, v2);

3.2. Directed/Undirected Graphs

It also allows us to create directed/undirected graphs.

In our example, we’ll create a directed graph and use it to demonstrate other utility functions and algorithms:

DirectedGraph<String, DefaultEdge> directedGraph 
  = new DefaultDirectedGraph<>(DefaultEdge.class);
directedGraph.addVertex("v1");
directedGraph.addVertex("v2");
directedGraph.addVertex("v3");
directedGraph.addEdge("v1", "v2");
// Add remaining vertices and edges

3.3. Complete Graphs

Similarly, we can also generate a complete graph:

public void createCompleteGraph() {
    completeGraph = new SimpleWeightedGraph<>(DefaultEdge.class);
    CompleteGraphGenerator<String, DefaultEdge> completeGenerator 
      = new CompleteGraphGenerator<>(size);
    VertexFactory<String> vFactory = new VertexFactory<String>() {
        private int id = 0;
        public String createVertex() {
            return "v" + id++;
        }
    };
    completeGenerator.generateGraph(completeGraph, vFactory, null);
}

3.4. Multi-Graphs

Other than simple-graphs, API also provides us with multigraphs (graphs with multiple paths between two vertices).

Besides, we can have weighted/unweighted or user-defined edges in any graph.

Let’s create a multigraph with weighted edges:

public void createMultiGraphWithWeightedEdges() {
    multiGraph = new Multigraph<>(DefaultWeightedEdge.class);
    multiGraph.addVertex("v1");
    multiGraph.addVertex("v2");
    DefaultWeightedEdge edge1 = multiGraph.addEdge("v1", "v2");
    multiGraph.setEdgeWeight(edge1, 5);

    DefaultWeightedEdge edge2 = multiGraph.addEdge("v1", "v2");
    multiGraph.setEdgeWeight(edge2, 3);
}

In addition to this, we can have unmodifiable (read-only) and listenable (allows external listeners to track modifications) graphs as well as subgraphs. Also, we can always create all compositions of these graphs.

Further API details can be found here.

4. API Algorithms

Now, that we’ve got full fledge graph objects, let’s look at some common problems and their solutions.

4.1. Graph Iteration

We can traverse the graph using various iterators such as BreadthFirstIterator, DepthFirstIterator, ClosestFirstIterator, RandomWalkIterator as per the requirement.
We simply need to create an instance of respective iterators by passing graph objects:

DepthFirstIterator depthFirstIterator 
  = new DepthFirstIterator<>(directedGraph);
BreadthFirstIterator breadthFirstIterator 
  = new BreadthFirstIterator<>(directedGraph);

Once we get the iterator objects, we can perform the iteration using hasNext() and next() methods.

4.2. Finding the Shortest Path

It provides implementations of various algorithms such as Dijkstra, Bellman-Ford, Astar, and FloydWarshall in the org.jgrapht.alg.shortestpath package.

Let’s find the shortest path using Dijkstra’s algorithm:

@Test
public void whenGetDijkstraShortestPath_thenGetNotNullPath() {
    DijkstraShortestPath dijkstraShortestPath 
      = new DijkstraShortestPath(directedGraph);
    List<String> shortestPath = dijkstraShortestPath
      .getPath("v1","v4").getVertexList();
 
    assertNotNull(shortestPath);
}

Similarly, to get the shortest path using the Bellman-Ford algorithm:

@Test
public void 
  whenGetBellmanFordShortestPath_thenGetNotNullPath() {
    BellmanFordShortestPath bellmanFordShortestPath 
      = new BellmanFordShortestPath(directedGraph);
    List<String> shortestPath = bellmanFordShortestPath
      .getPath("v1", "v4")
      .getVertexList();
 
    assertNotNull(shortestPath);
}

4.3. Finding Strongly Connected Subgraphs

Before we get into the implementation, let’s briefly look at what strongly connected subgraphs mean. A subgraph is said to be strongly connected only if there is a path between each pair of its vertices.

In our example, {v1,v2,v3,v4} can be considered a strongly connected subgraph if we can traverse to any vertex irrespective of what the current vertex is.

We can list four such subgraphs for the directed graph shown in above image:
{v9},{v8},{v5,v6,v7},{v1,v2,v3,v4}

Implementation to list out all strongly connected subgraphs:

@Test
public void 
  whenGetStronglyConnectedSubgraphs_thenPathExists() {

    StrongConnectivityAlgorithm<String, DefaultEdge> scAlg 
      = new KosarajuStrongConnectivityInspector<>(directedGraph);
    List<DirectedSubgraph<String, DefaultEdge>> stronglyConnectedSubgraphs 
      = scAlg.stronglyConnectedSubgraphs();
    List<String> stronglyConnectedVertices 
      = new ArrayList<>(stronglyConnectedSubgraphs.get(3)
      .vertexSet());

    String randomVertex1 = stronglyConnectedVertices.get(0);
    String randomVertex2 = stronglyConnectedVertices.get(3);
    AllDirectedPaths<String, DefaultEdge> allDirectedPaths 
      = new AllDirectedPaths<>(directedGraph);

    List<GraphPath<String, DefaultEdge>> possiblePathList 
      = allDirectedPaths.getAllPaths(
        randomVertex1, randomVertex2, false,
          stronglyConnectedVertices.size());
 
    assertTrue(possiblePathList.size() > 0);
}

4.4. Eulerian Circuit

A Eulerian Circuit in a graph G is a circuit that includes all vertices and edges of G. A graph which has it is a Eulerian Graph.

Let’s have a look at the graph:

public void createGraphWithEulerianCircuit() {
    SimpleWeightedGraph<String, DefaultEdge> simpleGraph 
      = new SimpleWeightedGraph<>(DefaultEdge.class);
    IntStream.range(1,5)
      .forEach(i-> simpleGraph.addVertex("v" + i));
    IntStream.range(1,5)
      .forEach(i-> {
        int endVertexNo = (i + 1) > 5 ? 1 : i + 1;
        simpleGraph.addEdge("v" + i,"v" + endVertexNo);
    });
}

Now, we can test whether a graph contains Eulerian Circuit using the API:

@Test
public void givenGraph_whenCheckEluerianCycle_thenGetResult() {
    HierholzerEulerianCycle eulerianCycle 
      = new HierholzerEulerianCycle<>();
 
    assertTrue(eulerianCycle.isEulerian(simpleGraph));
}
@Test
public void whenGetEulerianCycle_thenGetGraphPath() {
    HierholzerEulerianCycle eulerianCycle 
      = new HierholzerEulerianCycle<>();
    GraphPath path = eulerianCycle.getEulerianCycle(simpleGraph);
 
    assertTrue(path.getEdgeList()
      .containsAll(simpleGraph.edgeSet()));
}

4.5. Hamiltonian Circuit

A GraphPath that visits each vertex exactly once is known as Hamiltonian Path.

A Hamiltonian cycle (or Hamiltonian circuit) is a Hamiltonian Path such that there is an edge (in the graph) from the last vertex to the first vertex of the path.

We can find optimal Hamiltonian Cycle for complete graph with HamiltonianCycle.getApproximateOptimalForCompleteGraph() method.

This method will return an approximate minimal traveling salesman tour (Hamiltonian cycle). The optimal solution is NP-complete, so this is a decent approximation that runs in polynomial time:

public void 
  whenGetHamiltonianCyclePath_thenGetVerticeSequence() {
    List<String> verticeList = HamiltonianCycle
      .getApproximateOptimalForCompleteGraph(completeGraph);
 
    assertEquals(verticeList.size(), completeGraph.vertexSet().size());
}

4.6. Cycle Detector

We can also check if there are any cycles in the graph. Currently, CycleDetector only supports directed graphs:

@Test
public void whenCheckCycles_thenDetectCycles() {
    CycleDetector<String, DefaultEdge> cycleDetector 
      = new CycleDetector<String, DefaultEdge>(directedGraph);
 
    assertTrue(cycleDetector.detectCycles());
    Set<String> cycleVertices = cycleDetector.findCycles();
 
    assertTrue(cycleVertices.size() > 0);
}

5. Conclusion

JGraphT provides almost all types of graphs and variety of graph algorithms. We covered how to use few popular APIs. However, you can always explore the library on the official page.

The implementation of all these examples and code snippets can be found in over on Github.

Validating Container Elements with Bean Validation 2.0

$
0
0

1. Overview

The 2.0 Version of the Java Bean Validation specification adds several new features, among which is the possibility to validate elements of containers.

This new functionality takes advantage of type annotations introduced in Java 8. Therefore it requires Java version 8 or higher to work.

Validation annotations can be added to containers such as collections, Optional objects, and other built-in as well as custom containers.

For an introduction to Java Bean Validation and how to setup the Maven dependencies we need, check out our previous article here.

In the following sections, we’ll focus on validating elements of each type of container.

2. Collection Elements

We can add validation annotations to elements of collections of type java.util.Iterable, java.util.List and java.util.Map.

Let’s see an example of validating the elements of a List:

public class Customer {    
     List<@NotBlank(message="Address must not be blank") String> addresses;
    
    // standard getters, setters 
}

In the example above, we’ve defined an addresses property for a Customer class, which contains elements that cannot be empty Strings.

Note that the @NotBlank validation applies to the String elements, and not the entire collection. If the collection is empty, then no validation is applied.

Let’s verify that if we attempt to add an empty String to the addresses list, the validation framework will return a ConstraintViolation:

@Test
public void whenEmptyAddress_thenValidationFails() {
    Customer customer = new Customer();
    customer.setName("John");

    customer.setAddresses(Collections.singletonList(" "));
    Set<ConstraintViolation<Customer>> violations = 
      validator.validate(customer);
    
    assertEquals(1, violations.size());
    assertEquals("Address must not be blank", 
      violations.iterator().next().getMessage());
}

Next, let’s see how we can validate the elements of a collection of type Map:

public class CustomerMap {
    
    private Map<@Email String, @NotNull Customer> customers;
    
    // standard getters, setters
}

Notice that we can add validation annotations for both the key and the value of a Map element.

Let’s verify that adding an entry with an invalid email will result in a validation error:

@Test
public void whenInvalidEmail_thenValidationFails() {
    CustomerMap map = new CustomerMap();
    map.setCustomers(Collections.singletonMap("john", new Customer()));
    Set<ConstraintViolation<CustomerMap>> violations
      = validator.validate(map);
 
    assertEquals(1, violations.size());
    assertEquals(
      "Must be a valid email", 
      violations.iterator().next().getMessage());
}

3. Optional Values

Validation constraints can also be applied to an Optional value:

private Integer age;

public Optional<@Min(18) Integer> getAge() {
    return Optional.ofNullable(age);
}

Let’s create a Customer with an age that is too low – and verify that this results in a validation error:

@Test
public void whenAgeTooLow_thenValidationFails() {
    Customer customer = new Customer();
    customer.setName("John");
    customer.setAge(15);
    Set<ConstraintViolation<Customer>> violations
      = validator.validate(customer);
 
    assertEquals(1, violations.size());
}

On the other hand, if the age is null, then the Optional value is not validated:

@Test
public void whenAgeNull_thenValidationSucceeds() {
    Customer customer = new Customer();
    customer.setName("John");
    Set<ConstraintViolation<Customer>> violations
      = validator.validate(customer);
 
    assertEquals(0, violations.size());
}

4. Non-Generic Container Elements

Besides adding annotations for type arguments, we can also apply validation to non-generic containers, as long as there is a value extractor for the type with the @UnwrapByDefault annotation.

Value extractors are the classes that extract the values from the containers for validation.

The reference implementation contains value extractors for OptionalInt, OptionalLong and OptionalDouble:

@Min(1)
private OptionalInt numberOfOrders;

In this case, the @Min annotation applies to the wrapped Integer value, and not the container.

5. Custom Container Elements

In addition to the built-in value extractors, we can also define our own and register them with a container type.

In this way, we can add validation annotations to elements of our custom containers.

Let’s add a new Profile class that contains a companyName property:

public class Profile {
    private String companyName;
    
    // standard getters, setters 
}

Next, we want to add a Profile property in the Customer class with a @NotBlank annotation – which verifies the companyName is not an empty String:

@NotBlank
private Profile profile;

For this to work, we need a value extractor that determines the validation to be applied to the companyName property and not the profile object directly.

Let’s add a ProfileValueExtractor class that implements the ValueExtractor interface and overrides the extractValue() method:

@UnwrapByDefault
public class ProfileValueExtractor 
  implements ValueExtractor<@ExtractedValue(type = String.class) Profile> {

    @Override
    public void extractValues(Profile originalValue, 
      ValueExtractor.ValueReceiver receiver) {
        receiver.value(null, originalValue.getCompanyName());
    }
}

This class also need to specify the type of the value extracted using the @ExtractedValue annotation.

Also, we’ve added the @UnwrapByDefault annotation that specifies the validation should be applied to the unwrapped value and not the container.

Finally, we need to register the class by adding a file called javax.validation.valueextraction.ValueExtractor to the META-INF/services directory, which contains the full name of our ProfileValueExtractor class:

org.baeldung.valueextractors.ProfileValueExtractor

Now, when we validate a Customer object with a profile property with an empty companyName, we will see a validation error:

@Test
public void whenProfileCompanyNameBlank_thenValidationFails() {
    Customer customer = new Customer();
    customer.setName("John");
    Profile profile = new Profile();
    profile.setCompanyName(" ");
    customer.setProfile(profile);
    Set<ConstraintViolation<Customer>> violations
     = validator.validate(customer);
 
    assertEquals(1, violations.size());
}

Note that if you are using hibernate-validator-annotation-processor, adding a validation annotation to a custom container class, when it’s marked as @UnwrapByDefault, will result in a compilation error in version 6.0.2.

This is a known issue and will likely be resolved in a future version.

6. Conclusion

In this article, we’ve shown how we can validate several types of container elements using Java Bean Validation 2.0.

You can find the full source code of the examples over on GitHub.

Viewing all 4717 articles
Browse latest View live


<script src="https://jsc.adskeeper.com/r/s/rssing.com.1596347.js" async> </script>