Quantcast
Channel: Baeldung
Viewing all 4709 articles
Browse latest View live

Custom JUnit 4 Test Runners

$
0
0

1. Overview

In this quick article, we’re going to focus on how to run JUnit tests using custom test runners.

Simply put, in order to specify the custom runner, we’ll need to use the @RunWith annotation.

2. Preparation

Let’s start by adding the standard JUnit dependency into our pom.xml:

<dependency>
  <groupId>junit</groupId>
  <artifactId>junit</artifactId>
  <version>4.12</version>  
</dependency>

3. Implementing a Custom Runner

In the following example, we’ll show how to write our own custom Runner – and run it using @RunWith.

A JUnit Runner is a class that extends JUnit’s abstract Runner class and it is responsible for running JUnit tests, typically using reflection.

Here, we’re implementing abstract methods of Runner class:

public class TestRunner extends Runner {

    private Class testClass;
    public TestRunner(Class testClass) {
        super();
        this.testClass = testClass;
    }

    @Override
    public Description getDescription() {
        return Description
          .createTestDescription(testClass, "My runner description");
    }

    @Override
    public void run(RunNotifier notifier) {
        System.out.println("running the tests from MyRunner: " + testClass);
        try {
            Object testObject = testClass.newInstance();
            for (Method method : testClass.getMethods()) {
                if (method.isAnnotationPresent(Test.class)) {
                    notifier.fireTestStarted(Description
                      .createTestDescription(testClass, method.getName()));
                    method.invoke(testObject);
                    notifier.fireTestFinished(Description
                      .createTestDescription(testClass, method.getName()));
                }
            }
        } catch (Exception e) {
            throw new RuntimeException(e);
        }
    }
}

The getDescription method is inherited from Describable and returns a Description that contains the information that is later being exported and may be used by various tools.

In the run implementation, we’re invoking the target test methods using reflection.

We’ve defined a constructor that takes a Class argument; this is a JUnit’s requirement. At runtime, JUnit will pass the target test class to this constructor.

RunNotifier is used for firing events that have information about the test progress.

Let’s use the runner in our test class:

public class Calculator {
    public int add(int a, int b) {
        return a + b;
    }
}

@RunWith(TestRunner.class)
public class CalculatorTest {
    Calculator calculator = new Calculator();

    @Test
    public void testAddition() {
        Syste.out.println("in testAddition");
        assertEquals("addition", 8, calculator.add(5, 3));
    }
}

The result we get:

-------------------------------------------------------
 T E S T S
-------------------------------------------------------
Running com.baeldung.junit.CalculatorTest
running the tests from MyRunner: class com.baeldung.junit.CalculatorTest
in testAddition
Tests run: 1, Failures: 0, Errors: 0, Skipped: 0, Time elapsed: 0.002 sec

Results :

Tests run: 1, Failures: 0, Errors: 0, Skipped: 0

4. Specialized Runners

Instead of extending the low-level Runner class, as we did in the last example, we can extend one of the specialized subclasses of Runner: ParentRunner or BlockJUnit4Runner.

The abstract ParentRunner class runs the tests in a hierarchical manner.

BlockJUnit4Runner is a concrete class and if we prefer to customize certain methods, we’ll probably be extending this class.

Let’s see that with an example:

public class BlockingTestRunner extends BlockJUnit4ClassRunner {
    public BlockingTestRunner(Class<?> klass) throws InitializationError {
        super(klass);
    }

    @Override
    protected Statement methodInvoker(FrameworkMethod method, Object test) {
        System.out.println("invoking: " + method.getName());
        return super.methodInvoker(method, test);
    }
}

Annotating a class with @RunWith(JUnit4.class) will always invoke the default JUnit 4 runner in the current version of JUnit; this class aliases the current default JUnit 4 class runner:

@RunWith(JUnit4.class)
public class CalculatorTest {
    Calculator calculator = new Calculator();

    @Test
    public void testAddition() {
        assertEquals("addition", 8, calculator.add(5, 3));
    }
}

5. Conclusion

JUnit Runners are highly adaptable and let the developer change the test execution procedure and the whole test process.

If we only want to make minor changes it is a good idea to have a look at the protected methods of BlockJUnit4Class runner.

Some popular third-party implementations of runners for use include SpringJUnit4ClassRunner, MockitoJUnitRunner, HierarchicalContextRunner, Cucumber Runner and much more.

The implementation of all these examples and code snippets can be found in the GitHub project – this is a Maven project, so it should be easy to import and run as it is.


Introduction to Atomix

$
0
0

1. Overview

Most distributed applications require some stateful component to be consistent and fault-tolerant. Atomix is an embeddable library helping in achieving fault-tolerance and consistency for distributed resources.

It provides a rich set of APIs for managing its resources like collections, groups, and tools for concurrency.

To get started, we need to add the following Maven dependency into our pom:

<dependency>
    <groupId>io.atomix</groupId>
    <artifactId>atomix-all</artifactId>
    <version>1.0.8</version>
</dependency>

This dependency provides a Netty-based transport needed by its nodes to communicate with each other.

2. Bootstrapping a Cluster

To get started with Atomix, we need to bootstrap a cluster first.

Atomix consists of a set of replicas which are used for creating stateful distributed resources. Each replica maintains a copy of the state of each resource existing in the cluster.

Replicas are two types in a cluster: active and passive.

State changes of distributed resources are propagated through active replicas while passive replicas are kept in sync to maintain fault-tolerance.

2.1. Bootstrapping an Embedded Cluster

To bootstrap a single node cluster, we need to create an instance of AtomixReplica first:

AtomixReplica replica = AtomixReplica.builder(
  new Address("localhost", 8700))
   .withStorage(storage)
   .withTransport(new NettyTransport())
   .build();

Here replica is configured with Storage and Transport. Code snippet to declare storage:

Storage storage = Storage.builder()
  .withDirectory(new File("logs"))
  .withStorageLevel(StorageLevel.DISK)
  .build();

Once the replica is declared and configured with storage and transport, we can bootstrap it by simply calling bootstrap() – which returns a CompletableFuture that can be used to block until the server is bootstrapped by calling associated blocking join() method:

CompletableFuture<AtomixReplica> future = replica.bootstrap();
future.join();

So far we’ve constructed a single node cluster. Now we can add more nodes to it.

To do this, we need to create other replicas and join them with the existing cluster; we need to spawn a new thread for calling the join(Address) method:

AtomixReplica replica2 = AtomixReplica.builder(
  new Address("localhost", 8701))
    .withStorage(storage)
    .withTransport(new NettyTransport())
    .build();
  
replica2
  .join(new Address("localhost", 8700))
  .join();

AtomixReplica replica3 = AtomixReplica.builder(
  new Address("localhost", 8702))
    .withStorage(storage)
    .withTransport(new NettyTransport())
    .build();

replica3.join(
  new Address("localhost", 8700), 
  new Address("localhost", 8701))
  .join();

Now we have a three nodes cluster bootstrapped. Alternatively, we can bootstrap a cluster by passing a List of addresses in bootstrap(List<Address>) method:

List<Address> cluster = Arrays.asList(
  new Address("localhost", 8700), 
  new Address("localhost", 8701), 
  new Address("localhsot", 8702));

AtomixReplica replica1 = AtomixReplica
  .builder(cluster.get(0))
  .build();
replica1.bootstrap(cluster).join();

AtomixReplica replica2 = AtomixReplica
  .builder(cluster.get(1))
  .build();
            
replica2.bootstrap(cluster).join();

AtomixReplica replica3 = AtomixReplica
  .builder(cluster.get(2))
  .build();

replica3.bootstrap(cluster).join();

We need to spawn a new thread for each replica.

2.2. Bootstrapping a Standalone Cluster

Atomix server can be run as a standalone server which can be downloaded from Maven Central. Simply put – it’s a Java archive which can be run via the terminal by providing

Simply put – it’s a Java archive which can be run via the terminal by providing host: port parameter in the address flag and using the -bootstrap flag.

Here’s the command to bootstrap a cluster:

java -jar atomix-standalone-server.jar 
  -address 127.0.0.1:8700 -bootstrap -config atomix.properties

Here atomix.properties is the configuration file to configure storage and transport. To make a multinode cluster, we can add nodes to the existing cluster using -join flag.

The format for it is:

java -jar atomix-standalone-server.jar 
  -address 127.0.0.1:8701 -join 127.0.0.1:8700

3. Working with a Client

Atomix supports creating a client to have remote access to its cluster, via the AtomixClient API.

Since clients need not be stateful, AtomixClient doesn’t have any storage. We simply need to configure transport while creating client since transport will be used to communicate with a cluster.

Let’s create a client with a transport:

AtomixClient client = AtomixClient.builder()
  .withTransport(new NettyTransport())
  .build();

We now need to connect the client to cluster.

We can declare a List of Address and pass the List as an argument to the connect() method of client:

client.connect(cluster)
  .thenRun(() -> {
      System.out.println("Client is connected to the cluster!");
  });

4. Handling Resources

The true power of Atomix lies in its strong set of APIs for creating and managing distributed resources. Resources are replicated and persisted in a cluster and are bolstered by a replicated state machine – managed by its underlying implementation of the Raft Consensus Protocol.

Distributed resources can be created and managed by one of its get() method. We can create a distributed resource instance from AtomixReplica.

Considering replica is an instance of AtomixReplica, the code snippet to create a distributed map resource and to set a value to it:

replica.getMap("map")
  .thenCompose(m -> m.put("bar", "Hello world!"))
  .thenRun(() -> System.out.println("Value is set in Distributed Map"))
  .join();

Here join() method will block program until the resource is created and value is set to it. We can get the same object using AtomixClient and retrieve the value with the get(“bar”) method.

We can use get() method at the end to wait for the result :

String value = client.getMap("map"))
  .thenCompose(m -> m.get("bar"))
  .thenApply(a -> (String) a)
  .get();

5. Consistency and Fault Tolerance

Atomix is utilized for mission-critical small scale data-sets for which consistency is a much bigger concern than availability.

It provides strong configurable consistency through linearizability for both reads and writes. In linearizability, once a write is committed, all clients are guaranteed to be aware of the resulting state.

Consistency in Atomix’s cluster is guaranteed by underlying Raft consensus algorithm where an elected leader will have all the writes that were previously successful.

All new writes will go through the cluster leader and synchronously replicated to a majority of the server before completion.

To maintain fault-tolerance, majority server of the cluster needs to be alive. If minority number of nodes fail, nodes will be marked inactive and will be replaced by passive nodes or standby nodes.

In case of leader failure, the remaining servers in the cluster will begin a new leader election. Meanwhile, the cluster will be unavailable.

In case of partition, if a leader is on the non-quorum side of the partition, it steps down, and a new leader is elected in the side with quorum.

And, if the leader is on the majority side, it’ll continue with no change. When the partition is resolved, nodes on the non-quorum side will join the quorum and update their log accordingly.

6. Conclusion

Like ZooKeeper, Atomix provides a robust set of libraries for dealing with distributed computing issues.

And, as always, the full source code for this task is available over on GitHub.

Java Weekly, Issue 197

$
0
0

Lots of interesting writeups on Java 9 this week.

Here we go…

1. Spring and Java

>> Spring Framework 5.0 goes GA [spring.io]

>> Reacting to Spring Framework 5.0 [content.pivotal.io]

Spring 5 is out! 

And, the Reactive Programming paradigm is the most significant addition in this major release, so this is a great time to start understand it and what problems it solves.

>> Get Started Quickly With Spring 5 Using Spring MVC Archetype [blog.codeleak.pl]

One of the easiest ways to start exploring Spring 5 is to use the new Maven archetype.

>> C# vs. Java: The Top 5 Features Java Developers Miss in C# [blog.takipi.com]

It turns out C# can learn something from Java as well, after all.

>> Code First Java 9 Module System Tutorial [blog.codefx.org]

Since Java 9 is out, it’s also time to get familiar with the JPMS.

Also worth reading:

Webinars and presentations:

Time to upgrade:

2. Technical and Musings

>> Software is about Storytelling [bravenewgeek.com]

History can justify even the most surprising technical decisions in a codebase.

>> Making Money through Tech Blogs [daedtech.com]

It’s worth being aware of opportunities that open as you grow your site.

Also worth reading:

4. Comics

And my favorite Dilberts of the week:

>> Dogbert The PR Specialist [dilbert.com]

>> False Rumor [dilbert.com]

>> Helping the Boss Be Successful [dilbert.com]

5. Pick of the Week

>> The Downside of Work-Life Balance [jamesclear.com]

Mocking Exception Throwing using Mockito

$
0
0

1. Overview

In this quick tutorial – we’ll focus on how to configure a method call to throw an exception with Mockito.

For more information on the library, also check out our Mockito series.

Here’s a simple dictionary class we’ll use in these examples:

class MyDictionary {
    private Map<String, String> wordMap = new HashMap<>();

    public void add(String word, String meaning) {
        wordMap.put(word, meaning);
    }

    public String getMeaning(String word) {
        return wordMap.get(word);
    }
}

2. Non-Void Return Type

First, if our method return type is not void we can use when().thenThrow():

@Test(expected = NullPointerException.class)
public void whenConfigNonVoidRetunMethodToThrowEx_thenExIsThrown() {
    MyDictionary dictMock = mock(MyDictionary.class);
    when(dictMock.getMeaning(anyString()))
      .thenThrow(NullPointerException.class);

    dictMock.getMeaning("word");
}

Notice, we configured the getMeaning() method – which returns a value of type String – to throw a NullPointerException when called.

3. Void Return Type

Now, if our method returns void, we’ll use doThrow():

@Test(expected = IllegalStateException.class)
public void whenConfigVoidRetunMethodToThrowEx_thenExIsThrown() {
    MyDictionary dictMock = mock(MyDictionary.class);
    doThrow(IllegalStateException.class)
      .when(dictMock)
      .add(anyString(), anyString());

    dictMock.add("word", "meaning");
}

Here, we configured an add() method – which returns void – to throw IllegalStateException when called.

We can’t use when().thenThrow() with void return type as the compiler doesn’t allow void methods inside brackets.

4. Exception as an Object

About configuring the exception itself, we can pass the exception’s class as in our previous examples or as an object:

@Test(expected = NullPointerException.class)
public void whenConfigNonVoidRetunMethodToThrowExWithNewExObj_thenExIsThrown() {
    MyDictionary dictMock = mock(MyDictionary.class);
    when(dictMock.getMeaning(anyString()))
      .thenThrow(new NullPointerException("Error occurred"));

    dictMock.getMeaning("word");
}

And we can do the same with doThrow() as well:

@Test(expected = IllegalStateException.class)
public void whenConfigVoidRetunMethodToThrowExWithNewExObj_thenExIsThrown() {
    MyDictionary dictMock = mock(MyDictionary.class);
    doThrow(new IllegalStateException("Error occurred"))
      .when(dictMock)
      .add(anyString(), anyString());

    dictMock.add("word", "meaning");
}

5. Spy

We can also configure Spy to throw an exception the same way we did with the mock:

@Test(expected = NullPointerException.class)
public void givenSpy_whenConfigNonVoidRetunMethodToThrowEx_thenExIsThrown() {
    MyDictionary dict = new MyDictionary();
    MyDictionary spy = Mockito.spy(dict);
    when(spy.getMeaning(anyString()))
      .thenThrow(NullPointerException.class);

    spy.getMeaning("word");
}

6. Conclusion

In this article, we explored how to configure method calls to throw an exception in Mockito.

As always, the full source code can be found over on GitHub.

Introduction to Conflict-Free Replicated Data Types

$
0
0

1. Overview

In this article, we’ll look at conflict-free replicated data types (CRDT) and how to work with them in Java. For our examples, we’ll use implementations from the wurmloch-crdt library.

When we have a cluster of N replica nodes in a distributed system, we may encounter a network partition — some nodes are temporarily unable to communicate with each other. This situation is called a split-brain.

When we have a split-brain in our system, some write requests — even for the same user — can go to different replicas that are not connected with each other. When such a situation occurs, our system is still available but is not consistent.

We need to decide what to do with writes and data that are not consistent when the network between two split clusters starts working again.

2. Conflict-Free Replicated Data Types to the Rescue

Let’s consider two nodes, A and B, that have become disconnected due to a split-brain.

Let’s say that a user changes his login and that a request goes to the node A. Then he/she decides to change it again, but this time the request goes to the node B.

Because of the split-brain, the two nodes are not connected. We need to decide how the login of this user should look when the network is working again.

We can utilize a couple of strategies: we can give the opportunity for resolving conflicts to the user (as is done in Google Docs), or we can use a CRDT for merging data from diverged replicas for us.

3. Maven Dependency

First, let’s add a dependency to the library that provides a set of useful CRDTs:

<dependency>
    <groupId>com.netopyr.wurmloch</groupId>
    <artifactId>wurmloch-crdt</artifactId>
    <version>0.1.0</version>
</dependency>

The latest version can be found on Maven Central.

4. Grow-Only Set

The most basic CRDT is a Grow-Only Set. Elements can only be added to a GSet and never removed. When the GSet diverges, it can be easily merged by calculating the union of two sets.

First, let’s create two replicas to simulate a distributed data structure and connect those two replicas using the connect() method:

LocalCrdtStore crdtStore1 = new LocalCrdtStore();
LocalCrdtStore crdtStore2 = new LocalCrdtStore();
crdtStore1.connect(crdtStore2);

Once we get two replicas in our cluster, we can create a GSet on the first replica and reference it on the second replica:

GSet<String> replica1 = crdtStore1.createGSet("ID_1");
GSet<String> replica2 = crdtStore2.<String>findGSet("ID_1").get();

At this point, our cluster is working as expected, and there is an active connection between two replicas. We can add two elements to the set from two different replicas and assert that the set contains the same elements on both replicas:

replica1.add("apple");
replica2.add("banana");

assertThat(replica1).contains("apple", "banana");
assertThat(replica2).contains("apple", "banana");

Let’s say that suddenly we have a network partition and there is no connection between the first and second replicas. We can simulate the network partition using the disconnect() method:

crdtStore1.disconnect(crdtStore2);

Next, when we add elements to the data set from both replicas, those changes are not visible globally because there is no connection between them:

replica1.add("strawberry");
replica2.add("pear");

assertThat(replica1).contains("apple", "banana", "strawberry");
assertThat(replica2).contains("apple", "banana", "pear");

Once the connection between both cluster members is established again, the GSet is merged internally using a union on both sets, and both replicas are consistent again:

crdtStore1.connect(crdtStore2);

assertThat(replica1)
  .contains("apple", "banana", "strawberry", "pear");
assertThat(replica2)
  .contains("apple", "banana", "strawberry", "pear");

5. Increment-Only Counter

Increment-Only counter is a CRDT that aggregates all increments locally on each node.

When replicas synchronize, after a network partition, the resulting value is calculated by summing all increments on all nodes — this is similar to LongAdder from java.concurrent but on a higher abstraction level.

Let’s create an increment-only counter using GCounter and increment it from both replicas. We can see that the sum is calculated properly:

LocalCrdtStore crdtStore1 = new LocalCrdtStore();
LocalCrdtStore crdtStore2 = new LocalCrdtStore();
crdtStore1.connect(crdtStore2);

GCounter replica1 = crdtStore1.createGCounter("ID_1");
GCounter replica2 = crdtStore2.findGCounter("ID_1").get();

replica1.increment();
replica2.increment(2L);

assertThat(replica1.get()).isEqualTo(3L);
assertThat(replica2.get()).isEqualTo(3L);

When we disconnect both cluster members and perform local increment operations, we can see that the values are inconsistent:

crdtStore1.disconnect(crdtStore2);

replica1.increment(3L);
replica2.increment(5L);

assertThat(replica1.get()).isEqualTo(6L);
assertThat(replica2.get()).isEqualTo(8L);

But once the cluster is healthy again, the increments will be merged, yielding the proper value:

crdtStore1.connect(crdtStore2);

assertThat(replica1.get())
  .isEqualTo(11L);
assertThat(replica2.get())
  .isEqualTo(11L);

6. PN Counter

Using a similar rule for the increment-only counter, we can create a counter that can be both incremented and decremented. The PNCounter stores all increments and decrements separately.

When replicas synchronize, the resulting value will be equal to the sum of all increments minus the sum of all decrements:

@Test
public void givenPNCounter_whenReplicasDiverge_thenMergesWithoutConflict() {
    LocalCrdtStore crdtStore1 = new LocalCrdtStore();
    LocalCrdtStore crdtStore2 = new LocalCrdtStore();
    crdtStore1.connect(crdtStore2);

    PNCounter replica1 = crdtStore1.createPNCounter("ID_1");
    PNCounter replica2 = crdtStore2.findPNCounter("ID_1").get();

    replica1.increment();
    replica2.decrement(2L);

    assertThat(replica1.get()).isEqualTo(-1L);
    assertThat(replica2.get()).isEqualTo(-1L);

    crdtStore1.disconnect(crdtStore2);

    replica1.decrement(3L);
    replica2.increment(5L);

    assertThat(replica1.get()).isEqualTo(-4L);
    assertThat(replica2.get()).isEqualTo(4L);

    crdtStore1.connect(crdtStore2);

    assertThat(replica1.get()).isEqualTo(1L);
    assertThat(replica2.get()).isEqualTo(1L);
}

7. Last-Writer-Wins Register

Sometimes, we have more complex business rules, and operating on sets or counters is insufficient. We can use the Last-Writer-Wins Register, which keeps only the last updated value when merging diverged data sets. Cassandra uses this strategy to resolve conflicts.

We need to be very cautious when using this strategy because it drops changes that occurred in the meantime.

Let’s create a cluster of two replicas and instances of the LWWRegister class:

LocalCrdtStore crdtStore1 = new LocalCrdtStore("N_1");
LocalCrdtStore crdtStore2 = new LocalCrdtStore("N_2");
crdtStore1.connect(crdtStore2);

LWWRegister<String> replica1 = crdtStore1.createLWWRegister("ID_1");
LWWRegister<String> replica2 = crdtStore2.<String>findLWWRegister("ID_1").get();

replica1.set("apple");
replica2.set("banana");

assertThat(replica1.get()).isEqualTo("banana");
assertThat(replica2.get()).isEqualTo("banana");

When the first replica sets the value to apple and the second one changes it to banana, the LWWRegister keeps only the last value.

Let’s see what happens if the cluster disconnects:

crdtStore1.disconnect(crdtStore2);

replica1.set("strawberry");
replica2.set("pear");

assertThat(replica1.get()).isEqualTo("strawberry");
assertThat(replica2.get()).isEqualTo("pear");

Each replica keeps its local copy of data that is inconsistent. When we call the set() method, the LWWRegister internally assigns a special version value that identifies the specific update to every using a VectorClock algorithm.

When the cluster synchronizes, it takes the value with the highest version and discards every previous update:

crdtStore1.connect(crdtStore2);

assertThat(replica1.get()).isEqualTo("pear");
assertThat(replica2.get()).isEqualTo("pear");

8. Conclusion

In this article, we showed the problem of consistency of distributed systems while maintaining availability.

In case of network partitions, we need to merge the diverged data when the cluster is synchronized. We saw how to use CRDTs to perform a merge of diverged data.

All these examples and code snippets can be found in the GitHub project – this is a Maven project, so it should be easy to import and run as it is.

A Guide to Deeplearning4j

$
0
0

 1. Introduction

In this article, we’ll create a simple neural network with the deeplearning4j (dl4j) library – a modern and powerful tool for machine learning.

Before we get started, not that this guide doesn’t require a profound knowledge of linear algebra, statistics, machine learning theory and lots of other topics necessary for a well-grounded ML engineer.

2. What is Deep Learning?

Neural networks are computational models that consist of interconnected layers of nodes.

Nodes are neuron-like processors of numeric data. They take data from their inputs, apply some weights and functions to these data and send the results to outputs. Such network can be trained with some examples of the source data.

Training essentially is saving some numeric state (weights) in the nodes which later affects the computation. Training examples may contain data items with features and certain known classes of these items (for instance, “this set of 16×16 pixels contains a hand-written letter “a”).

After training is finished, a neural network can derive information from new data, even if it has not seen these particular data items before. A well-modeled and well-trained network can recognize images, hand-written letters, speech, process statistical data to produce results for business intelligence, and much more.

Deep neural networks became possible in the recent years, with the advance of high-performance and parallel computing. Such networks differ from simple neural networks in that they consist of multiple intermediate (or hidden) layers. This structure allows networks to process data in a lot more complicated manner (in a recursive, recurrent, convolutional way, etc.), and extract a lot more information from it.

3. Setting Up the Project

To use the library, we need at least Java 7. Also, due to some native components, it only works with the 64-bit JVM version.

Before starting with the guide, let’s check if requirements are met:

$ java -version
java version "1.8.0_131"
Java(TM) SE Runtime Environment (build 1.8.0_131-b11)
Java HotSpot(TM) 64-Bit Server VM (build 25.131-b11, mixed mode)

First, let’s add the required libraries to our Maven pom.xml file. We’ll extract the version of the library to a property entry (for the latest version of the libraries, check out the Maven Central repository):

<properties>
    <dl4j.version>0.9.1</dl4j.version>
</properties>

<dependencies>

    <dependency>
        <groupId>org.nd4j</groupId>
        <artifactId>nd4j-native-platform</artifactId>
        <version>${dl4j.version}</version>
    </dependency>

    <dependency>
        <groupId>org.deeplearning4j</groupId>
        <artifactId>deeplearning4j-core</artifactId>
        <version>${dl4j.version}</version>
    </dependency>
</dependencies>

Note that nd4j-native-platform dependency is one of the several available implementations.

It relies on native libraries available for many different platforms (macOS, Windows, Linux, Android, etc.). We could also switch the backend to nd4j-cuda-8.0-platform, if we wanted to execute computations on a graphics card that supports CUDA programming model.

4. Preparing the Data

4.1. Preparing the DataSet File

We’ll write the “Hello World” of machine learning — classification of the iris flower data set. This is a set of data that was gathered from the flowers of different species (Iris setosa, Iris versicolor, and Iris virginica).

These species differ in lengths and widths of petals and sepals. It’d be hard to write a precise algorithm that classifies an input data item (i.e., determines to what species does a particular flower belong). But a well-trained neural network can classify it quickly and with little mistakes.

We’re going to use a CSV version of this data, where columns 0..3 contain the different features of the species and column 4 contains the class of the record, or the species, coded with a value 0, 1 or 2:

5.1,3.5,1.4,0.2,0
4.9,3.0,1.4,0.2,0
4.7,3.2,1.3,0.2,0
…
7.0,3.2,4.7,1.4,1
6.4,3.2,4.5,1.5,1
6.9,3.1,4.9,1.5,1
…

4.2. Vectorizing and Reading the Data

We encode the class with a number because neural networks work with numbers. Transforming real-world data items into series of numbers (vectors) is called vectorization – deeplearning4j uses the datavec library to do this.

First, let’s use this library to input the file with the vectorized data. When creating the CSVRecordReader, we can specify the number of lines to skip (for instance, if the file has a header line) and the separator symbol (in our case a comma):

try (RecordReader recordReader = new CSVRecordReader(0, ',')) {
    recordReader.initialize(new FileSplit(
      new ClassPathResource("iris.txt").getFile()));

    // …
}

To iterate over the records, we can use any of the multiple implementations of the DataSetIterator interface. The datasets can be quite massive, and the ability to page or cache the values could come in handy.

But our small dataset contains only 150 records, so let’s read all the data into memory at once with a call of iterator.next().

We also specify the index of the class column which in our case is the same as feature count (4) and the total number of classes (3).

Also, note that we need to shuffle the dataset to get rid of the class ordering in the original file.

We specify a constant random seed (42) instead of the default System.currentTimeMillis() call so that the results of the shuffling would always be the same. This allows us to get stable results each time we will run the program:

DataSetIterator iterator = new RecordReaderDataSetIterator(
  recordReader, 150, FEATURES_COUNT, CLASSES_COUNT);
DataSet allData = iterator.next();
allData.shuffle(42);

4.3. Normalizing and Splitting

Another thing we should do with the data before training is to normalize it. The normalization is a two-phase process:

  • gathering of some statistics about the data (fit)
  • changing (transform) the data in some way to make it uniform

Normalization may differ for different types of data.

For instance, if we want to process images of various sizes, we should first collect the size statistics and then scale the images to a uniform size.

But for numbers, normalization usually means transforming them into a so-called normal distribution. The NormalizerStandardize class can help us with that:

DataNormalization normalizer = new NormalizerStandardize();
normalizer.fit(allData);
normalizer.transform(allData);

Now that the data is prepared, we need to split the set into two parts.

The first part will be used in a training session. We’ll use the second part of the data (which the network would not see at all) to test the trained network.

This would allow us to verify that the classification works correctly. We will take 65% of the data (0.65) for the training and leave the rest 35% for the testing:

SplitTestAndTrain testAndTrain = allData.splitTestAndTrain(0.65);
DataSet trainingData = testAndTrain.getTrain();
DataSet testData = testAndTrain.getTest();

5. Preparing the Network Configuration

5.1. Fluent Configuration Builder

Now we can build a configuration of our network with a fancy fluent builder:

MultiLayerConfiguration configuration 
  = new NeuralNetConfiguration.Builder()
    .iterations(1000)
    .activation(Activation.TANH)
    .weightInit(WeightInit.XAVIER)
    .learningRate(0.1)
    .regularization(true).l2(0.0001)
    .list()
    .layer(0, new DenseLayer.Builder().nIn(FEATURES_COUNT).nOut(3).build())
    .layer(1, new DenseLayer.Builder().nIn(3).nOut(3).build())
    .layer(2, new OutputLayer.Builder(
      LossFunctions.LossFunction.NEGATIVELOGLIKELIHOOD)
        .activation(Activation.SOFTMAX)
        .nIn(3).nOut(CLASSES_COUNT).build())
    .backprop(true).pretrain(false)
    .build();

Even with this simplified fluent way of building a network model, there’s a lot to digest and a lot of parameters to tweak. Let’s break this model down.

5.2. Setting Network Parameters

The iterations() builder method specifies the number of optimization iterations.

The iterative optimization means performing multiple passes on the training set until the network converges to a good result.

Usually, when training on real and large datasets, we use multiple epochs (complete passes of data through the network) and one iteration for each epoch. But since our initial dataset is minimal, we’ll use one epoch and multiple iterations.

The activation() is a function that runs inside a node to determine its output.

The simplest activation function would be linear f(x) = x. But it turns out that only non-linear functions allow networks to solve complex tasks by using a few nodes.

There are lots of different activation functions available which we can look up in the org.nd4j.linalg.activations.Activation enum. We could also write our activation function if needed. But we’ll use the provided hyperbolic tangent (tanh) function.

The weightInit() method specifies one of the many ways to set up the initial weights for the network. Correct initial weights can profoundly affect the results of the training. Without going too much into the math, let’s set it to a form of Gaussian distribution (WeightInit.XAVIER), as this is usually a good choice for a start.

All other weight initialization methods can be looked up in the org.deeplearning4j.nn.weights.WeightInit enum.

Learning rate is a crucial parameter that profoundly affects the ability of the network to learn.

We could spend a lot of time tweaking this parameter in a more complex case. But for our simple task, we’ll use a pretty significant value of 0.1 and set it up with the learningRate() builder method.

One of the problems with training neural networks is a case of overfitting when a network “memorizes” the training data.

This happens when the network sets excessively high weights for the training data and produces bad results on any other data.

To solve this issue, we’re going to set up l2 regularization with the line .regularization(true).l2(0.0001). Regularization “penalizes” the network for too large weights and prevents overfitting.

5.3. Building Network Layers

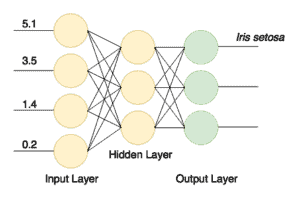
Next, we create a network of dense (also known as fully connect) layers.

The first layer should contain the same amount of nodes as the columns in the training data (4).

The second dense layer will contain three nodes. This is the value we can variate, but the number of outputs in the previous layer has to be the same.

The final output layer should contain the number of nodes matching the number of classes (3). The structure of the network is shown in the picture:

After successful training, we’ll have a network that receives four values via its inputs and sends a signal to one of its three outputs. This is a simple classifier.

Finally, to finish building the network, we set up back propagation (one of the most effective training methods) and disable pre-training with the line .backprop(true).pretrain(false).

6. Creating and Training a Network

Now let’s create a neural network from the configuration, initialize and run it:

MultiLayerNetwork model = new MultiLayerNetwork(configuration);
model.init();
model.fit(trainingData);

Now we can test the trained model by using the rest of the dataset and verify the results with evaluation metrics for three classes:

INDArray output = model.output(testData.getFeatureMatrix());
Evaluation eval = new Evaluation(3);
eval.eval(testData.getLabels(), output);

If we now print out the eval.stats(), we’ll see that our network is pretty good at classifying iris flowers, although it did mistake class 1 for class 2 three times.

Examples labeled as 0 classified by model as 0: 19 times
Examples labeled as 1 classified by model as 1: 16 times
Examples labeled as 1 classified by model as 2: 3 times
Examples labeled as 2 classified by model as 2: 15 times

==========================Scores========================================
# of classes: 3
Accuracy: 0.9434
Precision: 0.9444
Recall: 0.9474
F1 Score: 0.9411
Precision, recall & F1: macro-averaged (equally weighted avg. of 3 classes)
========================================================================

The fluent configuration builder allows us to add or modify layers of the network quickly, or tweak some other parameters to see if our model can be improved.

7. Conclusion

In this article, we’ve built a simple yet powerful neural network by using the deeplearning4j library.

As always, the source code for the article is available over on GitHub.

Introduction To Docx4J

$
0
0

1. Overview

In this article, we’ll focus on creating a .docx document using docx4j library.

Docx4j is a Java library used for creating and manipulating Office OpenXML files – which means it can only work with the .docx file type, while older versions of Microsoft Word use a .doc extension (binary files).

Note that the OpenXML format is supported by Microsoft Office starting with the 2007 version.

2. Maven Setup

To start working with docx4j, we need to add the required dependency into our pom.xml:

<dependency>
    <groupId>org.docx4j</groupId>
    <artifactId>docx4j</artifactId>
    <version>3.3.5</version>
</dependency>
<dependency> 
    <groupId>javax.xml.bind</groupId>
    <artifactId>jaxb-api</artifactId>
    <version>2.1</version>
</dependency>

Note that we can always look up the latest dependencies versions in the Maven Central Repository.

The JAXB dependency is needed, as docx4j uses this library under the hood to marshall/unmarshall XML parts in a docx file.

3. Create a Docx File Document

3.1. Text Elements And Styling

Let’s first see how to create a simple docx file – with a text paragraph:

WordprocessingMLPackage wordPackage = WordprocessingMLPackage.createPackage();
MainDocumentPart mainDocumentPart = wordPackage.getMainDocumentPart();
mainDocumentPart.addStyledParagraphOfText("Title", "Hello World!");
mainDocumentPart.addParagraphOfText("Welcome To Baeldung");
File exportFile = new File("welcome.docx");
wordPackage.save(exportFile);

Here’s the resulting welcome.docx file:

To create a new document, we have to make use of the WordprocessingMLPackage, which represents a docx file in OpenXML format, while the MainDocumentPart class holds a representation of the main document.xml part.

To clear things up, let’s unzip the welcome.docx file, and open the word/document.xml file to see what the XML representation looks like:

<w:body>
    <w:p>
        <w:pPr>
            <w:pStyle w:val="Title"/>
        </w:pPr>
        <w:r>
            <w:t>Hello World!</w:t>
        </w:r>
    </w:p>
    <w:p>
        <w:r>
            <w:t>Welcome To Baeldung!</w:t>
        </w:r>
    </w:p>
</w:body>

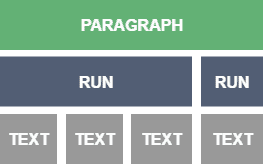
As we can see, each sentence is represented by a run (r) of text (t) inside a paragraph (p), and that’s what the addParagraphOfText() method is for.

The addStyledParagraphOfText() do a little more than that; it creates a paragraph properties (pPr) that holds the style to apply to the paragraph.

Simply put, paragraphs declare separate runs, and each run contain some text elements:

To create a nice looking document, we need to have full control of these elements (paragraph, run, and text).

So, let’s discover how to stylize our content using the runProperties (RPr) object:

ObjectFactory factory = Context.getWmlObjectFactory();
P p = factory.createP();
R r = factory.createR();
Text t = factory.createText();
t.setValue("Welcome To Baeldung");
r.getContent().add(t);
p.getContent().add(r);
RPr rpr = factory.createRPr();       
BooleanDefaultTrue b = new BooleanDefaultTrue();
rpr.setB(b);
rpr.setI(b);
rpr.setCaps(b);
Color green = factory.createColor();
green.setVal("green");
rpr.setColor(green);
r.setRPr(rpr);
mainDocumentPart.getContent().add(p);
File exportFile = new File("welcome.docx");
wordPackage.save(exportFile);

Here’s what the result looks like:

After we’ve created a paragraph, a run and a text element using createP(), createR() and createText() respectively, we’ve declared a new runProperties object (RPr) to add some styling to the text element.

The rpr object is used to set formatting properties, Bold (B), Italicized (I), and capitalized (Caps), those properties are applied to the text run using the setRPr() method.

3.2. Working with Images

Docx4j offers an easy way to add images to our Word document:

File image = new File("image.jpg" );
byte[] fileContent = Files.readAllBytes(image.toPath());
BinaryPartAbstractImage imagePart = BinaryPartAbstractImage
  .createImagePart(wordPackage, fileContent);
Inline inline = imagePart.createImageInline(
  "Baeldung Image (filename hint)", "Alt Text", 1, 2, false);
P Imageparagraph = addImageToParagraph(inline);
mainDocumentPart.getContent().add(Imageparagraph);

And here’s what the implementation of the addImageToParagraph() method looks like:

private static P addImageToParagraph(Inline inline) {
    ObjectFactory factory = new ObjectFactory();
    P p = factory.createP();
    R r = factory.createR();
    p.getContent().add(r);
    Drawing drawing = factory.createDrawing();
    r.getContent().add(drawing);
    drawing.getAnchorOrInline().add(inline);
    return p;
}

First, we’ve created the file that contains the image we want to add into our main document part, then, we’ve linked the byte array representing the image with the wordMLPackage object.

Once the image part is created, we need to create an Inline object using the createImageInline() method.

The addImageToParagraph() method embed the Inline object into a Drawing so that it can be added to a run.

Finally, like a text paragraph, the paragraph containing the image is added to the mainDocumentPart.

And here’s the resulting document:

3.3. Creating Tables

Docx4j also makes it quite easy to manipulate Tables (Tbl), rows (Tr), and columns (Tc).

Let’s see how to create a 3×3 table and add some content to it:

int writableWidthTwips = wordPackage.getDocumentModel()
  .getSections().get(0).getPageDimensions().getWritableWidthTwips();
int columnNumber = 3;
Tbl tbl = TblFactory.createTable(3, 3, writableWidthTwips/columnNumber);     
List<Object> rows = tbl.getContent();
for (Object row : rows) {
    Tr tr = (Tr) row;
    List<Object> cells = tr.getContent();
    for(Object cell : cells) {
        Tc td = (Tc) cell;
        td.getContent().add(p);
    }
}

Given some rows and columns, the createTable() method creates a new Tbl object, the third argument refers to the column width in twips (which is a distance measurement – 1/1440th of an inch).

Once created, we can iterate over the content of the tbl object, and add Paragraph objects into each cell.

Let’s see what the final result looks like:

4. Reading a Docx File Document

Now that we’ve discovered how to use docx4j to create documents, let’s see how to read an existing docx file, and print its content:

File doc = new File("helloWorld.docx");
WordprocessingMLPackage wordMLPackage = WordprocessingMLPackage
  .load(doc);
MainDocumentPart mainDocumentPart = wordMLPackage
  .getMainDocumentPart();
String textNodesXPath = "//w:t";
List<Object> textNodes= mainDocumentPart
  .getJAXBNodesViaXPath(textNodesXPath, true);
for (Object obj : textNodes) {
    Text text = (Text) ((JAXBElement) obj).getValue();
    String textValue = text.getValue();
    System.out.println(textValue);
}

In this example, we’ve created a WordprocessingMLPackage object based on an existing helloWorld.docx file, using the load() method.

After that, we’ve used a XPath expression (//w:t) to get all text nodes from the main document part.

The getJAXBNodesViaXPath() method returns a list of JAXBElement objects.

As a result, all text elements inside the mainDocumentPart object are printed in the console.

Note that we can always unzip our docx files to get a better understanding of the XML structure, which helps in analyzing problems, and gives better insight into how to tackle them.

5. Conclusion

In this article, we’ve discovered how docx4j makes it easier to perform complex operations on MSWord document, such as creating paragraphs, tables, document parts, and adding images.

The code snippets can be found, as always, over on GitHub.

Introduction to ORMLite

$
0
0

1. Overview

ORMLite is a lightweight ORM library for Java applications. It provides standard features of an ORM tool for the most common use cases, without the added complexity and overhead of other ORM frameworks.

It’s main features are:

  • defining entity classes by using Java annotations
  • extensible DAO classes
  • a QueryBuilder class for creating complex queries
  • generated classes for creating and dropping database tables
  • support for transactions
  • support for entity relationships

In the next sections, we’ll take a look at how we can set up the library, define entity classes and perform operations on the database using the library.

2. Maven Dependencies

To start using ORMLite, we need to add the ormlite-jdbc dependency to our pom.xml:

<dependency>
    <groupId>com.j256.ormlite</groupId>
    <artifactId>ormlite-jdbc</artifactId>
    <version>5.0</version>
</dependency>

By default, this also brings in the h2 dependency. In our examples, we’ll use an H2 in-memory database, so we don’t need another JDBC driver.

If you want to use a different database, you’ll also need the corresponding dependency.

3. Defining Entity Classes

To set up our model classes for persistence with ORMLite, there are two primary annotations we can use:

  • @DatabaseTable for the entity class
  • @DatabaseField for the properties

Let’s start by defining a Library entity with a name field and a libraryId field which is also a primary key:

@DatabaseTable(tableName = "libraries")
public class Library {	
 
    @DatabaseField(generatedId = true)
    private long libraryId;

    @DatabaseField(canBeNull = false)
    private String name;

    public Library() {
    }
    
    // standard getters, setters
}

The @DatabaseTable annotation has an optional tableName attribute that specifies the name of the table, if we don’t want to rely on a default class name.

For every field that we want to persist as a column in the database table, we have to add the @DatabaseField annotation.

The property that will serve as a primary key for the table can be marked with either id, generatedId or generatedSequence attributes. In our example, we choose the generatedId=true attribute so that the primary key will be automatically incremented.

Also, note that the class needs to have a no-argument constructor with at least package-scope visibility.

A few other familiar attributes we can use for configuring the fields are columnName, dataType, defaultValue, canBeNull, unique.

3.1. Using JPA Annotations

In addition to the ORMLite-specific annotations, we can also use JPA-style annotations to define our entities.

The equivalent of the Library entity we defined before using JPA standard annotations would be:

@Entity
public class LibraryJPA {
 
    @Id
    @GeneratedValue(strategy = GenerationType.IDENTITY)
    private long libraryId;

    @Column
    private String name;
    
    // standard getters, setters
}

Although ORMLite recognizes these annotations, we still need to add the javax.persistence-api dependency to use them.

The full list of supported JPA annotations is @Entity, @Id, @Column, @GeneratedValue, @OneToOne, @ManyToOne, @JoinColumn, @Version.

4. ConnectionSource

To work with the objects defined, we need to set up a ConnectionSource.

For this, we can use the JdbcConnectionSource class which creates a single connection, or the JdbcPooledConnectionSource which represents a simple pooled connection source:

JdbcPooledConnectionSource connectionSource 
  = new JdbcPooledConnectionSource("jdbc:h2:mem:myDb");

// work with the connectionSource

connectionSource.close();

Other external data source with better performance can also be used, by wrapping them in a DataSourceConnectionSource object.

5. TableUtils Class

Based on the ConnectionSource, we can use static methods from the TableUtils class to perform operations on the database schema:

  • createTable() – to create a table based on a entity class definition or a DatabaseTableConfig object
  • createTableIfNotExists() – similar to the previous method, except it will only create the table if it doesn’t exist; this only works on databases that support it
  • dropTable() – to delete a table
  • clearTable() – to delete the data from a table

Let’s see how we can use TableUtils to create the table for our Library class:

TableUtils.createTableIfNotExists(connectionSource, Library.class);

6. DAO Objects

ORMLite contains a DaoManager class that can create DAO objects for us with CRUD functionality:

Dao<Library, Long> libraryDao 
  = DaoManager.createDao(connectionSource, Library.class);

The DaoManager doesn’t regenerate the class for each subsequent call of createDao(), but instead reuses it for better performance.

Next, we can perform CRUD operations on Library objects:

Library library = new Library();
library.setName("My Library");
libraryDao.create(library);
        
Library result = libraryDao.queryForId(1L);
        
library.setName("My Other Library");
libraryDao.update(library);
        
libraryDao.delete(library);

The DAO is also an iterator that can loop through all the records:

libraryDao.forEach(lib -> {
    System.out.println(lib.getName());
});

However, ORMLite will only close the underlying SQL statement if the loop goes all the way to the end. An exception or a return statement may cause a resource leak in your code.

For that reason, the ORMLite documentation recommends we use the iterator directly:

try (CloseableWrappedIterable<Library> wrappedIterable 
  = libraryDao.getWrappedIterable()) {
    wrappedIterable.forEach(lib -> {
        System.out.println(lib.getName());
    });
 }

This way, we can close the iterator using a try-with-resources or a finally block and avoid any resource leak.

6.1. Custom DAO Class

If we want to extend the behavior of the DAO objects provided, we can create a new interface which extends the Dao type:

public interface LibraryDao extends Dao<Library, Long> {
    public List<Library> findByName(String name) throws SQLException;
}

Then, let’s add a class that implements this interface and extends the BaseDaoImpl class:

public class LibraryDaoImpl extends BaseDaoImpl<Library, Long> 
  implements LibraryDao {
    public LibraryDaoImpl(ConnectionSource connectionSource) throws SQLException {
        super(connectionSource, Library.class);
    }

    @Override
    public List<Library> findByName(String name) throws SQLException {
        return super.queryForEq("name", name);
    }
}

Note that we need to have a constructor of this form.

Finally, to use our custom DAO, we need to add the class name to the Library class definition:

@DatabaseTable(tableName = "libraries", daoClass = LibraryDaoImpl.class)
public class Library { 
    // ...
}

This enables us to use the DaoManager to create an instance of our custom class:

LibraryDao customLibraryDao 
  = DaoManager.createDao(connectionSource, Library.class);

Then we can use all the methods from the standard DAO class, as well as our custom method:

Library library = new Library();
library.setName("My Library");

customLibraryDao.create(library);
assertEquals(
  1, customLibraryDao.findByName("My Library").size());

7. Defining Entity Relationships

ORMLite uses the concept of “foreign” objects or collections to define relationships between entities for persistence.

Let’s take a look at how we can define each type of field.

7.1. Foreign Object Fields

We can create a unidirectional one-to-one relationship between two entity classes by using the foreign=true attribute on a field annotated with @DatabaseField. The field must be of a type that’s also persisted in the database.

First, let’s define a new entity class called Address:

@DatabaseTable(tableName="addresses")
public class Address {
    @DatabaseField(generatedId = true)
    private long addressId;

    @DatabaseField(canBeNull = false)
    private String addressLine;
    
    // standard getters, setters 
}

Next, we can add a field of type Address to our Library class which is marked as foreign:

@DatabaseTable(tableName = "libraries")
public class Library {      
    //...

    @DatabaseField(foreign=true, foreignAutoCreate = true, 
      foreignAutoRefresh = true)
    private Address address;

    // standard getters, setters
}

Notice that we’ve also added two more attributes to the @DatabaseField annotation: foreignAutoCreate and foreignAutoRefresh, both set to true.

The foreignAutoCreate=true attribute means that when we save a Library object with an address field, the foreign object will also be saved, provided its id is not null and has a generatedId=true attribute.

If we set foreignAutoCreate to false, which is the default value, then we’d need to persist the foreign object explicitly before saving the Library object that references it.

Similarly, the foreignAutoRefresh=true attribute specifies that when retrieving a Library object, the associated foreign object will also be retrieved. Otherwise, we’d need to refresh it manually.

Let’s add a new Library object with an Address field and call the libraryDao to persist both:

Library library = new Library();
library.setName("My Library");
library.setAddress(new Address("Main Street nr 20"));

Dao<Library, Long> libraryDao 
  = DaoManager.createDao(connectionSource, Library.class);
libraryDao.create(library);

Then, we can call the addressDao to verify that the Address has also been saved:

Dao<Address, Long> addressDao 
  = DaoManager.createDao(connectionSource, Address.class);
assertEquals(1, 
  addressDao.queryForEq("addressLine", "Main Street nr 20")
  .size());

7.2. Foreign Collections

For the many side of a relationship, we can use the types ForeignCollection<T> or Collection<T> with a @ForeignCollectionField annotation.

Let’s create a new Book entity like the ones above, then add a one-to-many relationship in the Library class:

@DatabaseTable(tableName = "libraries")
public class Library {  
    // ...
    
    @ForeignCollectionField(eager=false)
    private ForeignCollection<Book> books;
    
    // standard getters, setters
}

In addition to this, it’s required that we add a field of type Library in the Book class:

@DatabaseTable
public class Book {
    // ...
    @DatabaseField(foreign = true, foreignAutoRefresh = true) 
    private Library library;

    // standard getters, setters
}

The ForeignCollection has add() and remove() methods that operate on the records of type Book:

Library library = new Library();
library.setName("My Library");
libraryDao.create(library);

libraryDao.refresh(library);

library.getBooks().add(new Book("1984"));

Here, we’ve created a library object, then added a new Book object to the books field, which also persists it to the database.

Note that since our collection is marked as lazily loaded (eager=false), we need to call the refresh() method before being able to use the book field.

We can also create the relationship by setting the library field in the Book class:

Book book = new Book("It");
book.setLibrary(library);
bookDao.create(book);

To verify that both Book objects are added to the library we can use the queryForEq() method to find all the Book records with the given library_id:

assertEquals(2, bookDao.queryForEq("library_id", library).size());

Here, the library_id is the default name of the foreign key column, and the primary key is inferred from the library object.

8. QueryBuilder

Each DAO can be used to obtain a QueryBuilder object that we can then leverage for building more powerful queries.

This class contains methods that correspond to common operations used in an SQL query such as: selectColumns(), where(), groupBy(), having(), countOf(), distinct(), orderBy(), join().

Let’s see an example of how we can find all the Library records that have more than one Book associated:

List<Library> libraries = libraryDao.queryBuilder()
  .where()
  .in("libraryId", bookDao.queryBuilder()
    .selectColumns("library_id")
    .groupBy("library_id")
    .having("count(*) > 1"))
  .query();

9. Conclusion

In this article, we’ve seen how we can define entities using ORMLite, as well as the main features of the library that we can use to manipulate objects and their associated relational databases.

The full source code of the example can be found over on GitHub.


Comparing Spring AOP and AspectJ

$
0
0

1. Introduction

There are multiple available AOP libraries today, and these need to be able to answer a number of questions:

  • Is it compatible with my existing or new application?
  • Where can I implement AOP?
  • How quickly will it integrate with my application?
  • What is the performance overhead?

In this article, we’ll look at answering these questions and introduce Spring AOP and AspectJ – the two most popular AOP frameworks for Java.

2. AOP Concepts

Before we begin, let’s do a quick, high-level review of terms and core concepts:

  • Aspect – a standard code/feature that is scattered across multiple places in the application and is typically different than the actual Business Logic (for example, Transaction management). Each aspect focuses on a specific cross-cutting functionality
  • Joinpoint – it’s a particular point during execution of programs like method execution, constructor call, or field assignment
  • Advice – the action taken by the aspect in a specific joinpoint
  • Pointcut – a regular expression that matches a joinpoint. Each time any join point matches a pointcut, a specified advice associated with that pointcut is executed
  • Weaving – the process of linking aspects with targeted objects to create an advised object

3. Spring AOP and AspectJ

Now, let’s discuss Spring AOP and AspectJ across a number of axis – such as capabilities, goals, weaving, internal structure, joinpoints, and simplicity.

3.1. Capabilities and Goals

Simply put, Spring AOP and AspectJ have different goals.

Spring AOP aims to provide a simple AOP implementation across Spring IoC to solve the most common problems that programmers face. It is not intended as a complete AOP solution – it can only be applied to beans that are managed by a Spring container.

On the other hand, AspectJ is the original AOP technology which aims to provide complete AOP solution. It is more robust but also significantly more complicated than Spring AOP. It’s also worth noting that AspectJ can be applied across all domain objects.

3.2. Weaving

Both AspectJ and Spring AOP uses the different type of weaving which affects their behavior regarding performance and ease of use.

AspectJ makes use of three different types of weaving:

  1. Compile-time weaving: The AspectJ compiler takes as input both the source code of our aspect and our application and produces a woven class files as output
  2. Post-compile weaving: This is also known as binary weaving. It is used to weave existing class files and JAR files with our aspects
  3. Load-time weaving: This is exactly like the former binary weaving, with a difference that weaving is postponed until a class loader loads the class files to the JVM

For more in-depth information on AspectJ itself, head on over to this article.

As AspectJ uses compile time and classload time weaving, Spring AOP makes use of runtime weaving.

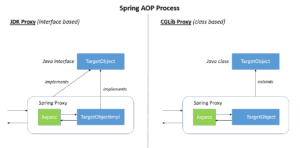
With runtime weaving, the aspects are woven during the execution of the application using proxies of the targeted object – using either JDK dynamic proxy or CGLIB proxy (which are discussed in next point):

3.3. Internal Structure and Application

Spring AOP is a proxy-based AOP framework. This means that to implement aspects to the target objects, it’ll create proxies of that object. This is achieved using either of two ways:

  1. JDK dynamic proxy – the preferred way for Spring AOP. Whenever the targeted object implements even one interface, then JDK dynamic proxy will be used
  2. CGLIB proxy – if the target object doesn’t implement an interface, then CGLIB proxy can be used

We can learn more about Spring AOP proxying mechanisms from the official docs.

AspectJ, on the other hand, doesn’t do anything at runtime as the classes are compiled directly with aspects.

And so unlike Spring AOP, it doesn’t require any design patterns. To weave the aspects to the code, it introduces its compiler known as AspectJ compiler (ajc), through which we compile our program and then runs it by supplying a small (< 100K) runtime library.

3.4. Joinpoints

In section 3.3, we showed that Spring AOP is based on proxy patterns. Because of this, it needs to subclass the targeted Java class and apply cross-cutting concerns accordingly.

But it comes with a limitation. We cannot apply cross-cutting concerns (or aspects) across classes that are “final” because they cannot be overridden and thus it would result in a runtime exception. 

The same applies for static and final methods. Spring aspects cannot be applied to them because they cannot be overridden. Hence Spring AOP because of these limitations, only supports method execution join points.

However, AspectJ weaves the cross-cutting concerns directly into the actual code before runtime. Unlike Spring AOP, it doesn’t require to subclass the targetted object and thus supports many others joinpoints as well. Following is the summary of supported joinpoints:

Joinpoint Spring AOP Supported AspectJ Supported
Method Call No Yes
Method Execution Yes Yes
Constructor Call No Yes
Constructor Execution No Yes
Static initializer execution No Yes
Object initialization No Yes
Field reference No Yes
Field assignment No Yes
Handler execution No Yes
Advice execution No Yes

It’s also worth noting that in Spring AOP, aspects aren’t applied to the method called within the same class.

That’s obviously because when we call a method within the same class, then we aren’t calling the method of the proxy that Spring AOP supplies. If we need this functionality, then we do have to define a separate method in different beans, or use AspectJ.

3.5. Simplicity

Spring AOP is obviously simpler because it doesn’t introduce any extra compiler or weaver between our build process. It uses runtime weaving, and therefore it integrates seamlessly with our usual build process. Although it looks simple, it only works with beans that are managed by Spring.

However, to use AspectJ, we’re required to introduce the AspectJ compiler (ajc) and re-package all our libraries (unless we switch to post-compile or load-time weaving).

This is, of course, more complicated than the former – because it introduces AspectJ Java Tools (which include a compiler (ajc), a debugger (ajdb), a documentation generator (ajdoc), a program structure browser (ajbrowser)) which we need to integrate with either our IDE or the build tool.

3.6. Performance

As far as performance is concerned, compile-time weaving is much faster than runtime weaving. Spring AOP is a proxy-based framework, so there is the creation of proxies at the time of application startup. Also, there are a few more method invocations per aspect, which affects the performance negatively.

On the other hand, AspectJ weaves the aspects into the main code before the application executes and thus there’s no additional runtime overhead, unlike Spring AOP.

For these reasons, the benchmarks suggest that AspectJ is almost around 8 to 35 times faster than Spring AOP.

4. Summary

This quick table summarizes the key differences between Spring AOP and AspectJ:

Spring AOP AspectJ
Implemented in pure Java Implemented using extensions of Java programming language
No need for separate compilation process Needs AspectJ compiler (ajc) unless LTW is set up
Only runtime weaving is available Runtime weaving is not available. Supports compile-time, post-compile, and load-time Weaving
Less Powerful – only supports method level weaving More Powerful – can weave fields, methods, constructors, static initializers, final class/methods, etc…
Can only be implemented on beans managed by Spring container Can be implemented on all domain objects
Supports only method execution pointcuts Support all pointcuts
Proxies are created of targeted objects, and aspects are applied on these proxies Aspects are weaved directly into code before application is executed (before runtime)
Much slower than AspectJ Better Performance
Easy to learn and apply Comparatively more complicated than Spring AOP

5. Choosing the Right Framework

If we analyze all the arguments made in this section, we’ll start to understand that it’s not at all that one framework is better than another.

Simply put, the choice heavily depends on our requirements:

  • Framework: If the application is not using Spring framework, then we have no option but to drop the idea of using Spring AOP because it cannot manage anything that’s outside the reach of spring container. However, if our application is created entirely using Spring framework, then we can use Spring AOP as it’s straightforward to learn and apply
  • Flexibility: Given the limited joinpoint support, Spring AOP is not a complete AOP solution, but it solves the most common problems that programmers face. Although if we want to dig deeper and exploit AOP to its maximum capability and want the support from a wide range of available joinpoints, then AspectJ is the choice
  • Performance: If we’re using limited aspects, then there are trivial performance differences. But there are sometimes cases when an application has more than tens of thousands of aspects. We would not want to use runtime weaving in such cases so it would be better to opt for AspectJ. AspectJ is known to be 8 to 35 times faster than Spring AOP
  • Best of Both: Both of these frameworks are fully compatible with each other. We can always take advantage of Spring AOP whenever possible and still use AspectJ to get support of joinpoints that aren’t supported by the former

6. Conclusion

In this article, we analyzed both Spring AOP and AspectJ, in several key areas.

We compared the two approaches to AOP both on flexibility as well as on how easily they will fit with our application.

JIRA REST API Integration

$
0
0

1. Introduction

In this article, we’ll have a quick look at how to integrate with the JIRA using its REST API.

2. Maven Dependency

The required artifacts can be found in Atlassian’s public Maven repository:

<repository>
    <id>atlassian-public</id>
    <url>https://packages.atlassian.com/maven/repository/public</url>
</repository>

Once the repository is added to the pom.xml, we need to add the below dependencies:

<dependency>
    <groupId>com.atlassian.jira</groupId>
    <artifactId>jira-rest-java-client-core</artifactId>
    <version>4.0.0</version>
</dependency>
<dependency>
    <groupId>com.atlassian.fugue</groupId>
    <artifactId>fugue</artifactId>
    <version>2.6.1</version>
</dependency>

You can refer to Maven Central for the latest versions of core and fugue dependencies.

3. Creating a Jira Client

First, let’s have a look at some basic information that we need to be able to connect to a Jira instance:

  • username – is the username of any valid Jira user
  • password – is the password of that user
  • jiraUrl – is the URL where the Jira instance is hosted

Once we have these details, we can instantiate our Jira Client:

MyJiraClient myJiraClient = new MyJiraClient(
  "user.name, 
  "password", 
  "http://jira.company.com");

The constructor of this class:

public MyJiraClient(String username, String password, String jiraUrl) {
    this.username = username;
    this.password = password;
    this.jiraUrl = jiraUrl;
    this.restClient = getJiraRestClient();
}

The getJiraRestClient() utilizes all the information provided and returns an instance of JiraRestClient. This is the main interface through which we’ll communicate with the Jira REST API:

private JiraRestClient getJiraRestClient() {
    return new AsynchronousJiraRestClientFactory()
      .createWithBasicHttpAuthentication(getJiraUri(), this.username, this.password);
}

Here, we’re using the basic authentication to communicate with the API. However, more sophisticated authentication mechanisms like OAuth are also supported.

The getUri() method simply converts the jiraUrl into an instance of java.net.URI:

private URI getJiraUri() {
    return URI.create(this.jiraUrl);
}

This concludes our infrastructure of creating a custom Jira client. We can now have a look at various ways to interact with the API.

3.1. Create a New Issue

Let’s start by creating a new issue. We will use this newly created issue for all other examples in this article:

public String createIssue(String projectKey, Long issueType, String issueSummary) {
    IssueRestClient issueClient = restClient.getIssueClient();
    IssueInput newIssue = new IssueInputBuilder(
      projectKey, issueType, issueSummary).build();
    return issueClient.createIssue(newIssue).claim().getKey();
}

The projectKey is the unique that defines your project. This is nothing but the prefix that is appended to all of our issues. The next argument, issueType is also project dependent that identifies the type of your issues like “Task” or “Story”. The issueSummary is the title of our issue.

The issue goes as an instance of IssueInput to the rest API. Apart from the inputs that we described, things like assignee, reporter, affected versions, and other metadata can go as an IssueInput.

3.2. Update Issue Description

Each issue in Jira is identified by a unique String like “MYKEY-123“. We need this issue key to interact with the rest API and update the description of the issue:

public void updateIssueDescription(String issueKey, String newDescription) {
    IssueInput input = new IssueInputBuilder()
      .setDescription(newDescription)
      .build();
    restClient.getIssueClient()
      .updateIssue(issueKey, input)
      .claim();
}

Once the description is updated, let’s not read back the updated description:

public Issue getIssue(String issueKey) {
    return restClient.getIssueClient()
      .getIssue(issueKey) 
      .claim();
}

The Issue instance represents an issue identified by the issueKey. We can use this instance to read the description of this issue:

Issue issue = myJiraClient.getIssue(issueKey);
System.out.println(issue.getDescription());

This will print the description of the issue to the console.

3.3. Vote for an Issue

Once we have an instance of Issue obtained, we can use it to perform update/edit actions as well. Let’s vote for the issue:

public void voteForAnIssue(Issue issue) {
    restClient.getIssueClient()
      .vote(issue.getVotesUri())
      .claim();
}

This will add the vote to the issue on behalf of the user whose credentials were used. This can be verified by checking the vote count:

public int getTotalVotesCount(String issueKey) {
    BasicVotes votes = getIssue(issueKey).getVotes();
    return votes == null ? 0 : votes.getVotes();
}

One thing to note here is that we are again fetching a fresh instance of Issue here as we want to get the updated vote count reflected.

3.4. Adding a Comment

We can use the same Issue instance to add a comment on behalf of the user. Like adding a vote, adding a comment is also pretty simple:

public void addComment(Issue issue, String commentBody) {
    restClient.getIssueClient()
      .addComment(issue.getCommentsUri(), Comment.valueOf(commentBody));
}

We used the factory method valueOf() provided by the Comment class to create an instance of a Comment. There are various other factory methods for advanced use cases, such as controlling the visibility of a Comment.

Let’s fetch a fresh instance of the Issue and read all the Comments:

public List<Comment> getAllComments(String issueKey) {
    return StreamSupport.stream(getIssue(issueKey).getComments().spliterator(), false)
      .collect(Collectors.toList());
}

3.5. Delete an Issue

Deleting an issue is also fairly simple. We only need the issue key that identifies the issue:

public void deleteIssue(String issueKey, boolean deleteSubtasks) {
    restClient.getIssueClient()
      .deleteIssue(issueKey, deleteSubtasks)
      .claim();
}

4. Conclusion

In this quick article, we created a simple Java client that integrates with the Jira Rest API and performs some of the basic operations.

The full source of this article can be found over on GitHub.

Exploring the New Spring Cloud Gateway

$
0
0

1. Overview

In this article, we’ll explore the main features of the Spring Cloud Gateway project, a new API based on Spring 5, Spring Boot 2 and Project Reactor.

The tool provides out-of-the-box routing mechanisms often used in microservices applications as a way of hiding multiple services behind a single facade.

2. Routing Handler

Being focused on routing requests, the Spring Cloud Gateway forwards requests to a Gateway Handler Mapping – which determines what should be done with requests matching a specific route.

Let’s start with a quick example of how to the Gateway Handler resolves route configurations by using RouteLocator:

@Bean
public RouteLocator routingConfig() {
    return Routes.locator()
      .route("baeldung")
      .uri("http://baeldung.com")
      .predicate(host("**.baeldung.com"))
      .and()
      .route("myOtherRouting")
      .id("myOtherID")
      .uri("http://othersite.com")
      .predicate(get("**.baeldung.com"))
      .and()
      .build();
}

Notice how we made use of the main building blocks of this API:

  • Route –  the primary API of the gateway. It is defined by a given identification (ID), a destination (URI) and set of predicates and filters
  • Predicate – a Java 8’s Predicate – which is used for matching HTTP requests using headers, methods or parameters
  • Filter – a standard Spring’s WebFilter

3. Dynamic Routing

Just like Zuul, Spring Cloud Gateway provides means for routing requests to different services.

The routing configuration can be created by using pure Java (RouteLocator, as shown in the example in section 2.1) or by using properties configuration:

spring:
  application:
    name: gateway-service  
  cloud:
    gateway:
      routes:
      - id: baeldung
        uri: baeldung.com
      - id: myOtherRouting
        uri: localhost:9999

4. Routing Factories 

Spring Cloud Gateway matches routes using the Spring WebFlux HandlerMapping infrastructure.

It also includes many built-in Route Predicate Factories. All of these predicates match different attributes of the HTTP request. Multiple Route Predicate Factories can be combined via the logical “and”.

Route matching can be applied both programmatically or via configuration properties file using a different type of Route Predicate Factories.

4.1. Before Route Predicate Factory

The Before Route Predicate Factory takes one parameter: a datetime. This predicate matches requests that happen before the current datetime:

spring:
  cloud:
    gateway:
      routes:
      - id: before_route
        uri: http://baeldung.com
        predicates:
        - Before=2017-09-11T17:42:47.789-07:00[America/Alaska]

The Java configuration can be represented as:

//..route definition 
.id("before_route")
.uri("http://baeldung.com")
.predicate(before(LocalDateTime.now().atZone(ZoneId.systemDefault()))

4.2. Between Route Predicate Factory

The Between Route Predicate Factory takes two parameters: datetime1, and datetime2. This predicate matches requests that happen after datetime1 (inclusive) and before datetime2 (exclusive). The datetime2 parameter must be after datetime1: 

spring:
  cloud:
    gateway:
      routes:
      - id: between_route
        uri: http://baeldung.com
        predicates:
        - Between=2017-09-10T17:42:47.789-07:00[America/Alaska], 2017-09-11T17:42:47.789-07:00[America/Alaska]

And the Java configuration looks like this:

ZonedDateTime datetime1 = LocalDateTime.now().minusDays(1).atZone(ZoneId.systemDefault());
ZonedDateTime datetime2 = LocalDateTime.now().atZone(ZoneId.systemDefault())
//..route definition
.id("between_route")
.uri("http://baeldung.com")
.predicate(between(datetime1, datetime2))

4.3. Header Route Predicate Factory

The Header Route Predicate Factory takes two parameters: the header name, and a regular expression. This predicate matches a header matching the regular expression: 

spring:
  cloud:
    gateway:
      routes:
      - id: header_route
        uri: http://baeldung.com
        predicates:
        - Header=X-Request-Id, \d+

The Java configuration can be represented as:

//..route definition
.id("header_route")
.uri("http://baeldung.com")
.predicate(header("X-Request-Id", "\d+"))

4.4. Host Route Predicate Factor

The Host Route Predicate Factory takes one parameter: the hostname pattern. The pattern is an Ant-style pattern with “.” as the separator.

This predicate matches the Host header with the given the pattern: 

spring:
  cloud:
    gateway:
      routes:
      - id: host_route
        uri: http://baeldung.com
        predicates:
        - Host=**.baeldung.com

Here’s the Java configuration alternative:

//..route definition
.id("host_route")
.uri("http://baeldung.com")
.predicate(host("**.baeldung.com"))

4.5. Method Route Predicate Factory

The Method Route Predicate Factory takes one parameter: the HTTP method to match: 

spring:
  cloud:
    gateway:
      routes:
      - id: method_route
        uri: http://baeldung.com
        predicates:
        - Method=GET

The Java configuration can be represented as:

//..route definition
.id("method_route")
.uri("http://baeldung.com")
.predicate(method("GET"))

4.6. Path Route Predicate Factory

The Path Route Predicate Factory takes one parameter: a Spring PathMatcher pattern: 

spring:
  cloud:
    gateway:
      routes:
      - id: path_route
        uri: http://baeldung.com
        predicates:
        - Path=/articles/{articleId}

The Java configuration:

//..route definition
.id("path_route")
.uri("http://baeldung.com")
.predicate(path("/articles/"+articleId))

4.7. Query Route Predicate Factory

The Query Route Predicate Factory takes two parameters: a required param and an optional regexp: 

spring:
  cloud:
    gateway:
      routes:
      - id: query_route
        uri: http://baeldung.com
        predicates:
        - Query=articleId, \w

And the Java configuration:

//..route definition
.id("query_route")
.uri("http://baeldung.com")
.predicate(query("articleId", "\w"))

4.8. RemoteAddr Route Predicate Factory

The RemoteAddr Route Predicate Factory takes a list (minimum of 1) of CIDR-notation strings, e.g., 192.168.0.1/16 (where 192.168.0.1 is an IP address, and 16 is a subnet mask): 

spring:
  cloud:
    gateway:
      routes:
      - id: remoteaddr_route
        uri: http://baeldung.com
        predicates:
        - RemoteAddr=192.168.1.1/24

And the corresponding Java configuration:

//..route definition
.id("remoteaddr_route")
.uri("http://baeldung.com")
.predicate(remoteAddr("192.168.1.1/24"))

5. WebFilter Factories

Route filters make the modification of the incoming HTTP request or outgoing HTTP response possible.

Spring Cloud Gateway includes many built-in WebFilter Factories.

5.1. AddRequestHeader WebFilter Factory 

The AddRequestHeader WebFilter Factory takes a name and value parameter: 

spring:
  cloud:
    gateway:
      routes:
      - id: addrequestheader_route
        uri: http://baeldung.com
        predicates:
        - Path=/articles
        filters:
        - AddRequestHeader=X-SomeHeader, bael

Here’s the corresponding Java config:

//...route definition
.route("addrequestheader_route")
.uri("http://baeldung.com")
.predicate(path("/articles"))
.add(addRequestHeader("X-SomeHeader", "bael"))

5.2. AddRequestParameter WebFilter Factory

The AddRequestParameter WebFilter Factory takes a name and value parameter: 

spring:
  cloud:
    gateway:
      routes:
      - id: addrequestparameter_route
        uri: http://baeldung.com
        predicates:
        - Path=/articles
        filters:
        - AddRequestParameter=foo, bar

The corresponding Java configuration:

//...route definition
.route("addrequestparameter_route")
.uri("http://baeldung.com")
.predicate(path("/articles"))
.add(addRequestParameter("foo", "bar"))

5.3. AddResponseHeader WebFilter Factory

The AddResponseHeader WebFilter Factory takes a name and value parameter: 

spring:
  cloud:
    gateway:
      routes:
      - id: addrequestheader_route
        uri: http://baeldung.com
        predicates:
        - Path=/articles
        filters:
        - AddResponseHeader=X-SomeHeader, Bar

The corresponding Java configuration:

//...route definition
.route("addrequestheader_route")
.uri("http://baeldung.com")
.predicate(path("/articles"))
.add(addResponseHeader("X-SomeHeader", "Bar"))

5.4. Circuit Breaker WebFilter Factory

Hystrix is used as Circuit-Breaker WebFilter Factory and takes a single name parameter, which is the name of the Hystrix command: 

spring:
  cloud:
    gateway:
      routes:
      - id: hystrix_route
        uri: http://baeldung.com
        predicates:
        - Path=/articles
        filters:
        - Hystrix=someCommand

The corresponding Java configuration:

//...route definition
.route("hystrix_route")
.uri("http://baeldung.com")
.predicate(path("/articles"))
.add(hystrix("someCommand"))

5.5. RedirectTo WebFilter Factory 

The RedirectTo WebFilter Factory takes a status and a URL parameter. The status should be a 300 redirect HTTP code, such as 301: 

spring:
  cloud:
    gateway:
      routes:
      - id: redirectto_route
        uri: http://baeldung.com
        predicates:
        - Path=/articles
        filters:
        - RedirectTo=302, http://foo.bar

And the corresponding Java configuration:

//...route definition
.route("redirectto_route")
.uri("http://baeldung.com")
.predicate(path("/articles"))
.add(redirectTo("302", "http://foo.bar"))

5.6. RewritePath WebFilter Factory

The RewritePath WebFilter Factory takes a path regexp parameter and a replacement parameter. This uses Java regular expressions to rewrite the request path.

Here is a configuration example: 

spring:
  cloud:
    gateway:
      routes:
      - id: rewritepath_route
        uri: http://baeldung.com
        predicates: 
        - Path=/articles/**
        filters:
        - RewritePath=/articles/(?<articleId>.*), /$\{articleId}

The Java configuration can be represented as:

//...route definition
.route("rewritepath_route")
.uri("http://baeldung.com")
.predicate(path("/articles"))
.add(rewritePath("(?<articleId>.*)", articleId))

5.7. RequestRateLimiter WebFilter Factory

The RequestRateLimiter WebFilter Factory takes three parameters: replenishRate, capacity, and keyResolverName.

  • replenishRate – represents how many requests per second do you want a user to be allowed to do
  • capacity – defines how much bursting capacity would be allowed
  • keyResolverName – is the name of a bean that implements the KeyResolver interface

The KeyResolver interface allows pluggable strategies to derive the key for limiting requests:

spring:
  cloud:
    gateway:
      routes:
      - id: requestratelimiter_route
        uri: http://baeldung.com
        predicates:
        - Path=/articles
        filters:
        - RequestRateLimiter=10, 50, userKeyResolver

The Java configuration can be represented as:

//...route definition
.route("requestratelimiter_route")
.uri("http://baeldung.com")
.predicate(path("/articles"))
.add(requestRateLimiter("10", "50", "UserKeyResolver"))

6. Spring Cloud DiscoveryClient Support

Spring Cloud Gateway can be easily integrated with Service Discovery and Registry libraries, such as Eureka Server and Consul:

@Configuration
@EnableDiscoveryClient
public class GatewayDiscoveryConfiguration {
 
    @Bean
    public DiscoveryClientRouteDefinitionLocator 
      discoveryClientRouteLocator(DiscoveryClient discoveryClient) {
 
        return new DiscoveryClientRouteDefinitionLocator(discoveryClient);
    }
}

6.1. LoadBalancerClient Filter

The LoadBalancerClientFilter looks for a URI in the exchange attribute property using ServerWebExchangeUtils.GATEWAY_REQUEST_URL_ATTR.

If the URL has a lb scheme (e.g., lb://baeldung-service) it’ll use the Spring Cloud LoadBalancerClient to resolve the name (i.e., baeldung-service) to an actual host and port.

The unmodified original URL is placed in the ServerWebExchangeUtils.GATEWAY_ORIGINAL_REQUEST_URL_ATTR attribute.

7. Monitoring

Spring Cloud Gateway makes use of the Actuator API, a well-known Spring-Boot library that provides several out-of-the-box services for monitoring the application.

Once the Actuator API is installed and configured, the gateway monitoring features can be visualized by accessing /gateway/ endpoint.

8. Implementation

We’ll now create a simple example of the usage of Spring Cloud Gateway as a proxy server using the path predicate.

8.1. Dependencies

The Spring Cloud Gateway is located at Spring Milestones repository, currently on version 2.0.0.M2. This is also the version we’re using here.

Let’s define the Maven dependencies used in this example:

<dependency>
    <groupId>org.springframework.boot</groupId>
    <artifactId>spring-boot-actuator</artifactId>
</dependency>
<dependency>
    <groupId>org.springframework.boot</groupId>
    <artifactId>spring-boot-starter-webflux</artifactId>
</dependency>
<dependency>
    <groupId>org.springframework.cloud</groupId>
    <artifactId>spring-cloud-gateway-core</artifactId>
</dependency>

8.2. Code Implementation


And now we create a simple routing configuration in the application.yml file:

spring:
  cloud:
    gateway:
      routes:
      - id: baeldung_route
        uri: http://baeldung.com
        predicates:
        - Path=/baeldung/
management:
  security:
    enabled: false

And the Gateway application code:

@SpringBootApplication
public class GatewayApplication {
    public static void main(String[] args) {
        SpringApplication.run(GatewayApplication.class, args);
    }
}

After the application starts, we can access the url: “http://localhost/admin/gateway/routes/baeldung_route” to check all routing configuration created:

{
    "id":"baeldung_route",
    "predicates":[{
        "name":"Path",
        "args":{"_genkey_0":"/baeldung"}
    }],
    "filters":[],
    "uri":"http://baeldung.com",
    "order":0
}

We see that the relative url: “/baeldung” is configured as a route, so hitting the url “http://localhost/baeldung” we’ll be redirected to  “http://baeldung.com“, as was configured in our example.

9. Conclusion

In this article, we explored some of the features and components that are part of Spring Cloud Gateway. This new API provides out-of-the-box tools for gateway and proxy support.

The examples presented here can be found in our GitHub repository.

ProcessEngine Configuration in Activiti

$
0
0

1. Overview

In our previous Activiti with Java intro article, we saw the importance of the ProcessEngine, and created one via the default static API provided by the framework.

Beyond the default, there are other ways of creating a ProcessEngine – which we’ll explore here.

2. Obtaining a ProcessEngine Instance

There are two ways of getting an instance of ProcessEngine :

  1. using the ProcessEngines class
  2. programmatically, via the ProcessEngineConfiguration

Let’s take a closer look at examples for both of these approaches.

3. Get ProcessEngine using ProcessEngines class

Typically, the ProcessEngine is configured using an XML file called activiti.cfg.xml, with is what the default creation process will use as well.

Here’s a quick example of what this configuration can look like:

<beans xmlns="...">
    <bean id="processEngineConfiguration" class=
      "org.activiti.engine.impl.cfg.StandaloneProcessEngineConfiguration">
        <property name="jdbcUrl"
          vasentence you have mentioned and also changed thelue="jdbc:h2:mem:activiti;DB_CLOSE_DELAY=1000" />
        <property name="jdbcDriver" value="org.h2.Driver" />
        <property name="jdbcUsername" value="root" />
        <property name="jdbcPassword" value="" />
        <property name="databaseSchemaUpdate" value="true" />
    </bean>
</beans>

Notice how the persistence aspect of the engine is configured here.

And now, we can obtain the ProcessEngine:

ProcessEngine processEngine = ProcessEngines.getDefaultProcessEngine();

4. Get ProcessEngine using ProcessEngineConfiguration

Moving past the default route of obtaining the engine – there are two ways of creating the ProcessEngineConfiguration:

  1. Using XML Config
  2. Using Java Config

Let’s start with XML configuration.

As mentioned in section 2.1. – we can define the ProcessEngineConfiguration programmatically, and build the ProcessEngine using that instance:

@Test 
void whenCreateDefaultConfiguration_thenGotProcessEngine() {
    ProcessEngineConfiguration processEngineConfiguration 
      = ProcessEngineConfiguration
        .createProcessEngineConfigurationFromResourceDefault();
    ProcessEngine processEngine 
      = processEngineConfiguration.buildProcessEngine();
    
    assertNotNull(processEngine);
}

The method createProcessEngineConfigurationFromResourceDefault() will also look for the activiti.cfg.xml file, and now we only need to call the buildProcessEngine() API.

In this case, the default bean name it looks for is processEngineConfiguration. If we want to change the config file name or the bean name, we can use other available methods for creating the ProcessEngineConfiguration.

Let’s have a look at a few examples.

First, we’ll change the configuration file name and ask the API to use our custom file:

@Test 
void whenGetProcessEngineConfig_thenGotResult() {
    ProcessEngineConfiguration processEngineConfiguration 
      = ProcessEngineConfiguration
        .createProcessEngineConfigurationFromResource(
          "my.activiti.cfg.xml");
    ProcessEngine processEngine = processEngineConfiguration
      .buildProcessEngine();
    
    assertNotNull(processEngine);
}

Now, let’s also change the bean name:

@Test 
void whenGetProcessEngineConfig_thenGotResult() {
    ProcessEngineConfiguration processEngineConfiguration 
      = ProcessEngineConfiguration
        .createProcessEngineConfigurationFromResource(
          "my.activiti.cfg.xml", 
          "myProcessEngineConfiguration");
    ProcessEngine processEngine = processEngineConfiguration
      .buildProcessEngine();
    
    assertNotNull(processEngine);
    assertEquals("root", processEngine.getProcessEngineConfiguration()
      .getJdbcUsername());
}

Of course, now that the configuration is expecting different names, we need to change the filename (and the bean name) to match – before running the test.

Other available options to create the engine are createProcessEngineConfigurationFromInputStream(InputStream inputStream),
createProcessEngineConfigurationFromInputStream(InputStream inputStream, String beanName).

If we don’t want to use XML config, we can also set things up using Java config only.

We’re going to work with four different classes; each of these represents a different environment:

  1. org.activiti.engine.impl.cfg.StandaloneProcessEngineConfiguration – the ProcessEngine is used in a standalone way, backed by the DB
  2. org.activiti.engine.impl.cfg.StandaloneInMemProcessEngineConfiguration – by default, an H2 in-memory database is used. The DB is created and dropped when the engine starts and shuts down – hence, this configuration style can be used for testing
  3. org.activiti.spring.SpringProcessEngineConfiguration – to be used in Spring environment
  4. org.activiti.engine.impl.cfg.JtaProcessEngineConfiguration – the engine runs in standalone mode, with JTA transactions

Let’s take a look at a few examples.

Here is a JUnit test for creating a standalone process engine configuration:

@Test 
void whenCreateProcessEngineConfig_thenCreated() {
    ProcessEngineConfiguration processEngineConfiguration 
      = ProcessEngineConfiguration
        .createStandaloneProcessEngineConfiguration();
    ProcessEngine processEngine = processEngineConfiguration
      .setDatabaseSchemaUpdate(ProcessEngineConfiguration
        .DB_SCHEMA_UPDATE_TRUE)
      .setJdbcUrl("jdbc:h2:mem:my-own-db;DB_CLOSE_DELAY=1000")
      .buildProcessEngine();
    
    assertNotNull(processEngine);
    assertEquals("sa", processEngine.getProcessEngineConfiguration()
      .getJdbcUsername());
}

Similarly, we’ll write a JUnit test case for creating the standalone process engine configuration using the in-memory database:

@Test 
void whenCreateInMemProcessEngineConfig_thenCreated() {
    ProcessEngineConfiguration processEngineConfiguration 
      = ProcessEngineConfiguration
      .createStandaloneInMemProcessEngineConfiguration();
    ProcessEngine processEngine = processEngineConfiguration
      .buildProcessEngine();
    
    assertNotNull(processEngine);
    assertEquals("sa", processEngine.getProcessEngineConfiguration()
      .getJdbcUsername());
}

5. Database Setup

By default, Activiti API will use the H2 in-memory database, with database name “activiti” and username “sa”.

If we need to use any other database, we’ll have to set things up explicitly – using two main properties.

databaseType – valid values are h2, mysql, oracle, postgres, mssql, db2. This can also be figured out from the DB configuration but will be useful if automatic detection fails.

databaseSchemaUpdate – this property allows us to define what happens to the database when the engine boots up or shuts down. It can have these three values:

  1. false (default) – this option validates the version of database schema against the library. The engine will throw an exception if they do not match
  2. true – when the process engine configuration is built, a check is performed on the database. The database will be created/updated create-drop accordingly
  3. ” – this will create the DB schema when the process engine is created and will drop it when the process engine shuts down.

We can define the DB configuration as JDBC properties:

<property name="jdbcUrl" value="jdbc:h2:mem:activiti;DB_CLOSE_DELAY=1000" />
<property name="jdbcDriver" value="org.h2.Driver" />
<property name="jdbcUsername" value="sa" />
<property name="jdbcPassword" value="" />
<property name="databaseType" value="mysql" />

Alternatively, if we are using DataSource:

<bean id="dataSource" class="org.apache.commons.dbcp.BasicDataSource" >
    <property name="driverClassName" value="com.mysql.jdbc.Driver" />
    <property name="url" value="jdbc:mysql://localhost:3306/activiti" />
    <property name="username" value="activiti" />
    <property name="password" value="activiti" />
    <property name="defaultAutoCommit" value="false" />
    <property name="databaseType" value="mysql" />
</bean>

6. Conclusion

In this quick tutorial, we focused on several different ways of creating ProcessEngine in Activiti.

We also saw different properties and approaches to handle database configuration.

As always, the code for examples we saw can be found over on GitHub.

Migrating from Java to Kotlin

$
0
0

1. Overview

In this tutorial, we’re going to take a look at how we can migrate from Java to Kotlin. While we’ll be looking at many basic examples, this article is not an introduction to Kotlin. For a dedicated article, you can start with this writeup here.

Here, we’ll look at basic examples of migrating our Java code to Kotlin, like simple print statements, defining variables, managing nullability.

Then, we’ll move towards inner areas like control statements like if-else and switch statements.

Finally, we’re moving to defining classes and working with collections.

2. Basic Migrations

Let’s get started with simple examples on how to migrate simple statements.

2.1. Print Statements

To start, let’s see how printing works. In Java:

System.out.print("Hello, Baeldung!");
System.out.println("Hello, Baeldung!");

In Kotlin:

print("Hello, Baeldung!")
println("Hello, Baeldung!")

2.2. Defining Variables

In Java:

final int a;
final int b = 21;
int c;
int d = 25;
d = 23;
c = 21;

In Kotlin:

val a: Int
val b = 21
var c: Int
var d = 25
d = 23
c = 21

As we can see, semi-colons in Kotlin are optional. Kotlin also utilizes enhanced type inference, and we do not need to define types explicitly.

Whenever we want to create a final variable, we can simply use “val” instead of “var”.

2.3. Casting

In Java, we need to perform unnecessary casting in situations like:

if(str instanceof String){
    String result = ((String) str).substring(1);
}

In Kotlin, smart casting allows us to skip a redundant cast:

if (str is String) {
    val result = str.substring(1)
}

2.4. Bit Operations

Bit operations in Kotlin are much more intuitive.

Let’s see this in action, with Java:

int orResult   = a | b;
int andResult  = a & b;
int xorResult  = a ^ b;
int rightShift = a >> 2;
int leftShift  = a << 2;

And in Kotlin:

var orResult   = a or b
var andResult  = a and b
var xorResult  = a xor b
var rightShift = a shr 2
var leftShift  = a shl 2

3. Null-Safety

In Java:

final String name = null;

String text;
text = null;

if(text != null){
    int length = text.length();
}

So, there’s no restriction in Java to assign null to variables and use them. While using any variable, we’re usually forced to make a null check as well.

This is not the case with Kotlin:

val name: String? = null

var lastName: String?
lastName = null

var firstName: String
firstName = null // Compilation error!!

By default, Kotlin assumes that values cannot be null.

We cannot assign null to the reference firstName, and if we try to, it’ll cause a compiler error. If we want to create a nullable reference, we need to append the question mark(?) to the type definition, as we did in the first line.

More on this can be found in this article.

4. String Operations

Strings work the same way as in Java. We can do similar operations like append and get a part of a String as well.

In Java:

String name = "John";
String lastName = "Smith";
String text = "My name is: " + name + " " + lastName;
String otherText = "My name is: " + name.substring(2);

String text = "First Line\n" +
  "Second Line\n" +
  "Third Line";

In Kotlin:

val name = "John"
val lastName = "Smith"
val text = "My name is: $name $lastName"
val otherText = "My name is: ${name.substring(2)}"

val text = """
  First Line
  Second Line
  Third Line
""".trimMargin()

That looked quite easy:

  • We can interpolate Strings by using the “$” character, and the expressions will be evaluated at runtime. In Java, we could achieve something similar by using String.format()
  • No need for breaking multiline Strings as in Java. Kotlin supports them out-of-the-box using. We just need to remember to use triple quotation marks

There is no symbol for line continuation in Kotlin. As its grammar allows to have spaces between almost all symbols, we can just break the statement:

val text = "This " + "is " + "a " +
  "long " + "long " + "line"

However, if the first line of the statement is a valid statement, it won’t work:

val text = "This " + "is " + "a "
  + "long " + "long " + "line" // syntax error

To avoid such issues when breaking long statements across multiple lines, we can use parentheses:

val text = ("This " + "is " + "a "
  + "long " + "long " + "line") // no syntax error

5. Loops and Control Statements

Just like any other programming language, in Kotlin as well we’ve got control statements and loops for repetitive tasks.

5.1. For loop

In Java, we have various kinds of loops for iterating over a collection, or a Map, like:

for (int i = 1; i < 11 ; i++) { }

for (int i = 1; i < 11 ; i+=2) { }

for (String item : collection) { }

for (Map.Entry<String, String> entry: map.entrySet()) { }

In Kotlin, we have something similar, but simpler. As we’re already familiar with, Kotlin’s syntax is trying to mimic the natural language as much as possible:

for (i in 1 until 11) { }

for (i in 1..10 step 2) { }

for (item in collection) { }
for ((index, item) in collection.withIndex()) { }

for ((key, value) in map) { }

5.2. Switch and When

We can use switch statements in Java to make selective decisions:

final int x = ...; // some value
final String xResult;

switch (x) {
    case 0:
    case 11:
        xResult = "0 or 11";
        break;
    case 1:
    case 2:
    //...
    case 10:
        xResult = "from 1 to 10";
        break;
    default:
        if(x < 12 && x > 14) {
        xResult = "not from 12 to 14";
        break;
    }

    if(isOdd(x)) {
        xResult = "is odd";
        break;
    }

    xResult = "otherwise";
}

final int y = ...; // some value;
final String yResult;

if(isNegative(y)){
    yResult = "is Negative";
} else if(isZero(y)){
    yResult = "is Zero";
} else if(isOdd(y)){
    yResult = "is Odd";
} else {
    yResult = "otherwise";
}

In Kotlin, instead of a switch statement, we use a when statement to make selective decisions:

val x = ... // some value
val xResult = when (x) {
  0, 11 -> "0 or 11"
  in 1..10 -> "from 1 to 10"
  !in 12..14 -> "not from 12 to 14"
  else -> if (isOdd(x)) { "is odd" } else { "otherwise" }
}

The when statement can act as an expression or a statement, with or without an argument:

val y = ... // some value
val yResult = when {
  isNegative(y) -> "is Negative"
  isZero(y) -> "is Zero"
  isOdd(y) -> "is odd"
  else -> "otherwise"
}

6. Classes

In Java, we define a model class and accompany them with standard setters and getters:

package com.baeldung;

public class Person {

    private long id;
    private String name;
    private String brand;
    private long price;

    // setters and getters
}

In Kotlin, getters and setters are autogenerated:

package com.baeldung

class Person {
  var id: Long = 0
  var name: String? = null
  var brand: String? = null
  var price: Long = 0
}

Modification of getter/setter visibility can also be changed, but keep in mind that the getter’s visibility must be the same as the property’s visibility.

In Kotlin, every class comes with the following methods (can be overridden):

  • toString (readable string representation for an object)
  • hashCode (provides a unique identifier for an object)
  • equals (used to compare two objects from the same class to see if they are the same)

7. Collections

Well, we know that Collections are a powerful concept with any programming language; simply put, we can collect similar kind of objects and perform operations with/on them. Let’s have a glimpse of those in Java:

final List<Integer> numbers = Arrays.asList(1, 2, 3);

final Map<Integer, String> map = new HashMap<Integer, String>();
map.put(1, "One");
map.put(2, "Two");
map.put(3, "Three");

// Java 9
final List<Integer> numbers = List.of(1, 2, 3);

final Map<Integer, String> map = Map.of(
  1, "One",
  2, "Two",
  3, "Three");

Now, in Kotlin, we can have similar collections:

val numbers = listOf(1, 2, 3)

val map = mapOf(
  1 to "One",
  2 to "Two",
  3 to "Three")

Performing operations is interesting as well, like in Java:

for (int number : numbers) {
    System.out.println(number);
}

for (int number : numbers) {
    if(number > 5) {
        System.out.println(number);
    }
}

Next, we can perform the same operations in Kotlin in a much simpler way:

numbers.forEach {
    println(it)
}

numbers
  .filter  { it > 5 }
  .forEach { println(it) }

Let’s study a final example on collecting even and odd numbers in a Map of String as keys, and List of Integers as their value. In Java, we’ll have to write:

final Map<String, List<Integer>> groups = new HashMap<>();
for (int number : numbers) {
    if((number & 1) == 0) {
        if(!groups.containsKey("even")) {
            groups.put("even", new ArrayList<>());
        }

        groups.get("even").add(number);
        continue;
    }

    if(!groups.containsKey("odd")){
        groups.put("odd", new ArrayList<>());
    }

    groups.get("odd").add(number);
}

In Kotlin:

val groups = numbers.groupBy {
  if (it and 1 == 0) "even" else "odd"
}

8. Conclusion

This article serves as an initial help when moving from Java to Kotlin.

While the comparison was just a hint of how simple and intuitive Kotlin can be, other articles can be found here.

Java Weekly, Issue 198

$
0
0

1. Spring and Java

>> JUnit 5 Tutorial: Writing Nested Tests [petrikainulainen.net]

Hierarchical tests were sometimes entirely missing in the old JUnit.

>> Benchmarking JDK String.replace() vs Apache Commons StringUtils.replace() [blog.jooq.org]

It turns out that String.replace() uses the Pattern class internally – which results in a lot of unnecessary allocation 🙂

>> How to JOIN unrelated entities with JPA and Hibernate [vladmihalcea.com]

A quick guide to “joining” entities that do not reference each other.

>> The Java Evolution of Eclipse Collections [infoq.com]

Eclipse Collections are an interesting alternative to standard Collections API.

Also worth reading:

Webinars and presentations:

Time to upgrade:

2. Technical

>> Truly immutable builds [blog.frankel.ch]

Ensuring that as many as possible aspects of the build are immutable – will result in more reliable builds even after a long period of time.

Also worth reading:

3. Musings

>> How to Do Code Reviews Like a Human (Part One) [mtlynch.io]

Very interesting takeaways about doing good code reviews, but also communication in general.

Also worth reading:

4. Comics

And my favorite Dilberts of the week:

>> Bad at Negotiating [dilbert.com]

>> Even Worse Negotiating [dilbert.com]

>> Fix it with Marketing [dilbert.com]

5. Pick of the Week

>> A Step By Step Guide to Tomcat Performance Monitoring [stackify.com]

A Guide to Java Profilers

$
0
0

1. Overview

Sometimes writing code that just runs is not enough. We might want to know what goes on internally such as how memory is allocated, consequences of using one coding approach over another, implications of concurrent executions, areas to improve performance, etc. We can use profilers for this.

A Java Profiler is a tool that monitors Java bytecode constructs and operations at the JVM level. These code constructs and operations include object creation, iterative executions (including recursive calls), method executions, thread executions, and garbage collections.

In this article, we’ll be discussing the main Java Profilers: JProfiler, YourKit, Java VisualVM, and the Netbeans Profiler.

2. JProfiler

JProfiler is a top choice for many developers. With an intuitive UI, JProfiler provides interfaces for viewing system performance, memory usage, potential memory leaks, and thread profiling.

With this information, we can easily know what we need to optimize, eliminate, or change – in the underlying system.

Here’s what the JProfiler’s interface looks like:

JProfiler overview interface with features

Like most profilers, we can use this tool for both local and remote applications. This means that it’s possible to profile Java applications running on remote machines without having to install anything on them.

JProfiler also provides advanced profiling for both SQL and NoSQL databases. It provides specific support for profiling JDBC, JPA/Hibernate, MongoDB, Casandra, and HBase databases.

The below screenshot shows the JDBC probing interface with a list of current connections:

JProfiler database probing view

If we are keen on learning about the call tree of interactions with our database and see connections that may be leaked, JProfiler nicely handles this.

Live Memory is one feature of JProfiler that allows us to see current memory usage by our application. We can view memory usage for object declarations and instances or for the full call tree.

In the case of the allocation call tree, we can choose to view the call tree of live objects, garbage-collected objects, or both. We can also decide if this allocation tree should be for a particular class or package or all classes.

The screen below shows the live memory usage by all objects with instance counts:

JProfiler live memory view

JProfiler supports integration with popular IDEs such as Eclipse, NetBeans, and IntelliJ. It’s even possible to navigate from snapshot to source code!

3. YourKit

YourKit Java Profiler runs on many different platforms and provides separate installations for each supported operating system (Windows, MacOS, Linux, Solaris, FreeBSD, etc.).

Like JProfiler, YourKit has core features for visualizing threads, garbage collections, memory usage, and memory leaks, with support for local and remote profiling via ssh tunneling.

Here’s a quick look at the memory profiling results of a Tomcat server application:

YourKit Java Profiler memory profiling of Tomcat server application

YourKit also comes in handy those times when we want to profile thrown exceptions. We can easily find out what types of exceptions were thrown and the number of times each exception occurred.

YourKit has an interesting CPU profiling feature that allows focused profiling on certain areas of our code such as methods or subtrees in threads. This is very powerful as it allows for conditional profiling through its what-if feature.

Figure 5 shows an example of the thread-profiling interface:

Figure 5. YourKit Java Profiler threads profiling interface

We can also profile SQL, and NoSQL database calls with YourKit. It even provides a view for actual queries that were executed.

Though this is not a technical consideration, the permissive licensing model of YourKit makes it a good choice for multi-user or distributed teams, as well as for single-license purchases.

4. Java VisualVM

Java VisualVM is a simplified yet robust profiling tool for Java applications. By default, this tool is bundled with Sun’s distribution of the Java Development Kit (JDK). Its operation relies on other standalone tools provided in the JDK, such as JConsole, jstat, jstack, jinfo, and jmap.

Below, we can see a simple overview interface of an ongoing profiling session using Java VisualVM:

Java VisualVM local tomcat server app profiling

One interesting advantage of Java VisualVM is that we can extend it to develop new functionalities as plugins. We can then add these plugins to Java VisualVM’s built-in update center.

Java VisualVM supports local and remote profiling, as well as memory and CPU profiling. Connecting to remote applications requires providing credentials (hostname/IP and password as necessary) but does not provide support for ssh tunneling. We can also choose to either enable real-time profiling with instant updates (typically every 2 seconds).

Below, we can see the memory outlook of a Java application profiled using Java VisualVM:

Java VisualVM memory heap histogram


With the snapshot feature of Java VisualVM, we can take snapshots of profiling sessions for later analysis.

5. NetBeans Profiler

The NetBeans Profiler is bundled with Oracle’s open source NetBeans IDE.

While this profiler shares a lot of similarities with Java VisualVM, it’s a good choice when we want everything wrapped in one program (IDE + Profiler).

All other profilers discussed above provide plugins to enhance IDEs integration.

Below screenshot shows an example of the NetBeans Profiler interface:

Netbeans Profiler telemetry interface

Netbeans Profiler is also a good choice for lightweight development and profiling. NetBeans Profiler provides a single window for configuring and controlling the profiling session and displaying the results. It gives a unique feature of knowing how often garbage collection occurs.

6. Other Solid Profilers

Some honorable mentions here are Java Mission Control, New Relic, and Prefix (from Stackify) – these have less market share overall, but definitely, do deserve a mention. For example, Stackify’s Prefix is an excellent lightweight profiling tool, well-suited for profiling not only Java applications but other web applications as well.

7. Conclusion

In this write-up, we discussed profiling and Java Profilers. We looked at the features of each Profiler and what informs the potential choice of one over another.

There’re many Java profilers available with some having unique characteristics. The choice of which Java profiler to use, as we’ve seen in this article, is mostly dependent on a developer’s selection of tools, the level of analysis required, and features of the profiler.


Introduction to StreamEx

$
0
0

1. Overview

One of the most exciting features of Java 8 is the Stream API – which, simply put, is a powerful tool for processing sequences of elements.

StreamEx is a library that provides additional functionality for the standard Stream API along with the performance improvements.

Here are a few core features:

  • Shorter and convenient ways of doing the everyday tasks
  • 100% compatibility with original JDK Streams
  • Friendliness for parallel processing: any new feature takes the advantage on parallel streams as much as possible
  • Performance and minimal overhead. If StreamEx allows solving the task using less code compared to standard Stream, it should not be significantly slower than the usual way (and sometimes it’s even faster)

In this tutorial, we’ll present some of the features of StreamEx API.

2. Setting up the Example

To use StreamEx, we need to add the following dependency to the pom.xml:

<dependency>
    <groupId>one.util</groupId>
    <artifactId>streamex</artifactId>
    <version>0.6.5</version>
</dependency>

The latest version of the library can be found on Maven Central.

Through this tutorial, we’re going to use a simple User class:

public class User {
    int id;
    String name;
    Role role = new Role();

    // standard getters, setters and constructors
}

And a simple Role class:

public class Role {
}

3. Collectors Shortcut Methods

One of the most popular terminal operations of Streams is the collect operation; this allows for repackaging Stream elements to a collection of our choice.

The problem is that code can get unnecessarily verbose for simple scenarios:

users.stream()
  .map(User::getName)
  .collect(Collectors.toList());

3.1. Collecting to a Collection


Now, with StreamEx, we don’t need to provide a Collector to specify that we need a List, Set, Map, InmutableList, etc.:

List<String> userNames = StreamEx.of(users)
  .map(User::getName)
  .toList();

The collect operation is still available in the API if we want to perform something more complicated than taking elements from a Stream and putting them in a collection.

3.2. Advanced Collectors

Another shorthand is groupingBy:

Map<Role, List<User>> role2users = StreamEx.of(users)
  .groupingBy(User::getRole);

This will produce a Map with the key type specified in the method reference, producing something similar to the group by operation in SQL.

Using plain Stream API, we’d need to write:

Map<Role, List<User>> role2users = users.stream()
  .collect(Collectors.groupingBy(User::getRole));

A similar shorthand form can be found for the Collectors.joining():

StreamEx.of(1, 2, 3)
  .joining("; "); // "1; 2; 3"

Which takes all the elements in the Stream a produces a String concatenating all of them.

4. Adding, Removing and Selecting Elements

In some scenarios, we’ve got a list of objects of different types, and we need to filter them by type:

List usersAndRoles = Arrays.asList(new User(), new Role());
List<Role> roles = StreamEx.of(usersAndRoles)
  .select(Role.class)
  .toList();

We can add elements to the start or end of our Stream, with this handy operations:

List<String> appendedUsers = StreamEx.of(users)
  .map(User::getName)
  .prepend("(none)")
  .append("LAST")
  .toList();

We can remove unwanted null elements using nonNull() and use the Stream as an Iterable:

for (String line : StreamEx.of(users).map(User::getName).nonNull()) {
    System.out.println(line);
}

5. Math Operations and Primitive Types Support

StreamEx adds supports for primitive types, as we can see in this self-explaining example:

short[] src = {1,2,3};
char[] output = IntStreamEx.of(src)
  .map(x -> x * 5)
  .toCharArray();

Now let’s take an array of double elements in an unordered manner. We want to create an array consisting of the difference between each pair.

We can use the pairMap method to perform this operation:

public double[] getDiffBetweenPairs(double... numbers) {
    return DoubleStreamEx.of(numbers)
      .pairMap((a, b) -> b - a)
      .toArray();
}

6. Map Operations

6.1. Filtering by Keys

Another useful feature is an ability to create a Stream from a Map and filter the elements by using the values they point at.

In this case, we’re taking all non-null values:

Map<String, Role> nameToRole = new HashMap<>();
nameToRole.put("first", new Role());
nameToRole.put("second", null);
Set<String> nonNullRoles = StreamEx.ofKeys(nameToRole, Objects::nonNull)
  .toSet();

6.2. Operating on Key-Value Pairs

We can also operate on key-value pairs by creating an EntryStream instance:

public Map<User, List<Role>> transformMap( 
    Map<Role, List<User>> role2users) {
    Map<User, List<Role>> users2roles = EntryStream.of(role2users)
     .flatMapValues(List::stream)
     .invert()
     .grouping();
    return users2roles;
}

The special operation EntryStream.of takes a Map and transforms it into a Stream of key-value objects. Then we use flatMapValues operation to transform our list of roles to a Stream of single values.

Next, we can invert the key-value pair, making the User class the key and the Role class the value.

And finally, we can use the grouping operation to transform our map to the inversion of the one received, all with just four operations.

6.3. Key-Value Mapping

We can also map keys and values independently:

Map<String, String> mapToString = EntryStream.of(users2roles)
  .mapKeys(String::valueOf)
  .mapValues(String::valueOf)
  .toMap();

With this, we can quickly transform our keys or values to another required type.

7. File Operations

Using StreamEx, we can read files efficiently, i.e., without loading full files at once. It’s handy while processing large files:

StreamEx.ofLines(reader)
  .remove(String::isEmpty)
  .forEach(System.out::println);

Note that we’ve used remove() method to filter away empty lines.

Point to note here is that StreamEx won’t automatically close the file. Hence, we must remember to manually perform closing operation on both file reading and writing occasion to avoid unnecessary memory overhead.

8. Conclusion

In this tutorial, we’ve learned about StreamEx, and it’s different utilities. There is a lot more to go through – and they have a handy cheat sheet here.

As always, the full source code is available over on GitHub.

[sc_name = “java_end”]

Advanced Querying in Apache Cayenne

$
0
0

1. Overview

Previously, we’ve focused on how to get started with Apache Cayenne.

In this article, we’ll cover how to write simple and advanced queries with the ORM.

2. Setup

The setup is similar to the one used in the previous article.

Additionally, before each test, we save three authors and at the end, we remove them:

  • Paul Xavier
  • pAuL Smith
  • Vicky Sarra

3. ObjectSelect

Let’s start simple, and look at how we can get all authors with names containing “Paul”:

@Test
public void whenContainsObjS_thenWeGetOneRecord() {
    List<Author> authors = ObjectSelect.query(Author.class)
      .where(Author.NAME.contains("Paul"))
      .select(context);

    assertEquals(authors.size(), 1);
}

Next, let’s see how we can apply a case-insensitive LIKE type of query on the Author’s name column:

@Test
void whenLikeObjS_thenWeGetTwoAuthors() {
    List<Author> authors = ObjectSelect.query(Author.class)
      .where(Author.NAME.likeIgnoreCase("Paul%"))
      .select(context);

    assertEquals(authors.size(), 2);
}

Next, the endsWith() expression will return just one record as only one author has the matching name:

@Test
void whenEndsWithObjS_thenWeGetOrderedAuthors() {
    List<Author> authors = ObjectSelect.query(Author.class)
      .where(Author.NAME.endsWith("Sarra"))
      .select(context);
    Author firstAuthor = authors.get(0);

    assertEquals(authors.size(), 1);
    assertEquals(firstAuthor.getName(), "Vicky Sarra");
}

A more complex one is querying Authors whose names are in a list:

@Test
void whenInObjS_thenWeGetAuthors() {
    List names = Arrays.asList(
      "Paul Xavier", "pAuL Smith", "Vicky Sarra");
 
    List<Author> authors = ObjectSelect.query(Author.class)
      .where(Author.NAME.in(names))
      .select(context);

    assertEquals(authors.size(), 3);
}

The nin one is the opposite, here only “Vicky” will be present in the result:

@Test
void whenNinObjS_thenWeGetAuthors() {
    List names = Arrays.asList(
      "Paul Xavier", "pAuL Smith");
    List<Author> authors = ObjectSelect.query(Author.class)
      .where(Author.NAME.nin(names))
      .select(context);
    Author author = authors.get(0);

    assertEquals(authors.size(), 1);
    assertEquals(author.getName(), "Vicky Sarra");
}

Note that these two following codes are same as they both will create an expression of the same type with the same parameter:

Expression qualifier = ExpressionFactory
  .containsIgnoreCaseExp(Author.NAME.getName(), "Paul");
Author.NAME.containsIgnoreCase("Paul");

Here is a list of some available expressions in Expression and ExpressionFactory classes:

  • likeExp: for building the LIKE expression
  • likeIgnoreCaseExp: used to build the LIKE_IGNORE_CASE expression
  • containsExp: an expression for a LIKE query with the pattern matching anywhere in the string
  • containsIgnoreCaseExp: same as containsExp but using case-insensitive approach
  • startsWithExp: the pattern should match the beginning of the string
  • startsWithIgnoreCaseExp: similar to the startsWithExp but using the case-insensitive approach
  • endsWithExp: an expression that matches the end of a string
  • endsWithIgnoreCaseExp: an expression that matches the end of a string using the case-insensitive approach
  • expTrue: for boolean true expression
  • expFalse: for boolean false expression
  • andExp: used to chain two expressions with the and operator
  • orExp: to chain two expressions using the or operator

More written tests are available in the code source of the article, please check the Github repository.

4. SelectQuery

It’s the widest-used query type in user applications. The SelectQuery describes a simple and powerful API that acts like SQL syntax, but still with Java Objects and methods followed with builder patterns to construct more complex expressions.

Here we’re talking about an expression language where we build queries using both Expression (to build expressions) aka qualifier and Ordering (to sort results) classes that are next converted to native SQL by the ORM.

To see this in action, we’ve put together some tests that show in practice how to build some expressions and sorting data.

Let’s apply a LIKE query to get Authors with the name like “Paul”:

@Test
void whenLikeSltQry_thenWeGetOneAuthor() {
    Expression qualifier 
      = ExpressionFactory.likeExp(Author.NAME.getName(), "Paul%");
    SelectQuery query 
      = new SelectQuery(Author.class, qualifier);
    
    List<Author> authorsTwo = context.performQuery(query);

    assertEquals(authorsTwo.size(), 1);
}

That means if you don’t provide any expression to the query (SelectQuery), the result will be all the records of the Author table.

A similar query can be performed using the containsIgnoreCaseExp expression to get all authors with the name containing Paul regardless the case of the letters:

@Test
void whenCtnsIgnorCaseSltQry_thenWeGetTwoAuthors() {
    Expression qualifier = ExpressionFactory
      .containsIgnoreCaseExp(Author.NAME.getName(), "Paul");
    SelectQuery query 
      = new SelectQuery(Author.class, qualifier);
    
    List<Author> authors = context.performQuery(query);

    assertEquals(authors.size(), 2);
}

Similarly, let’s get authors with names containing “Paul”, in a case case-insensitive way (containsIgnoreCaseExp) and with the name that ends (endsWithExp) with the letter h:

@Test
void whenCtnsIgnorCaseEndsWSltQry_thenWeGetTwoAuthors() {
    Expression qualifier = ExpressionFactory
      .containsIgnoreCaseExp(Author.NAME.getName(), "Paul")
      .andExp(ExpressionFactory
        .endsWithExp(Author.NAME.getName(), "h"));
    SelectQuery query = new SelectQuery(
      Author.class, qualifier);
    List<Author> authors = context.performQuery(query);

    Author author = authors.get(0);

    assertEquals(authors.size(), 1);
    assertEquals(author.getName(), "pAuL Smith");
}

An ascending order can be performed using the Ordering class:

@Test
void whenAscOrdering_thenWeGetOrderedAuthors() {
    SelectQuery query = new SelectQuery(Author.class);
    query.addOrdering(Author.NAME.asc());
 
    List<Author> authors = query.select(context);
    Author firstAuthor = authors.get(0);

    assertEquals(authors.size(), 3);
    assertEquals(firstAuthor.getName(), "Paul Xavier");
}

Here instead of using query.addOrdering(Author.NAME.asc()), we can also just use the SortOrder class to get the ascending order:

query.addOrdering(Author.NAME.getName(), SortOrder.ASCENDING);

Relatively there is the descending ordering:

@Test
void whenDescOrderingSltQry_thenWeGetOrderedAuthors() {
    SelectQuery query = new SelectQuery(Author.class);
    query.addOrdering(Author.NAME.desc());

    List<Author> authors = query.select(context);
    Author firstAuthor = authors.get(0);

    assertEquals(authors.size(), 3);
    assertEquals(firstAuthor.getName(), "pAuL Smith");
}

As we’ve seen in the previous example – another way to set this ordering is:

query.addOrdering(Author.NAME.getName(), SortOrder.DESCENDING);

5. SQLTemplate

SQLTemplate is also one alternative we can use with Cayenne to don’t use object style querying.

Build queries with SQLTemplate is directly relative to write native SQL statements with some parameters. Let’s implement some quick examples.

Here is how we delete all authors after each test:

@After
void deleteAllAuthors() {
    SQLTemplate deleteAuthors = new SQLTemplate(
      Author.class, "delete from author");
    context.performGenericQuery(deleteAuthors);
}

To find all recorded Authors we just need to apply the SQL query select * from Author and we’ll directly see that the result is correct as we have exactly three saved authors:

@Test
void givenAuthors_whenFindAllSQLTmplt_thenWeGetThreeAuthors() {
    SQLTemplate select = new SQLTemplate(
      Author.class, "select * from Author");
    List<Author> authors = context.performQuery(select);

    assertEquals(authors.size(), 3);
}

Next, let’s get the Author with the name “Vicky Sarra”:

@Test
void givenAuthors_whenFindByNameSQLTmplt_thenWeGetOneAuthor() {
    SQLTemplate select = new SQLTemplate(
      Author.class, "select * from Author where name = 'Vicky Sarra'");
    List<Author> authors = context.performQuery(select);
    Author author = authors.get(0);

    assertEquals(authors.size(), 1);
    assertEquals(author.getName(), "Vicky Sarra");
}

6. EJBQLQuery

Next, let’s query data through the EJBQLQuery, which was created as a part of an experiment to adopt the Java Persistence API in Cayenne.

Here, the queries are applied with a parametrized object style; let’s have a look at some practical examples.

First, the search of all saved authors will look like this:

@Test
void givenAuthors_whenFindAllEJBQL_thenWeGetThreeAuthors() {
    EJBQLQuery query = new EJBQLQuery("select a FROM Author a");
    List<Author> authors = context.performQuery(query);

    assertEquals(authors.size(), 3);
}

Let’s search the Author again with the name “Vicky Sarra”, but now with EJBQLQuery:

@Test
void givenAuthors_whenFindByNameEJBQL_thenWeGetOneAuthor() {
    EJBQLQuery query = new EJBQLQuery(
      "select a FROM Author a WHERE a.name = 'Vicky Sarra'");
    List<Author> authors = context.performQuery(query);
    Author author = authors.get(0);

    assertEquals(authors.size(), 1);
    assertEquals(author.getName(), "Vicky Sarra");
}

An even better example is updating the author:

@Test
void whenUpdadingByNameEJBQL_thenWeGetTheUpdatedAuthor() {
    EJBQLQuery query = new EJBQLQuery(
      "UPDATE Author AS a SET a.name "
      + "= 'Vicky Edison' WHERE a.name = 'Vicky Sarra'");
    QueryResponse queryResponse = context.performGenericQuery(query);

    EJBQLQuery queryUpdatedAuthor = new EJBQLQuery(
      "select a FROM Author a WHERE a.name = 'Vicky Edison'");
    List<Author> authors = context.performQuery(queryUpdatedAuthor);
    Author author = authors.get(0);

    assertNotNull(author);
}

If we just want to select a column we should use this query “select a.name FROM Author a”. More examples are available in the source code of the article on Github.

7. SQLExec

SQLExec is also a new fluent query API introduced from version M4 of Cayenne.

A simple insert looks like this:

@Test
void whenInsertingSQLExec_thenWeGetNewAuthor() {
    int inserted = SQLExec
      .query("INSERT INTO Author (name) VALUES ('Baeldung')")
      .update(context);

    assertEquals(inserted, 1);
}

Next, we can update an author based on his name:

@Test
void whenUpdatingSQLExec_thenItsUpdated() {
    int updated = SQLExec.query(
      "UPDATE Author SET name = 'Baeldung' "
      + "WHERE name = 'Vicky Sarra'")
      .update(context);

    assertEquals(updated, 1);
}

We can get more details from the documentation.

8. Conclusion

In this article, we’ve looked at a number of ways to write simple and more advanced queries using Cayenne.

As always, the source code for this article can be found over on GitHub.

Introduction to Caffeine

$
0
0

1. Introduction

In this article, we’re going to take a look at Caffeine — a high-performance caching library for Java.

One fundamental difference between a cache and a Map is that a cache evicts stored items.

An eviction policy decides which objects should be deleted at any given time. This policy directly affects the cache’s hit rate — a crucial characteristic of caching libraries.

Caffeine uses the Window TinyLfu eviction policy, which provides a near-optimal hit rate.

2. Dependency

We need to add the caffeine dependency to our pom.xml:

<dependency>
    <groupId>com.github.ben-manes.caffeine</groupId>
    <artifactId>caffeine</artifactId>
    <version>2.5.5</version>
</dependency>

You can find the latest version of caffeine on Maven Central.

3. Populating Cache

Let’s focus on Caffeine’s three strategies for cache population: manual, synchronous loading, and asynchronous loading.

First, let’s write a class for the types of values that we’ll store in our cache:

class DataObject {
    private final String data;

    private static int objectCounter = 0;
    // standard constructors/getters
    
    public static DataObject get(String data) {
        objectCounter++;
        return new DataObject(data);
    }
}

3.1. Manual Populating

In this strategy, we manually put values into the cache and retrieve them later.

Let’s initialize our cache:

Cache<String, DataObject> cache = Caffeine.newBuilder()
  .expireAfterWrite(1, TimeUnit.MINUTES)
  .maximumSize(100)
  .build();

Now, we can get some value from the cache using the getIfPresent method. This method will return null if the value is not present in the cache:

String key = "A";
DataObject dataObject = cache.getIfPresent(key);

assertNull(dataObject);

We can populate the cache manually using the put method:

cache.put(key, dataObject);
dataObject = cache.getIfPresent(key);

assertNotNull(dataObject);

We can also get the value using the get method, which takes a Function along with a key as an argument. This function will be used for providing the fallback value if the key is not present in the cache, which would be inserted in the cache after computation:

dataObject = cache
  .get(key, k -> DataObject.get("Data for A"));

assertNotNull(dataObject);
assertEquals("Data for A", dataObject.getData());

The get method performs the computation atomically. This means that the computation will be made only once — even if several threads ask for the value simultaneously. That’s why using get is preferable to getIfPresent.

Sometimes we need to invalidate some cached values manually:

cache.invalidate(key);
dataObject = cache.getIfPresent(key);

assertNull(dataObject);

3.2. Synchronous Loading

This method of loading the cache takes a Function, which is used for initializing values, similar to the get method of the manual strategy. Let’s see how we can use that.

First of all, we need to initialize our cache:

LoadingCache<String, DataObject> cache = Caffeine.newBuilder()
  .maximumSize(100)
  .expireAfterWrite(1, TimeUnit.MINUTES)
  .build(k -> DataObject.get("Data for " + k));

Now we can retrieve the values using the get method:

DataObject dataObject = cache.get(key);

assertNotNull(dataObject);
assertEquals("Data for " + key, dataObject.getData());

We can also get a set of values using the getAll method:

Map<String, DataObject> dataObjectMap 
  = cache.getAll(Arrays.asList("A", "B", "C"));

assertEquals(3, dataObjectMap.size());

Values are retrieved from the underlying back-end initialization Function that was passed to the build method. This makes it possible to use the cache as the main facade for accessing values.

3.3. Asynchronous Loading

This strategy works the same as the previous but performs operations asynchronously and returns a CompletableFuture holding the actual value:

AsyncLoadingCache<String, DataObject> cache = Caffeine.newBuilder()
  .maximumSize(100)
  .expireAfterWrite(1, TimeUnit.MINUTES)
  .buildAsync(k -> DataObject.get("Data for " + k));

We can use the get and getAll methods, in the same manner, taking into account the fact that they return CompletableFuture:

String key = "A";

cache.get(key).thenAccept(dataObject -> {
    assertNotNull(dataObject);
    assertEquals("Data for " + key, dataObject.getData());
});

cache.getAll(Arrays.asList("A", "B", "C"))
  .thenAccept(dataObjectMap -> assertEquals(3, dataObjectMap.size()));

CompletableFuture has a rich and useful API, which you can read more about in this article.

4. Eviction of Values

Caffeine has three strategies for value eviction: size-based, time-based, and reference-based.

4.1. Size-Based Eviction

This type of eviction assumes that eviction occurs when the configured size limit of the cache is exceeded. There are two ways of getting the size — counting objects in the cache, or getting their weights.

Let’s see how we could count objects in the cache. When the cache is initialized, its size is equal to zero:

LoadingCache<String, DataObject> cache = Caffeine.newBuilder()
  .maximumSize(1)
  .build(k -> DataObject.get("Data for " + k));

assertEquals(0, cache.estimatedSize());

When we add a value, the size obviously increases:

cache.get("A");

assertEquals(1, cache.estimatedSize());

We can add the second value to the cache, which leads to the removal of the first value:

cache.get("B");
cache.cleanUp();

assertEquals(1, cache.estimatedSize());

It is worth mention that we call the cleanUp method before getting the cache size. This is because the cache eviction is executed asynchronously, and this method helps to await the completion of the eviction.

We can also pass a weigher Function to get the size of the cache:

LoadingCache<String, DataObject> cache = Caffeine.newBuilder()
  .maximumWeight(10)
  .weigher((k,v) -> 5)
  .build(k -> DataObject.get("Data for " + k));

assertEquals(0, cache.estimatedSize());

cache.get("A");
assertEquals(1, cache.estimatedSize());

cache.get("B");
assertEquals(2, cache.estimatedSize());

The values are removed from the cache when the weight is over 10:

cache.get("C");
cache.cleanUp();

assertEquals(2, cache.estimatedSize());

4.2. Time-Based Eviction

This eviction strategy is based on the expiration time of the entry and has three types:

  • Expire after access — entry is expired after period is passed since the last read or write occurs
  • Expire after write — entry is expired after period is passed since the last write occurs
  • Custom policy — an expiration time is calculated for each entry individually by the Expiry implementation

Let’s configure the expire-after-access strategy using the expireAfterAccess method:

LoadingCache<String, DataObject> cache = Caffeine.newBuilder()
  .expireAfterAccess(5, TimeUnit.MINUTES)
  .build(k -> DataObject.get("Data for " + k));

To configure expire-after-write strategy, we use the expireAfterWrite method:

cache = Caffeine.newBuilder()
  .expireAfterWrite(10, TimeUnit.SECONDS)
  .weakKeys()
  .weakValues()
  .build(k -> DataObject.get("Data for " + k));

To initialize a custom policy, we need to implement the Expiry interface:

cache = Caffeine.newBuilder().expireAfter(new Expiry<String, DataObject>() {
    @Override
    public long expireAfterCreate(
      String key, DataObject value, long currentTime) {
        return value.getData().length() * 1000;
    }
    @Override
    public long expireAfterUpdate(
      String key, DataObject value, long currentTime, long currentDuration) {
        return currentDuration;
    }
    @Override
    public long expireAfterRead(
      String key, DataObject value, long currentTime, long currentDuration) {
        return currentDuration;
    }
}).build(k -> DataObject.get("Data for " + k));

4.3. Reference-Based Eviction

We can configure our cache to allow garbage-collection of cache keys and/or values. To do this, we’d configure usage of the WeakRefence for both keys and values, and we can configure the SoftReference for garbage-collection of values only.

The WeakRefence usage allows garbage-collection of objects when there are not any strong references to the object. SoftReference allows objects to be garbage-collected based on the global Least-Recently-Used strategy of the JVM. More details about references in Java can be found here.

We should use Caffeine.weakKeys(), Caffeine.weakValues(), and Caffeine.softValues() to enable each option:

LoadingCache<String, DataObject> cache = Caffeine.newBuilder()
  .expireAfterWrite(10, TimeUnit.SECONDS)
  .weakKeys()
  .weakValues()
  .build(k -> DataObject.get("Data for " + k));

cache = Caffeine.newBuilder()
  .expireAfterWrite(10, TimeUnit.SECONDS)
  .softValues()
  .build(k -> DataObject.get("Data for " + k));

5. Refreshing

It’s possible to configure the cache to refresh entries after a defined period automatically. Let’s see how to do this using the refreshAfterWrite method:

Caffeine.newBuilder()
  .refreshAfterWrite(1, TimeUnit.MINUTES)
  .build(k -> DataObject.get("Data for " + k));

Here we should understand a difference between expireAfter and refreshAfter. When the expired entry is requested, an execution blocks until the new value would have been calculated by the build Function.

But if the entry is eligible for the refreshing, then the cache would return an old value and asynchronously reload the value.

6. Statistics

Caffeine has a means of recording statistics about cache usage:

LoadingCache<String, DataObject> cache = Caffeine.newBuilder()
  .maximumSize(100)
  .recordStats()
  .build(k -> DataObject.get("Data for " + k));
cache.get("A");
cache.get("A");

assertEquals(1, cache.stats().hitCount());
assertEquals(1, cache.stats().missCount());

We may also pass into recordStats supplier, which creates an implementation of the StatsCounter. This object will be pushed with every statistics-related change.

7. Conclusion

In this article, we got acquainted with the Caffeine caching library for Java. We saw how to configure and populate a cache, as well as how to choose an appropriate expiration or refresh policy according to our needs.

The source code shown here is available over on Github.

Ant vs Maven vs Gradle

$
0
0

1. Introduction

In this article, we’ll explore three Java build automation tools which dominated the JVM ecosystem – Ant, Maven, and Gradle.

We’ll introduce each of them and explore how Java build automation tools evolved.

2. Apache Ant

In the beginning, Make was the only build automation tool, beyond homegrown solutions. Make has been around since 1976 and as such, it was used for building Java applications in the early Java years.

However, a lot of conventions from C programs didn’t fit in the Java ecosystem, so in time Ant was released as a better alternative.

Apache Ant (“Another Neat Tool”) is a Java library used for automating build processes for Java applications. Additionally, Ant can be used for building non-Java applications. It was initially part of Apache Tomcat codebase and was released as a standalone project in 2000.

In many aspects, Ant is very similar to Make, and it’s simple enough so anyone can start using it without any particular prerequisites. Ant build files are written in XML, and by convention, they’re called build.xml.

Different phases of a build process are called “targets”.

Here is an example of a build.xml file for a simple Java project with the HelloWorld main class:

<project>
    <target name="clean">
        <delete dir="classes" />
    </target>

    <target name="compile" depends="clean">
        <mkdir dir="classes" />
        <javac srcdir="src" destdir="classes" />
    </target>

    <target name="jar" depends="compile">
        <mkdir dir="jar" />
        <jar destfile="jar/HelloWorld.jar" basedir="classes">
            <manifest>
                <attribute name="Main-Class" 
                  value="antExample.HelloWorld" />
            </manifest>
        </jar>
    </target>

    <target name="run" depends="jar">
        <java jar="jar/HelloWorld.jar" fork="true" />
    </target>
</project>

This build file defines four targets: clean, compile, jar and run. For example, we can compile the code by running:

ant compile

This will trigger target clean first which will delete the “classes” directory. After that, target compile will recreate the directory and compile src folder into it.

The main benefit of Ant is its flexibility. Ant doesn’t impose any coding conventions or project structures. Consequently, this means that Ant requires developers to write all the commands by themselves, which sometimes leads to huge XML build files which are hard to maintain.

Since there are no conventions, just knowing Ant does not mean we’ll quickly understand any Ant build file. It’ll likely take some time to get accustomed with an unfamiliar Ant file, which is a disadvantage compared the other, newer tools.

At first, Ant had no built-in support for dependency management. However, as dependency management became a must in the later years, Apache Ivy was developed as a sub-project of the Apache Ant project. It’s integrated with Apache Ant, and it follows the same design principles.

However, the initial Ant limitations due to not having built-in support for dependency management and frustrations when working with unmanagable XML build files led to the creation of Maven.

3. Apache Maven

Apache Maven is a dependency management and a build automation tool, primarily used for Java applications. Maven continues to use XML files just like Ant but in a much more manageable way. The name of the game here is convention over configuration.

While Ant gives the flexibility and requires everything to be written from scratch, Maven relies on conventions and provides predefined commands (goals).

Simply put, Maven allows us to focus on what our build should do, and gives us the framework to do it. Another positive aspect of Maven was that it provided built-in support for dependency management.

Maven’s configuration file, containing build and dependency management instructions, is by convention called pom.xml. Additionally, Maven also prescribes strict project structure, while Ant provides flexibility there as well.

Here’s an example of a pom.xml file for the same simple Java project with the HelloWorld main class from before:

<project xmlns="http://maven.apache.org/POM/4.0.0" 
  xmlns:xsi="http://www.w3.org/2001/XMLSchema-instance"
    xsi:schemaLocation="http://maven.apache.org/POM/4.0.0 
      http://maven.apache.org/xsd/maven-4.0.0.xsd">
    <modelVersion>4.0.0</modelVersion>
    <groupId>baeldung</groupId>
    <artifactId>mavenExample</artifactId>
    <version>0.0.1-SNAPSHOT</version>
    <description>Maven example</description>

    <dependencies>
        <dependency>
            <groupId>junit</groupId>
            <artifactId>junit</artifactId>
            <version>4.12</version>
            <scope>test</scope>
        </dependency>
    </dependencies>
</project>

However, now the project structure has been standardized as well and conforms to the Maven conventions:

+---src
|   +---main
|   |   +---java
|   |   |   \---com
|   |   |       \---baeldung
|   |   |           \---maven
|   |   |                   HelloWorld.java
|   |   |                   
|   |   \---resources
|   \---test
|       +---java
|       \---resources

As opposed to Ant, there is no need to define each of the phases in the build process manually. Instead, we can simply call Maven’s built-in commands.

For example, we can compile the code by running:

mvn compile

At its core, as noted on official pages, Maven can be considered a plugin execution framework, since all work is done by plugins. Maven supports a wide range of available plugins, and each of them can be additionally configured.

One of the available plugins is Apache Maven Dependency Plugin which has a copy-dependencies goal that will copy our dependencies to a specified directory.

To show this plugin in action, let’s include this plugin in our pom.xml file and configure an output directory for our dependencies:

<build>
    <plugins>
        <plugin>
            <groupId>org.apache.maven.plugins</groupId>
            <artifactId>maven-dependency-plugin</artifactId>
            <executions>
                <execution>
                    <id>copy-dependencies</id>
                    <phase>package</phase>
                    <goals>
                        <goal>copy-dependencies</goal>
                    </goals>
                    <configuration>
                        <outputDirectory>target/dependencies
                          </outputDirectory>
                    </configuration>
                </execution>
            </executions>
        </plugin>
    </plugins>
</build>

This plugin will be executed in a package phase, so if we run:

mvn package

We’ll execute this plugin and copy dependencies to the target/dependencies folder.

There is also an existing article on how to create an executable JAR using different Maven plugins. Additionally, for a detailed Maven overview, have a look at this core guide on Maven, where some Maven’s key features are explored.

Maven became very popular since build files were now standardized and it took significantly less time to maintain build files, comparing to Ant. However, though more standardized than Ant files, Maven configuration files still tend to get big and cumbersome.

Maven’s strict conventions come with a price of being a lot less flexible than Ant. Goal customization is very hard, so writing custom build scripts is a lot harder to do, compared with Ant.

Although Maven has made some serious improvements regarding making application’s build processes easier and more standardized, it still comes with a price due to being a lot less flexible than Ant. This lead to the creation of Gradle which combines best of both worlds – Ant’s flexibility and Maven’s features.

4. Gradle

Gradle is a dependency management and a build automation tool which was built upon the concepts of Ant and Maven.

One of the first things we can note about Gradle is that it’s not using XML files, unlike Ant or Maven.

Over time, developers became more and more interested in having and working with a domain specific language – which, simply put, would allow them to solve problems in a specific domain using a language tailored for that particular domain.

This was adopted by Gradle, which is using a DSL based on Groovy. This led to smaller configuration files with less clutter since the language was specifically designed to solve specific domain problems. Gradle’s configuration file is by convention called build.gradle.

Here is an example of a build.gradle file for the same simple Java project with the HelloWorld main class from before:

apply plugin: 'java'

repositories {
    mavenCentral()
}

jar {
    baseName = 'gradleExample'
    version = '0.0.1-SNAPSHOT'
}

dependencies {
    compile 'junit:junit:4.12'
}

We can compile the code by running:

gradle classes

At its core, Gradle intentionally provides very little functionality. Plugins add all useful features. In our example, we were using java plugin which allows us to compile Java code and other valuable features.

Gradle gave its build steps name “tasks”, as opposed to Ant’s “targets” or Maven’s “phases”. With Maven, we used Apache Maven Dependency Plugin, and it’s specific goal to copy dependencies to a specified directory. With Gradle, we can do the same by using tasks:

task copyDependencies(type: Copy) {
   from configurations.compile
   into 'dependencies'
}

We can run this task by executing:

gradle copyDependencies

5. Conclusion

In this article, we presented Ant, Maven, and Gradle – three Java build automation tools.

Not surprisingly, Maven holds the majority of the build tool market today. Gradle, however, has seen good adoption in more complex codebases, including a number of open-source projects such as Spring.

Activiti Kickstart App and Activiti Rest Webapp

$
0
0

1. Overview

In our previous articles (based on Activiti API with Java and Spring), we saw how to manage processes programmatically. If we want to set up a demo, along with the UI for Activiti, we have two webapps which will allow us to do so in just a few minutes.

activiti-app offers a user interface through which a user can perform any identity management and task management related operations, create users and groups.

Similarly, activiti-rest is a webapp that provides the REST API for performing any operation on a process, task, process, etc.

In this article, we’ll look into how to use these webapps, and what functionalities they provide.

2. Downloads

We can download the war files for both webapps from Activiti Website itself.

For v6.0.0, we can just download the activiti-6.0.0.zip, extract it, and the war files can be found in activiti-6.0.0/wars directory.

3. Activiti Kickstart App

We’ll need a working Java runtime and an Apache Tomcat installation to deploy the app. Any web container would work, but Activiti is tested on Tomcat primarily.

Now, we need just to deploy the war on Tomcat and access it using http://localhost:8080/activiti-app.

The home page should look like this:


3.1. Database

By default, it uses the H2 in-memory database. If we want to change the DB configuration, we can check out the code and modify the activiti-app.properties file.

After doing this, we need to re-generate the war file, which can be done by running the start.sh script. This will build the activiti-app along with the required dependencies.

3.2. Kickstart App

When we click on the Kickstart App, we get the options for working with a Process. We can create/import processes and run them from here.

Let’s create a small process that has a single User Task, which receives a message from a user. Once in the Kickstart App, to create a process select the Processes tab, and click on Create Process:

Process editor will open where we can drag and drop various symbols for start events, various types of tasks and end events to define a Process.

As we’re adding a User Task to our process, we need to assign it to someone. We can do it by clicking on assignments from the options for this task and selecting an Assignee.

For simplicity, let’s assign the task to the process initiator:

We also want this User Task to get an input message from the user. To achieve this, we need to associate a Form, with a single text field, with this task.

Select the User Task and select Referenced Form. Currently, there’s no Form associated with the task, so click on New Form, and add the required details:

After this, it’ll take us to the Forms section where we can drag and drop various fields that we want in our form and also set labels for them:

Notice that we’ve ticked the Required, which means the User task cannot complete without entering the Message.

Once done, we’ll save it and go to Apps tab. To be able to run the process we created, we need to create a Process App.

In the Process App, we can add one or more Process Definitions. After doing this, we need to publish this App, so that the Processes are available to other users:

3.3. Task App

In the Task App, there’re two tabs: Tasks – for currently running tasks, and Processes – for currently running Processes.

Once we click on the Start Process in Processes tab, we get the list of available processes that we can run. From this list, we’ll select our process and click on start:

Our process contains only a single task, and it is a User Task. Hence, the process is waiting for a user to complete this task. When we click on the task that the process is waiting on, we see the form that we created:

If we click on Show Diagram, it’ll not only show us the Process diagram but also highlight the tasks that are completed and the one which is pending. In our case the User Task is still pending, which is highlighted:

To complete this task, we can click on Complete. As mentioned earlier we’ll need to enter the Message, as we have kept it mandatory. Hence, after entering the Message, we can Complete the task.

3.4. Identity Management App

Apart from managing a process, we’ve got an Identity Management App, that allows us to add users and groups. We can also define roles for the users.

4. Activiti REST

Activiti provides a REST API for the Activiti Engine that can be installed by deploying the activiti-rest.war file to a servlet container like Apache Tomcat.

By default, the Activiti Engine will connect to an in-memory H2 database. Just like we saw in activiti-app, here we can change the database settings in the db.properties file in the WEB-INF/classes folder and recreate the war file.

With the app up and running, we can use this base URL for all the requests:

http://localhost:8080/activiti-rest/service/

By default, all REST resources require a valid Activiti user to be authenticated. Basic HTTP access authentication should be used for every REST call.

4.1. Creating and Running a Process

To create a process, first, we need the BPMN file for our process. We can either create the file as described in our previous articles based on Activiti with Java, or it can be downloaded from the Kickstart App’s Process section.

We need to make a POST request, along with the contentType: multipart/form-data, where we’ll upload the BPMN file for our new process:

POST repository/deployments

When we make this call by passing the BPMN file for the process we created, it’ll give the following output:

{    
    "id": "40",
    "name": "user_msg.bpmn20.xml",
    "deploymentTime": "2017-10-04T17:28:07.963+05:30",
    "category": null,
    "url": "http://localhost:8080/activiti-rest/service/repository/deployments/40",
    "tenantId": ""
}

Now, we can see our process definition listed, if we get all the process definitions:

GET repository/process-definitions

Next, we can run this process using the processKey that we have mentioned in the BPMN file:

POST /runtime/process-instances

With this request body:

{
    "processDefinitionKey":"user_msg”}
}

The response will be:

{
    "id": "44",
    "url": "http://localhost:8080/activiti-rest/service/runtime/process-instances/44",
    "businessKey": null,
    "suspended": false,
    "ended": false,
    "processDefinitionId": "user_msg:1:43",
    "processDefinitionUrl": "http://localhost:8080/activiti-rest/service/repository/process-definitions/user_msg:1:43",
    "processDefinitionKey": "user_msg",
    //other details...
}

We can see the diagram of our running process using the id of the process instance returned with the previous response:

GET runtime/process-instances/44/diagram

As mentioned earlier, the process is waiting for the User Task to finish, and hence it is highlighted in the diagram:

4.2. Completing a Task

Let’s now take a look at our pending task using:

GET runtime/tasks

The response will have a list of pending tasks. Currently, there’s only one task – our User Task:

{
    "data": [
        {
            "id": "49",
            "url": "http://localhost:8080/activiti-rest/service/runtime/tasks/49",
            "owner": null,
            "assignee": "$INITIATOR",
            "delegationState": null,
            "name": "User Input Message",
            "description": "User Task to take user input",
            "createTime": "2017-10-04T17:33:07.205+05:30",
            "dueDate": null,
            // other details...
        }
}

At last, let’s complete this task using the task id 49:

POST runtime/tasks/49

This is a POST request, and we need to send the action field indicating what we want to do with the task. We can “resolve”, “complete” or “delete” a task. Also, we can pass an array of variables, required by the task to complete.

In our case, we’ve to pass a field “message”, which is the is of out User Message text field. So our request body is:

{
  "action" : "complete",
  "variables" : [{"message":"This is a User Input Message"}]
}

5. Conclusion

In this article, we discussed how we could use the Activiti Kickstart App and the provided REST API.

More information about activiti-rest can be found in the User Guide, and activiti-app details can be found in the documentation by Alfresco.

Viewing all 4709 articles
Browse latest View live


<script src="https://jsc.adskeeper.com/r/s/rssing.com.1596347.js" async> </script>