Quantcast
Channel: Baeldung
Viewing all 4713 articles
Browse latest View live

Bubble Sort in Java

$
0
0

1. Introduction

In this quick article, we’ll explore the Bubble Sort algorithm in detail, focusing on a Java implementation.

This is one of the most straightforward sorting algorithms; the core idea is to keep swapping adjacent elements of an array if they are in an incorrect order until the collection is sorted.

Small items “bubble” to the top of the list as we iterate the data structure. Hence, the technique is known as bubble sort.

As sorting is performed by swapping, we can say it performs in-place sorting.

Also, if two elements have same values, resulting data will have their order preserved – which makes it a stable sort.

2. Methodology

As mentioned earlier, to sort an array, we iterate through it while comparing adjacent elements, and swapping them if necessary. For an array of size n, we perform n-1 such iterations.

Let’s take up an example to understand the methodology. We’d like to sort the array in the ascending order:

4    2    1    6    3    5

We start the first iteration by comparing 4 and 2; they are definitely not in the proper order. Swapping would result in:

[2    4]    1    6    3    5

Now, repeating the same for 4 and 1:

2    [1    4]    6    3    5

We keep doing it until the end:

2    1    [4    6]    3    5

2    1    4    [3    6]    5

2    1    4    3    [5    6]

As we can see, at the end of the first iteration, we got the last element at its rightful place. Now, all we need to do is repeat the same procedure in further iterations. Except, we exclude the elements which are already sorted.

In the second iteration, we’ll iterate through entire array except for the last element. Similarly, for 3rd iteration, we omit last 2 elements. In general, for k-th iteration, we iterate till index n-k (excluded). At the end of n-1 iterations, we’ll get the sorted array.

Now that in you understand the technique, let’s dive into the implementation.

3. Implementation

Let’s implement the sorting for the example array we discussed using the Java 8 approach:

void bubbleSort(Integer[] arr) {
    int n = arr.length;
    IntStream.range(0, n - 1)
    .flatMap(i -> IntStream.range(i + 1, n - i))
    .forEach(j -> {
        if (arr[j - 1] > arr[j]) {
            int temp = arr[j];
            arr[j] = arr[j - 1];
            arr[j - 1] = temp;
            }
     });
}

And a quick JUnit test for the algorithm:

@Test
public void whenSortedWithBubbleSort_thenGetSortedArray() {
    Integer[] array = { 2, 1, 4, 6, 3, 5 };
    Integer[] sortedArray = { 1, 2, 3, 4, 5, 6 };
    BubbleSort bubbleSort = new BubbleSort();
    bubbleSort.bubbleSort(array);
    
    assertArrayEquals(array, sortedArray);
}

4. Complexity and Optimization

As we can see, for the average and the worst case, the time complexity is O(n^2).

In addition, the space complexity, even in the worst scenario, is O(1) as Bubble sort algorithm doesn’t require any extra memory and the sorting takes place in the original array.

By analyzing the solution carefully, we can see that if no swaps are found in an iteration, we don’t need to iterate further.

In case of the example discussed earlier, after the 2nd iteration, we get:

1    2    3    4    5    6

In the third iteration, we don’t need to swap any pair of adjacent elements. So we can skip all remaining iterations.

In case of a sorted array, swapping won’t be needed in the first iteration itself – which means we can stop the execution. This is the best case scenario and the time complexity of the algorithm is O(n).

Now, let’s implement the optimized solution.

public void optimizedBubbleSort(Integer[] arr) {
    int i = 0, n = arr.length;
    boolean swapNeeded = true;
    while (i < n - 1 && swapNeeded) {
        swapNeeded = false;
        for (int j = i + 1; j < n - i; j++) {
            if (arr[j - 1] > arr[j]) {
                int temp = arr[j - 1];
                arr[j - 1] = arr[j];
                arr[j] = temp;
                swapNeeded = true;
            }
        }
        if(!swapNeeded) {
            break;
        }
        i++;
    }
}

Let’s check the output for the optimized algorithm:

@Test
public void 
  givenIntegerArray_whenSortedWithOptimizedBubbleSort_thenGetSortedArray() {
      Integer[] array = { 2, 1, 4, 6, 3, 5 };
      Integer[] sortedArray = { 1, 2, 3, 4, 5, 6 };
      BubbleSort bubbleSort = new BubbleSort();
      bubbleSort.optimizedBubbleSort(array);
 
      assertArrayEquals(array, sortedArray);
}

5. Conclusion

In this tutorial, we saw how Bubble Sort works, and it’s implementation in Java. We also saw how it can be optimized. To summarize, it’s an in-place stable algorithm, with time complexity:

  •  Worst and Average case: O(n*n), when the array is in reverse order
  •  Best case: O(n), when the array is already sorted

The algorithm is popular in computer graphics, due to its capability to detect some small errors in sorting. For example, in an almost sorted array, only two elements need to be swapped, to get a completely sorted array. Bubble Sort can fix such errors (ie. sort this array) in linear time.

As always, the code for the implementation of this algorithm can be found over on GitHub.


Java Weekly, Issue 199

$
0
0

Lots of interesting writeups on Java 9 this week.

Here we go…

1. Spring and Java

>> Migrating a Spring Boot application to Java 9 – Compatibility [blog.frankel.ch]

An interesting case study showing that migrating to the new JDK is not as easy as just bumping up the version number.

>> Low-risk Monolith to Microservice Evolution Part II [blog.christianposta.com]

The second part of the Microservice migration guide.

>> How to manage Docker containers in Kubernetes with Java [oreilly.com]

A good intro to using Docker and Kubernetes for a typical Spring web application.

Also worth reading:

Webinars and presentations:

Time to upgrade:

2. Technical

>> A Developer’s Guide To Docker – Docker Compose [developer.okta.com]

Docker Compose makes it possible to compose applications from individual containers.

Also worth reading:

3. Musings

>> The Programmer Skill Fetish, Contextualized [daedtech.com]

We can’t be best at everything at once, so it’s better to specialize.

>> Sapiens and Collective Fictions [zwischenzugs.wordpress.com]

Demystifying some of the popular buzzwords.

Also worth reading:

4. Comics

And my favorite Dilberts of the week:

>> Being Ineffective [dilbert.com]

>> The Common Variable [dilbert.com]

>> Boss Didn’t Understand a Word of It [dilbert.com]

5. Pick of the Week

>> The 6-Step “Happy Path” to HTTPS [troyhunt.com]

Commits and NRT Search in SolrCloud

$
0
0

1. Overview

Solr is one of the most popular Lucene-based search solutions. It’s fast, distributed, robust, flexible and has an active developer community behind it. SolrCloud is the new, distributed version of Solr.

One of its key features here is the near real-time (NRT) search, i.e., documents being available for search as soon as they are indexed.

2. Indexing in SolrCloud

A collection in Solr is made up of multiple shards, and each shard has various replicas. One of the replicas of a shard is selected as the leader for that shard when a collection is created:

  • When a client tries to index a document, the document is first assigned a shard based on the hash of the id of the document
  • The client gets the URL of the leader of that shard from zookeeper, and finally, the index request is made to that URL
  • The shard leader indexes the document locally before sending it to replicas
  • Once the leader receives an acknowledgment from all active and recovering replicas, it returns confirmation to the indexing client application

When we index a document in Solr, it doesn’t go to the index directly. It’s written in what is called a tlog (transaction log). Solr uses the transaction log to ensure that documents are not lost before they are committed, in case of a system crash.

If the system crashes before the documents in the transaction log are committed, i.e., persisted to disk, the transaction log is replayed when the system comes back up, leading to zero loss of documents.

Every index/update request is logged to the transaction log which continues to grow until we issue a commit.

3. Commits in SolrCloud

commit operation means finalizing a change and persisting that change on disk. SolrCloud provides two kinds of commit operations viz. a commit and a soft commit.

3.1. Commit (Hard Commit)

A commit or hard commit is one in which Solr flushes all uncommitted documents in a transaction log to disk. The active transaction log is processed, and then a new transaction log file is opened.

It also refreshes a component called a searcher so that the newly committed documents become available for searching. A searcher can be considered as a read-only view of all committed documents in the index.

The commit operation can be done exclusively by the client by calling the commit API:

String zkHostString = "zkServer1:2181,zkServer2:2181,zkServer3:2181/solr";
SolrClient solr = new CloudSolrClient.Builder()
  .withZkHost(zkHostString)
  .build();
SolrInputDocument doc1 = new SolrInputDocument();
doc1.addField("id", "123abc");
doc1.addField("date", "14/10/2017");
doc1.addField("book", "To kill a mockingbird");
doc1.addField("author", "Harper Lee");
solr.add(doc1);
solr.commit();

Equivalently, it can be automated as autoCommit by specifying it in the solrconfig.xml file, see section 3.4.

3.2. SoftCommit

Softcommit has been added from Solr 4 onwards, primarily to support the NRT feature of SolrCloud. It’s a mechanism for making documents searchable in near real-time by skipping the costly aspects of hard commits.

During a softcommit, the transaction log is not truncated, it continues to grow. However, a new searcher is opened, which makes the documents since last softcommit visible for searching. Also, some of the top-level caches in Solr are invalidated, so it’s not a completely free operation.

When we specify the maxTime for softcommit as 1000, it means that the document will be available in queries no later than 1 second from the time it got indexed.

This feature grants SolrCloud the power of near real-time searching, as new documents can be made searchable even without committing them. Softcommit can be triggered only as autoSoftCommit by specifying it in solrconfig.xml file, see section 3.4.

3.3. Autocommit and Autosoftcommit

The solrconfig.xml file is one of the most important configuration files in SolrCloud. It is generated at the time of collection creation. To enable autoCommit or autoSoftCommit, we need to update the following sections in the file:

<autoCommit>
  <maxDocs>10000</maxDocs>
  <maxTime>30000</maxTime>
  <openSearcher>true</openSearcher>
</autoCommit>

<autoSoftCommit>
  <maxTime>6000</maxTime>
  <maxDocs>1000</maxDocs>
</autoSoftCommit>

maxTime: The number of milliseconds since the earliest uncommitted update after which the next commit/softcommit should happen.

maxDocs: The number of updates that have occurred since the last commit and after which the next commit/softcommit should happen.

openSearcher: This property tells Solr whether to open a new searcher after a commit operation or not. If it’s true, after a commit, the old searcher is closed, and a new searcher is opened, making the committed document visible for searching, If it’s false, the document won’t be available for searching after commit.

4. Near Real-Time Search

Near Real-Time Searching is achieved in Solr using a combination of commit and softcommit. As mentioned before, when a document is added to Solr, it won’t be visible in search results until it’s committed to the index.

Normal commits are costly, which is why softcommits are useful. But, as softcommit doesn’t persist the documents, we do need to set the autocommit maxTime interval (or maxDocs) to a reasonable value, depending upon the load we are expecting.

4.1. Real-Time Gets

There is another feature provided by Solr which is in-fact real time – the get API. The get API can return us a document that is not even soft committed yet.

It searches directly in the transaction logs if the document is not found in the index. So we can fire a get API call, immediately after the index call returns and we’ll still be able to retrieve the document.

However, like all too-good things, there is a catch here. We need to pass the id of the document in the get API call. Of course, we can provide other filter queries along with the id, but without id, the call doesn’t work:

http://localhost:8985/solr/myCollection/get?id=1234&fq=name:baeldung

5. Conclusion

Solr provides quite a bit of flexibility to us regarding tweaking the NRT capability. To get the best performance out of the server, we need to experiment with the values of commits and softcommits, based upon our use case and expected load.

We shouldn’t keep our commit interval too long, or else our transaction log will grow to a considerable size. We shouldn’t execute our softcommits too frequently though.

It is also advised to do a proper performance testing of our system before we go to production. We should check if the documents are becoming searchable within our desired time interval.

Spring MVC Guides

$
0
0

The Spring MVC project provides tools that can be used for fast development of web applications in the MVC architecture.

>> Spring MVC Tutorial

Starting at the top – this is a simple Spring MVC tutorial showing how to set up a Spring MVC project, both with Java-based configuration, as well as with XML-based configuration.

>> Spring MVC Setup with Kotlin

Here, we take a look at what it takes to create a simple Spring MVC project with the Kotlin language.

>> Model, ModelMap, and ModelView

We look at the use of the core org.springframework.ui.Model, org.springframework.ui.ModelMap and org.springframework.web.servlet.ModelView classes.

>> A Guide to the ViewResolver

A simple tutorial showing how to set up the most common view resolvers and how to use multiple ViewResolvers within the same configuration.

>> Content Negotiation

How to implement the content negotiation in a Spring MVC project.

>> File Upload

Here, we focus on what Spring offers for multipart (file upload) support in web applications.

>> A Quick Guide to Matrix Variables

We show how we can simplify complex GET requests that use either variable or optional path parameters inside the different path segments of a URI.

>> The @ModelAttribute Annotation

We demonstrate the usability and functionality of the annotation, through a common concept: a form submitted from a company’s employee.

>> Returning Image/Media Data

We illustrate how to return images and other media using the Spring MVC framework.

>> Using a Custom Handler Interceptor to Manage Sessions

We focus on the Spring MVC HandlerInterceptor – we show a more advanced use case for using interceptors – we emulate a session timeout logic by setting custom counters and tracking sessions manually.

>> Custom Validation

We create a custom validator to validate a form with a phone number field, then show a custom validator for multiple fields.

>> Getting Started with Forms

We have a look at Spring forms and data binding to a controller.

>> Introduction to HandlerInterceptor

We introduce the Spring MVC HandlerInterceptor and show how to use it properly.

>> The HttpMediaTypeNotAcceptableException

We have a look at the HttpMediaTypeNotAcceptableException exception and see cases where we might encounter it.

>> Cachable Static Assets

We dive into caching static assets (such as Javascript and CSS files) when serving them with Spring MVC.

>> Custom Error Pages

In this tutorial, we set up customized error pages for a few HTTP error codes.

>> Servlet 3 Async Support with Spring MVC and Spring Security

We focus on the Servlet 3 support for async requests, and how Spring MVC and Spring Security handle these.

>> A Custom Data Binder

Here, we show how we can use Spring’s Data Binding mechanism in order to make our code more clear and readable by applying automatic conversions.

>> HandlerAdapters

We focus on the various handler adapters implementations available in the Spring framework.

>> Upload and Display Excel Files

We demonstrate how to upload Excel files and display their content in a web page using the Spring MVC framework.

>> Testing an OAuth Secured API

We show how we can test an API which is secured using OAuth with the Spring MVC test support.

>> Form Validation with AngularJS

We have a look at implementing client-side validation of form input using AngularJS and server-side validation using the Spring MVC framework.

>> Quick Guide to Spring MVC with Velocity

We focus on using Velocity with a typical Spring MVC web application.

>> Introduction to Using FreeMarker in Spring MVC

How to configure FreeMarker for use in Spring MVC as an alternative to JSP.

>> Spring MVC + Thymeleaf 3.0: New Features

We discuss new features of Thymeleaf 3.0 in Spring MVC with Thymeleaf application.

>> CSRF Protection with Spring MVC and Thymeleaf

We show how to prevent Cross-Site Request Forgery (CSRF) attacks in Spring MVC with Thymeleaf application.

>> Apache Tiles Integration with Spring MVC

In this article, we integrate Apache Tiles with Spring MVC.

A Guide to Java Bytecode Manipulation with ASM

$
0
0

1. Introduction

In this article, we’ll look at how to use the ASM library for manipulating an existing Java class by adding fields, adding methods, and changing the behavior of existing methods.

2. Dependencies

We need to add the ASM dependencies to our pom.xml:

<dependency>
    <groupId>org.ow2.asm</groupId>
    <artifactId>asm</artifactId>
    <version>6.0</version>
</dependency>
<dependency>
    <groupId>org.ow2.asm</groupId>
    <artifactId>asm-util</artifactId>
    <version>6.0</version>
</dependency>

We can get the latest versions of asm and asm-util from Maven Central.

3. ASM API Basics

The ASM API provides two styles of interacting with Java classes for transformation and generation: event-based and tree-based.

3.1. Event-based API

This API is heavily based on the Visitor pattern and is similar in feel to the SAX parsing model of processing XML documents. It is comprised, at its core, of the following components:

  • ClassReader helps to read class files and is the beginning of transforming a class
  • ClassVisitor – provides the methods used to transform the class after reading the raw class files
  • ClassWriter – is used to output the final product of the class transformation

It’s in the ClassVisitor that we have all the visitor methods that we’ll use to touch the different components (fields, methods, etc.) of a given Java class. We do this by providing a subclass of ClassVisitor to implement any changes in a given class.

Due to the need to preserve the integrity of the output class concerning Java conventions and the resulting bytecode, this class requires a strict order in which its methods should be called to generate correct output.

The ClassVisitor methods in the event-based API are called in the following order:

visit
visitSource?
visitOuterClass?
( visitAnnotation | visitAttribute )*
( visitInnerClass | visitField | visitMethod )*
visitEnd

3.2. Tree-based API

This API is a more object-oriented API and is analogous to the JAXB model of processing XML documents.

It’s still based on the event-based API, but it introduces the ClassNode root class. This class serves as the entry point into the class structure.

4. Working With the Event-based ASM API

We’ll modify the java.lang.Integer class with ASM. And we need to grasp a fundamental concept at this point: the ClassVisitor class contains all the necessary visitor methods to create or modify all the parts of a class.

We only need to override the necessary visitor method to implement our changes. Let’s start by setting up the prerequisite components:

public class CustomClassWriter {

    static String className = "java.lang.Integer"; 
    static String cloneableInterface = "java/lang/Cloneable";
    ClassReader reader;
    ClassWriter writer;

    public CustomClassWriter() {
        reader = new ClassReader(className);
        writer = new ClassWriter(reader, 0);
    }
}

We use this as a basis to add the Cloneable interface to the stock Integer class, and we also add a field and a method.

4.1. Working With Fields

Let’s create our ClassVisitor that we’ll use to add a field to the Integer class:

public class AddFieldAdapter extends ClassVisitor {
    private String fieldName;
    private String fieldDefault;
    private int access = org.objectweb.asm.Opcodes.ACC_PUBLIC;
    private boolean isFieldPresent;

    public AddFieldAdapter(
      String fieldName, int fieldAccess, ClassVisitor cv) {
        super(ASM4, cv);
        this.cv = cv;
        this.fieldName = fieldName;
        this.access = fieldAccess;
    }
}

Next, let’s override the visitField method, where we first check if the field we plan to add already exists and set a flag to indicate the status.

We still have to forward the method call to the parent class — this needs to happen as the visitField method is called for every field in the class. Failing to forward the call means no fields will be written to the class.

This method also allows us to modify the visibility or type of existing fields:

@Override
public FieldVisitor visitField(
  int access, String name, String desc, String signature, Object value) {
    if (name.equals(fieldName)) {
        isFieldPresent = true;
    }
    return cv.visitField(access, name, desc, signature, value); 
}

We first check the flag set in the earlier visitField method and call the visitField method again, this time providing the name, access modifier, and description. This method returns an instance of FieldVisitor.

The visitEnd method is the last method called in order of the visitor methods. This is the recommended position to carry out the field insertion logic.

Then, we need to call the visitEnd method on this object to signal that we’re done visiting this field:

@Override
public void visitEnd() {
    if (!isFieldPresent) {
        FieldVisitor fv = cv.visitField(
          access, fieldName, fieldType, null, null);
        if (fv != null) {
            fv.visitEnd();
        }
    }
    cv.visitEnd();
}

It’s important to be sure that all the ASM components used come from the org.objectweb.asm package — a lot of libraries use the ASM library internally and IDEs could auto-insert the bundled ASM libraries.

We now use our adapter in the addField method, obtaining a transformed version of java.lang.Integer with our added field:

public class CustomClassWriter {
    AddFieldAdapter addFieldAdapter;
    //...
    public byte[] addField() {
        addFieldAdapter = new AddFieldAdapter(
          "aNewBooleanField",
          org.objectweb.asm.Opcodes.ACC_PUBLIC,
          writer);
        reader.accept(addFieldAdapter, 0);
        return writer.toByteArray();
    }
}

We’ve overridden the visitField and visitEnd methods.

Everything to be done concerning fields happens with the visitField method. This means we can also modify existing fields (say, transforming a private field to public) by changing the desired values passed to the visitField method.

4.2. Working With Methods

Generating whole methods in the ASM API is more involved than other operations in the class. This involves a significant amount of low-level byte-code manipulation and, as a result, is beyond the scope of this article.

For most practical uses, however, we can either modify an existing method to make it more accessible (perhaps make it public so that it can be overridden or overloaded) or modify a class to make it extensible.

Let’s make the toUnsignedString method public:

public class PublicizeMethodAdapter extends ClassVisitor {
    public PublicizeMethodAdapter(int api, ClassVisitor cv) {
        super(ASM4, cv);
        this.cv = cv;
    }
    public MethodVisitor visitMethod(
      int access,
      String name,
      String desc,
      String signature,
      String[] exceptions) {
        if (name.equals("toUnsignedString0")) {
            return cv.visitMethod(
              ACC_PUBLIC + ACC_STATIC,
              name,
              desc,
              signature,
              exceptions);
        }
        return cv.visitMethod(
          access, name, desc, signature, exceptions);
   }
}

Like we did for the field modification, we merely intercept the visit method and change the parameters we desire.

In this case, we use the access modifiers in the org.objectweb.asm.Opcodes package to change the visibility of the method. We then plug in our ClassVisitor:

public byte[] publicizeMethod() {
    pubMethAdapter = new PublicizeMethodAdapter(writer);
    reader.accept(pubMethAdapter, 0);
    return writer.toByteArray();
}

4.3. Working With Classes

Along the same lines as modifying methods, we modify classes by intercepting the appropriate visitor method. In this case, we intercept visit, which is the very first method in the visitor hierarchy:

public class AddInterfaceAdapter extends ClassVisitor {

    public AddInterfaceAdapter(ClassVisitor cv) {
        super(ASM4, cv);
    }

    @Override
    public void visit(
      int version,
      int access,
      String name,
      String signature,
      String superName, String[] interfaces) {
        String[] holding = new String[interfaces.length + 1];
        holding[holding.length - 1] = cloneableInterface;
        System.arraycopy(interfaces, 0, holding, 0, interfaces.length);
        cv.visit(V1_8, access, name, signature, superName, holding);
    }
}

We override the visit method to add the Cloneable interface to the array of interfaces to be supported by the Integer class. We plug this in just like all the other uses of our adapters.

5. Using the Modified Class

So we’ve modified the Integer class. Now we need to be able to load and use the modified version of the class.

In addition to simply writing the output of writer.toByteArray to disk as a class file, there are some other ways to interact with our customized Integer class.

5.1. Using the TraceClassVisitor

The ASM library provides the TraceClassVisitor utility class that we’ll use to introspect the modified class. Thus we can confirm that our changes have happened.

Because the TraceClassVisitor is a ClassVisitor, we can use it as a drop-in replacement for a standard ClassVisitor:

PrintWriter pw = new PrintWriter(System.out);

public PublicizeMethodAdapter(ClassVisitor cv) {
    super(ASM4, cv);
    this.cv = cv;
    tracer = new TraceClassVisitor(cv,pw);
}

public MethodVisitor visitMethod(
  int access,
  String name,
  String desc,
  String signature,
  String[] exceptions) {
    if (name.equals("toUnsignedString0")) {
        System.out.println("Visiting unsigned method");
        return tracer.visitMethod(
          ACC_PUBLIC + ACC_STATIC, name, desc, signature, exceptions);
    }
    return tracer.visitMethod(
      access, name, desc, signature, exceptions);
}

public void visitEnd(){
    tracer.visitEnd();
    System.out.println(tracer.p.getText());
}

What we have done here is to adapt the ClassVisitor that we passed to our earlier PublicizeMethodAdapter with the TraceClassVisitor.

All the visiting will now be done with our tracer, which then can print out the content of the transformed class, showing any modifications we’ve made to it.

While the ASM documentation states that the TraceClassVisitor can print out to the PrintWriter that’s supplied to the constructor, this doesn’t appear to work properly in the latest version of ASM.

Fortunately, we have access to the underlying printer in the class and were able to manually print out the tracer’s text contents in our overridden visitEnd method.

5.2. Using Java Instrumentation

This is a more elegant solution that allows us to work with the JVM at a closer level via Instrumentation.

To instrument the java.lang.Integer class, we write an agent that will be configured as a command line parameter with the JVM. The agent requires two components:

  • A class that implements a method named premain
  • An implementation of ClassFileTransformer in which we’ll conditionally supply the modified version of our class
public class Premain {
    public static void premain(String agentArgs, Instrumentation inst) {
        inst.addTransformer(new ClassFileTransformer() {
            @Override
            public byte[] transform(
              ClassLoader l,
              String name,
              Class c,
              ProtectionDomain d,
              byte[] b)
              throws IllegalClassFormatException {
                if(name.equals("java/lang/Integer")) {
                    CustomClassWriter cr = new CustomClassWriter(b);
                    return cr.addField();
                }
                return b;
            }
        });
    }
}

We now define our premain implementation class in a JAR manifest file using the Maven jar plugin:

<plugin>
    <groupId>org.apache.maven.plugins</groupId>
    <artifactId>maven-jar-plugin</artifactId>
    <version>2.4</version>
    <configuration>
        <archive>
            <manifestEntries>
                <Premain-Class>
                    com.baeldung.examples.asm.instrumentation.Premain
                </Premain-Class>
                <Can-Retransform-Classes>
                    true
                </Can-Retransform-Classes>
            </manifestEntries>
        </archive>
    </configuration>
</plugin>

Building and packaging our code so far produces the jar that we can load as an agent. To use our customized Integer class in a hypothetical “YourClass.class“:

java YourClass -javaagent:"/path/to/theAgentJar.jar"

6. Conclusion

While we implemented our transformations here individually, ASM allows us to chain multiple adapters together to achieve complex transformations of classes.

In addition to the basic transformations we examined here, ASM also supports interactions with annotations, generics, and inner classes.

We’ve seen some of the power of the ASM library — it removes a lot of limitations we might encounter with third-party libraries and even standard JDK classes.

ASM is widely used under the hood of some of the most popular libraries (Spring, AspectJ, JDK, etc.) to perform a lot of “magic” on the fly.

You can find the source code for this article in the GitHub project.

Mathematical and Aggregate Operators in RxJava

$
0
0

1. Introduction

Following the introduction to RxJava article, we’re going to look at aggregate and mathematical operators.

These operations must wait for the source Observable to emit all items. Because of this, these operators are dangerous to use on Observables that may represent very long or infinite sequences.

Secondly, all the examples use an instance of the TestSubscriber, a particular variety of Subscriber that can be used for unit testing, to perform assertions, inspect received events or wrap a mocked Subscriber.

Now, let’s start looking at the Mathematical operators.

2. Setup

To use additional operators, we’ll need to add the additional dependency to the pom.xml:

<dependency>
    <groupId>io.reactivex</groupId>
    <artifactId>rxjava-math</artifactId>
    <version>1.0.0</version>
</dependency>

Or, for a Gradle project:

compile 'io.reactivex:rxjava-math:1.0.0'

3. Mathematical Operators

The MathObservable is dedicated to performing mathematical operations and its operators use another Observable that emits items that can be evaluated as numbers.

3.1. Average

The average operator emits a single value – the average of all values emitted by the source.

Let’s see that in action:

Observable<Integer> sourceObservable = Observable.range(1, 20);
TestSubscriber<Integer> subscriber = TestSubscriber.create();

MathObservable.averageInteger(sourceObservable).subscribe(subscriber);

subscriber.assertValue(10);

There’re four similar operators for dealing with primitive values: averageInteger, averageLong, averageFloat, and averageDouble.

3.2. Max

The max operator emits the largest encountered number.

Let’s see that in action:

Observable<Integer> sourceObservable = Observable.range(1, 20);
TestSubscriber<Integer> subscriber = TestSubscriber.create();

MathObservable.max(sourceObservable).subscribe(subscriber);

subscriber.assertValue(9);

It’s important to note that the max operator has an overloaded method that takes a comparison function.

Considering the fact that the mathematical operators can also work on objects that can be managed as numbers, the max overloaded operator allows for comparing custom types or custom sorting of standard types.

Let’s define the Item class:

class Item {
    private Integer id;

    // standard constructors, getter and setter
}

We can now define the itemObservable and then use the max operator in order emit the Item with the highest id:

Item five = new Item(5);
List<Item> list = Arrays.asList(
  new Item(1), 
  new Item(2), 
  new Item(3), 
  new Item(4), 
  five);
Observable<Item> itemObservable = Observable.from(list);

TestSubscriber<Item> subscriber = TestSubscriber.create();

MathObservable.from(itemObservable)
  .max(Comparator.comparing(Item::getId))
  .subscribe(subscriber);

subscriber.assertValue(five);

3.3. Min

The min operator emits a single item containing the smallest element from the source:

Observable<Integer> sourceObservable = Observable.range(1, 20);
TestSubscriber<Integer> subscriber = TestSubscriber.create();

MathObservable.min(sourceObservable).subscribe(subscriber);

subscriber.assertValue(1);

The min operator has an overloaded method that takes a comparator instance:

Item one = new Item(1);
List<Item> list = Arrays.asList(
  one, 
  new Item(2), 
  new Item(3), 
  new Item(4), 
  new Item(5));
TestSubscriber<Item> subscriber = TestSubscriber.create();
Observable<Item> itemObservable = Observable.from(list);

MathObservable.from(itemObservable)
  .min(Comparator.comparing(Item::getId))
  .subscribe(subscriber);

subscriber.assertValue(one);

3.4. Sum

The sum operator emits a single value that represents the sum of all of the numbers emitted by the source Observable:

Observable<Integer> sourceObservable = Observable.range(1, 20);
TestSubscriber<Integer> subscriber = TestSubscriber.create();

MathObservable.sumInteger(sourceObservable).subscribe(subscriber);

subscriber.assertValue(210);

There’re also primitive-specialized similar operators: sumInteger, sumLong, sumFloat, and sumDouble.

4. Aggregate Operators

4.1. Concat

The concat operator concatenates items emitted by the source.

Let’s now define two Observables and concatenate them:

List<Integer> listOne = Arrays.asList(1, 2, 3, 4);
Observable<Integer> observableOne = Observable.from(listOne);

List<Integer> listTwo = Arrays.asList(5, 6, 7, 8);
Observable<Integer> observableTwo = Observable.from(listTwo);

TestSubscriber<Integer> subscriber = TestSubscriber.create();

Observable<Integer> concatObservable = observableOne
  .concatWith(observableTwo);

concatObservable.subscribe(subscriber);

subscriber.assertValues(1, 2, 3, 4, 5, 6, 7, 8);

Going into details, the concat operator waits with subscribing to each additional Observable that are passed to it until the previous one completes.

For this reason, concatenating a “hot” Observable, that begins emitting items immediately, will lead to the loss of any items that the “hot” Observable emits before all previous ones are completed.

4.2. Count

The count operator emits the count of all items emitted by the source:

Let’s count the numbers of items emitted by an Observable:

List<String> lettersList = Arrays.asList(
  "A", "B", "C", "D", "E", "F", "G");
TestSubscriber<Integer> subscriber = TestSubscriber.create();

Observable<Integer> sourceObservable = Observable
  .from(lettersList).count();
sourceObservable.subscribe(subscriber);

subscriber.assertValue(7);

If the source Observable terminates with an error, the count will pass a notification error without emitting an item. However, if it doesn’t terminate at all, the count will neither emit an item nor terminate.

For the count operation, there is also the countLong operator, that in the end emits a Long value, for those sequences that may exceed the capacity of an Integer.

4.3. Reduce

The reduce operator reduces all emitted elements into a single element by applying the accumulator function.

This process continues until the all the items are emitted and then the Observable, from the reduce, emits the final value returned from the function.

Now, let’s see how it’s possible to reduce a list of String, concatenating them in a reverse order:

List<String> list = Arrays.asList("A", "B", "C", "D", "E", "F", "G");
TestSubscriber<String> subscriber = TestSubscriber.create();

Observable<String> reduceObservable = Observable.from(list)
  .reduce((letter1, letter2) -> letter2 + letter1);
reduceObservable.subscribe(subscriber);

subscriber.assertValue("GFEDCBA");

4.4. Collect

The collect operator is similar to the reduce operator, but it’s dedicated to collecting elements into a single mutable data structure.

It requires two parameters:

  • a function that returns the empty mutable data structure
  • a function that, when given the data structure and an emitted item, modifies the data structure appropriately

Let’s see how it can be possible to return a set of items from an Observable:

List<String> list = Arrays.asList("A", "B", "C", "B", "B", "A", "D");
TestSubscriber<HashSet> subscriber = TestSubscriber.create();

Observable<HashSet<String>> reduceListObservable = Observable
  .from(list)
  .collect(HashSet::new, HashSet::add);
reduceListObservable.subscribe(subscriber);

subscriber.assertValues(new HashSet(list));

4.5. ToList

The toList operator works just like the collect, but collects all elements into a single list – think about Collectors.toList() from the Stream API:
Observable<Integer> sourceObservable = Observable.range(1, 5);
TestSubscriber<List> subscriber = TestSubscriber.create();

Observable<List<Integer>> listObservable = sourceObservable
  .toList();
listObservable.subscribe(subscriber);

subscriber.assertValue(Arrays.asList(1, 2, 3, 4, 5));

4.6. ToSortedList

Just like in the previous example but the emitted list is sorted:

Observable<Integer> sourceObservable = Observable.range(10, 5);
TestSubscriber<List> subscriber = TestSubscriber.create();

Observable<List<Integer>> listObservable = sourceObservable
  .toSortedList();
listObservable.subscribe(subscriber);

subscriber.assertValue(Arrays.asList(10, 11, 12, 13, 14));

As we can see, the toSortedList uses the default comparison, but it’s possible to provide a custom sorting function. We can now see how it’s possible to sort the integers in a reverse order using a custom sort function:

Observable<Integer> sourceObservable = Observable.range(10, 5);
TestSubscriber<List> subscriber = TestSubscriber.create();

Observable<List<Integer>> listObservable 
  = sourceObservable.toSortedList((int1, int2) -> int2 - int1);
listObservable.subscribe(subscriber);

subscriber.assertValue(Arrays.asList(14, 13, 12, 11, 10));

4.7. ToMap

The toMap operator converts the sequence of items emitted by an Observable into a map keyed by a specified key function.

In particular, the toMap operator has different overloaded methods that require 1, 2 or 3 of the following parameters:

  1. the keySelector that produces a key from the item
  2. the valueSelector that produces from the emitted item the actual value that will be stored in the map
  3. the mapFactory that creates the collection that will hold the items

Let’s start defining a simple class Book:

class Book {
    private String title;
    private Integer year;

    // standard constructors, getters and setters
}

We can now see how it’s possible to convert a series of emitted Book items to a Map, having the book title as key and the year as value:

Observable<Book> bookObservable = Observable.just(
  new Book("The North Water", 2016), 
  new Book("Origin", 2017), 
  new Book("Sleeping Beauties", 2017)
);
TestSubscriber<Map> subscriber = TestSubscriber.create();

Observable<Map<String, Integer>> mapObservable = bookObservable
  .toMap(Book::getTitle, Book::getYear, HashMap::new);
mapObservable.subscribe(subscriber);

subscriber.assertValue(new HashMap() {{
  put("The North Water", 2016);
  put("Origin", 2017);
  put("Sleeping Beauties", 2017);
}});

4.8. ToMultiMap

When mapping, it is very common that many values share the same key. The data structure that maps one key to multiple values is called a multimap.

This can be achieved with the toMultiMap operator that converts the sequence of items emitted by an Observable into a List that is also a map keyed by a specified key function.

This operator adds another parameter to those of the toMap operator, the collectionFactory. This parameter permits to specify in which collection type the value should be stored. Let’s see how this can be done:

Observable<Book> bookObservable = Observable.just(
  new Book("The North Water", 2016), 
  new Book("Origin", 2017), 
  new Book("Sleeping Beauties", 2017)
);
TestSubscriber<Map> subscriber = TestSubscriber.create();

Observable multiMapObservable = bookObservable.toMultimap(
  Book::getYear, 
  Book::getTitle, 
  () -> new HashMap<>(), 
  (key) -> new ArrayList<>()
);
multiMapObservable.subscribe(subscriber);

subscriber.assertValue(new HashMap() {{
    put(2016, Arrays.asList("The North Water"));
    put(2017, Arrays.asList("Origin", "Sleeping Beauties"));
}});

5. Conclusion

In this article, we explored the mathematical and aggregate operators available within RxJava – and, of course, simple example of how to use each.

As always, all code examples in this article can be found over on Github.

Mapping Nested Values with Jackson

$
0
0

1. Overview

A typical use case when working with JSON is to perform a transformation from one model into another. For example, we might want to parse a complex, densely nested object graph into a more straightforward model for use in another domain.

In this quick article, we’ll look at how to map nested values with Jackson to flatten out a complex data structure. We’ll deserialize JSON in three different ways:

  • Using@JsonProperty
  • Using JsonNode
  • Using a custom JsonDeserializer

2. Maven Dependency

Let’s first add the following dependency to pom.xml:

<dependency>
    <groupId>com.fasterxml.jackson.core</groupId>
    <artifactId>jackson-databind</artifactId>
    <version>2.9.2</version>
</dependency>

We can find the latest versions of jackson-databind on Maven Central.

3. JSON Source

Consider the following JSON as the source material for our examples. While the structure is contrived, note that we include properties that are nested two levels deep:

{
    "id": "957c43f2-fa2e-42f9-bf75-6e3d5bb6960a",
    "name": "The Best Product",
    "brand": {
        "id": "9bcd817d-0141-42e6-8f04-e5aaab0980b6",
        "name": "ACME Products",
        "owner": {
            "id": "b21a80b1-0c09-4be3-9ebd-ea3653511c13",
            "name": "Ultimate Corp, Inc."
        }
    }  
}

4. Simplified Domain Model

In a flattened domain model described by the Product class below, we’ll extract brandName, which is nested one level deep within our source JSON. Also, we’ll extract ownerName, which is nested two levels deep and within the nested brand object:

public class Product {

    private String id;
    private String name;
    private String brandName;
    private String ownerName;

    // standard getters and setters
}

5. Mapping with Annotations

To map the nested brandName property, we first need to unpack the nested brand object to a Map and extract the name property. Then to map ownerName, we unpack the nested owner object to a Map and extract its name property.

We can instruct Jackson to unpack the nested property by using a combination of @JsonProperty and some custom logic that we add to our Product class:

public class Product {
    // ...

    @SuppressWarnings("unchecked")
    @JsonProperty("brand")
    private void unpackNested(Map<String,Object> brand) {
        this.brandName = (String)brand.get("name");
        Map<String,String> owner = (Map<String,String>)brand.get("owner");
        this.ownerName = owner.get("name");
    }
}

Our client code can now use an ObjectMapper to transform our source JSON, which exists as the String constant SOURCE_JSON within the test class:

@Test
public void whenUsingAnnotations_thenOk() throws IOException {
    Product product = new ObjectMapper()
      .readerFor(Product.class)
      .readValue(SOURCE_JSON);

    assertEquals(product.getName(), "The Best Product");
    assertEquals(product.getBrandName(), "ACME Products");
    assertEquals(product.getOwnerName(), "Ultimate Corp, Inc.");
}

6. Mapping with JsonNode

Mapping a nested data structure with JsonNode requires a little more work. Here, we use ObjectMapper‘s readTree to parse out the desired fields:

@Test
public void whenUsingJsonNode_thenOk() throws IOException {
    JsonNode productNode = new ObjectMapper().readTree(SOURCE_JSON);

    Product product = new Product();
    product.setId(productNode.get("id").textValue());
    product.setName(productNode.get("name").textValue());
    product.setBrandName(productNode.get("brand")
      .get("name").textValue());
    product.setOwnerName(productNode.get("brand")
      .get("owner").get("name").textValue());

    assertEquals(product.getName(), "The Best Product");
    assertEquals(product.getBrandName(), "ACME Products");
    assertEquals(product.getOwnerName(), "Ultimate Corp, Inc.");
}

7. Mapping with Custom JsonDeserializer

Mapping a nested data structure with a custom JsonDeserializer is identical to the JsonNode approach from an implementation point of view. We first create the JsonDeserializer:

public class ProductDeserializer extends StdDeserializer<Product> {

    public ProductDeserializer() {
        this(null);
    }

    public ProductDeserializer(Class<?> vc) {
        super(vc);
    }

    @Override
    public Product deserialize(JsonParser jp, DeserializationContext ctxt) 
      throws IOException, JsonProcessingException {
 
        JsonNode productNode = jp.getCodec().readTree(jp);
        Product product = new Product();
        product.setId(productNode.get("id").textValue());
        product.setName(productNode.get("name").textValue());
        product.setBrandName(productNode.get("brand")
          .get("name").textValue());
        product.setOwnerName(productNode.get("brand").get("owner")
          .get("name").textValue());		
        return product;
    }
}

7.1. Manual Registration of Deserializer

To manually register our custom deserializer, our client code must add the JsonDeserializer to a Module, register the Module with an ObjectMapper, and call readValue:

@Test
public void whenUsingDeserializerManuallyRegistered_thenOk()
 throws IOException {
 
    ObjectMapper mapper = new ObjectMapper();
    SimpleModule module = new SimpleModule();
    module.addDeserializer(Product.class, new ProductDeserializer());
    mapper.registerModule(module);

    Product product = mapper.readValue(SOURCE_JSON, Product.class);
 
    assertEquals(product.getName(), "The Best Product");
    assertEquals(product.getBrandName(), "ACME Products");
    assertEquals(product.getOwnerName(), "Ultimate Corp, Inc.");
}

7.2. Automatic Registration of Deserializer

As an alternative to the manual registration of the JsonDeserializer, we can register the deserializer directly on the class:

@JsonDeserialize(using = ProductDeserializer.class)
public class Product {
    // ...
}

With this approach, there is no need to register manually. Let’s take a look at our client code using automatic registration:

@Test
public void whenUsingDeserializerAutoRegistered_thenOk()
  throws IOException {
 
    ObjectMapper mapper = new ObjectMapper();
    Product product = mapper.readValue(SOURCE_JSON, Product.class);

    assertEquals(product.getName(), "The Best Product");
    assertEquals(product.getBrandName(), "ACME Products");
    assertEquals(product.getOwnerName(), "Ultimate Corp, Inc.");
}

8. Conclusion

In this tutorial, we demonstrated several ways of using Jackson to parse JSON containing nested values. Have a look at our main Jackson Tutorial page for more examples.

And, as always, code snippets, can be found over on GitHub.

How to Calculate Levenshtein Distance in Java?

$
0
0

1. Introduction

In this article, we describe the Levenshtein distance, alternatively known as the Edit distance. The algorithm explained here was devised by a Russian scientist, Vladimir Levenshtein, in 1965.

We’ll provide an iterative and a recursive Java implementation of this algorithm.

2. What is the Levenshtein Distance?

The Levenshtein distance is a measure of dissimilarity between two Strings. Mathematically, given two Strings x and y, the distance measures the minimum number of character edits required to transform x into y.

Typically three type of edits are allowed:

  1. Insertion of a character c
  2. Deletion of a character c
  3. Substitution of a character c with c

Example: If x = ‘shot’ and y = ‘spot’, the edit distance between the two is 1 because ‘shot’ can be converted to ‘spot’ by substituting ‘h‘ to ‘p‘.

In certain sub-classes of the problem, the cost associated with each type of edit may be different.

For example, less cost for substitution with a character located nearby on the keyboard and more cost otherwise. For simplicity, we’ll consider all costs to be equal in this article.

Some of the applications of edit distance are:

  1. Spell Checkers – detecting spelling errors in text and find the closest correct spelling in dictionary
  2. Plagiarism Detection (refer – IEEE Paper)
  3. DNA Analysis – finding similarity between two sequences
  4. Speech Recognition (refer – Microsoft Research)

3. Algorithm Formulation

Let’s take two Strings x and y of lengths m and n respectively. We can denote each String as x[1:m] and y[1:n].

We know that at the end of the transformation, both Strings will be of equal length and have matching characters at each position. So, if we consider the first character of each String, we’ve got three options:

  1. Substitution:
    1. Determine the cost (D1) of substituting x[1] with y[1]. The cost of this step would be zero if both characters are same. If not, then the cost would be one
    2. After step 1.1, we know that both Strings start with the same character. Hence the total cost would now be the sum of the cost of step 1.1 and the cost of transforming the rest of the String x[2:m] into y[2:n]
  2. Insertion:
    1. Insert a character in x to match the first character in y, the cost of this step would be one
    2. After 2.1, we have processed one character from y. Hence the total cost would now be the sum of the cost of step 2.1 (i.e., 1) and the cost of transforming the full x[1:m] to remaining y (y[2:n])
  3. Deletion:
    1. Delete the first character from x, the cost of this step would be one
    2. After 3.1, we have processed one character from x, but the full y remains to be processed. The total cost would be the sum of the cost of 3.1 (i.e., 1) and the cost of transforming remaining x to the full y

The next part of the solution is to figure out which option to choose out of these three. Since we do not know which option would lead to minimum cost at the end, we must try all options and choose the best one.

4. Naive Recursive Implementation

We can see that the second step of each option in section #3 is mostly the same edit distance problem but on sub-strings of the original Strings. This means after each iteration we end up with the same problem but with smaller Strings.

This observation is the key to formulate a recursive algorithm. The recurrence relation can be defined as:

D(x[1:m], y[1:n]) = min {

  D(x[2:m], y[2:n]) + Cost of Replacing x[1] to y[1],

  D(x[1:m], y[2:n]) + 1,

  D(x[2:m], y[1:n]) + 1

}

We must also define base cases for our recursive algorithm, which in our case is when one or both Strings become empty:

  1. When both Strings are empty, then the distance between them is zero
  2. When one of the Strings is empty, then the edit distance between them is the length of the other String, as we need that many numbers of insertions/deletions to transform one into the other:
    • Example: if one String is “dog” and other String is “” (empty), we need either three insertions in empty String to make it “dog”, or we need three deletions in “dog” to make it empty. Hence the edit distance between them is 3

A naive recursive implementation of this algorithm:

public class EditDistanceRecursive {

   static int calculate(String x, String y) {
        if (x.isEmpty()) {
            return y.length();
        }

        if (y.isEmpty()) {
            return x.length();
        } 

        int substitution = calculate(x.substring(1), y.substring(1)) 
         + costOfSubstitution(x.charAt(0), y.charAt(0));
        int insertion = calculate(x, y.substring(1)) + 1;
        int deletion = calculate(x.substring(1), y) + 1;

        return min(substitution, insertion, deletion);
    }

    public static int costOfSubstitution(char a, char b) {
        return a == b ? 0 : 1;
    }

    public static int min(int... numbers) {
        return Arrays.stream(numbers)
          .min().orElse(Integer.MAX_VALUE);
    }
}

This algorithm has the exponential complexity. At each step, we branch-off into three recursive calls, building an O(3^n) complexity.

In the next section, we’ll see how to improve upon this.

5. Dynamic Programming Approach

On analyzing the recursive calls, we observe that the arguments for sub-problems are suffixes of the original Strings. This means there can only be m*n unique recursive calls (where m and n are a number of suffixes of x and y). Hence the complexity of the optimal solution should be quadratic, O(m*n).

Lets look at some of the sub-problems (according to recurrence relation defined in section #4):

  1. Sub-problems of D(x[1:m], y[1:n]) are D(x[2:m], y[2:n]), D(x[1:m], y[2:n]) and D(x[2:m], y[1:n])
  2. Sub-problems of D(x[1:m], y[2:n]) are D(x[2:m], y[3:n]), D(x[1:m], y[3:n]) and D(x[2:m], y[2:n])
  3. Sub-problems of D(x[2:m], y[1:n]) are D(x[3:m], y[2:n]), D(x[2:m], y[2:n]) and D(x[3:m], y[1:n])

In all three cases, one of the sub-problems is D(x[2:m], y[2:n]). Instead of calculating this three times like we do in the naive implementation, we can calculate this once and reuse the result whenever needed again.

This problem has a lot of overlapping sub-problems, but if we know the solution to the sub-problems, we can easily find the answer to the original problem. Therefore, we have both of the properties needed for formulating a dynamic programming solution, i.e., Overlapping Sub-Problems and Optimal Substructure.

We can optimize the naive implementation by introducing memoization, i.e., store the result of the sub-problems in an array and reuse the cached results.

Alternatively, we can also implement this iteratively by using a table based approach:

static int calculate(String x, String y) {
    int[][] dp = new int[x.length() + 1][y.length() + 1];

    for (int i = 0; i <= x.length(); i++) {
        for (int j = 0; j <= y.length(); j++) {
            if (i == 0) {
                dp[i][j] = j;
            }
            else if (j == 0) {
                dp[i][j] = i;
            }
            else {
                dp[i][j] = min(dp[i - 1][j - 1] 
                 + costOfSubstitution(x.charAt(i - 1), y.charAt(j - 1)), 
                  dp[i - 1][j] + 1, 
                  dp[i][j - 1] + 1);
            }
        }
    }

    return dp[x.length()][y.length()];
}

This algorithm performs significantly better than the recursive implementation. However, it involves significant memory consumption.

This can further be optimized by observing that we only need the value of three adjacent cells in the table to find the value of the current cell.

6. Conclusion

In this article, we described what is Levenshtein distance and how it can be calculated using a recursive and a dynamic-programming based approach.

Levenshtein distance is only one of the measures of string similarity, some of the other metrics are Cosine Similarity (which uses a token-based approach and considers the strings as vectors), Dice Coefficient, etc.

As always the full implementation of examples can be found over on GitHub.


Java Weekly, Issue 200

$
0
0

Let’s jump right in. 

1. Spring and Java

>> Enabling Two-factor Authentication For Your Web Application [techblog.bozho.net]

A quick and practical example of a 2FA implementation with Spring.

>> Creating Multi-Release JAR Files in IntelliJ IDEA [blog.jetbrains.com]

IntelliJ IDEA makes it quite easy to leverage JDK 9’s multi-release JARs.

>> Performance measurement with JMH – Java Microbenchmark Harness [blog.codecentric.de]

Benchmarking JVM application can be tricky because of runtime optimizations but using JMH makes it straightforward.

>> Making JSR 305 Work On Java 9 [blog.codefx.org]

Mixing JSR 305 and javax.annotation annotations is not obvious – but certainly doable.

>> How to test Spring Cloud Stream applications (Part I) [spring.io]

SpringRunner (from Spring Testing Framework), Boot auto-configuration for the test environment and mocks from Spring Integration – all make integration tests not so challenging anymore.

Also worth reading:

Webinars and presentations:

Time to upgrade:

2. Technical and Musings

 >> Jenkins vs Travis CI vs Circle CI vs TeamCity vs Codeship vs GitLab CI vs Bamboo [blog.takipi.com]

A comprehensive comparison of most CI tools available on the market.

>> Knowing What Is There [michaelfeathers.silvrback.com]

An insightful writeup on the mindset of how to approach building and evolving a system.

This is the kind of insight you can only get with experience and failure.

>> How CV-driven development shapes our industry [swizec.com]

A fun read of an all to familiar journey from a junior developer, not really understanding their choices to a more experienced engineer.

Also worth reading:

3. Comics

And my favorite Dilberts of the week:

>> Arguing on Twitter [dilbert.com]

>> Listening to Your Gut [dilbert.com]

>> False Rumor [dilbert.com]

4. Pick of the Week

>> Deep Dive into Java Management Extensions (JMX) [stackify.com]

A Guide to the Static Keyword in Java

$
0
0

1. Introduction

In this article, we’ll explore the static keyword of the Java language in detail. We’ll find how we can apply keyword static to variables, methods, blocks, nested classes and what difference it makes.

2. The Anatomy of the static Keyword

In the Java programming language, the keyword static indicates that the particular member belongs to a type itself, rather than to an instance of that type.

This means that only one instance of that static member is created which is shared across all instances of the class.

The keyword can be applied to variables, methods, blocks and nested class.

3. The static Fields (or class variables)

In Java, if a field is declared static, then exactly a single copy of that field is created and shared among all instances of that class. It doesn’t matter how many times we initialize a class; there will always be only one copy of static field belonging to it. The value of this static field will be shared across all object of either same of any different class.

From the memory perspective, static variables go in a particular pool in JVM memory called Metaspace (before Java 8, this pool was called Permanent Generation or PermGen, which was completely removed and replaced with Metaspace).

3.1. Example of the static Field

Suppose we have a Car class with several attributes (instance variables)Whenever new objects are initialized from this Car blueprint, each new object will have its distinct copy of these instance variables.

However, suppose we are looking for a variable that holds the count of the number of Car objects that are initialized and is shared across all instances such that they can access it and increment it upon their initialization.

That’s where static variables come in:

public class Car {
    private String name;
    private String engine;
    
    public static int numberOfCars;
    
    public Car(String name, String engine) {
        this.name = name;
        this.engine = engine;
        numberOfCars++;
    }

    // getters and setters
}

Now for every object of this class that gets initialized, the same copy of the numberOfCars variable is incremented. So for this case, the following assertions will be true:

@Test
public void whenNumberOfCarObjectsInitialized_thenStaticCounterIncreases() {
    new Car("Jaguar", "V8");
    new Car("Bugatti", "W16");
 
    assertEquals(2, Car.numberOfCars);
}

3.2. Compelling Reasons to Use static Fields

  • When the value of variable is independent of objects
  • When the value is supposed to be shared across all objects

3.3. Key Points to Remember

  • Since static variables belong to a class, they can be accessed directly using class name and don’t need any object reference
  • static variables can only be declared at the class level
  • static fields can be accessed without object initialization
  • Although we can access static fields using an object reference (like ford.numberOfCars++) , we should refrain from using it as in this case it becomes difficult to figure whether it’s an instance variable or a class variable; instead, we should always refer to static variables using class name (for example, in this case, Car.numberOfCars++)

4. The static Methods (or Class Methods)

Similar to static fields, static methods also belong to a class instead of the object, and so they can be called without creating the object of the class in which they reside. They’re meant to be used without creating objects of the class.

4.1. Example of static Method

static methods are generally used to perform an operation that is not dependent upon instance creation.

If there is a code that is supposed to be shared across all instances of that class, then write that code in a static method:

public static void setNumberOfCars(int numberOfCars) {
    Car.numberOfCars = numberOfCars;
}

static methods are also widely used to create utility or helper classes so that they can be obtained without creating a new object of these classes.

Just take a look at Collections or Math utility classes from JDK, StringUtils from Apache or CollectionUtils from Spring framework and notice that all methods are static.

4.2. Compelling Reasons to Use static Methods

  • To access/manipulate static variables and other static methods that don’t depend upon objects
  • static methods are widely used in utility and helper classes

4.3. Key Points to Remember

  • static methods in Java are resolved at compile time. Since method overriding is part of Runtime Polymorphism, so static methods can’t be overridden
  • abstract methods can’t be static
  • static methods cannot use this or super keywords
  • The following combinations of the instance, class methods and variables are valid:
    1. Instance methods can directly access both instance methods and instance variables
    2. Instance methods can also access static variables and static methods directly
    3. static methods can access all static variables and other static methods
    4. static methods cannot access instance variables and instance methods directly; they need some object reference to do so

5. A static Block

A static block is used for initializing static variables. Although static variables can be initialized directly during declaration, there are situations when we’re required to do the multiline processing.

In such cases, static blocks come in handy.

If static variables require additional, multi-statement logic while initialization, then a static block can be used.

5.1. The static Block Example

Suppose we want to initialize a list object with some pre-defined values.

This becomes easy with static blocks:

public class StaticBlockDemo {
    public static List<String> ranks = new LinkedList<>();

    static {
        ranks.add("Lieutenant");
        ranks.add("Captain");
        ranks.add("Major");
    }
    
    static {
        ranks.add("Colonel");
        ranks.add("General");
    }
}

In this example, it wouldn’t be possible to initialize List object with all the initial values along with declaration; and that’s why we’ve utilized the static block here.

5.2. Compelling Reasons to Use static Blocks

  • If initialization of static variables requires some additional logic except the assignment
  • If the initialization of static variables is error-prone and requires exception handling

5.3. Key Points to Remember

  • A class can have multiple static blocks
  • static fields and static blocks are resolved and executed in the same order as they are present in the class

6. A static Class

Java programming language allows us to create a class within a class. It provides a compelling way of grouping elements that are only going to be used in one place, this helps to keep our code more organized and readable.

The nested class architecture is divided into two:

  • nested classes that are declared static are called static nested classes whereas,
  • nested classes that are non-static are called inner classes

The main difference between these two is that the inner classes have access to all member of the enclosing class (including private), whereas the static nested classes don’t have any such access.

In fact, static nested classes behaved exactly like any other top-level class but enclosed in the only class which will access it, to provide better packaging convenience.

6.1. Example of static Class

The most widely used approach to create singleton objects is through static nested class is it doesn’t require any synchronization and is easy to learn and implement:

public class Singleton  {    
    private Singleton() {}
    
    private static class SingletonHolder {    
        public static final Singleton instance = new Singleton();
    }    

    public static Singleton getInstance() {    
        return SingletonHolder.instance;    
    }    
}

6.2. Compelling Reasons to Use a static Inner Class

  • Grouping classes that will be used only in one place increases encapsulation
  • The code is brought closer to the place that will be only one to use it; this increases readability and code is more maintainable
  • If nested class doesn’t require any access to it’s enclosing class members, then it’s better to declare it as static because this way, it won’t be coupled to the outer class and hence will be more optimal as they won’t require any heap or stack memory

6.3. Key Points to Remember

  • static nested classes do not have access to any member of the enclosing outer class; it can only access them through an object’s reference
  • Java programming specification doesn’t allow us to declare the top-level class as static; only classes within the classes (nested classes) can be made as static

7. Conclusion

In this article, we saw the static keyword in action. We also read about the reasons and advantages for using static fields, static methods, static blocks and static inner classes.

As always, we can find the complete code over on GitHub.

Quick Guide to Micrometer

$
0
0

1. Introduction

Micrometer provides a simple facade over the instrumentation clients for a number of popular monitoring systems. Currently, it supports the following monitoring systems: Atlas, Datadog, Graphite, Ganglia, Influx, JMX and Prometheus.

In this article, we’ll introduce the basic usage of Micrometer and its integration with Spring.

For the sake of simplicity, we’ll take Micrometer Atlas as an example to demonstrate most of our use cases.

2. Maven Dependency

To start with, let’s add the following dependency to the pom.xml:

<dependency>
    <groupId>io.micrometer</groupId>
    <artifactId>micrometer-registry-atlas</artifactId>
    <version>0.12.0.RELEASE</version>
</dependency>

The latest version can be found here.

3. MeterRegistry

In Micrometer, a MeterRegistry is the core component used for registering meters. We can iterate over the registry and further each meter’s metrics, to generate a time series in the backend with combinations of metrics and their dimension values.

The simplest form of the registry is SimpleMeterRegistry. But in most cases, we should use a MeterRegistry explicitly designed for our monitoring system; for Atlas, it’s AtlasMeterRegistry.

CompositeMeterRegistry allows multiple registries to be added. It provides a solution to publish application metrics to various supported monitoring systems simultaneously.

We can add any MeterRegistry needed to upload the data to multiple platforms:

CompositeMeterRegistry compositeRegistry = new CompositeMeterRegistry();
SimpleMeterRegistry oneSimpleMeter = new SimpleMeterRegistry();
AtlasMeterRegistry atlasMeterRegistry 
  = new AtlasMeterRegistry(atlasConfig, Clock.SYSTEM);

compositeRegistry.add(oneSimpleMeter);
compositeRegistry.add(atlasMeterRegistry);

There’s a static global registry support in Micrometer: Metrics.globalRegistry. Also, a set of static builders based on this global registry is provided to generate meters in Metrics:

@Test
public void givenGlobalRegistry_whenIncrementAnywhere_thenCounted() {
    class CountedObject {
        private CountedObject() {
            Metrics.counter("objects.instance").increment(1.0);
        }
    }
    Metrics.addRegistry(new SimpleMeterRegistry());

    Metrics.counter("objects.instance").increment();
    new CountedObject();

    Optional<Counter> counterOptional = Metrics.globalRegistry
      .find("objects.instance").counter();
    assertTrue(counterOptional.isPresent());
    assertTrue(counterOptional.get().count() == 2.0);
}

4. Tags and Meters

4.1. Tags

An identifier of a Meter consists of a name and tags. It is suggested that we should follow a naming convention that separates words with a dot, to help guarantee portability of metric names across multiple monitoring systems.

Counter counter = registry.counter("page.visitors", "age", "20s");

Tags can be used for slicing the metric for reasoning about the values. In the code above, page.visitors is the name of the meter, with age=20s as its tag. In this case, the counter is meant to count the visitors to the page with age between 20 and 30.

For a large system, we can append common tags to a registry, say the metrics are from a specific region:

registry.config().commonTags("region", "ua-east");

4.2. Counter

A Counter reports merely a count over a specified property of an application. We can build a custom counter with the fluent builder or the helper method of any MetricRegistry:

Counter counter = Counter
  .builder("instance")
  .description("indicates instance count of the object")
  .tags("dev", "performance")
  .register(registry);

counter.increment(2.0);
 
assertTrue(counter.count() == 2);
 
counter.increment(-1);
 
assertTrue(counter.count() == 2);

As seen from the snippet above, we tried to decrease the counter by one but we can only increment the counter monotonically by a fixed positive amount.

4.3. Timers

To measure latencies or frequency of events in our system, we can use Timers. A Timer will report at least the total time and events count of specific time series.

For example, we can record an application event that may last several seconds:

SimpleMeterRegistry registry = new SimpleMeterRegistry();
Timer timer = registry.timer("app.event");
timer.record(() -> {
    try {
        TimeUnit.MILLISECONDS.sleep(1500);
    } catch (InterruptedException ignored) { }
});

timer.record(3000, MILLISECONDS);

assertTrue(2 == timer.count());
assertTrue(4510 > timer.totalTime(MILLISECONDS) 
  && 4500 <= timer.totalTime(MILLISECONDS));

To record a long time running events, we use LongTaskTimer:

SimpleMeterRegistry registry = new SimpleMeterRegistry();
LongTaskTimer longTaskTimer = LongTaskTimer
  .builder("3rdPartyService")
  .register(registry);

long currentTaskId = longTaskTimer.start();
try {
    TimeUnit.SECONDS.sleep(2);
} catch (InterruptedException ignored) { }
long timeElapsed = longTaskTimer.stop(currentTaskId);
 
assertTrue(timeElapsed / (int) 1e9 == 2);

4.4. Gauge

A gauge shows the current value of a meter.

Different to other meters, Gauges should only report data when observed. Gauges can be useful when monitoring stats of cache, collections, etc.:

SimpleMeterRegistry registry = new SimpleMeterRegistry();
List<String> list = new ArrayList<>(4);

Gauge gauge = Gauge
  .builder("cache.size", list, List::size)
  .register(registry);

assertTrue(gauge.value() == 0.0);
 
list.add("1");
 
assertTrue(gauge.value() == 1.0);

4.5. DistributionSummary

Distribution of events and a simple summary is provided by DistributionSummary:

SimpleMeterRegistry registry = new SimpleMeterRegistry();
DistributionSummary distributionSummary = DistributionSummary
  .builder("request.size")
  .baseUnit("bytes")
  .register(registry);

distributionSummary.record(3);
distributionSummary.record(4);
distributionSummary.record(5);

assertTrue(3 == distributionSummary.count());
assertTrue(12 == distributionSummary.totalAmount());

Moreover, DistributionSummary and Timers can be enriched by quantiles:

SimpleMeterRegistry registry = new SimpleMeterRegistry();
Timer timer = Timer.builder("test.timer")
  .quantiles(WindowSketchQuantiles
    .quantiles(0.3, 0.5, 0.95)
    .create())
  .register(registry);

In the snippet above, three gauges with tags quantile=0.3, quantile=0.5 and quantile=0.95 will be available in the registry, indicating the values below which 95%, 50% and 30% of observations fall, respectively.

To see these quantiles in action, let’s add the following records:

timer.record(2, TimeUnit.SECONDS);
timer.record(3, TimeUnit.SECONDS);
timer.record(4, TimeUnit.SECONDS);
timer.record(8, TimeUnit.SECONDS);
timer.record(13, TimeUnit.SECONDS);

Then we can verify by extracting values in those three quantile Gauges:

List<Gauge> quantileGauges = registry.getMeters().stream()
  .filter(m -> m.getType().name().equals("Gauge"))
  .map(meter -> (Gauge) meter)
  .collect(Collectors.toList());
 
assertTrue(3 == quantileGauges.size());

Map<String, Integer> quantileMap = extractTagValueMap(registry, Type.Gauge, 1e9);
assertThat(quantileMap, allOf(
  hasEntry("quantile=0.3",2),
  hasEntry("quantile=0.5", 3),
  hasEntry("quantile=0.95", 8)));

The following four different quantile algorithms are provided out of the box: WindowSketchQuantilesFrugal2UQuantilesCKMSQuantiles (Cormode, Korn, Muthukrishnan, and Srivastava algorithm) and GKQuantiles (Greenwald-Khanna algorithm).

Besides, Micrometer also supports histograms:

DistributionSummary hist = DistributionSummary
  .builder("summary")
  .histogram(Histogram.linear(0, 10, 5))
  .register(registry);

Similar to quantiles, after appending several records, we can see that histogram handles the computation pretty well:

Map<String, Integer> histograms = extractTagValueMap(registry, Type.Counter, 1.0);
assertThat(histograms, allOf(
  hasEntry("bucket=0.0", 0),
  hasEntry("bucket=10.0", 2),
  hasEntry("bucket=20.0", 2),
  hasEntry("bucket=30.0", 1),
  hasEntry("bucket=40.0", 1),
  hasEntry("bucket=Infinity", 0)));

Generally, histograms can help illustrate a direct comparison in separate buckets. Histograms can also be time scaled, which is quite useful for analyzing backend service response time:

SimpleMeterRegistry registry = new SimpleMeterRegistry();
Timer timer = Timer
  .builder("timer")
  .histogram(Histogram.linearTime(TimeUnit.MILLISECONDS, 0, 200, 3))
  .register(registry);

//...
assertThat(histograms, allOf(
  hasEntry("bucket=0.0", 0),
  hasEntry("bucket=2.0E8", 1),
  hasEntry("bucket=4.0E8", 1),
  hasEntry("bucket=Infinity", 3)));

5. Binders

The Micrometer has multiple built-in binders to monitor the JVM, caches, ExecutorService and logging services.

When it comes to JVM and system monitoring, we can monitor class loader metrics (ClassLoaderMetrics), JVM memory pool (JvmMemoryMetrics) and GC metrics (JvmGcMetrics), thread and CPU utilization (JvmThreadMetricsProcessorMetrics).

Cache monitoring (currently, only Guava, EhCache, Hazelcast, and Caffeine are supported) is supported by instrumenting with GuavaCacheMetrics, EhCache2MetricsHazelcastCacheMetrics, and CaffeineCacheMetrics. And to monitor log back service, we can bind LogbackMetrics to any valid registry:

new LogbackMetrics().bind(registry);

The usage of above binders are quite similar to LogbackMetrics and are all rather simple, so we won’t dive into further details here.

6. Spring Integration

Spring Boot Actuator provides dependency management and auto-configuration for Micrometer. Now it’s supported in Spring Boot 2.0/1.x and Spring Framework 5.0/4.x.

We’ll need the following dependency (the latest version can be found here):

<dependency>
    <groupId>io.micrometer</groupId>
    <artifactId>micrometer-spring-legacy</artifactId>
    <version>0.12.0.RELEASE</version>
</dependency>

Without any further change to existing code, we have enabled Spring support with the Micrometer. JVM memory metrics of our Spring application will be automatically registered in the global registry and published to the default atlas endpoint: http://localhost:7101/api/v1/publish.

There’re several configurable properties available to control metrics exporting behaviors, starting with spring.metrics.atlas.*. Check AtlasConfig to see a full list of configuration properties for Atlas publishing.

If we need to bind more metrics, only add them as @Bean to the application context.

Say we need the JvmThreadMetrics:

@Bean
JvmThreadMetrics threadMetrics(){
    return new JvmThreadMetrics();
}

As for web monitoring, it’s auto-configured for every endpoint in our application, yet manageable via a configuration property: spring.metrics.web.autoTimeServerRequests.

The default implementation provides four dimensions of metrics for endpoints: HTTP request method, HTTP response code, endpoint URI, and exception information.

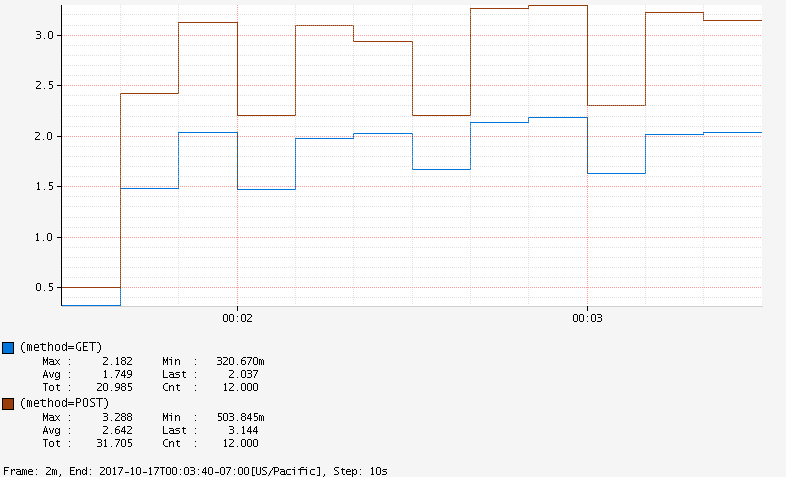
When requests are responded, metrics relating to request method (GET, POST, etc.) will be published in Atlas.

With Atlas Graph API, we can generate a graph to compare the response time for different methods:

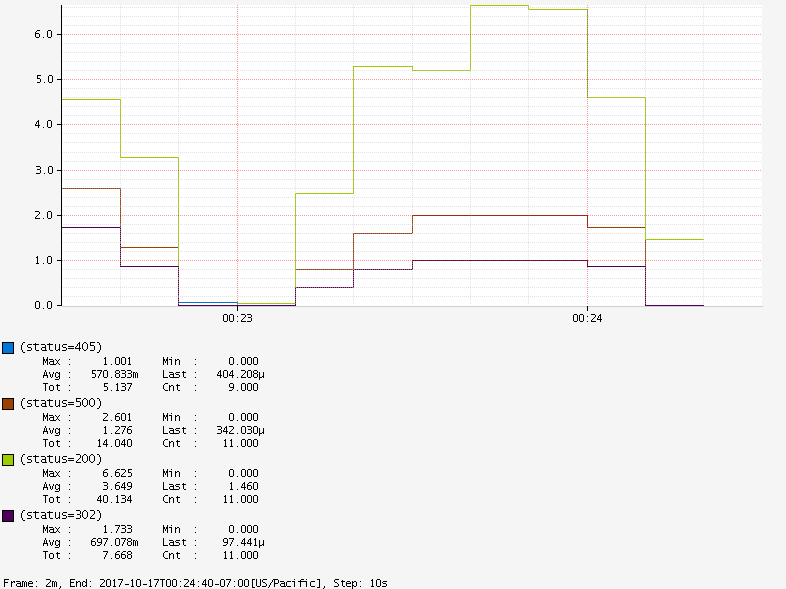
By default, response codes of 20x, 30x, 40x, 50x will also be reported:

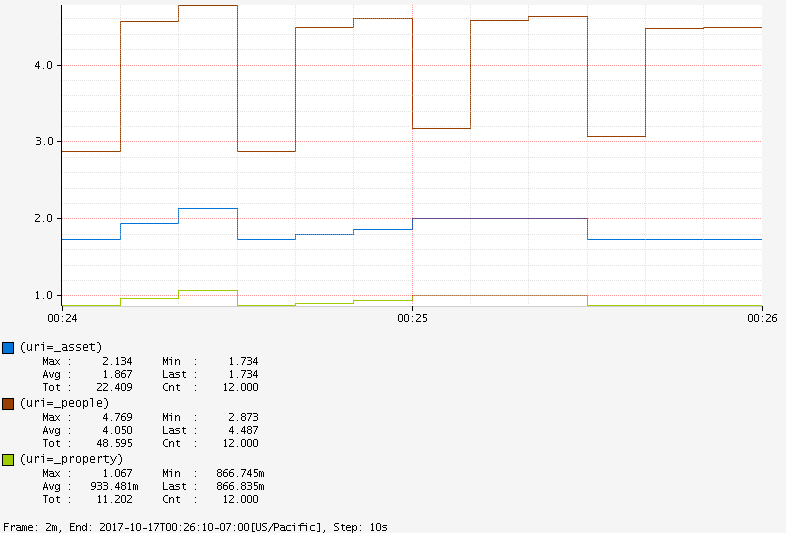
We can also compare different URIs :

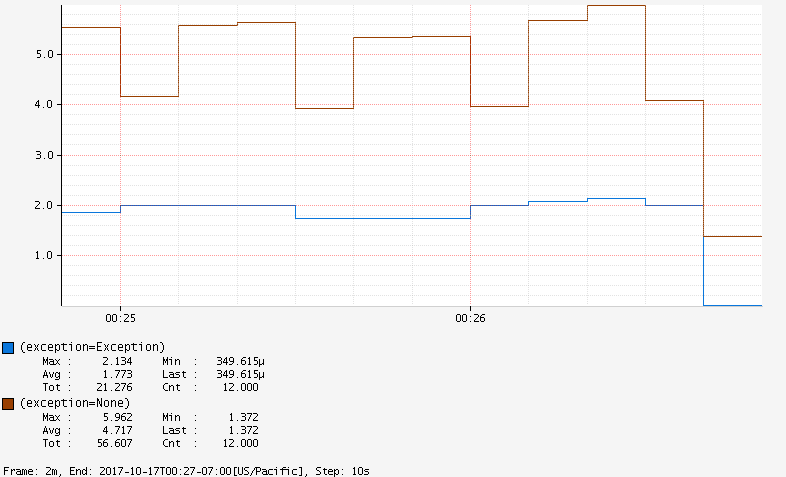
or check exception metrics:

Note that we can also use @Timed on the controller class or specific endpoint methods to customize tags, long task, quantiles, and percentiles of the metrics:

@RestController
@Timed("people")
public class PeopleController {

    @GetMapping("/people")
    @Timed(value = "people.all", longTask = true)
    public List<String> listPeople() {
        //...
    }

}

Based on the code above, we can see the following tags by checking Atlas endpoint http://localhost:7101/api/v1/tags/name:

["people", "people.all", "jvmBufferCount", ... ]

Micrometer also works in the function web framework introduced in Spring Boot 2.0. Metrics can be enabled by filtering the RouterFunction:

RouterFunctionMetrics metrics = new RouterFunctionMetrics(registry);
RouterFunctions.route(...)
  .filter(metrics.timer("server.requests"));

Metrics from the data source and scheduled tasks can also be collected. Check the official documentation for more details.

7. Conclusion

In this article, we introduced the metrics facade Micrometer. By abstracting away and supporting multiple monitoring systems under common semantics, the tool makes switching between different monitoring platforms quite easy.

As always, the full implementation code of this article can be found over on Github.

Spring Data JPA – Adding a Method in All Repositories

$
0
0

1. Overview

Spring Data makes the process of working with entities a lot easier by merely defining repository interfaces. These come with a set of pre-defined methods and allow the possibility of adding custom methods in each interface.

However, if we want to add a custom method that’s available in all the repositories, the process is a bit more complex. So, that’s what we’ll explore here with Spring Data JPA.

For more information on configuring and using Spring Data JPA, check out our previous articles: Guide to Hibernate with Spring 4 and Introduction to Spring Data JPA.

2. Defining a Base Repository Interface

First, we have to create a new interface that declares our custom method:

@NoRepositoryBean
public interface ExtendedRepository<T, ID extends Serializable> 
  extends JpaRepository<T, ID> {
 
    public List<T> findByAttributeContainsText(String attributeName, String text);
}

Our interface extends the JpaRepository interface so that we’ll benefit from all the standard behavior.

You’ll also notice we added the @NoRepositoryBean annotation. This is necessary because otherwise, the default Spring behavior is to create an implementation for all subinterfaces of Repository.

Here, we’ll want to provide our implementation that should be used, as this is only an interface meant to be extended by the actual entity-specific DAO interfaces.

3. Implementing a Base Class

Next, we’ll provide our implementation of the ExtendedRepository interface:

public class ExtendedRepositoryImpl<T, ID extends Serializable>
  extends SimpleJpaRepository<T, ID> implements ExtendedRepository<T, ID> {
    
    private EntityManager entityManager;

    public ExtendedRepositoryImpl(JpaEntityInformation<T, ?> 
      entityInformation, EntityManager entityManager) {
        super(entityInformation, entityManager);
        this.entityManager = entityManager;
    }

    // ...
}

This class extends the SimpleJpaRepository class, which is the default class that Spring uses to provide implementations for repository interfaces.

This requires that we create a constructor with the JpaEntityInformation and EntityManager parameters that calls the constructor from the parent class.

We also need the EntityManager property to use in our custom method.

Also, we have to implement the custom method inherited from the ExtendedRepository interface:

@Transactional
public List<T> findByAttributeContainsText(String attributeName, String text) {
    CriteriaBuilder builder = entityManager.getCriteriaBuilder();
    CriteriaQuery<T> cQuery = builder.createQuery(getDomainClass());
    Root<T> root = cQuery.from(getDomainClass());
    cQuery
      .select(root)
      .where(builder
        .like(root.<String>get(attributeName), "%" + text + "%"));
    TypedQuery<T> query = entityManager.createQuery(cQuery);
    return query.getResultList();
}

Here, the findByAttributeContainsText() method searches for all the objects of type T that have a particular attribute which contains the String value given as parameter.

4. JPA Configuration

To tell Spring to use our custom class instead of the default one for building repository implementations, we can use the repositoryBaseClass attribute:

@Configuration
@EnableJpaRepositories(basePackages = "org.baeldung.persistence.dao", 
  repositoryBaseClass = ExtendedRepositoryImpl.class)
public class StudentJPAH2Config {
    // additional JPA Configuration
}

5. Creating an Entity Repository

Next, let’s see how we can use our new interface.

First, let’s add a simple Student entity:

@Entity
public class Student {

    @Id
    private long id;
    private String name;
    
    // standard constructor, getters, setters
}

Then, we can create a DAO for the Student entity which extends the ExtendedRepository interface:

public interface ExtendedStudentRepository extends ExtendedRepository<Student, Long> {
}

And that’s it! Now our implementation will have the custom findByAttributeContainsText() method.

Similarly, any interface we define by extending the ExtendedRepository interface will have the same method.

6. Testing the Repository

Let’s create a JUnit test that shows the custom method in action:

@RunWith(SpringJUnit4ClassRunner.class)
@ContextConfiguration(classes = { StudentJPAH2Config.class })
public class ExtendedStudentRepositoryIntegrationTest {
 
    @Resource
    private ExtendedStudentRepository extendedStudentRepository;
   
    @Before
    public void setup() {
        Student student = new Student(1, "john");
        extendedStudentRepository.save(student);
        Student student2 = new Student(2, "johnson");
        extendedStudentRepository.save(student2);
        Student student3 = new Student(3, "tom");
        extendedStudentRepository.save(student3);
    }
    
    @Test
    public void givenStudents_whenFindByName_thenOk(){
        List<Student> students 
          = extendedStudentRepository.findByAttributeContainsText("name", "john");
 
        assertEquals("size incorrect", 2, students.size());        
    }
}

The test uses the extendedStudentRepository bean first to create 3 Student records. Then, the findByAttributeContains() method is called to find all students whose name contains the text “john”.

The ExtendedStudentRepository class can use both standard methods like save() and the custom method we added.

7. Conclusion

In this quick article, we’ve shown how we can add a custom method to all repositories in Spring Data JPA.

The full source code for the examples can be found over on GitHub.

Initializing Arrays in Java

$
0
0

1. Overview

In this quick tutorial, we’re going to see the different ways in which we can initialize an array and the subtle differences between these.

2. One Element at a Time

Let’s start with a simple, loop-based method:

for (int i = 0; i < array.length; i++) {
    array[i] = i + 2;
}

And let’s also see how we can initialize a multi-dimensional array one element at a time:

for (int i = 0; i < 2; i++) {
    for (int j = 0; j < 5; j++) {
        array[i][j] = j + 1;
    }
}

3. At the Time of Declaration

Let’s now initialize an array at the time of declaration:

String array[] = new String[] { 
  "Toyota", "Mercedes", "BMW", "Volkswagen", "Skoda" };

While instantiating the array, we do not have to specify its type:

int array[] = { 1, 2, 3, 4, 5 };

Note that it’s not possible to initialize an array after the declaration using this approach. An attempt to do so will result in a compilation error.

4. Using Arrays.fill()

The java.util.Arrays class has several methods named fill() which accept different types of arguments and fill the whole array with the same value:

long array[] = new long[5];
Arrays.fill(array, 30);

The method also has several alternatives which set a range of an array to a particular value:

int array[] = new int[5];
Arrays.fill(array, 0, 3, -50);

Note that the method accepts the array, the index of the first element, the number of elements, and the value.

5. Using Arrays.copyOf()

The method Arrays.copyOf() creates a new array by copying another array. The method has many overloads which accept different types of arguments.

Let’s see a quick example:

int array[] = { 1, 2, 3, 4, 5 };
int[] copy = Arrays.copyOf(array, 5);

A few notes here:

  • The method accepts the source array and the length of the copy to be created
  • If the length is greater than the length of the array to be copied, then the extra elements will be initialized using their default values
  • If the source array has not been initialized, then a NullPointerException gets thrown
  • If the source array length is negative, then a NegativeArraySizeException is thrown

6. Using Arrays.setAll()

The method Arrays.setAll() sets all elements of an array using a generator function:

int[] array = new int[20];
Arrays.setAll(array, p -> p > 9 ? 0 : p);

// [0, 1, 2, 3, 4, 5, 6, 7, 8, 9, 0, 0, 0, 0, 0, 0, 0, 0, 0, 0]

If the generator function is null, then a NullPointerException is thrown.

7. Using ArrayUtils.clone()

Finally, let’s utilize the ArrayUtils.clone() API out of Apache Commons Lang 3 – which initializes an array by creating a direct copy of another array:

char[] array = new char[] {'a', 'b', 'c'};
char[] copy = ArrayUtils.clone(array);

Note that this method is overloaded for all primitive types.

7. Conclusion

In this article, we’ve explored different ways of initializing arrays in Java.

As always, the full version of the code is available over on GitHub.

Introduction to BouncyCastle with Java

$
0
0

1. Overview

BouncyCastle is a Java library that complements the default Java Cryptographic Extension (JCE).

In this introductory article, we’re going to show how to use BouncyCastle to perform cryptographic operations, such as encryption and signature.

2. Maven Configuration

Before we start working with the library, we need to add the required dependencies to our pom.xml file:

<dependency>
    <groupId>org.bouncycastle</groupId>
    <artifactId>bcpkix-jdk15on</artifactId>
    <version>1.58</version>
</dependency>

Note that we can always look up the latest dependencies versions in the Maven Central Repository.

3. Setup Unlimited Strength Jurisdiction Policy Files

The standard Java installation is limited in terms of strength for cryptographic functions, this is due to policies prohibiting the use of a key with a size that exceeds certain values e.g. 128 for AES.

To overcome this limitation, we need to configure the unlimited strength jurisdiction policy files.

In order to do that, we first need to download the package by following this link. Afterwards, we need to extract the zipped file into a directory of our choice – which contains two jar files:

  • local_policy.jar
  • US_export_policy.jar

Finally, we need to look for the {JAVA_HOME}/lib/security folder and replace the existing policy files with the ones that we’ve extracted here.

Note that in Java 9, we no longer need to download the policy files package, setting the crypto.policy property to unlimited is enough:

Security.setProperty("crypto.policy", "unlimited");

Once done, we need to check that the configuration is working correctly:

int maxKeySize = javax.crypto.Cipher.getMaxAllowedKeyLength("AES");
System.out.println("Max Key Size for AES : " + maxKeySize);

As a result:

Max Key Size for AES : 2147483647

Based on the maximum key size returned by the getMaxAllowedKeyLength() method, we can safely say that the unlimited strength policy files have been installed correctly.

If the returned value is equal to 128, we need to make sure that we’ve installed the files into the JVM where we’re running the code.

4. Cryptographic Operations

4.1. Preparing Certificate And Private Key

Before we jump into the implementation of cryptographic functions, we first need to create a certificate and a private key.

For test purposes, we can use these resources:

Baeldung.cer is a digital certificate that uses the international X.509 public key infrastructure standard, while the Baeldung.p12 is a password-protected PKCS12 Keystore that contains a private key.

Let’s see how these can be loaded in Java:

Security.addProvider(new BouncyCastleProvider());
CertificateFactory certFactory= CertificateFactory
  .getInstance("X.509", "BC");
 
X509Certificate certificate = (X509Certificate) certFactory
  .generateCertificate(new FileInputStream("Baeldung.cer"));
 
char[] keystorePassword = "password".toCharArray();
char[] keyPassword = "password".toCharArray();
 
KeyStore keystore = KeyStore.getInstance("PKCS12");
keystore.load(new FileInputStream("Baeldung.p12"), keystorePassword);
PrivateKey key = (PrivateKey) keystore.getKey("baeldung", keyPassword);

First, we’ve added the BouncyCastleProvider as a security provider dynamically using the addProvider() method.

This can also be done statically by editing the {JAVA_HOME}/jre/lib/security/java.security file, and adding this line:

security.provider.N = org.bouncycastle.jce.provider.BouncyCastleProvider

Once the provider is properly installed, we’ve created a CertificateFactory object using the getInstance() method.

The getInstance() method takes two arguments; the certificate type “X.509”, and the security provider “BC”.

The certFactory instance is subsequently used to generate an X509Certificate object, via the generateCertificate() method.

In the same way, we’ve created a PKCS12 Keystore object, on which the load() method is called.

The getKey() method returns the private key associated with a given alias.

Note that a PKCS12 Keystore contains a set of private keys, each private key can have a specific password, that’s why we need a global password to open the Keystore, and a specific one to retrieve the private key.

The Certificate and the private key pair are mainly used in asymmetric cryptographic operations:

  • Encryption
  • Decryption
  • Signature
  • Verification

4.2 CMS/PKCS7 Encryption And Decryption

In asymmetric encryption cryptography, each communication requires a public certificate and a private key.

The recipient is bound to a certificate, that is publicly shared between all senders.

Simply put, the sender needs the recipient’s certificate to encrypt a message, while the recipient needs the associated private key to be able to decrypt it.

Let’s have a look at how to implement an encryptData() function, using an encryption certificate:

public static byte[] encryptData(byte[] data,
  X509Certificate encryptionCertificate)
  throws CertificateEncodingException, CMSException, IOException {
 
    byte[] encryptedData = null;
    if (null != data && null != encryptionCertificate) {
        CMSEnvelopedDataGenerator cmsEnvelopedDataGenerator
          = new CMSEnvelopedDataGenerator();
 
        JceKeyTransRecipientInfoGenerator jceKey 
          = new JceKeyTransRecipientInfoGenerator(encryptionCertificate);
        cmsEnvelopedDataGenerator.addRecipientInfoGenerator(transKeyGen);
        CMSTypedData msg = new CMSProcessableByteArray(data);
        OutputEncryptor encryptor
          = new JceCMSContentEncryptorBuilder(CMSAlgorithm.AES128_CBC)
          .setProvider("BC").build();
        CMSEnvelopedData cmsEnvelopedData = cmsEnvelopedDataGenerator
          .generate(msg,encryptor);
        encryptedData = cmsEnvelopedData.getEncoded();
    }
    return encryptedData;
}

We’ve created a JceKeyTransRecipientInfoGenerator object using the recipient’s certificate.

Then, we’ve created a new CMSEnvelopedDataGenerator object and added the recipient information generator into it.

After that, we’ve used the JceCMSContentEncryptorBuilder class to create an OutputEncrytor object, using the AES CBC algorithm.

The encryptor is used later to generate a CMSEnvelopedData object that encapsulates the encrypted message.

Finally, the encoded representation of the envelope is returned as a byte array.

Now, let’s see what the implementation of the decryptData() method looks like:

public static byte[] decryptData(
  byte[] encryptedData, 
  PrivateKey decryptionKey) 
  throws CMSException {
 
    byte[] decryptedData = null;
    if (null != encryptedData && null != decryptionKey) {
        CMSEnvelopedData envelopedData = new CMSEnvelopedData(encryptedData);
 
        Collection<RecipientInformation> recipients
          = envelopedData.getRecipientInfos().getRecipients();
        KeyTransRecipientInformation recipientInfo 
          = (KeyTransRecipientInformation) recipients.iterator().next();
        JceKeyTransRecipient recipient
          = new JceKeyTransEnvelopedRecipient(decryptionKey);
        
        return recipientInfo.getContent(recipient);
    }
    return decryptedData;
}

First, we’ve initialized a CMSEnvelopedData object using the encrypted data byte array, and then we’ve retrieved all the intended recipients of the message using the getRecipients() method.

Once done, we’ve created a new JceKeyTransRecipient object associated with the recipient’s private key.

The recipientInfo instance contains the decrypted/encapsulated message, but we can’t retrieve it unless we have the corresponding recipient’s key.

Finally, given the recipient key as an argument, the getContent() method returns the raw byte array extracted from the EnvelopedData this recipient is associated with.

Let’s write a simple test to make sure everything works exactly as it should:

String secretMessage = "My password is 123456Seven";
System.out.println("Original Message : " + secretMessage);
byte[] stringToEncrypt = secretMessage.getBytes();
byte[] encryptedData = encryptData(stringToEncrypt, certificate);
System.out.println("Encrypted Message : " + new String(encryptedData));
byte[] rawData = decryptData(encryptedData, privateKey);
String decryptedMessage = new String(rawData);
System.out.println("Decrypted Message : " + decryptedMessage);

As a result:

Original Message : My password is 123456Seven
Encrypted Message : 0�*�H��...
Decrypted Message : My password is 123456Seven

4.2 CMS/PKCS7 Signature And Verification

Signature and verification are cryptographic operations that validate the authenticity of data.

Let’s see how to sign a secret message using a digital certificate:

public static byte[] signData(
  byte[] data, 
  X509Certificate signingCertificate,
  PrivateKey signingKey) throws Exception {
 
    byte[] signedMessage = null;
    List<X509Certificate> certList = new ArrayList<X509Certificate>();
    CMSTypedData cmsData= new CMSProcessableByteArray(data);
    certList.add(signingCertificate);
    Store certs = new JcaCertStore(certList);

    CMSSignedDataGenerator cmsGenerator = new CMSSignedDataGenerator();
    ContentSigner contentSigner 
      = new JcaContentSignerBuilder("SHA256withRSA").build(signingKey);
    cmsGenerator.addSignerInfoGenerator(new JcaSignerInfoGeneratorBuilder(
      new JcaDigestCalculatorProviderBuilder().setProvider("BC")
      .build()).build(contentSigner, signingCertificate));
    cmsGenerator.addCertificates(certs);
    
    CMSSignedData cms = cmsGenerator.generate(cmsData, true);
    signedMessage = cms.getEncoded();
    return signedMessage;
}

First, we’ve embedded the input into a CMSTypedData, then, we’ve created a new CMSSignedDataGenerator object.

We’ve used SHA256withRSA as a signature algorithm, and our signing key to create a new ContentSigner object.

The contentSigner instance is used afterward, along with the signing certificate to create a SigningInfoGenerator object.

After adding the SignerInfoGenerator and the signing certificate to the CMSSignedDataGenerator instance, we finally use the generate() method to create a CMS signed-data object, which also carries a CMS signature.

Now that we’ve seen how to sign data, let’s see how to verify signed data:

public static boolean verifSignedData(byte[] signedData)
  throws Exception {
 
    X509Certificate signCert = null;
    ByteArrayInputStream inputStream
     = new ByteArrayInputStream(signedData);
    ASN1InputStream asnInputStream = new ASN1InputStream(inputStream);
    CMSSignedData cmsSignedData = new CMSSignedData(
      ContentInfo.getInstance(asnInputStream.readObject()));
    
    SignerInformationStore signers 
      = cmsSignedData.getCertificates().getSignerInfos();
    SignerInformation signer = signers.getSigners().iterator().next();
    Collection<X509CertificateHolder> certCollection 
      = certs.getMatches(signer.getSID());
    X509CertificateHolder certHolder = certCollection.iterator().next();
    
    return signer
      .verify(new JcaSimpleSignerInfoVerifierBuilder()
      .build(certHolder));
}

Again, we’ve created a CMSSignedData object based on our signed data byte array, then, we’ve retrieved all signers associated with the signatures using the getSignerInfos() method.

In this example, we’ve verified only one signer, but for generic use, it is mandatory to iterate over the collection of signers returned by the getSigners() method and check each one separately.

Finally, we’ve created a SignerInformationVerifier object using the build() method and passed it to the verify() method.

The verify() method returns true if the given object can successfully verify the signature on the signer object.

Here’s a simple example:

byte[] signedData = signData(rawData, certificate, privateKey);
Boolean check = verifSignData(signedData);
System.out.println(check);

As a result:

true

5. Conclusion

In this article, we’ve discovered how to use the BouncyCastle library to perform basic cryptographic operations, such as encryption and signature.

In a real-world situation, we often want to sign then encrypt our data, that way, only the recipient is able to decrypt it using the private key, and check its authenticity based on the digital signature.

The code snippets can be found, as always, over on GitHub.

Introduction to Apache Spark

$
0
0

1. Introduction

Apache Spark is an open-source cluster-computing framework. It provides elegant development APIs for Scala, Java, Python, and R that allow developers to execute a variety of data-intensive workloads across diverse data sources including HDFS, Cassandra, HBase, S3 etc.

Historically, Hadoop’s MapReduce prooved to be inefficient for some iterative and interactive computing jobs, which eventually led to the development of Spark. With Spark, we can run logic up to two orders of magnitude faster than with Hadoop in memory, or one order of magnitude faster on disk.

2. Spark Architecture

Spark applications run as independent sets of processes on a cluster as described in the below diagram:

These set of processes are coordinated by the SparkContext object in your main program (called the driver program). SparkContext connects to several types of cluster managers (either Spark’s own standalone cluster manager, Mesos or YARN), which allocate resources across applications.

Once connected, Spark acquires executors on nodes in the cluster, which are processes that run computations and store data for your application.

Next, it sends your application code (defined by JAR or Python files passed to SparkContext) to the executors. Finally, SparkContext sends tasks to the executors to run.

3. Core Components

The following diagram gives the clear picture of the different components of Spark:

3.1. Spark Core

Spark Core component is accountable for all the basic I/O functionalities, scheduling and monitoring the jobs on spark clusters, task dispatching, networking with different storage systems, fault recovery, and efficient memory management.

Unlike Hadoop, Spark avoids shared data to be stored in intermediate stores like Amazon S3 or HDFS by using a special data structure known as RDD (Resilient Distributed Datasets).

Resilient Distributed Datasets are immutable, a partitioned collection of records that can be operated on – in parallel and allows – fault-tolerant ‘in-memory’ computations.

RDDs support two kinds of operations:

  • Transformation – Spark RDD transformation is a function that produces new RDD from the existing RDDs. The transformer takes RDD as input and produces one or more RDD as output. Transformations are lazy in nature i.e., they get execute when we call an action
  • Actiontransformations create RDDs from each other, but when we want to work with the actual data set, at that point action is performed. Thus, Actions are Spark RDD operations that give non-RDD values. The values of action are stored to drivers or to the external storage system

An action is one of the ways of sending data from Executor to the driver. Executors are agents that are responsible for executing a task. While the driver is a JVM process that coordinates workers and execution of the task. Some of the actions of Spark are count and collect.

Executors are agents that are responsible for executing a task. While the driver is a JVM process that coordinates workers and execution of the task. Some of the actions of Spark are count and collect.

3.2. Spark SQL

Spark SQL is a Spark module for structured data processing. It’s primarily used to execute SQL queries. DataFrame constitutes the main abstraction for Spark SQL. Distributed collection of data ordered into named columns is known as a DataFrame in Spark.

Spark SQL supports fetching data from different sources like Hive, Avro, Parquet, ORC, JSON, and JDBC. It also scales to thousands of nodes and multi-hour queries using the Spark engine – which provides full mid-query fault tolerance.

3.3. Spark Streaming

Spark Streaming is an extension of the core Spark API that enables scalable, high-throughput, fault-tolerant stream processing of live data streams. Data can be ingested from a number of sources, such as Kafka, Flume, Kinesis, or TCP sockets.

Finally, processed data can be pushed out to file systems, databases, and live dashboards.

3.4. Spark Mlib

MLlib is Spark’s machine learning (ML) library. Its goal is to make practical machine learning scalable and easy. At a high level, it provides tools such as:

  • ML Algorithms – common learning algorithms such as classification, regression, clustering, and collaborative filtering
  • Featurization – feature extraction, transformation, dimensionality reduction, and selection
  • Pipelines – tools for constructing, evaluating, and tuning ML Pipelines
  • Persistence – saving and load algorithms, models, and Pipelines
  • Utilities – linear algebra, statistics, data handling, etc.

3.5. Spark GraphX

GraphX is a component for graphs and graph-parallel computations. At a high level, GraphX extends the Spark RDD by introducing a new Graph abstraction: a directed multigraph with properties attached to each vertex and edge.

To support graph computation, GraphX exposes a set of fundamental operators (e.g., subgraph, joinVertices, and aggregateMessages).

In addition, GraphX includes a growing collection of graph algorithms and builders to simplify graph analytics tasks.

4. “Hello World” in Spark

Now that we understand the core components, we can move on to simple Maven-based Spark project – for calculating word counts.

We’ll be demonstrating Spark running in the local mode where all the components are running locally on the same machine where it’s the master node, executor nodes or Spark’s standalone cluster manager.

4.1. Maven Setup

Let’s set up a Java Maven project with Spark-related dependencies in pom.xml file:

<dependencies>
    <dependency>
        <groupId>org.apache.spark</groupId>
	<artifactId>spark-core_2.10</artifactId>
	<version>1.6.0</version>
    </dependency>
</dependencies>

4.2. Word Count – Spark Job

Let’s now write Spark job to process a file containing sentences and output distinct words and their counts in the file:

public static void main(String[] args) throws Exception {
    if (args.length < 1) {
        System.err.println("Usage: JavaWordCount <file>");
        System.exit(1);
    }
    SparkConf sparkConf = new SparkConf().setAppName("JavaWordCount");
    JavaSparkContext ctx = new JavaSparkContext(sparkConf);
    JavaRDD<String> lines = ctx.textFile(args[0], 1);

    JavaRDD<String> words 
      = lines.flatMap(s -> Arrays.asList(SPACE.split(s)).iterator());
    JavaPairRDD<String, Integer> ones 
      = words.mapToPair(word -> new Tuple2<>(word, 1));
    JavaPairRDD<String, Integer> counts 
      = ones.reduceByKey((Integer i1, Integer i2) -> i1 + i2);

    List<Tuple2<String, Integer>> output = counts.collect();
    for (Tuple2<?, ?> tuple : output) {
        System.out.println(tuple._1() + ": " + tuple._2());
    }
    ctx.stop();
}

Notice that we pass the path of the local text file as an argument to a Spark job.

A SparkContext object is the main entry point for Spark and represents the connection to an already running Spark cluster. It uses SparkConf object for describing the application configuration. SparkContext is used to read a text file in memory as JavaRDD object.

Next, we transform the lines JavaRDD object to words JavaRDD object using the flatmap method to first convert each line to space-separated words and then flatten the output of each line processing.

We again apply transform operation mapToPair which basically maps each occurrence of the word to tuple of words and count of 1.

Then, we apply reduceByKey operation to group multiple occurrences of any word with count 1 to a tuple of words and summed up the count.

Lastly, we execute collect RDD action to get the final results.

4.3. Executing – Spark Job

Let’s now build the project using Maven to generate apache-spark-1.0-SNAPSHOT.jar in the target folder.

Next, we need to submit this WordCount job to Spark:

${spark-install-dir}/bin/spark-submit --class com.baeldung.WordCount 
  --master local ${WordCount-MavenProject}/target/apache-spark-1.0-SNAPSHOT.jar
  ${WordCount-MavenProject}/src/main/resources/spark_example.txt

Spark installation directory and WordCount Maven project directory needs to be updated before running above command.

On submission couple of steps happens behind the scenes:

  1. From the driver code, SparkContext connects to cluster manager(in our case spark standalone cluster manager running locally)
  2. Cluster Manager allocates resources across the other applications
  3. Spark acquires executors on nodes in cluster. Here, our word count application will get its own executor processes
  4. Application code (jar files) is sent to executors
  5. Tasks are sent by the SparkContext to the executors.

Finally, the result of spark job is returned to the driver and we will see the count of words in the file as the output:

Hello 1
from 2
Baledung 2
Keep 1
Learning 1
Spark 1
Bye 1

5. Conclusion

In this article, we discussed the architecture and different components of Apache Spark. We also demonstrated a working example of a Spark job giving word counts from a file.

As always, the full source code is available over on GitHub.


Mocking Void Methods with Mockito

$
0
0

1. Overview

In this short tutorial, we focus on mocking void methods with Mockito.

As with other articles focused on the Mockito framework (like Mockito VerifyMockito When/Then, and Mockito’s Mock Methods) the MyList class shown below will be used as the collaborator in test cases. We’ll add a new method for this tutorial:

public class MyList extends AbstractList<String> {
 
    @Override
    public void add(int index, String element) {
        // no-op
    }
}

2. Simple Mocking and Verifying

Void methods can be used with Mockito’s doNothing(), doThrow(), and doAnswer() methods, making mocking and verifying intuitive:

@Test
public void whenAddCalledVerfied() {
    MyList myList = mock(MyList.class);
    doNothing().when(myList).add(isA(Integer.class), isA(String.class));
    myList.add(0, "");
 
    verify(myList, times(1)).add(0, "");
}

However, doNothing() is Mockito’s default behavior for void methods.

This version of whenAddCalledVerified() accomplishes the same thing as the one above:

@Test
public void whenAddCalledVerfied() {
    MyList myList = mock(MyList.class);
    myList(0, "");
 
    verify(myList, times(1)).add(0, "");
}

DoThrow() generates an exception:

@Test(expected = Exception.class)
public void givenNull_AddThrows() {
    MyList myList = mock(MyList.class);
    doThrow().when(myList).add(isA(Integer.class), isNull());
 
    myList.add(0, null);
}

We’ll cover doAnswer() below.

3. Argument Capture

One reason to override the default behavior with doNothing() is to capture arguments.

In the example above verify() is used to check the arguments passed to add().

However, we may need to capture the arguments and do something more with them. In these cases, we use doNothing() just as we did above, but with an ArgumentCaptor:

@Test
public void whenAddCalledValueCaptured() {
    MyList myList = mock(MyList.class);
    ArgumentCaptor valueCapture = ArgumentCaptor.forClass(String.class);
    doNothing().when(myList).add(any(Integer.class), valueCapture.capture());
    myList.add(0, "captured");
 
    assertEquals("captured", valueCapture.getValue());
}

4. Answering a Call to Void

A method may perform more complex behavior than merely adding or setting value. For these situations we can use Mockito’s Answer to add the behavior we need:

@Test
public void whenAddCalledAnswered() {
    MyList myList = mock(MyList.class);
    doAnswer((Answer) invocation -> {
        Object arg0 = invocation.getArgument(0);
        Object arg1 = invocation.getArgument(1);
        
        assertEquals(3, arg0);
        assertEquals("answer me", arg1);
        return null;
    }).when(myList).add(any(Integer.class), any(String.class));
    myList.add(3, "answer me");
}

As explained in Mockito’s Java 8 Features we use a lambda with Answer to define custom behavior for add().

5. Partial Mocking

Partial mocks are an option, too. Mockito’s doCallRealMethod() can be used for void methods:

@Test
public void whenAddCalledRealMethodCalled() {
    MyList myList = mock(MyList.class);
    doCallRealMethod().when(myList).add(any(Integer.class), any(String.class));
    myList.add(1, "real");
 
    verify(myList, times(1)).add(1, "real");
}

This allows us to call the actual method is called and verify it at the same time.

6. Conclusion

In this brief tutorial, we covered four different ways to approach void methods when testing with Mockito.

As always, the examples are available in this GitHub project.

Mockito and JUnit 5 – Using ExtendWith

$
0
0

1. Introduction

In this quick article, we’ll show how to integrate Mockito with the JUnit 5 extension model. To learn more about the JUnit 5 extension model, have a look at this article.

First, we’ll show how to create an extension that automatically creates mock objects for any class attribute or method parameter annotated with @Mock.

Then, we’ll use our Mockito extension in a JUnit 5 test class.

2. Maven Dependencies

2.1. Required Dependencies

Let’s add the JUnit 5 (jupiter) and mockito dependencies to our pom.xml:

<dependency>
    <groupId>org.junit.jupiter</groupId>
    <artifactId>junit-jupiter-engine</artifactId>
    <version>5.0.1</version>
    <scope>test</scope>
</dependency>
<dependency>
    <groupId>org.mockito</groupId>
    <artifactId>mockito-core</artifactId>
    <version>2.11.0</version>
    <scope>test</scope>
</dependency>

Note that junit-jupiter-engine is the main JUnit 5 library, and junit-platform-launcher is used with the Maven plugin and IDE launcher.

2.2. Surefire Plugin

Let’s also configure the Maven Surefire plugin to run our test classes using the new JUnit platform launcher:

<plugin>
    <artifactId>maven-surefire-plugin</artifactId>
    <version>2.19.1</version>
    <configuration>
        <includes>
            <include>**/*Test.java</include>
        </includes>
    </configuration>
    <dependencies>
        <dependency>
            <groupId>org.junit.platform</groupId>
            <artifactId>junit-platform-surefire-provider</artifactId>
            <version>1.0.1</version>
        </dependency>
    </dependencies>
</plugin>

2.3. JUnit 4 IDE Compatibility Dependencies

For our test cases to be JUnit4 (vintage) compatible, for IDEs that have no support for JUnit 5 yet, let’s include these dependencies:

<dependency>
    <groupId>org.junit.platform</groupId>
    <artifactId>junit-platform-launcher</artifactId>
    <version>1.0.1</version>
    <scope>test</scope>
</dependency>
<dependency>
    <groupId>org.junit.vintage</groupId>
    <artifactId>junit-vintage-engine</artifactId>
    <version>4.12.1</version>
    <scope>test</scope>
</dependency>

Also, we should consider annotating all our test classes with @RunWith(JUnitPlatform.class)

The latest versions of junit-jupiter-engine, junit-vintage-enginejunit-platform-launcher, and mockito-core can be downloaded from Maven Central.

3. Mockito Extension

Until now, there is no official JUnit5 extension implementation from Mockito, so we’ll be using the default implementation provided by the JUnit team.

This extension implements the TestInstancePostProcessor interface for creating mock objects for class attributes and the ParameterResolver interface for creating mock objects for method parameters:

public class MockitoExtension 
  implements TestInstancePostProcessor, ParameterResolver {

    @Override
    public void postProcessTestInstance(Object testInstance,
      ExtensionContext context) {
        MockitoAnnotations.initMocks(testInstance);
    }

    @Override
    public boolean supportsParameter(ParameterContext parameterContext,
      ExtensionContext extensionContext) {
        return 
          parameterContext.getParameter().isAnnotationPresent(Mock.class);
    }

    @Override
    public Object resolveParameter(ParameterContext parameterContext,
      ExtensionContext extensionContext) {
        return getMock(parameterContext.getParameter(), extensionContext);
    }

    private Object getMock(
      Parameter parameter, ExtensionContext extensionContext) {
        
        Class<?> mockType = parameter.getType();
        Store mocks = extensionContext.getStore(Namespace.create(
          MockitoExtension.class, mockType));
        String mockName = getMockName(parameter);

        if (mockName != null) {
            return mocks.getOrComputeIfAbsent(
              mockName, key -> mock(mockType, mockName));
        }
        else {
            return mocks.getOrComputeIfAbsent(
              mockType.getCanonicalName(), key -> mock(mockType));
        }
    }

    private String getMockName(Parameter parameter) {
        String explicitMockName = parameter.getAnnotation(Mock.class)
          .name().trim();
        if (!explicitMockName.isEmpty()) {
            return explicitMockName;
        }
        else if (parameter.isNamePresent()) {
            return parameter.getName();
        }
        return null;
    }
}

Let’s review the methods implemented in this extension:

  • postProcessTestInstance — initializes mock objects for all attributes of testInstance object
  • supportsParameter — tells JUnit that our extension may handle this method parameter if it is annotated with @Mock
  • resolveParameter — initializes the mock object for the given parameter

4. Building the Test Class

Let’s build our test class and attach the Mockito extension to it:

@ExtendWith(MockitoExtension.class)
@RunWith(JUnitPlatform.class)
public class UserServiceTest {
    UserService userService;

    //...
}

We can use the @Mock annotation to inject a mock for an instance variable that we can use anywhere in the test class:

@Mock UserRepository userRepository;

Also, we can inject mock objects into method parameters:

@BeforeEach
void init(@Mock SettingRepository settingRepository,
  @Mock MailClient mailClient) {
    userService = new DefaultUserService(
      userRepository, settingRepository, mailClient);
    
    when(settingRepository.getUserMinAge()).thenReturn(10);
    when(settingRepository.getUserNameMinLength()).thenReturn(4);
    when(userRepository.isUsernameAlreadyExists(any(String.class)))
      .thenReturn(false);
}

We can even inject a mock object into a test method parameter:

@Test
void givenValidUser_whenSaveUser_thenSucceed(@Mock MailClient mailClient) {
    user = new User("Jerry", 12);
    when(userRepository.insert(any(User.class))).then(new Answer<User>() {
        int sequence = 1;
        
        @Override
        public User answer(InvocationOnMock invocation) throws Throwable {
            User user = (User) invocation.getArgument(0);
            user.setId(sequence++);
            return user;
        }
    });
    
    User insertedUser = userService.register(user);
    
    verify(userRepository).insert(user);
    Assertions.assertNotNull(user.getId());
    verify(mailClient).sendUserRegistrationMail(insertedUser);
}

Note that the MailClient mock that we inject as a test method parameter will be the same instance that we injected in the init method.

5. Conclusion

Junit 5 has provided a nice model for extension. We demonstrated a simple Mockito extension that simplified our mock creation logic.

All the code used in this article can be found in the com.baeldung.junit5.mockito package of the GitHub project, along with a few additional unit test methods.

Intro to JDO Queries 2/2

$
0
0

1. Overview

In the previous article in this series, we showed how to persist Java objects to different data stores. For more details, please check Guide to Java Data Objects.

JDO supports different query languages to provide flexibility for the developer to use the query language he is most acquainted with.

2. JDO Query Languages

JDO supports the following query languages:

  • JDOQL – a query language using Java syntax
  • Typed JDOQL – following JDOQL syntax but providing an API to ease using the queries.
  • SQL – used only for RDBMS.
  • JPQL – provided by Datanucleus, but not part of the JDO specifications.

3. Query API

3.1. Creating a Query

To create a query, we need to specify the language as well as a query String:

Query query = pm.newQuery(
  "javax.jdo.query.SQL",
  "select * from product_item where price < 10");

If we do not specify the language, it defaults to the JDOQL:

Query query = pm.newQuery(
  "SELECT FROM com.baeldung.jdo.query.ProductItem WHERE price < 10");

3.2. Creating a Named Query

We can also define the query and refer to it by its saved name.

To do so, we first create a ProductItem class:

@PersistenceCapable
public class ProductItem {

    @PrimaryKey
    @Persistent(valueStrategy = IdGeneratorStrategy.INCREMENT)
    int id;
    String name;
    String status;
    String description;
    double price;

    //standard getters, setters & constructors
}

Next, we add a class configuration to the META-INF/package.jdo file to define a query and name it:

<jdo>
    <package name="com.baeldung.jdo.query">
        <class name="ProductItem" detachable="true" table="product_item">
            <query name="PriceBelow10" language="javax.jdo.query.SQL">
            <![CDATA[SELECT * FROM PRODUCT_ITEM WHERE PRICE < 10]]>
            </query>
        </class>
    </package>
</jdo>

We defined a query named “PriceBelow10″. 

We can use it in our code:

Query<ProductItem> query = pm.newNamedQuery(
  ProductItem.class, "PriceBelow10");
List<ProductItem> items = query.executeList();

3.3. Closing a Query

To save resources, we can close queries:

query.close();

Equivalently, we can close a specific result set by passing it as a parameter to the close() method:

query.close(ResultSet);

3.4. Compiling a Query

If we want to validate a query, we can call the compile() method:

query.compile();

If the query is not valid, then the method will throw a JDOException.

4. JDOQL

JDOQL is an object-based query language, designed to provide the power of SQL language and preserve the Java object relationships in the application model.

JDOQL queries can be defined in a single-String form.

Before we dive deeper, let’s go over some basic concepts:

4.1. Candidate Class

The candidate class in the JDOQL has to be a persistable class. We’re using the full class name instead of the table name in the SQL language:

Query query = pm.newQuery("SELECT FROM com.baeldung.jdo.query.ProductItem");
List<ProductItem> r = query.executeList();

As we can see in the example above, the com.baeldung.jdo.query.ProductItem is the candidate class here.

4.2. Filter

A filter can be written in Java but must evaluate to a boolean value:

Query query = pm.newQuery("SELECT FROM com.baeldung.jdo.query.ProductItem");
query.setFilter("status == 'SoldOut'");
List<ProductItem> result = query.executeList();

4.3. Methods

JDOQL does not support all Java methods, but it supports various methods that we can call them from the query and can be used in a wide range:

query.setFilter("this.name.startsWith('supported')");

For more details about the supported methods, please check this link.

4.4. Parameters

We can pass values to queries as parameters. We can either define the parameters explicitly or implicitly.

To define a parameter explicitly:

Query query = pm.newQuery(
  "SELECT FROM com.baeldung.jdo.query.ProductItem "
  + "WHERE price < threshold PARAMETERS double threshold");
List<ProductItem> result = (List<ProductItem>) query.execute(10);

This can also be achieved using the setParameters method:

Query query = pm.newQuery(
  "SELECT FROM com.baeldung.jdo.query.ProductItem "
  + "WHERE price < :threshold");
query.setParameters("double threshold");
List<ProductItem> result = (List<ProductItem>) query.execute(10);

We can do it implicitly by not defining a parameter type:

Query query = pm.newQuery(
  "SELECT FROM com.baeldung.jdo.query.ProductItem "
  + "WHERE price < :threshold");
List<ProductItem> result = (List<ProductItem>) query.execute(10);

5. JDOQL Typed

To use JDOQLTypedQueryAPI, we need to prepare the environment.

5.1. Maven Setup

<dependency>
    <groupId>org.datanucleus</groupId>
    <artifactId>datanucleus-jdo-query</artifactId>
    <version>5.0.2</version>
</dependency>
...
<plugins>
    <plugin>
        <artifactId>maven-compiler-plugin</artifactId>
        <configuration>
            <source>1.8</source>
            <target>1.8</target>
        </configuration>
    </plugin>
</plugins>

The latest versions of these dependencies are datanucleus-jdo-query and maven-compiler-plugin.

5.2. Enabling Annotation Processing

For Eclipse, we can follow the steps below to enable annotated processing:

  1. Go to Java Compiler and make sure the compiler compliance level is 1.8 or above
  2. Go to Java Compiler → Annotation Processing and enable the project specific settings and enable annotation processing
  3. Go to Java Compiler → Annotation Processing → Factory Path, enable the project specific settings and then add the following jars to the list: javax.jdo.jar, datanucleus-jdo-query.jar

The above preparation means that whenever we compile persistable classes, the annotation processor in the datanucleus-jdo-query.jar will generate a query class for each class annotated by @PersistenceCapable.

In our case, the processor generates a QProductItem class. The generated class has almost the same name of the persistable class, albeit prefixed with a Q.

5.3. Create JDOQL Typed Query:

JDOQLTypedQuery<ProductItem> tq = pm.newJDOQLTypedQuery(ProductItem.class);
QProductItem cand = QProductItem.candidate();
tq = tq.filter(cand.price.lt(10).and(cand.name.startsWith("pro")));
List<ProductItem> results = tq.executeList();

We can make use of the query class to access the candidate fields and use its available Java methods.

6. SQL

JDO supports the SQL language in case we are using an RDBMS.

Let’s create SQL query:

Query query = pm.newQuery("javax.jdo.query.SQL","select * from "
  + "product_item where price < ? and status = ?");
query.setClass(ProductItem.class);
query.setParameters(10,"InStock");
List<ProductItem> results = query.executeList();

We used the setClass() for the query to retrieve ProductItem objects when we execute the query. Otherwise, it retrieves an Object type.

7. JPQL

JDO DataNucleus provides the JPQL language.

Let’s Create a query using JPQL:

Query query = pm.newQuery("JPQL","select i from "
  + "com.baeldung.jdo.query.ProductItem i where i.price < 10"
  + " and i.status = 'InStock'");
List<ProductItem> results = (List<ProductItem>) query.execute();

The entity name here is com.baeldung.jdo.query.ProductItem. We cannot use the class name only. This is because JDO doesn’t have metadata to define an entity name like JPA.  We have defined a ProductItem p, and after that, we can use p as an alias to refer to the ProductItem.

For more details about JPQL syntax, please check this link.

8. Conclusion

In this article, we showed the different query languages that are supported by JDO. We showed how to save named queries for reusing and explained the JDOQL concepts and showed how to use SQL and JPQL with JDO.

The code examples in the article can be found over on GitHub.


Dynamic Mapping with Hibernate

$
0
0

1. Introduction

In this article, we’ll explore some dynamic mapping capabilities of Hibernate with the @Formula, @Where, @Filter and @Any annotations.

Note that although Hibernate implements the JPA specification, annotations described here are available only in Hibernate and are not directly portable to other JPA implementations.

2. Project Setup

To demonstrate the features, we’ll only need the hibernate-core library and a backing H2 database:

<dependency>
    <groupId>org.hibernate</groupId>
    <artifactId>hibernate-core</artifactId>
    <version>5.2.12.Final</version>
</dependency>
<dependency>
    <groupId>com.h2database</groupId>
    <artifactId>h2</artifactId>
    <version>1.4.194</version>
</dependency>

For the current version of the hibernate-core library, head over to Maven Central.

3. Calculated Columns with @Formula

Suppose we want to calculate an entity field value based on some other properties. One way to do it would be by defining a calculated read-only field in our Java entity:

@Entity
public class Employee implements Serializable {

    @Id
    @GeneratedValue(strategy = GenerationType.IDENTITY)
    private Integer id;

    private long grossIncome;

    private int taxInPercents;

    public long getTaxJavaWay() {
        return grossIncome * taxInPercents / 100;
    }

}

The obvious drawback is that we’d have to do the recalculation each time we access this virtual field by the getter.

It would be much easier to get the already calculated value from the database. This can be done with the @Formula annotation:

@Entity
public class Employee implements Serializable {

    @Id
    @GeneratedValue(strategy = GenerationType.IDENTITY)
    private Integer id;

    private long grossIncome;

    private int taxInPercents;

    @Formula("grossIncome * taxInPercents / 100")
    private long tax;

}

With @Formula, we can use subqueries, call native database functions and stored procedures and basically do anything that does not break the syntax of an SQL select clause for this field.

Hibernate is smart enough to parse the SQL we provided and insert correct table and field aliases. The caveat to be aware of is that since the value of the annotation is raw SQL, it may make our mapping database-dependent.

Also, keep in mind that the value is calculated when the entity is fetched from the database. Hence, when we persist or update the entity, the value would not be recalculated until the entity is evicted from the context and loaded again:

Employee employee = new Employee(10_000L, 25);
session.save(employee);

session.flush();
session.clear();

employee = session.get(Employee.class, employee.getId());
assertThat(employee.getTax()).isEqualTo(2_500L);

4. Filtering Entities with @Where

Suppose we want to provide an additional condition to the query whenever we request some entity.

For instance, we need to implement “soft delete”. This means that the entity is never deleted from the database, but only marked as deleted with a boolean field.

We’d have to take great care with all existing and future queries in the application. We’d have to provide this additional condition to every query. Fortunately, Hibernate provides a way to do this in one place:

@Entity
@Where(clause = "deleted = false")
public class Employee implements Serializable {

    // ...
}

The @Where annotation on a method contains an SQL clause that will be added to any query or subquery to this entity:

employee.setDeleted(true);

session.flush();
session.clear();

employee = session.find(Employee.class, employee.getId());
assertThat(employee).isNull();

As in the case of @Formula annotation, since we’re dealing with raw SQL, the @Where condition won’t be reevaluated until we flush the entity to the database and evict it from the context.

Until that time, the entity will stay in the context and will be accessible with queries and lookups by id.

The @Where annotation can also be used for a collection field. Suppose we have a list of deletable phones:

@Entity
public class Phone implements Serializable {

    @Id
    @GeneratedValue(strategy = GenerationType.IDENTITY)
    private Integer id;

    private boolean deleted;

    private String number;

}

Then, from the Employee side, we could map a collection of deletable phones as follows:

public class Employee implements Serializable {
    
    // ...

    @OneToMany
    @JoinColumn(name = "employee_id")
    @Where(clause = "deleted = false")
    private Set<Phone> phones = new HashSet<>(0);

}

The difference is that the Employee.phones collection would always be filtered, but we still could get all phones, including deleted ones, via direct query:

employee.getPhones().iterator().next().setDeleted(true);
session.flush();
session.clear();

employee = session.find(Employee.class, employee.getId());
assertThat(employee.getPhones()).hasSize(1);

List<Phone> fullPhoneList 
  = session.createQuery("from Phone").getResultList();
assertThat(fullPhoneList).hasSize(2);

5. Parameterized Filtering with @Filter

The problem with @Where annotation is that it allows us to only specify a static query without parameters, and it can’t be disabled or enabled by demand.

The @Filter annotation works the same way as @Where, but it also can be enabled or disabled on session level, and also parameterized.

5.1. Defining the @Filter

To demonstrate how @Filter works, let’s first add the following filter definition to the Employee entity:

@FilterDef(
    name = "incomeLevelFilter", 
    parameters = @ParamDef(name = "incomeLimit", type = "int")
)
@Filter(
    name = "incomeLevelFilter", 
    condition = "grossIncome > :incomeLimit"
)
public class Employee implements Serializable {

The @FilterDef annotation defines the filter name and a set of its parameters that will participate in the query. The type of the parameter is the name of one of the Hibernate types (Type, UserType or CompositeUserType), in our case, an int.

The @FilterDef annotation may be placed either on the type or on package level. Note that it does not specify the filter condition itself (although we could specify the defaultCondition parameter).

This means that we can define the filter (its name and set of parameters) in one place and then define the conditions for the filter in multiple other places differently.

This can be done with the @Filter annotation. In our case, we put it in the same class for simplicity. The syntax of the condition is a raw SQL with parameter names preceded by colons.

5.2. Accessing Filtered Entities

Another difference of @Filter from @Where is that @Filter is not enabled by default. We have to enable it on the session level manually, and provide the parameter values for it:

session.enableFilter("incomeLevelFilter")
  .setParameter("incomeLimit", 11_000);

Now suppose we have the following three employees in the database:

session.save(new Employee(10_000, 25));
session.save(new Employee(12_000, 25));
session.save(new Employee(15_000, 25));

Then with the filter enabled, as shown above, only two of them will be visible by querying:

List<Employee> employees = session.createQuery("from Employee")
  .getResultList();
assertThat(employees).hasSize(2);

Note that both the enabled filter and its parameter values are applied only inside the current session. In a new session without filter enabled, we’ll see all three employees:

session = HibernateUtil.getSessionFactory().openSession();
employees = session.createQuery("from Employee").getResultList();
assertThat(employees).hasSize(3);

Also, when directly fetching the entity by id, the filter is not applied:

Employee employee = session.get(Employee.class, 1);
assertThat(employee.getGrossIncome()).isEqualTo(10_000);

5.3. @Filter and Second-Level Caching

If we have a high-load application, then we’d definitely want to enable Hibernate second-level cache, which can be a huge performance benefit. We should keep in mind that the @Filter annotation does not play nicely with caching.

The second-level cache only keeps full unfiltered collections. If it wasn’t the case, then we could read a collection in one session with filter enabled, and then get the same cached filtered collection in another session even with filter disabled.

This is why the @Filter annotation basically disables caching for the entity.

6. Mapping Any Entity Reference with @Any

Sometimes we want to map a reference to any of multiple entity types, even if they are not based on a single @MappedSuperclass. They could even be mapped to different unrelated tables. We can achieve this with the @Any annotation.

In our example, we’ll need to attach some description to every entity in our persistence unit, namely, Employee and Phone. It’d be unreasonable to inherit all entities from a single abstract superclass just to do this.

6.1. Mapping Relation with @Any

Here’s how we can define a reference to any entity that implements Serializable (i.e., to any entity at all):

@Entity
public class EntityDescription implements Serializable {

    private String description;

    @Any(
        metaDef = "EntityDescriptionMetaDef",
        metaColumn = @Column(name = "entity_type"))
    @JoinColumn(name = "entity_id")
    private Serializable entity;

}

The metaDef property is the name of the definition, and metaColumn is the name of the column that will be used to distinguish the entity type (not unlike the discriminator column in the single table hierarchy mapping).

We also specify the column that will reference the id of the entity. It’s worth noting that this column will not be a foreign key because it can reference any table that we want.

The entity_id column also can’t generally be unique because different tables could have repeated identifiers.

The entity_type/entity_id pair, however, should be unique, as it uniquely describes the entity that we’re referring to.

6.2. Defining the @Any Mapping with @AnyMetaDef

Right now, Hibernate does not know how to distinguish different entity types, because we did not specify what the entity_type column could contain.

To make this work, we need to add the meta-definition of the mapping with the @AnyMetaDef annotation. The best place to put it would be the package level, so we could reuse it in other mappings.

Here’s how the package-info.java file with the @AnyMetaDef annotation would look like:

@AnyMetaDef(
    name = "EntityDescriptionMetaDef", 
    metaType = "string", 
    idType = "int",
    metaValues = {
        @MetaValue(value = "Employee", targetEntity = Employee.class),
        @MetaValue(value = "Phone", targetEntity = Phone.class)
    }
)
package com.baeldung.hibernate.pojo;

Here we’ve specified the type of the entity_type column (string), the type of the entity_id column (int), the acceptable values in the entity_type column (“Employee” and “Phone”) and the corresponding entity types.

Now, suppose we have an employee with two phones described like this:

Employee employee = new Employee();
Phone phone1 = new Phone("555-45-67");
Phone phone2 = new Phone("555-89-01");
employee.getPhones().add(phone1);
employee.getPhones().add(phone2);

Now we could add descriptive metadata to all three entities, even though they have different unrelated types:

EntityDescription employeeDescription = new EntityDescription(
  "Send to conference next year", employee);
EntityDescription phone1Description = new EntityDescription(
  "Home phone (do not call after 10PM)", phone1);
EntityDescription phone2Description = new EntityDescription(
  "Work phone", phone1);

7. Conclusion

In this article, we’ve explored some of Hibernate’s annotations that allow fine-tuning entity mapping using raw SQL.

The source code for the article is available over on GitHub.

Daemon Threads in Java

$
0
0

1. Overview

In this short article, we’ll have a look at daemon threads in Java and see what can they be used for. We’ll also explain the difference between daemon threads and user threads.

2. Difference Between Daemon and User Threads

Java offers two types of threads: user threads and daemon threads.

User threads are high-priority threads. The JVM will wait for any user thread to complete its task before terminating it.

On the other hand, daemon threads are low-priority threads whose only role is to provide services to user threads.

Since daemon threads are meant to serve user threads and are only needed while user threads are running, they won’t prevent the JVM from exiting once all user threads have finished their execution.

That’s why infinite loops, which typically exist in daemon threads, will not cause problems, because any code, including the finally blocks, won’t be executed once all user threads have finished their execution. For this reason, daemon threads are not recommended for I/O tasks.

However, there’re exceptions to this rule. Poorly designed code in daemon threads can prevent the JVM from exiting. For example calling Thread.join() on a running daemon thread can block the shutdown of the application.

3. Uses of Daemon Threads

Daemon threads are useful for background supporting tasks such as garbage collection, releasing memory of unused objects and removing unwanted entries from the cache. Most of the JVM threads are daemon threads.

4. Creating a Daemon Thread

To set a thread to be a daemon thread, all we need to do is to call Thread.setDaemon(). In this example, we’ll use the NewThread class which extends the Thread class:

NewThread daemonThread = new NewThread();
daemonThread.setDaemon(true);
daemonThread.start();

Any thread inherits the daemon status of the thread that created it. Since the main thread is a user thread, any thread that is created inside the main method is by default a user thread.

The method setDaemon() can only be called after the Thread object has been created and the thread has not been started. An attempt to call setDaemon() while a thread is running will throw an IllegalThreadStateException:

@Test(expected = IllegalThreadStateException.class)
public void whenSetDaemonWhileRunning_thenIllegalThreadStateException() {
    NewThread daemonThread = new NewThread();
    daemonThread.start();
    daemonThread.setDaemon(true);
}

5. Checking if a Thread Is a Daemon Thread

Finally, to check if a thread is a daemon thread, we can simply call the method isDaemon():

@Test
public void whenCallIsDaemon_thenCorrect() {
    NewThread daemonThread = new NewThread();
    NewThread userThread = new NewThread();
    daemonThread.setDaemon(true);
    daemonThread.start();
    userThread.start();
    
    assertTrue(daemonThread.isDaemon());
    assertFalse(userThread.isDaemon());
}

6. Conclusion

In this quick tutorial, we’ve seen what daemon threads are and what they can be used for in a few practical scenarios.

As always, the full version of the code is available over on GitHub.

Viewing all 4713 articles
Browse latest View live


<script src="https://jsc.adskeeper.com/r/s/rssing.com.1596347.js" async> </script>