Quantcast
Channel: Baeldung
Viewing all 4715 articles
Browse latest View live

Java Weekly, Issue 201

$
0
0

Lots of interesting writeups on Java 9 this week.

Here we go…

1. Spring and Java

>> Learning Java with jshell [javaspecialists.eu]

A Quick intro of JShell makes it possible to explore Java without public static void main() methods 🙂

>> Data Classes for Java [openjdk.java.net]

A comprehensive explanation of the new upcoming Java feature – data classes.

>> Hibernate Tips: How to map an entity attribute to an Optional [thoughts-on-java.org]

Unfortunately, Hibernate and JPA 2.2 don’t support Optional as an attribute type but with a little trick, we can still use Optional as the return type of getter methods.

>> Bean Validation benchmark revisited [in.relation.to]

An interesting performance comparison of three most popular Bean Validation implementations – Hibernate Validator 6.x.x is faster than ever.

Also worth reading:

Webinars and presentations:

Time to upgrade:

2. Technical and Musings

>> Customize Your Agile Approach: Start With Results You Want [infoq.com]

Velocity is a current measure of capacity and not a measure of project progress – it makes more sense to track completed stories and not Story Points – the value of those change over time.

Also worth reading:

3. Comics

And my favorite Dilberts of the week:

>> App For a Better Boss [dilbert.com]

>> Robot is not a Droid [dilbert.com]

>> Troll Has No Job [dilbert.com]

4. Pick of the Week

>> How To Track and Monitor Critical Java Application Metrics [stackify.com]


Making Tomcat UTF-8-Ready

$
0
0

1. Introduction

UTF-8 is the most common character encoding used in web applications. It supports all languages currently spoken in the world including Chinese, Korean, and Japanese.

In this article, we demonstrate all configuration needed to ensure UTF-8 in Tomcat.

2. Connector Configuration

A Connector listens for connections on a specific port. We need to make sure that all of our Connectors use UTF-8 to encode requests.

Let’s add the parameter URIEncoding=”UTF-8″ to all the Connectors in TOMCAT_ROOT/conf/server.xml:

<Connector 
  URIEncoding="UTF-8" 
  port="8080" 
  redirectPort="8443" 
  connectionTimeout="20000" 
  protocol="HTTP/1.1"/>

<Connector 
  URIEncoding="UTF-8" 
  port="8009" 
  redirectPort="8443" 
  protocol="AJP/1.3"/>

3. Character Set Filter

After configuring the connector, it’s time to force the web application to handle all requests and responses in UTF-8.

Let’s define a class named CharacterSetFilter:

public class CharacterSetFilter implements Filter {

    // ...

    public void doFilter(
      ServletRequest request, 
      ServletResponse response, 
      FilterChain next) throws IOException, ServletException {
        request.setCharacterEncoding("UTF-8");
        response.setContentType("text/html; charset=UTF-8");
        response.setCharacterEncoding("UTF-8");
        next.doFilter(request, response);
    }

    // ...
}

We need to add the filter to our application’s web.xml so that it’s applied to all requests and responses:

<filter>
    <filter-name>CharacterSetFilter</filter-name>
    <filter-class>com.baeldung.CharacterSetFilter</filter-class>
</filter>

<filter-mapping>
    <filter-name>CharacterSetFilter</filter-name>
    <url-pattern>/*</url-pattern>
</filter-mapping>

4. Servlet Page Encoding

The other part of our web application we need to configure is servlet pages.

The best way to ensure UTF-8 in servlet pages is to add this tag at the top of each JSP page:

<%@page pageEncoding="UTF-8" contentType="text/html; charset=UTF-8"%>

5. HTML Page Encoding

While servlet page encoding tells JVM how to handle page characters, HTML page encoding tells the browser how to handle page characters.

We should add this <meta> tag in the head section of all HTML pages:

<meta http-equiv='Content-Type' content='text/html; charset=UTF-8' />

6. MySQL Server Configuration

Now, that our Tomcat is configured, it’s time to configure the database.

We assume that a MySQL server is used. The configuration file is named my.ini on Windows and my.cnf on Linux.

We need to find the configuration file, search for these parameters, and edit them accordingly:

[client]
default-character-set = utf8mb4

[mysql]
default-character-set = utf8mb4

[mysqld]
character-set-client-handshake = FALSE
character-set-server = utf8mb4
collation-server = utf8mb4_unicode_ci

We need to restart MySQL server for the changes to take effect.

7. MySQL Database Configuration

MySQL server character set configuration is only applied to new databases. We need to migrate old ones manually. This can be easily achieved using a few commands.

For each database:

ALTER DATABASE database_name CHARACTER SET = utf8mb4 
    COLLATE = utf8mb4_unicode_ci;

For each table:

ALTER TABLE table_name CONVERT TO 
    CHARACTER SET utf8mb4 COLLATE utf8mb4_unicode_ci;

For each VARCHAR or TEXT column:

ALTER TABLE table_name CHANGE column_name column_name 
    VARCHAR(69) CHARACTER SET utf8mb4 COLLATE utf8mb4_unicode_ci;

8. Conclusion

In this article, we demonstrated how to ensure Tomcat uses the UTF-8 encoding.

Activiti with Spring Security

$
0
0

1. Overview

Activiti is an open-source BPM (Business Process Management) system. For an introduction, check our Guide to Activiti with Java.

Both Activiti and the Spring framework provide their own identity management. However, in an application that integrates both projects, we may want to combine the two into a single user management process.

In the following, we’ll explore two possibilities to achieve this: one is by providing an Activiti-backed user service for Spring Security and the other by plugging a Spring Security user source into the Activiti identity management.

2. Maven Dependencies

To set up Activiti in a Spring Boot project, check out our previous article. In addition to activiti-spring-boot-starter-basic, we’ll also need the activiti-spring-boot-starter-security dependency:

<dependency>
    <groupId>org.activiti</groupId>
    <artifactId>activiti-spring-boot-starter-security</artifactId>
    <version>6.0.0</version>
</dependency>

3. Identity Management Using Activiti

For this scenario, the Activiti starters provide a Spring Boot auto-configuration class which secures all REST endpoints with HTTP Basic authentication.

The auto-configuration also creates a UserDetailsService bean of class IdentityServiceUserDetailsService. 

The class implements the Spring interface UserDetailsService and overrides the loadUserByUsername() method. This method retrieves an Activiti User object with the given id and uses it to create a Spring UserDetails object.

Also, the Activiti Group object corresponds to a Spring user role.

What this means is that when we login to the Spring Security application, we’ll use Activiti credentials.

3.1. Setting Up Activiti Users

First, let’s create a user in an InitializingBean defined in the main @SpringBootApplication class, using the IdentityService:

@Bean
InitializingBean usersAndGroupsInitializer(IdentityService identityService) {
    return new InitializingBean() {
        public void afterPropertiesSet() throws Exception {
            User user = identityService.newUser("activiti_user");
            user.setPassword("pass");
            identityService.saveUser(user);

            Group group = identityService.newGroup("user");
            group.setName("ROLE_USER");
            group.setType("USER");
            identityService.saveGroup(group);
            identityService.createMembership(user.getId(), group.getId());
        }
    };
}

You’ll notice that since this will be used by Spring Security, the Group object name has to be of the form “ROLE_X”.

3.2. Spring Security Configuration

If we want to use a different security configuration instead of the HTTP Basic authentication, first we have to exclude the auto-configuration:

@SpringBootApplication(
  exclude = org.activiti.spring.boot.SecurityAutoConfiguration.class)
public class ActivitiSpringSecurityApplication {
    // ...
}

Then, we can provide our own Spring Security configuration class that uses the IdentityServiceUserDetailsService to retrieve users from the Activiti data source:

@Configuration
public class SecurityConfig extends WebSecurityConfigurerAdapter {
 
    @Autowired
    private IdentityService identityService;

    @Autowired
    public void configureGlobal(AuthenticationManagerBuilder auth)
      throws Exception {
 
        auth.userDetailsService(userDetailsService());
    }
    
    @Bean
    public UserDetailsService userDetailsService() {
        return new IdentityServiceUserDetailsService(
          this.identityService);
    }

    // spring security configuration
}

4. Identity Management Using Spring Security

If we already have user management set up with Spring Security and we want to add Activiti to our application, then we need to customize Activiti’s identity management.

For this purpose, there’re two main classes we have to extend: UserEntityManagerImpl and GroupEntityManagerImpl which handle users and groups.

Let’s take a look at each of these in more detail.

4.1. Extending UserEntityManagerImpl

Let’s create our own class which extends the UserEntityManagerImpl class:

public class SpringSecurityUserManager extends UserEntityManagerImpl {

    private JdbcUserDetailsManager userManager;

    public SpringSecurityUserManager(
      ProcessEngineConfigurationImpl processEngineConfiguration, 
      UserDataManager userDataManager, 
      JdbcUserDetailsManager userManager) {
 
        super(processEngineConfiguration, userDataManager);
        this.userManager = userManager;
    }
    
    // ...
}

This class needs a constructor of the form above, as well as the Spring Security user manager. In our case, we’ve used a database-backed UserDetailsManager.

The main methods we want to override are those that handle user retrieval: findById(), findUserByQueryCriteria() and findGroupsByUser().

The findById() method uses the JdbcUserDetailsManager to find a UserDetails object and transform it into a User object:

@Override
public UserEntity findById(String userId) {
    UserDetails userDetails = userManager.loadUserByUsername(userId);
    if (userDetails != null) {
        UserEntityImpl user = new UserEntityImpl();
        user.setId(userId);
        return user;
    }
    return null;
}

Next, the findGroupsByUser() method finds all the Spring Security authorities of a user and returns a List of Group objects:

public List<Group> findGroupsByUser(String userId) {
    UserDetails userDetails = userManager.loadUserByUsername(userId);
    if (userDetails != null) {
        return userDetails.getAuthorities().stream()
          .map(a -> {
            Group g = new GroupEntityImpl();
            g.setId(a.getAuthority());
            return g;
          })
          .collect(Collectors.toList());
    }
    return null;
}

The findUserByQueryCriteria() method is based on a UserQueryImpl object with multiple properties, from which we’ll extract the group id and user id, as they have correspondents in Spring Security:

@Override
public List<User> findUserByQueryCriteria(
  UserQueryImpl query, Page page) {
    // ...
}

This method follows a similar principle to the ones above, by creating User objects from UserDetails objects. See the GitHub link at the end for the full implementation.

Similarly, we’ve got the findUserCountByQueryCriteria() method:

public long findUserCountByQueryCriteria(
  UserQueryImpl query) {
 
    return findUserByQueryCriteria(query, null).size();
}

The checkPassword() method should always return true as the password verification is not done by Activiti:

@Override
public Boolean checkPassword(String userId, String password) {
    return true;
}

For other methods, such as those dealing with updating users, we’ll just throw an exception since this is handled by Spring Security:

public User createNewUser(String userId) {
    throw new UnsupportedOperationException("This operation is not supported!");
}

4.2. Extend the GroupEntityManagerImpl

The SpringSecurityGroupManager is similar to the user manager class, except the fact it deals with user groups:

public class SpringSecurityGroupManager extends GroupEntityManagerImpl {

    private JdbcUserDetailsManager userManager;

    public SpringSecurityGroupManager(ProcessEngineConfigurationImpl 
      processEngineConfiguration, GroupDataManager groupDataManager) {
        super(processEngineConfiguration, groupDataManager);
    }

    // ...
}

Here the main method to override is the findGroupsByUser() method:

@Override
public List<Group> findGroupsByUser(String userId) {
    UserDetails userDetails = userManager.loadUserByUsername(userId);
    if (userDetails != null) {
        return userDetails.getAuthorities().stream()
          .map(a -> {
            Group g = new GroupEntityImpl();
            g.setId(a.getAuthority());
            return g;
          })
          .collect(Collectors.toList());
    }
    return null;
}

The method retrieves a Spring Security user’s authorities and transforms them to a list of Group objects.

Based on this, we can also override the findGroupByQueryCriteria() and findGroupByQueryCriteriaCount() methods:

@Override
public List<Group> findGroupByQueryCriteria(GroupQueryImpl query, Page page) {
    if (query.getUserId() != null) {
        return findGroupsByUser(query.getUserId());
    }
    return null;
}

@Override
public long findGroupCountByQueryCriteria(GroupQueryImpl query) {
    return findGroupByQueryCriteria(query, null).size();
}

Other methods that update groups can be overridden to throw an exception:

public Group createNewGroup(String groupId) {
    throw new UnsupportedOperationException("This operation is not supported!");
}

4.3. Process Engine Configuration

After defining the two identity manager classes, we need to wire them into the configuration.

The spring starters auto-configure a SpringProcessEngineConfiguration for us. To modify this, we can use an InitializingBean:

@Autowired
private SpringProcessEngineConfiguration processEngineConfiguration;

@Autowired
private JdbcUserDetailsManager userManager;

@Bean
InitializingBean processEngineInitializer() {
    return new InitializingBean() {
        public void afterPropertiesSet() throws Exception {
            processEngineConfiguration.setUserEntityManager(
              new SpringSecurityUserManager(processEngineConfiguration, 
              new MybatisUserDataManager(processEngineConfiguration), userManager));
            processEngineConfiguration.setGroupEntityManager(
              new SpringSecurityGroupManager(processEngineConfiguration, 
              new MybatisGroupDataManager(processEngineConfiguration)));
            }
        };
    }

Here, the existing processEngineConfiguration is modified to use our custom identity managers.

If we want to set the current user in Activiti, we can use the method:

identityService.setAuthenticatedUserId(userId);

Keep in mind that this sets a ThreadLocal property, so the value is different for every thread.

5. Conclusion

In this article, we’ve seen the two ways we can integrate Activiti with Spring Security.

The full source code can be found over on GitHub.

JUnit 5 for Kotlin Developers

$
0
0

1. Introduction

The newly released JUnit 5 is the next version of the well-known testing framework for Java. This version includes a number of features that specifically target functionality introduced in Java 8 — it’s primarily built around the use of lambda expressions.

In this quick article, we’ll show how well the same tool works with the Kotlin language.

2. Simple JUnit 5 Tests

At its very simplest, a JUnit 5 test written in Kotlin works exactly as would be expected. We write a test class, annotate our test methods with the @Test annotation, write our code, and perform the assertions:

class CalculatorTest {
    private val calculator = Calculator()

    @Test
    fun whenAdding1and3_thenAnswerIs4() {
        Assertions.assertEquals(4, calculator.add(1, 3))
    }
}

Everything here just works out of the box. We can make use of the standard @Test, @BeforeAll, @BeforeEach, @AfterEach, and @AfterAll annotations. We can also interact with fields in the test class exactly the same as in Java.

Note that the imports required are different, and we do assertions using the Assertions class instead of the Assert class. This is a standard change for JUnit 5 and is not specific to Kotlin.

3. Advanced Assertions

JUnit 5 adds some advanced assertions for working with lambdas. These work the same in Kotlin as in Java but need to be expressed in a slightly different way due to the way the language works.

3.1. Asserting Exceptions

JUnit 5 adds an assertion for when a call is expected to throw an exception. We can test that a specific call — rather than just any call in the method — throws the expected exception. We can even assert on the exception itself.

In Java, we’d pass a lambda into the call to Assertions.assertThrows. We do the same in Kotlin, but we can make the code more readable by appending a block to the end of the assertion call:

@Test
fun whenDividingBy0_thenErrorOccurs() {
    val exception = Assertions.assertThrows(DivideByZeroException::class.java) {
        calculator.divide(5, 0)
    }

    Assertions.assertEquals(5, exception.numerator)
}

This code works exactly the same as the Java equivalent but is easier to read, since we don’t need to pass a lambda inside of the brackets where we call the assertThrows function.

3.2. Multiple Assertions

JUnit 5 adds the ability to perform multiple assertions at the same time, and it’ll evaluate them all and report on all of the failures.

This allows us to gather more information in a single test run rather than being forced to fix one error only to hit the next one. To do so, we call Assertions.assertAll, passing in an arbitrary number of lambdas.

In Kotlin, we need to handle this slightly differently. The function actually takes a varargs parameter of type Executable.

At present, there’s no support for automatically casting a lambda to a functional interface, so we need to do it by hand:

fun whenSquaringNumbers_thenCorrectAnswerGiven() {
    Assertions.assertAll(
        Executable { Assertions.assertEquals(1, calculator.square(1)) },
        Executable { Assertions.assertEquals(4, calculator.square(2)) },
        Executable { Assertions.assertEquals(9, calculator.square(3)) }
    )
}

3.3. Suppliers For True And False Tests

On occasion, we want to test that some call returns a true or false value. Historically we would compute this value and call assertTrue or assertFalse as appropriate. JUnit 5 allows for a lambda to be provided instead that returns the value being checked.

Kotlin allows us to pass in a lambda in the same way that we saw above for testing exceptions. We can also pass in method references. This is especially useful when testing the return value of some existing object like we do here using List.isEmpty:

@Test
fun whenEmptyList_thenListIsEmpty() {
    val list = listOf<String>()
    Assertions.assertTrue(list::isEmpty)
}

3.4. Suppliers For Failure Messages

In some cases, we want to provide our own error message to be displayed on an assertion failure instead of the default one.

Often these are simple strings, but sometimes we may want to use a string that is expensive to compute. In JUnit 5, we can provide a lambda to compute this string, and it is only called on failure instead of being computed up front.

This can help make the tests run faster and reduce build times. This works exactly the same as we saw before:

@Test
fun when3equals4_thenTestFails() {
    val actual = someComputedValue()
    Assertions.assertEquals(3, actual) {
        "3 does not equal $actual"
    }
}

4. Data-Driven Tests

One of the big improvements in JUnit 5 is the native support for data-driven tests. These work equally well in Kotlin, and the use of functional mappings on collections can make our tests easier to read and maintain.

4.1. TestFactory Methods

The easiest way to handle data-driven tests is by using the @TestFactory annotation. This replaces the @Test annotation, and the method returns some collection of DynamicNode instances — normally created by calling DynamicTest.dynamicTest.

This works exactly the same in Kotlin, and we can pass in the lambda in a cleaner way again, as we saw earlier:

@TestFactory
fun testSquares() = listOf(
    DynamicTest.dynamicTest("when I calculate 1^2 then I get 1") { Assertions.assertEquals(1,calculator.square(1))},
    DynamicTest.dynamicTest("when I calculate 2^2 then I get 4") { Assertions.assertEquals(4,calculator.square(2))},
    DynamicTest.dynamicTest("when I calculate 3^2 then I get 9") { Assertions.assertEquals(9,calculator.square(3))}
)

We can do better than this though. We can easily build our list by performing some functional mapping on a simple input list of data:

@TestFactory
fun testSquares() = listOf(
    1 to 1,
    2 to 4,
    3 to 9,
    4 to 16,
    5 to 25)
    .map { (input, expected) ->
        DynamicTest.dynamicTest("when I calculate $input^2 then I get $expected") {
            Assertions.assertEquals(expected, calculator.square(input))
        }
    }

Straight away, we can easily add more test cases to the input list, and it will automatically add tests.

We can also create the input list as a class field and share it between multiple tests:

private val squaresTestData = listOf(
    1 to 1,
    2 to 4,
    3 to 9,
    4 to 16,
    5 to 25)

@TestFactory
fun testSquares() = squaresTestData
    .map { (input, expected) ->
        DynamicTest.dynamicTest("when I calculate $input^2 then I get $expected") {
            Assertions.assertEquals(expected, calculator.square(input))
        }
    }
@TestFactory
fun testSquareRoots() = squaresTestData
    .map { (expected, input) ->
        DynamicTest.dynamicTest("when I calculate the square root of $input then I get $expected") {
            Assertions.assertEquals(expected, calculator.squareRoot(input))
        }
    }

4.2. Parameterized Tests

There are experimental extensions to JUnit 5 to allow easier ways to write parameterized tests. These are done using the @ParameterizedTest annotation from the org.junit.jupiter:junit-jupiter-params dependency:

<dependency>
    <groupId>org.junit.jupiter</groupId>
    <artifactId>junit-jupiter-params</artifactId>
    <version>5.0.0</version>
</dependency>

The latest version can be found on Maven Central.

The @MethodSource annotation allows us to produce test parameters by calling a static function that resides in the same class as the test. This is possible but not obvious in Kotlin. We have to use the @JvmStatic annotation inside a companion object:

@ParameterizedTest
@MethodSource("squares")
fun testSquares(input: Int, expected: Int) {
    Assertions.assertEquals(expected, input * input)
}

companion object {
    @JvmStatic
    fun squares() = listOf(
        Arguments.of(1, 1),
        Arguments.of(2, 4)
    )
}

This also means that the methods used to produce parameters must all be together since we can only have a single companion object per class.

All of the other ways of using parameterized tests work exactly the same in Kotlin as they do in Java. @CsvSource is of special note here, since we can use that instead of @MethodSource for simple test data most of the time to make our tests more readable:

@ParameterizedTest
@CsvSource(
    "1, 1",
    "2, 4",
    "3, 9"
)
fun testSquares(input: Int, expected: Int) {
    Assertions.assertEquals(expected, input * input)
}

5. Tagged Tests

The Kotlin language does not currently allow for repeated annotations on classes and methods. This makes the use of tags slightly more verbose, as we are required to wrap them in the @Tags annotation:

@Tags(
    Tag("slow"),
    Tag("logarithms")
)
@Test
fun whenIcalculateLog2Of8_thenIget3() {
    assertEquals(3, calculator.log(2, 8))
}

This is also required in Java 7 and is fully supported by JUnit 5 already.

6. Summary

JUnit 5 adds some powerful testing tools that we can use. These almost all work perfectly well with the Kotlin language, though in some cases with slightly different syntax than we see in the Java equivalents.

Often though, these changes in syntax are easier to read and work with when using Kotlin.

Examples of all these features can be found over on GitHub.

Hibernate – Mapping Date and Time

$
0
0

1. Introduction

In this article, we’ll show how to map temporal column values in Hibernate, including the classes from java.sql, java.util and java.time packages.

2. Project Setup

To demonstrate the mapping of the temporal types, we’re going to need the H2 database and the latest version of the hibernate-core library:

<dependency>
    <groupId>org.hibernate</groupId>
    <artifactId>hibernate-core</artifactId>
    <version>5.2.12.Final</version>
</dependency>
<dependency>
    <groupId>com.h2database</groupId>
    <artifactId>h2</artifactId>
    <version>1.4.194</version>
</dependency>

For the current version of the hibernate-core library, head over to the Maven Central repository.

3. Time Zone Setup

When dealing with dates, it’s a good idea to set a specific time zone for the JDBC driver. This way our application would be independent of the current timezone of the system.

For our example, we’ll set it up on a per-session basis:

session = HibernateUtil.getSessionFactory().withOptions()
  .jdbcTimeZone(TimeZone.getTimeZone("UTC"))
  .openSession();

Another way would be to set up the hibernate.jdbc.time_zone property in Hibernate properties file that is used to construct the session factory. This way we could specify the timezone once for the entire application.

4. Mapping java.sql Types

The java.sql package contains JDBC types that are aligned with the types defined by the SQL standard:

  • Date corresponds to the DATE SQL type, which is only a date without time
  • Time corresponds to the TIME SQL type, which is a time of the day specified in hours, minutes and seconds
  • Timestamp includes information about date and time with precision up to nanoseconds and corresponds to the TIMESTAMP SQL type

As these types are in line with SQL, so their mapping is relatively straight-forward. We can use either the @Basic or the @Column annotation:

@Entity
public class TemporalValues {

    @Basic
    private java.sql.Date sqlDate;

    @Basic
    private java.sql.Time sqlTime;

    @Basic
    private java.sql.Timestamp sqlTimestamp;

}

We could then set the corresponding values like this:

temporalValues.setSqlDate(java.sql.Date.valueOf("2017-11-15"));
temporalValues.setSqlTime(java.sql.Time.valueOf("15:30:14"));
temporalValues.setSqlTimestamp(
  java.sql.Timestamp.valueOf("2017-11-15 15:30:14.332"));

Note that choosing java.sql types for entity fields may not always be a good choice. These classes are JDBC-specific and contain a lot of deprecated functionality.

5. Mapping java.util.Date Type

The type java.util.Date contains both date and time information, up to millisecond precision. But it doesn’t directly relate to any SQL type.

This is why we need another annotation to specify the desired SQL type:

@Basic
@Temporal(TemporalType.DATE)
private java.util.Date utilDate;

@Basic
@Temporal(TemporalType.TIME)
private java.util.Date utilTime;

@Basic
@Temporal(TemporalType.TIMESTAMP)
private java.util.Date utilTimestamp;

The @Temporal annotation has the single parameter value of type TemporalType. It can be either DATE, TIME or TIMESTAMP, depending on the underlying SQL type that we want to use for the mapping.

We could then set the corresponding fields like this:

temporalValues.setUtilDate(
  new SimpleDateFormat("yyyy-MM-dd").parse("2017-11-15"));
temporalValues.setUtilTime(
  new SimpleDateFormat("HH:mm:ss").parse("15:30:14"));
temporalValues.setUtilTimestamp(
  new SimpleDateFormat("yyyy-MM-dd HH:mm:ss.SSS")
    .parse("2017-11-15 15:30:14.332"));

As we’ve seen, the java.util.Date type (milliseconds precision) is not precise enough to handle the Timestamp value (nanoseconds precision).

So when we retrieve the entity from the database, we’ll unsurprisingly find a java.sql.Timestamp instance in this field, even if we initially persisted a java.util.Date:

temporalValues = session.get(TemporalValues.class, 
  temporalValues.getId());
assertThat(temporalValues.getUtilTimestamp())
  .isEqualTo(java.sql.Timestamp.valueOf("2017-11-15 15:30:14.332"));

This should be fine for our code since Timestamp extends Date.

6. Mapping java.util.Calendar Type

As with the java.util.Date, the java.util.Calendar type may be mapped to different SQL types, so we have to specify them with @Temporal.

The only difference is that Hibernate does not support mapping Calendar to TIME:

@Basic
@Temporal(TemporalType.DATE)
private java.util.Calendar calendarDate;

@Basic
@Temporal(TemporalType.TIMESTAMP)
private java.util.Calendar calendarTimestamp;

Here’s how we can set the value of the field:

Calendar calendarDate = Calendar.getInstance(
  TimeZone.getTimeZone("UTC"));
calendarDate.set(Calendar.YEAR, 2017);
calendarDate.set(Calendar.MONTH, 10);
calendarDate.set(Calendar.DAY_OF_MONTH, 15);
temporalValues.setCalendarDate(calendarDate);

7. Mapping java.time Types

Since Java 8, the new Java Date and Time API is available for dealing with temporal values. This API fixes many of the problems of java.util.Date and java.util.Calendar classes.

The types from the java.time package are directly mapped to corresponding SQL types. So there’s no need to explicitly specify @Temporal annotation:

  • LocalDate is mapped to DATE
  • LocalTime and OffsetTime are mapped to TIME
  • Instant, LocalDateTime, OffsetDateTime and ZonedDateTime are mapped to TIMESTAMP

This means that we can mark these fields only with @Basic (or @Column) annotation, like this:

@Basic
private java.time.LocalDate localDate;

@Basic
private java.time.LocalTime localTime;

@Basic
private java.time.OffsetTime offsetTime;

@Basic
private java.time.Instant instant;

@Basic
private java.time.LocalDateTime localDateTime;

@Basic
private java.time.OffsetDateTime offsetDateTime;

@Basic
private java.time.ZonedDateTime zonedDateTime;

Every temporal class in the java.time package has a static parse() method to parse the provided String value using the appropriate format. So here’s how we can set the values of the entity fields:

temporalValues.setLocalDate(LocalDate.parse("2017-11-15"));

temporalValues.setLocalTime(LocalTime.parse("15:30:18"));
temporalValues.setOffsetTime(OffsetTime.parse("08:22:12+01:00"));

temporalValues.setInstant(Instant.parse("2017-11-15T08:22:12Z"));
temporalValues.setLocalDateTime(
  LocalDateTime.parse("2017-11-15T08:22:12"));
temporalValues.setOffsetDateTime(
  OffsetDateTime.parse("2017-11-15T08:22:12+01:00"));
temporalValues.setZonedDateTime(
  ZonedDateTime.parse("2017-11-15T08:22:12+01:00[Europe/Paris]"));

8. Conclusion

In this article, we’ve shown how to map temporal values of different types in Hibernate.

The source code for the article is available over on GitHub.

A Guide to Spring Boot Admin

$
0
0

1. Overview

Spring Boot Admin is a web application, used for managing and monitoring Spring Boot applications. Each application is considered as a client and registers to the admin server. Behind the scenes, the magic is given by the Spring Boot Actuator endpoints.

In this article, we’re going to describe steps for configuring a Spring Boot Admin server and how an application becomes a client.

2. Admin Server Setup

First of all, we need to create a simple Spring Boot web application and add the following Maven dependencies:

<dependency>
    <groupId>de.codecentric</groupId>
    <artifactId>spring-boot-admin-server</artifactId>
    <version>1.5.4</version>
</dependency>
<dependency>
    <groupId>de.codecentric</groupId>
    <artifactId>spring-boot-admin-server-ui</artifactId>
    <version>1.5.4</version>
</dependency>

After this, the @EnableAdminServer will be available, so we’ll be adding it to the main class, as shown in the example below:

@EnableAdminServer
@SpringBootApplication
public class SpringBootAdminServerApplication {

    public static void main(String[] args) {
        SpringApplication.run(SpringBootAdminServerApplication.class, args);
    }
}

At this point, the server is ready to be started and can register client applications.

3. Setting Up a Client

Now, after we’ve set up our admin server, we can register our first Spring Boot application as client. We must add the following Maven dependency:

<dependency>
    <groupId>de.codecentric</groupId>
    <artifactId>spring-boot-admin-starter-client</artifactId>
    <version>1.5.4</version>
</dependency>

The only thing left is to configure the client to know about the admin server’s base URL. For this to happen, we just add the following properties:

spring.boot.admin.url=http://localhost:8080
management.security.enabled=false

4. Security Configuration

The Spring Boot Admin server has access to application’s sensitive endpoints, so it’s advised that we add some security configuration to both admin and client application.

At first, we’ll focus on configuring the admin server’s security. We must add the following Maven dependencies:

<dependency>
    <groupId>de.codecentric</groupId>
    <artifactId>spring-boot-admin-server-ui-login</artifactId>
    <version>1.5.4</version>
</dependency>
<dependency>
    <groupId>org.springframework.boot</groupId>
    <artifactId>spring-boot-starter-security</artifactId>
</dependency>

This will enable security and add a login interface to the admin application.

After, we’ll add a security configuration class as you can see below:

@Configuration
public class WebSecurityConfig extends WebSecurityConfigurerAdapter {

    @Override
    protected void configure(HttpSecurity http) throws Exception {
        http
          .formLogin()
          .loginPage("/login.html")
          .loginProcessingUrl("/login")
          .permitAll();
        http
          .logout().logoutUrl("/logout");
        http
          .csrf().disable();
        http
          .authorizeRequests()
          .antMatchers("/login.html", "/**/*.css", "/img/**", "/third-party/**")
          .permitAll();
        http
          .authorizeRequests()
          .antMatchers("/**")
          .authenticated();
        http.httpBasic();
    }
}

There’s a simple security configuration, but after adding it, we’ll notice that the client cannot register to the server anymore.

In order to register the client to the newly secured server, we must add some more configuration into the property file of the client:

spring.boot.admin.username=admin
spring.boot.admin.password=admin

We’re at the point, where our admin server is secured, but the client is not. In a production system, naturally, the applications we’re trying to monitor will be secured.

So, we’ll add security to the client as well – and we’ll notice in the UI interface of the admin server that the client information is not available anymore.

We have to add some metadata that we’ll be sent to the admin server. This information is used by the server to connect to client’s endpoints:

management.security.enabled=true
security.user.name=client
security.user.password=client
spring.boot.admin.client.metadata.user.name=${security.user.name}
spring.boot.admin.client.metadata.user.password=${security.user.password}

Sending credentials via HTTP is, of course, not safe – so the communication needs to go over HTTPS.

5. Monitoring and Management Features

Spring Boot Admin can be configured to display only the information that we consider useful. We just have to alter the default configuration and add our own needed metrics:

spring.boot.admin.routes.endpoints=env, metrics, trace, jolokia, info, configprops

As we go further, we’ll see that there are some other features that can be explored. We’re talking about JMX bean management using Jolokia and also Loglevel management.

Spring Boot Admin also supports cluster replication using Hazelcast. We just have to add the following Maven dependency and let the autoconfiguration do the rest:

<dependency>
    <groupId>com.hazelcast</groupId>
    <artifactId>hazelcast</artifactId>
</dependency>

If we want a persistent instance of Hazelcast, we’re going to use a custom configuration:

@Configuration
public class HazelcastConfig {

    @Bean
    public Config hazelcast() {
        return new Config()
          .setProperty("hazelcast.jmx", "true")
          .addMapConfig(new MapConfig("spring-boot-admin-application-store")
            .setBackupCount(1)
            .setEvictionPolicy(EvictionPolicy.NONE))
          .addListConfig(new ListConfig("spring-boot-admin-event-store")
            .setBackupCount(1)
            .setMaxSize(1000));
    }
}

6. Notifications

Next, let’s discuss the possibility to receive notifications from the admin server if something happens with our registered client. The following notifiers are available for configuration:

  • Email
  • PagerDuty
  • OpsGenie
  • Hipchat
  • Slack
  • Let’s Chat

6.1. Email Notifications

We’ll focus on configuring mail notifications for our admin server. For this to happen, we have to add the mail starter dependency as shown below:

<dependency>
    <groupId>org.springframework.boot</groupId>
    <artifactId>spring-boot-starter-mail</artifactId>
    <version>1.5.4</version>
</dependency>

After this, we must add some mail configuration:

spring.mail.host=smtp.example.com
spring.mail.username=smtp_user
spring.mail.password=smtp_password
spring.boot.admin.notify.mail.to=admin@example.com

Now, whenever our registered client changes his status from UP to OFFLINE or otherwise, an email is sent to the address configured above. For the other notifiers, the configuration is similar.

6.2. Hipchat Notifications

As we’ll see, the integration with Hipchat is quite straightforward; there are only a few mandatory properties to set:

spring.boot.admin.notify.hipchat.auth-token=<generated_token>
spring.boot.admin.notify.hipchat.room-id=<room-id>
spring.boot.admin.notify.hipchat.url=https://yourcompany.hipchat.com/v2/

Having these defined, we’ll notice in the Hipchat room that we receive notifications whenever the status of the client changes.

6.3. Customized Notifications Configuration

We can configure a custom notification system having at our disposal some powerful tools for this. We can use a reminding notifier to send a scheduled notification until the status of client changes.

Or maybe we want to send notifications to a filtered set of clients. For this, we can use a filtering notifier:

@Configuration
@EnableScheduling
public class NotifierConfiguration {

    @Autowired private Notifier notifier;

    @Bean
    public FilteringNotifier filteringNotifier() {
        return new FilteringNotifier(notifier);
    }

    @Bean
    @Primary
    public RemindingNotifier remindingNotifier() {
        RemindingNotifier remindingNotifier 
          = new RemindingNotifier(filteringNotifier());
        remindingNotifier.setReminderPeriod(TimeUnit.MINUTES.toMillis(5));
        return remindingNotifier;
    }

    @Scheduled(fixedRate = 60_000L)
    public void remind() {
        remindingNotifier().sendReminders();
    }
}

7. Conclusion

This intro tutorial covers the simple steps that one has to do, in order to monitor and manage his Spring Boot applications using Spring Boot Admin.

The autoconfiguration permits us to add only some minor configurations and at the end, to have a fully working admin server.

And, as always, the sample code of this guide can be found over on Github.

Introduction to Spring AOP

$
0
0

1. Introduction

In this tutorial, we’ll introduce AOP (Aspect Oriented Programming) with Spring and start understanding how we can start using this powerful tool in practical scenarios.

It’s also possible to leverage AspectJ’s annotations when developing using Spring AOP but in this article, we’re focusing on the core Spring AOP XML-based configuration.

2. Overview

AOP is a programming paradigm that aims to increase modularity by allowing the separation of cross-cutting concerns. It does so by adding additional behavior to existing code without modification of the code itself.

Instead, we can declare this new code and these new behaviors separately.

Spring’s AOP framework helps us implement these cross-cutting concerns.

3. Maven Dependencies

Let’s start by adding Spring’s AOP library dependency in the pom.xml:

<parent>
    <groupId>org.springframework.boot</groupId>
    <artifactId>spring-boot-starter-parent</artifactId>
    <version>1.5.7.RELEASE<version>
</parent>
 
<dependencies>
    <dependency>
        <groupId>org.springframework.boot</groupId>
        <artifactId>spring-boot-starter-aop</artifactId>
    </dependency>
</dependencies>

The latest version of the dependency can be checked here.

4. AOP Concepts and Terminology

Let’s briefly go over the concepts and terminology specific to AOP.

4.1. Business Object

A business object is a normal class which has a normal business logic. Let’s look at simple example of a business object where we just add two numbers:

public class SampleAdder {
    public int add(int a, int b) {
        return a + b;
    }
}

Note that this class is a normal class with business logic and without any Spring-related annotations.

4.2. Aspect

An aspect is a modularization of a concern that cuts across multiple classes. Unified logging can be an example of such cross-cutting concern.

Let’s see how we define a simple Aspect:

public class AdderAfterReturnAspect {
    private Logger logger = LoggerFactory.getLogger(this.getClass());
    public void afterReturn(Object returnValue) throws Throwable {
        logger.info("value return was {}",  returnValue);
    }
}

In the above example, we’ve just defined a simple Java class which has a method called afterReturn that takes one argument of type Object and it just logs in that value. Note that even our AdderAfterReturnAspect is a standard class, free of any Spring annotations.

In the next sections, we’ll see how we can wire this Aspect to our Business Object.

4.3. Joinpoint

A Joinpoint is a point during the execution of a program, such as execution of a method or the handling of an exception.

In Spring AOP, a JoinPoint always represents a method execution.

4.4. Pointcut

A Pointcut is a predicate that helps match an Advice to be applied by an Aspect at a particular JoinPoint.

The Advice is often associated with a Pointcut expression and runs at any Joinpoint matched by the Pointcut.

4.5. Advice

An advice is an action taken by an aspect at a particular Joinpoint. Different types of advice include “around,” “before” and “after” advice.

In Spring, an Advice is modeled as an interceptor, maintaining a chain of interceptors around the Joinpoint.

4.6. Wiring Business Object and Aspect

Let’s look at how we can wire a Business object to an Aspect with an After-Returning advice.

Below is the config excerpt that we’d place in a standard Spring config in the “<beans>” tag:

<bean id="sampleAdder" class="org.baeldung.logger.SampleAdder" />
<bean id="doAfterReturningAspect" 
  class="org.baeldung.logger.AdderAfterReturnAspect" />
<aop:config>
    <aop:aspect id="aspects" ref="doAfterReturningAspect">
       <aop:pointcut id="pointCutAfterReturning" expression=
         "execution(* org.baeldung.logger.SampleAdder+.*(..))"/>
       <aop:after-returning method="afterReturn"
         returning="returnValue" pointcut-ref="pointCutAfterReturning"/>
    </aop:aspect>
</aop:config>

As can be seen, we’ve defined a simple bean called simpleAdder which represents an instance of a Business Object. In addition, we’re creating an instance of an Aspect called AdderAfterReturnAspect.

XML is, of course, not our only option here; as mentioned before, AspectJ annotations are fully supported as well.

4.7. Configuration at Glance

Tag aop:config is used for defining AOP-related configuration. Within the config tag, we define the class that represents an aspect. We’ve given it a reference of “doAfterReturningAspect” aspect bean that we created.

Next, we define a Pointcut using the pointcut tag. Pointcut used in example above is execution(* org.baeldung.logger.SampleAdder+.*(..)) which means apply an advice on any method within SampleAdder class that accepts any number of arguments and returns any value type.

Next, we define which advice we want to apply. In the above example, we’re going to apply after-returning advice which is defined in our Aspect AdderAfterReturnAspect by executing method named afterReturn defined using attribute method.

This advice within Aspect takes one parameter of type Object. The parameter gives us an opportunity to take an action before and/or after the target method call. In this case, we just log the method’s return value.

Spring AOP supports multiple advices using annotation-based config – this and more examples can be found here and here.

5. Conclusion

In this tutorial, we illustrated concepts used in AOP and example of using the AOP module of Spring. If you’re interested in discovering more about AOP, here’re some resources:

The implementation of these examples can be found in the GitHub project – this is a Maven-based project, so it should be easy to import and run as is.

JUnit5 @RunWith

$
0
0

1. Introduction

In this quick article, we’ll cover the usage of the @RunWith annotation in the JUnit 5 framework.

In JUnit 5, the @RunWith annotation has been replaced by the more powerful @ExtendWith annotation.

However, the @RunWith annotation can still be used in JUnit5 for the sake of the backward compatibility.

2. Running Tests with a JUnit4-Based Runner

We can run JUnit5 tests with any other older JUnit environment using the @RunWith annotation.

Let’s see an example of running these tests in an Eclipse version that only supports JUnit4.

First, let’s create the class we’re going to test:

public class Greetings {
    public static String sayHello() {
        return "Hello";
    }  
}

Next, let’s create this plain JUnit5 test:

public class GreetingsTest {
    @Test
    void whenCallingSayHello_thenReturnHello() {
        assertTrue("Hello".equals(Greetings.sayHello()));
    }
}

Finally, let’s add this annotation to be able to run the test:

@RunWith(JUnitPlatform.class)
public class GreetingsTest {
    // ...
}

The JUnitPlatform class is a JUnit4-based runner that let us run JUnit4 tests on the JUnit Platform.

Let’s keep in mind that JUnit4 does not support all the features of the new JUnit Platform, so this runner has a limited functionality.

If we check the result of the test in Eclipse we can see that a JUnit4 runner was used:

junit4 test

3. Running Tests in a JUnit5 Environment

Let’s now run the same test in an Eclipse version that supports JUnit5. In this case, we don’t need the @RunWith annotation anymore and we can write the test without a runner:

public class GreetingsTest {
    @Test
    void whenCallingSayHello_thenReturnHello() {
        assertTrue("Hello".equals(Greetings.sayHello()));
    }
}

The test result shows that we’re now using the JUnit5 runner:

junit5 test

4. Migrating from a JUnit4-Based Runner

Let’s now migrate a test that uses a JUnit4-based runner to JUnit5.

We’re going to use a Spring test as an example:

@RunWith(SpringJUnit4ClassRunner.class)
@ContextConfiguration(classes = { SpringTestConfiguration.class })
public class GreetingsSpringTest {
    // ...
}

If we want to migrate this test to JUnit5 we need to replace the @RunWith annotation with the new @ExtendWith:

@ExtendWith(SpringExtension.class)
@ContextConfiguration(classes = { SpringTestConfiguration.class })
public class GreetingsSpringTest {
    // ...
}

The SpringExtension class is provided by Spring 5 and integrates the Spring TestContext Framework into JUnit 5. The @ExtendWith annotation accepts any class that implements the Extension interface.

5. Conclusion

In this brief article, we covered the use of the JUnit 4’s @RunWith annotation in the JUnit5 framework.

The full source code for the examples is available over on GitHub.


Guide to Spring Type Conversions

$
0
0

1. Introduction

In this article, we’ll have a look at Spring’s type conversions.

Spring provides out-of-the-box various converters for built-in types; this means converting to/from basic types like String, Integer, Boolean and a number of other types.

Apart from this, Spring also provides a solid type conversion SPI for developing our custom converters.

2. Built-in Converters

We’ll start with the converters available out-of-the-box in Spring; let’s have a look at the String to Integer conversion:

@Autowired
ConversionService conversionService;

@Test
public void whenConvertStringToIntegerUsingDefaultConverter_thenSuccess() {
    assertThat(
      conversionService.convert("25", Integer.class)).isEqualTo(25);
}

The only thing we need to do here is to autowire the ConversionService provided by Spring and call the convert() method. The first argument is the value that we want to convert and the second argument is the target type that we want to convert to.

Apart from this String to Integer example, there’re a lot of various other combinations available for us.

3. Creating a Custom Converter

Let’s have a look at an example of converting a String representation of an Employee to an Employee instance.

Here’s the Employee class:

public class Employee {

    private long id;
    private double salary;

    // standard constructors, getters, setters
}

The String will be a comma-separated pair representing id and salary. For example, “1,50000.00”.

In order to create our custom Converter, we need to implement the Converter<S, T> interface and implement the convert() method:

public class StringToEmployeeConverter
  implements Converter<String, Employee> {

    @Override
    public Employee convert(String from) {
        String[] data = from.split(",");
        return new Employee(
          Long.parseLong(data[0]), 
          Double.parseDouble(data[1]));
    }
}

We’re not done yet. We also need to tell Spring about this new converter by adding the StringToEmployeeConverter to the FormatterRegistry. This can be done by extending the WebMvcConfigurerAdapter and overriding addFormatters() method:

@Configuration
public class WebConfig extends WebMvcConfigurerAdapter {

    @Override
    public void addFormatters(FormatterRegistry registry) {
        registry.addConverter(new StringToEmployeeConverter());
    }
}

And that’s it. Our new Converter is now available to the ConversionService and we can use it in the same way as any other built-in Converter:

@Test
public void whenConvertStringToEmployee_thenSuccess() {
    Employee employee = conversionService
      .convert("1,50000.00", Employee.class);
    Employee actualEmployee = new Employee(1, 50000.00);
    
    assertThat(conversionService.convert("1,50000.00", 
      Employee.class))
      .isEqualToComparingFieldByField(actualEmployee);
}

3.1. Implicit Conversion

Beyond these explicit conversion using the ConversionService, Spring is also capable of implicitly converting values right in Controller methods for all registered converters:

@RestController
public class StringToEmployeeConverterController {

    @GetMapping("/string-to-employee")
    public ResponseEntity<Object> getStringToEmployee(
      @RequestParam("employee") Employee employee) {
        return ResponseEntity.ok(employee);
    }
}

This is a more natural way of using the Converters. Let’s add a test to see it in action:

@Test
public void getStringToEmployeeTest() throws Exception {
    mockMvc.perform(get("/string-to-employee?employee=1,2000"))
      .andDo(print())
      .andExpect(jsonPath("$.id", is(1)))
      .andExpect(jsonPath("$.salary", is(2000.0)))
}

As you can see, the test will print all the details of the request as well as the response. Here is the Employee object in JSON format that is returned as part of the response:

{"id":1,"salary":2000.0}

4. Creating a ConverterFactory

It’s also possible to create a ConverterFactory that creates Converters on demand. This is particularly helpful in creating Converters for Enums.

Let’s have a look at a really simple Enum:

public enum Modes {
    ALPHA, BETA;
}

Next, let’s create a StringToEnumConverterFactory that can generate Converters for converting a String to any Enum:

@Component
public class StringToEnumConverterFactory 
  implements ConverterFactory<String, Enum> {

    private static class StringToEnumConverter<T extends Enum> 
      implements Converter<String, T> {

        private Class<T> enumType;

        public StringToEnumConverter(Class<T> enumType) {
            this.enumType = enumType;
        }

        public T convert(String source) {
            return (T) Enum.valueOf(this.enumType, source.trim());
        }
    }

    @Override
    public <T extends Enum> Converter<String, T> getConverter(
      Class<T> targetType) {
        return new StringToEnumConverter(targetType);
    }
}

As we can see, the factory class internally uses an implementation of Converter interface.

One thing to note here is that although we’ll use our Modes Enum to demonstrate the usage, we haven’t mentioned the Enum anywhere in the StringToEnumConverterFactory. Our factory class is generic enough to generate the Converters on demand for any Enum type.

The next step is to register this factory class like we registered our Converter in the previous example:

@Override
public void addFormatters(FormatterRegistry registry) {
    registry.addConverter(new StringToEmployeeConverter());
    registry.addConverterFactory(new StringToEnumConverterFactory());
}

Now the ConversionService is ready to convert Strings to Enums:

@Test
public void whenConvertStringToEnum_thenSuccess() {
    assertThat(conversionService.convert("ALPHA", Modes.class))
      .isEqualTo(Modes.ALPHA);
}

5. Creating a GenericConverter

A GenericConverter provides us more flexibility to create a Converter for a more generic use at the cost of losing some type safety.

Let’s consider an example of converting an Integer, Double, or a String to a BigDecimal value.We don’t need to write three Converters for this. A simple GenericConverter could serve the purpose.

The first step is to tell Spring what types of conversion are supported. We do this by creating a Set of ConvertiblePair:

public class GenericBigDecimalConverter 
  implements GenericConverter {

@Override
public Set<ConvertiblePair> getConvertibleTypes () {

    ConvertiblePair[] pairs = new ConvertiblePair[] {
          new ConvertiblePair(Number.class, BigDecimal.class),
          new ConvertiblePair(String.class, BigDecimal.class)};
        return ImmutableSet.copyOf(pairs);
    }
}

The next step is to override the convert() method in the same class:

@Override
public Object convert (Object source, TypeDescriptor sourceType, 
  TypeDescriptor targetType) {

    if (sourceType.getType() == BigDecimal.class) {
        return source;
    }

    if(sourceType.getType() == String.class) {
        String number = (String) source;
        return new BigDecimal(number);
    } else {
        Number number = (Number) source;
        BigDecimal converted = new BigDecimal(number.doubleValue());
        return converted.setScale(2, BigDecimal.ROUND_HALF_EVEN);
    }
}

The convert() method is as simple as it can be. However, the TypeDescriptor provides us great flexibility in terms of getting the details concerning the source and the target type.

As you might have already guessed, the next step is to register this Converter:

@Override
public void addFormatters(FormatterRegistry registry) {
    registry.addConverter(new StringToEmployeeConverter());
    registry.addConverterFactory(new StringToEnumConverterFactory());
    registry.addConverter(new GenericBigDecimalConverter());
}

Using this Converter is similar to the other examples that we’ve already seen:

@Test
public void whenConvertingToBigDecimalUsingGenericConverter_thenSuccess() {
    assertThat(conversionService
      .convert(Integer.valueOf(11), BigDecimal.class))
      .isEqualTo(BigDecimal.valueOf(11.00)
      .setScale(2, BigDecimal.ROUND_HALF_EVEN));
    assertThat(conversionService
      .convert(Double.valueOf(25.23), BigDecimal.class))
      .isEqualByComparingTo(BigDecimal.valueOf(Double.valueOf(25.23)));
    assertThat(conversionService.convert("2.32", BigDecimal.class))
      .isEqualTo(BigDecimal.valueOf(2.32));
}

6. Conclusion

In this tutorial, we’ve seen how to use and extend Spring’s type conversion system with various examples.

As always, the full source code for this article can be found over on GitHub.

Groovy Bean Definitions

$
0
0

1. Overview

In this quick article, we’ll focus on how we can use a Groovy-based configuration in our Java Spring projects.

2. Dependencies

Before we start, we need to add the dependency to our pom.xml file. We need to also add a plugin for the sake of compiling our Groovy files.

Let’s add the dependency for Groovy first to our pom.xml file:

<dependency>
    <groupId>org.codehaus.groovy</groupId>
    <artifactId>groovy-all</artifactId>
    <version>2.4.12</version>
</dependency>

Now, let’s add the plugin:

<plugin>
    <artifactId>maven-compiler-plugin</artifactId>
    <version>3.7.0</version>
    <configuration>
        <compilerId>groovy-eclipse-compiler</compilerId>
        <verbose>true</verbose>
        <source>1.8</source>
        <target>1.8</target>
        <encoding>${project.build.sourceEncoding}</encoding>
    </configuration>
    <dependencies>
        <dependency>
            <groupId>org.codehaus.groovy</groupId>
            <artifactId>groovy-eclipse-compiler</artifactId>
            <version>2.9.2-01</version>
        </dependency>
    </dependencies>
</plugin>

Here, we use the Maven compiler to compile the project by using the Groovy-Eclipse compiler. This may vary depending on the IDE we use.

The latest versions of these libraries can be found on Maven Central.

3. Defining Beans

Since version 4, Spring provides a support for Groovy-based configurations. This means that Groovy classes can be legitimate Spring beans.

To illustrate this, we’re going to define a bean using the standard Java configuration and then we’re going to configure the same bean using Groovy. This way, we’ll be able to see the difference.

Let’s create a simple class with a few properties:

public class JavaPersonBean {
    private String firstName;
    private String lastName;

    // standard getters and setters
}

It’s important to remember about getters/setters – they’re crucial for the mechanism to work.

3.1. Java Configuration

We can configure the same bean using a Java-based configuration:

@Configuration
public class JavaBeanConfig {

    @Bean
    public JavaPersonBean javaPerson() {
        JavaPersonBean jPerson = new JavaPersonBean();
        jPerson.setFirstName("John");
        jPerson.setLastName("Doe");
        
        return jPerson;
    }
}

3.2. Groovy Configuration

Now, we can see the difference when we use Groovy to configure the previously created bean:

beans {
    javaPersonBean(JavaPersonBean) {
        firstName = 'John'
        lastName = 'Doe'
    }
}

Note that before defining beans configuration, we should import the JavaPersonBean class. Also, inside the beans block, we can define as many beans as we need.

We defined our fields as private and although Groovy makes it look like it’s accessing them directly, it’s doing it using provided getters/setters.

4. Additional Bean Settings

As with the XML and Java-based configuration, we can configure not only beans.

If we need to set an alias for our bean, we can do it easily:

registerAlias("bandsBean","bands")

If we want to define the bean’s scope:

{ 
    bean ->
        bean.scope = "prototype"
}

To add lifecycle callbacks for our bean, we can do:

{ 
    bean ->
        bean.initMethod = "someInitMethod"
        bean.destroyMethod = "someDestroyMethod"
}

We can also specify inheritance in the bean definition:

{ 
    bean->
        bean.parent="someBean"
}

Finally, if we need to import some previously defined beans from an XML configuration, we can do this using the importBeans():

importBeans("somexmlconfig.xml")

5. Conclusion

In this tutorial, we saw how we to create Spring Groovy bean configurations. We also covered setting additional properties on our beans such as their aliases, scopes, parents, methods for initialization or destruction, and how to import other XML-defined beans. 

Although the examples are simple, they can be extended and used for creating any type of Spring config.

A full example code that is used in this article can be found in our GitHub project. This is a Maven project, so you should be able to import it and run it as it is.

Mocking of Private Methods Using PowerMock

$
0
0

1. Overview

One of the challenges of unit testing is mocking private methods.

In this tutorial, we’ll learn about how we can achieve this by using the PowerMock library – which is supported by JUnit and TestNG.

PowerMock integrates with mocking frameworks like EasyMock and Mockito and is meant to add additional functionality to these – such as mocking private methods, final classes, and final methods, etc.

It does that by relying on bytecode manipulation and an entirely separate classloader.

2. Maven Dependencies

First, let’s add required dependencies to use PowerMock with Mockito and JUnit into our pom.xml:

<dependency>
    <groupId>org.powermock</groupId>
    <artifactId>powermock-module-junit4</artifactId>
    <version>1.7.3</version>
    <scope>test</scope>
</dependency>
<dependency>
    <groupId>org.powermock</groupId>
    <artifactId>powermock-api-mockito2</artifactId>
    <version>1.7.3</version>
    <scope>test</scope>
</dependency>

The latest versions can be checked here and here.

3. Example

Let’s get started with an example of a LuckyNumberGenerator. This class has a single public method for generating a lucky number:

public int getLuckyNumber(String name) {
    saveIntoDatabase(name);
    if (name == null) {
        return getDefaultLuckyNumber();
    }
    return getComputedLuckyNumber(name.length());
}

4. Variations in Mocking of Private Methods

For exhaustive unit testing of the method, we’d need to mock private methods.

4.1. Method with No Arguments but with Return Value

As a simple example, let’s mock the behavior of a private method with no arguments and force it to return the desired value:

LuckyNumberGenerator mock = spy(new LuckyNumberGenerator());

when(mock, "getDefaultLuckyNumber").thenReturn(300);

In this case, we mock the private method getDefaultLuckyNumber and make it return a value of 300.

4.2. Method with Argument and Return Value

Next, let’s mock the behavior of a private method with an argument and force it to return the desired value:

LuckyNumberGenerator mock = spy(new LuckyNumberGenerator());

doReturn(1).when(mock, "getComputedLuckyNumber", ArgumentMatchers.anyInt());

In this case, we mock the private method and make it return 1.

Notice that we don’t care about the input argument and use ArgumentMatchers.anyInt() as a wildcard.

4.3. Verification of Invocation of a Method

Our final strategy is to use PowerMock to verify the invocation of a private method:

LuckyNumberGenerator mock = spy(new LuckyNumberGenerator());
int result = mock.getLuckyNumber("Tyranosorous");

verifyPrivate(mock).invoke("saveIntoDatabase", ArgumentMatchers.anyString());

5. A Word of Caution

Finally, although private methods can be tested using PowerMock, we must be extra cautious while using this technique.

Given the intent of our testing is to validate the behavior of a class, we should refrain from changing the internal behavior of the class during unit testing.

Mocking techniques should be applied to the external dependencies of the class and not to the class itself.

If mocking of private methods is essential for testing our classes, it usually indicates a bad design.

6. Conclusion

In this quick article, we showed how PowerMock could be used to extend the capability of Mockito for mocking and verification of private methods in the class under test.

The source code of this tutorial can be found over on GitHub.

A Quick Guide to Using Keycloak with Spring Boot

$
0
0

1. Overview

In this article, we’ll cover the basics of setting up a Keycloak server, how to connect a Spring Boot application to it, and how to use it with Spring Security.

2. What is Keycloak?

Keycloak is an open source Identity and Access Management solution targeted towards modern applications and services.

Keycloak offers features such as Single-Sign-On (SSO), Identity Brokering and Social Login, User Federation, Client Adapters, an Admin Console, and an Account Management Console. To learn more about Keycloak, please visit the official page.

In our tutorial, we’ll be using the Admin Console of Keycloak for setting up and then connecting to Spring Boot using the Keycloak Client Adapter.

3. Setting Up a Keycloak Server

3.1. Downloading and Installing Keycloak

There’re several distributions to choose from.

However, in this tutorial, we’ll be using the standalone version.

Download Keycloak-3.3.0.Final Standalone server distribution from the official source.

Once we’ve downloaded the Standalone server distribution, we can unzip and start Keycloak from the terminal:

unzip keycloak-3.3.0.Final.zip
cd keycloak-3.3.0.Final/bin
./standalone.sh -Djboss.socket.binding.port-offset=100

After running ./standalone.sh, Keycloak will be starting its services. Once we see a line containing Keycloak 3.3.0.Final (WildFly Core 3.0.1.Final) started, we’ll know its start-up is complete.

Open a browser and visit http://localhost:8180. We’ll be redirected to http://localhost:8180/auth to create an administrative login:

Let’s create a user named “initial1” with the password “zaq1!QAZ“.

We now see “Welcome to Keycloak”:

We can now proceed to the Administrative Console.

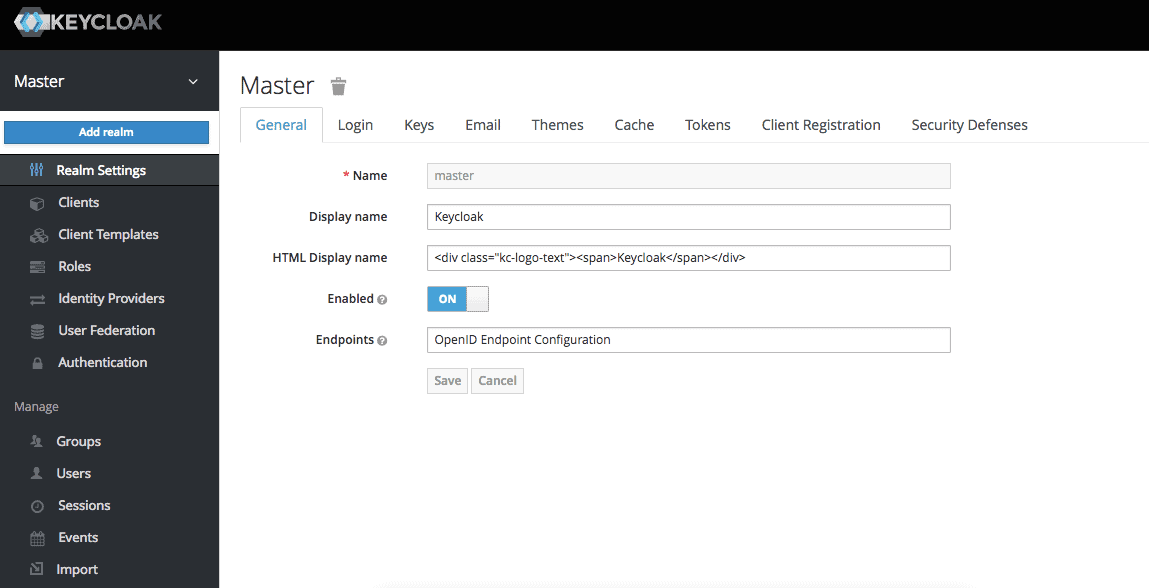
3.2. Creating a Realm

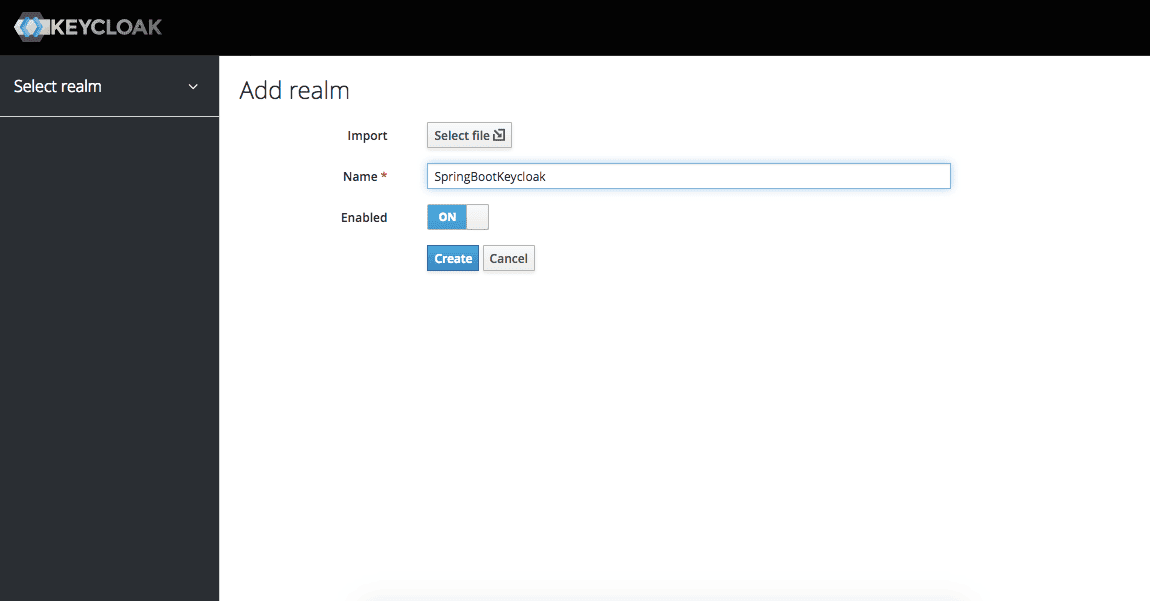
Let’s navigate our mouse into the upper left upper corner to discover the “Create a Realm” button:

We’re naming it “SpringBootKeycloak“:

3.3. Creating a Client

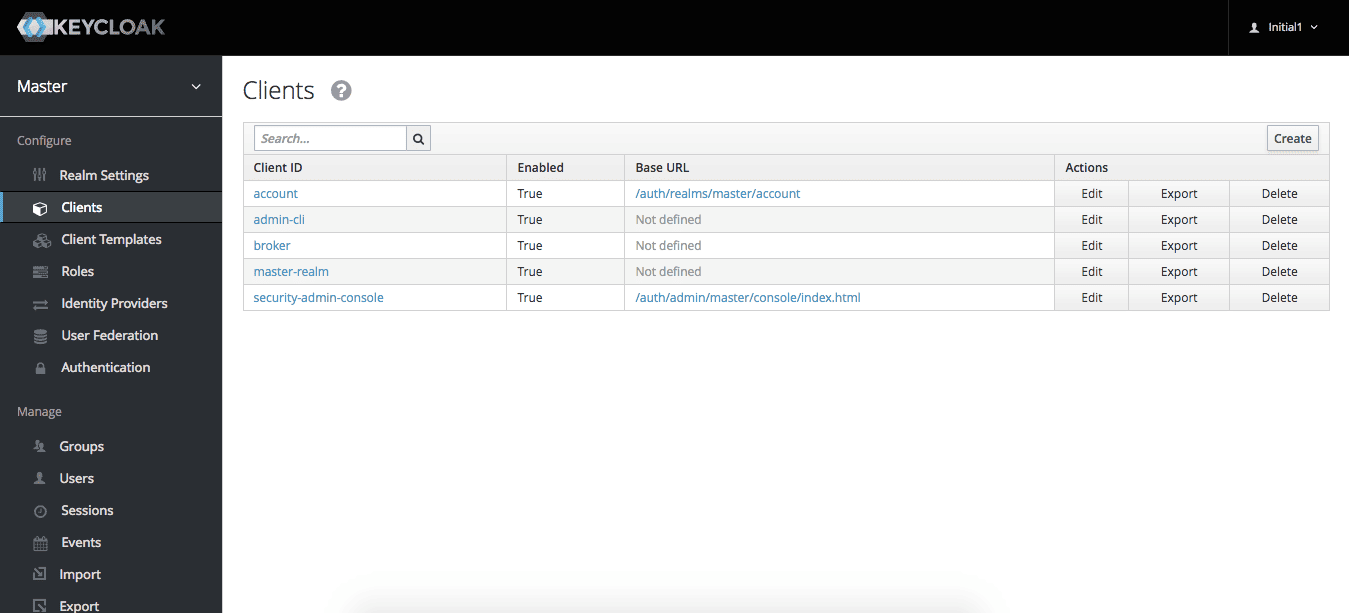
Now we’ll navigate to the Clients page. As we can see in the image below, Keycloak comes with Clients that are already built in:

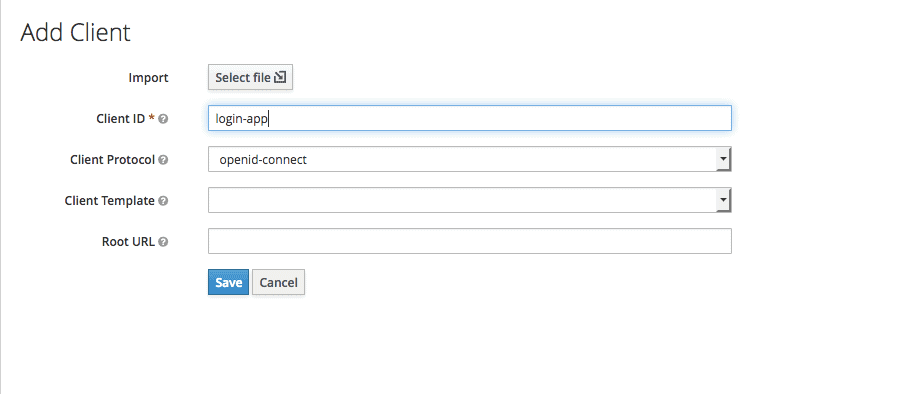
But we need to add a client to our application, so we click “Create”. We’ll call the new Client “login-app:

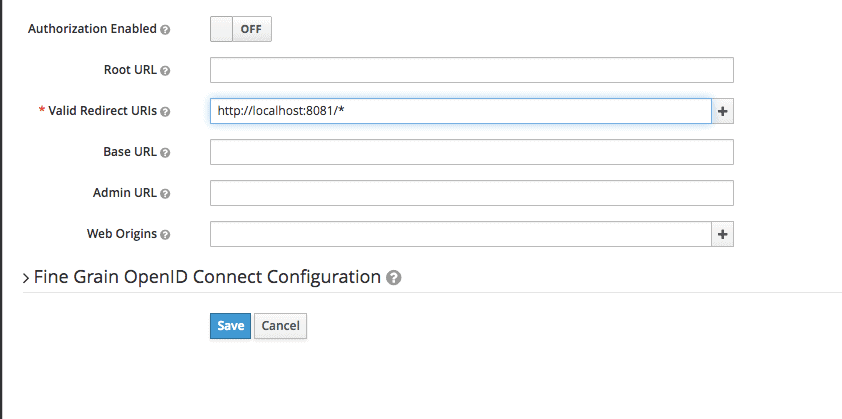
In the next screen, for this tutorial, we’ll be leaving all the defaults except the “Valid Redirect URIs field”. We’ll be redirected to the port 8081:

3.4. Creating a Role and a User

Keycloak uses the Role-Based Access. Therefore, each user must have a role.

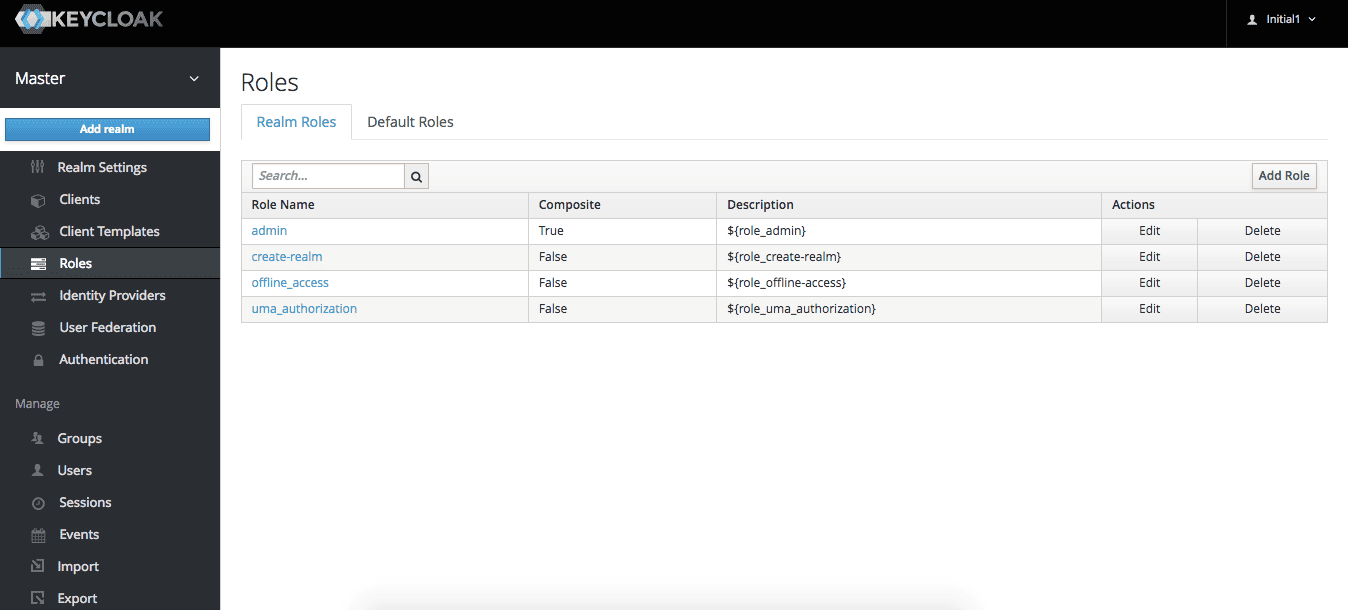
We need to navigate to the “Role” page:

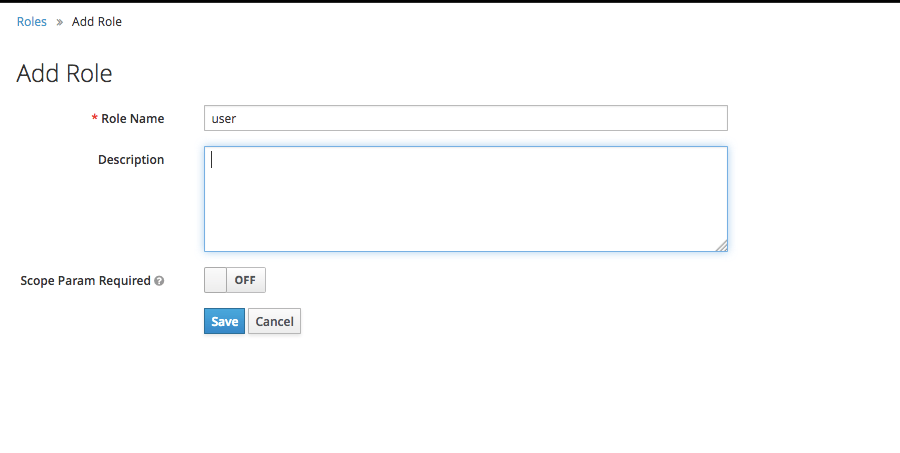
Then, we add the “user” role:

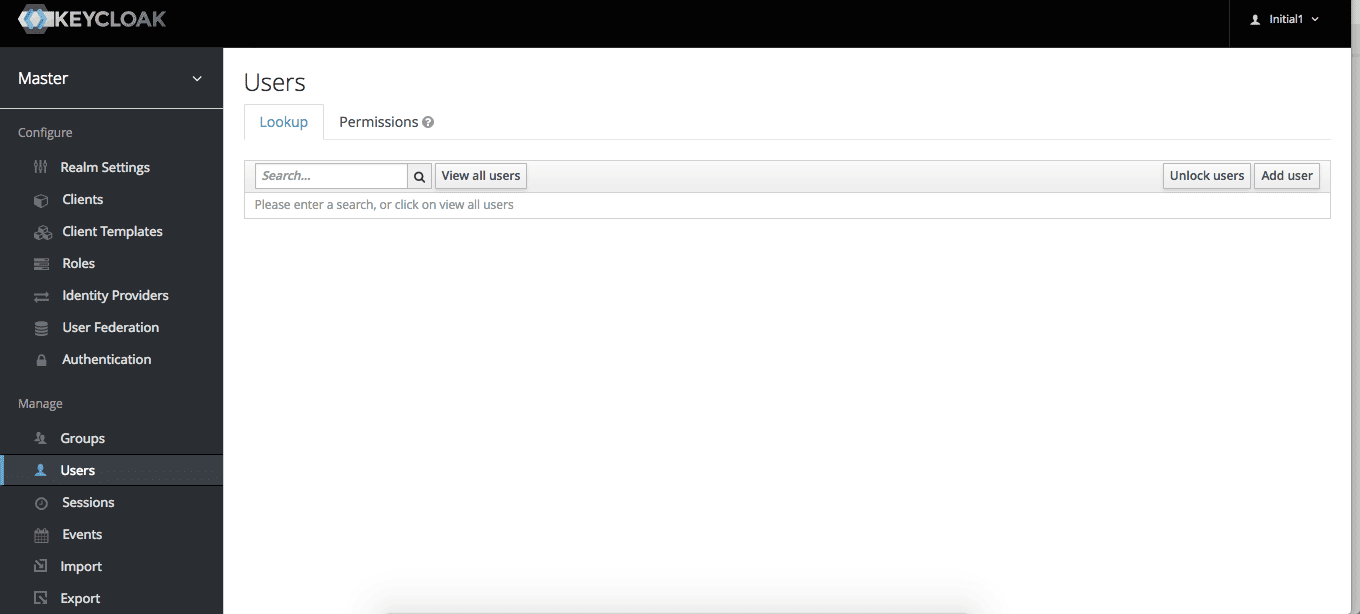
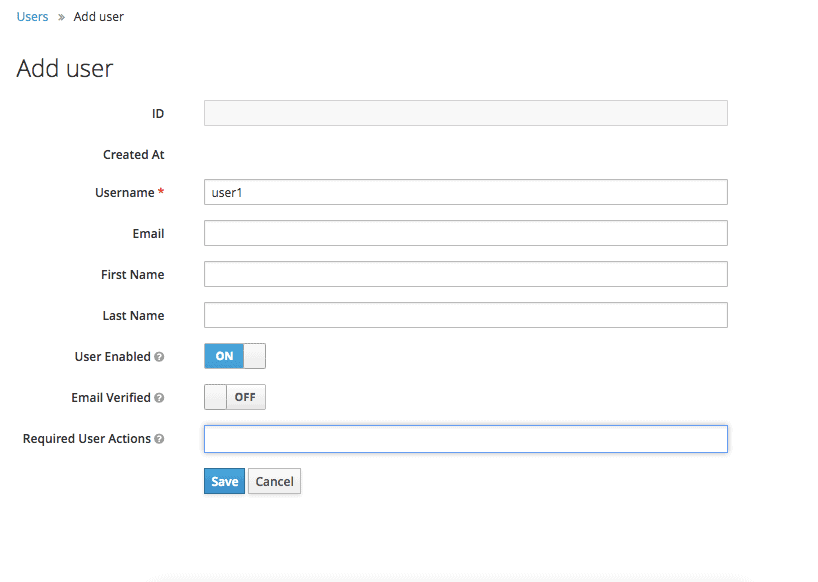
Now we’ve got a role that can be assigned to users, but there’s no users yet. So let’s go the “Users” page and add one:

We add the user “user1”:

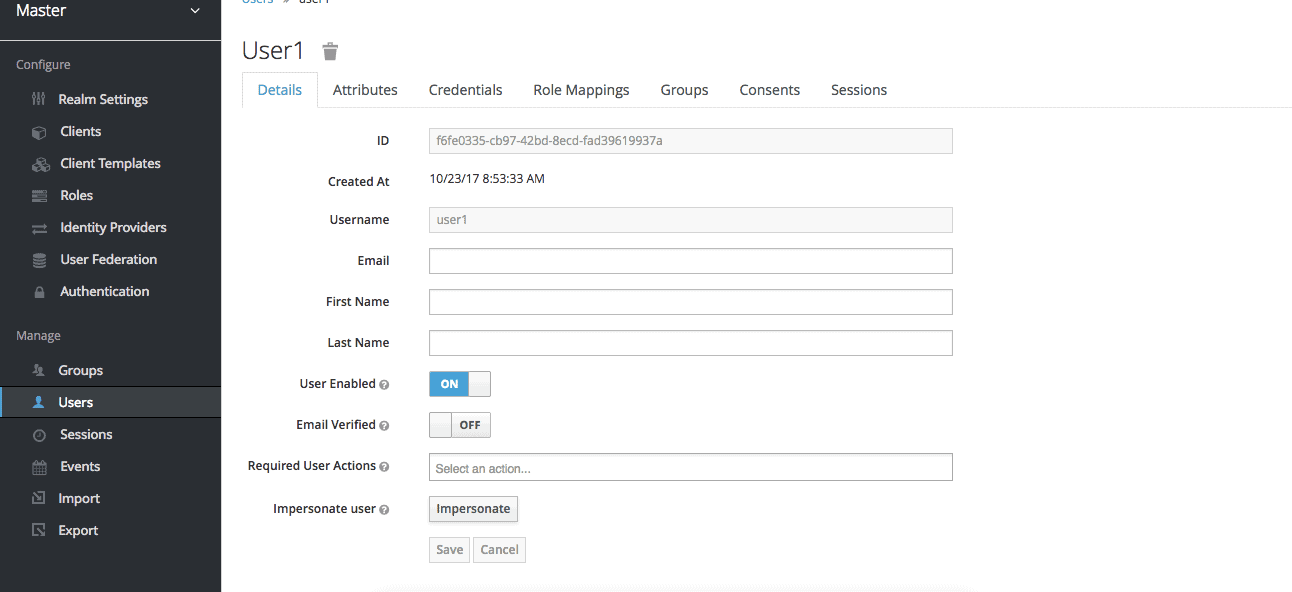
Once the user is created, we’ll be shown this page:

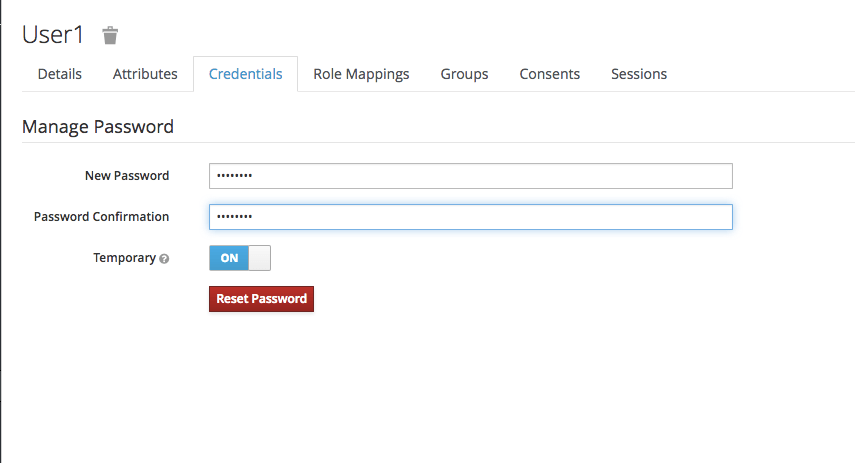
We can now go to the “Credentials” tab. We’ll be setting the password to “xsw2@WSX”:

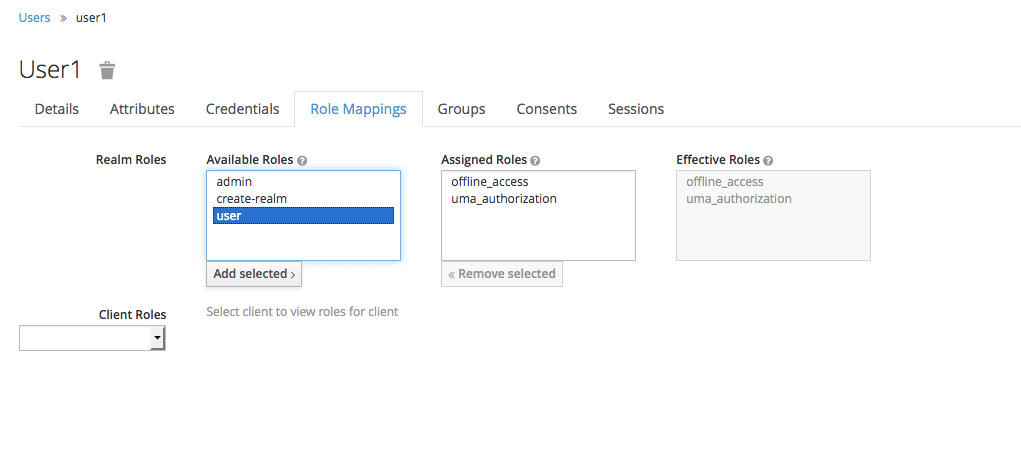
We navigate to the “Role Mappings” tab. We’ll be assigning the user role:

4. Creating a Spring Boot Application

4.1. Dependencies

The latest Spring Boot Keycloak Starter dependencies can be found on Maven Central.

The Keycloak Spring Boot adapter capitalizes on Spring Boot’s auto-configuration, so all we need to do is add the Keycloak Spring Boot starter to our project.

Within the dependencies XML element, we need the following to run Keycloak with Spring Boot:

<dependency>
    <groupId>org.keycloak</groupId>
    <artifactId>keycloak-spring-boot-starter</artifactId>
</dependency>

After the dependencies XML element, we need to specify dependencyManagement for Keycloak:

<dependencyManagement>
    <dependencies>
        <dependency>
            <groupId>org.keycloak.bom</groupId>
            <artifactId>keycloak-adapter-bom</artifactId>
            <version>3.3.0.Final</version>
            <type>pom</type>
            <scope>import</scope>
        </dependency>
    </dependencies>
</dependencyManagement>

The following embedded containers are supported now and don’t require any extra dependencies if using Spring Boot Keycloak Starter:

  • Tomcat
  • Undertow
  • Jetty

4.2. Thymeleaf Web Pages

We’re using Thymeleaf for our web pages.

We’ve got three pages:

  • external.html – an externally facing web page for the public
  • customers.html – an internally facing page that will have its access restricted to only authenticated users with the role “user.”
  • layout.html – a simple layout, consisting of two fragments, that is used for both the externally facing page and the internally facing page

The code for the Thymeleaf templates is available on Github.

4.3. Controller

The web controller maps the internal and external URLs to the appropriate Thymeleaf templates:

@GetMapping(path = "/")
public String index() {
    return "external";
}
    
@GetMapping(path = "/customers")
public String customers(Model model) {
    addCustomers();
    model.addAttribute("customers", customerDAO.findAll());
    return "customers";
}

For the path /customers, we’re retrieving all customers from a repository and adding the result as an attribute to Model. Later on, we iterate through the results in Thymeleaf.

4.4. Keycloak Configuration

Here’s the basic, mandatory configuration:

keycloak.auth-server-url=http://localhost:8180/auth
keycloak.realm=SpringBootKeycloak
keycloak.resource=login-app
keycloak.public-client=true

As we recall, we started Keycloak on port 8180, hence the path specified in keycloak.auth-server-url. We enter the realm name we created in the Keycloak admin console.

The value we specify in keycloak.resource matches the client we named in the admin console.

Here are security constraints we’ll be using:

keycloak.security-constraints[0].authRoles[0]=user
keycloak.security-constraints[0].securityCollections[0].patterns[0]=/customers/*

The above security restraints state ensure every request to /customers/* will only be authorized if the one requesting it’s an authenticated user with the role “user”.

4.5. Demonstration

Now, we’re ready to test our application. To run a Spring Boot application, we can start it easily through an IDE like Spring Tool Suite (STS) or run this command in the terminal:

mvn clean spring-boot:run

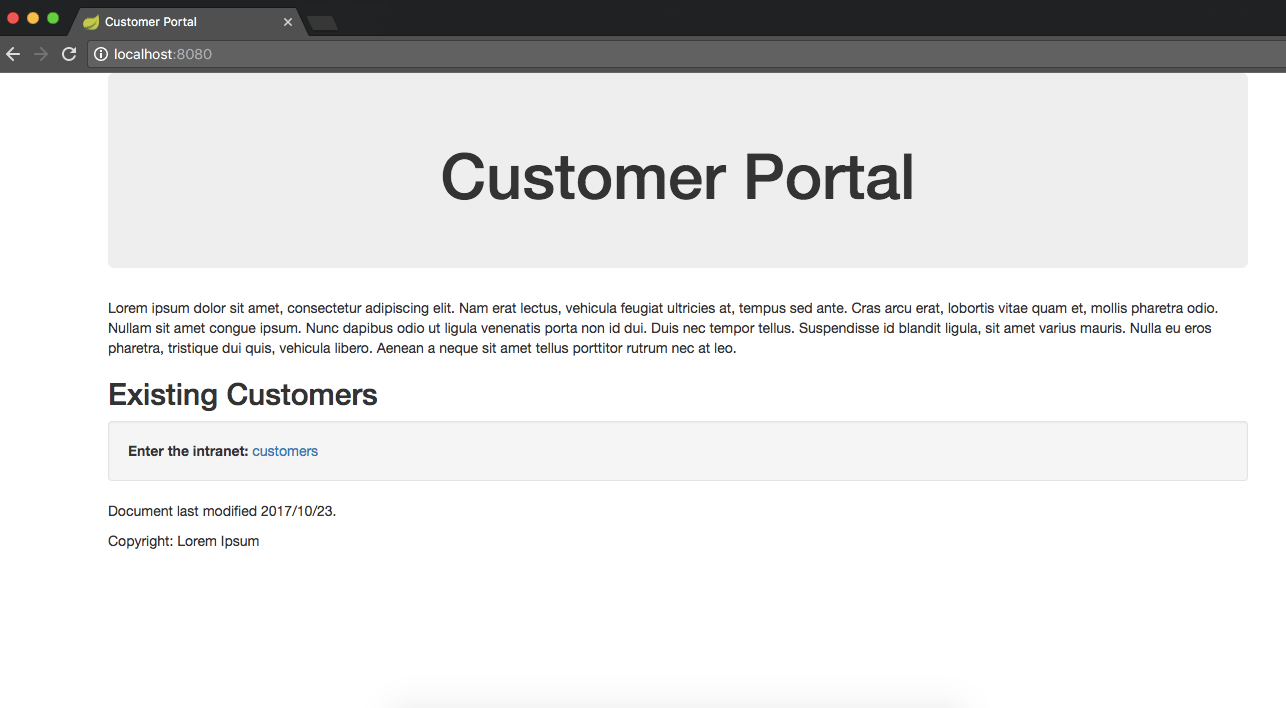
We visit localhost:8080:

Now we click “customers” to enter the intranet, which is the location of sensitive information.

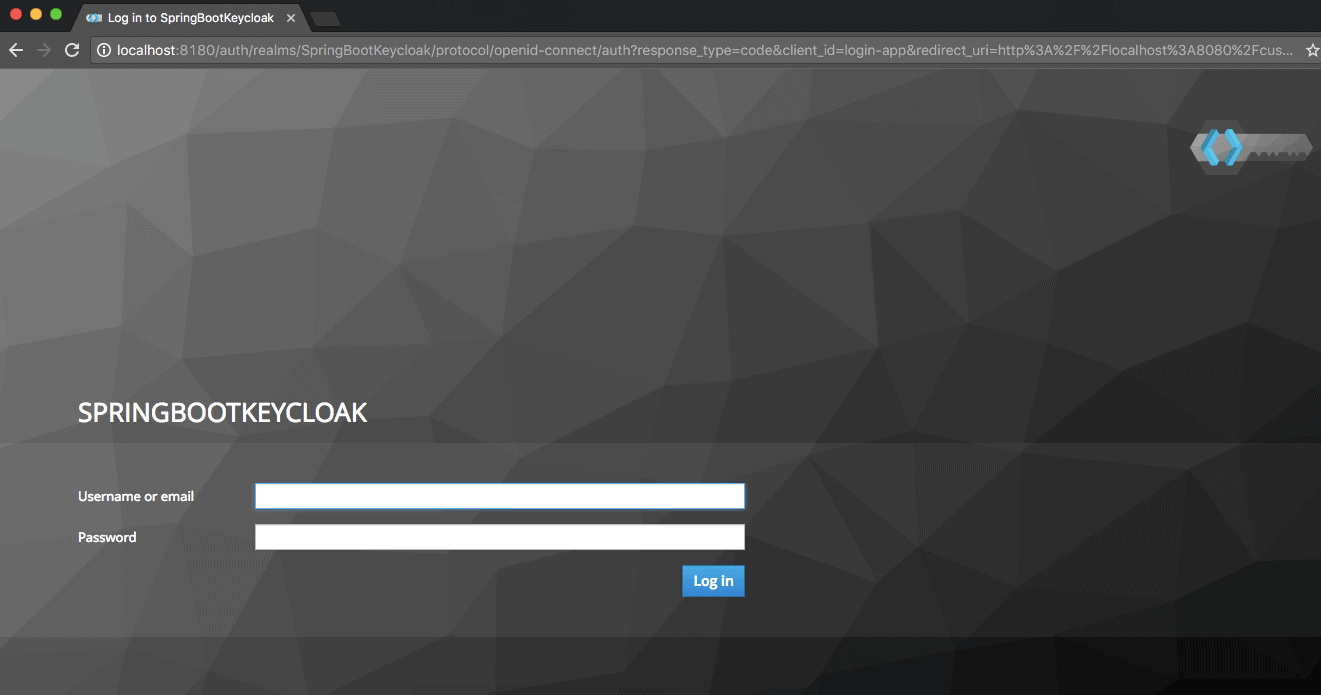
We can see that we’ve been redirected to authenticate through Keycloak to see if we’re authorized to view this content:

Once we authenticate and our authorization is checked by Keycloak,  we’re redirected to the restricted customers’ page:

Now we’ve finished the set up of connecting Spring Boot with Keycloak and demonstrating how it works.

Now we’ll be reviewing how to use Spring Security in conjunction with our existing application.

5. Spring Security

There is a Keycloak Spring Security Adapter, and it’s already included in our Spring Boot Keycloak Starter dependency. We’ll now see how to integrate Spring Security with Keycloak.

5.1. Dependency

To use Spring Security with Spring Boot, we must add this dependency:

<dependency>
    <groupId>org.springframework.boot</groupId>
    <artifactId>spring-boot-starter-security</artifactId>
    <version>1.5.3</version>
</dependency>

The latest Spring Boot Starter Security release can be found on Maven Central.

5.2. Configuration class

Keycloak provides a KeycloakWebSecurityConfigurerAdapter as a convenient base class for creating a WebSecurityConfigurer instance, which is convenient because a configuration class extending WebSecurityConfigurerAdapter is needed for any application secured by Spring Security:

@Configuration
@EnableWebSecurity
@ComponentScan(basePackageClasses = KeycloakSecurityComponents.class)
class SecurityConfig extends KeycloakWebSecurityConfigurerAdapter {

    @Autowired
    public void configureGlobal(
      AuthenticationManagerBuilder auth) throws Exception {
 
        KeycloakAuthenticationProvider keycloakAuthenticationProvider
         = keycloakAuthenticationProvider();
        keycloakAuthenticationProvider.setGrantedAuthoritiesMapper(
          new SimpleAuthorityMapper());
        auth.authenticationProvider(keycloakAuthenticationProvider);
    }

    @Bean
    public KeycloakSpringBootConfigResolver KeycloakConfigResolver() {
        return new KeycloakSpringBootConfigResolver();
    }

    @Bean
    @Override
    protected SessionAuthenticationStrategy sessionAuthenticationStrategy() {
        return new RegisterSessionAuthenticationStrategy(
          new SessionRegistryImpl());
    }

    @Override
    protected void configure(HttpSecurity http) throws Exception {
        super.configure(http);
        http.authorizeRequests()
          .antMatchers("/customers*")
          .hasRole("user")
          .anyRequest()
          .permitAll();
    }
}

Please note the code above:

  • configureGlobal: tasks the SimpleAuthorityMapper to make sure roles are not prefixed with ROLE_
  • keycloakConfigResolver: this defines that we want to use the Spring Boot properties file support instead of the default keycloak.json

5.3. application.properties

Because we’ve set up the security constraints with Spring Security, we can remove the previous security constraints we placed in application.properties.

Now we’ll add this to our application.properties:

keycloak.principal-attribute=preferred_username

5.4. Controller

To make use of a user’s username, we’re updating our controller to inject the Principal:

@GetMapping(path = "/customers")
public String customers(Principal principal, Model model){
    addCustomers(); 
    model.addAttribute("customers", customerDAO.findAll());
    model.addAttribute("username", principal.getName());
    return "customers";
}

5.5. Thymeleaf

Under the div container, we’ll add this one line to greet the user:

<h1>Hello, <span th:text="${username}">--name--</span>.</h1>

5.6. Demo

Now, after we authenticate and are taken to the internal customers’ page, we’ll see:

6 Conclusion

In this tutorial, we’ve configured a Keycloak server and used it with a Spring Boot Application.

We’ve also seen how to set up Spring Security and use it in conjunction with Keycloak. A working version of the code shown in this article is available over on Github.

XML-Based Injection in Spring

$
0
0

1. Introduction

In this basic tutorial, we’ll learn how to do simple XML-based bean configuration with the Spring Framework.

2. Overview

Let’s start by adding Spring’s library dependency in the pom.xml:

<dependency>
    <groupId>org.springframework</groupId>
    <artifactId>spring-context</artifactId>
    <version>5.0.1.RELEASE</version>         
</dependency>

The latest version of the Spring dependency can be found here.

3. Dependency Injection – An Overview

Dependency injection is a technique whereby dependencies of an object are supplied by external containers.

Let’s say we’ve got an application class that depends on a service that actually handles the business logic:

public class IndexApp {
    private IService service;
    // standard constructors/getters/setters
}

Now let’s say IService is an Interface:

public interface IService {
    public String serve();
}

This interface can have multiple implementations.

Let’s have a quick look at one potential implementation:

public class IndexService implements IService {
    @Override
    public String serve() {
        return "Hello World";
    }
}

Here, IndexApp is a high-level component that depends on the low-level component called IService.

In essence, we’re decoupling IndexApp from a particular implementation of the IService which can vary based on the various factors.

4. Dependency Injection – In Action

Let’s see how we can inject a dependency.

4.1. Using Properties

Let’s see how we can wire the dependencies together using an XML-based configuration:

<bean 
  id="indexService" 
  class="com.baeldung.di.spring.IndexService" />
     
<bean 
  id="indexApp" 
  class="com.baeldung.di.spring.IndexApp" >
    <property name="service" ref="indexService" />
</bean>    

As can be seen, we’re creating an instance of IndexService and assigning it an id. By default, the bean is a singleton. Also, we’re creating an instance of IndexApp.

Within this bean, we’re injecting the other bean using setter method.

4.2. Using Constructor

Instead of injecting a bean via the setter method, we can inject the dependency using the constructor:

<bean 
  id="indexApp" 
  class="com.baeldung.di.spring.IndexApp">
    <constructor-arg ref="indexService" />
</bean>    

4.3. Using Static Factory

We can also inject a bean returned by a factory. Let’s create a simple factory that returns an instance of IService based on the number supplied:

public class StaticServiceFactory {
    public static IService getNumber(int number) {
        // ...
    }
}

Now let’s see how we could use above implementation to inject a bean into IndexApp using an XML-based configuration:

<bean id="messageService"
  class="com.baeldung.di.spring.StaticServiceFactory"
  factory-method="getService">
    <constructor-arg value="1" />
</bean>   
  
<bean id="indexApp" class="com.baeldung.di.spring.IndexApp">
    <property name="service" ref="messageService" />
</bean>

In the above example, we’re calling the static getService method using factory-method to create a bean with id messageService which we inject into IndexApp.

4.4. Using Factory Method

Let’s consider an instance factory that returns an instance of IService based on the number supplied. This time, the method is not static:

public class InstanceServiceFactory {
    public IService getNumber(int number) {
        // ...
    }
}

Now let’s see how we could use above implementation to inject a bean into IndexApp using XML configuration:

<bean id="indexServiceFactory" 
  class="com.baeldung.di.spring.InstanceServiceFactory" />
<bean id="messageService"
  class="com.baeldung.di.spring.InstanceServiceFactory"
  factory-method="getService" factory-bean="indexServiceFactory">
    <constructor-arg value="1" />
</bean>  
<bean id="indexApp" class="com.baeldung.di.spring.IndexApp">
    <property name="service" ref="messageService" />
</bean>

In the above example, we’re calling the getService method on an instance of InstanceServiceFactory using factory-method to create a bean with id messageService which we inject in IndexApp.

5. Testing

This is how we can access configured beans:

@Test
public void whenGetBeans_returnsBean() {
    ApplicationContext applicationContext = new ClassPathXmlApplicationContext("...");
    IndexApp indexApp = applicationContext.getBean("indexApp", IndexApp.class);
    assertNotNull(indexApp);
}

6. Conclusion

In this quick tutorial, we illustrated examples of how we can inject dependency using the XML-based configuration using Spring Framework.

The implementation of these examples can be found in the GitHub project – this is a Maven-based project, so it should be easy to import and run as is.

Java Weekly, Issue 202

$
0
0

Here we go…

1. Spring and Java

>> New Version Scheme for Java SE Platform and the JDK [infoq.com]

The details of the next version scheme for Java.

>> How to Implement Conditional Auditing with Hibernate Envers [thoughts-on-java.org]

A dive into Hibernate Envers and conditional auditing.

>> SOLID Principles in Action: From Slack to Twilio [twilio.com]

An interesting, long read from Twilio engineering.

>> JEPs Proposed to Target JDK 10 [openjdk.java.net]

These are the early JEPs targeted for JDK 10.

Also worth reading:

Time to upgrade:

2. Technical

>> Microservices with Nomad and Consul [blog.codecentric.de]

The Nomad/Consul stack is another interesting option for Microservices.

>> The multiple usages of git rebase –onto [blog.frankel.ch]

git rebase certainly has many useful applications.

>> The Pain of Implicit Dependencies [blog.thecodewhisperer.com]

Introducing implicit dependencies can effectively make code legacy.

Also worth reading:

3. Musings

>> Becoming an accidental architect [oreilly.com]

The role of the architect might be more demanding than you think it is.

>> How to Politely Say No and When To Do It [daedtech.com]

If there’s ever a silver bullet, it’s saying “no”.

It’s an uncomfortable skill most never master, and it can unlock a lot of great things, so it’s worth exploring and learning how to do right.

Also worth reading:

4. Comics

And my favorite Dilberts of the week:

>> Barry Dingle [dilbert.com]

>> Barry Dingle Asks About Blockchain [dilbert.com]

>> App For Jumping Off the Roof [dilbert.com]

5. Pick of the Week

>> You can have two Big Things, but not three [blog.asmartbear.com]

An Overview of Identifiers in Hibernate

$
0
0

1. Introduction

Identifiers in Hibernate represent the primary key of an entity. This implies the values are unique so that they can identify a specific entity, that they aren’t null and that they won’t be modified.

Hibernate provides a few different ways to define identifiers. In this article, we’ll review each method of mapping entity ids using the library.

2. Simple Identifiers

The most straightforward way to define an identifier is by using the @Id annotation.

Simple ids are mapped using @Id to a single property of one of these types: Java primitive and primitive wrapper types, String, Date, BigDecimal, BigInteger.

Let’s see a quick example of defining an entity with a primary key of type long:

@Entity
public class Student {

    @Id
    private long studentId;
    
    // standard constructor, getters, setters
}

3. Generated Identifiers

If we want the primary key value to be generated automatically for us, we can add the @GeneratedValue annotation.

This can use 4 generation types: AUTO, IDENTITY, SEQUENCE, TABLE.

If we don’t specify a value explicitly, the generation type defaults to AUTO.

3.1. AUTO Generation

If we’re using the default generation type, the persistence provider will determine values based on the type of the primary key attribute.  This type can be numerical or UUID.

For numeric values, the generation is based on a sequence or table generator, while UUID values will use the UUIDGenerator.

Let’s see an example of mapping an entity primary key using AUTO generation strategy:

@Entity
public class Student {

    @Id
    @GeneratedValue
    private long studentId;

    // ...
}

In this case, the primary key values will be unique at the database level.

An interesting feature introduced in Hibernate 5 is the UUIDGenerator. To use this, all we need to do is declare an id of type UUID with @GeneratedValue annotation:

@Entity
public class Course {

    @Id
    @GeneratedValue
    private UUID courseId;

    // ...
}

Hibernate will generate an id of the form “8dd5f315-9788-4d00-87bb-10eed9eff566”.

3.2. IDENTITY Generation

This type of generation relies on the IdentityGenerator which expects values generated by an identity column in the database, meaning they are auto-incremented.

To use this generation type, we only need to set the strategy parameter:

@Entity
public class Student {

    @Id
    @GeneratedValue (strategy = GenerationType.IDENTITY)
    private long studentId;

    // ...
}

One thing to note is that IDENTITY generation disables batch updates.

3.3. SEQUENCE Generation

To use a sequence-based id, Hibernate provides the SequenceStyleGenerator class.

This generator uses sequences if they’re supported by our database, and switches to table generation if they aren’t.

To customize the sequence name, we can use the JPA @SequenceGenerator annotation:

@Entity
public class User {
    @Id
    @GeneratedValue(strategy = GenerationType.SEQUENCE, 
      generator = "sequence-generator")
    @SequenceGenerator(name = "sequence-generator", 
      sequenceName = "user_sequence", initialValue = 4)
    private long userId;
    
    // ...
}

In this example, we’ve also set an initial value for the sequence, which means the primary key generation will start at 4.

SEQUENCE is the generation type recommended by the Hibernate documentation.

The generated values are unique per sequence. If you don’t specify a sequence name, Hibernate will re-use the same hibernate_sequence for different types.

3.4. TABLE Generation

The TableGenerator uses an underlying database table that holds segments of identifier generation values.

Let’s customize the table name using the @TableGenerator annotation:

@Entity
public class Department {
    @Id
    @GeneratedValue(strategy = GenerationType.TABLE, 
      generator = "table-generator")
    @TableGenerator(name = "table-generator", 
      table = "dep_ids", 
      pkColumnName = "seq_id", 
      valueColumnName = "seq_value")
    private long depId;

    // ...
}

In this example, we can see that other attributes such as the pkColumnName and valueColumnName can also be customized.

The disadvantage of this method is that it doesn’t scale well and can negatively affect performance.

To sum up, these four generation types will result in similar values being generated but use different database mechanisms.

3.5. Custom Generator

If we don’t want to use any of the out-of-the-box strategies, we can define our custom generator by implementing the IdentifierGenerator interface.

Let’s create a generator that builds identifiers containing a String prefix and a number:

public class MyGenerator 
  implements IdentifierGenerator, Configurable {

    private String prefix;

    @Override
    public Serializable generate(
      SharedSessionContractImplementor session, Object obj) 
      throws HibernateException {

        String query = String.format("select %s from %s", 
            session.getEntityPersister(obj.getClass().getName(), obj)
              .getIdentifierPropertyName(),
            obj.getClass().getSimpleName());

        Stream ids = session.createQuery(query).stream();

        Long max = ids.map(o -> o.replace(prefix + "-", ""))
          .mapToLong(Long::parseLong)
          .max()
          .orElse(0L);

        return prefix + "-" + (max + 1);
    }

    @Override
    public void configure(Type type, Properties properties, 
      ServiceRegistry serviceRegistry) throws MappingException {
        prefix = properties.getProperty("prefix");
    }
}

In this example, we override the generate() method from the IdentifierGenerator interface and first find the highest number from the existing primary keys of the form prefix-XX.

Then we add 1 to the maximum number found and append the prefix property to obtain the newly generated id value.

Our class also implements the Configurable interface, so that we can set the prefix property value in the configure() method.

Next, let’s add this custom generator to an entity. For this, we can use the @GenericGenerator annotation with a strategy parameter that contains the full class name of our generator class:

@Entity
public class Product {

    @Id
    @GeneratedValue(generator = "prod-generator")
    @GenericGenerator(name = "prod-generator", 
      parameters = @Parameter(name = "prefix", value = "prod"), 
      strategy = "com.baeldung.hibernate.pojo.generator.MyGenerator")
    private String prodId;

    // ...
}

Also, notice we’ve set the prefix parameter to “prod”.

Let’s see a quick JUnit test for a clearer understanding of the id values generated:

@Test
public void whenSaveCustomGeneratedId_thenOk() {
    Product product = new Product();
    session.save(product);
    Product product2 = new Product();
    session.save(product2);

    assertThat(product2.getProdId()).isEqualTo("prod-2");
}

Here, the first value generated using the “prod” prefix was “prod-1”, followed by “prod-2”.

4. Composite Identifiers

Besides the simple identifiers we’ve seen so far, Hibernate also allows us to define composite identifiers.

A composite id is represented by a primary key class with one or more persistent attributes.

The primary key class must fulfill several conditions:

  • it should be defined using @EmbeddedId or @IdClass annotations
  • it should be public, serializable and have a public no-arg constructor
  • it should implement equals() and hashCode() methods

The class’s attributes can be basic, composite or ManyToOne while avoiding collections and OneToOne attributes.

4.1. @EmbeddedId

To define an id using @EmbeddedId, first we need a primary key class annotated with @Embeddable:

@Embeddable
public class OrderEntryPK implements Serializable {

    private long orderId;
    private long productId;

    // standard constructor, getters, setters
    // equals() and hashCode() 
}

Next, we can add an id of type OrderEntryPK to an entity using @EmbeddedId:

@Entity
public class OrderEntry {

    @EmbeddedId
    private OrderEntryPK entryId;

    // ...
}

Let’s see how we can use this type of composite id to set the primary key for an entity:

@Test
public void whenSaveCompositeIdEntity_thenOk() {
    OrderEntryPK entryPK = new OrderEntryPK();
    entryPK.setOrderId(1L);
    entryPK.setProductId(30L);
        
    OrderEntry entry = new OrderEntry();
    entry.setEntryId(entryPK);
    session.save(entry);

    assertThat(entry.getEntryId().getOrderId()).isEqualTo(1L);
}

Here the OrderEntry object has an OrderEntryPK primary id formed of two attributes: orderId and productId.

4.2. @IdClass

The @IdClass annotation is similar to the @EmbeddedId, except the attributes are defined in the main entity class using @Id for each one.

The primary-key class will look the same as before.

Let’s rewrite the OrderEntry example with an @IdClass:

@Entity
@IdClass(OrderEntryPK.class)
public class OrderEntry {
    @Id
    private long orderId;
    @Id
    private long productId;
    
    // ...
}

Then we can set the id values directly on the OrderEntry object:

@Test
public void whenSaveIdClassEntity_thenOk() {        
    OrderEntry entry = new OrderEntry();
    entry.setOrderId(1L);
    entry.setProductId(30L);
    session.save(entry);

    assertThat(entry.getOrderId()).isEqualTo(1L);
}

Note that for both types of composite ids, the primary key class can also contain @ManyToOne attributes.

Hibernate also allows defining primary-keys made up of  @ManyToOne associations combined with @Id annotation. In this case, the entity class should also fulfill the conditions of a primary-key class.

The disadvantage of this method is that there’s no separation between the entity object and the identifier.

5. Derived Identifiers

Derived identifiers are obtained from an entity’s association using the @MapsId annotation.

First, let’s create a UserProfile entity which derives its id from a one-to-one association with the User entity:

@Entity
public class UserProfile {

    @Id
    private long profileId;
    
    @OneToOne
    @MapsId
    private User user;

    // ...
}

Next, let’s verify that a UserProfile instance has the same id as its associated User instance:

@Test
public void whenSaveDerivedIdEntity_thenOk() {        
    User user = new User();
    session.save(user);
       
    UserProfile profile = new UserProfile();
    profile.setUser(user);
    session.save(profile);

    assertThat(profile.getProfileId()).isEqualTo(user.getUserId());
}

6. Conclusion

In this article, we’ve seen the multiple ways we can define identifiers in Hibernate.

The full source code of the examples can be found over on GitHub.


Quick Guide to Java Stack

$
0
0

1. Overview

In this article, we’ll introduce the java.util.Stack class and start looking at how we can make use of it. 

The Stack is a generic data structure which represents a LIFO (last in, first out) collection of objects allowing for pushing/popping elements in constant time.

2. Creation

Let’s start by creating an empty instance of Stack, by using the default, no-argument constructor:

@Test
public void whenStackIsCreated_thenItHasSize0() {
    Stack<Integer> intStack = new Stack();
 
    assertEquals(0, intStack.size());
}

This will create a Stack with the default capacity of 10. If the number of added elements exceeds the total Stack size, it will be doubled automatically. However, its size will never shrink after removing elements.

3. Synchronization

Stack is a direct subclass of Vector; this means that similarly to its superclass, it’s a synchronized implementation.

However, synchronization isn’t always needed, in such cases, it’s advised to use ArrayDeque.

4. Adding

Let’s start by adding an element to the top of the Stack, with the push() method – which also returns the element that was added:

@Test
public void whenElementIsPushed_thenStackSizeIsIncreased() {
    Stack<Integer> intStack = new Stack();
    intStack.push(1);
 
    assertEquals(1, intStack.size());
}

Using push() method has the same effect as using addElement(). The only difference is that addElement() returns the result of the operation, instead of the element that was added.

We can also add multiple elements at once:

@Test
public void whenMultipleElementsArePushed_thenStackSizeisIncreased() {
    Stack<Integer> intStack = new Stack();
    List<Integer> intList = Arrays.asList(1, 2, 3, 4, 5, 6, 7);
    boolean result = intStack.addAll(intList);
 
    assertTrue(result);
    assertEquals(7, intList.size());
}

5. Retrieving

Next, let’s have a look at how to get and remove the last element in a Stack:

@Test
public void whenElementIsPoppedFromStack_thenSizeChanges() {
    Stack<Integer> intStack = new Stack();
    intStack.push(5);
    intStack.pop();

    assertTrue(intStack.isEmpty());
}

We can also get the last element of the Stack without removing it:

@Test
public void whenElementIsPeeked_thenElementIsNotRemoved() {
    Stack<Integer> intStack = new Stack();
    intStack.push(5);
    intStack.peek();

    assertEquals(1, intStack.search(5));
    assertEquals(1, intStack.size());
}

6. Searching for an Element

6.1. Search

Stack allows us to search for an element and get its distance from the top:

@Test
public void whenElementIsOnStack_thenSearchReturnsItsDistanceFromTheTop() {
    Stack<Integer> intStack = new Stack();
    intStack.push(5);

    assertEquals(1, intStack.search(5));
}

The result is an index of given Object. If more than one Object is present, the index of Object closest to the top is returned. The item that is on the top of the stack is considered to be at position 1.

If the Object is not found, search() will return -1.

6.2. Getting Index of Element

To get an index of an element on the Stack, we can also use the indexOf() and lastIndexOf() methods:

@Test
public void whenElementIsOnStack_thenIndexOfReturnsItsIndex() {
    Stack<Integer> intStack = new Stack();
    intStack.push(5);
    int indexOf = intStack.indexOf(5);

    assertEquals(0, indexOf);
}

The lastIndexOf() will always find the index of the element that’s closest to the top of the stack. This works very similarly to search() – with the important difference that it returns the index, instead of the distance from the top:

@Test
public void whenMultipleElementsAreOnStack_thenIndexOfReturnsLastElementIndex() {
    Stack<Integer> intStack = new Stack();
    intStack.push(5);
    intStack.push(5);
    intStack.push(5);
    int lastIndexOf = intStack.lastIndexOf(5);

    assertEquals(2, lastIndexOf);
}

7. Removing Elements

Apart from the pop() operation, used both for removing and retrieving elements, we can also use multiple operations inherited from the Vector class to remove elements.

7.1. Removing Specified Elements

We can use the removeElement() method to remove the first occurrence of given element:

@Test
public void whenRemoveElementIsInvoked_thenElementIsRemoved() {
    Stack<Integer> intStack = new Stack();
    intStack.push(5);
    intStack.push(5);
    intStack.removeElement(5);
 
    assertEquals(1, intStack.size());
}

We can also use the removeElementAt() to delete elements under a specified index in the Stack:

@Test 
public void whenRemoveElementAtIsInvoked_thenElementIsRemoved() { 
    Stack<Integer> intStack = new Stack(); 
    intStack.push(5); intStack.push(7); 
    intStack.removeElementAt(1); 
 
    assertEquals(-1, intStack.search(7)); 
}

7.2. Removing Multiple Elements

Let’s have a quick look at how to remove multiple elements from a Stack using the removeAll() API – which will take a Collection as an argument and remove all matching elements from the Stack:

@Test
public void whenRemoveAllIsInvoked_thenAllElementsFromCollectionAreRemoved() {
    Stack<Integer> intStack = new Stack();
    List<Integer> intList = Arrays.asList(1, 2, 3, 4, 5, 6, 7);
    intStack.addAll(intList);
    intStack.add(500);
    intStack.removeAll(intList);
 
    assertEquals(1, intStack.size());
}

It’s also possible to remove all elements from the Stack using the clear() or removeAllElements() methods; both of those methods work the same:

@Test
public void whenRemoveIfIsInvoked_thenAllElementsSatysfyingConditionAreRemoved() {
    Stack<Integer> intStack = new Stack();
    List<Integer> intList = Arrays.asList(1, 2, 3, 4, 5, 6, 7);
    intStack.addAll(intList);
    intStack.removeIf(element -> element < 6);
 
    assertEquals(2, intStack.size());
}

7.3. Removing Elements Using Filter

We can also use a condition for removing elements from the Stack. Let’s see how to do this using the removeIf(), with a filter expression as an argument:

@Test
public void whenRemoveIfIsInvoked_thenAllElementsSatysfyingConditionAreRemoved() {
    Stack<Integer> intStack = new Stack();
    List<Integer> intList = Arrays.asList(1, 2, 3, 4, 5, 6, 7);
    intStack.addAll(intList);
    intStack.removeIf(element -> element < 6);
    
    assertEquals(2, intStack.size());
}

8. Iterating

Stack allows us to use both an Iterator and a ListIterator. The main difference is that the first one allows us to traverse Stack in one direction and second allows to do this in both directions:

@Test
public void whenAnotherStackCreatedWhileTraversingStack_thenStacksAreEqual() {
    Stack<Integer> intStack = new Stack<>();
    List<Integer> intList = Arrays.asList(1, 2, 3, 4, 5, 6, 7);
    intStack.addAll(intList);
    ListIterator<Integer> it = intStack.listIterator();
    Stack<Integer> result = new Stack();
    while(it.hasNext()) {
        result.push(it.next());
    }

    assertThat(result, equalTo(intStack));
}

All Iterators returned by Stack are fail-fast.

9. Stream API

A Stack is a collection, which means we can use it with Java 8 Streams API. Using Streams with the Stack is similar to using it with any other Collection:

@Test
public void whenStackIsFiltered_allElementsNotSatisfyingFilterConditionAreDiscarded() {
    Stack<Integer> intStack = new Stack();
    List<Integer> inputIntList = Arrays.asList(1, 2, 3, 4, 5, 6, 7,9,10);
    intStack.addAll(inputIntList);
    int[] intArray = intStack.stream()
      .mapToInt(element -> (int)element)
      .filter(element -> element <= 3)
      .toArray();
 
    assertEquals(3, intArray.length);
}

10. Summary

This tutorial was a quick guide to understanding the Java Stack. To learn more about this topic refer to Javadoc.

And, as always, all code samples can be found over on Github.

Generating Prime Numbers in Java

$
0
0

1. Introduction

In this tutorial, we’ll show various ways in which we can generate prime numbers using Java.

If you’re looking to check if a number is prime – here’s a quick guide on how to do that.

2. Prime Numbers

Let’s start with the core definition. A prime number is a natural number greater than one that has no positive divisors other than one and itself.

For example, 7 is prime because 1 and 7 are its only positive integer factors, whereas 12 is not because it has the divisors 3 and 2 in addition to 1, 4 and 6.

3. Generating Prime Numbers

In this section, we’ll see how we can generate prime numbers efficiently that are lower than a given value.

3.1. Java 7 And Before – Brute Force

public static List<Integer> primeNumbersBruteForce(int n) {
    List<Integer> primeNumbers = new LinkedList<>();
    for (int i = 2; i <= n; i++) {
        if (isPrimeBruteForce(i)) {
            primeNumbers.add(i);
        }
    }
    return primeNumbers;
}
public static boolean isPrimeBruteForce(int number) {
    for (int i = 2; i < number; i++) {
        if (number % i == 0) {
            return false;
        }
    }
    return true;
}

As you can see, primeNumbersBruteForce is iterating over the numbers from 2 to n and simply calling the isPrimeBruteForce() method to check if a number is prime or not.

The method checks each numbers divisibility by the numbers in a range from 2 till number-1.

If at any point we encounter a number that is divisible, we return false. At the end when we find that number is not divisible by any of its prior number, we return true indicating its a prime number.

3.2. Efficiency And Optimization

The previous algorithm is not linear and has the time complexity of O(n^2). The algorithm is also not efficient and there’s clearly a room for improvement.

Let’s look at the condition in the isPrimeBruteForce() method.

When a number is not a prime, this number can be factored into two factors namely a and b i.e. number = a * b. If both a and b were greater than the square root of n, a*b would be greater than n.

So at least one of those factors must be less than or equal the square root of a number and to check if a number is prime, we only need to test for factors lower than or equal to the square root of the number being checked.

Prime numbers can never be an even number as even numbers are all divisible by 2.

Additionally, prime numbers can never be an even number as even numbers are all divisible by 2.

Keeping in mind above ideas, let’s improve the algorithm:

public static List<Integer> primeNumbersBruteForce(int n) {
    List<Integer> primeNumbers = new LinkedList<>();
    if (n >= 2) {
        primeNumbers.add(2);
    }
    for (int i = 3; i <= n; i += 2) {
        if (isPrimeBruteForce(i)) {
            primeNumbers.add(i);
        }
    }
    return primeNumbers;
}
private static boolean isPrimeBruteForce(int number) {
    for (int i = 2; i*i < number; i++) {
        if (number % i == 0) {
            return false;
        }
    }
    return true;
}

3.3. Using Java 8

Let’s see how we can rewrite the previous solution using Java 8 idioms:

public static List<Integer> primeNumbersTill(int n) {
    return IntStream.rangeClosed(2, n)
      .filter(x -> isPrime(x)).boxed()
      .collect(Collectors.toList());
}
private static boolean isPrime(int number) {
    return IntStream.rangeClosed(2, (int) (Math.sqrt(number)))
      .filter(n -> (n & 0X1) != 0)
      .allMatch(n -> x % n != 0);
}

3.4. Using Sieve Of Eratosthenes

There’s yet another efficient method which could help us to generate prime numbers efficiently, and it’s called Sieve Of Eratosthenes. Its time efficiency is O(n logn).

Let’s take a look at the steps of this algorithm:

  1. Create a list of consecutive integers from 2 to n: (2, 3, 4, …, n)
  2. Initially, let p be equal 2, the first prime number
  3. Starting from p, count up in increments of p and mark each of these numbers greater than p itself in the list. These numbers will be 2p, 3p, 4p, etc.; note that some of them may have already been marked
  4. Find the first number greater than p in the list that is not marked. If there was no such number, stop. Otherwise, let p now equal this number (which is the next prime), and repeat from step 3

At the end when the algorithm terminates, all the numbers in the list that are not marked are the prime numbers.

Here’s what the code looks like:

public static List<Integer> sieveOfEratosthenes(int n) {
    boolean prime[] = new boolean[n + 1];
    Arrays.fill(prime, true);
    for (int p = 2; p * p <= n; p++) {
        if (prime[p]) {
            for (int i = p * 2; i <= n; i += p) {
                prime[i] = false;
            }
        }
    }
    List<Integer> primeNumbers = new LinkedList<>();
    for (int i = 2; i <= n; i++) {
        if (prime[i]) {
            primeNumbers.add(i);
        }
    }
    return primeNumbers;
}

3.5. Working Example of Sieve Of Eratosthenes

Let’s see how it works for n=30.

Consider the image above, here are the passes made by the algorithm:

  1. The loop starts with 2, so we leave 2 unmarked and mark all the divisors of 2. It’s marked in image with the red color
  2. The loop moves to 3, so we leave 3 unmarked and mark all the divisors of 3 not already marked. It’s marked in image with the green color
  3. Loop moves to 4, it’s already marked, so we continue
  4. Loop moves to 5, so we leave 5 unmarked and mark all the divisors of 5 not already marked. It’s marked in image with the purple color
  5. We continue above steps until loop is reached equal to square root of n

4. Conclusion

In this quick tutorial, we illustrated ways in which we can generate prime numbers until ‘N’ value.

The implementation of these examples can be found over on GitHub.

Creating a Java Compiler Plugin

$
0
0

1. Overview

Java 8 provides an API for creating Javac plugins. Unfortunately, it’s hard to find good documentation for it.

In this article, we’re going to show the whole process of creating a compiler extension which adds custom code to *.class files.

2. Setup

First, we need to add JDK’s tools.jar as a dependency for our project:

<dependency>
    <groupId>com.sun</groupId>
    <artifactId>tools</artifactId>
    <version>1.8.0</version>
    <scope>system</scope>
    <systemPath>${java.home}/../lib/tools.jar</systemPath>
</dependency>

Every compiler extension is a class which implements com.sun.source.util.Plugin interface. Let’s create it in our example:

Let’s create it in our example:

public class SampleJavacPlugin implements Plugin {

    @Override
    public String getName() {
        return "MyPlugin";
    }

    @Override
    public void init(JavacTask task, String... args) {
        Context context = ((BasicJavacTask) task).getContext();
        Log.instance(context)
          .printRawLines(Log.WriterKind.NOTICE, "Hello from " + getName());
    }
}

For now, we’re just printing “Hello” to ensure that our code is successfully picked up and included in the compilation.

Our end goal will be to create a plugin that adds runtime checks for every numeric argument marked with a given annotation, and throw an exception if the argument doesn’t match a condition.

There’s one more necessary step to make the extension discoverable by Javac: it should be exposed through the ServiceLoader framework.

To achieve this, we need to create a file named com.sun.source.util.Plugin with content which is our plugin’s fully qualified class name (com.baeldung.javac.SampleJavacPlugin) and place it in the META-INF/services directory.

After that, we can call Javac with the -Xplugin:MyPlugin switch:

baeldung/tutorials$ javac -cp ./core-java/target/classes -Xplugin:MyPlugin ./core-java/src/main/java/com/baeldung/javac/TestClass.java
Hello from MyPlugin

Note that we must always use a String returned from the plugin’s getName() method as a -Xplugin option value.

3. Plugin Lifecycle

A plugin is called by the compiler only once, through the init() method.

To be notified of subsequent events, we have to register a callback. These arrive before and after every processing stage per source file:

  • PARSE – builds an Abstract Syntax Tree (AST)
  • ENTER – source code imports are resolved
  • ANALYZE – parser output (an AST) is analyzed for errors
  • GENERATE – generating binaries for the target source file

There are two more event kinds – ANNOTATION_PROCESSING and ANNOTATION_PROCESSING_ROUND but we’re not interested in them here.

For example, when we want to enhance compilation by adding some checks based on source code info, it’s reasonable to do that at the PARSE finished event handler:

public void init(JavacTask task, String... args) {
    task.addTaskListener(new TaskListener() {
        public void started(TaskEvent e) {
        }

        public void finished(TaskEvent e) {
            if (e.getKind() != TaskEvent.Kind.PARSE) {
                return;
            }
            // Perform instrumentation
        }
    });
}

4. Extract AST Data

We can get an AST generated by the Java compiler through the TaskEvent.getCompilationUnit(). Its details can be examined through the TreeVisitor interface.

Note that only a Tree element, for which the accept() method is called, dispatches events to the given visitor.

For example, when we execute ClassTree.accept(visitor), only visitClass() is triggered; we can’t expect that, say, visitMethod() is also activated for every method in the given class.

We can use TreeScanner to overcome the problem:

public void finished(TaskEvent e) {
    if (e.getKind() != TaskEvent.Kind.PARSE) {
        return;
    }
    e.getCompilationUnit().accept(new TreeScanner<Void, Void>() {
        @Override
        public Void visitClass(ClassTree node, Void aVoid) {
            return super.visitClass(node, aVoid);

        @Override
        public Void visitMethod(MethodTree node, Void aVoid) {
            return super.visitMethod(node, aVoid);
        }
    }, null);
}

In this example, it’s necessary to call super.visitXxx(node, value) to recursively process the current node’s children.

5. Modify AST

To showcase how we can modify the AST, we’ll insert runtime checks for all numeric arguments marked with a @Positive annotation.

This is a simple annotation that can be applied to method parameters:

@Documented
@Retention(RetentionPolicy.CLASS)
@Target({ElementType.PARAMETER})
public @interface Positive { }

Here’s an example of using the annotation:

public void service(@Positive int i) { }

In the end, we want the bytecode to look as if it’s compiled from a source like this:

public void service(@Positive int i) {
    if (i <= 0) {
        throw new IllegalArgumentException("A non-positive argument ("
          + i + ") is given as a @Positive parameter 'i'");
    }
}

What this means is that we want an IllegalArgumentException to be thrown for every argument marked with @Positive which is equal or less than 0. 

5.1. Where to Instrument

Let’s find out how we can locate target places where the instrumentation should be applied:

private static Set<String> TARGET_TYPES = Stream.of(
  byte.class, short.class, char.class, 
  int.class, long.class, float.class, double.class)
 .map(Class::getName)
 .collect(Collectors.toSet());

For simplicity, we’ve only added primitive numeric types here.

Next, let’s define a shouldInstrument() method that checks if the parameter has a type in the TARGET_TYPES set as well as the @Positive annotation:

private boolean shouldInstrument(VariableTree parameter) {
    return TARGET_TYPES.contains(parameter.getType().toString())
      && parameter.getModifiers().getAnnotations().stream()
      .anyMatch(a -> Positive.class.getSimpleName()
        .equals(a.getAnnotationType().toString()));
}

Then we’ll continue the finished() method in our SampleJavacPlugin class with applying a check to all parameters that fulfill our conditions:

public void finished(TaskEvent e) {
    if (e.getKind() != TaskEvent.Kind.PARSE) {
        return;
    }
    e.getCompilationUnit().accept(new TreeScanner<Void, Void>() {
        @Override
        public Void visitMethod(MethodTree method, Void v) {
            List<VariableTree> parametersToInstrument
              = method.getParameters().stream()
              .filter(SampleJavacPlugin.this::shouldInstrument)
              .collect(Collectors.toList());
            
              if (!parametersToInstrument.isEmpty()) {
                Collections.reverse(parametersToInstrument);
                parametersToInstrument.forEach(p -> addCheck(method, p, context));
            }
            return super.visitMethod(method, v);
        }
    }, null);

In this example, we’ve reversed the parameters list because there’s a possible case that more than one argument is marked by @Positive. As every check is added as the very first method instruction, we process them RTL to ensure correct order.

As every check is added as the very first method instruction, we process them RTL to ensure correct order.

5.2. How to Instrument

The problem is that “read AST” lays in the public API area, while “modify AST” operations like “add null-checks” are a private API.

To address this, we’ll create new AST elements through a TreeMaker instance.

First, we need to obtain a Context instance:

@Override
public void init(JavacTask task, String... args) {
    Context context = ((BasicJavacTask) task).getContext();
    // ...
}

Then, we can obtain the TreeMarker object through the TreeMarker.instance(Context) method.

Now we can build new AST elements, e.g., an if expression can be constructed by a call to TreeMaker.If():

private static JCTree.JCIf createCheck(VariableTree parameter, Context context) {
    TreeMaker factory = TreeMaker.instance(context);
    Names symbolsTable = Names.instance(context);
        
    return factory.at(((JCTree) parameter).pos)
      .If(factory.Parens(createIfCondition(factory, symbolsTable, parameter)),
        createIfBlock(factory, symbolsTable, parameter), 
        null);
}

Please note that we want to show the correct stack trace line when an exception is thrown from our check. That’s why we adjust the AST factory position before creating new elements through it with factory.at(((JCTree) parameter).pos).

The createIfCondition() method builds the “parameterId < 0″ if condition:

private static JCTree.JCBinary createIfCondition(TreeMaker factory, 
  Names symbolsTable, VariableTree parameter) {
    Name parameterId = symbolsTable.fromString(parameter.getName().toString());
    return factory.Binary(JCTree.Tag.LE, 
      factory.Ident(parameterId), 
      factory.Literal(TypeTag.INT, 0));
}

Next, the createIfBlock() method builds a block that returns an IllegalArgumentException:

private static JCTree.JCBlock createIfBlock(TreeMaker factory, 
  Names symbolsTable, VariableTree parameter) {
    String parameterName = parameter.getName().toString();
    Name parameterId = symbolsTable.fromString(parameterName);
        
    String errorMessagePrefix = String.format(
      "Argument '%s' of type %s is marked by @%s but got '", 
      parameterName, parameter.getType(), Positive.class.getSimpleName());
    String errorMessageSuffix = "' for it";
        
    return factory.Block(0, com.sun.tools.javac.util.List.of(
      factory.Throw(
        factory.NewClass(null, nil(), 
          factory.Ident(symbolsTable.fromString(
            IllegalArgumentException.class.getSimpleName())),
            com.sun.tools.javac.util.List.of(factory.Binary(JCTree.Tag.PLUS, 
            factory.Binary(JCTree.Tag.PLUS, 
              factory.Literal(TypeTag.CLASS, errorMessagePrefix), 
              factory.Ident(parameterId)), 
              factory.Literal(TypeTag.CLASS, errorMessageSuffix))), null))));
}

Now that we’re able to build new AST elements, we need to insert them into the AST prepared by the parser. We can achieve this by casting public API elements to private API types:

private void addCheck(MethodTree method, VariableTree parameter, Context context) {
    JCTree.JCIf check = createCheck(parameter, context);
    JCTree.JCBlock body = (JCTree.JCBlock) method.getBody();
    body.stats = body.stats.prepend(check);
}

6. Testing the Plugin

We need to be able to test our plugin. It involves the following:

  • compile the test source
  • run the compiled binaries and ensure that they behave as expected

For this, we need to introduce a few auxiliary classes.

SimpleSourceFile exposes the given source file’s text to the Javac:

public class SimpleSourceFile extends SimpleJavaFileObject {
    private String content;

    public SimpleSourceFile(String qualifiedClassName, String testSource) {
        super(URI.create(String.format(
          "file://%s%s", qualifiedClassName.replaceAll("\\.", "/"),
          Kind.SOURCE.extension)), Kind.SOURCE);
        content = testSource;
    }

    @Override
    public CharSequence getCharContent(boolean ignoreEncodingErrors) {
        return content;
    }
}

SimpleClassFile holds the compilation result as a byte array:

public class SimpleClassFile extends SimpleJavaFileObject {

    private ByteArrayOutputStream out;

    public SimpleClassFile(URI uri) {
        super(uri, Kind.CLASS);
    }

    @Override
    public OutputStream openOutputStream() throws IOException {
        return out = new ByteArrayOutputStream();
    }

    public byte[] getCompiledBinaries() {
        return out.toByteArray();
    }

    // getters
}

SimpleFileManager ensures the compiler uses our bytecode holder:

public class SimpleFileManager
  extends ForwardingJavaFileManager<StandardJavaFileManager> {

    private List<SimpleClassFile> compiled = new ArrayList<>();

    // standard constructors/getters

    @Override
    public JavaFileObject getJavaFileForOutput(Location location,
      String className, JavaFileObject.Kind kind, FileObject sibling) {
        SimpleClassFile result = new SimpleClassFile(
          URI.create("string://" + className));
        compiled.add(result);
        return result;
    }

    public List<SimpleClassFile> getCompiled() {
        return compiled;
    }
}

Finally, all of that is bound to the in-memory compilation:

public class TestCompiler {
    public byte[] compile(String qualifiedClassName, String testSource) {
        StringWriter output = new StringWriter();

        JavaCompiler compiler = ToolProvider.getSystemJavaCompiler();
        SimpleFileManager fileManager = new SimpleFileManager(
          compiler.getStandardFileManager(null, null, null));
        List<SimpleSourceFile> compilationUnits 
          = singletonList(new SimpleSourceFile(qualifiedClassName, testSource));
        List<String> arguments = new ArrayList<>();
        arguments.addAll(asList("-classpath", System.getProperty("java.class.path"),
          "-Xplugin:" + SampleJavacPlugin.NAME));
        JavaCompiler.CompilationTask task 
          = compiler.getTask(output, fileManager, null, arguments, null,
          compilationUnits);
        
        task.call();
        return fileManager.getCompiled().iterator().next().getCompiledBinaries();
    }
}

After that, we need only to run the binaries:

public class TestRunner {

    public Object run(byte[] byteCode, String qualifiedClassName, String methodName,
      Class<?>[] argumentTypes, Object... args) throws Throwable {
        ClassLoader classLoader = new ClassLoader() {
            @Override
            protected Class<?> findClass(String name) throws ClassNotFoundException {
                return defineClass(name, byteCode, 0, byteCode.length);
            }
        };
        Class<?> clazz;
        try {
            clazz = classLoader.loadClass(qualifiedClassName);
        } catch (ClassNotFoundException e) {
            throw new RuntimeException("Can't load compiled test class", e);
        }

        Method method;
        try {
            method = clazz.getMethod(methodName, argumentTypes);
        } catch (NoSuchMethodException e) {
            throw new RuntimeException(
              "Can't find the 'main()' method in the compiled test class", e);
        }

        try {
            return method.invoke(null, args);
        } catch (InvocationTargetException e) {
            throw e.getCause();
        }
    }
}

A test might look like this:

public class SampleJavacPluginTest {

    private static final String CLASS_TEMPLATE
      = "package com.baeldung.javac;\n\n" +
        "public class Test {\n" +
        "    public static %1$s service(@Positive %1$s i) {\n" +
        "        return i;\n" +
        "    }\n" +
        "}\n" +
        "";

    private TestCompiler compiler = new TestCompiler();
    private TestRunner runner = new TestRunner();

    @Test(expected = IllegalArgumentException.class)
    public void givenInt_whenNegative_thenThrowsException() throws Throwable {
        compileAndRun(double.class,-1);
    }
    
    private Object compileAndRun(Class<?> argumentType, Object argument) 
      throws Throwable {
        String qualifiedClassName = "com.baeldung.javac.Test";
        byte[] byteCode = compiler.compile(qualifiedClassName, 
          String.format(CLASS_TEMPLATE, argumentType.getName()));
        return runner.run(byteCode, qualifiedClassName, 
        "service", new Class[] {argumentType}, argument);
    }
}

Here we’re compiling a Test class with a service() method that has a parameter annotated with @Positive. Then, we’re running the Test class by setting a double value of -1 for the method parameter.

As a result of running the compiler with our plugin, the test will throw an IllegalArgumentException for the negative parameter.

7. Conclusion

In this article, we’ve shown the full process of creating, testing and running a Java Compiler plugin.

The full source code of the examples can be found over on GitHub.

Introduction to Spring REST Shell

$
0
0

1. Overview

In this article, we’ll have a look at Spring REST Shell and some of its features.

It’s a Spring Shell extension so we recommend reading about it first.

2. Introduction

The Spring REST Shell is a command-line shell designed to facilitate working with Spring HATEOAS-compliant REST resources.

We no longer need to manipulate the URLs in bash by using tools like curl. Spring REST Shell provides a more convenient way of interacting with REST resources.

3. Installation

If we’re using a macOS machine with Homebrew, we can simply execute the next command:

brew install rest-shell

For users of other operating systems, we need to download a binary package from the official GitHub project page, unpack the package and find an executable to run:

tar -zxvf rest-shell-1.2.0.RELEASE.tar.gz
cd rest-shell-1.2.0.RELEASE
bin/rest-shell

Another option is to download the source code and perform a Gradle task:

git clone git://github.com/spring-projects/rest-shell.git
cd rest-shell
./gradlew installApp
cd build/install/rest-shell-1.2.0.RELEASE
bin/rest-shell

If everything is set correctly, we’ll see the following greeting:

 ___ ___  __ _____  __  _  _     _ _  __    
| _ \ __/' _/_   _/' _/| || |   / / | \ \   
| v / _|`._`. | | `._`.| >< |  / / /   > >  
|_|_\___|___/ |_| |___/|_||_| |_/_/   /_/   
1.2.1.RELEASE

Welcome to the REST shell. For assistance hit TAB or type "help".
http://localhost:8080:>

4. Getting Started

We’ll be working with the API already developed for another article. The localhost:8080 is used as a base URL.

Here’s a list of exposed endpoints:

  • GET /articles – get all Articles
  • GET /articles/{id} – get an Article by id
  • GET /articles/search/findByTitle?title={title} – get an Article by title
  • GET /profile/articles – get the profile data for an Article resource
  • POST /articles – create a new Article with a body provided

The Article class has three fields: id, title, and content.

4.1. Creating New Resources

Let’s add a new article. We’re going to use the post command passing a JSON String with the –data parameter.

First, we need to follow the URL associated with the resource we want to add. The command follow takes a relative URI, concatenates it with the baseUri and sets the result as the current location:

http://localhost:8080:> follow articles
http://localhost:8080/articles:> post --data "{title: "First Article"}"

The result of the execution of the command will be:

< 201 CREATED
< Location: http://localhost:8080/articles/1
< Content-Type: application/hal+json;charset=UTF-8
< Transfer-Encoding: chunked
< Date: Sun, 29 Oct 2017 23:04:43 GMT
< 
{
  "title" : "First Article",
  "content" : null,
  "_links" : {
    "self" : {
      "href" : "http://localhost:8080/articles/1"
    },
    "article" : {
      "href" : "http://localhost:8080/articles/1"
    }
  }
}

4.2. Discovering Resources

Now, when we’ve got some resources, let’s find them out. We’re going use the discover command which reveals all available resources at the current URI:

http://localhost:8080/articles:> discover

rel        href                                  
=================================================
self       http://localhost:8080/articles/       
profile    http://localhost:8080/profile/articles
article    http://localhost:8080/articles/1

Being aware of the resource URI, we can fetch it by using the get command:

http://localhost:8080/articles:> get 1

> GET http://localhost:8080/articles/1

< 200 OK
< Content-Type: application/hal+json;charset=UTF-8
< Transfer-Encoding: chunked
< Date: Sun, 29 Oct 2017 23:25:36 GMT
< 
{
  "title" : "First Article",
  "content" : null,
  "_links" : {
    "self" : {
      "href" : "http://localhost:8080/articles/1"
    },
    "article" : {
      "href" : "http://localhost:8080/articles/1"
    }
  }
}

4.3. Adding Query Parameters

We can specify query parameters as JSON fragments using the –params parameter.

Let’s get an article by the given title:

http://localhost:8080/articles:> get search/findByTitle \
> --params "{title: "First Article"}"

> GET http://localhost:8080/articles/search/findByTitle?title=First+Article

< 200 OK
< Content-Type: application/hal+json;charset=UTF-8
< Transfer-Encoding: chunked
< Date: Sun, 29 Oct 2017 23:39:39 GMT
< 
{
  "title" : "First Article",
  "content" : null,
  "_links" : {
    "self" : {
      "href" : "http://localhost:8080/articles/1"
    },
    "article" : {
      "href" : "http://localhost:8080/articles/1"
    }
  }
}

4.4. Setting Headers

The command called headers allows managing headers within the session scope – every request will be sent using these headers. The headers set takes the  –name and –value arguments to determine a header.

We are going to add a few headers and make a request including those headers:

http://localhost:8080/articles:>
  headers set --name Accept --value application/json

{
  "Accept" : "application/json"
}

http://localhost:8080/articles:>
  headers set --name Content-Type --value application/json

{
  "Accept" : "application/json",
  "Content-Type" : "application/json"
}

http://localhost:8080/articles:> get 1

> GET http://localhost:8080/articles/1
> Accept: application/json
> Content-Type: application/json

4.5. Writing Results to a File

It’s not always desirable to print out the results of an HTTP request to the screen. Sometimes, we need to save the results in a file for further analysis. 

The –output parameter allows performing such operations:

http://localhost:8080/articles:> get search/findByTitle \
> --params "{title: "First Article"}" \
> --output first_article.txt

>> first_article.txt

4.6. Reading JSON From a File

Often, JSON data is too large or too complex to be entered through the console using the –data parameter.

Also, there are some limitations on the format of the JSON data we can enter directly into the command line.

The –from parameter gives the possibility of reading data from a file or a directory.

If the value is a directory, the shell will read each file that ends with “.json” and perform a POST or PUT with the content of that file.

If the parameter is a file, then the shell will load the file and POST/PUT data from that file.

Let’s create the next article from the file second_article.txt:

http://localhost:8080/articles:> post --from second_article.txt

1 files uploaded to the server using POST

4.7. Setting Context Variables

We can also define variables within the current session context. The command var defines the get and set parameters for getting and setting a variable respectively.

By analogy with the headers, the arguments –name and –value are for giving the name and the value of a new variable:

http://localhost:8080:> var set --name articlesURI --value articles
http://localhost:8080/articles:> var get --name articlesURI

articles

Now, we’re going to print out a list of currently available variables within the context:

http://localhost:8080:> var list

{
  "articlesURI" : "articles"
}

Having made sure that our variable was saved, we’ll use it with the follow command to switch to the given URI:

http://localhost:8080:> follow #{articlesURI}
http://localhost:8080/articles:> 

4.8. Viewing History

All the paths we visit are recorded. The command history shows these paths in the chronological order:

http://localhost:8080:> history list

1: http://localhost:8080/articles
2: http://localhost:8080

Each URI is associated with a number that can be used to go to that URI:

http://localhost:8080:> history go 1
http://localhost:8080/articles:>

5. Conclusion

In this tutorial, we’ve focused on an interesting and rare tool in the Spring ecosystem – a command line tool.

You can find more information about the project over on GitHub.

And, as always, all the code snippets mentioned in the article can be found in our repository.

Deploy Application at Tomcat Root

$
0
0

1. Overview

In this quick article, we’ll discuss deploying a web application at the root of a Tomcat.

2. Tomcat Deployment Basics and Terminology

First, the basics of deploying an application to Tomcat can be found in this guide: How to Deploy a WAR File to Tomcat.

Simply put, web applications are placed under $CATALINA_HOME\webapps, where $CATALINA_HOME is the Tomcat’s installation directory.

The context path refers to the location relative to the server’s address which represents the name of the web application.

By default, Tomcat derives it from the name of the deployed war-file. So if we deploy a file ExampleApp.war, it will be available at http://localhost:8080/ExampleApp. I. e. the context path is /ExampleApp.

If we now need to have that app available at http://localhost:8080/ instead, we have a few options, which we’ll discuss in the following sections.

For a more detailed explanation of the context concept of Tomcat, have a look at the official Tomcat documentation.

3. Deploying the App as ROOT.war

The first option is very straightforward: we just have to delete the default /ROOT/ folder in $CATALINA_HOME\webapps, rename our ExampleApp.war to ROOT.war, and deploy it.

Our app will now be available at http://localhost:8080/.

4. Specifying the Context Path in the server.xml

The second option is to set the context path of the application in the server.xml (which is located at $CATALINA_HOME\conf).

We must insert the following inside the <Host> tag for that:

<Context path="" docBase="ExampleApp"></Context>

Note: defining the context path manually has the side effect that the application is deployed twice by default: at http://localhost:8080/ExampleApp/ as well as at http://localhost:8080/.

To prevent this, we have to set autoDeploy=”false” and deployOnStartup=”false” in the <Host> tag:

<Host name="localhost" appBase="webapps" unpackWARs="true"
  autoDeploy="false" deployOnStartup="false">
    <Context path="" docBase="ExampleApp"></Context>

    <!-- Further settings for localhost -->
</Host>

Important: this option is not recommended anymore, since Tomcat 5: it makes context configurations more invasive, since the server.xml file cannot be reloaded without restarting Tomcat.


5. Specifying the Context Path in an App-Specific XML File

To avoid this problem with the server.xml, we’ve got the third option: we’ll set the context path in an application-specific XML file.

Therefore, we have to create a ROOT.xml at $CATALINA_HOME\conf\Catalina\localhost with the following content:

<Context docBase="../deploy/ExampleApp.war"/>

Two points are worth nothing here.

First, we don’t have to specify the path explicitly like in the previous option – Tomcat derives that from the name of our ROOT.xml.

And second – since we’re defining our context in a different file than the server.xml, our docBase has to be outside of $CATALINA_HOME\webApps.

6. Conclusion

In this tutorial, we discussed different options of how to deploy a web application at the root of a Tomcat.

Viewing all 4715 articles
Browse latest View live


<script src="https://jsc.adskeeper.com/r/s/rssing.com.1596347.js" async> </script>